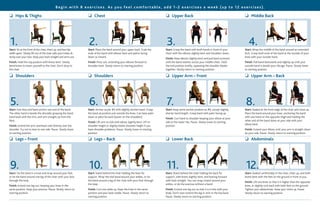
Call Girls Jayanagar Just Call 7001305949 Top Class Call Girl Service Available
F11 cda introductory resistance program
1. Guidelines for Progression in
resistance Training
Follow the plan identified to gradually increase rep-
etitions, sets, and resistance to meet the Canadian
Diabetes Association recommendation of resistance
activity 3 times a week.
Initial resistance Plan Progression
*Start at the improvement stage if you are somewhat
active and have no medical limitations.
Beginning Program: resistance Band Training
• Involves mostly seated exercises for those with
mobility difficulties.
• Requires a resistance band
(available at most stores).
• A good starting program for those who have not
done resistance exercise.
• A good option for indoor exercise when it is raining
or snowing!
resistance Training and Diabetes
Keeping your muscles active and healthy through
regular resistance training will greatly improve your
management of diabetes. The Canadian Diabetes
Association recommends resistance activities 3 times
a week.
Benefits of resistance Training
Resistance exercise uses more muscles than just walk-
ing. It uses upper body muscles that are rarely used in
modern society today.
Resistance training also maintains or increases lean
muscle. This helps to burn calories at rest through-
out the day. This is important for weight control and
diabetes management, especially as we age.
rEMEMBEr: You don’t have to go to a gym to get the
benefits of resistance training. All you need are simple
forms of resistance such as:
• Exercise bands.
• Your own body weight.
• Light dumbbells or hand weights.
• Other items you may find around the house such
as milk jugs filled with water.
The resistance program shown in this
handout works all muscles in the body, using
a resistance band, to better manage your
diabetes and improve your health.
If you are unsure about how to do the
exercises in this handout, seek the help of an
exercise resource, diabetes care provider or
qualified exercise professional to help you get
started and keep you going.
Guidelines for resistance Training
Important Safety Considerations and Tips:
It is recommended you see a diabetes care provider
or a qualified exercise professional, or refer to the
resistance training video, to learn how to do the
exercises provided in this handout.
Only Do the Exercises You Are Able To Do
• Make sure that you do not do any exercises that
hurt (for example, sore shoulder or sore knee –
see a physician or physiotherapist if you have
any questions).
• If you have confirmed eye or kidney disease,
discuss resistance exercises first with your physician
or diabetes care provider.
Maintain Stable and Proper Posture for
each Exercise
• Keep your chest out.
• Avoid rounding the shoulders or twisting your back.
Keep Each Movement Slow and Controlled
• 3 seconds up; 3 seconds down
Do Not Hold Your Breath
• Exhale with effort.
• Release your breath with each repetition.
Keep to a Comfortable range of Motion
• Use a complete range that is comfortable for you.
Use an Appropriate resistance
• Pick a band that makes it moderately hard to do
the exercise.
Increasing the resistance Used
• Change the length of the resistance band
– Shorter band = harder
– Longer band = easier
Where to start
• Begin at the initial stage if you are inactive and
want to start easy with resistance exercise.
• Begin at the improvement stage if you are
somewhat active and have no medical limitations.
Program
Stage
Week
Frequency
(days/week)
Intensity
Duration
(min)ExertionLevel
rPE
(10pt)
Initialstage12Light21x8
22Light21x10
32Moderate31x12
42Moderate32x8
Improvement*5-72Moderate32x10
8-102Moderate32x12
11-133Moderate32x8
14-163SomewhatStrong42x10
17-203SomewhatStrong42x12
21-243SomewhatStrong42x15
Maintenance25+2-3ModerateStrong3-42-3x8-15
Tableadaptedfrom:Warburton,etal.2006
3
Introductory
Resistance
Program
316523
2. ❏ Hips & Thighs ❏ Chest ❏ Upper Back ❏ Middle Back
1. 2. 3. 4.Start: Sit at the front of the chair, chest up, and feet hip
width apart. Slowly lift out of the chair with your knees di-
rectly over your toes. Keep your back straight and arms out.
Finish: Hold the top position with knees bent. Slowly
bend knees to lower yourself to the chair. Don’t drop to
the chair.
Start: Place the band around your upper back. Grab the
ends of the band with elbows bent and palms facing
down or inward.
Finish: Press out, extending your elbows forward to
shoulder level. Slowly return to starting position.
Start: Grasp the band with both hands in front of your
chest with the elbows slightly bent and shoulders down.
Finish: Keep elbows slightly bent and pull band outward
until the band reaches across your middle chest. Hold
the end position briefly, squeezing the shoulder blades
together. Slowly return to starting position.
Start: Wrap the middle of the band around an extended
foot. Grasp both ends of the band at the outside of your
knee with your outside hand.
Finish: Pull band backwards and slightly up until your
outside hand is beside your ribcage. Pause. Slowly lower
to starting position.
❏ Shoulders ❏ Shoulders ❏ Upper Arm – Front ❏ Upper Arm – Back
5. 6. 7. 8.Start: One foot and hand anchor one end of the band.
The other hand is beside the shoulder grasping the band,
hand level with the chin, and arm straight up from the
floor.
Finish: Extend the arm overhead until directly over the
shoulder. Try not to lean to one side. Pause. Slowly lower
to starting position.
Start: Anchor as per #5 with slightly shorter band. Grasp
the band at position just outside the knee. Can have palm
down or palm forward (easier on the shoulders).
Finish: Lift arm to side with elbow slightly bent. Lift to
shoulder height or slightly below shoulder height if you
have shoulder problems. Pause. Slowly lower to starting
position.
Start: Keep same anchor position as #6, except slightly
shorter band length. Grasp band with palm facing up.
Finish: Curl hand to shoulder keeping your elbow at your
side at the lower ribs. Pause. Slowly lower to starting
position.
Start: Seated at the front edge of the chair and chest up.
Place the band around your knee, anchoring the band
with one hand on the opposite thigh and holding the
other end of the band down at your side with your
elbow bent.
Finish: Extend your elbow until your arm is straight down
by your side. Pause. Slowly return to starting position.
❏ Legs – Front ❏ Legs – Back ❏ Lower Back ❏ Abdominals
9. 10. 11. 12.Start: Tie the band in a knot and wrap around your feet,
or tie the band around one leg of the chair with your foot
through the loop.
Finish: Extend one leg out, keeping your knee in the
same position. Keep your posture. Pause. Slowly return to
starting position.
Start: Stand behind the chair holding the back for
support. Wrap the tied band around your ankles, or tie
the band around a leg of the chair with your foot through
the loop.
Finish: Curl one ankle up. Keep the knee in the same
position and your back stable. Pause. Slowly return to
starting position.
Start: Stand behind the chair holding the back for
support, with knees slightly bent, and leaning forward
with back straight. You can wrap a band around your
ankles, or do the exercise without a band.
Finish: Extend one leg out so that it is in line with your
body. Don’t over-extend the leg or arch in the low back.
Pause. Slowly return to starting position.
Start: Seated comfortably in the chair, chest up, and both
knees bent with the feet on the ground in front of you.
Finish: Lift one knee so that it is higher than the opposite
knee, or slightly rock back with both feet on the ground.
Tighten your abdominals. Keep your chest up. Pause.
Slowly return to starting position.
Begin with 8 exercises. As you f eel comfortable, add 1-2 exercises a week (up to 12 exercises).