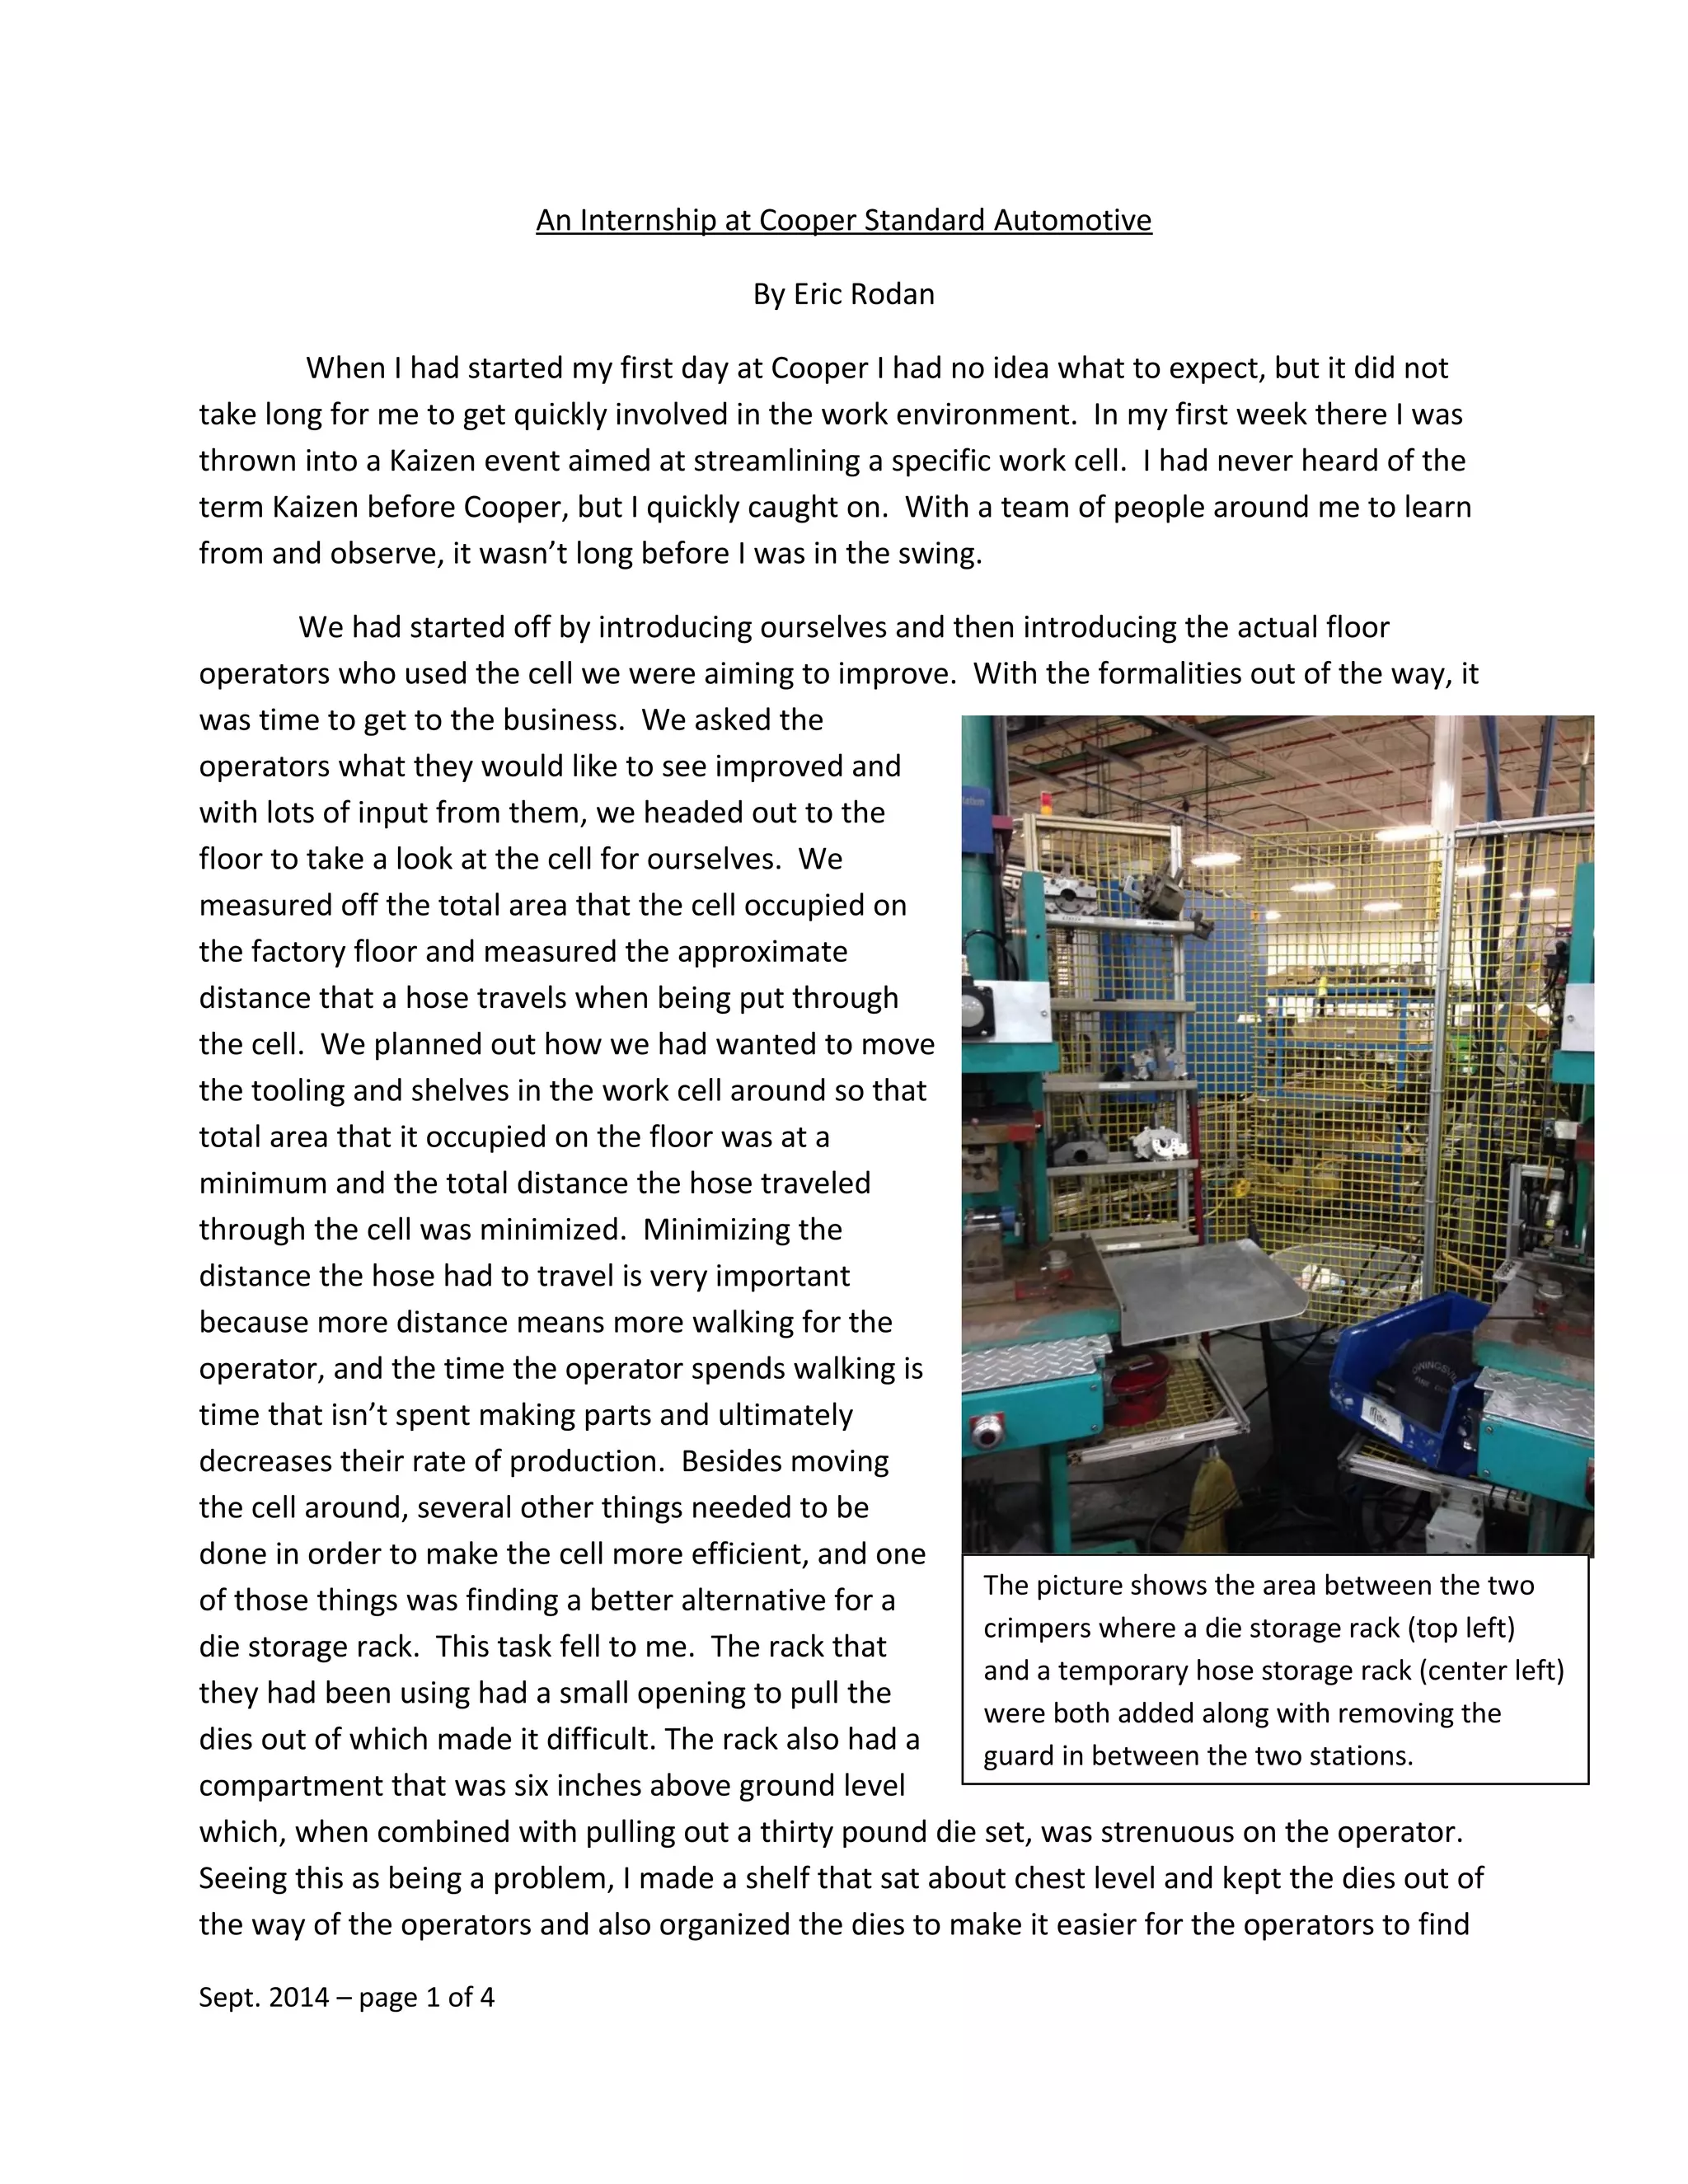
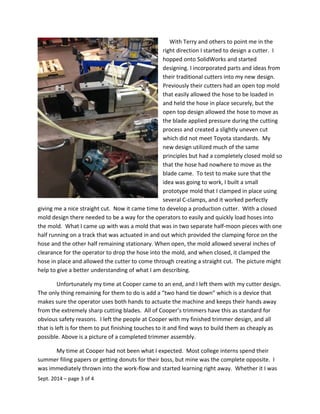
An Internship at Cooper Standard Automotive
By Eric Rodan
When I had started my first day at Cooper I had no idea what to expect, but it did not
take long for me to get quickly involved in the work environment. In my first week there I was
thrown into a Kaizen event aimed at streamlining a specific work cell. I had never heard of the
term Kaizen before Cooper, but I quickly caught on. With a team of people around me to learn
from and observe, it wasn’t long before I was in the swing.
We had started off by introducing ourselves and then introducing the actual floor
operators who used the cell we were aiming to improve. With the formalities out of the way, it
was time to get to the business. We asked the
operators what they would like to see improved and
with lots of input from them, we headed out to the
floor to take a look at the cell for ourselves. We
measured off the total area that the cell occupied on
the factory floor and measured the approximate
distance that a hose travels when being put through
the cell. We planned out how we had wanted to move
the tooling and shelves in the work cell around so that
total area that it occupied on the floor was at a
minimum and the total distance the hose traveled
through the cell was minimized. Minimizing the
distance the hose had to travel is very important
because more distance means more walking for the
operator, and the time the operator spends walking is
time that isn’t spent making parts and ultimately
decreases their rate of production. Besides moving
the cell around, several other things needed to be
done in order to make the cell more efficient, and one
of those things was finding a better alternative for a
die storage rack. This task fell to me. The rack that
they had been using had a small opening to pull the
dies out of which made it difficult. The rack also had a
compartment that was six inches above ground level
which, when combined with pulling out a thirty pound die set, was strenuous on the operator.
Seeing this as being a problem, I made a shelf that sat about chest level and kept the dies out of
the way of the operators and also organized the dies to make it easier for the operators to find
Sept. 2014 – page 1 of 4
The picture shows the area between the two
crimpers where a die storage rack (top left)
and a temporary hose storage rack (center left)
were both added along with removing the
guard in between the two stations.
what they wanted. Along with better storage for their dies, I was also tasked with finding a
better way to temporarily store hoses that were moving from one station to the next. Typically,
the operators took five hoses at a time through the entire course of the work cell, so as the
operator finished a hose at a particular station they then needed a place to set down the hoses
that had completed that station before they could pick up all five hoses and move on to the
next station. I was asked to create a temporary storage area between two machine operated
crimpers that each had a guard around them. I took the two separate guards and turned them
in one guard that encompassed both machines so that there was nothing between the two
machines, and I built a shelf that came off one of the machines as a place to store hoses
temporarily before moving on to the next crimper. After completing my work and everyone
else completing their assigned tasks, it was time to get back together and share what we had
done and compare the efficiency of the cell before and after the Kaizen.
After completing the Kaizen, I spent the next few weeks working in the maintenance
and tooling shop on the floor and familiarizing myself with all kinds of shop practices. I
followed a maintenance man named Toby who showed me the tricks of the trade. Previously, I
had some experience working with machine shop tools but not much. He gave me tips on the
use of a mill, how to better line up holes when using a transfer punch, and how to weld several
different joints, among many other things. I think that these lessons are invaluable because
understanding the hands on aspect of what an engineer designs and ultimately makes is
important, and doing hands on work is always fun.
After spending several weeks helping Toby do everything from adding guards to tooling
to fixing downed machines, I was given an opportunity to do something more on my own. My
boss, Terry Fraley, told me that currently they have a robot that they use to cut all of their
hoses for Toyota; however, the robot does not always make straight cuts and frequently breaks
down. The robot is both expensive and a general pain to have around. Toyota is also extremely
picky about how much of an angle
they allow for the cuts on their
hoses. Terry told me that he
wanted a cutter that was more
traditional like the other ones they
had on the floor where an operator
loads each hose individually and
uses a two hand tie down system to
clamp the hose and actuate the
cutting motion. He said that several months prior he paid a company in Germany to develop
the better cutter, but what he got did not cut any better than the robot. So now it was my turn
to take a crack at it.
Sept. 2014 – page 2 of 4
With Terry and others to point me in the
right direction I started to design a cutter. I
hopped onto SolidWorks and started
designing. I incorporated parts and ideas from
their traditional cutters into my new design.
Previously their cutters had an open top mold
that easily allowed the hose to be loaded in
and held the hose in place securely, but the
open top design allowed the hose to move as
the blade applied pressure during the cutting
process and created a slightly uneven cut
which did not meet Toyota standards. My
new design utilized much of the same
principles but had a completely closed mold so
that the hose had nowhere to move as the
blade came. To test to make sure that the
idea was going to work, I built a small
prototype mold that I clamped in place using
several C-clamps, and it worked perfectly
giving me a nice straight cut. Now it came time to develop a production cutter. With a closed
mold design there needed to be a way for the operators to easily and quickly load hoses into
the mold. What I came up with was a mold that was in two separate half-moon pieces with one
half running on a track that was actuated in and out which provided the clamping force on the
hose and the other half remaining stationary. When open, the mold allowed several inches of
clearance for the operator to drop the hose into the mold, and when closed, it clamped the
hose in place and allowed the cutter to come through creating a straight cut. The picture might
help to give a better understanding of what I am describing.
Unfortunately my time at Cooper came to an end, and I left them with my cutter design.
The only thing remaining for them to do is add a “two hand tie down” which is a device that
makes sure the operator uses both hands to actuate the machine and keeps their hands away
from the extremely sharp cutting blades. All of Cooper’s trimmers have this as standard for
obvious safety reasons. I left the people at Cooper with my finished trimmer design, and all
that is left is for them to put finishing touches to it and find ways to build them as cheaply as
possible. Above is a picture of a completed trimmer assembly.
My time at Cooper had not been what I expected. Most college interns spend their
summer filing papers or getting donuts for their boss, but mine was the complete opposite. I
was immediately thrown into the work-flow and started learning right away. Whether it I was
Sept. 2014 – page 3 of 4
maintaining/modifying existing equipment or building something of my own design, every
experience was new, and yes more often than not a challenge. But, that was the point of this
experience - to learn and become acclimated to what will hopefully be my future work
environment. Cooper gave me lots of new experiences and put me in a better position to
succeed in the future.
Sept. 2014 – page 4 of 4

Eric - Cooper summer (with edits)

  • 1.
    An Internship atCooper Standard Automotive By Eric Rodan When I had started my first day at Cooper I had no idea what to expect, but it did not take long for me to get quickly involved in the work environment. In my first week there I was thrown into a Kaizen event aimed at streamlining a specific work cell. I had never heard of the term Kaizen before Cooper, but I quickly caught on. With a team of people around me to learn from and observe, it wasn’t long before I was in the swing. We had started off by introducing ourselves and then introducing the actual floor operators who used the cell we were aiming to improve. With the formalities out of the way, it was time to get to the business. We asked the operators what they would like to see improved and with lots of input from them, we headed out to the floor to take a look at the cell for ourselves. We measured off the total area that the cell occupied on the factory floor and measured the approximate distance that a hose travels when being put through the cell. We planned out how we had wanted to move the tooling and shelves in the work cell around so that total area that it occupied on the floor was at a minimum and the total distance the hose traveled through the cell was minimized. Minimizing the distance the hose had to travel is very important because more distance means more walking for the operator, and the time the operator spends walking is time that isn’t spent making parts and ultimately decreases their rate of production. Besides moving the cell around, several other things needed to be done in order to make the cell more efficient, and one of those things was finding a better alternative for a die storage rack. This task fell to me. The rack that they had been using had a small opening to pull the dies out of which made it difficult. The rack also had a compartment that was six inches above ground level which, when combined with pulling out a thirty pound die set, was strenuous on the operator. Seeing this as being a problem, I made a shelf that sat about chest level and kept the dies out of the way of the operators and also organized the dies to make it easier for the operators to find Sept. 2014 – page 1 of 4 The picture shows the area between the two crimpers where a die storage rack (top left) and a temporary hose storage rack (center left) were both added along with removing the guard in between the two stations.
  • 2.
    what they wanted.Along with better storage for their dies, I was also tasked with finding a better way to temporarily store hoses that were moving from one station to the next. Typically, the operators took five hoses at a time through the entire course of the work cell, so as the operator finished a hose at a particular station they then needed a place to set down the hoses that had completed that station before they could pick up all five hoses and move on to the next station. I was asked to create a temporary storage area between two machine operated crimpers that each had a guard around them. I took the two separate guards and turned them in one guard that encompassed both machines so that there was nothing between the two machines, and I built a shelf that came off one of the machines as a place to store hoses temporarily before moving on to the next crimper. After completing my work and everyone else completing their assigned tasks, it was time to get back together and share what we had done and compare the efficiency of the cell before and after the Kaizen. After completing the Kaizen, I spent the next few weeks working in the maintenance and tooling shop on the floor and familiarizing myself with all kinds of shop practices. I followed a maintenance man named Toby who showed me the tricks of the trade. Previously, I had some experience working with machine shop tools but not much. He gave me tips on the use of a mill, how to better line up holes when using a transfer punch, and how to weld several different joints, among many other things. I think that these lessons are invaluable because understanding the hands on aspect of what an engineer designs and ultimately makes is important, and doing hands on work is always fun. After spending several weeks helping Toby do everything from adding guards to tooling to fixing downed machines, I was given an opportunity to do something more on my own. My boss, Terry Fraley, told me that currently they have a robot that they use to cut all of their hoses for Toyota; however, the robot does not always make straight cuts and frequently breaks down. The robot is both expensive and a general pain to have around. Toyota is also extremely picky about how much of an angle they allow for the cuts on their hoses. Terry told me that he wanted a cutter that was more traditional like the other ones they had on the floor where an operator loads each hose individually and uses a two hand tie down system to clamp the hose and actuate the cutting motion. He said that several months prior he paid a company in Germany to develop the better cutter, but what he got did not cut any better than the robot. So now it was my turn to take a crack at it. Sept. 2014 – page 2 of 4
  • 3.
    With Terry andothers to point me in the right direction I started to design a cutter. I hopped onto SolidWorks and started designing. I incorporated parts and ideas from their traditional cutters into my new design. Previously their cutters had an open top mold that easily allowed the hose to be loaded in and held the hose in place securely, but the open top design allowed the hose to move as the blade applied pressure during the cutting process and created a slightly uneven cut which did not meet Toyota standards. My new design utilized much of the same principles but had a completely closed mold so that the hose had nowhere to move as the blade came. To test to make sure that the idea was going to work, I built a small prototype mold that I clamped in place using several C-clamps, and it worked perfectly giving me a nice straight cut. Now it came time to develop a production cutter. With a closed mold design there needed to be a way for the operators to easily and quickly load hoses into the mold. What I came up with was a mold that was in two separate half-moon pieces with one half running on a track that was actuated in and out which provided the clamping force on the hose and the other half remaining stationary. When open, the mold allowed several inches of clearance for the operator to drop the hose into the mold, and when closed, it clamped the hose in place and allowed the cutter to come through creating a straight cut. The picture might help to give a better understanding of what I am describing. Unfortunately my time at Cooper came to an end, and I left them with my cutter design. The only thing remaining for them to do is add a “two hand tie down” which is a device that makes sure the operator uses both hands to actuate the machine and keeps their hands away from the extremely sharp cutting blades. All of Cooper’s trimmers have this as standard for obvious safety reasons. I left the people at Cooper with my finished trimmer design, and all that is left is for them to put finishing touches to it and find ways to build them as cheaply as possible. Above is a picture of a completed trimmer assembly. My time at Cooper had not been what I expected. Most college interns spend their summer filing papers or getting donuts for their boss, but mine was the complete opposite. I was immediately thrown into the work-flow and started learning right away. Whether it I was Sept. 2014 – page 3 of 4
  • 4.
    maintaining/modifying existing equipmentor building something of my own design, every experience was new, and yes more often than not a challenge. But, that was the point of this experience - to learn and become acclimated to what will hopefully be my future work environment. Cooper gave me lots of new experiences and put me in a better position to succeed in the future. Sept. 2014 – page 4 of 4