This document provides steps to extend an existing SAP Fiori app called Sales Order Tracking by adding a payment terms field and hiding an existing material information section. It describes finding the corresponding backend standard BSP application (SD_SO_MONITORING) for the Fiori app in the Fiori Configurator. The document then outlines importing and enhancing the app's source code in Eclipse to add the new field and modification.
How to extendFiori Wave 2 Applications
1
How to Extend Fiori Applications
2.
How to extendFiori Wave 2 Applications
2
TABLE OF CONTENTS
1. Document Overview .................................................................................................................................... 3
1.1. Purpose ......................................................................................................................................................... 3
1.2. Out of Scope................................................................................................................................................. 3
1.3. Technical Background................................................................................................................................ 3
1.4. UI Extensibility ............................................................................................................................................. 3
2. Technical Requirements............................................................................................................................. 4
2.1. Prerequisites ................................................................................................................................................ 4
2.1.1. Setting up Eclipse and UI5 Environment ................................................................................................. 4
2.1.2. Using this document................................................................................................................................... 4
3. Step-by-Step Guide ..................................................................................................................................... 4
3.1. Output Preview Before and After Change ............................................................................................... 4
3.2. Finding the corresponding BSP application of Fiori App ..................................................................... 7
3.3. Downloading the Source Code of the Sales Order Tracking app ...................................................... 12
3.4. Importing the SAPUI5 Application to Eclipse. ...................................................................................... 14
3.5. Deciding the Application Name............................................................................................................... 20
3.6. Gateway Extensibility................................................................................................................................ 22
3.7. Creating a New Enhancement SAPUI5 Project ..................................................................................... 36
3.8. Testing the Application Locally before Uploading............................................................................... 43
3.9. Upload the Application into the SAP System........................................................................................ 54
3.10. Configuring the New Application in the SAP Fiori Launchpad. ......................................................... 59
3.
How to extendFiori Wave 2 Applications
3
1. Document Overview
1.1. Purpose
This document describes how to extend an existing SAP Fiori app (SAP Fiori principal apps for SAP ERP and SAP Fiori
principal apps for SAP SRM). The example scenario involves adding a “payment terms information” field to the SAP Fiori
principal app, Sales Order tracking. This scenario outlines one of the strengths of the SAP Fiori solution: how to perform a
modification-free extension to an SAP Fiori app.
This document describes OData and UI extensibility for SAP Fiori principal applications (built during wave 2 or later).
1.2. Out of Scope
This document does not provide details to build a custom application from scratch.
1.3. Technical Background
SAP Fiori is a collection of apps that look not only beautiful but are also extremely easy to use. The apps run across
different devices with the same user experience. With the new SAPUI5, SAP
Fiori apps run on desktop, tablet or smartphone and all UI5-compatible browsers, like Safari on iOS, IE9 and higher, or
Chrome.
SAP Fiori provides a role-based, homogenous experience across a variety of devices. SAP has put in high effort to mobilize
workflows and productivity applications for employees, executives, and managers who need a consolidated, intuitive, and
easy-to-use interface based on SAPUI5 (HTML5).
1.4. UI Extensibility
The extensibility concept provides a very high flexibility of extensions. In particular, the UI Extensibility concept allows a
customer to make modification-free extensions for certain extensibility use cases. SAP has enabled extension points in the
code of SAP Fiori apps. To find the extension points for each app, consult the app-specific documentation.
You can use the following properties of the Component.js file to extend the app:
o sap.ui.viewExtensions
This provides custom view content at a specified extension point in the standard, SAP- delivered application.
Simply, you can extend the application with new fields or edited images at extension points.
o sap.ui.viewModifications
This is used for overriding certain control properties in the standard SAP-delivered application. You can use it to
hide or show any property of the existing element; for example, changing the width or height of an element.
o sap.ui.viewReplacements
This is used for replacing a view in an SAP-delivered application with a custom view. You should use this property
if there is no extension point in a particular place/view, or if you need a major change in the application.
o sap.ui.controllerExtensions
This property is used for replacing a controller in an SAP-delivered application with a custom controller.
Controllers contain application business logic. Therefore, if there is change needed in the business logic, you have
to use this property.
Note: This document only covers how to use the sap.ui.viewExtensions and sap.ui.viewModifications properties.
4.
How to extendFiori Wave 2 Applications
4
2. Technical Requirements
2.1. Prerequisites
2.1.1. Setting up Eclipse and UI5 Environment
For details on this, refer to http://scn.sap.com/docs/DOC-52436.
2.1.2. Using this document
All the objects mentioned in this document are fictitious. If you are following this document and creating objects,
please change the name for each new object. We recommend using the customer namespace as a prefix and then
adding some two-digit number to all objects (same number for all objects) as shown below.
Example
New application name: Z_SD_SO_MON as ZS_D_SO_MON_XX (where XX is 01 or 02 or 11, or 22, etc.)
Gateway service: ZSRA018_SO_TRACKING_SRV as ZSRA018_SO_TRACKING_SRV_XX
If you are keeping the different name, change the object name accordingly in the source code and the configuration.
Otherwise you may end up with an error.
3. Step-by-Step Guide
3.1. Output Preview Before and After Change
In this scenario we are going to display the payment term information in the header section using the property
sap.ui.viewExtensions. We are also going to hide material information using the property sap.ui.viewModifications.
What to do What to Say
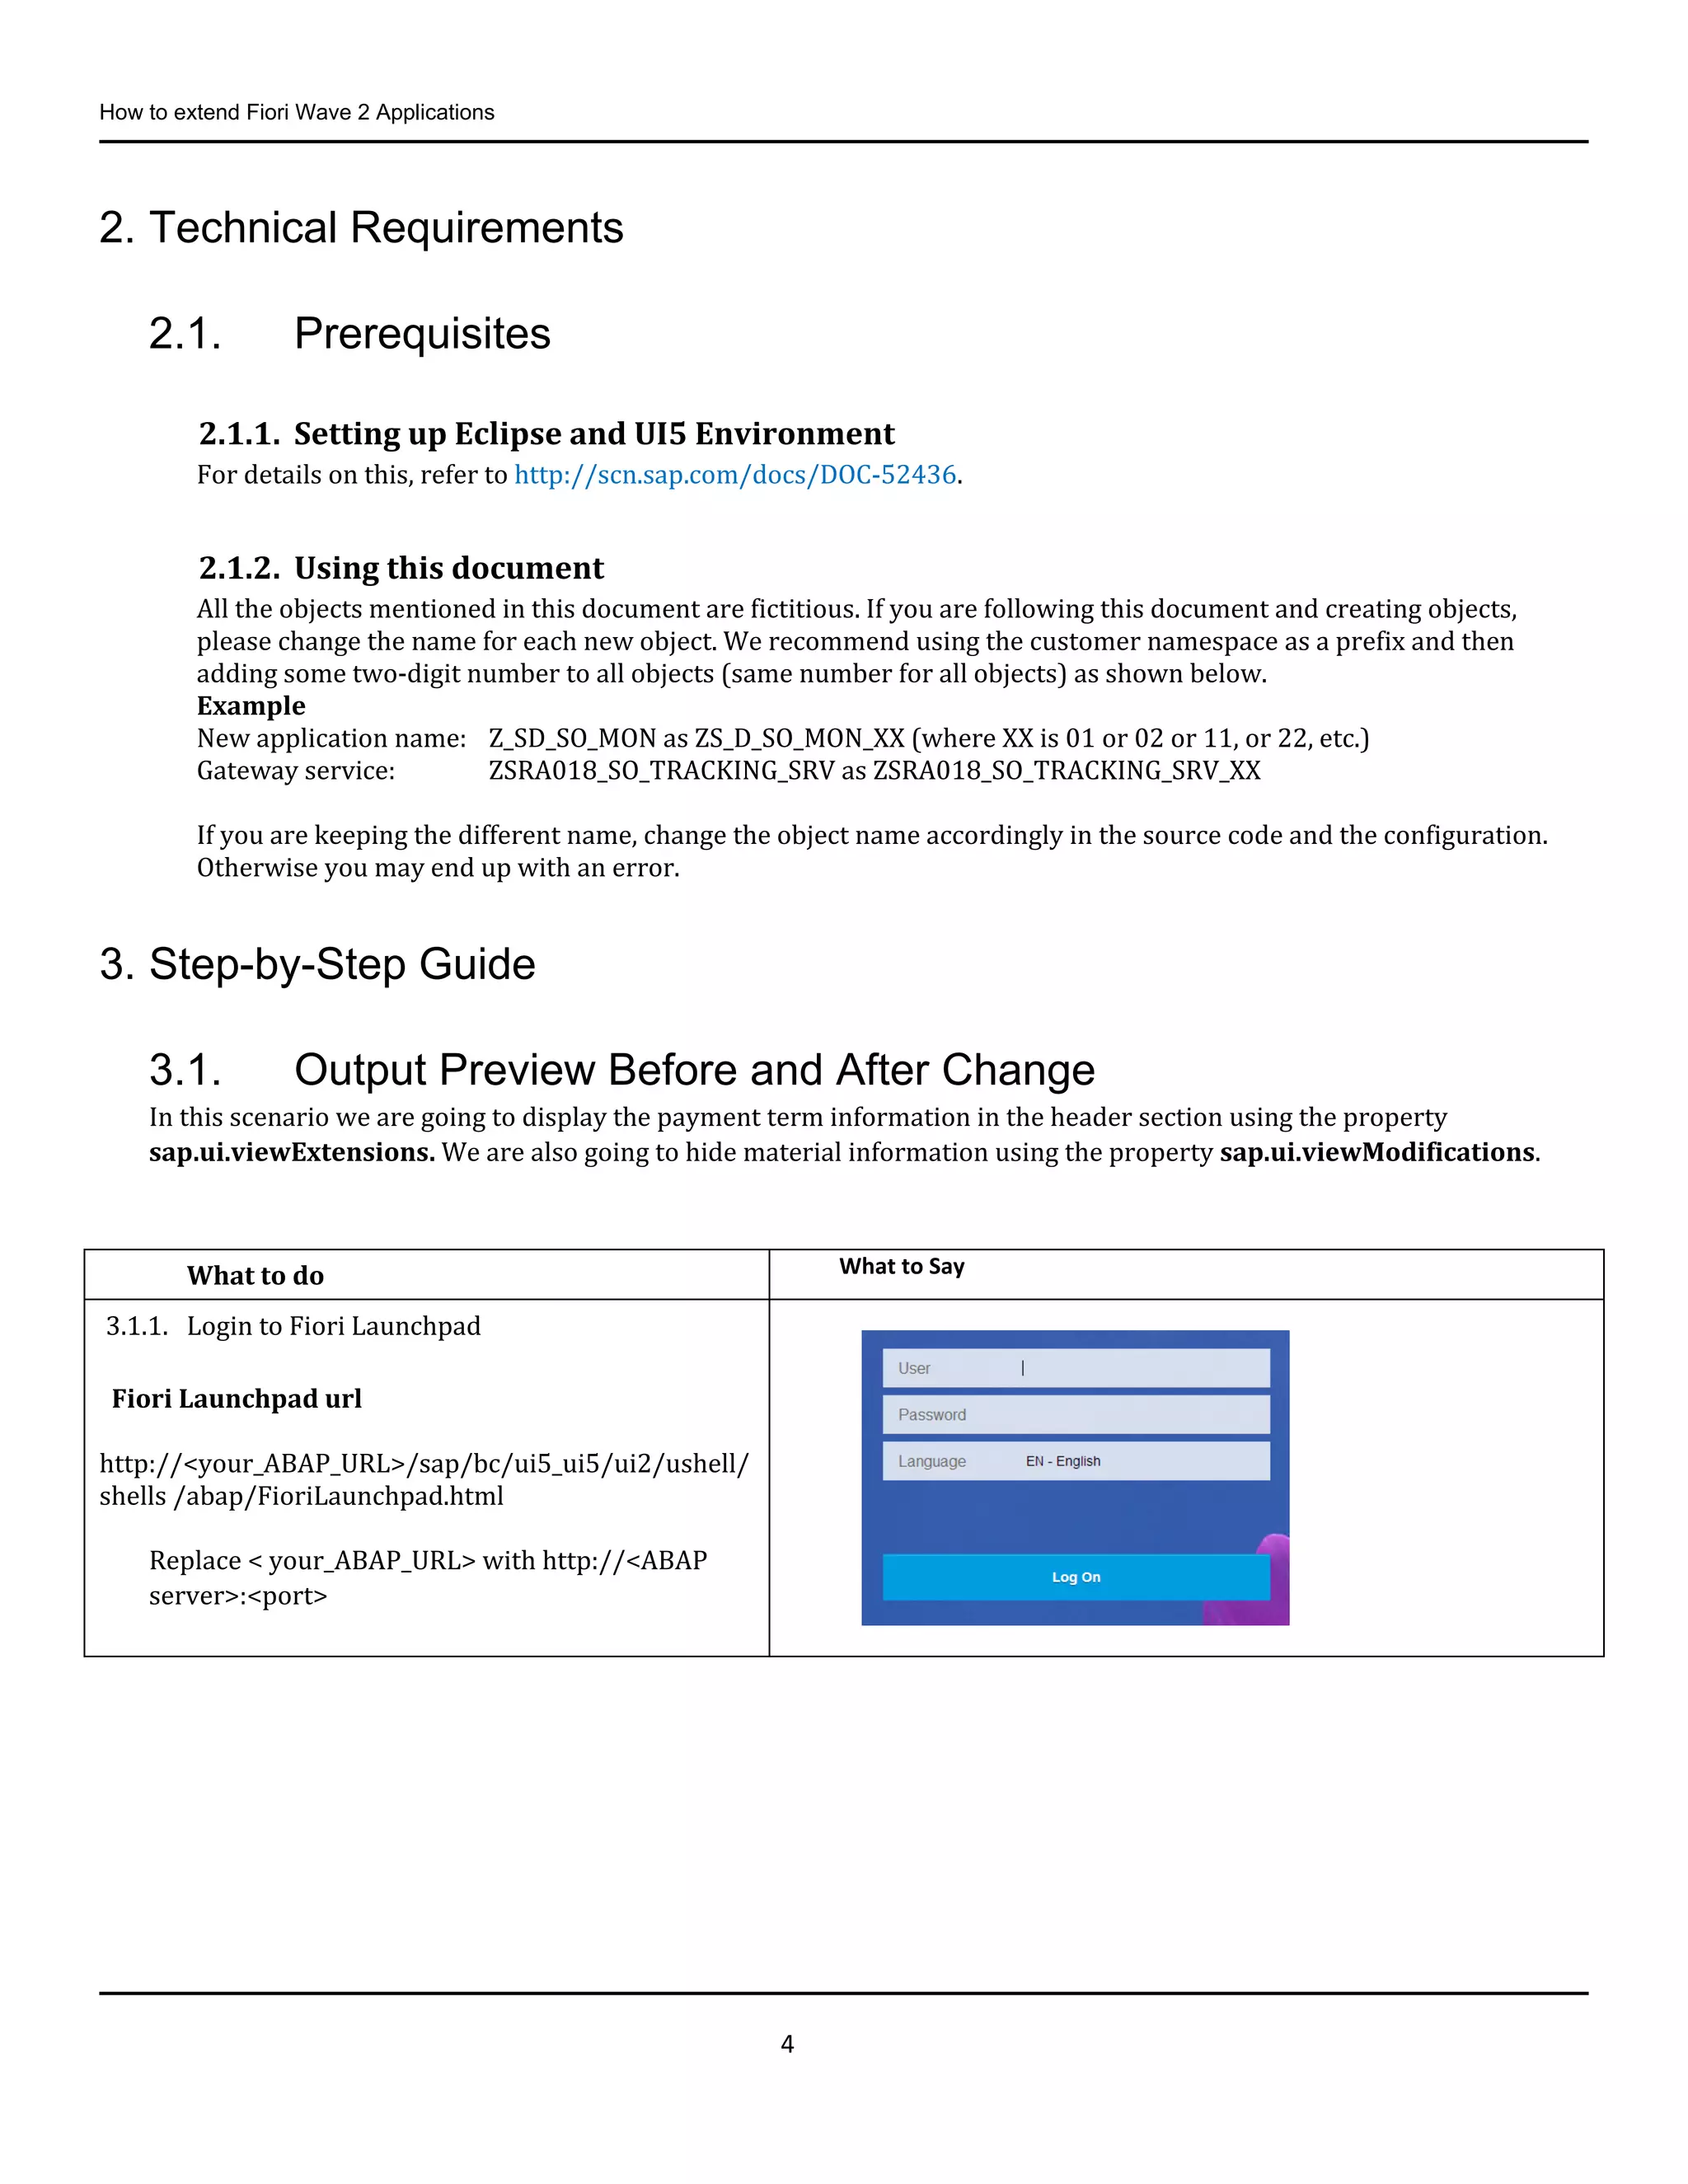
3.1.1. Login to Fiori Launchpad
Fiori Launchpad url
http://<your_ABAP_URL>/sap/bc/ui5_ui5/ui2/ushell/
shells /abap/FioriLaunchpad.html
Replace < your_ABAP_URL> with http://<ABAP
server>:<port>
5.
How to extendFiori Wave 2 Applications
5
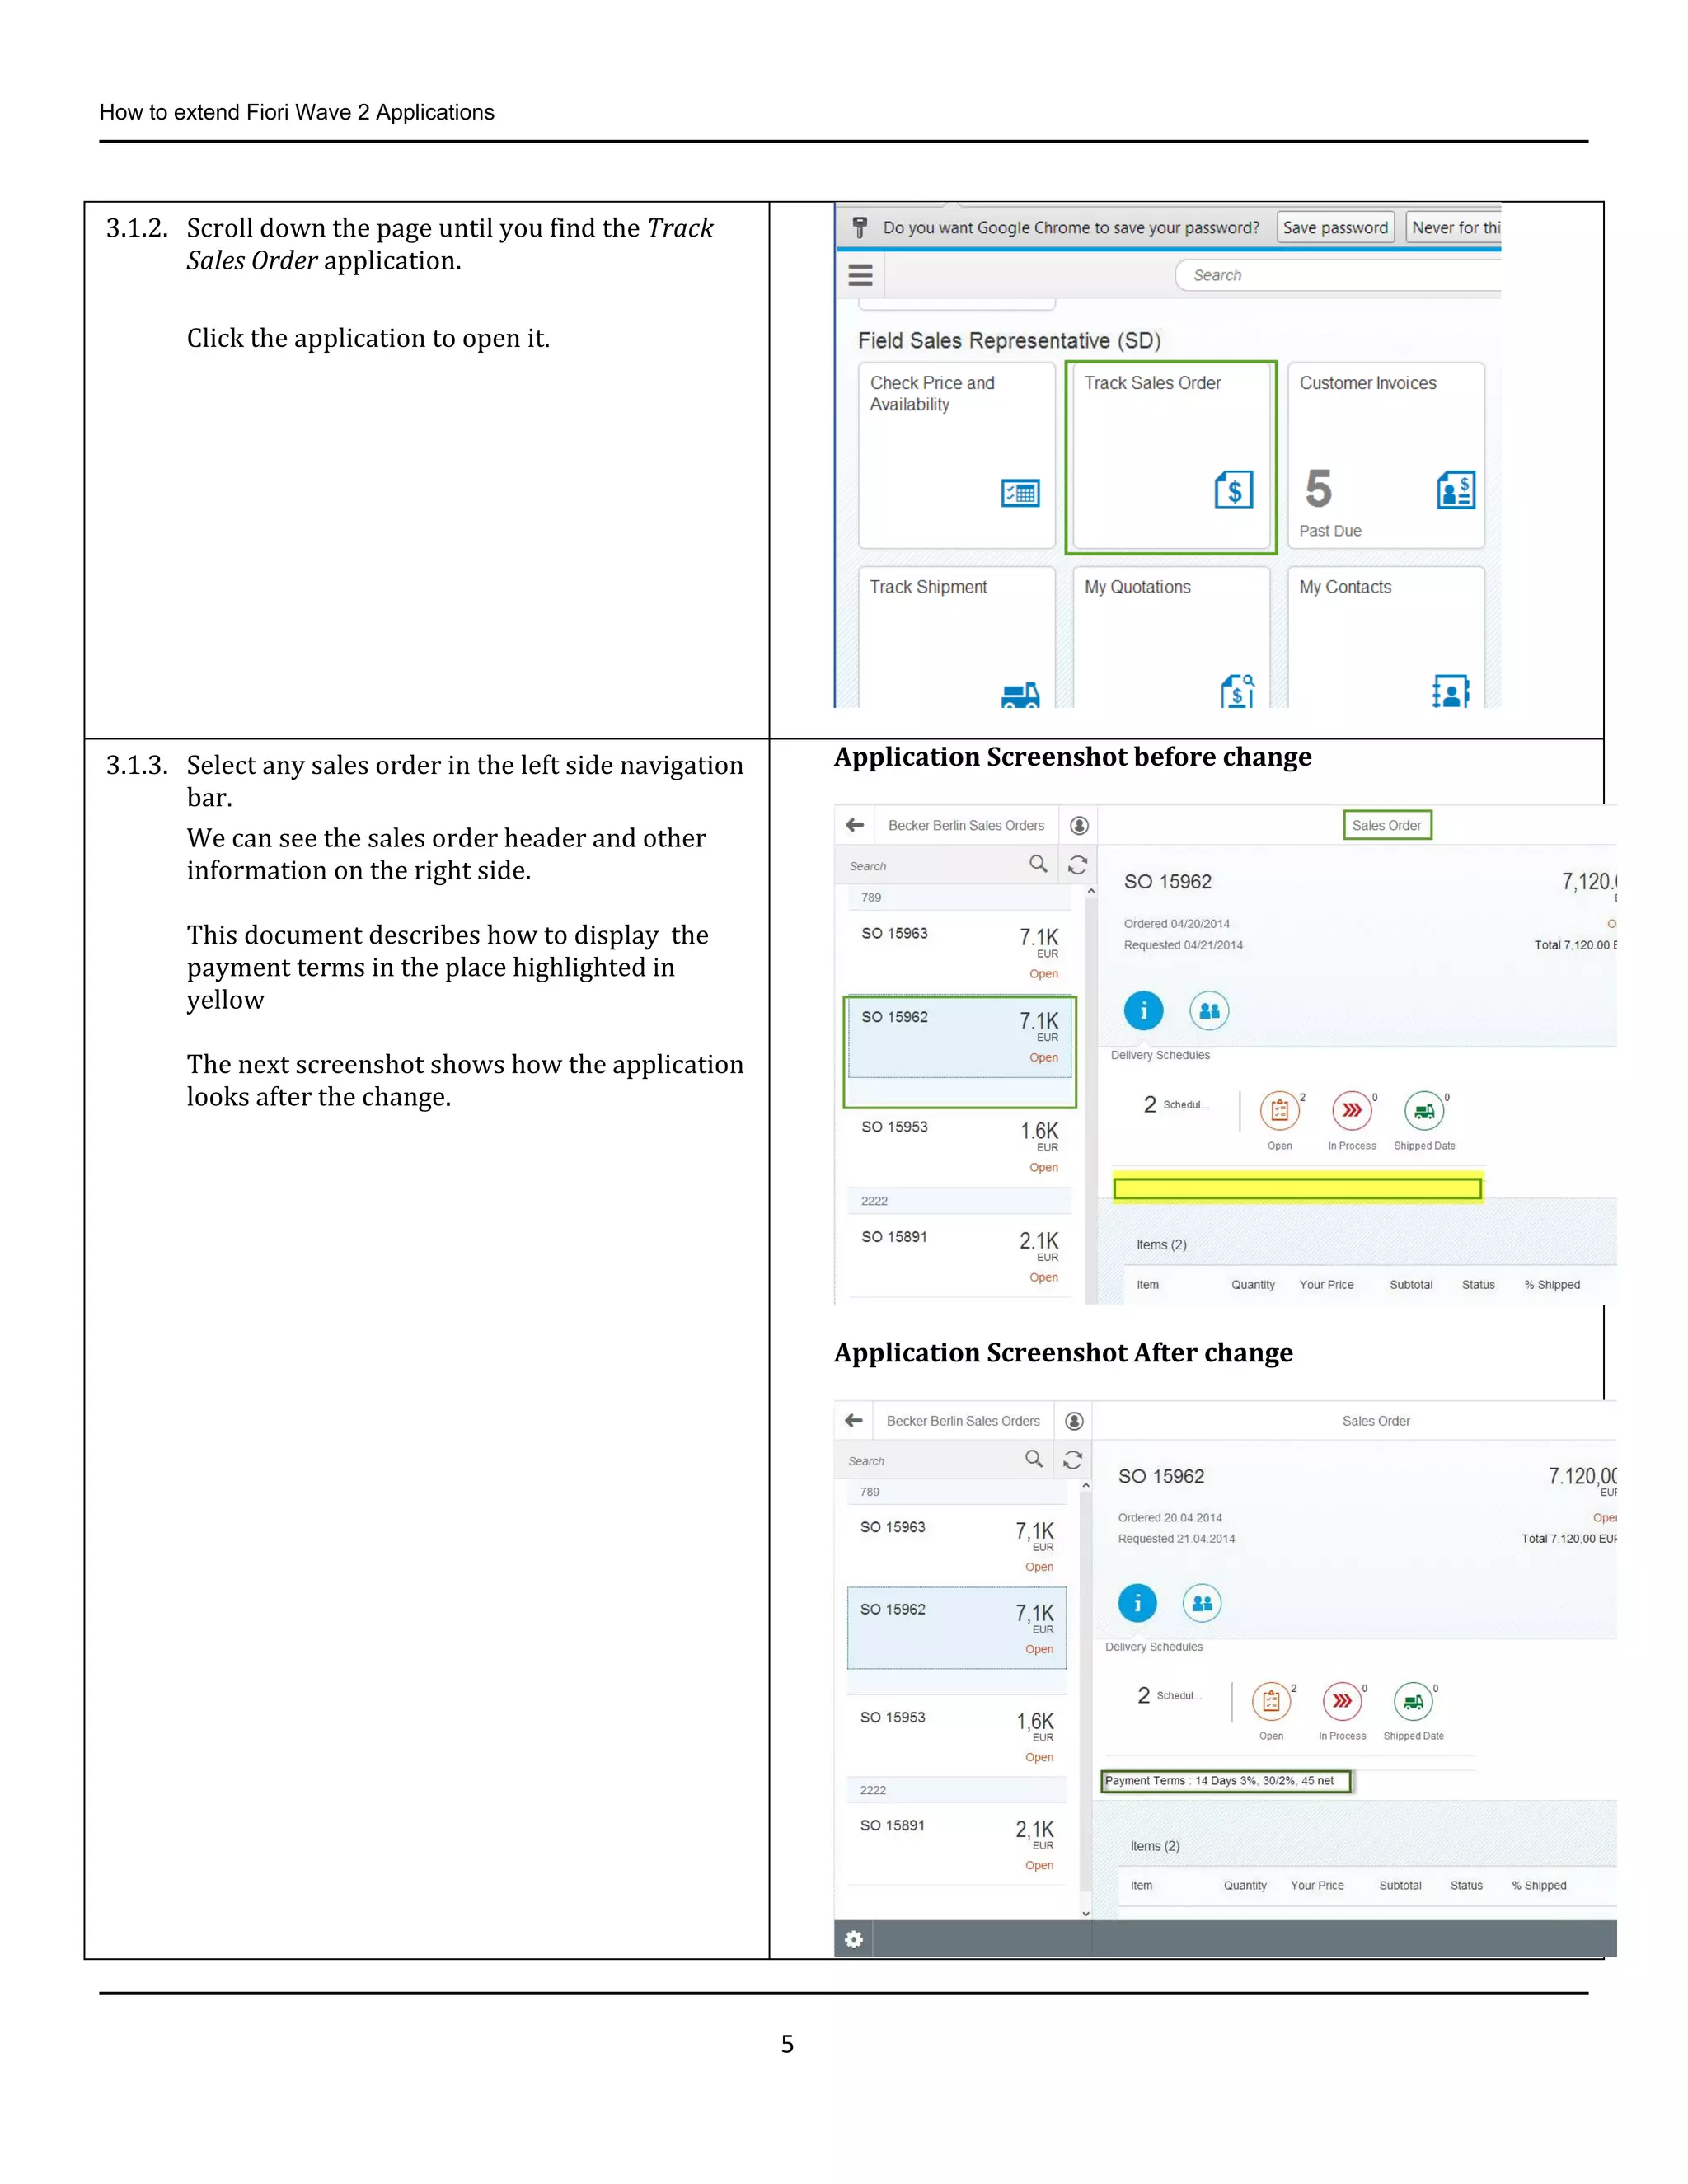
3.1.2. Scroll down the page until you find the Track
Sales Order application.
Click the application to open it.
3.1.3. Select any sales order in the left side navigation
bar.
We can see the sales order header and other
information on the right side.
This document describes how to display the
payment terms in the place highlighted in
yellow
The next screenshot shows how the application
looks after the change.
Application Screenshot before change
Application Screenshot After change
6.
How to extendFiori Wave 2 Applications
6
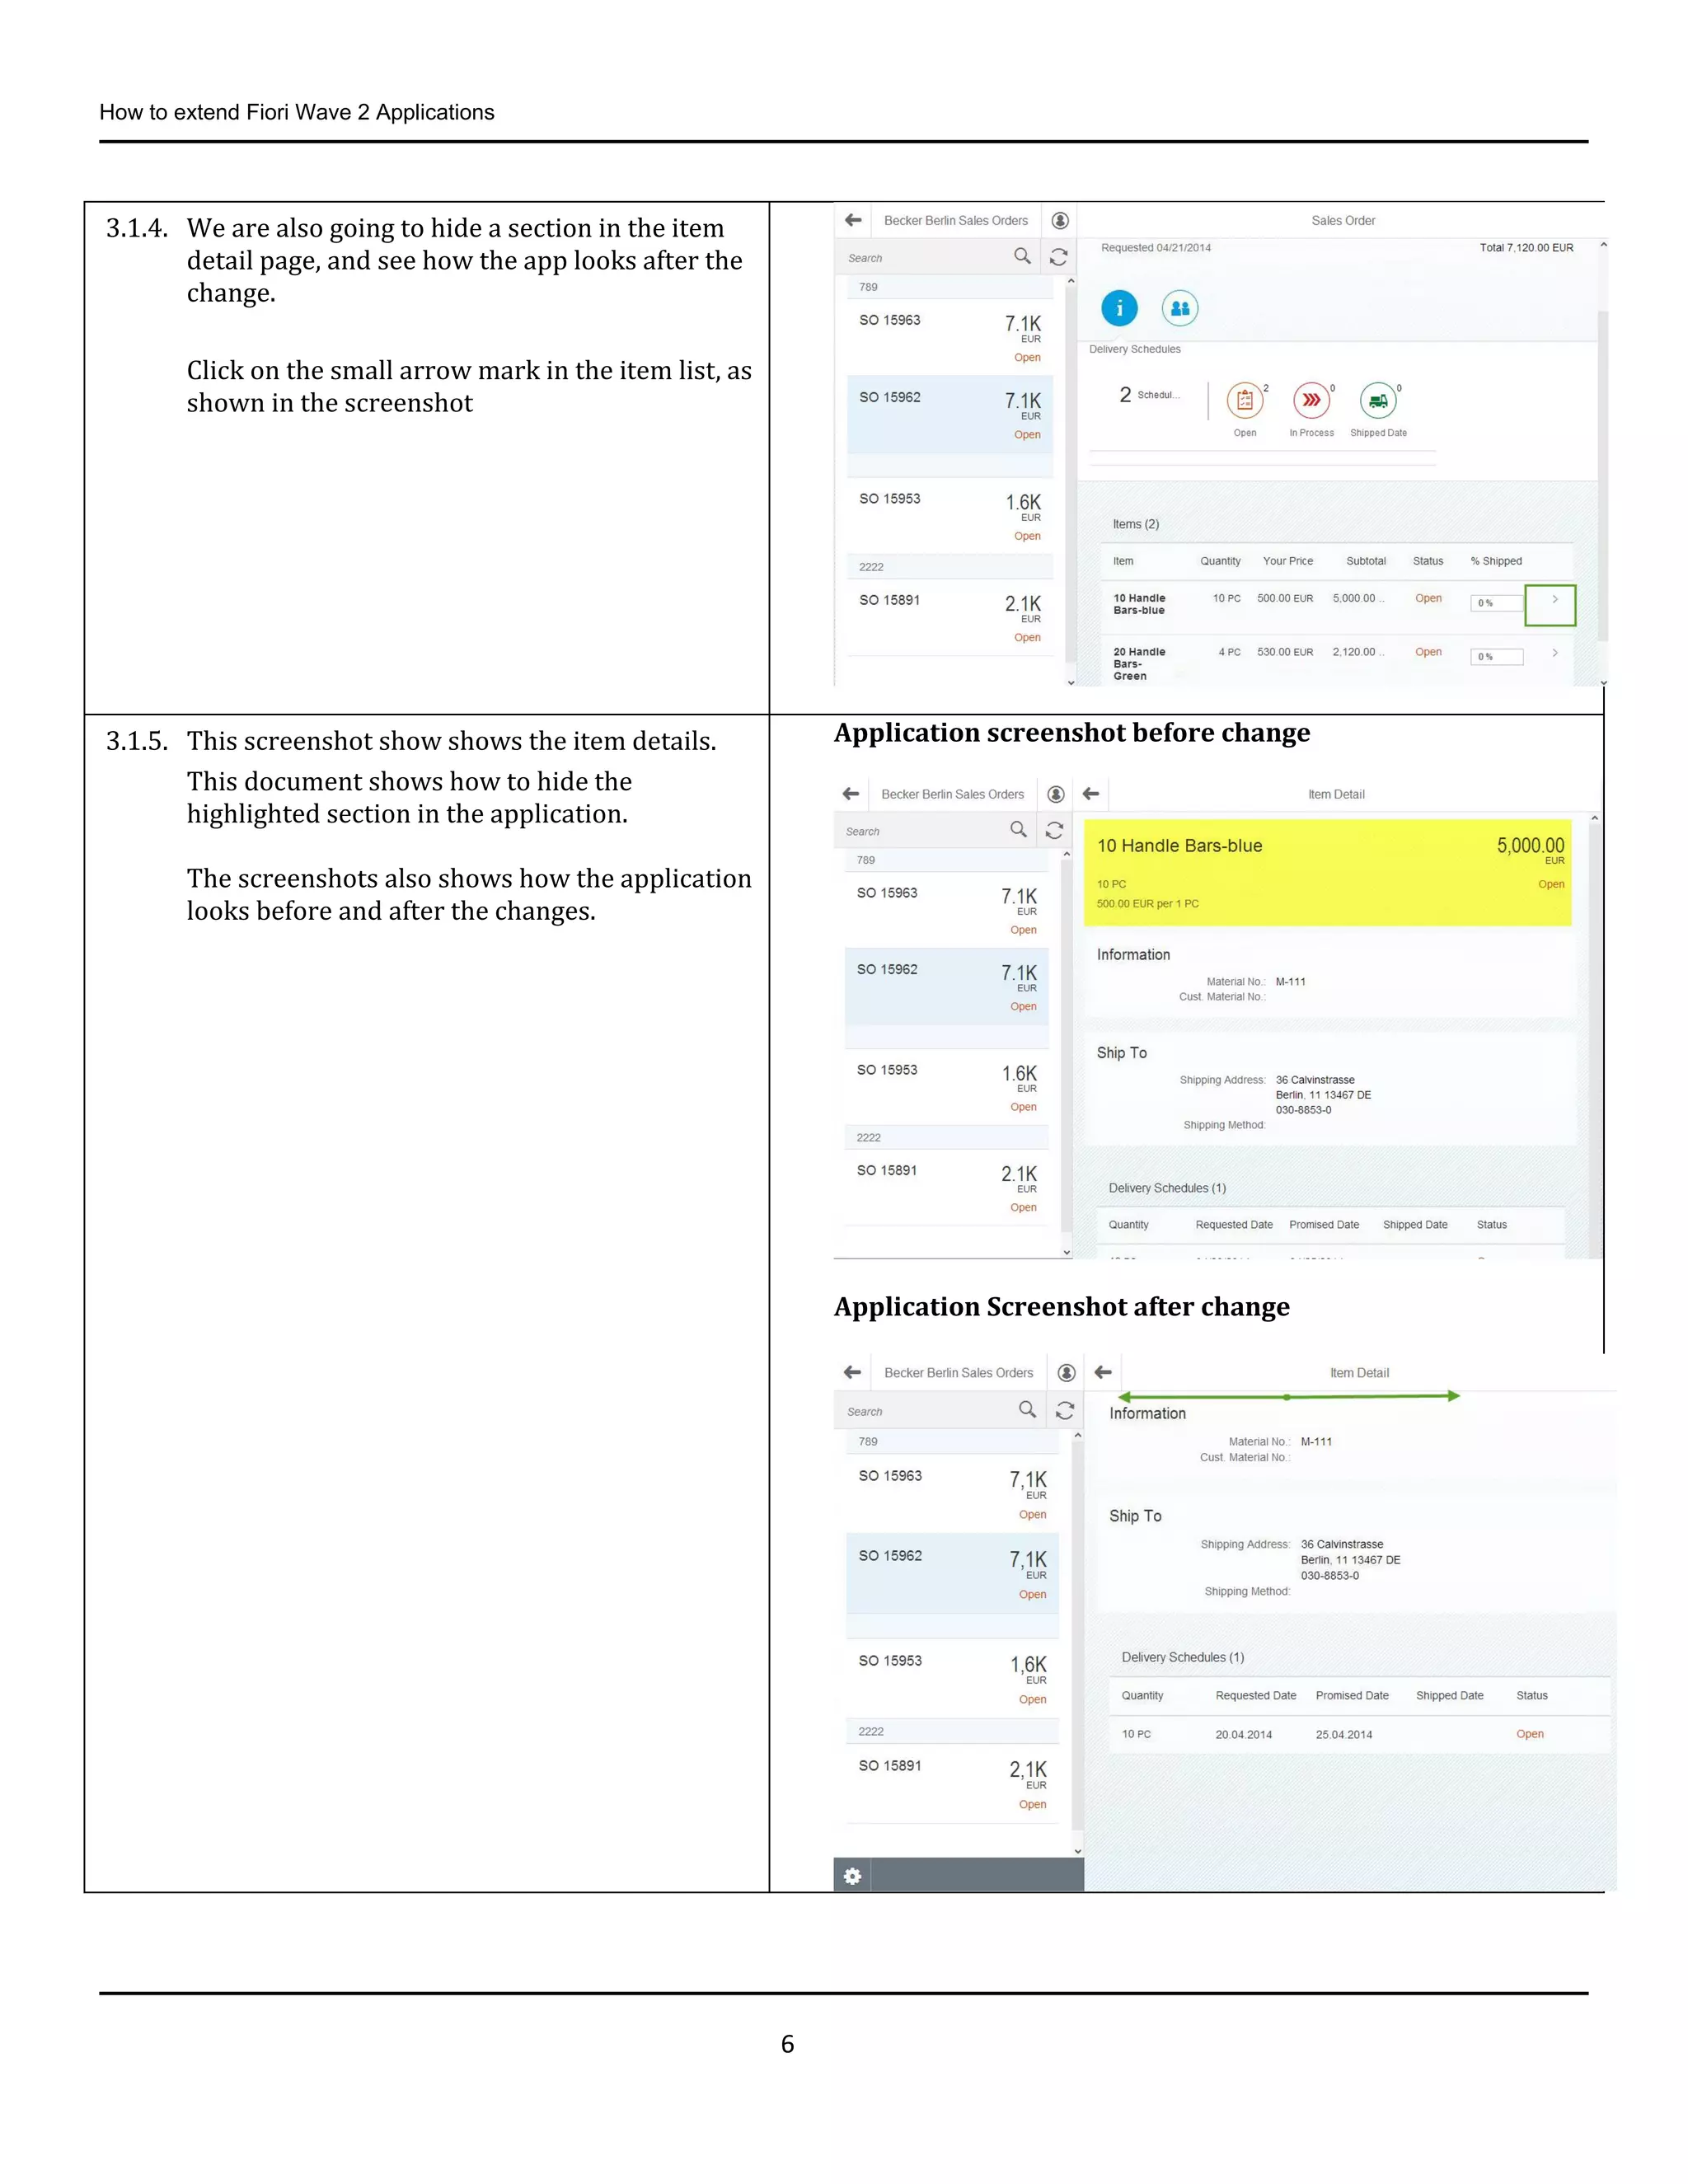
3.1.4. We are also going to hide a section in the item
detail page, and see how the app looks after the
change.
Click on the small arrow mark in the item list, as
shown in the screenshot
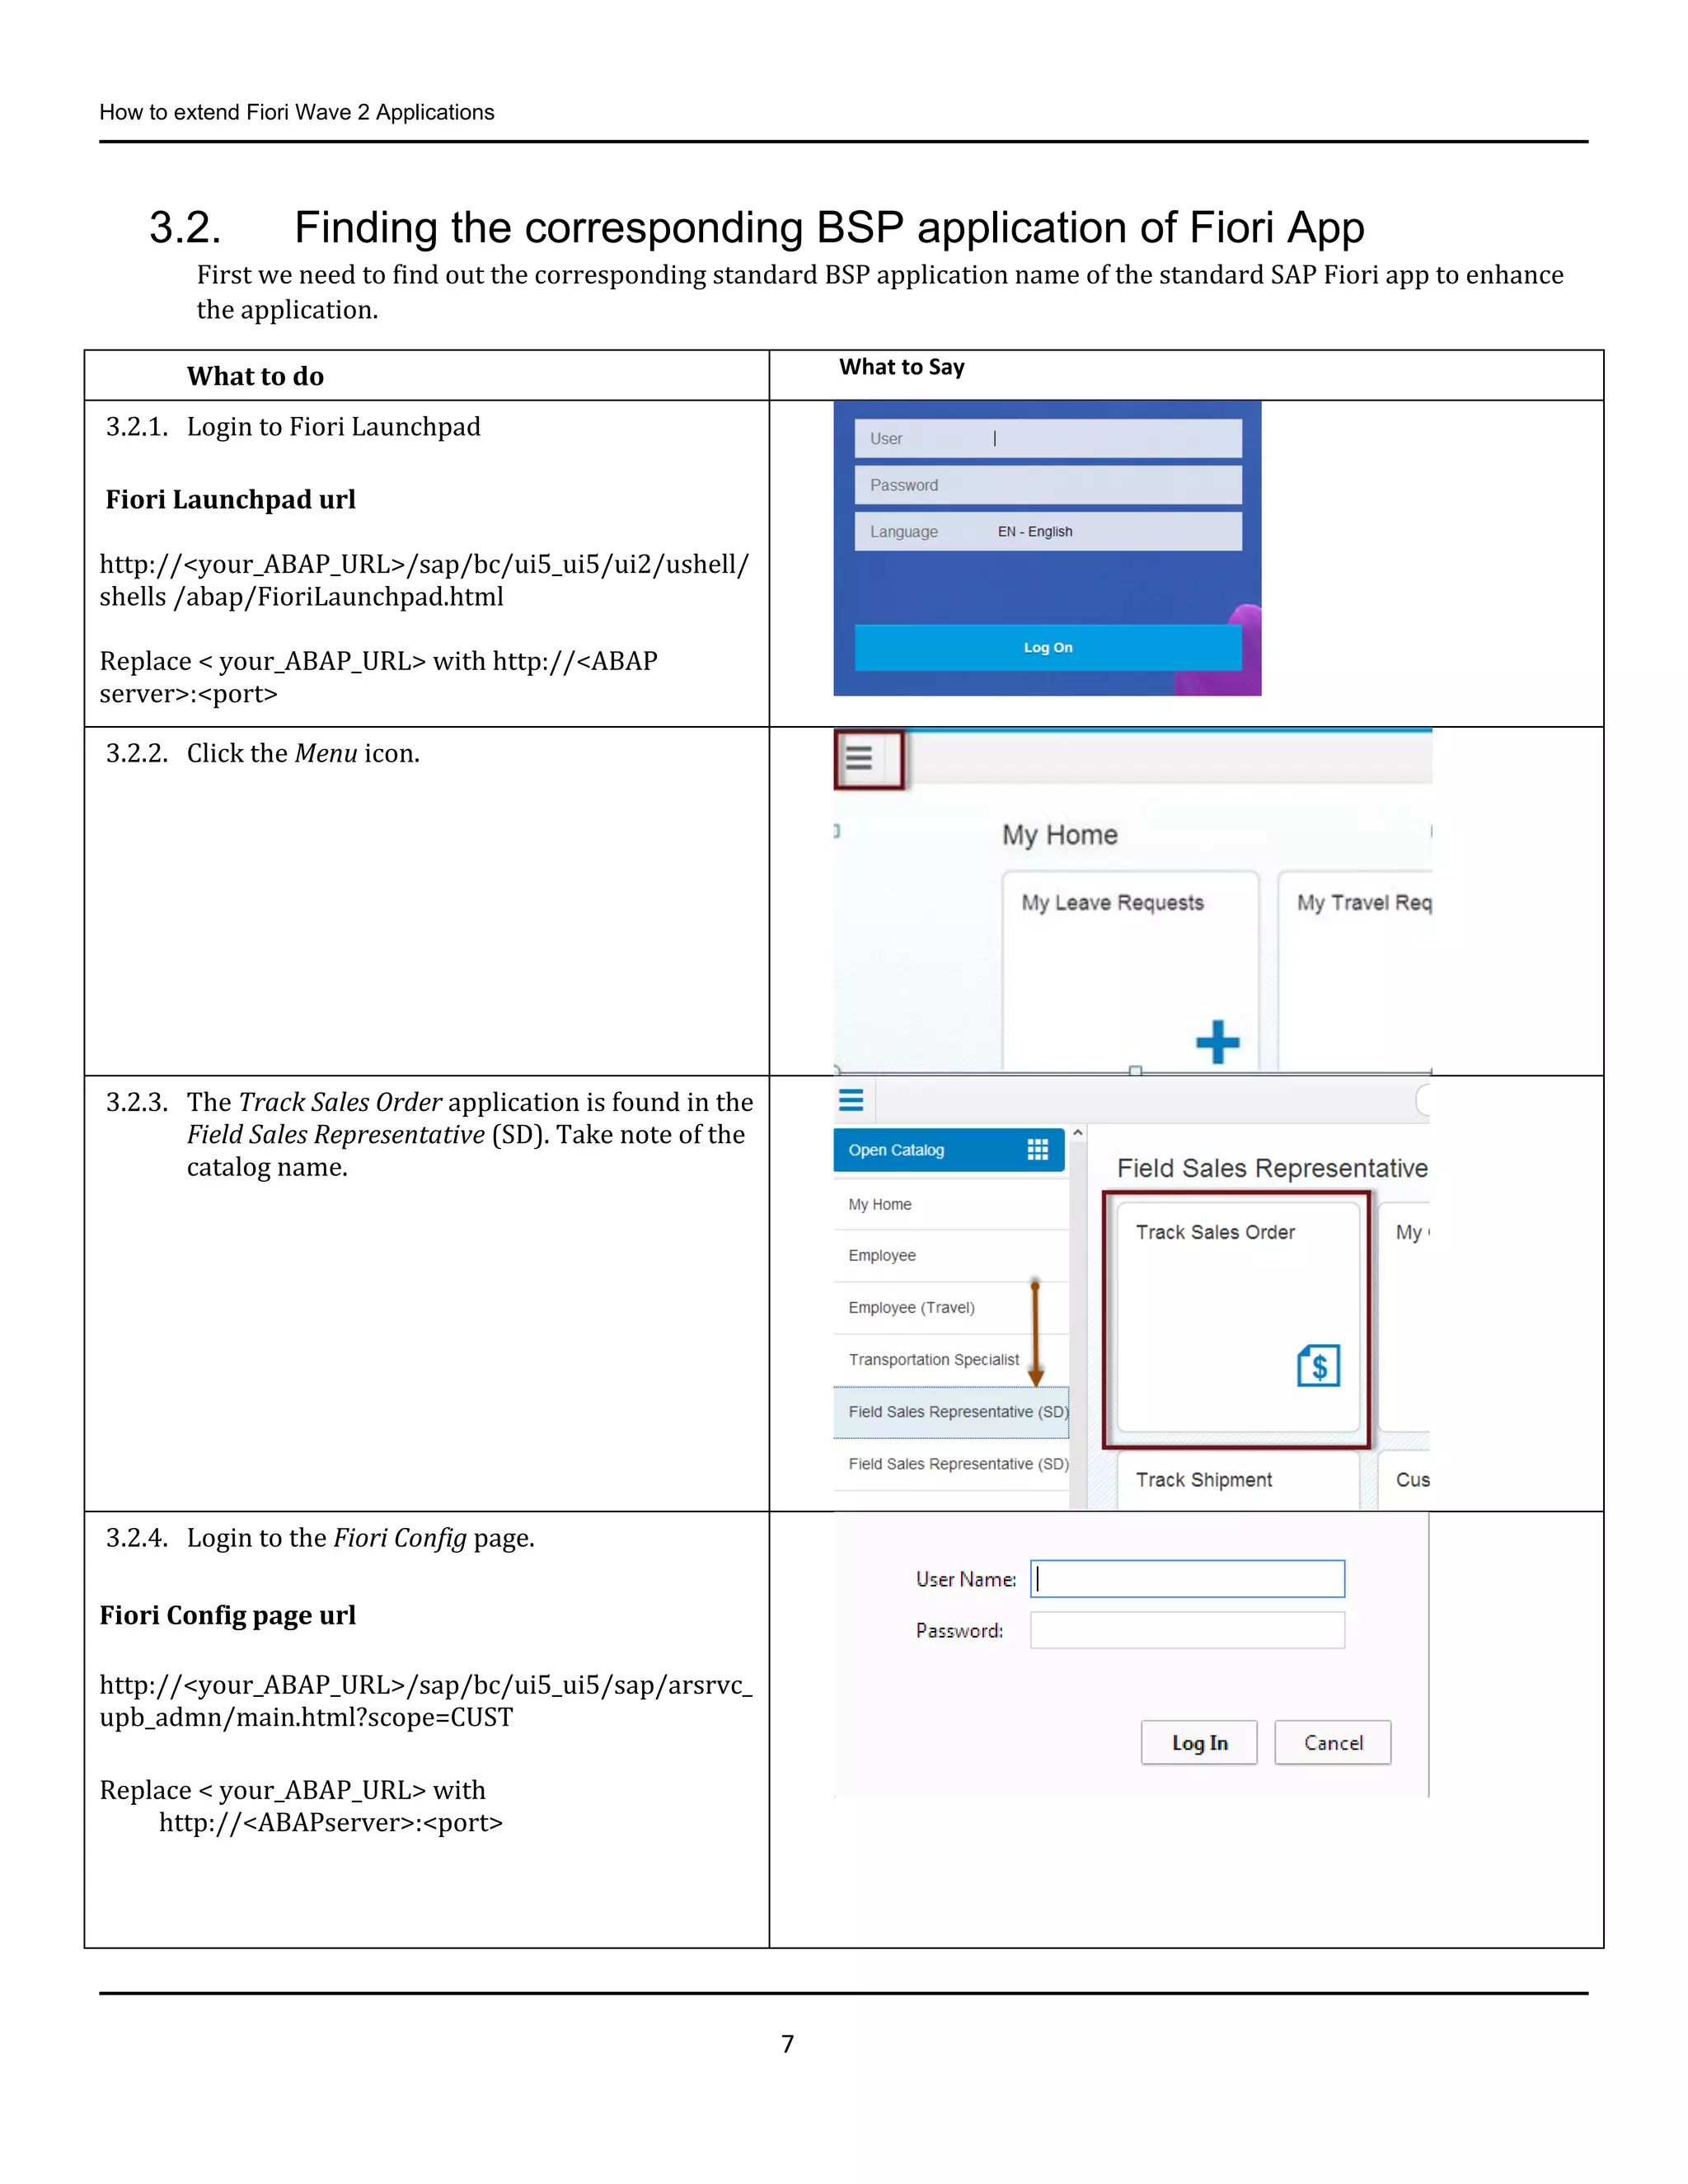
3.1.5. This screenshot show shows the item details.
This document shows how to hide the
highlighted section in the application.
The screenshots also shows how the application
looks before and after the changes.
Application screenshot before change
Application Screenshot after change
7.
How to extendFiori Wave 2 Applications
7
3.2. Finding the corresponding BSP application of Fiori App
First we need to find out the corresponding standard BSP application name of the standard SAP Fiori app to enhance
the application.
What to do What to Say
3.2.1. Login to Fiori Launchpad
Fiori Launchpad url
http://<your_ABAP_URL>/sap/bc/ui5_ui5/ui2/ushell/
shells /abap/FioriLaunchpad.html
Replace < your_ABAP_URL> with http://<ABAP
server>:<port>
3.2.2. Click the Menu icon.
3.2.3. The Track Sales Order application is found in the
Field Sales Representative (SD). Take note of the
catalog name.
3.2.4. Login to the Fiori Config page.
Fiori Config page url
http://<your_ABAP_URL>/sap/bc/ui5_ui5/sap/arsrvc_
upb_admn/main.html?scope=CUST
Replace < your_ABAP_URL> with
http://<ABAPserver>:<port>
8.
How to extendFiori Wave 2 Applications
8
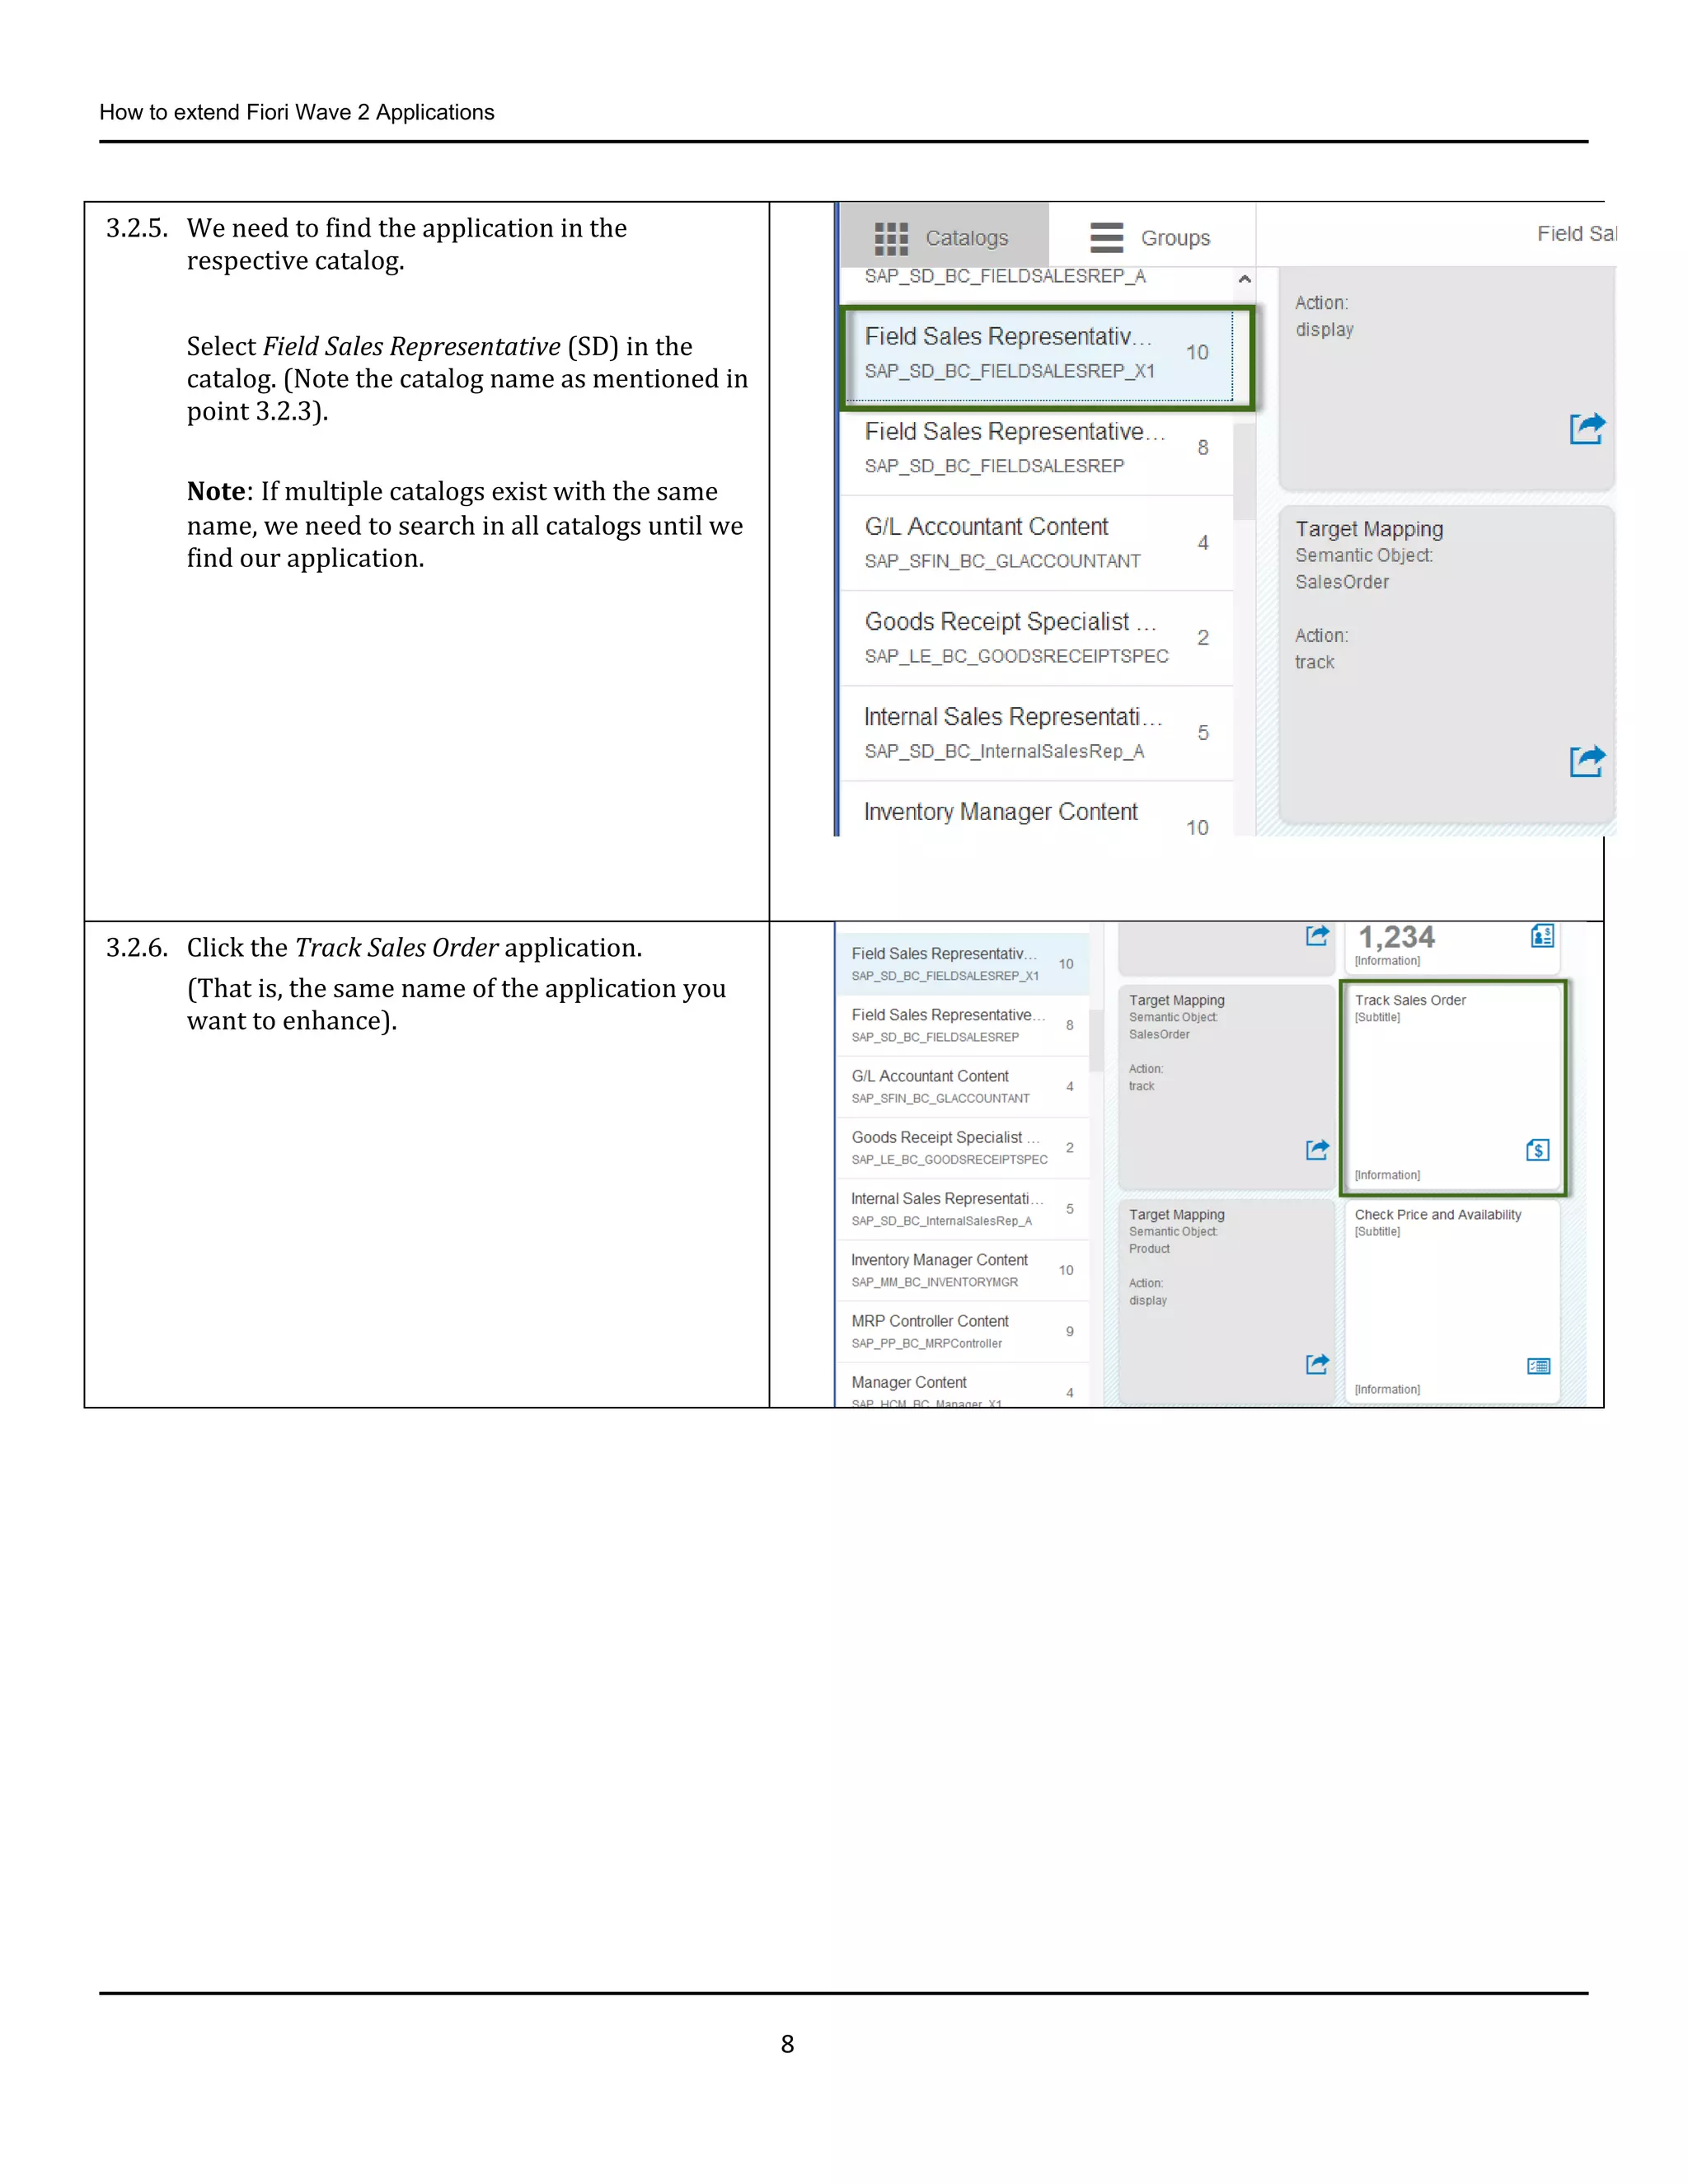
3.2.5. We need to find the application in the
respective catalog.
Select Field Sales Representative (SD) in the
catalog. (Note the catalog name as mentioned in
point 3.2.3).
Note: If multiple catalogs exist with the same
name, we need to search in all catalogs until we
find our application.
3.2.6. Click the Track Sales Order application.
(That is, the same name of the application you
want to enhance).
9.
How to extendFiori Wave 2 Applications
9
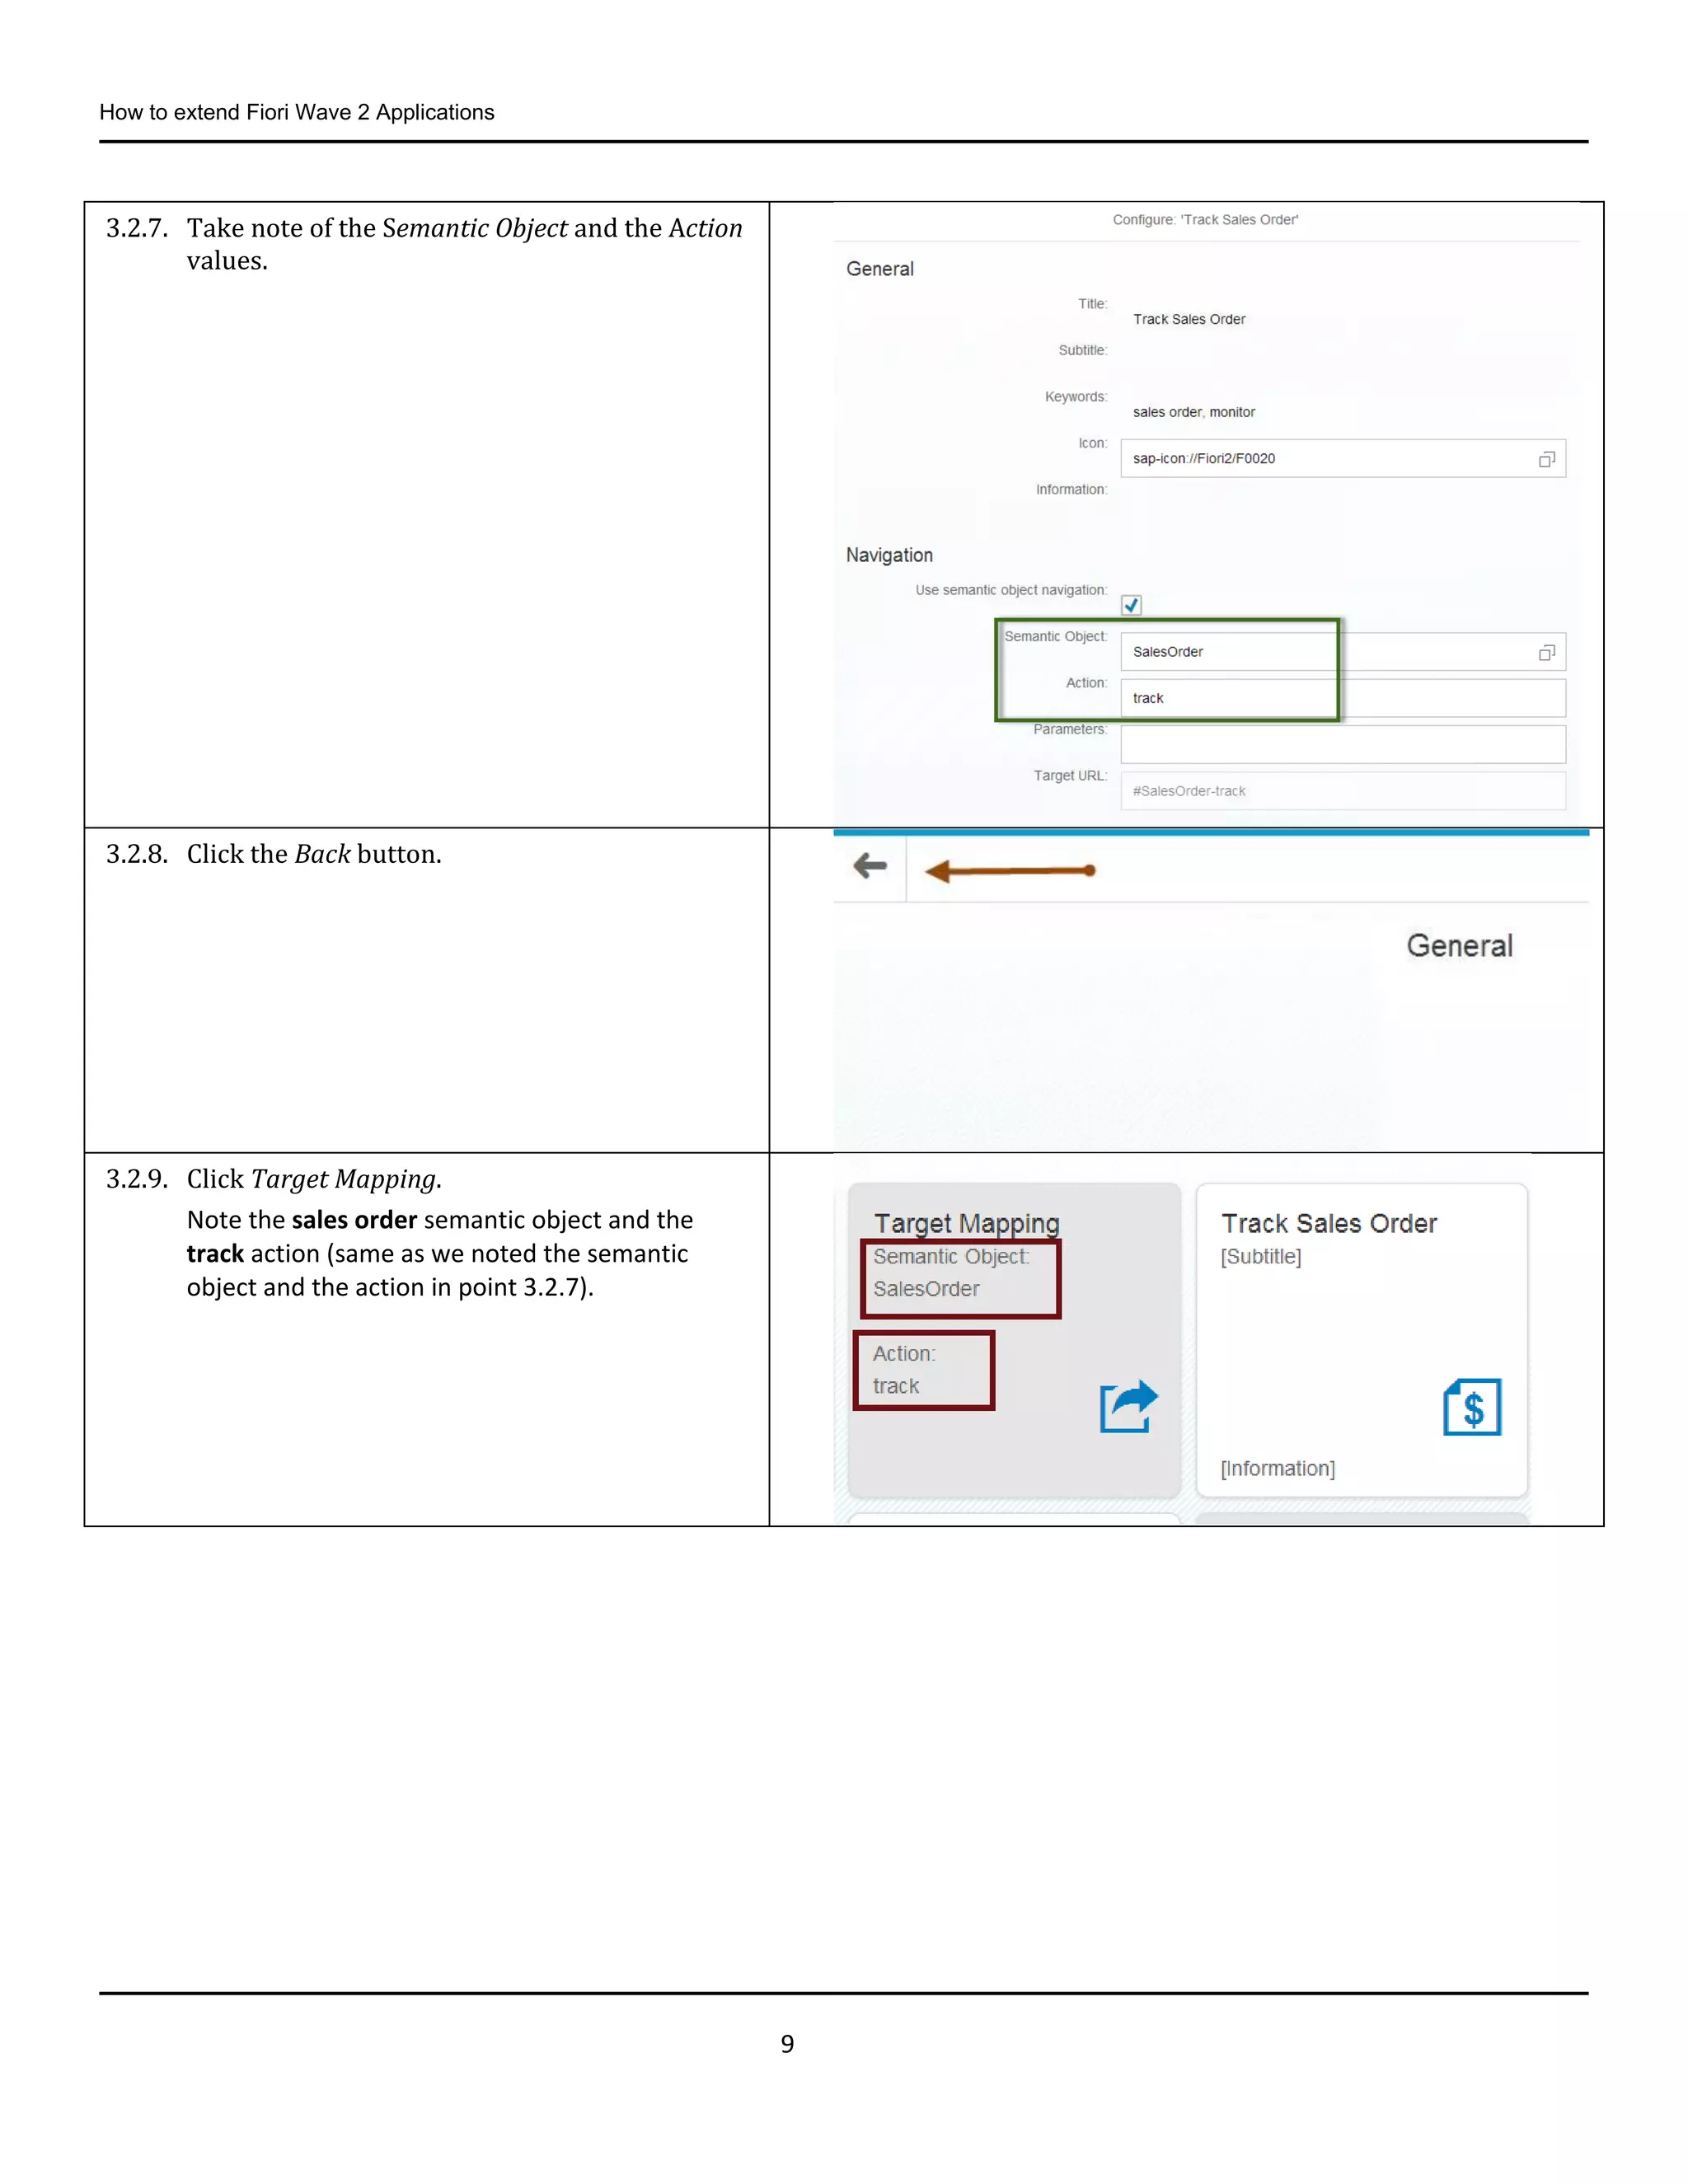
3.2.7. Take note of the Semantic Object and the Action
values.
3.2.8. Click the Back button.
3.2.9. Click Target Mapping.
Note the sales order semantic object and the
track action (same as we noted the semantic
object and the action in point 3.2.7).
10.
How to extendFiori Wave 2 Applications
10
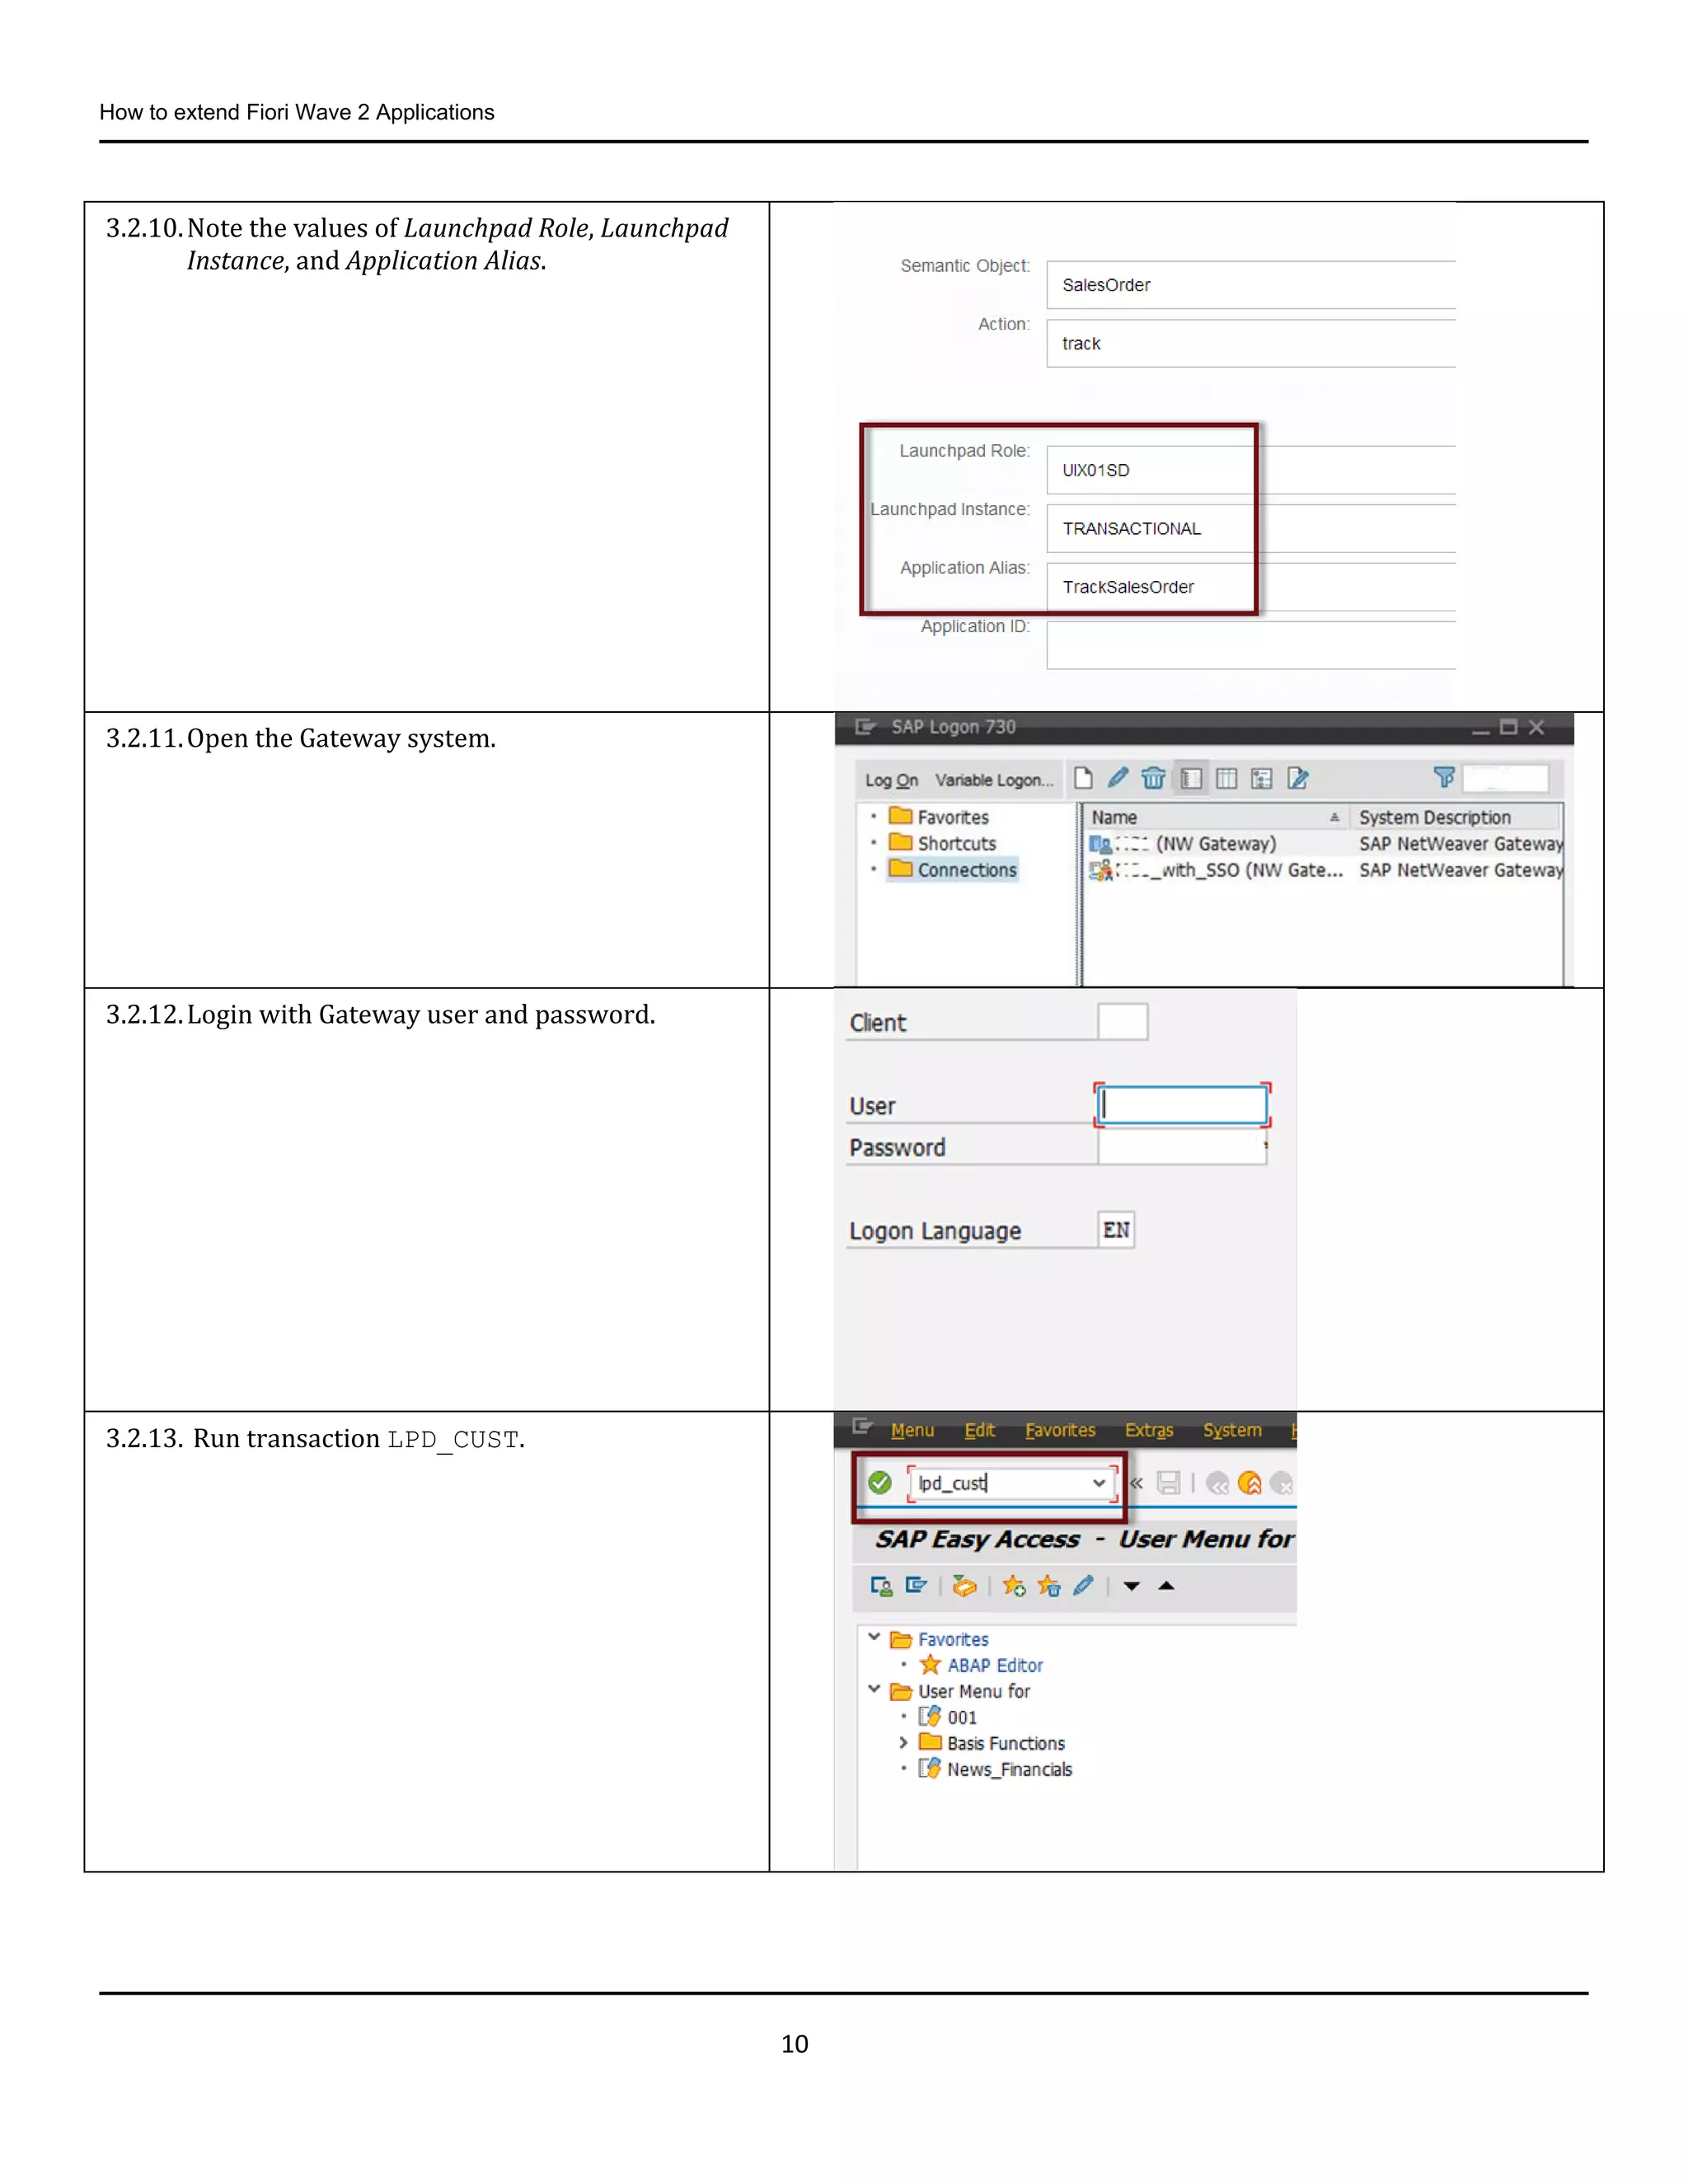
3.2.10.Note the values of Launchpad Role, Launchpad
Instance, and Application Alias.
3.2.11.Open the Gateway system.
3.2.12.Login with Gateway user and password.
3.2.13. Run transaction LPD_CUST.
11.
How to extendFiori Wave 2 Applications
11
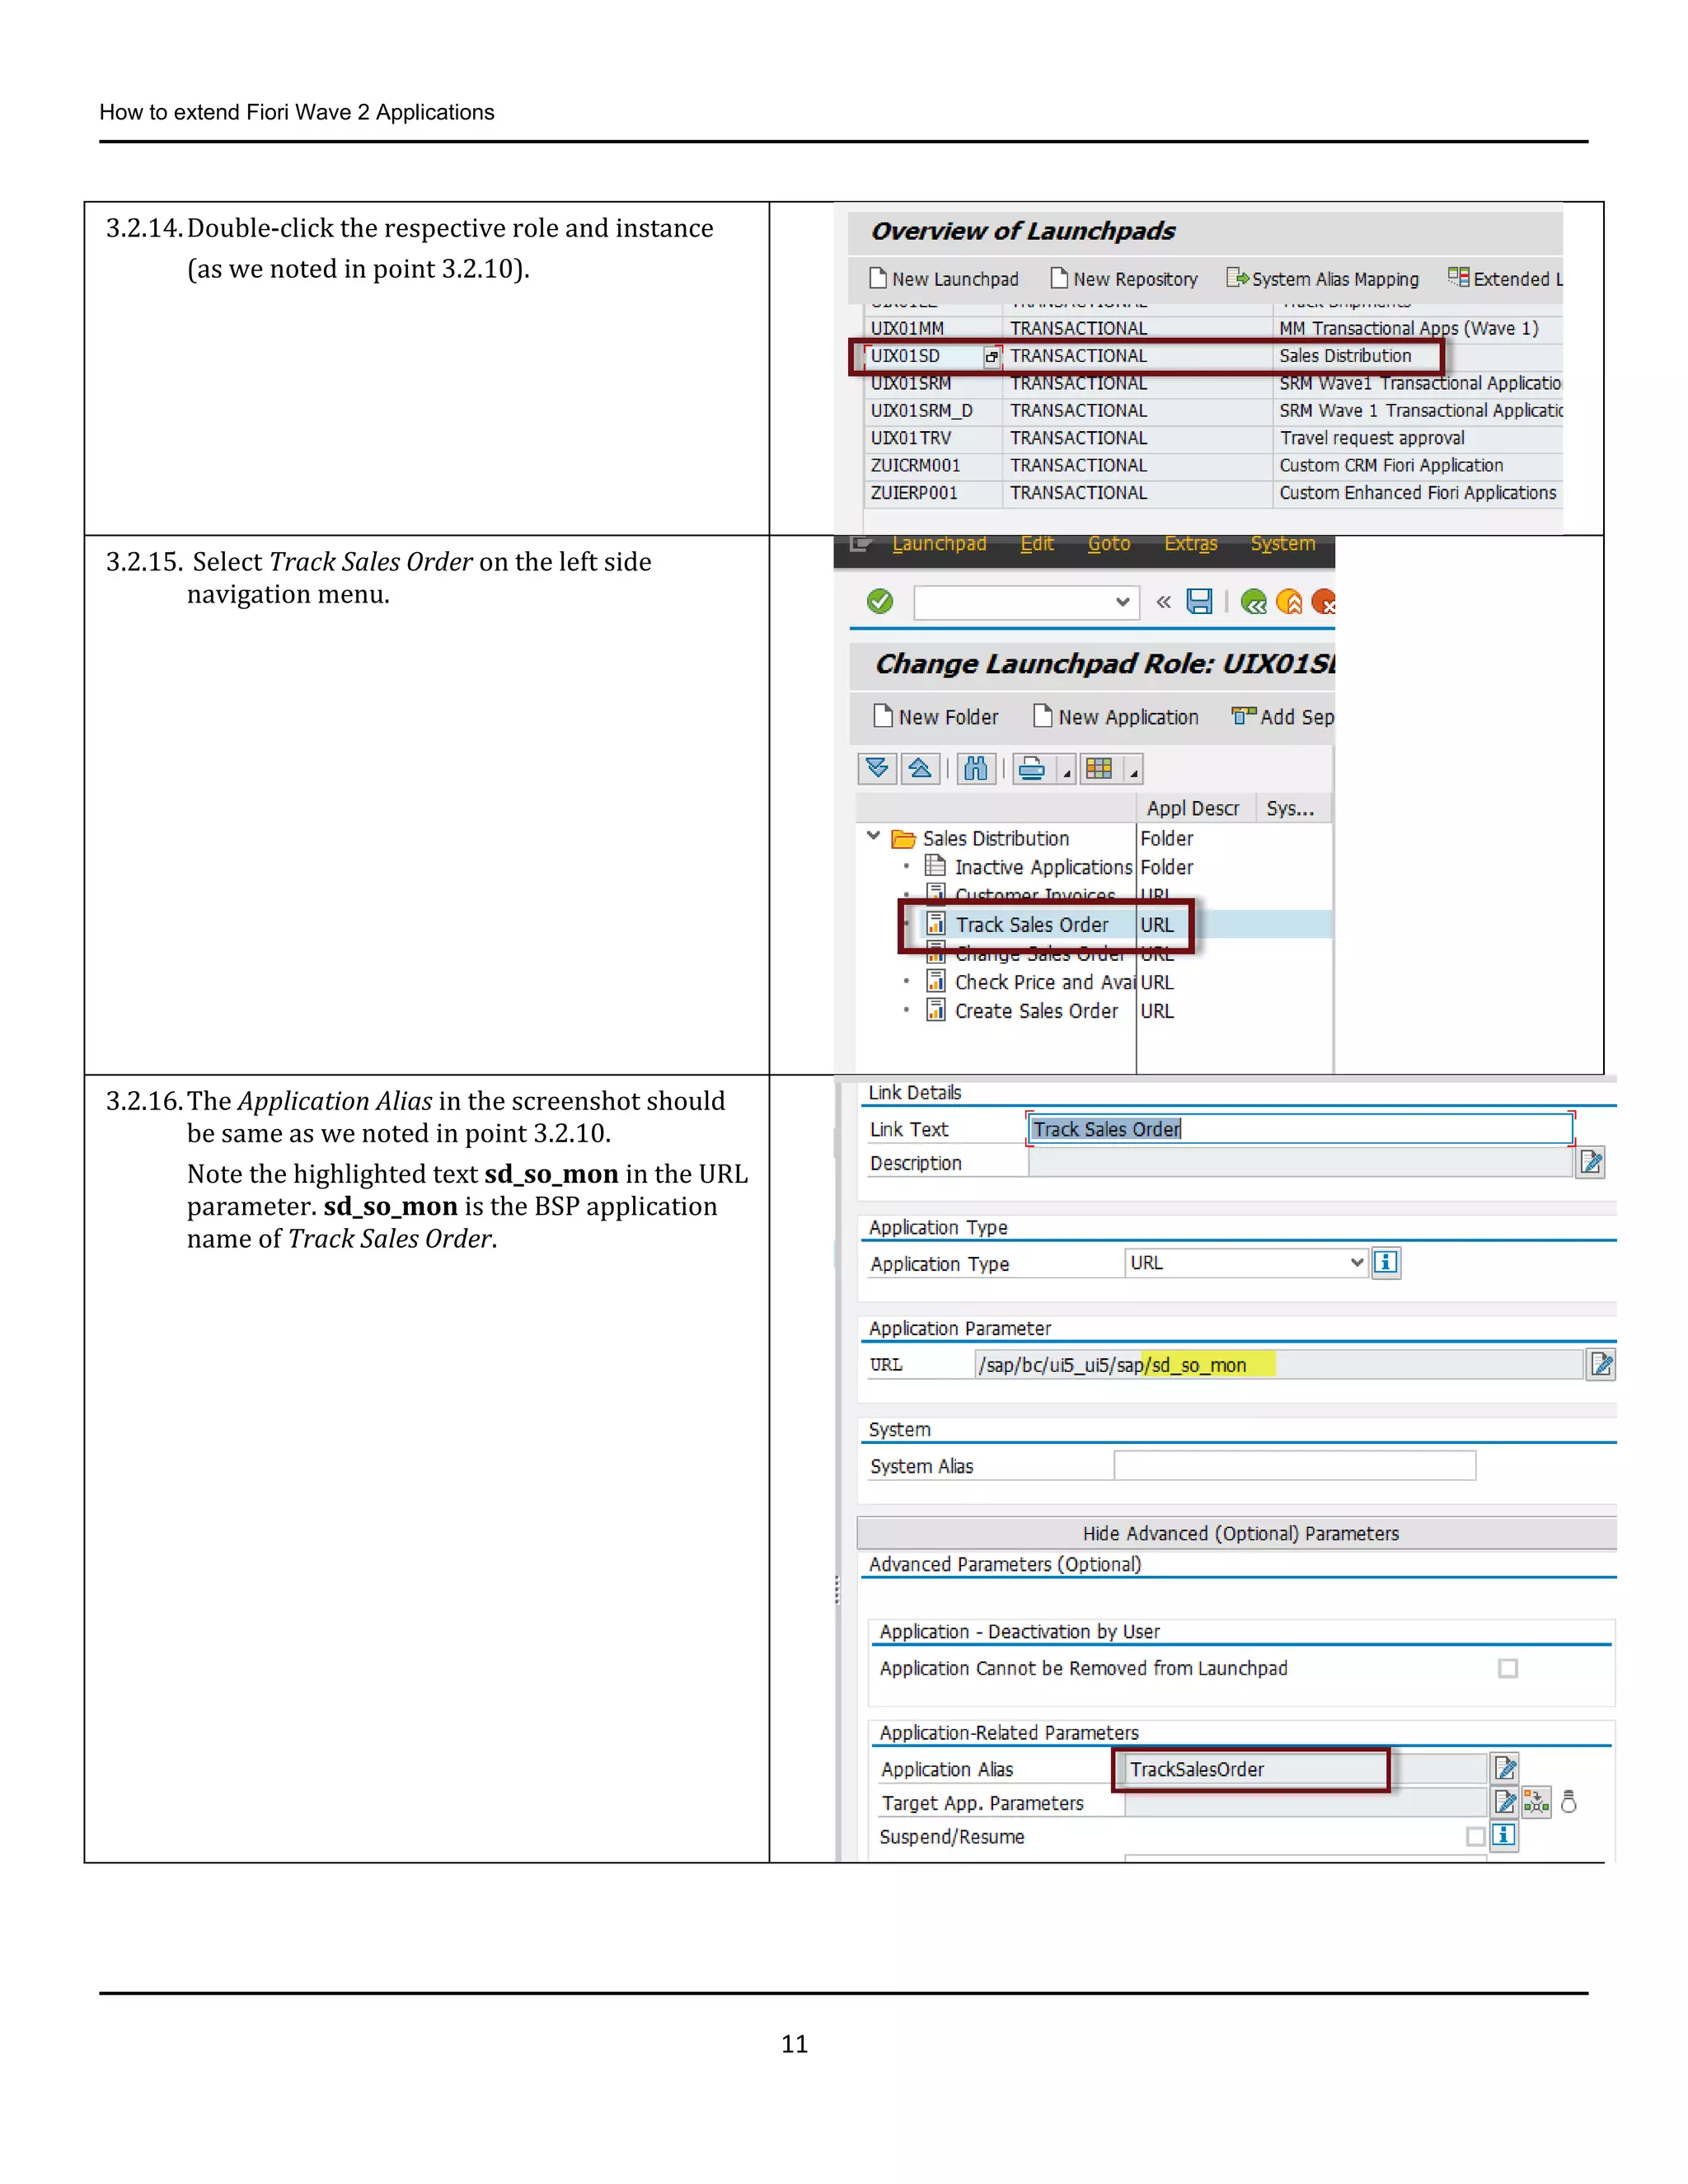
3.2.14.Double-click the respective role and instance
(as we noted in point 3.2.10).
3.2.15. Select Track Sales Order on the left side
navigation menu.
3.2.16.The Application Alias in the screenshot should
be same as we noted in point 3.2.10.
Note the highlighted text sd_so_mon in the URL
parameter. sd_so_mon is the BSP application
name of Track Sales Order.
12.
How to extendFiori Wave 2 Applications
12
3.3. Downloading the Source Code of the Sales Order Tracking app
What to do What to Say
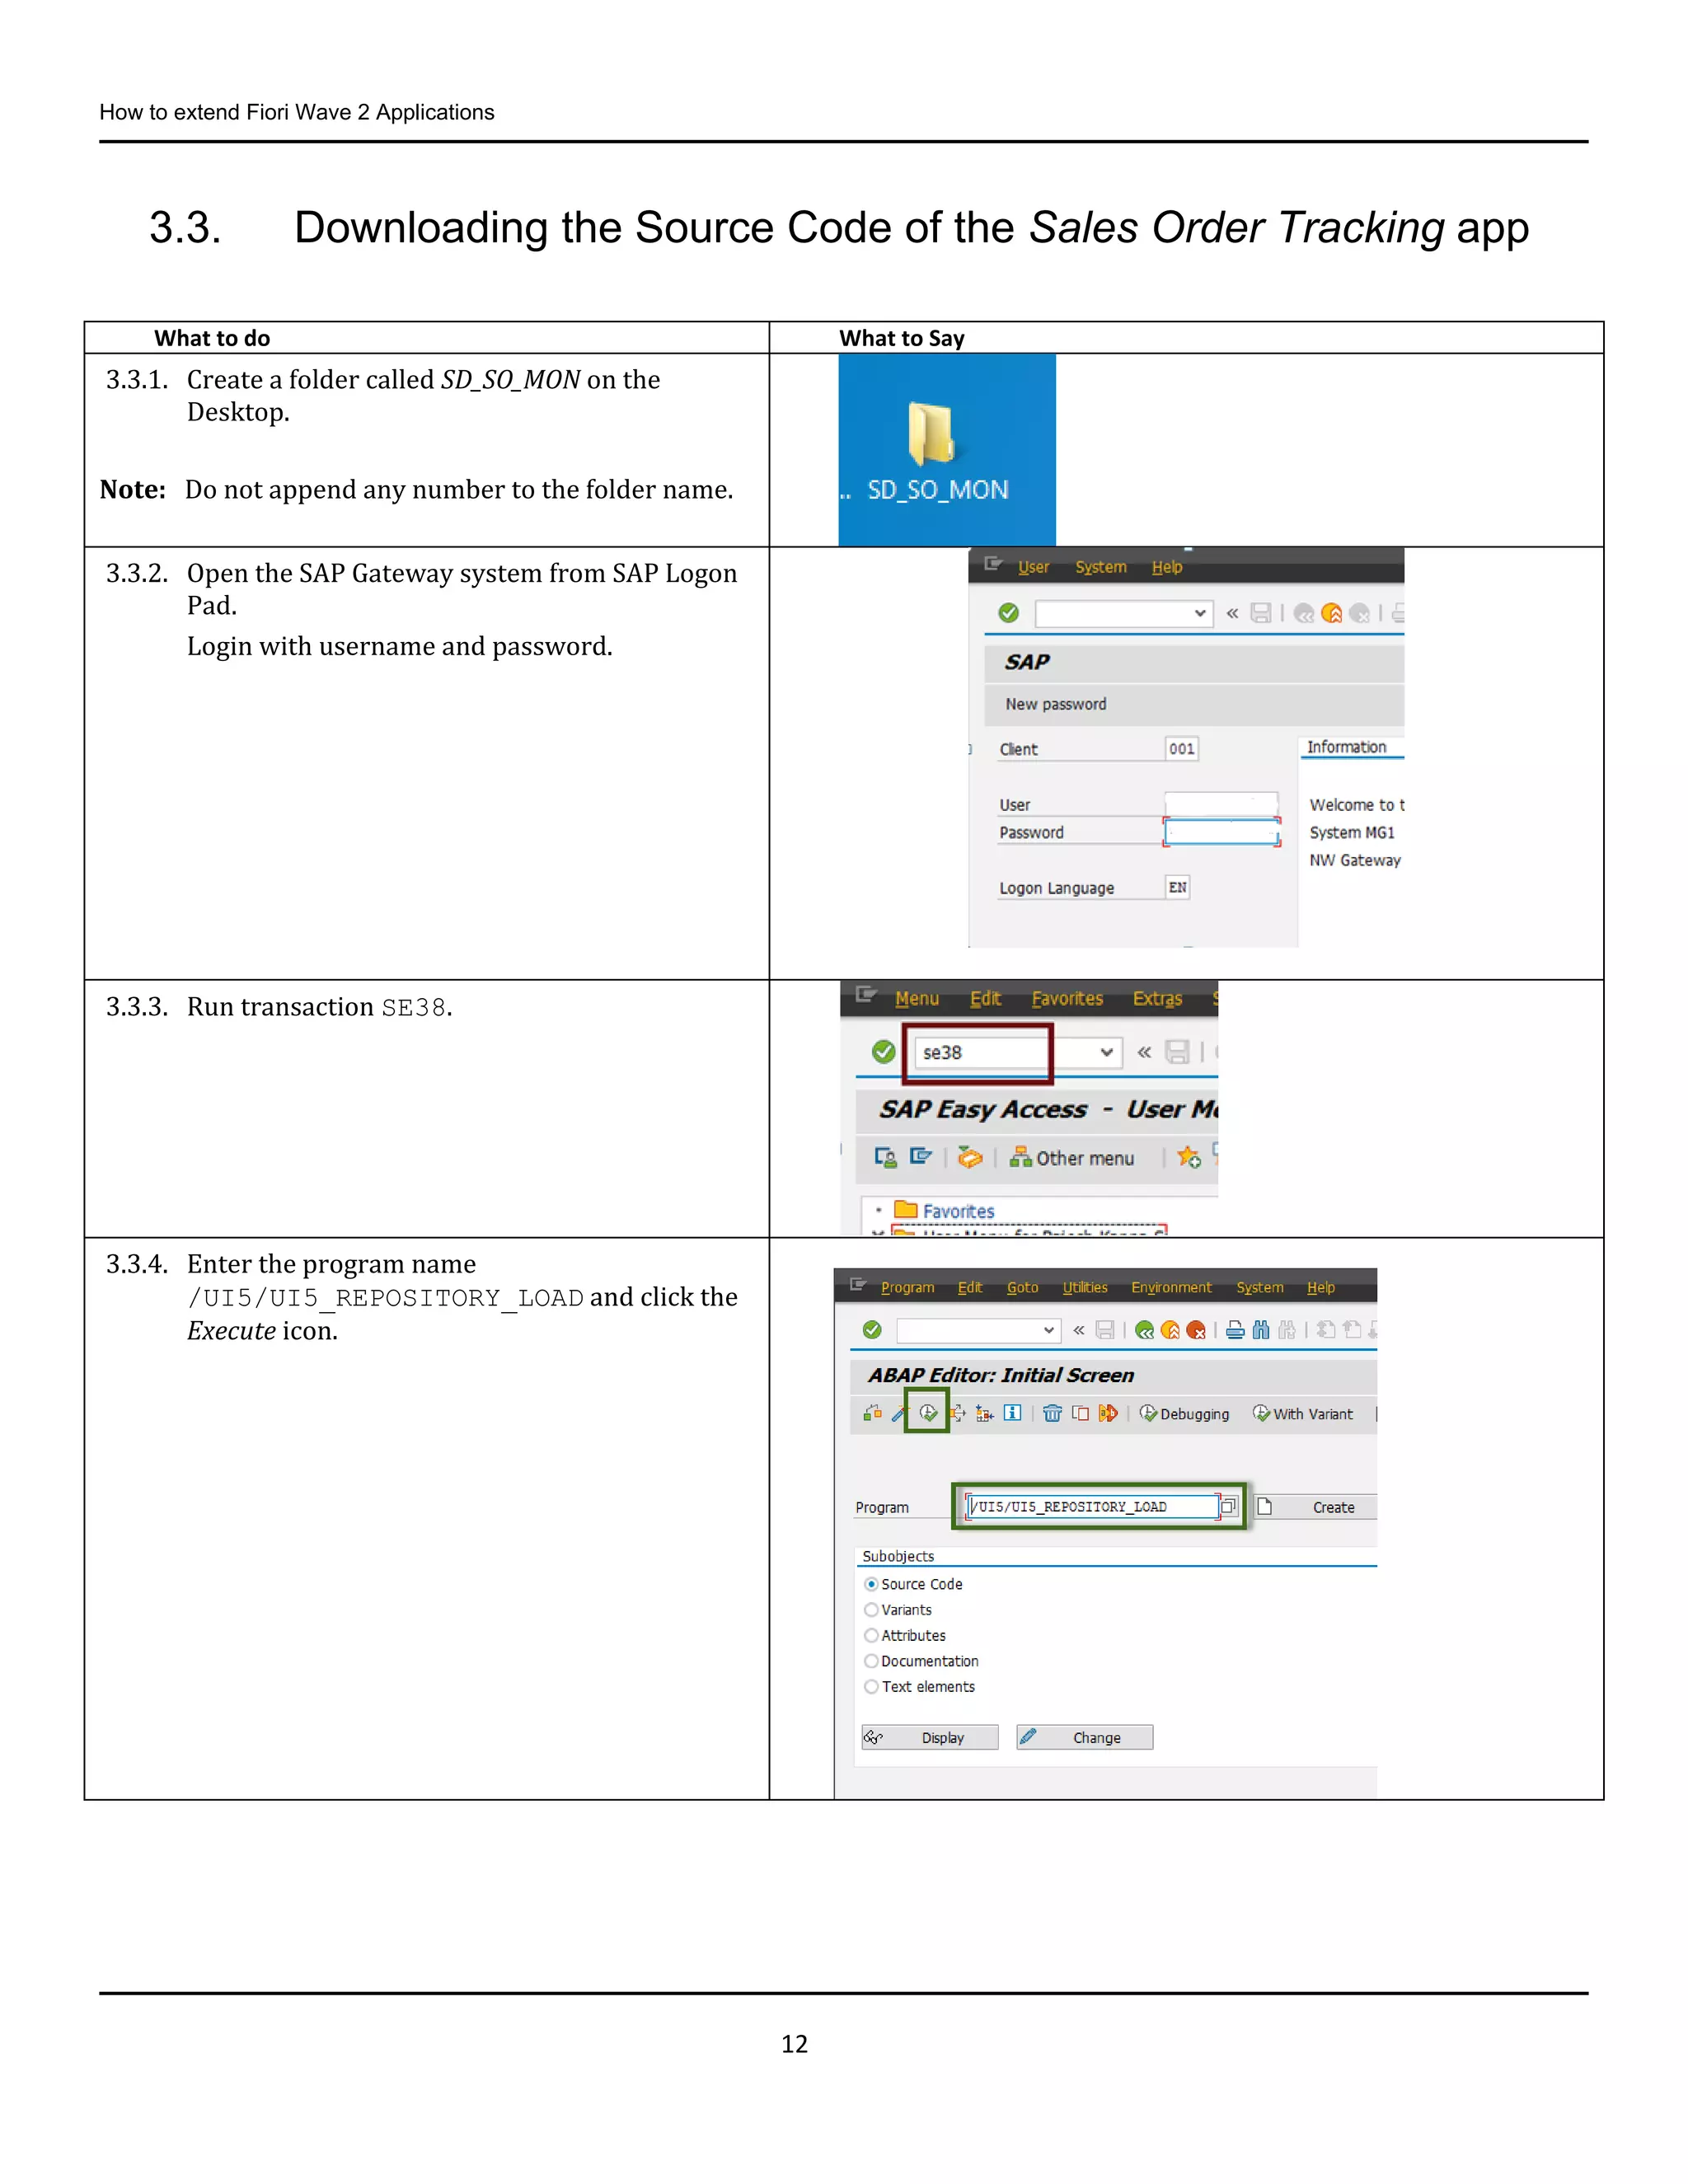
3.3.1. Create a folder called SD_SO_MON on the
Desktop.
Note: Do not append any number to the folder name.
3.3.2. Open the SAP Gateway system from SAP Logon
Pad.
Login with username and password.
3.3.3. Run transaction SE38.
3.3.4. Enter the program name
/UI5/UI5_REPOSITORY_LOAD and click the
Execute icon.
13.
How to extendFiori Wave 2 Applications
13
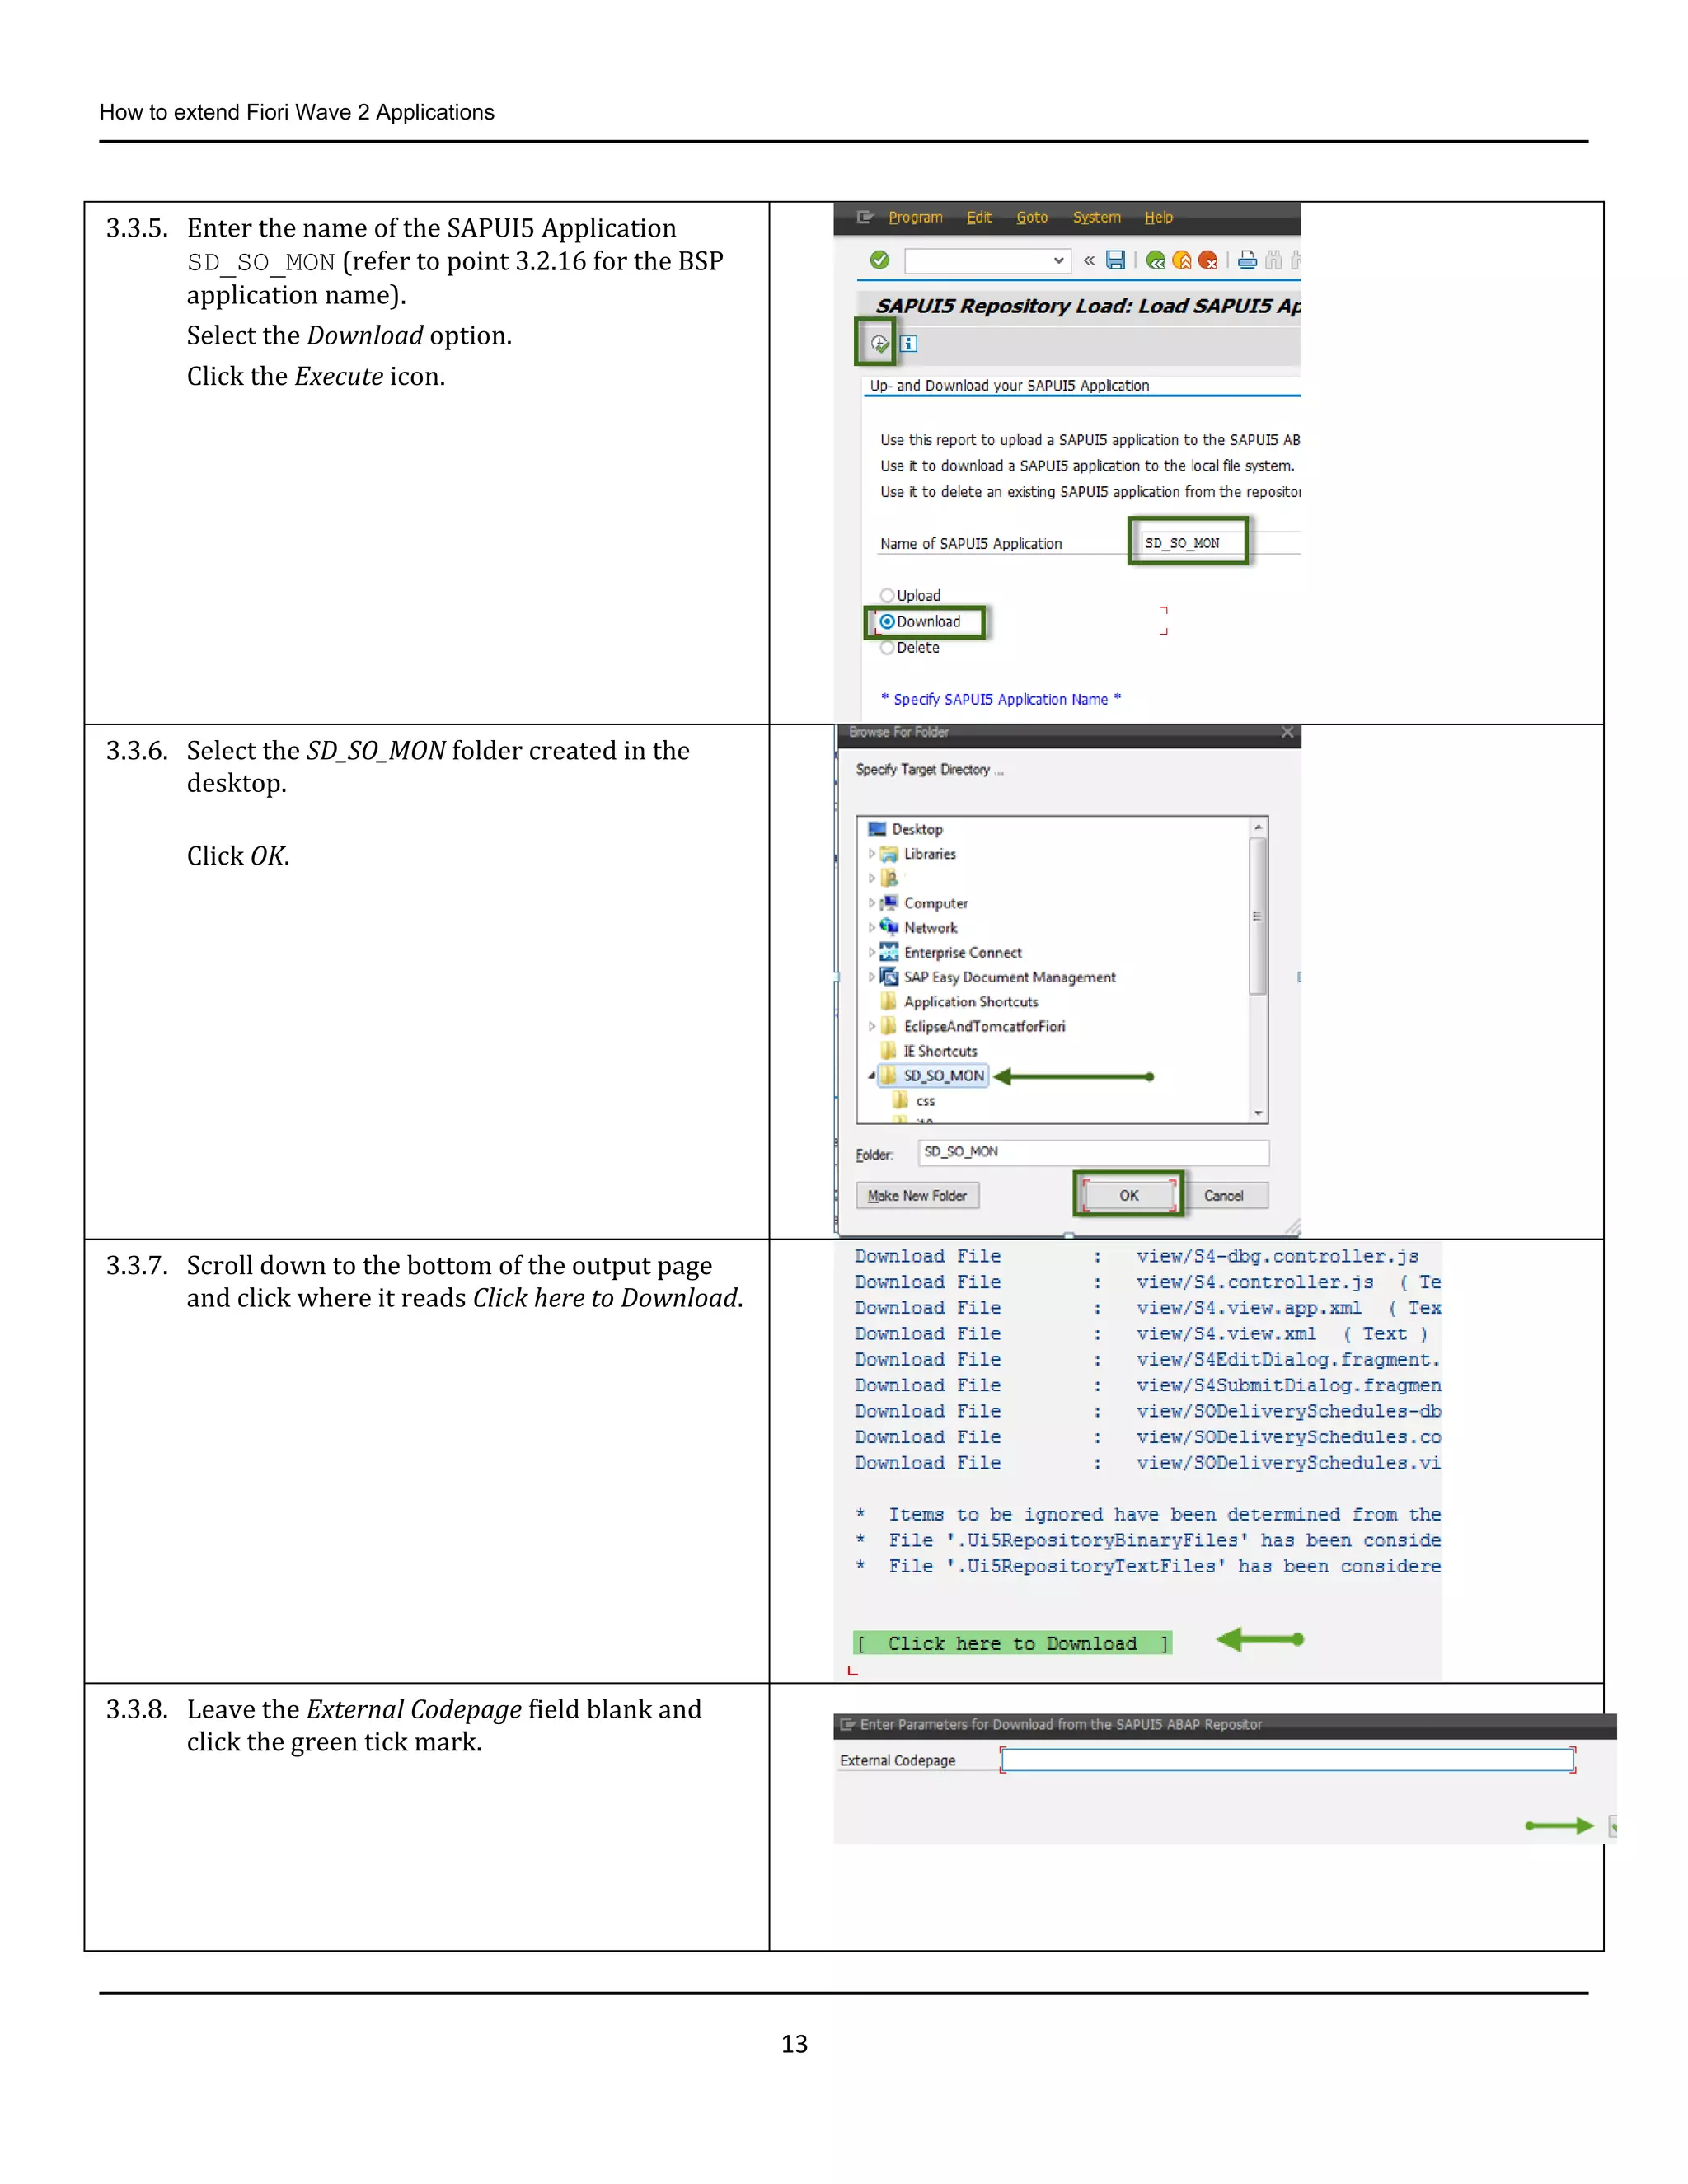
3.3.5. Enter the name of the SAPUI5 Application
SD_SO_MON (refer to point 3.2.16 for the BSP
application name).
Select the Download option.
Click the Execute icon.
3.3.6. Select the SD_SO_MON folder created in the
desktop.
Click OK.
3.3.7. Scroll down to the bottom of the output page
and click where it reads Click here to Download.
3.3.8. Leave the External Codepage field blank and
click the green tick mark.
14.
How to extendFiori Wave 2 Applications
14
3.4. Importing the SAPUI5 Application to Eclipse.
In order to modify an SAP Fiori app, it is recommended to so with an Eclipse installation that has the SAPUI5 Application
Development feature and the Fiori toolkit installed. (We have already copied Eclipse with SAP Fiori toolkit installed to the
desktop). This simplifies the development process.
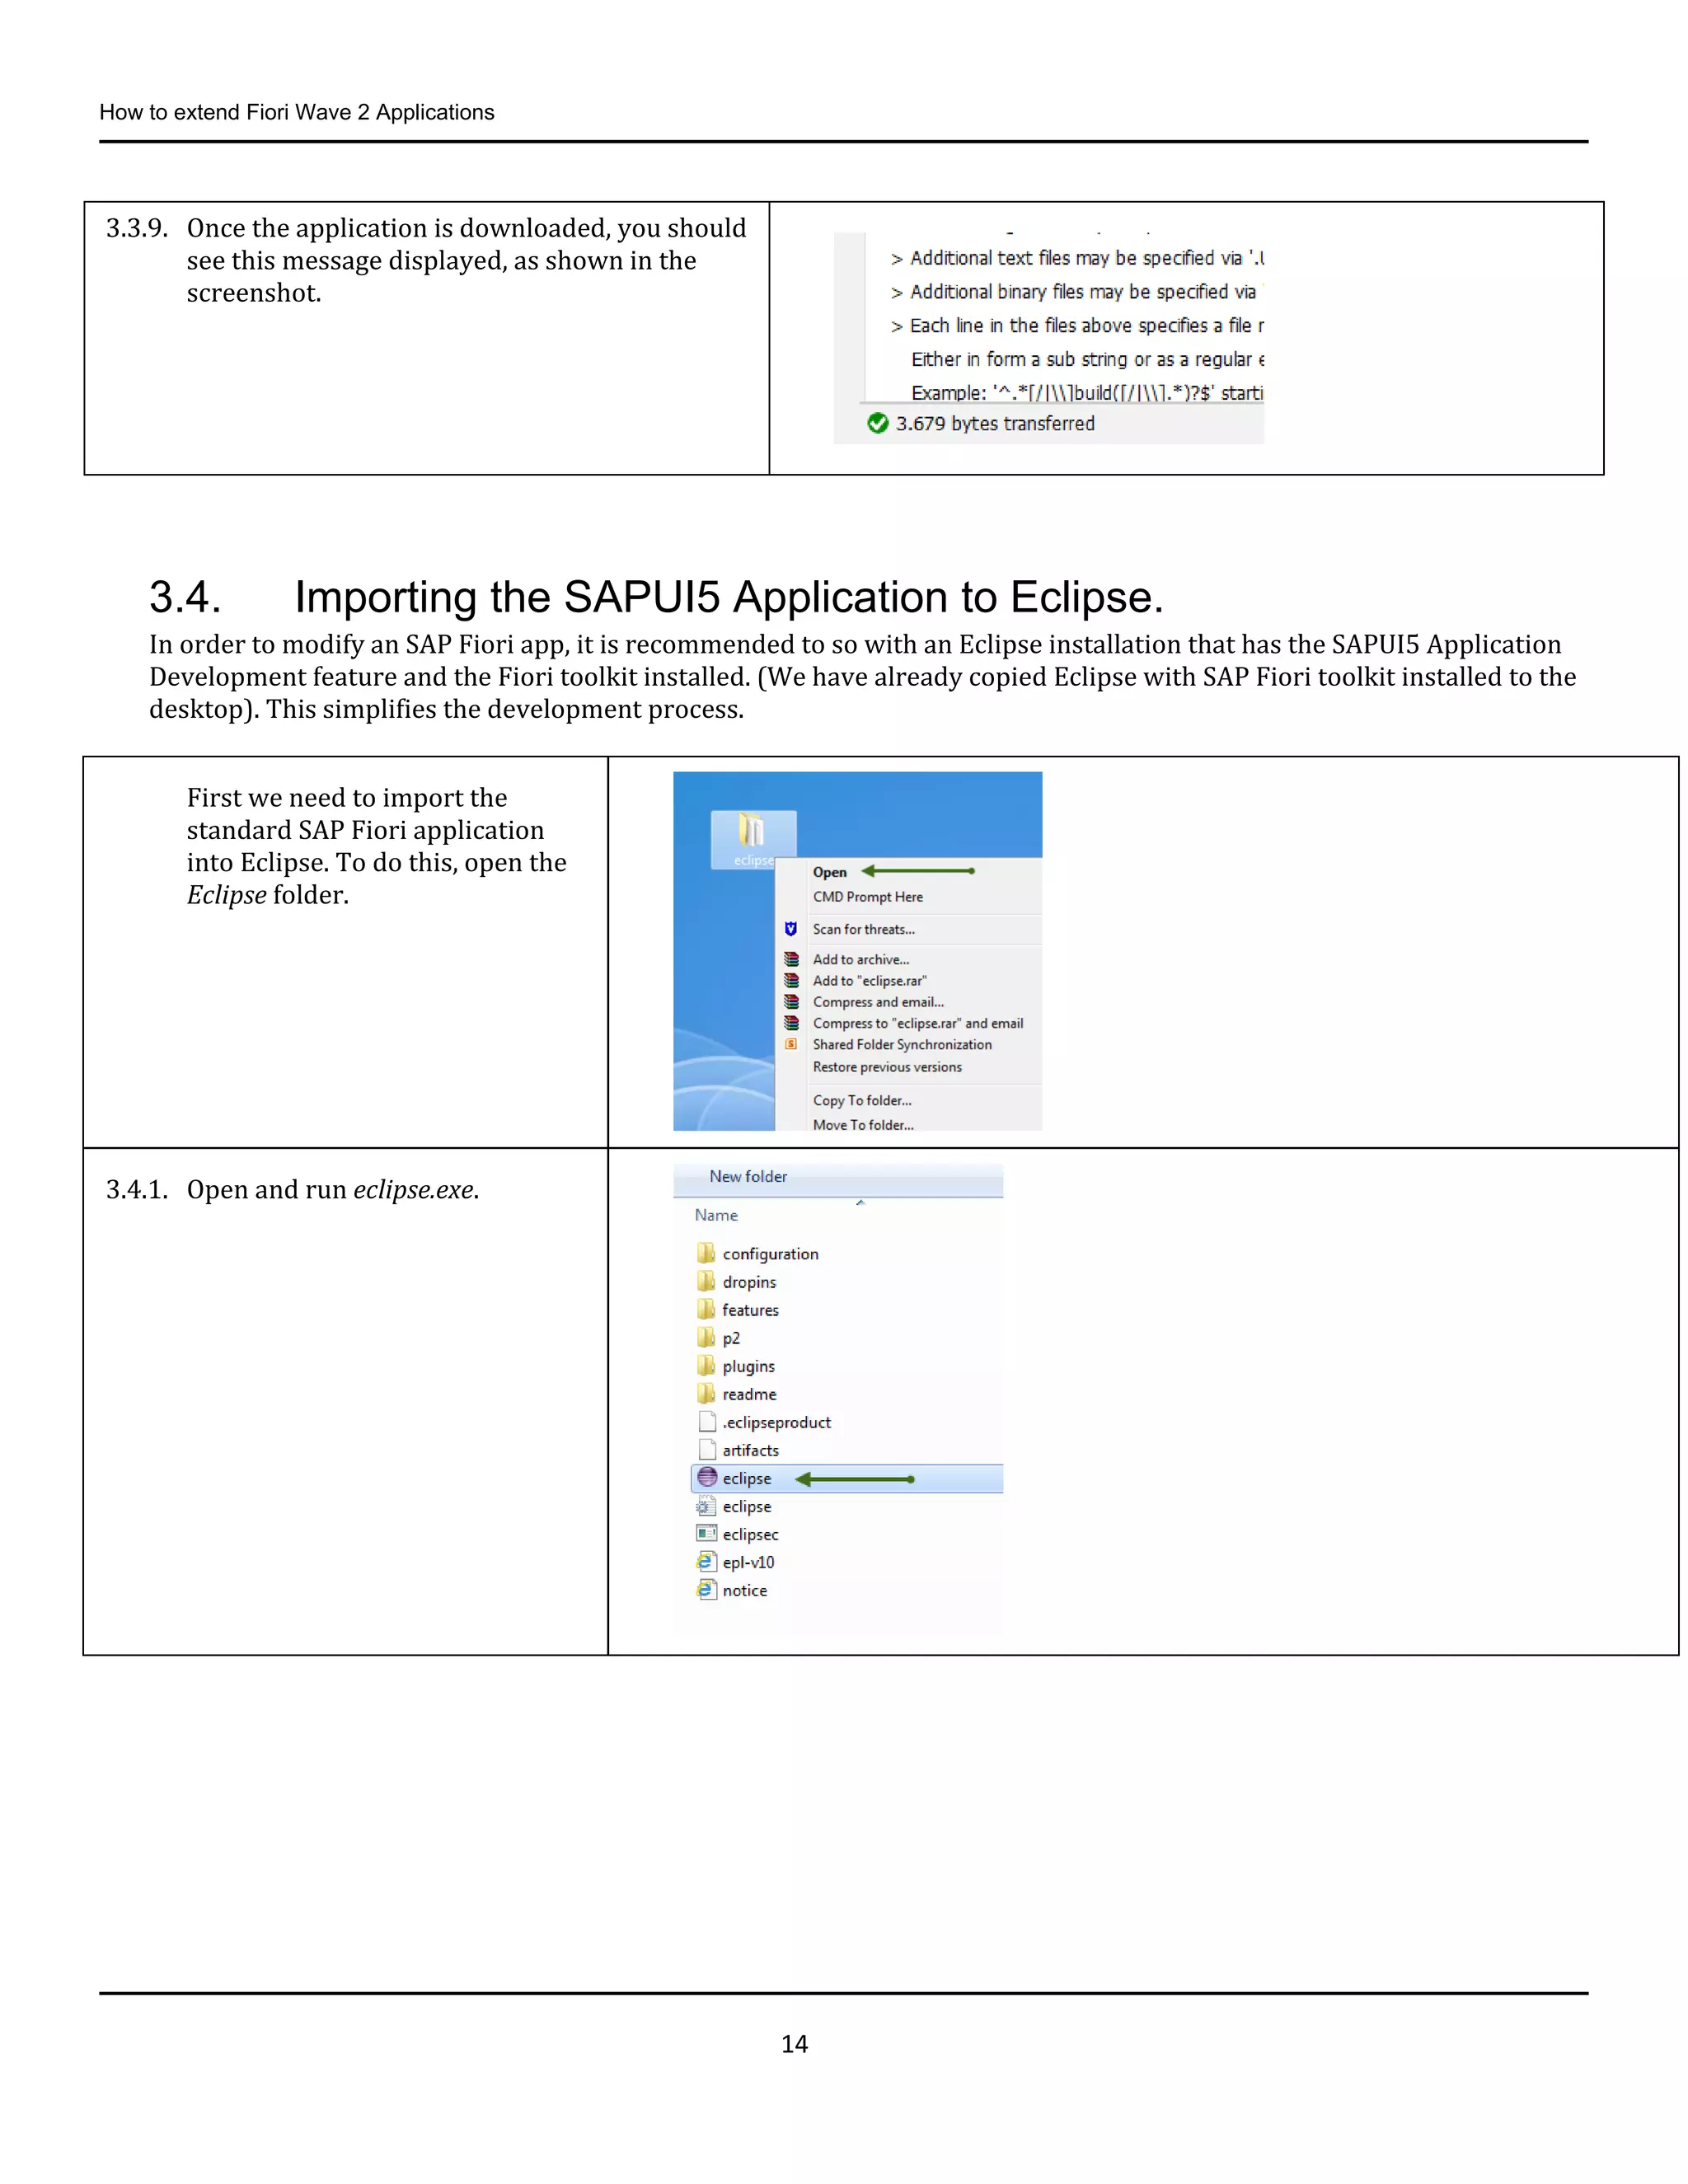
3.3.9. Once the application is downloaded, you should
see this message displayed, as shown in the
screenshot.
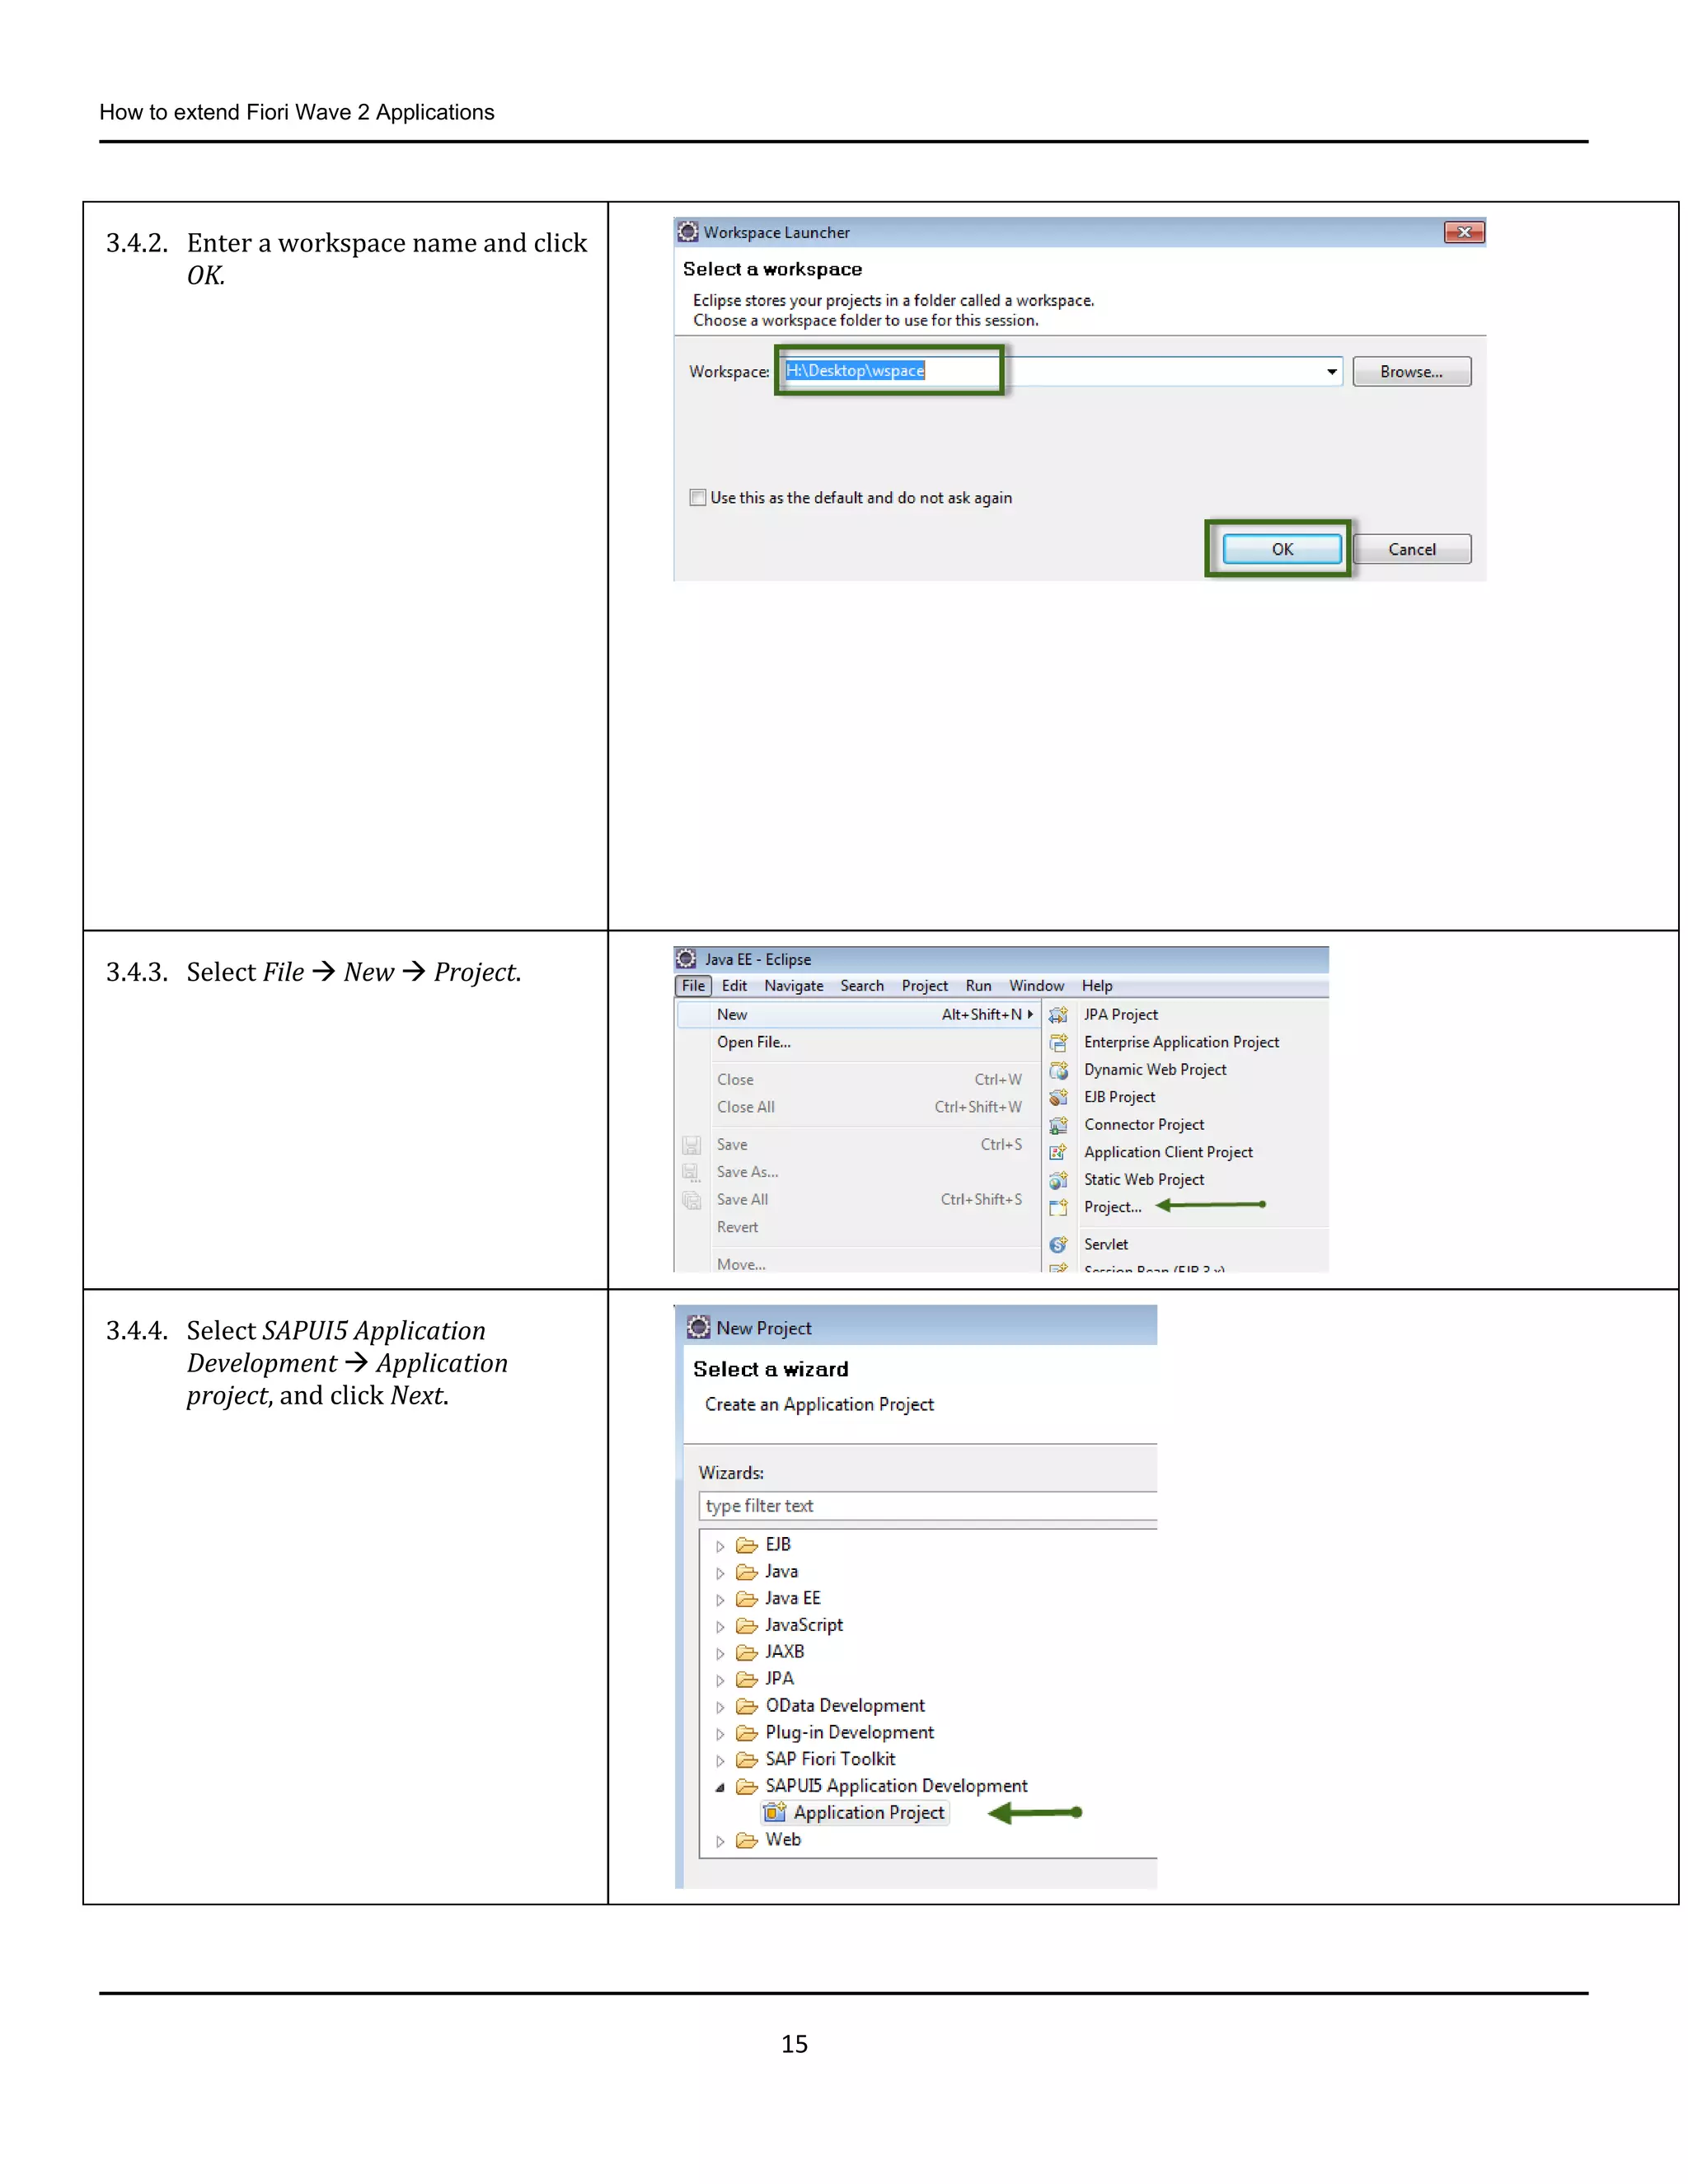
First we need to import the
standard SAP Fiori application
into Eclipse. To do this, open the
Eclipse folder.
3.4.1. Open and run eclipse.exe.
15.
How to extendFiori Wave 2 Applications
15
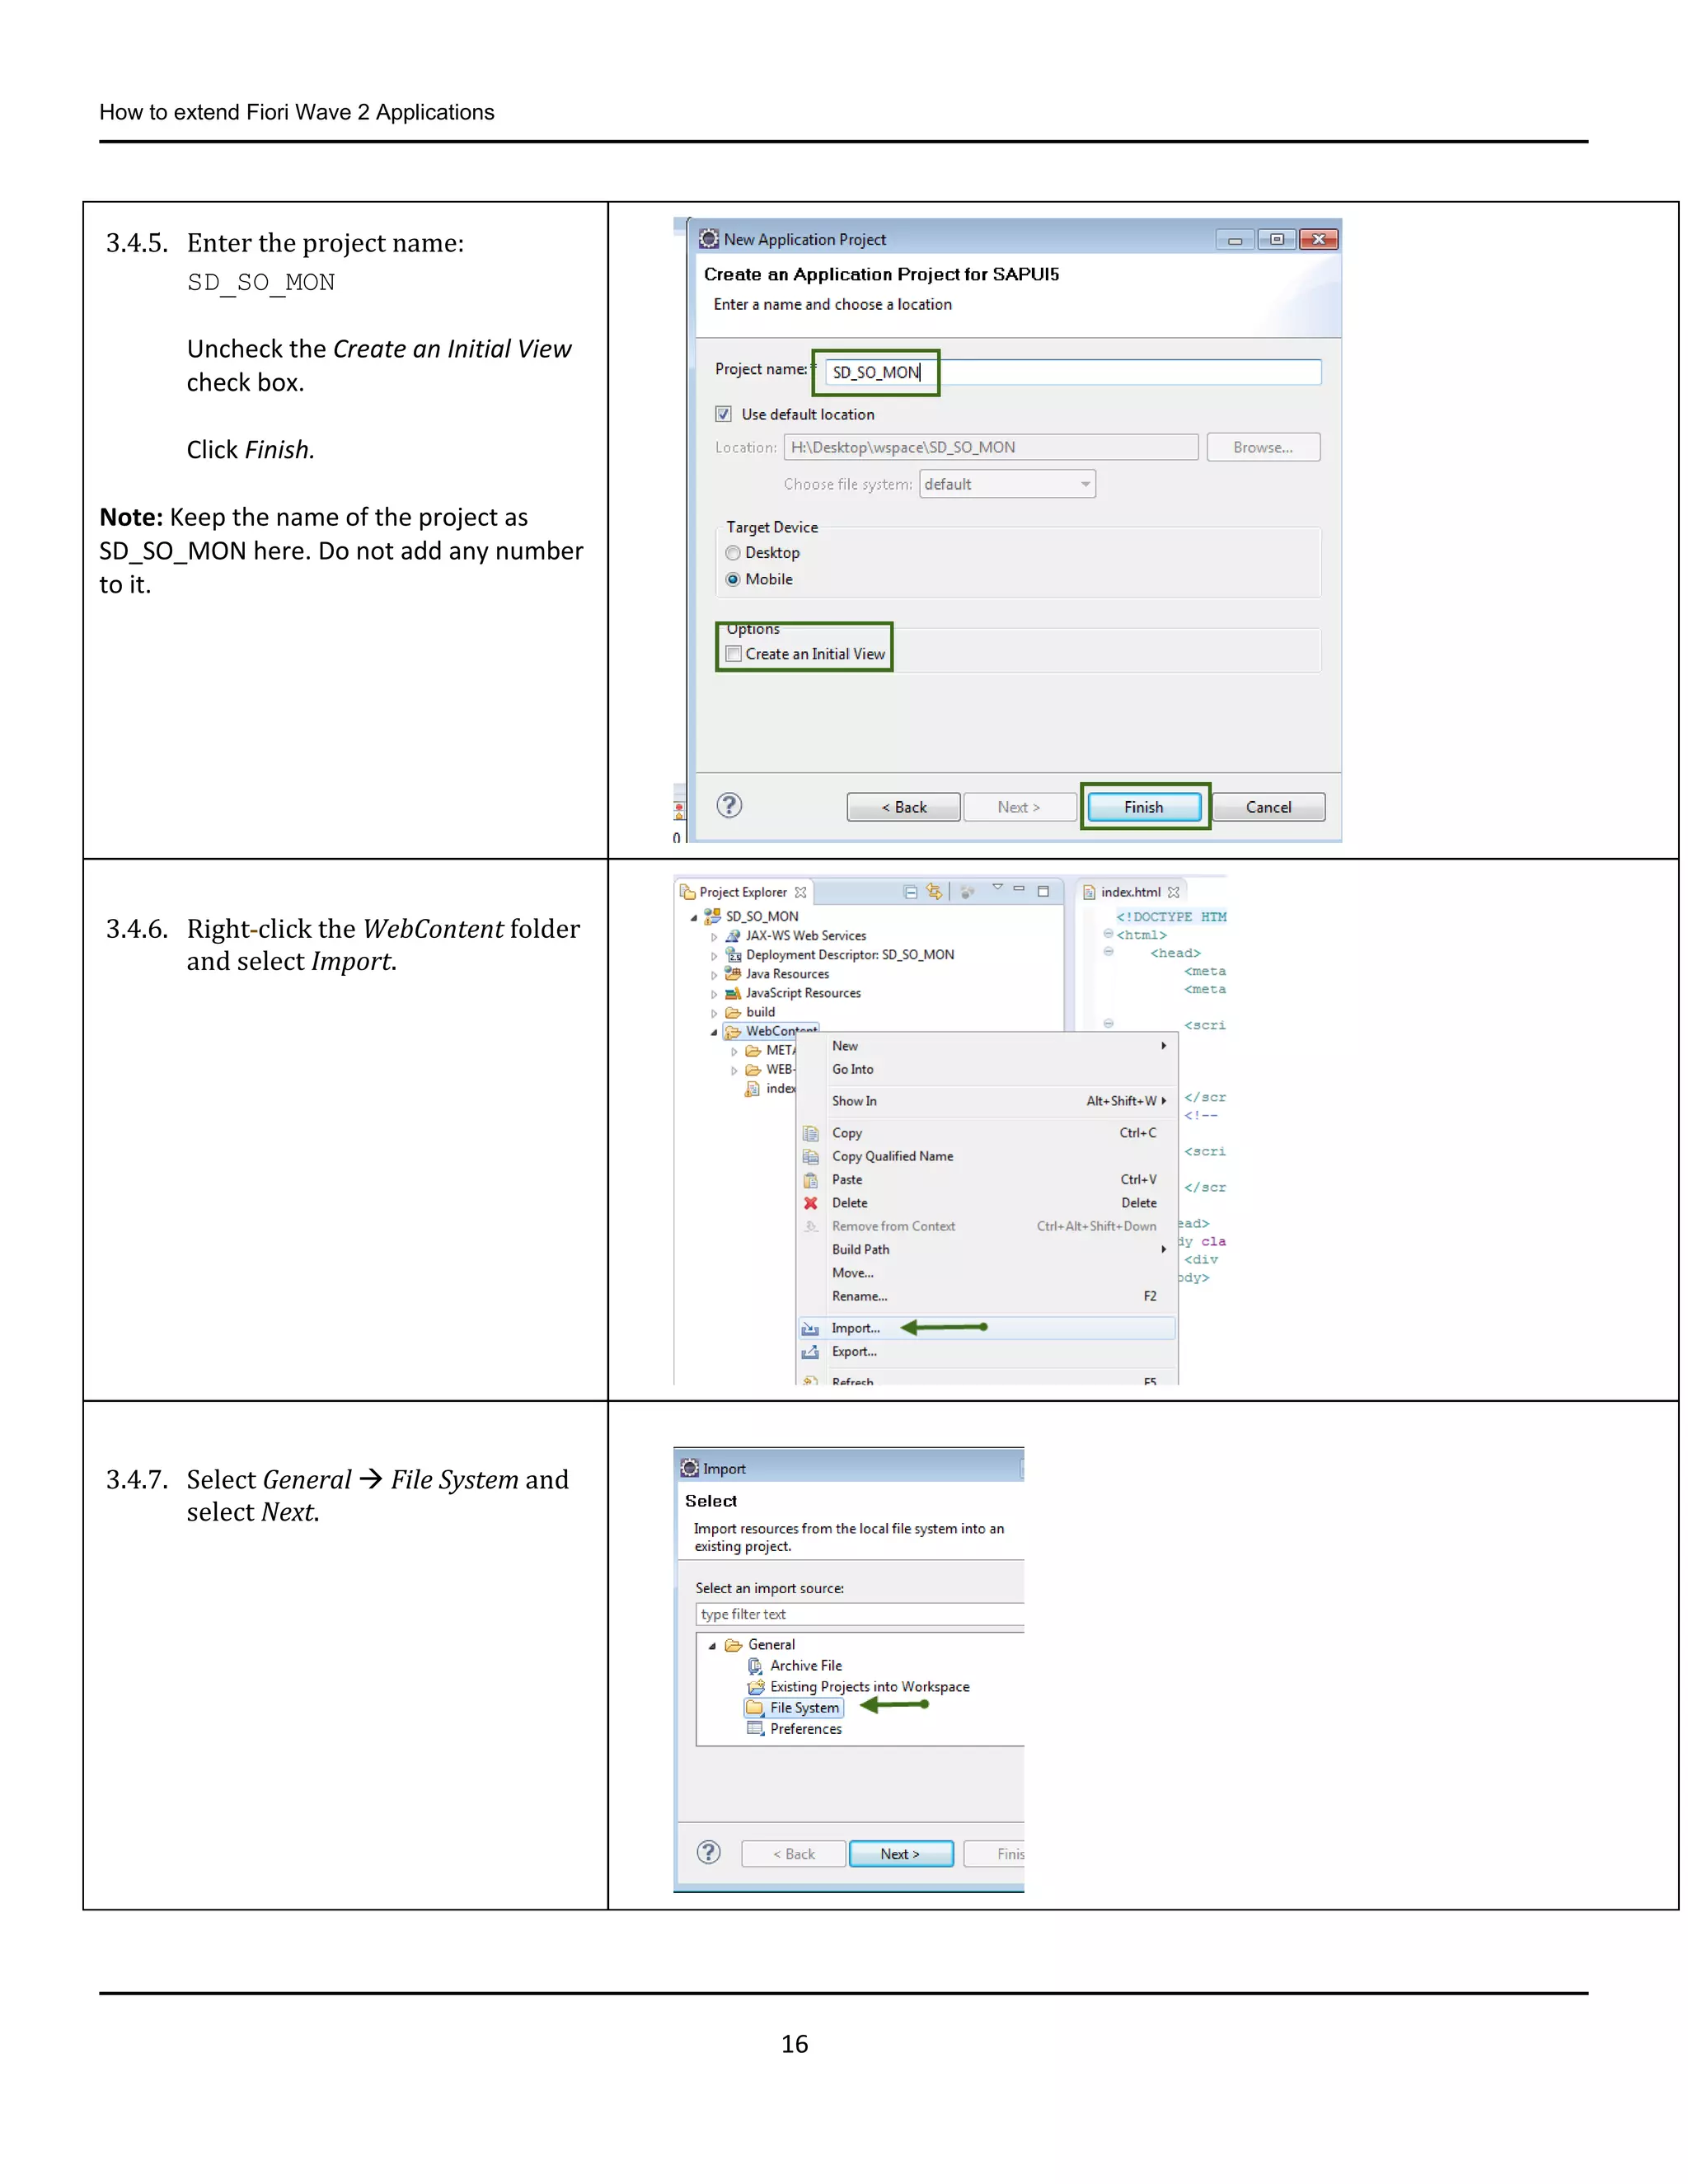
3.4.2. Enter a workspace name and click
OK.
3.4.3. Select File New Project.
3.4.4. Select SAPUI5 Application
Development Application
project, and click Next.
16.
How to extendFiori Wave 2 Applications
16
3.4.5. Enter the project name:
SD_SO_MON
Uncheck the Create an Initial View
check box.
Click Finish.
Note: Keep the name of the project as
SD_SO_MON here. Do not add any number
to it.
3.4.6. Right-click the WebContent folder
and select Import.
3.4.7. Select General File System and
select Next.
17.
How to extendFiori Wave 2 Applications
17
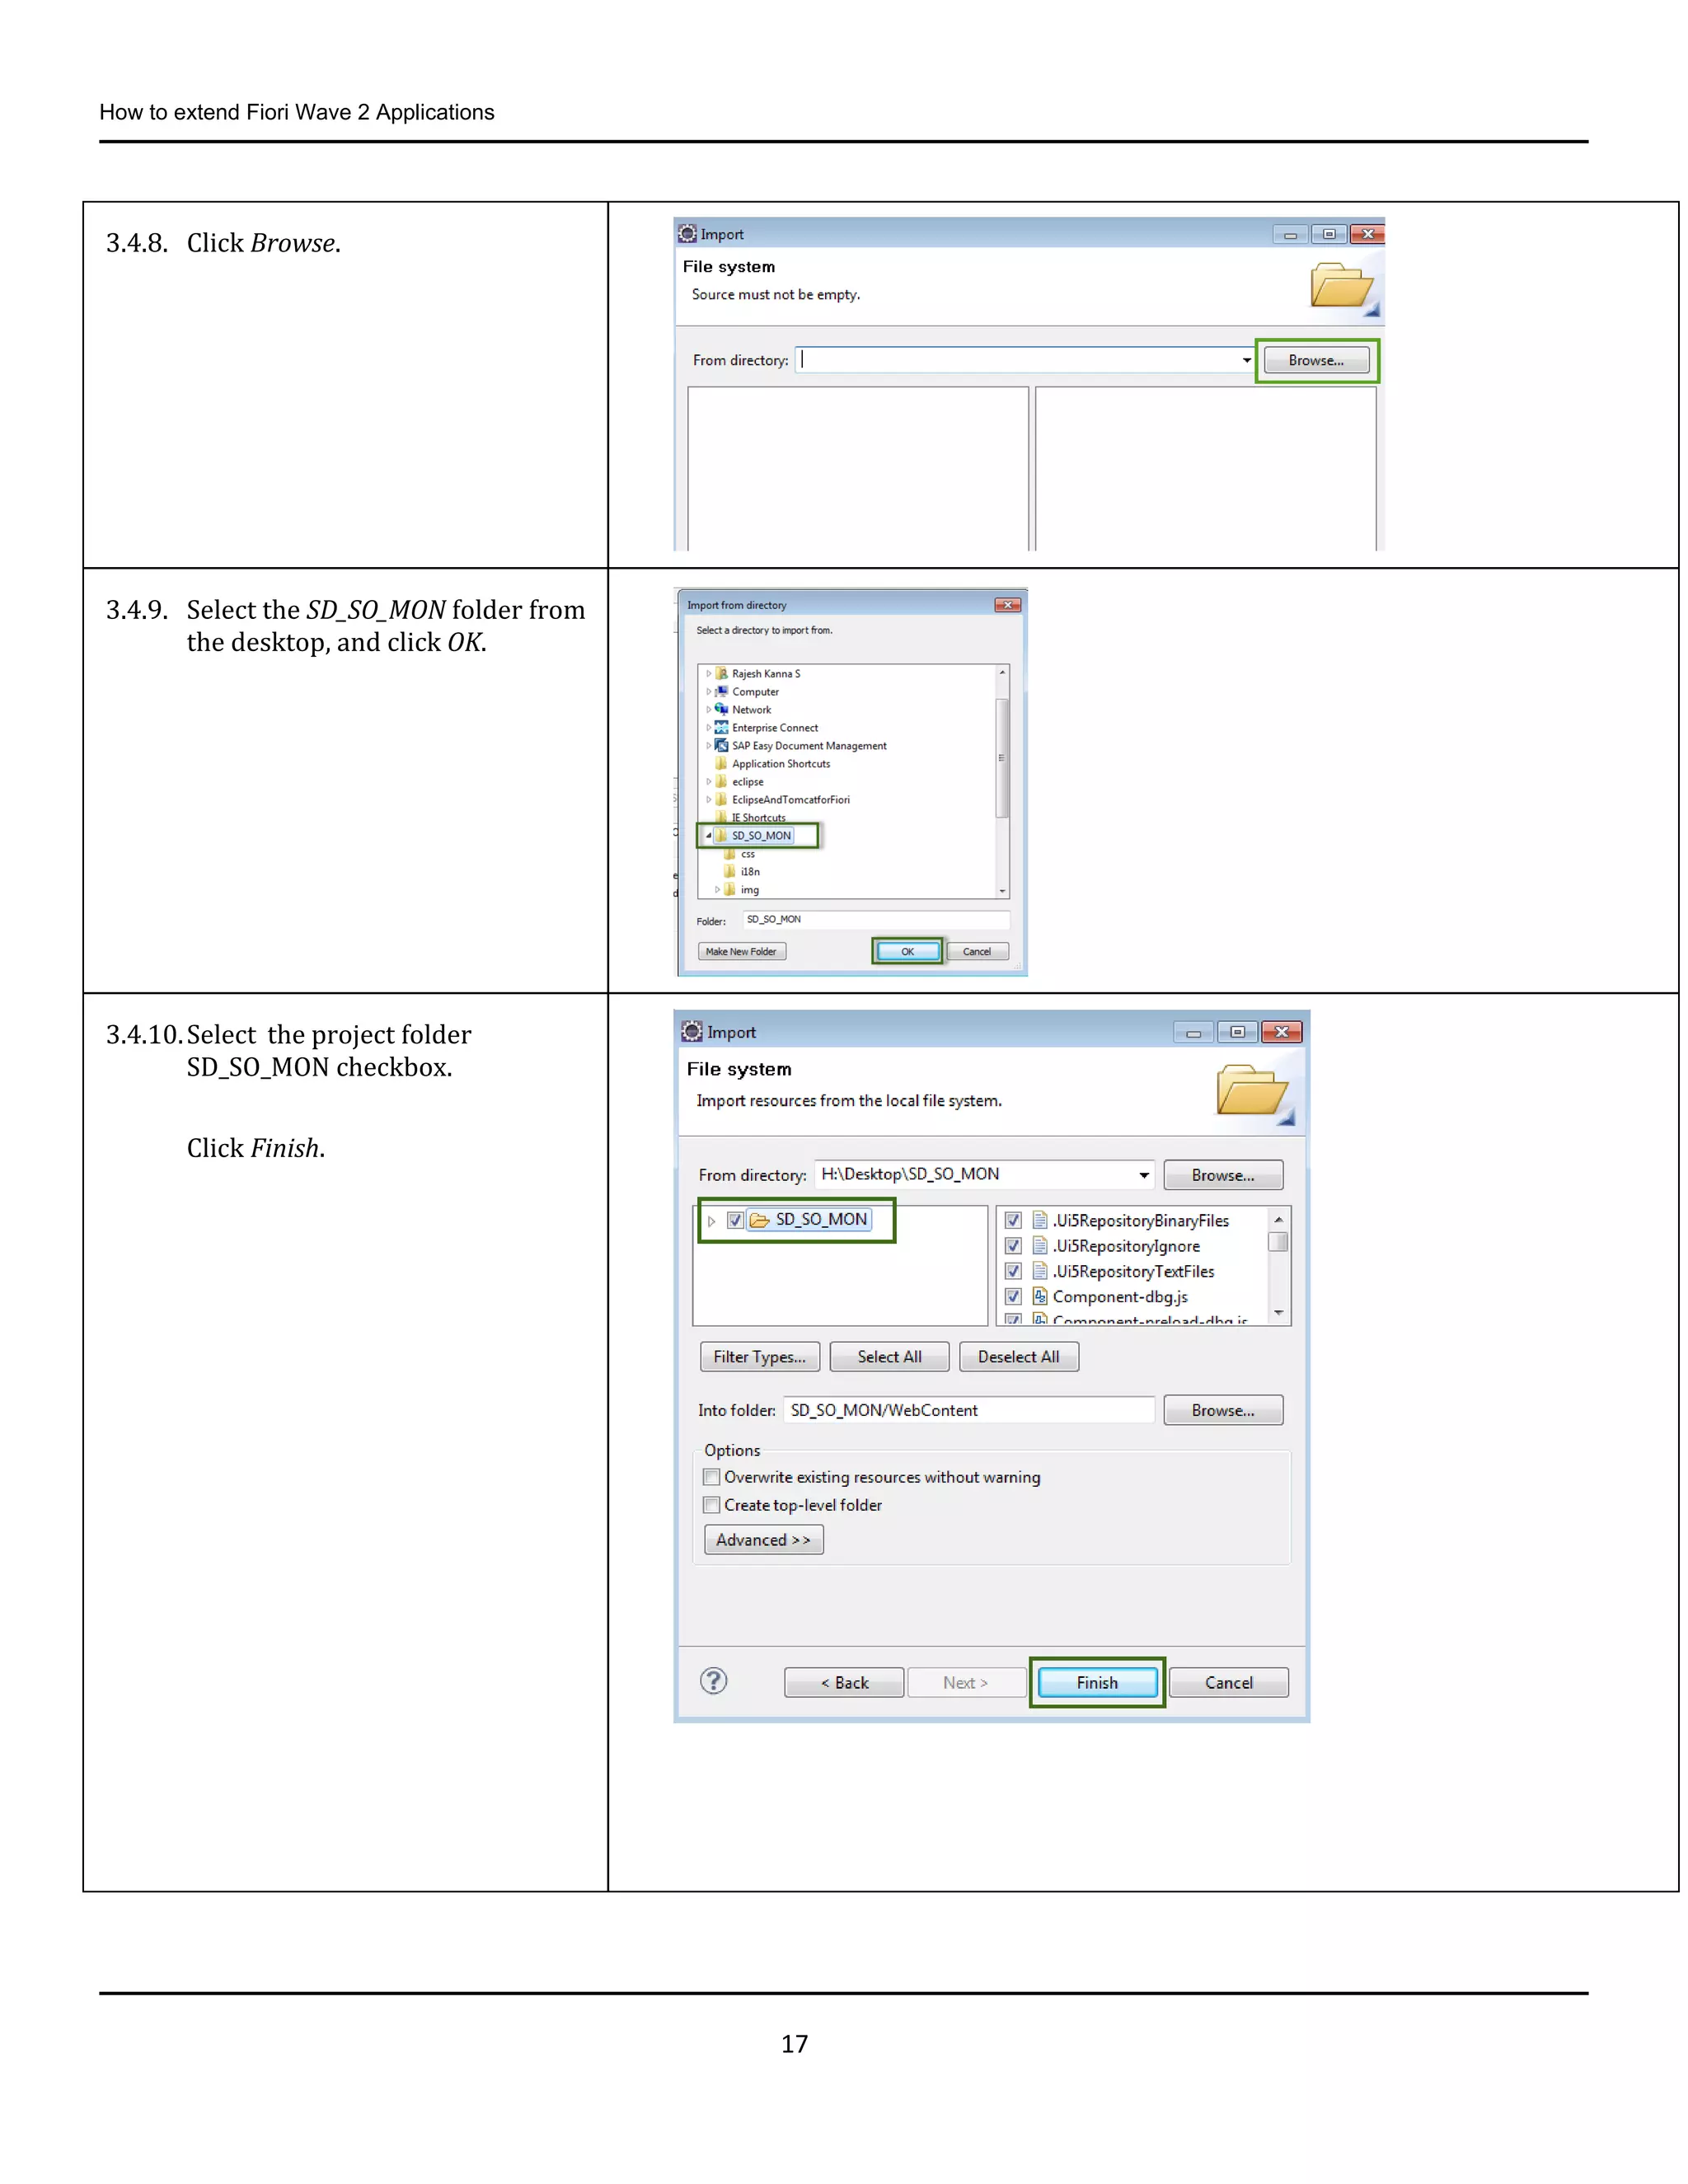
3.4.8. Click Browse.
3.4.9. Select the SD_SO_MON folder from
the desktop, and click OK.
3.4.10.Select the project folder
SD_SO_MON checkbox.
Click Finish.
18.
How to extendFiori Wave 2 Applications
18
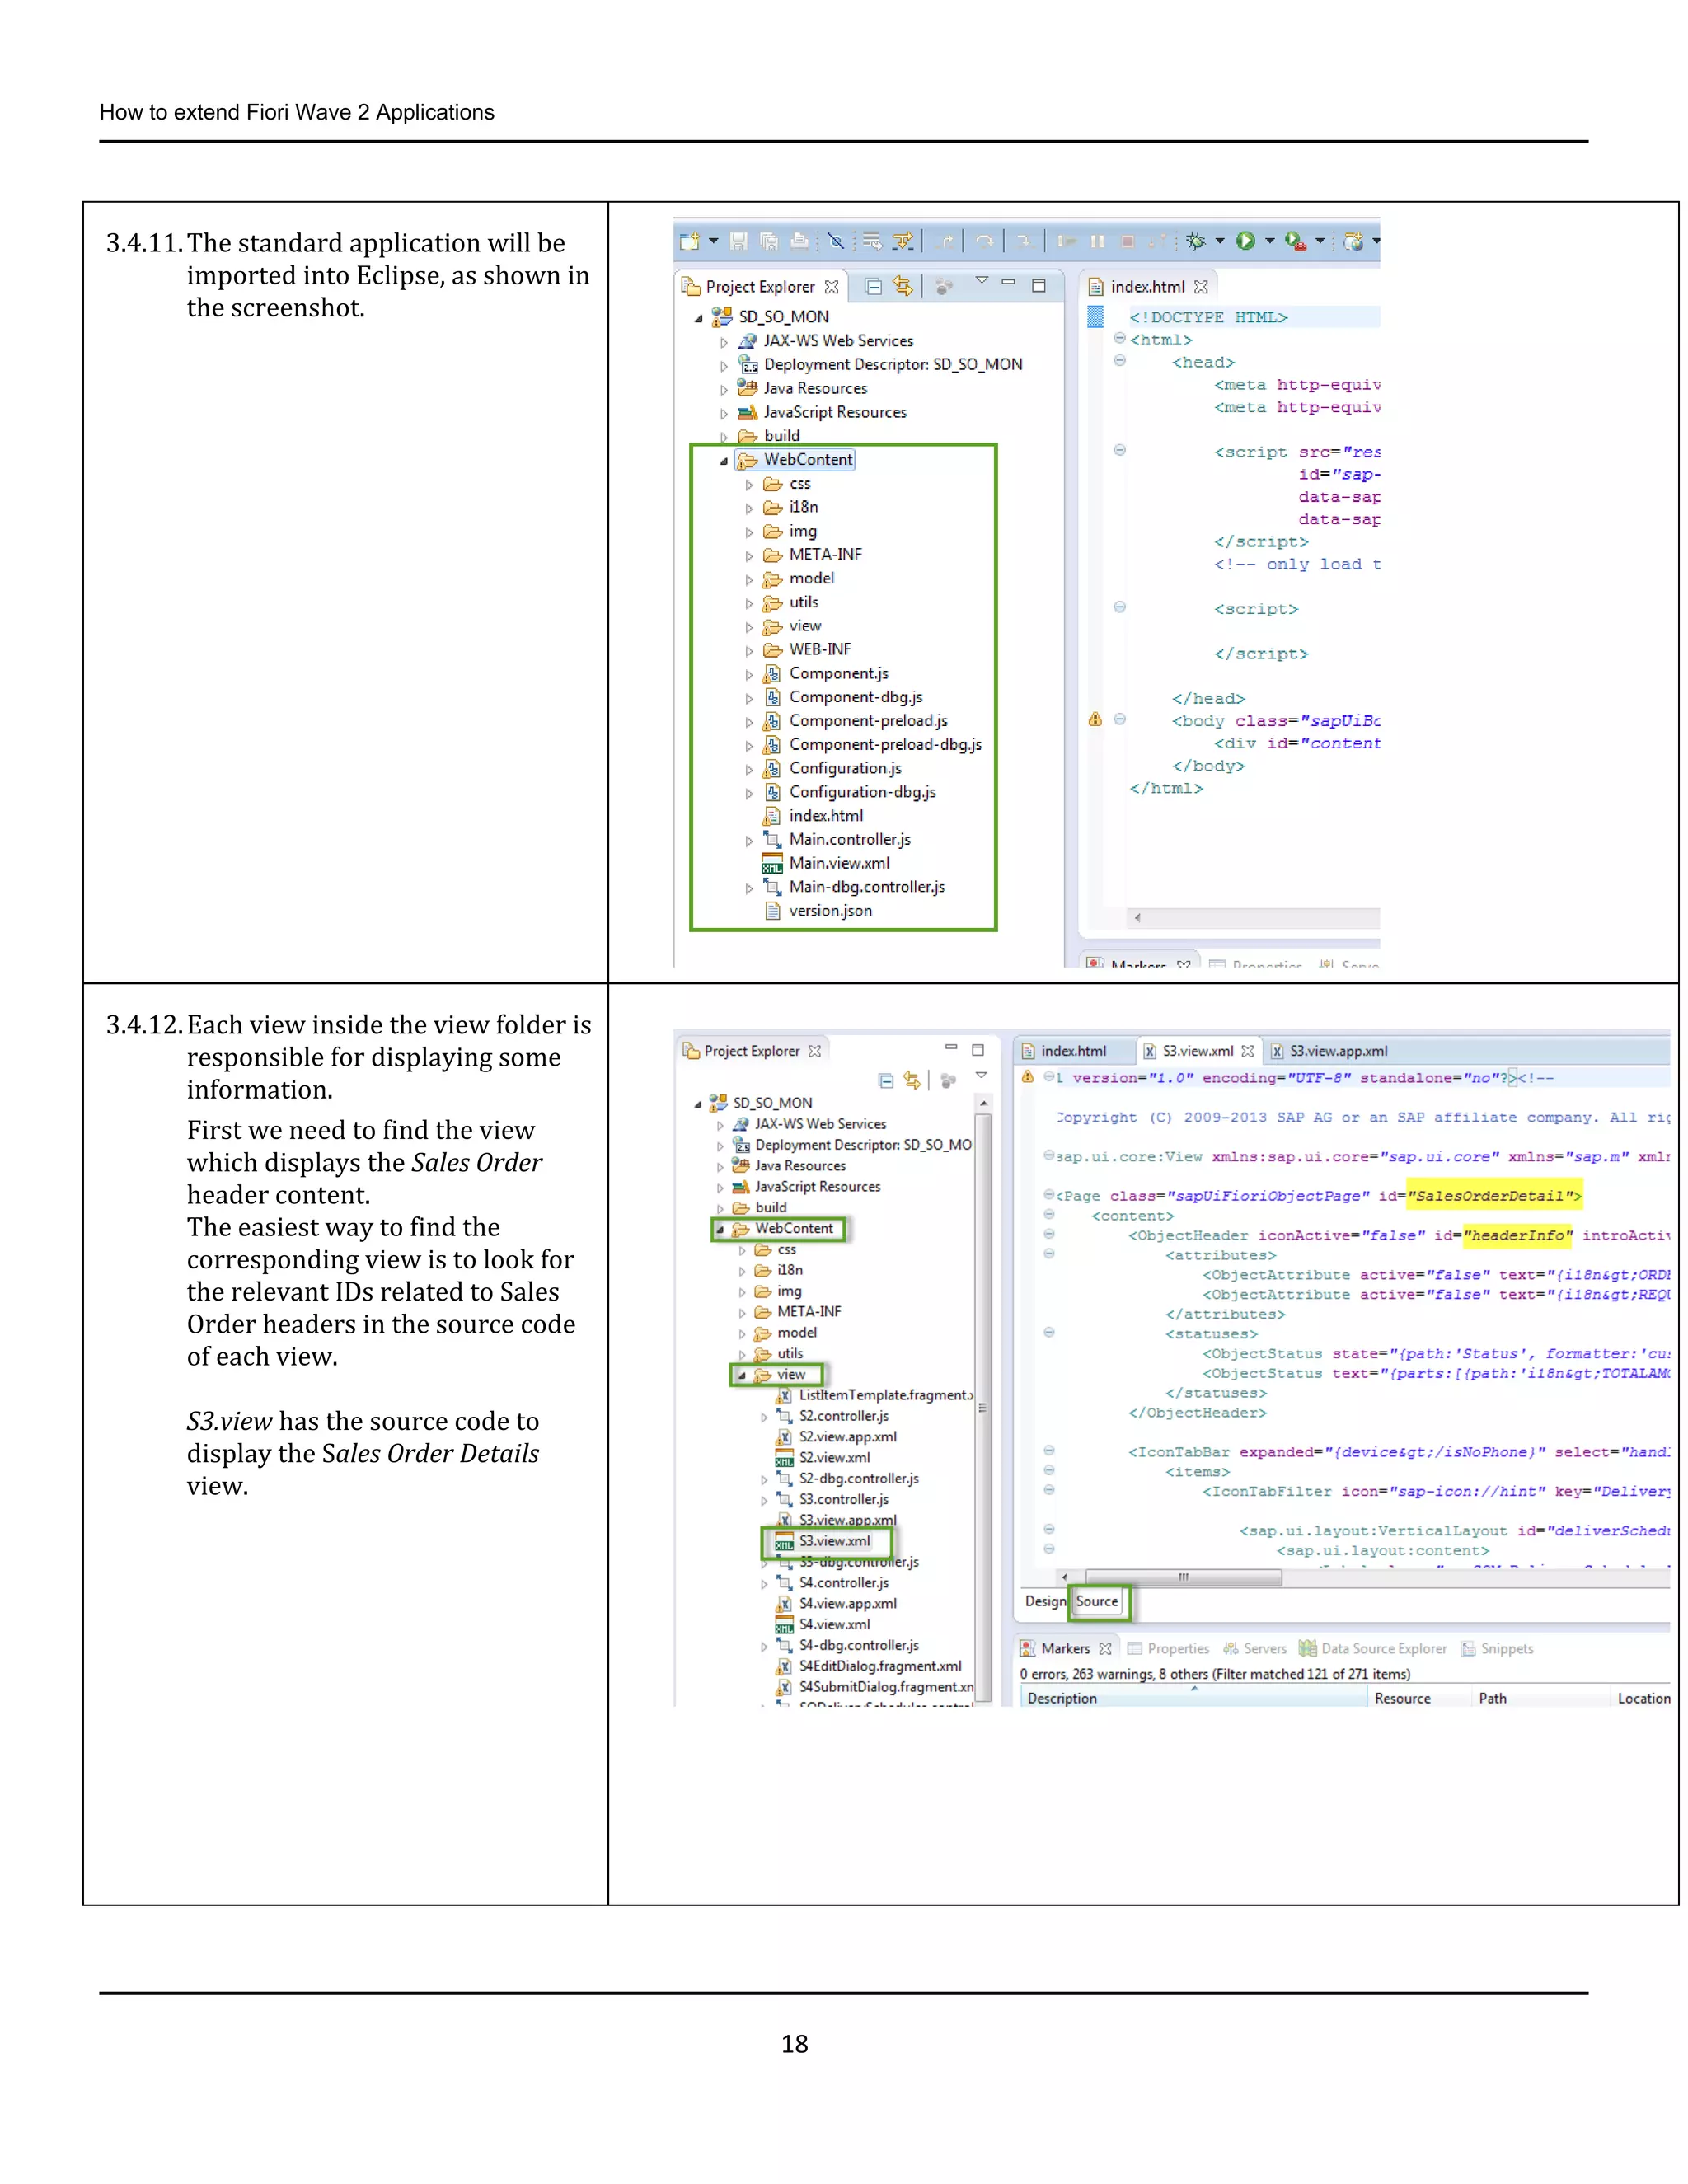
3.4.11.The standard application will be
imported into Eclipse, as shown in
the screenshot.
3.4.12.Each view inside the view folder is
responsible for displaying some
information.
First we need to find the view
which displays the Sales Order
header content.
The easiest way to find the
corresponding view is to look for
the relevant IDs related to Sales
Order headers in the source code
of each view.
S3.view has the source code to
display the Sales Order Details
view.
19.
How to extendFiori Wave 2 Applications
19
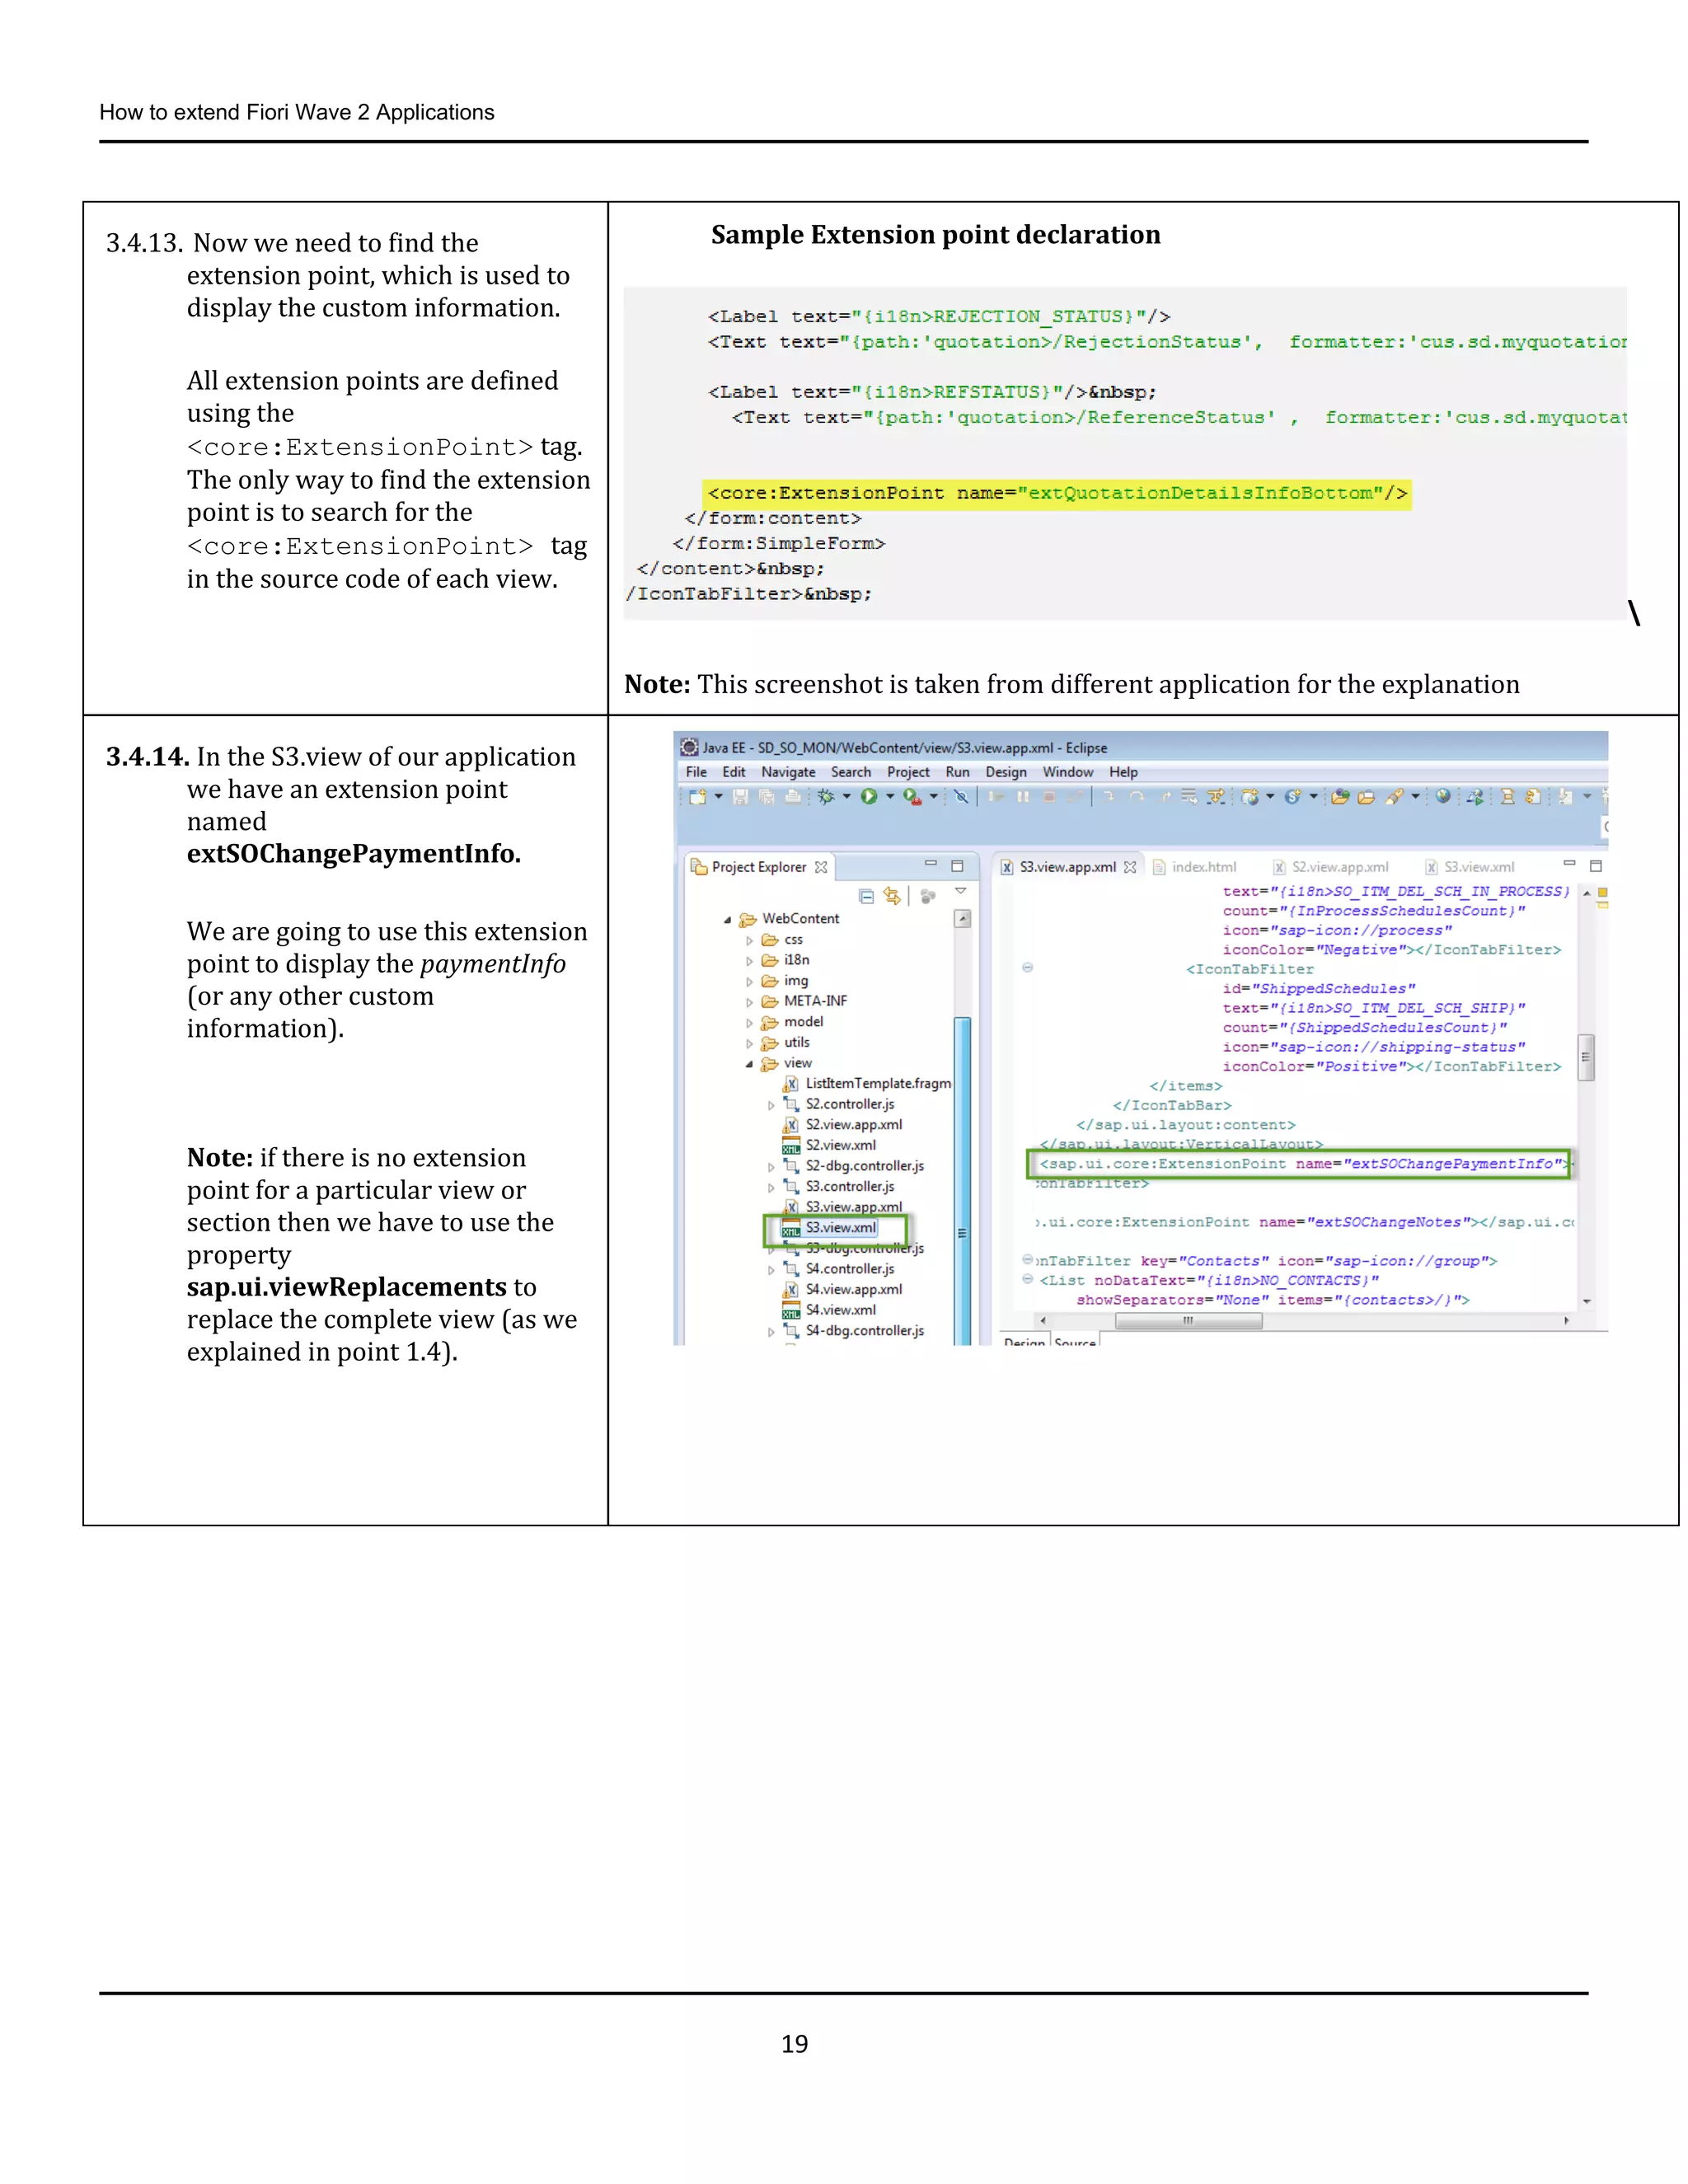
3.4.13. Now we need to find the
extension point, which is used to
display the custom information.
All extension points are defined
using the
<core:ExtensionPoint> tag.
The only way to find the extension
point is to search for the
<core:ExtensionPoint> tag
in the source code of each view.
Sample Extension point declaration
Note: This screenshot is taken from different application for the explanation
3.4.14. In the S3.view of our application
we have an extension point
named
extSOChangePaymentInfo.
We are going to use this extension
point to display the paymentInfo
(or any other custom
information).
Note: if there is no extension
point for a particular view or
section then we have to use the
property
sap.ui.viewReplacements to
replace the complete view (as we
explained in point 1.4).
20.
How to extendFiori Wave 2 Applications
20
3.5. Deciding the Application Name
From now we are going to create new objects. First, think of two digit numbers as - mentioned in point 2.3.2 - which you
are going to append to your objects.
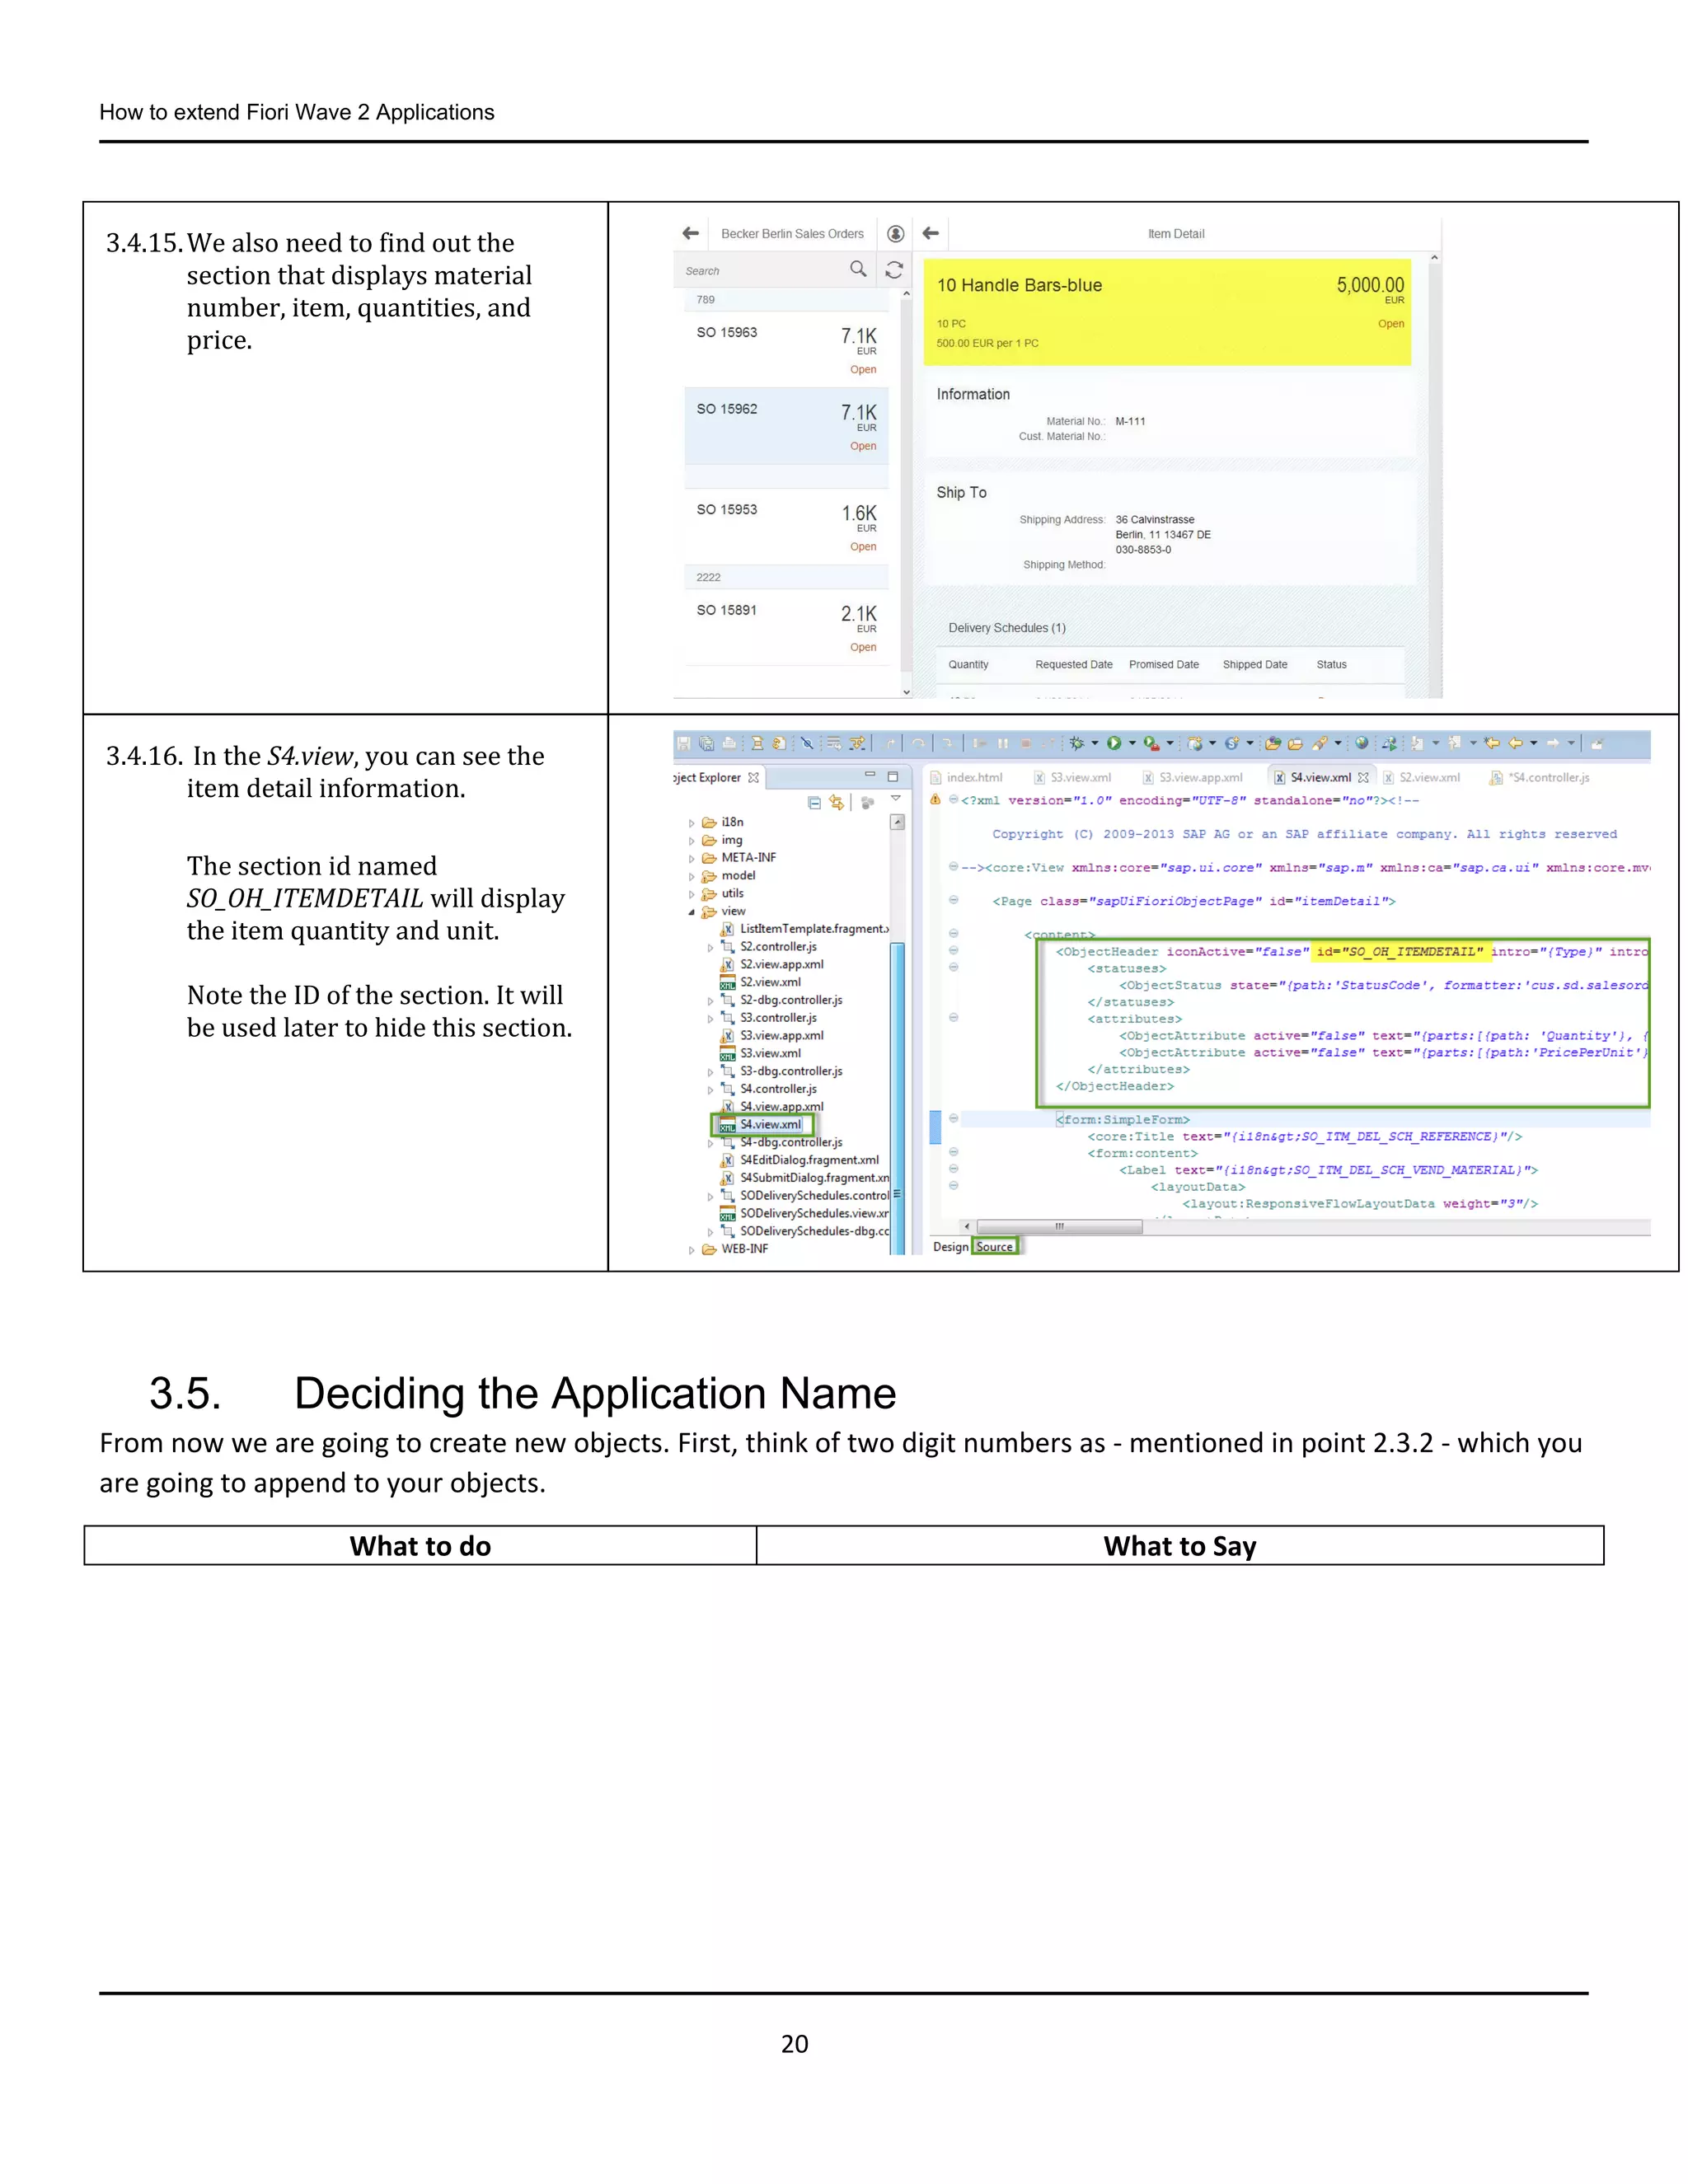
3.4.15.We also need to find out the
section that displays material
number, item, quantities, and
price.
3.4.16. In the S4.view, you can see the
item detail information.
The section id named
SO_OH_ITEMDETAIL will display
the item quantity and unit.
Note the ID of the section. It will
be used later to hide this section.
What to do What to Say
21.
How to extendFiori Wave 2 Applications
21
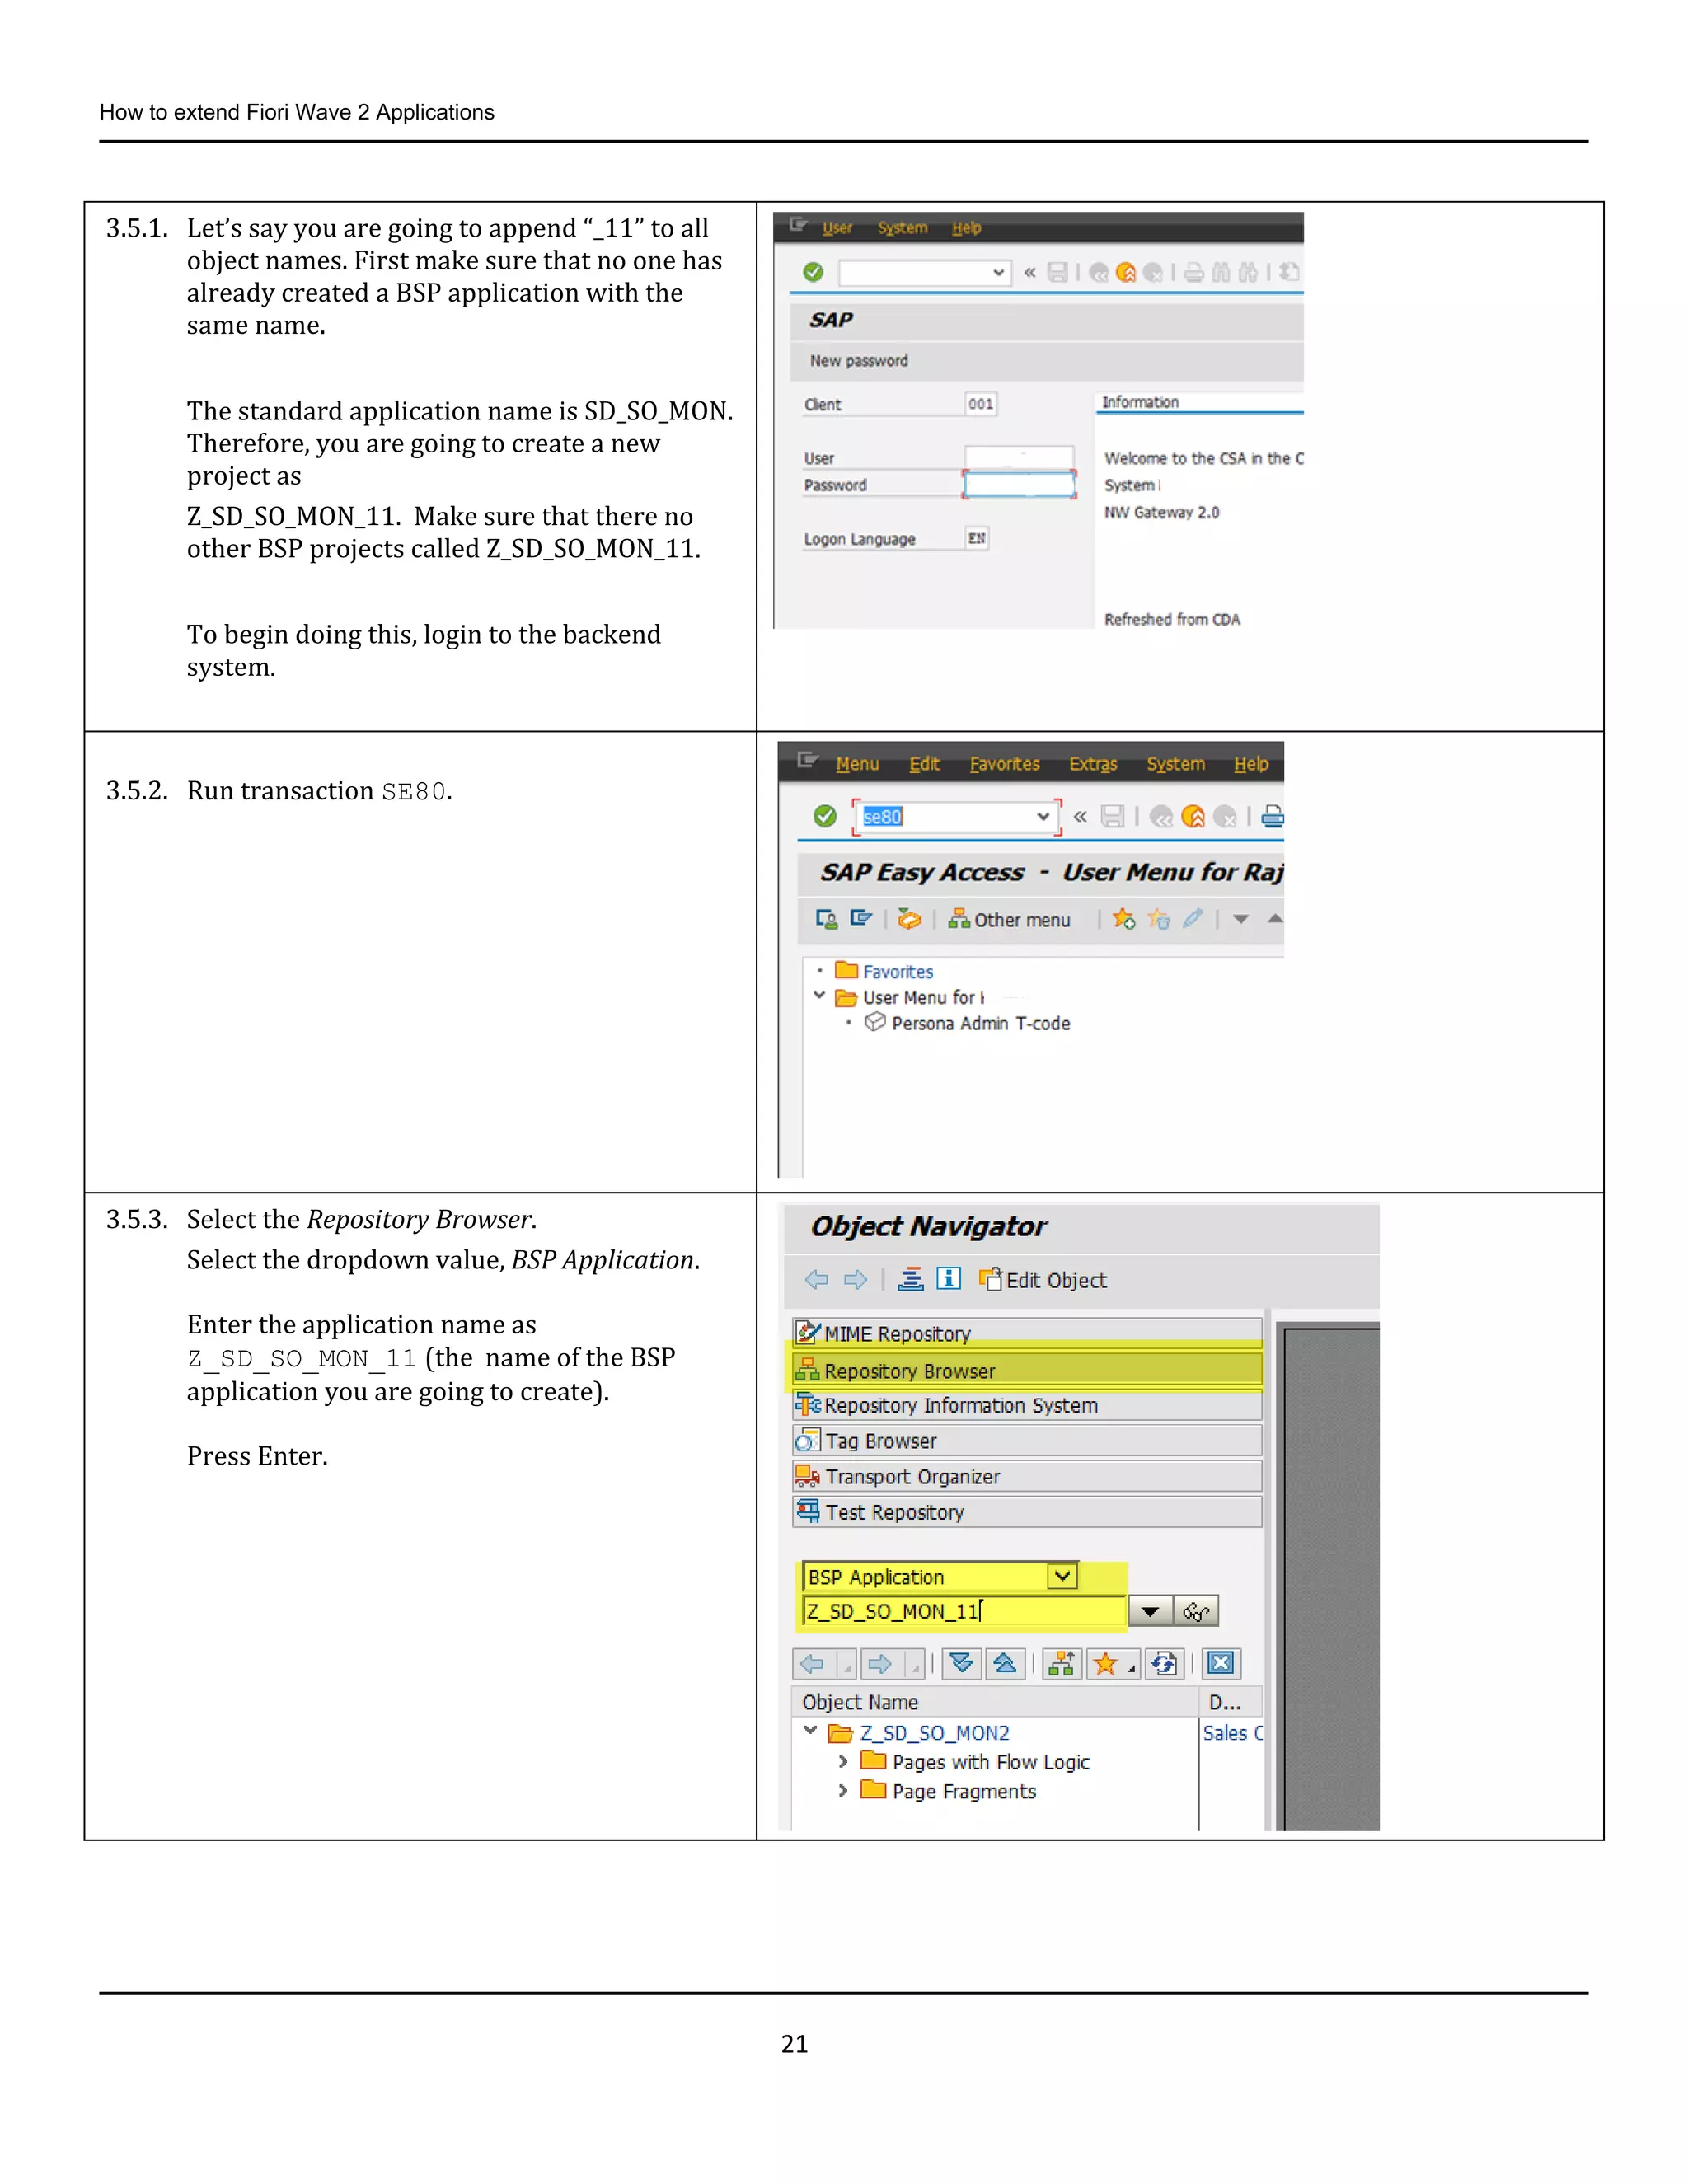
3.5.1. Let’s say you are going to append “_11” to all
object names. First make sure that no one has
already created a BSP application with the
same name.
The standard application name is SD_SO_MON.
Therefore, you are going to create a new
project as
Z_SD_SO_MON_11. Make sure that there no
other BSP projects called Z_SD_SO_MON_11.
To begin doing this, login to the backend
system.
3.5.2. Run transaction SE80.
3.5.3. Select the Repository Browser.
Select the dropdown value, BSP Application.
Enter the application name as
Z_SD_SO_MON_11 (the name of the BSP
application you are going to create).
Press Enter.
22.
How to extendFiori Wave 2 Applications
22
3.6. Gateway Extensibility
If we are using existing fields in the standard Gateway service, then we do not need to extend it. But if we need more
information than the standard Gateway service provides, then we do need to extend it.
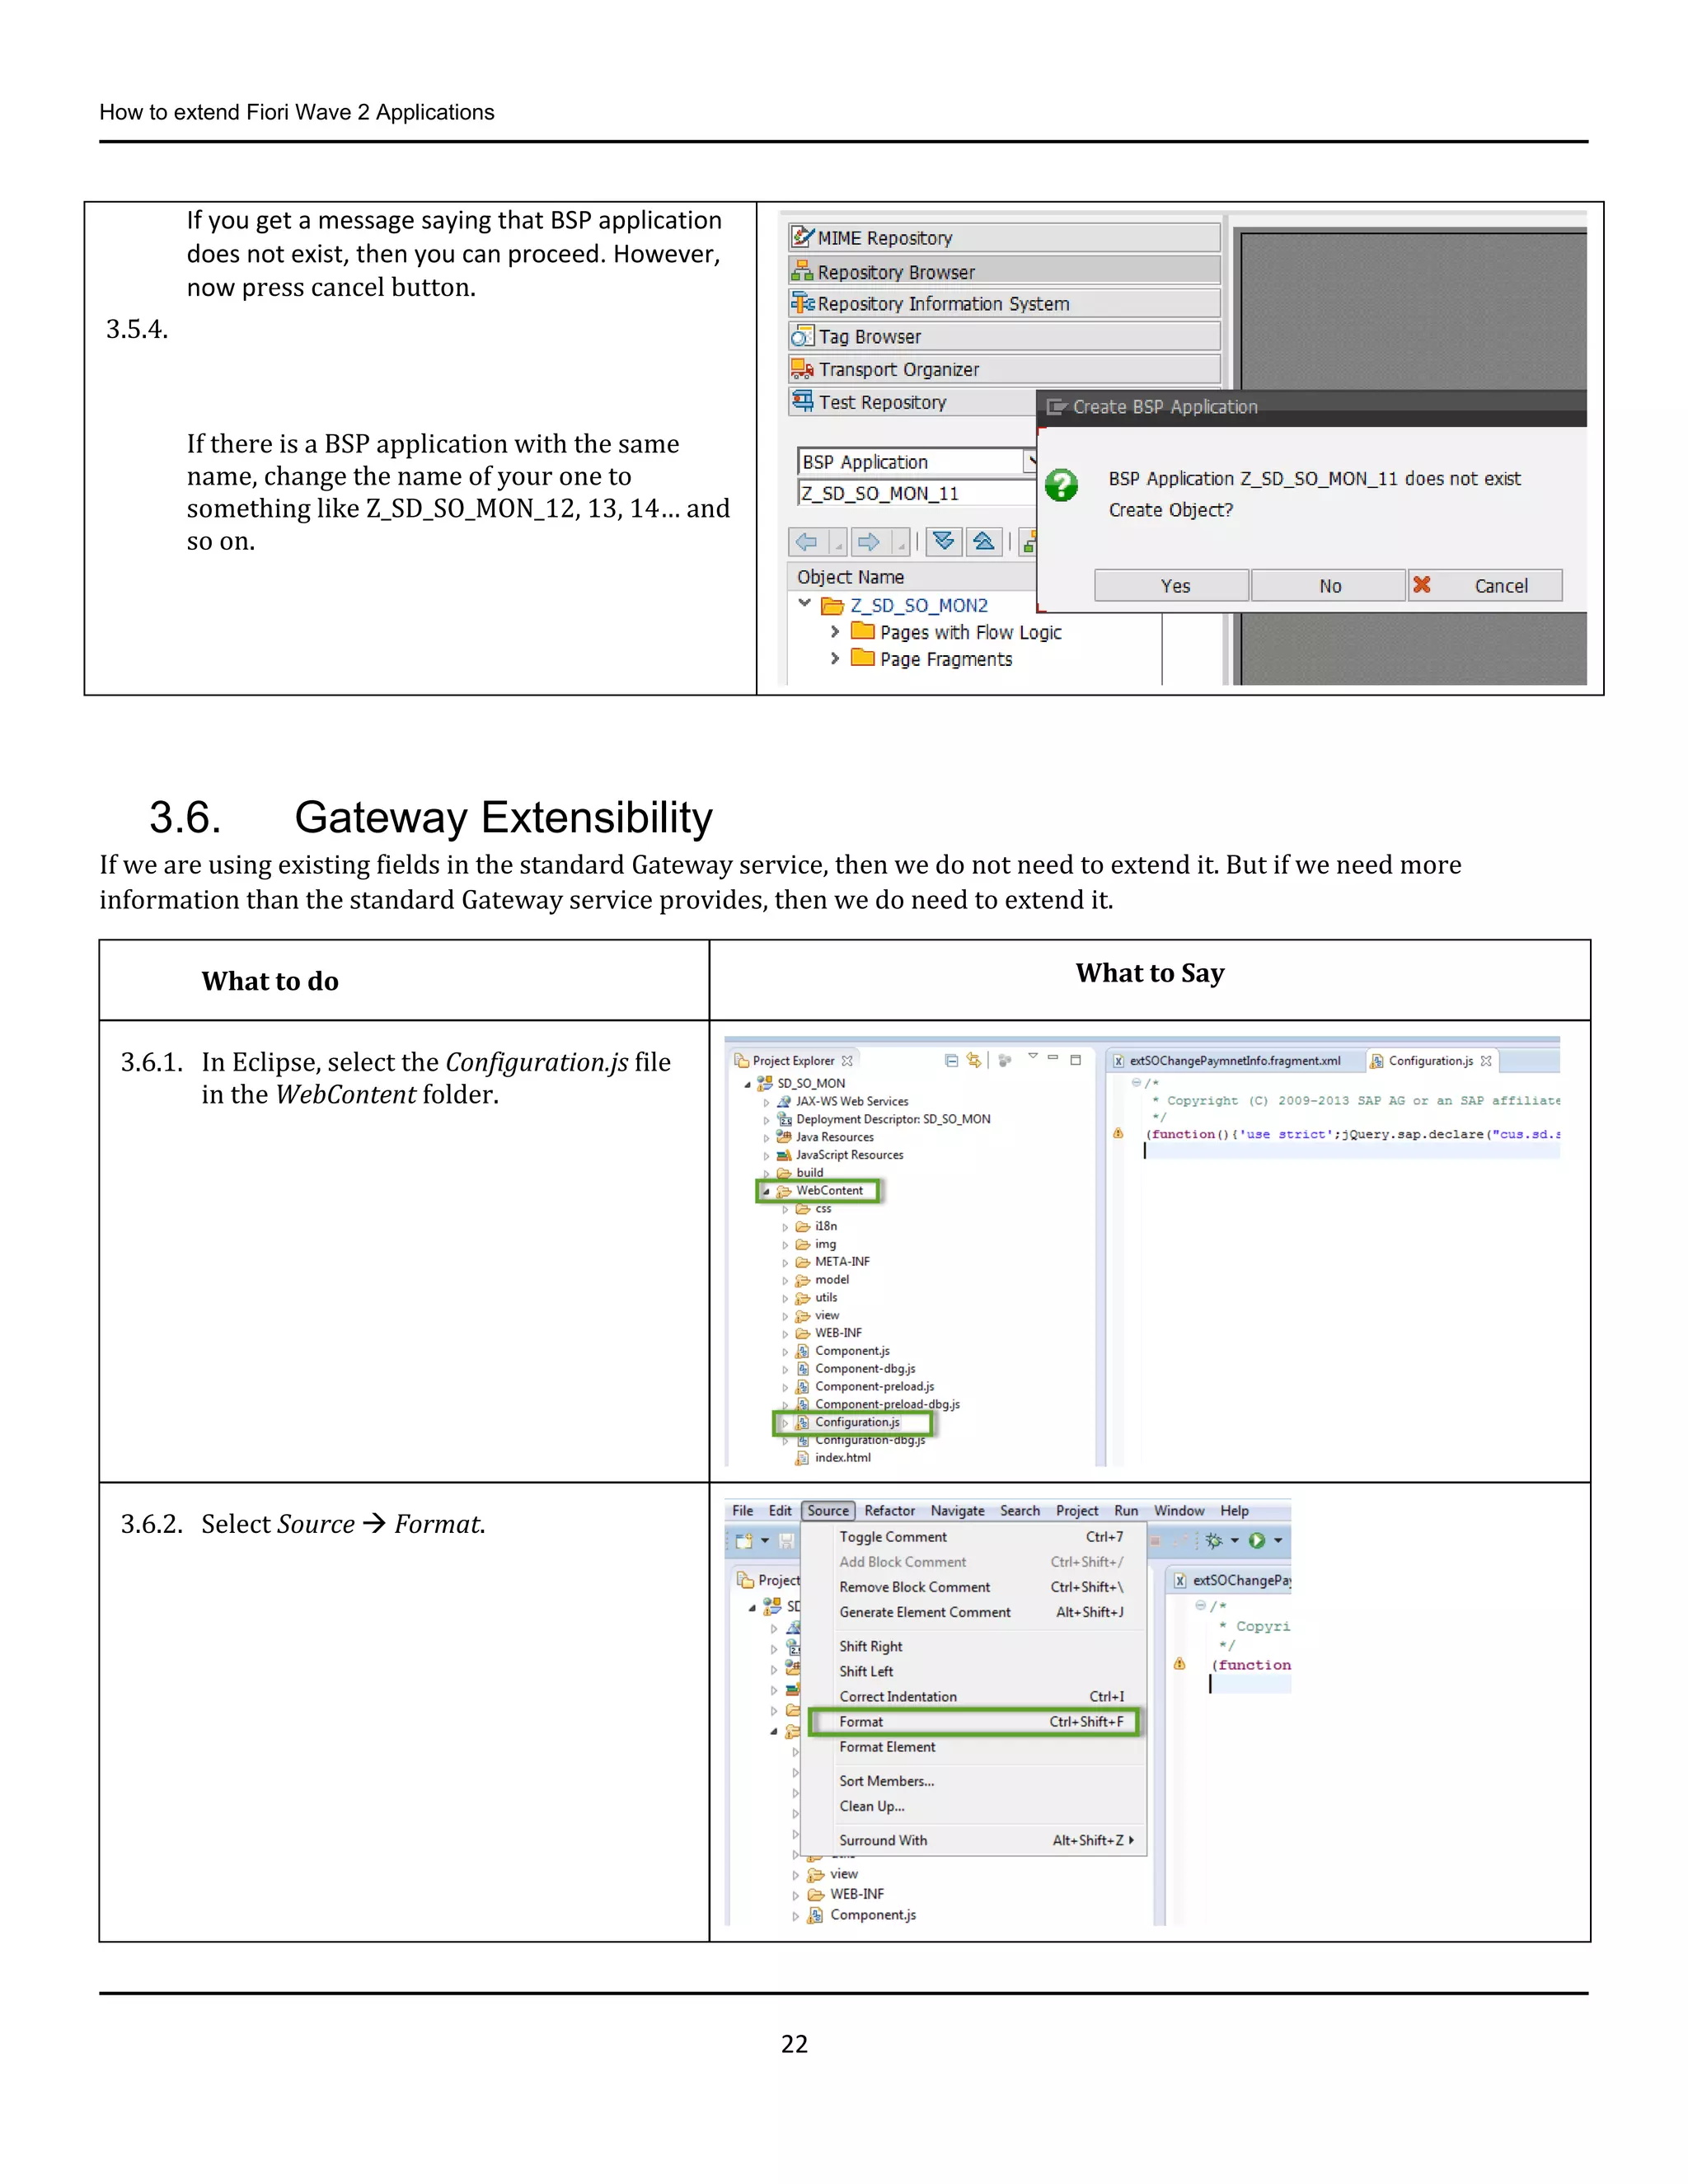
If you get a message saying that BSP application
does not exist, then you can proceed. However,
now press cancel button.
3.5.4.
If there is a BSP application with the same
name, change the name of your one to
something like Z_SD_SO_MON_12, 13, 14… and
so on.
What to do What to Say
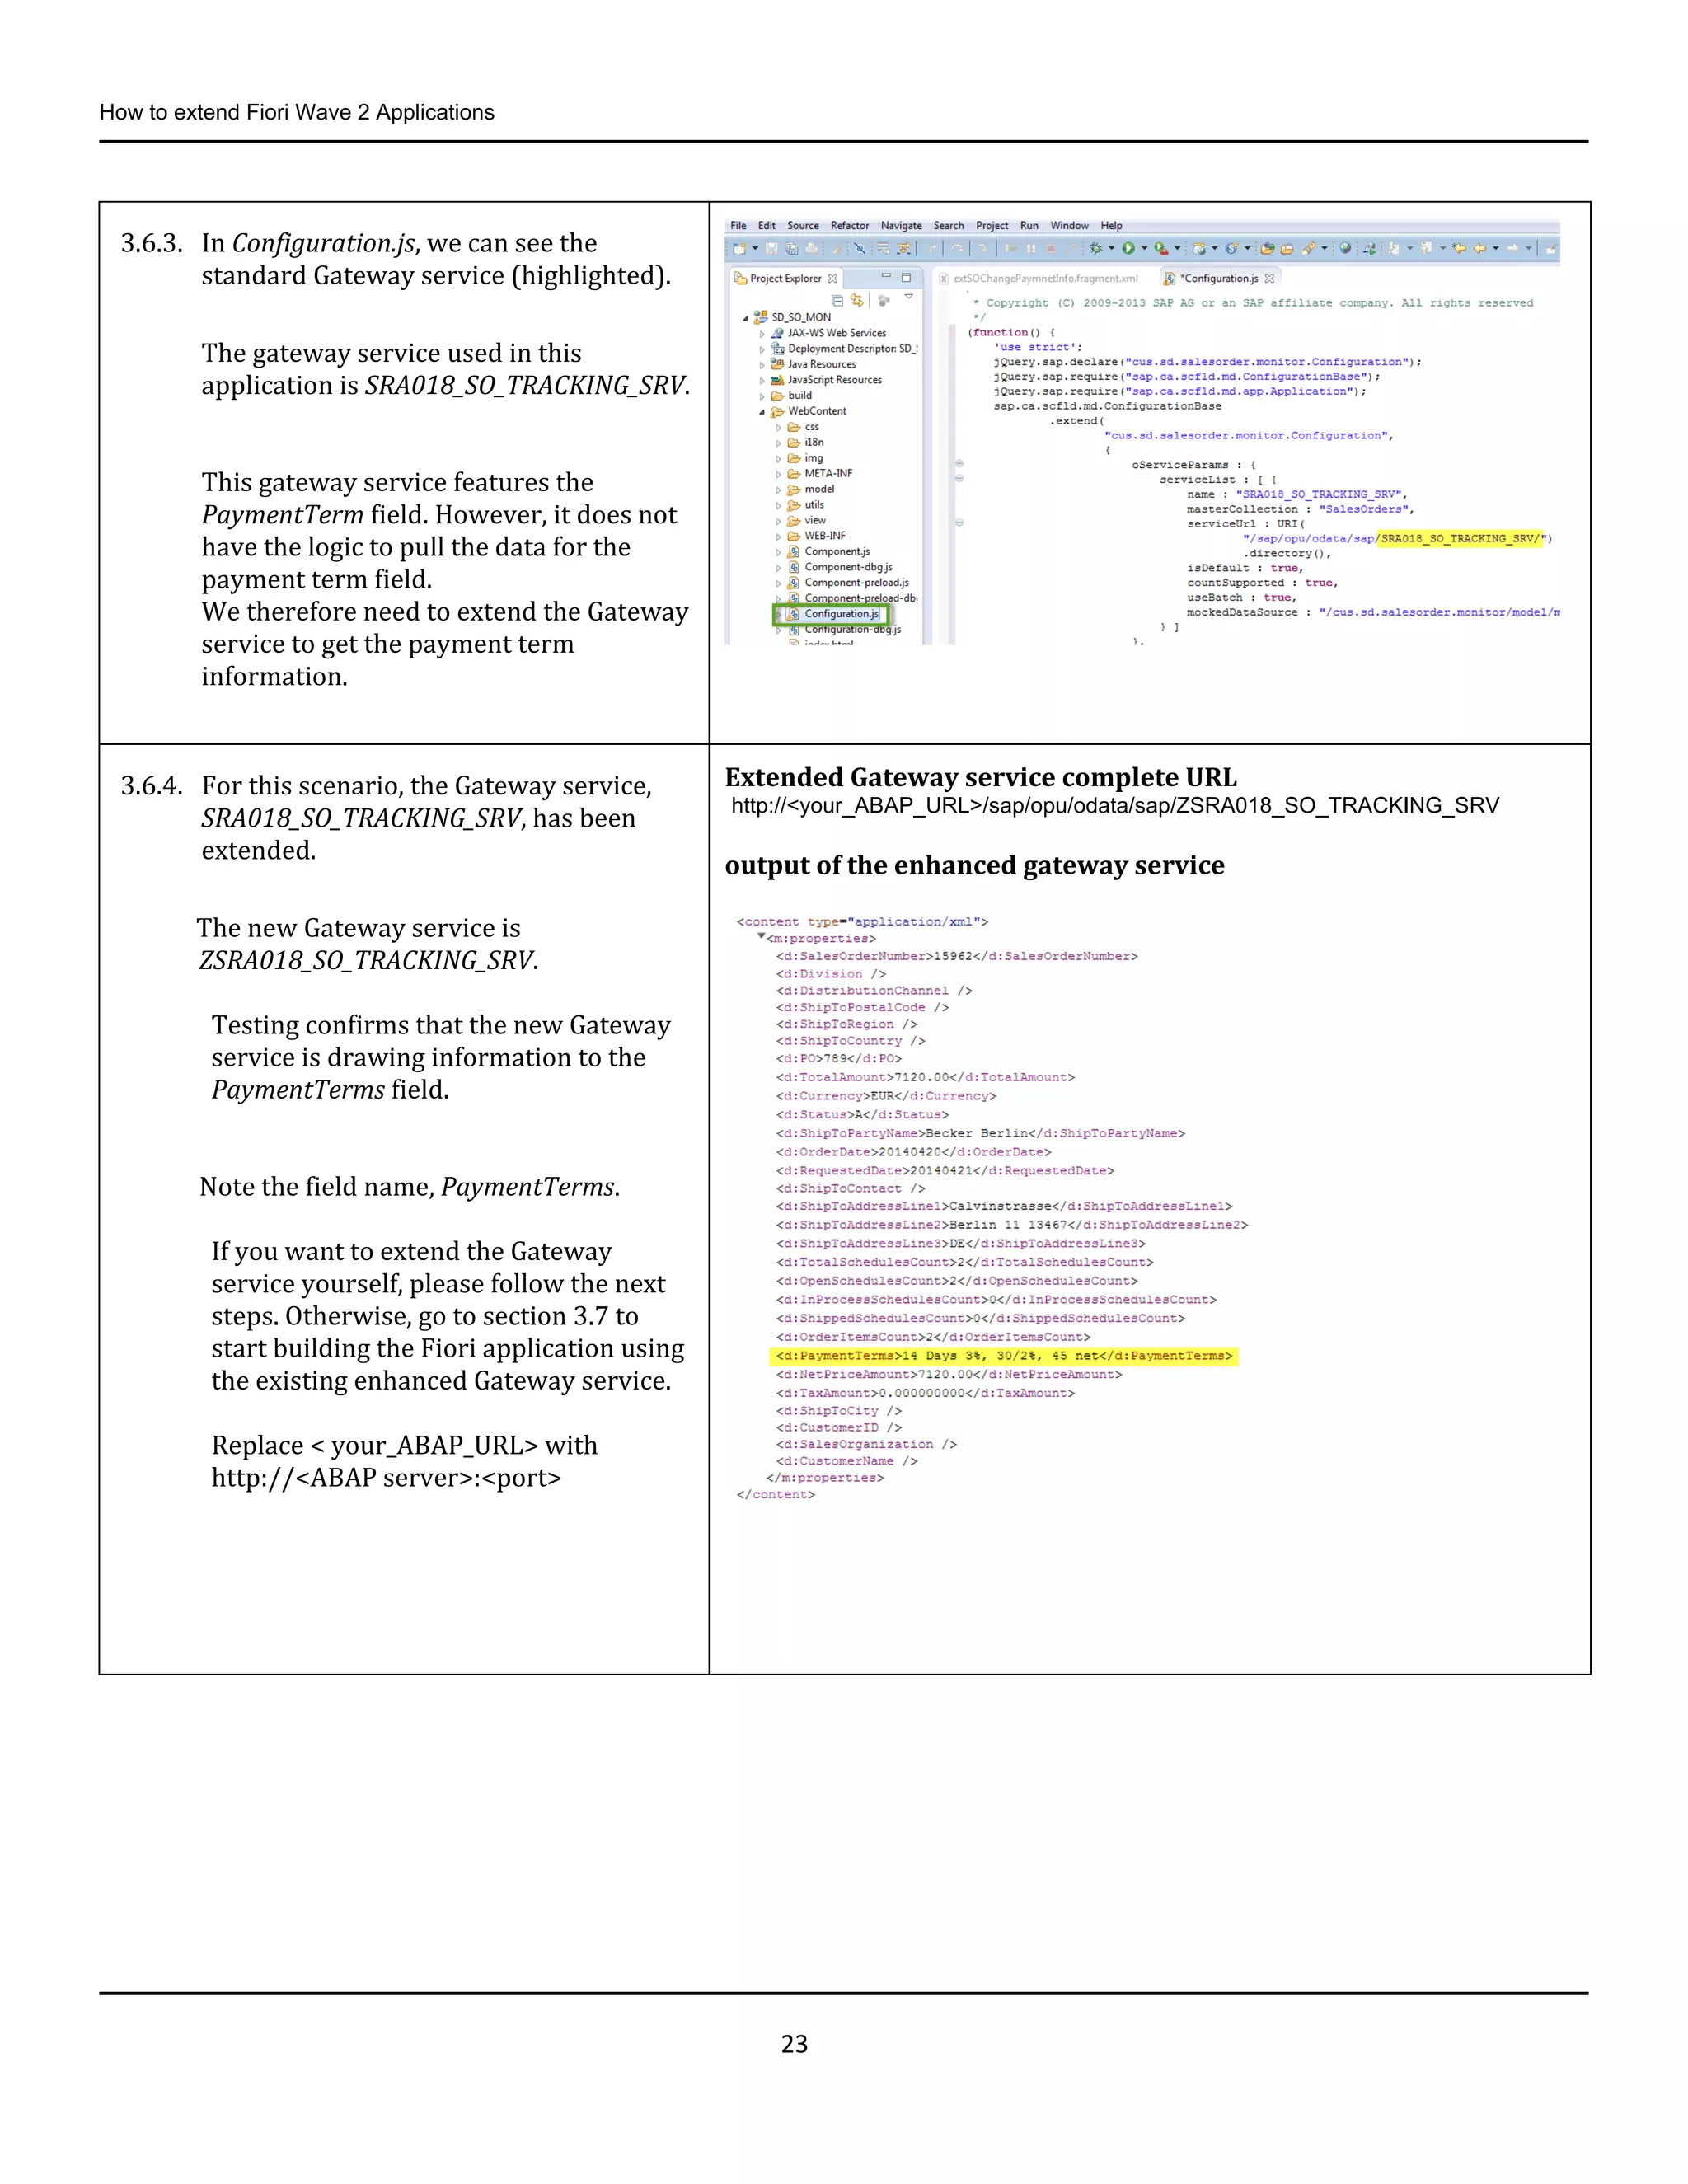
3.6.1. In Eclipse, select the Configuration.js file
in the WebContent folder.
3.6.2. Select Source Format.
23.
How to extendFiori Wave 2 Applications
23
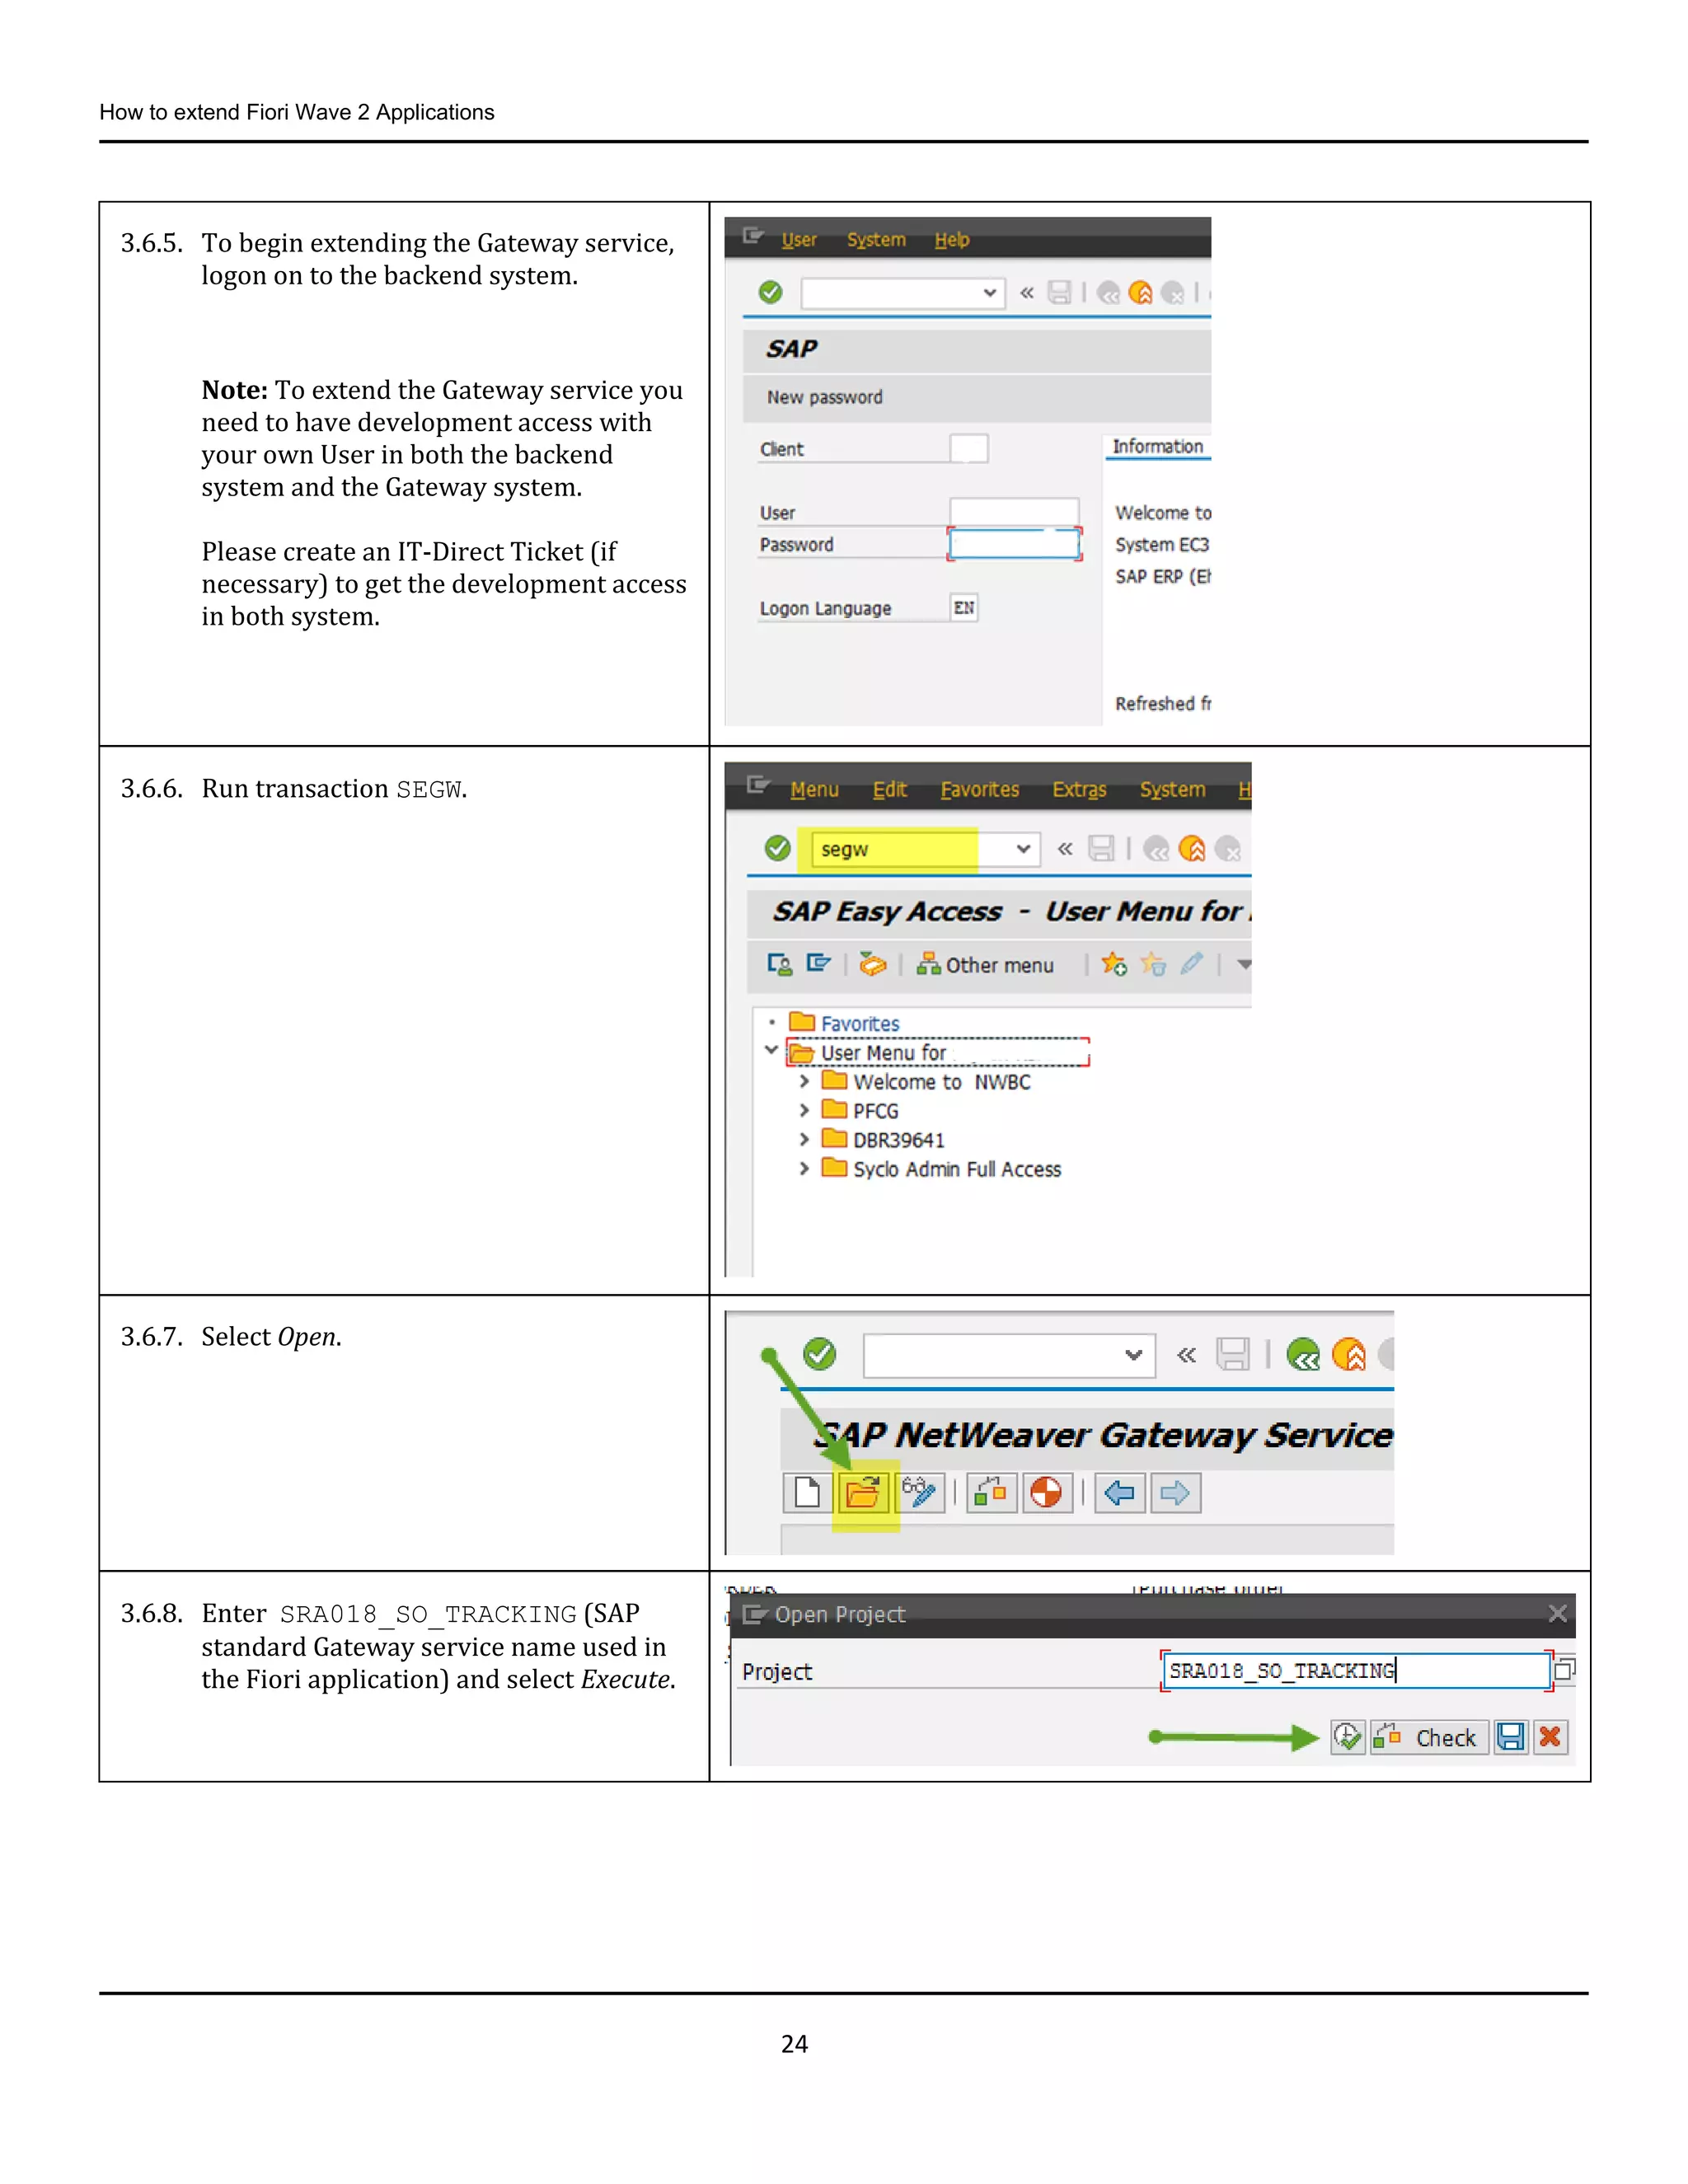
3.6.3. In Configuration.js, we can see the
standard Gateway service (highlighted).
The gateway service used in this
application is SRA018_SO_TRACKING_SRV.
This gateway service features the
PaymentTerm field. However, it does not
have the logic to pull the data for the
payment term field.
We therefore need to extend the Gateway
service to get the payment term
information.
3.6.4. For this scenario, the Gateway service,
SRA018_SO_TRACKING_SRV, has been
extended.
The new Gateway service is
ZSRA018_SO_TRACKING_SRV.
Testing confirms that the new Gateway
service is drawing information to the
PaymentTerms field.
Note the field name, PaymentTerms.
If you want to extend the Gateway
service yourself, please follow the next
steps. Otherwise, go to section 3.7 to
start building the Fiori application using
the existing enhanced Gateway service.
Replace < your_ABAP_URL> with
http://<ABAP server>:<port>
Extended Gateway service complete URL
http://<your_ABAP_URL>/sap/opu/odata/sap/ZSRA018_SO_TRACKING_SRV
output of the enhanced gateway service
24.
How to extendFiori Wave 2 Applications
24
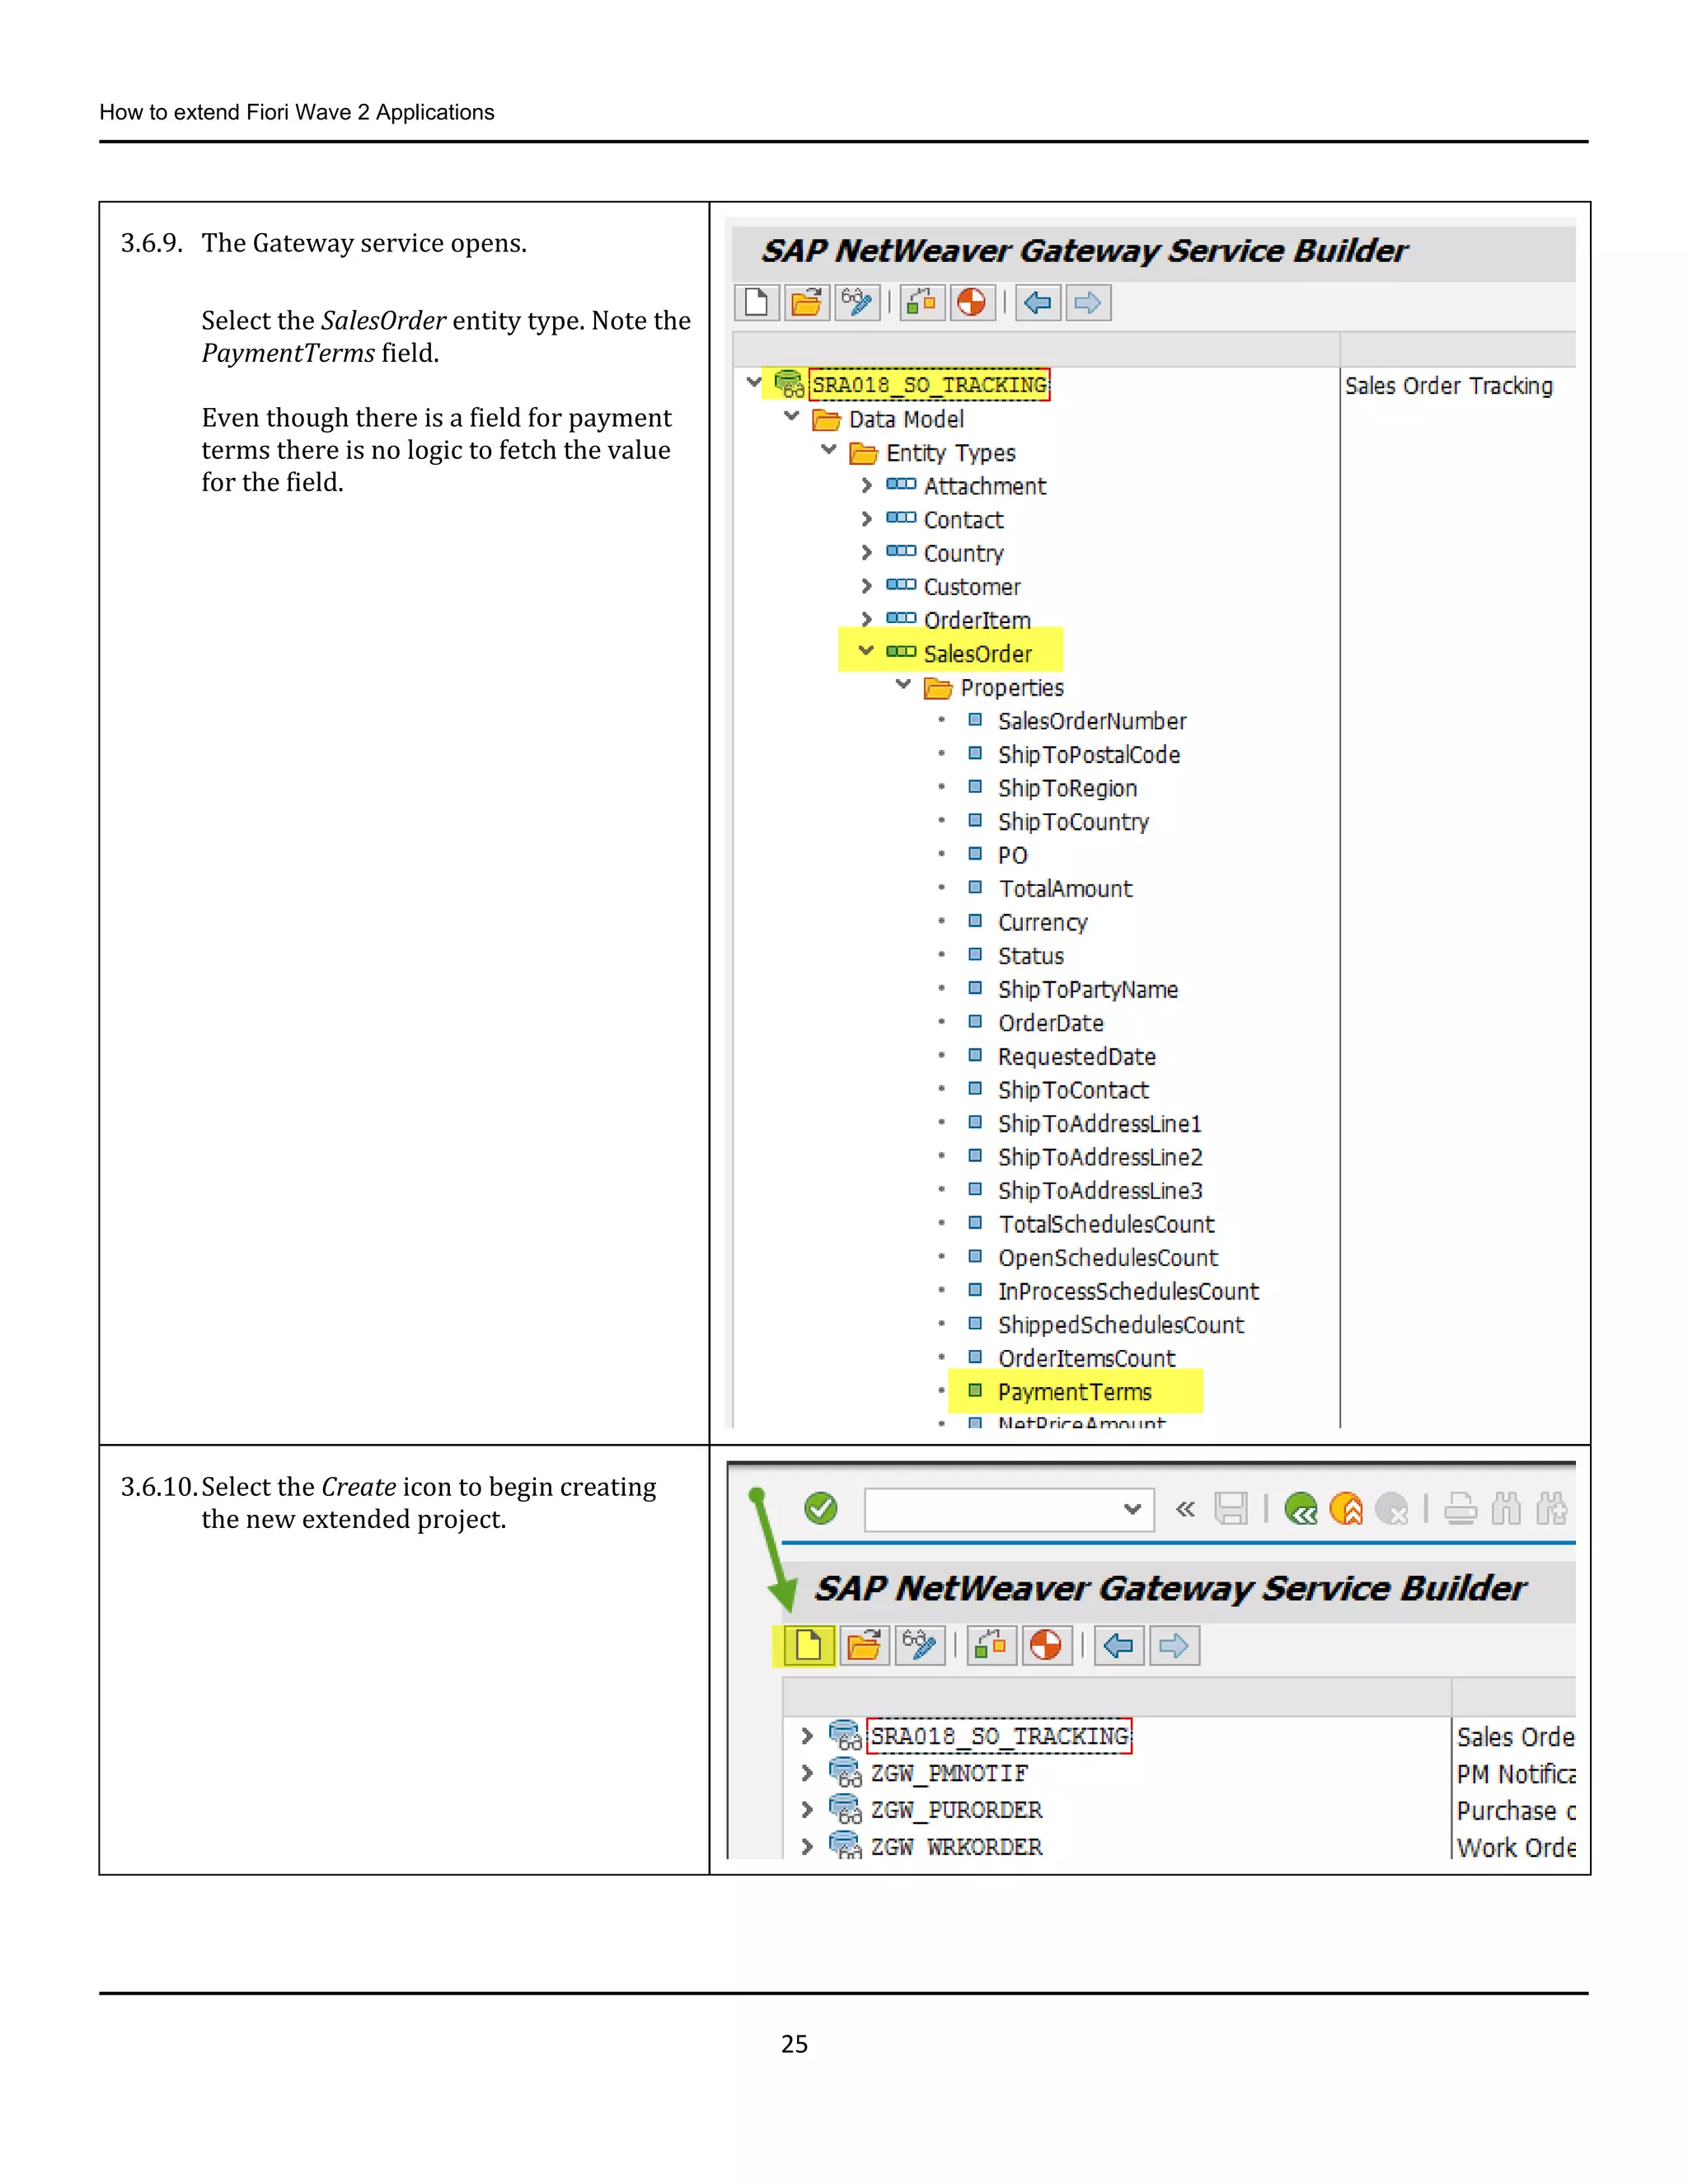
3.6.5. To begin extending the Gateway service,
logon on to the backend system.
Note: To extend the Gateway service you
need to have development access with
your own User in both the backend
system and the Gateway system.
Please create an IT-Direct Ticket (if
necessary) to get the development access
in both system.
3.6.6. Run transaction SEGW.
3.6.7. Select Open.
3.6.8. Enter SRA018_SO_TRACKING (SAP
standard Gateway service name used in
the Fiori application) and select Execute.
25.
How to extendFiori Wave 2 Applications
25
3.6.9. The Gateway service opens.
Select the SalesOrder entity type. Note the
PaymentTerms field.
Even though there is a field for payment
terms there is no logic to fetch the value
for the field.
3.6.10.Select the Create icon to begin creating
the new extended project.
26.
How to extendFiori Wave 2 Applications
26
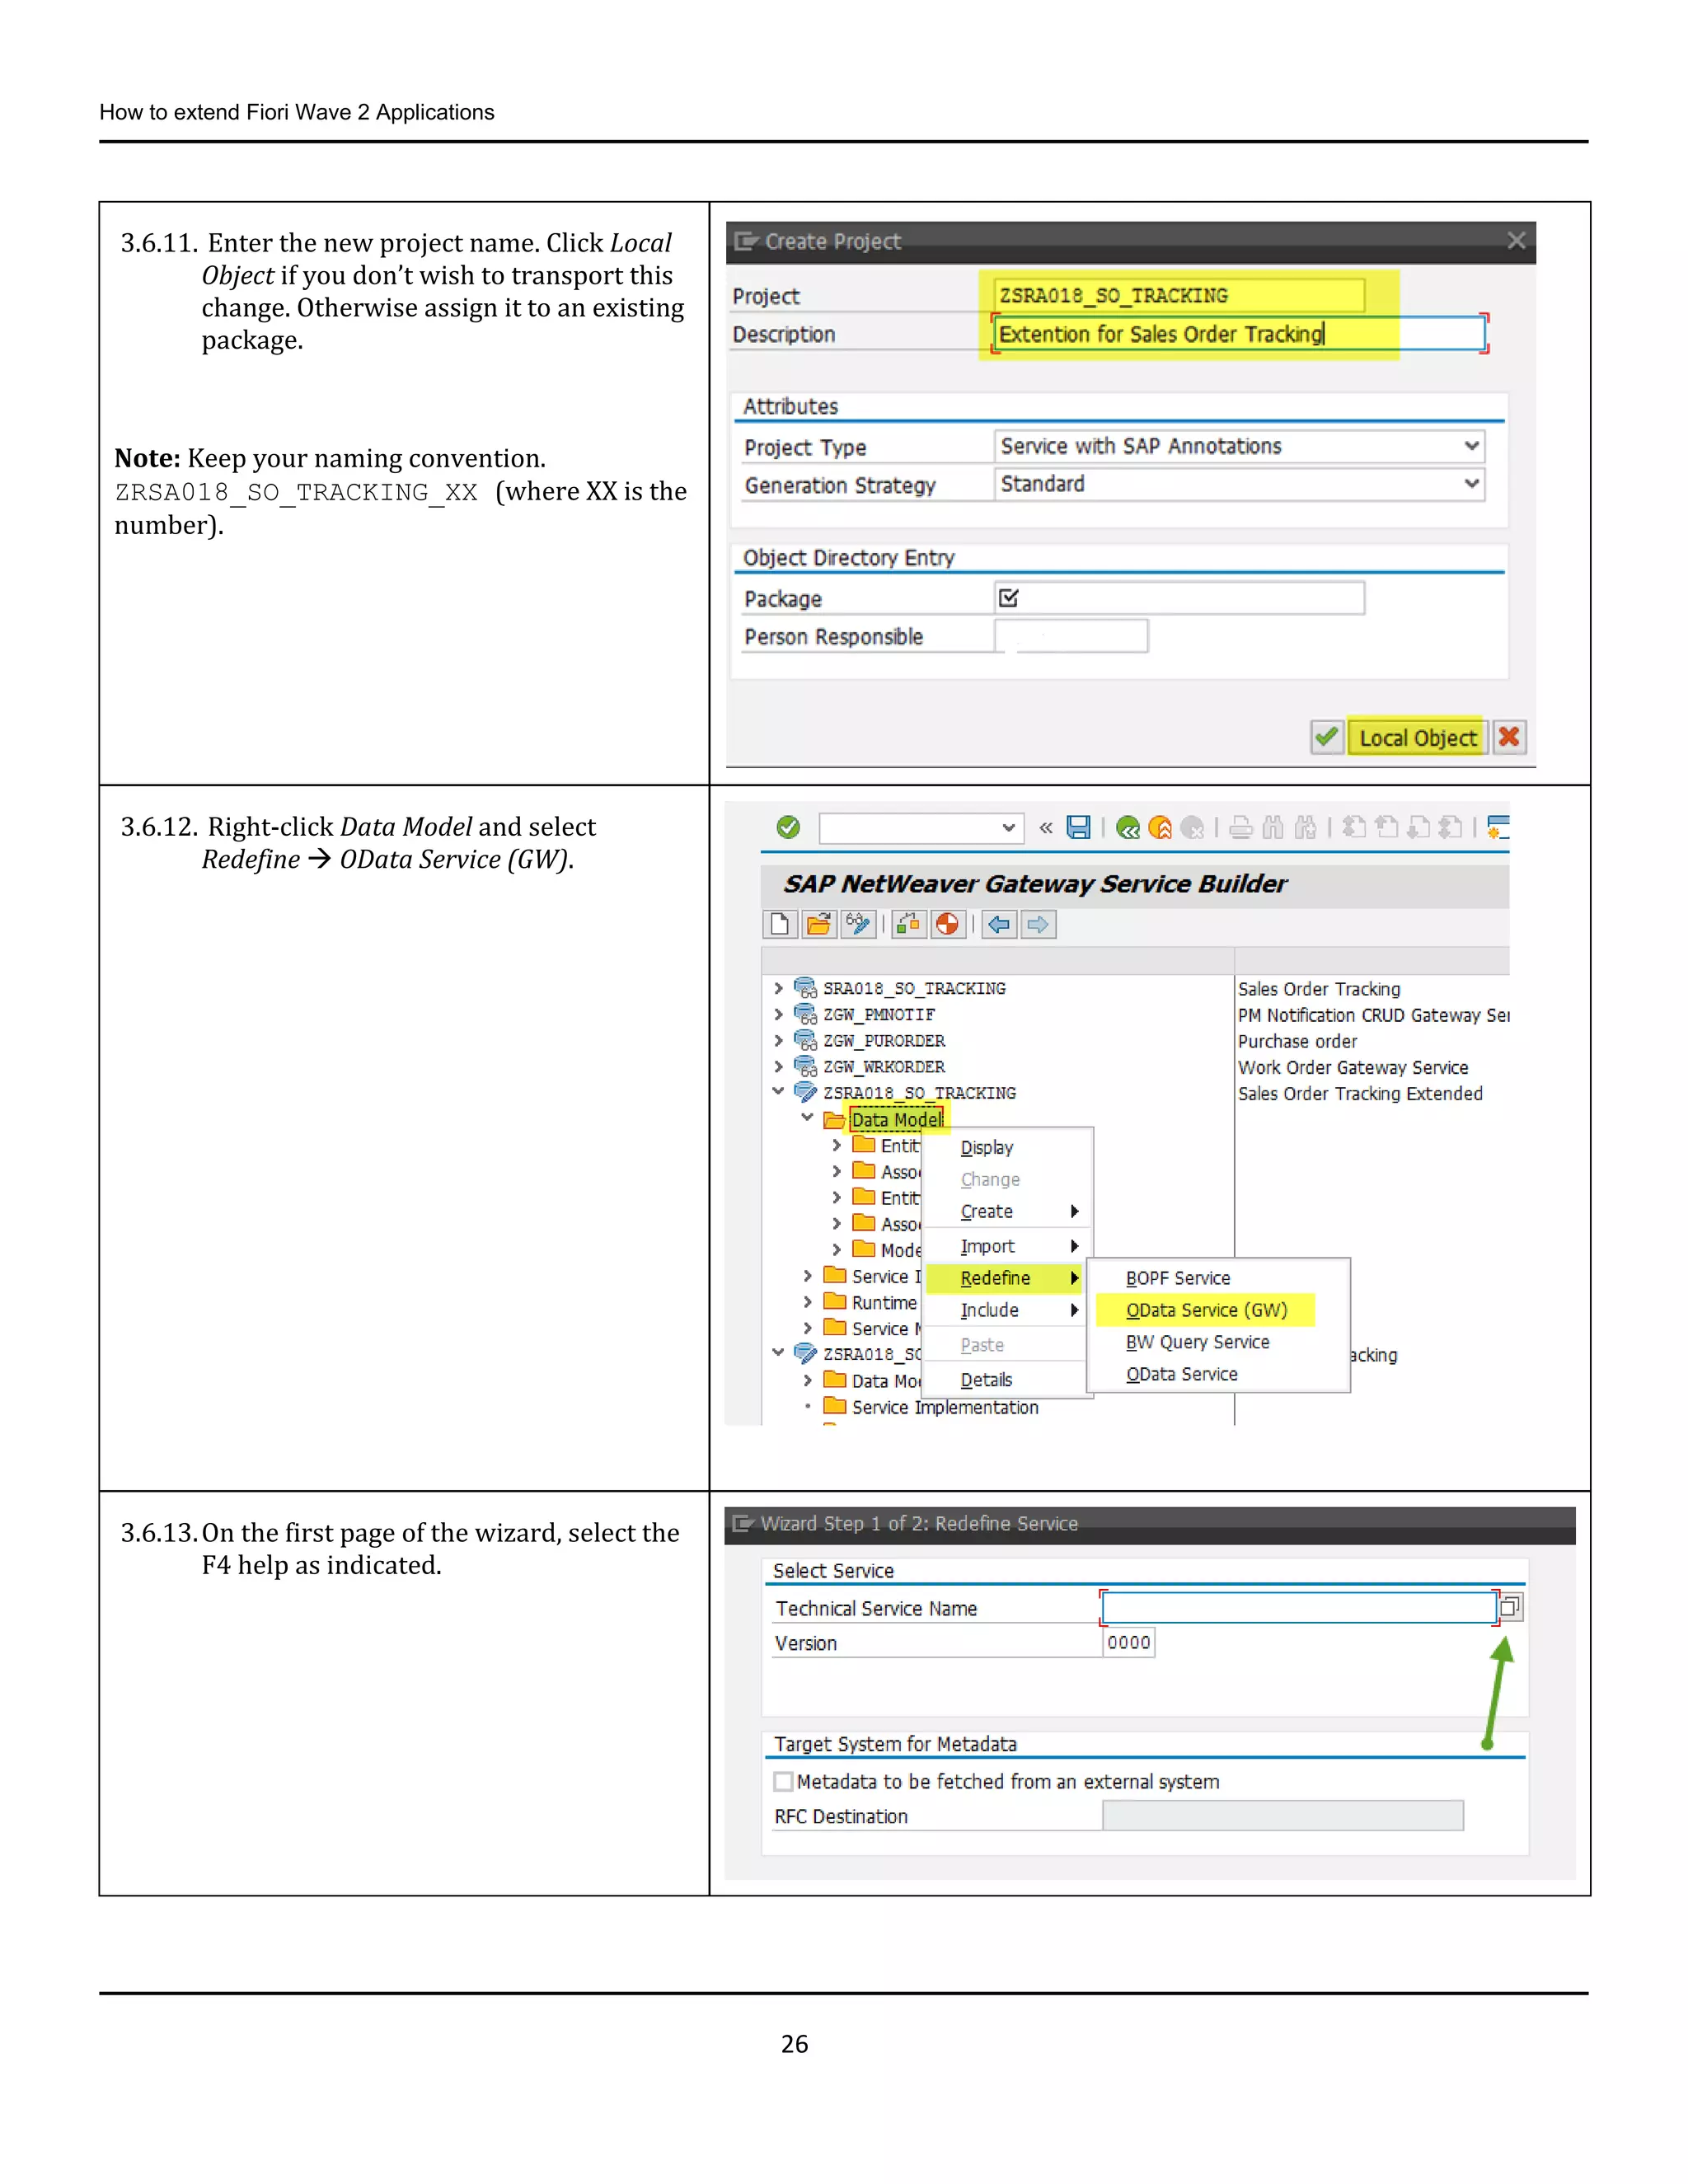
3.6.11. Enter the new project name. Click Local
Object if you don’t wish to transport this
change. Otherwise assign it to an existing
package.
Note: Keep your naming convention.
ZRSA018_SO_TRACKING_XX (where XX is the
number).
3.6.12. Right-click Data Model and select
Redefine OData Service (GW).
3.6.13.On the first page of the wizard, select the
F4 help as indicated.
27.
How to extendFiori Wave 2 Applications
27
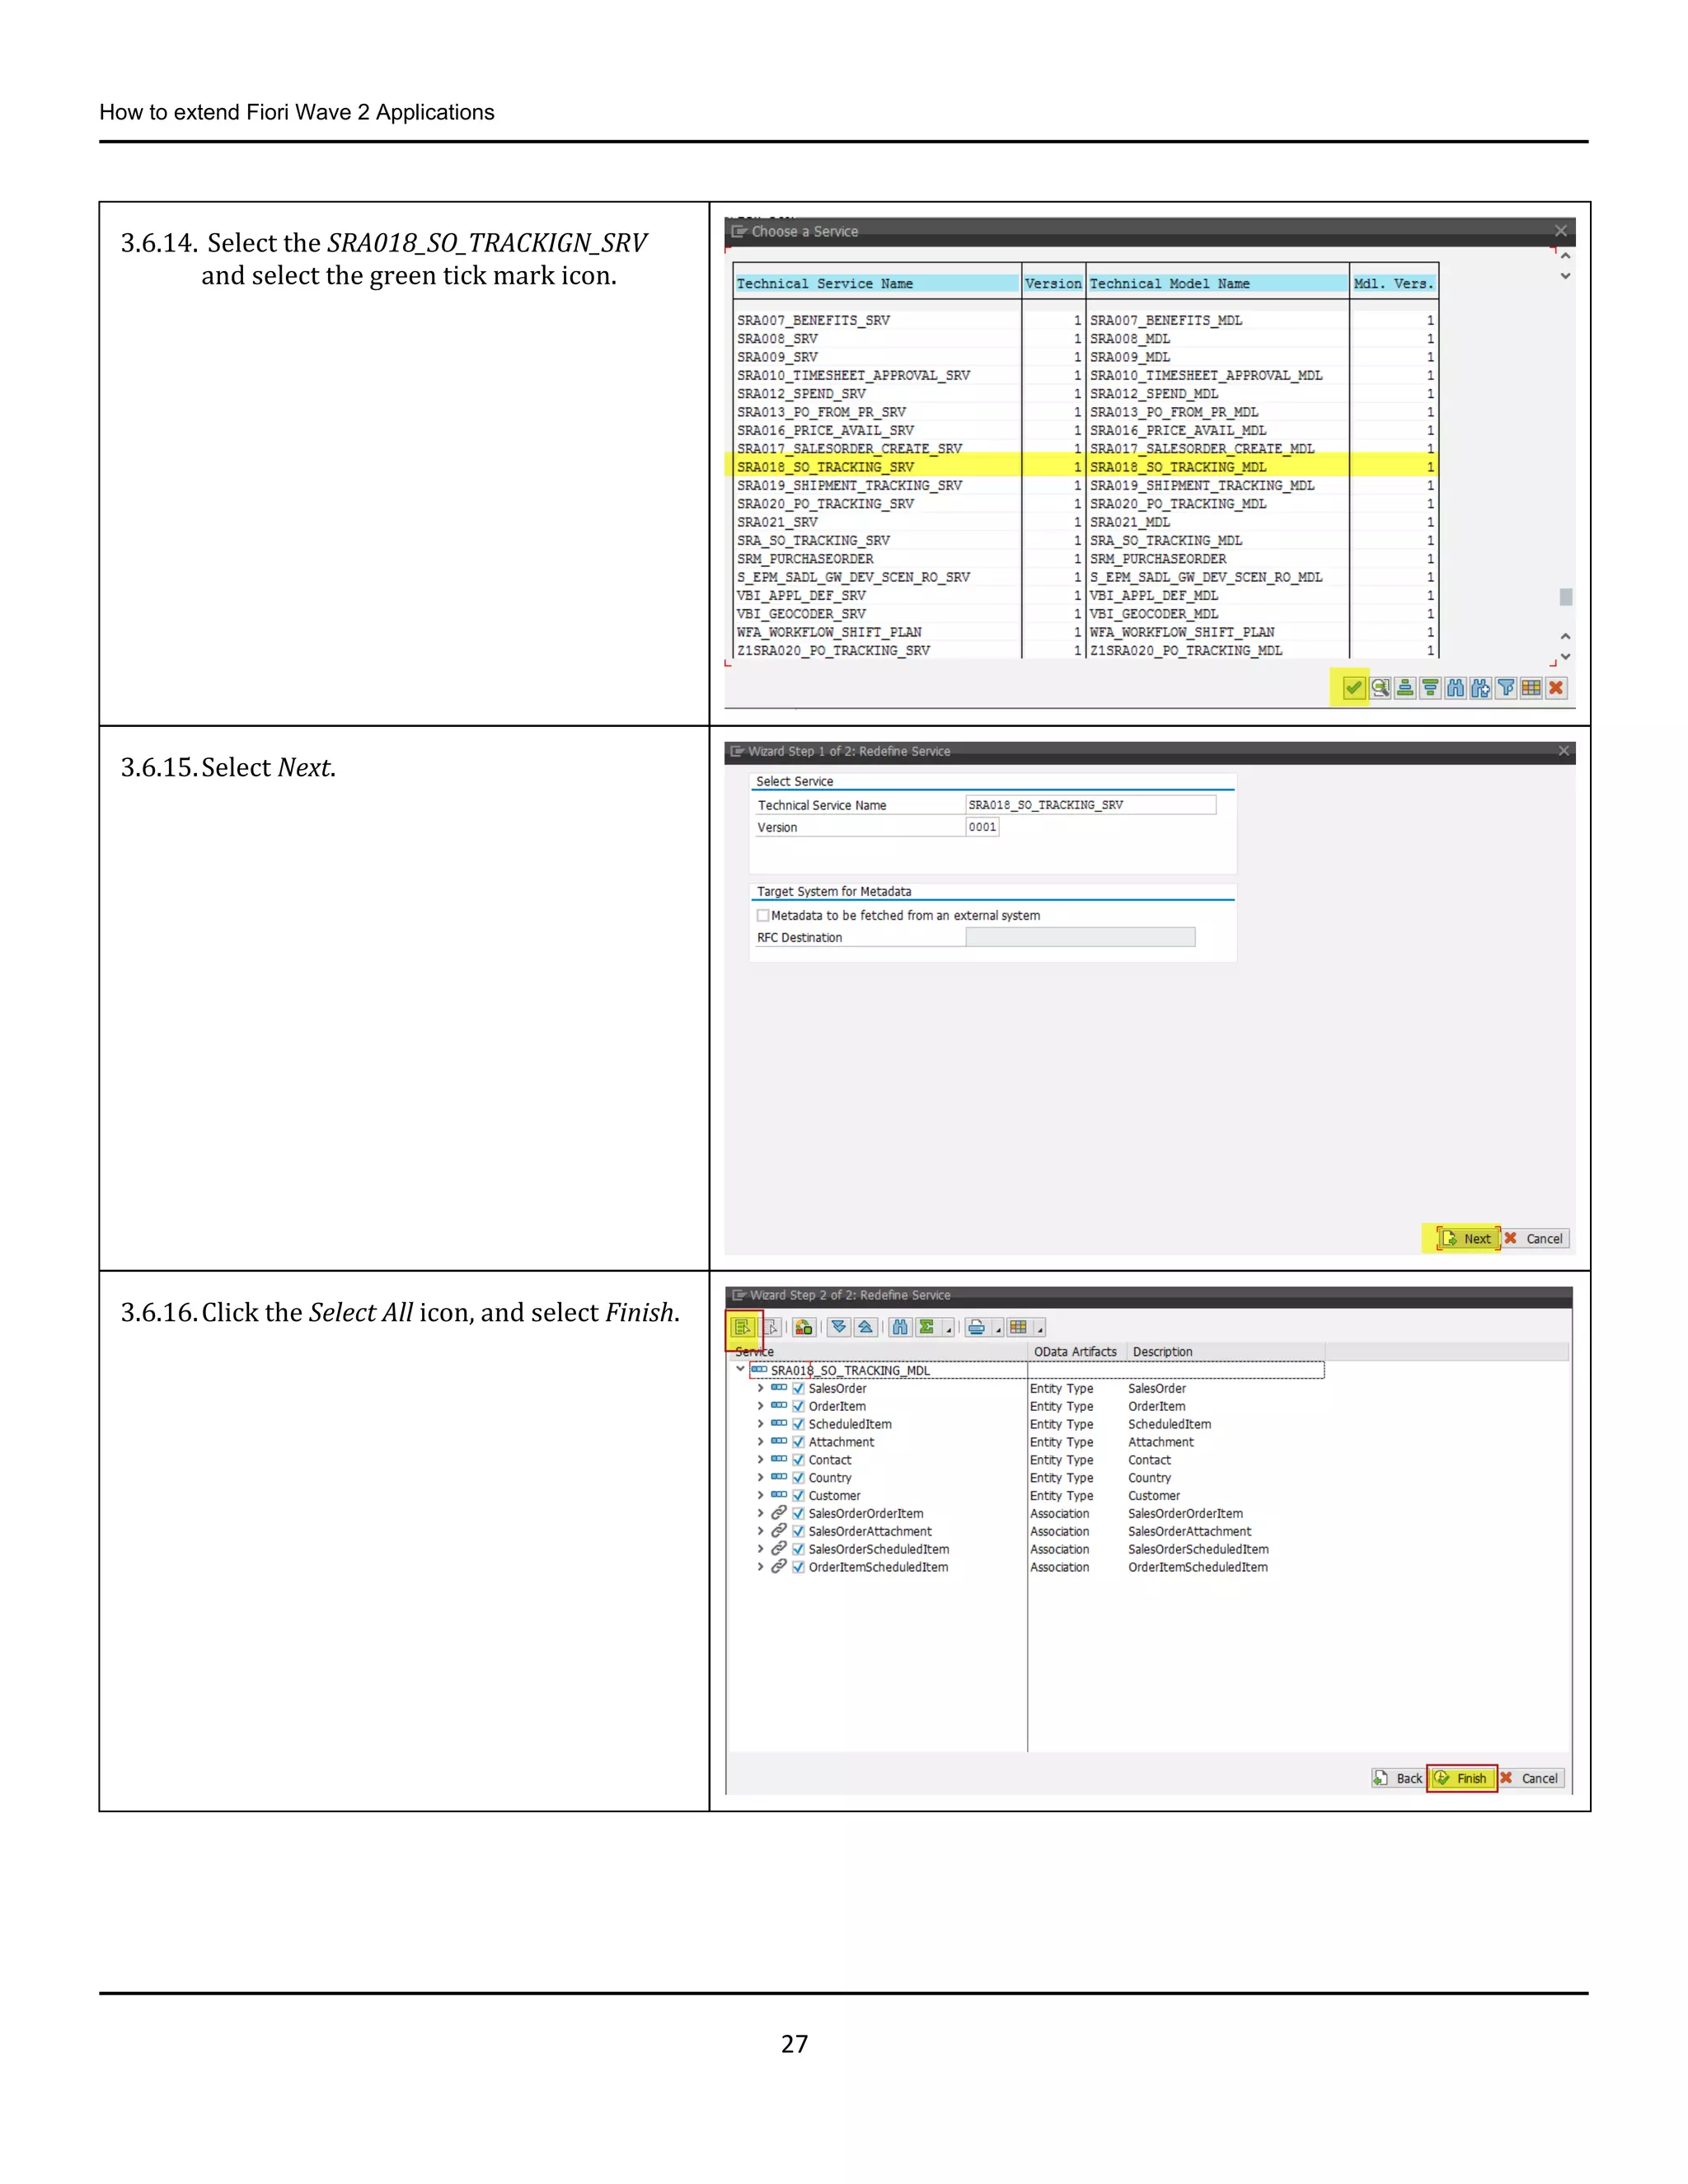
3.6.14. Select the SRA018_SO_TRACKIGN_SRV
and select the green tick mark icon.
3.6.15.Select Next.
3.6.16.Click the Select All icon, and select Finish.
28.
How to extendFiori Wave 2 Applications
28
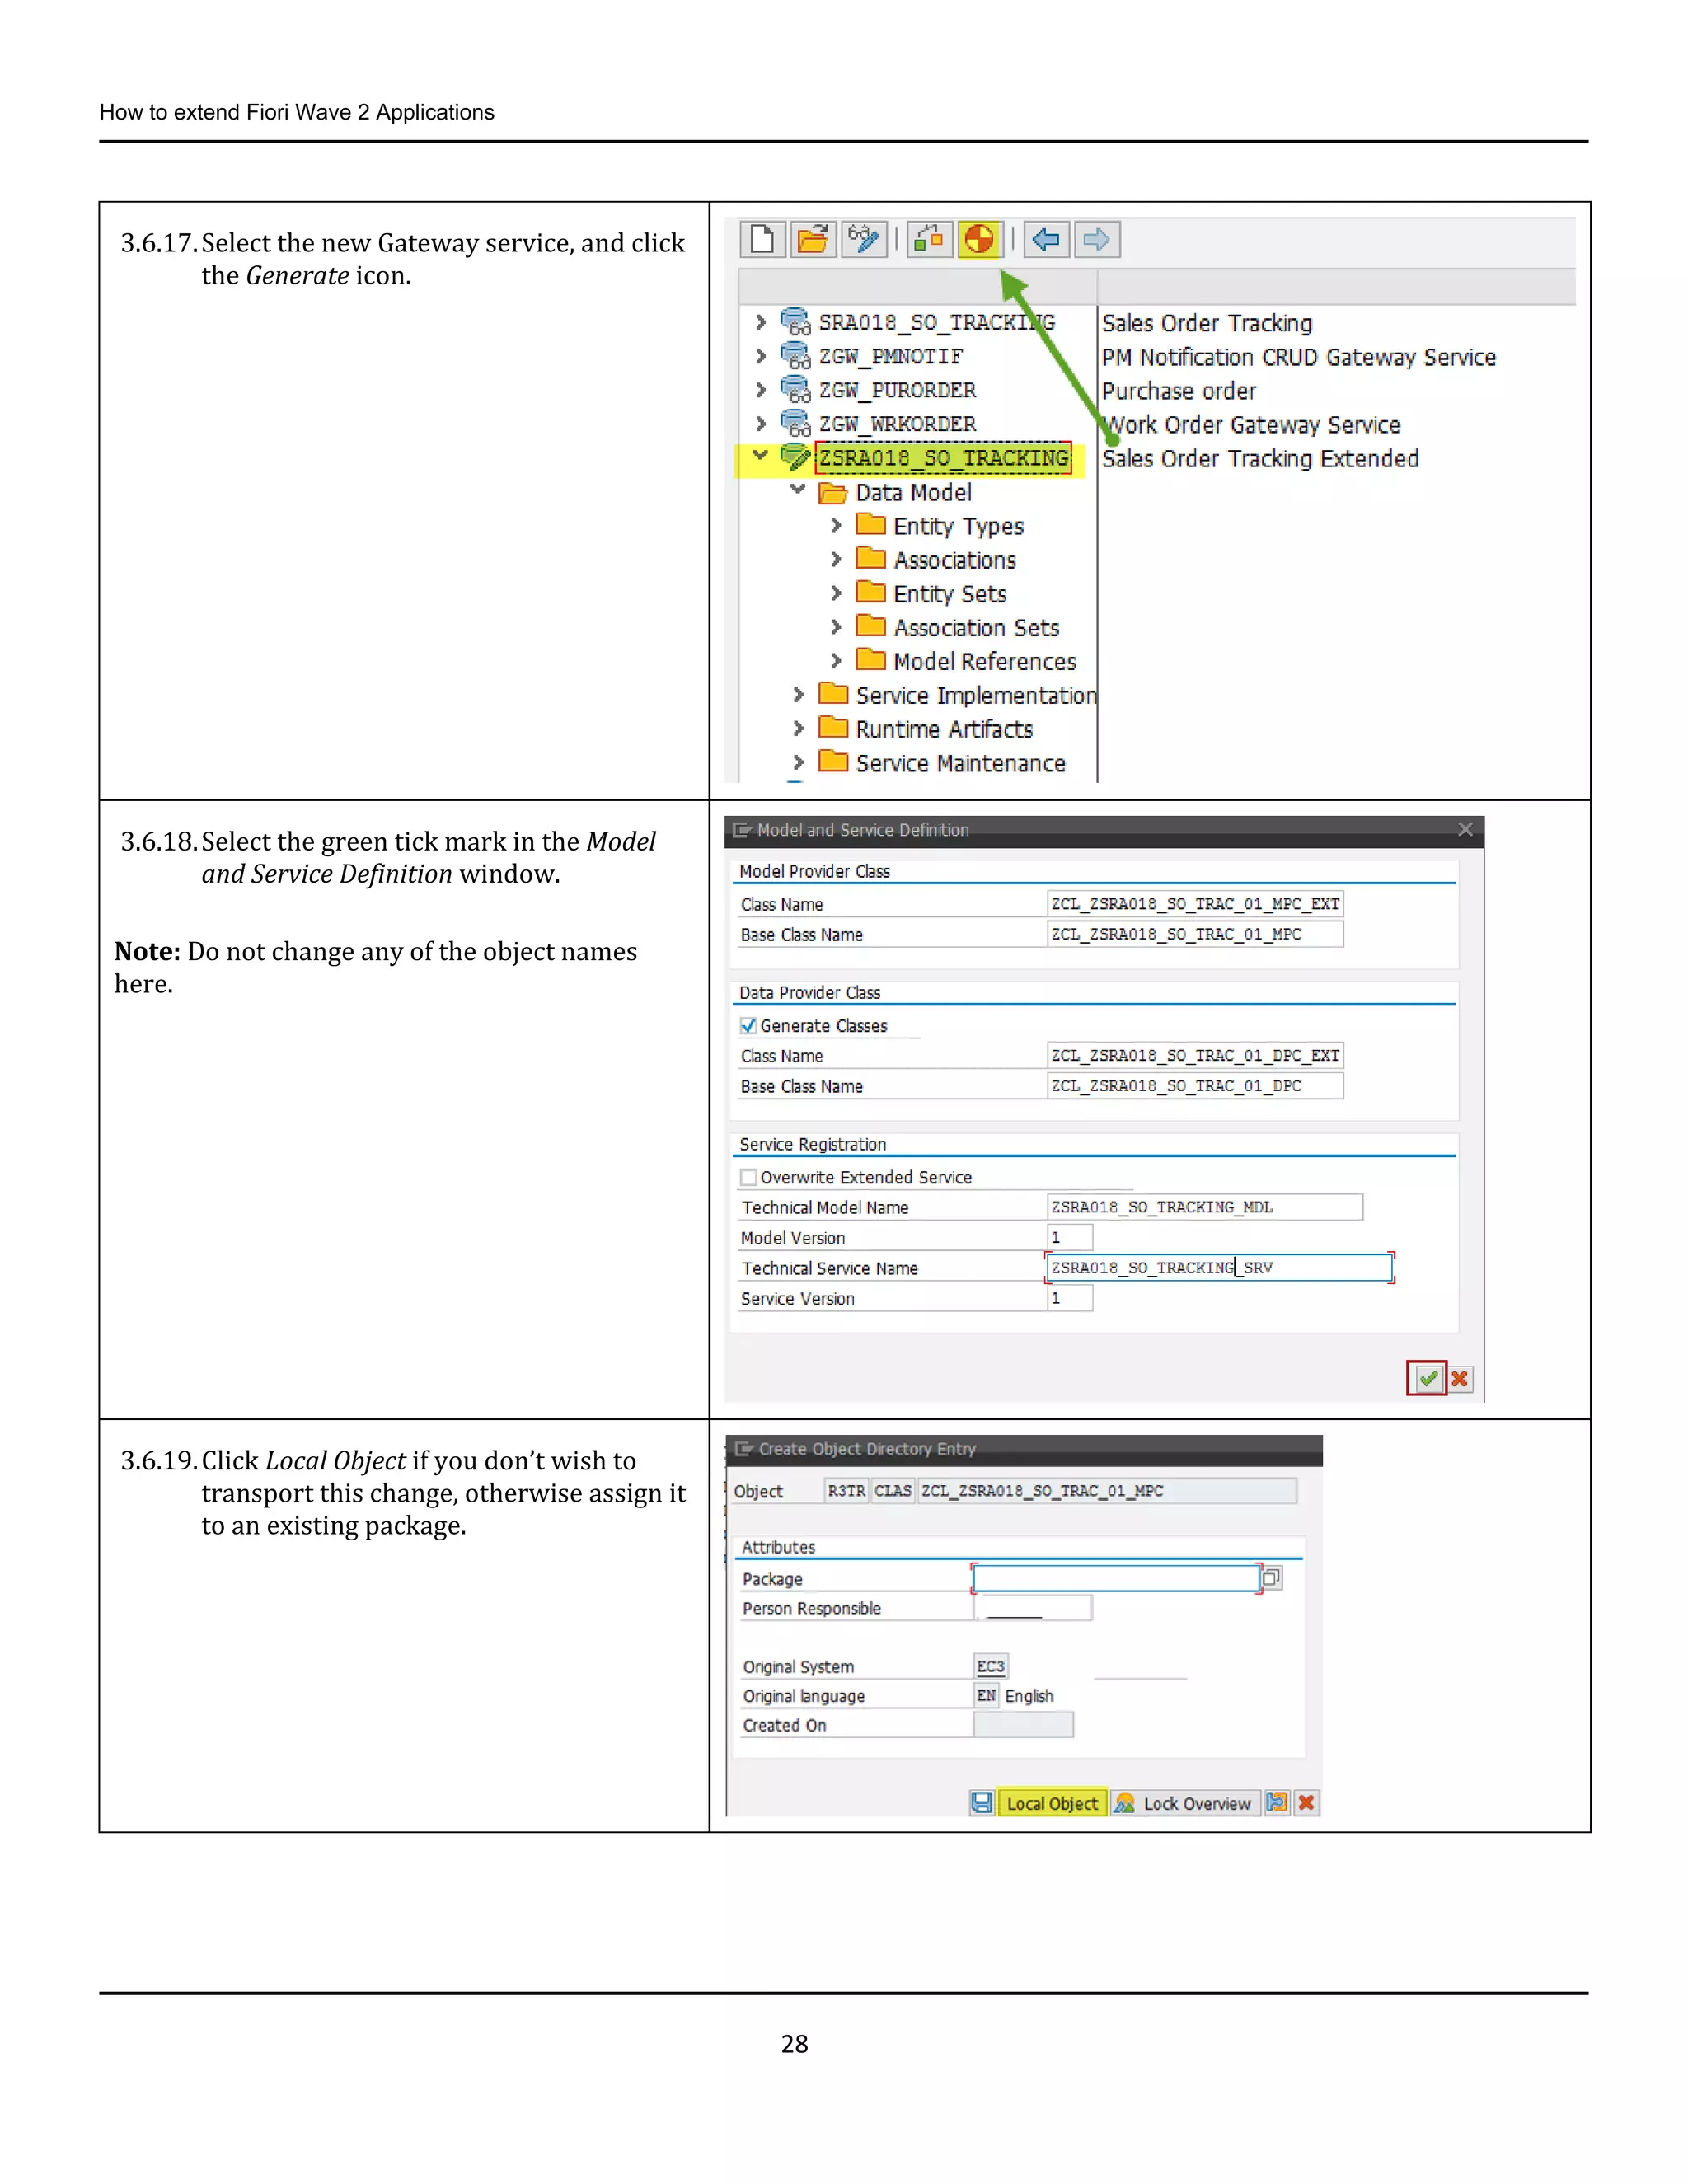
3.6.17.Select the new Gateway service, and click
the Generate icon.
3.6.18.Select the green tick mark in the Model
and Service Definition window.
Note: Do not change any of the object names
here.
3.6.19.Click Local Object if you don’t wish to
transport this change, otherwise assign it
to an existing package.
29.
How to extendFiori Wave 2 Applications
29
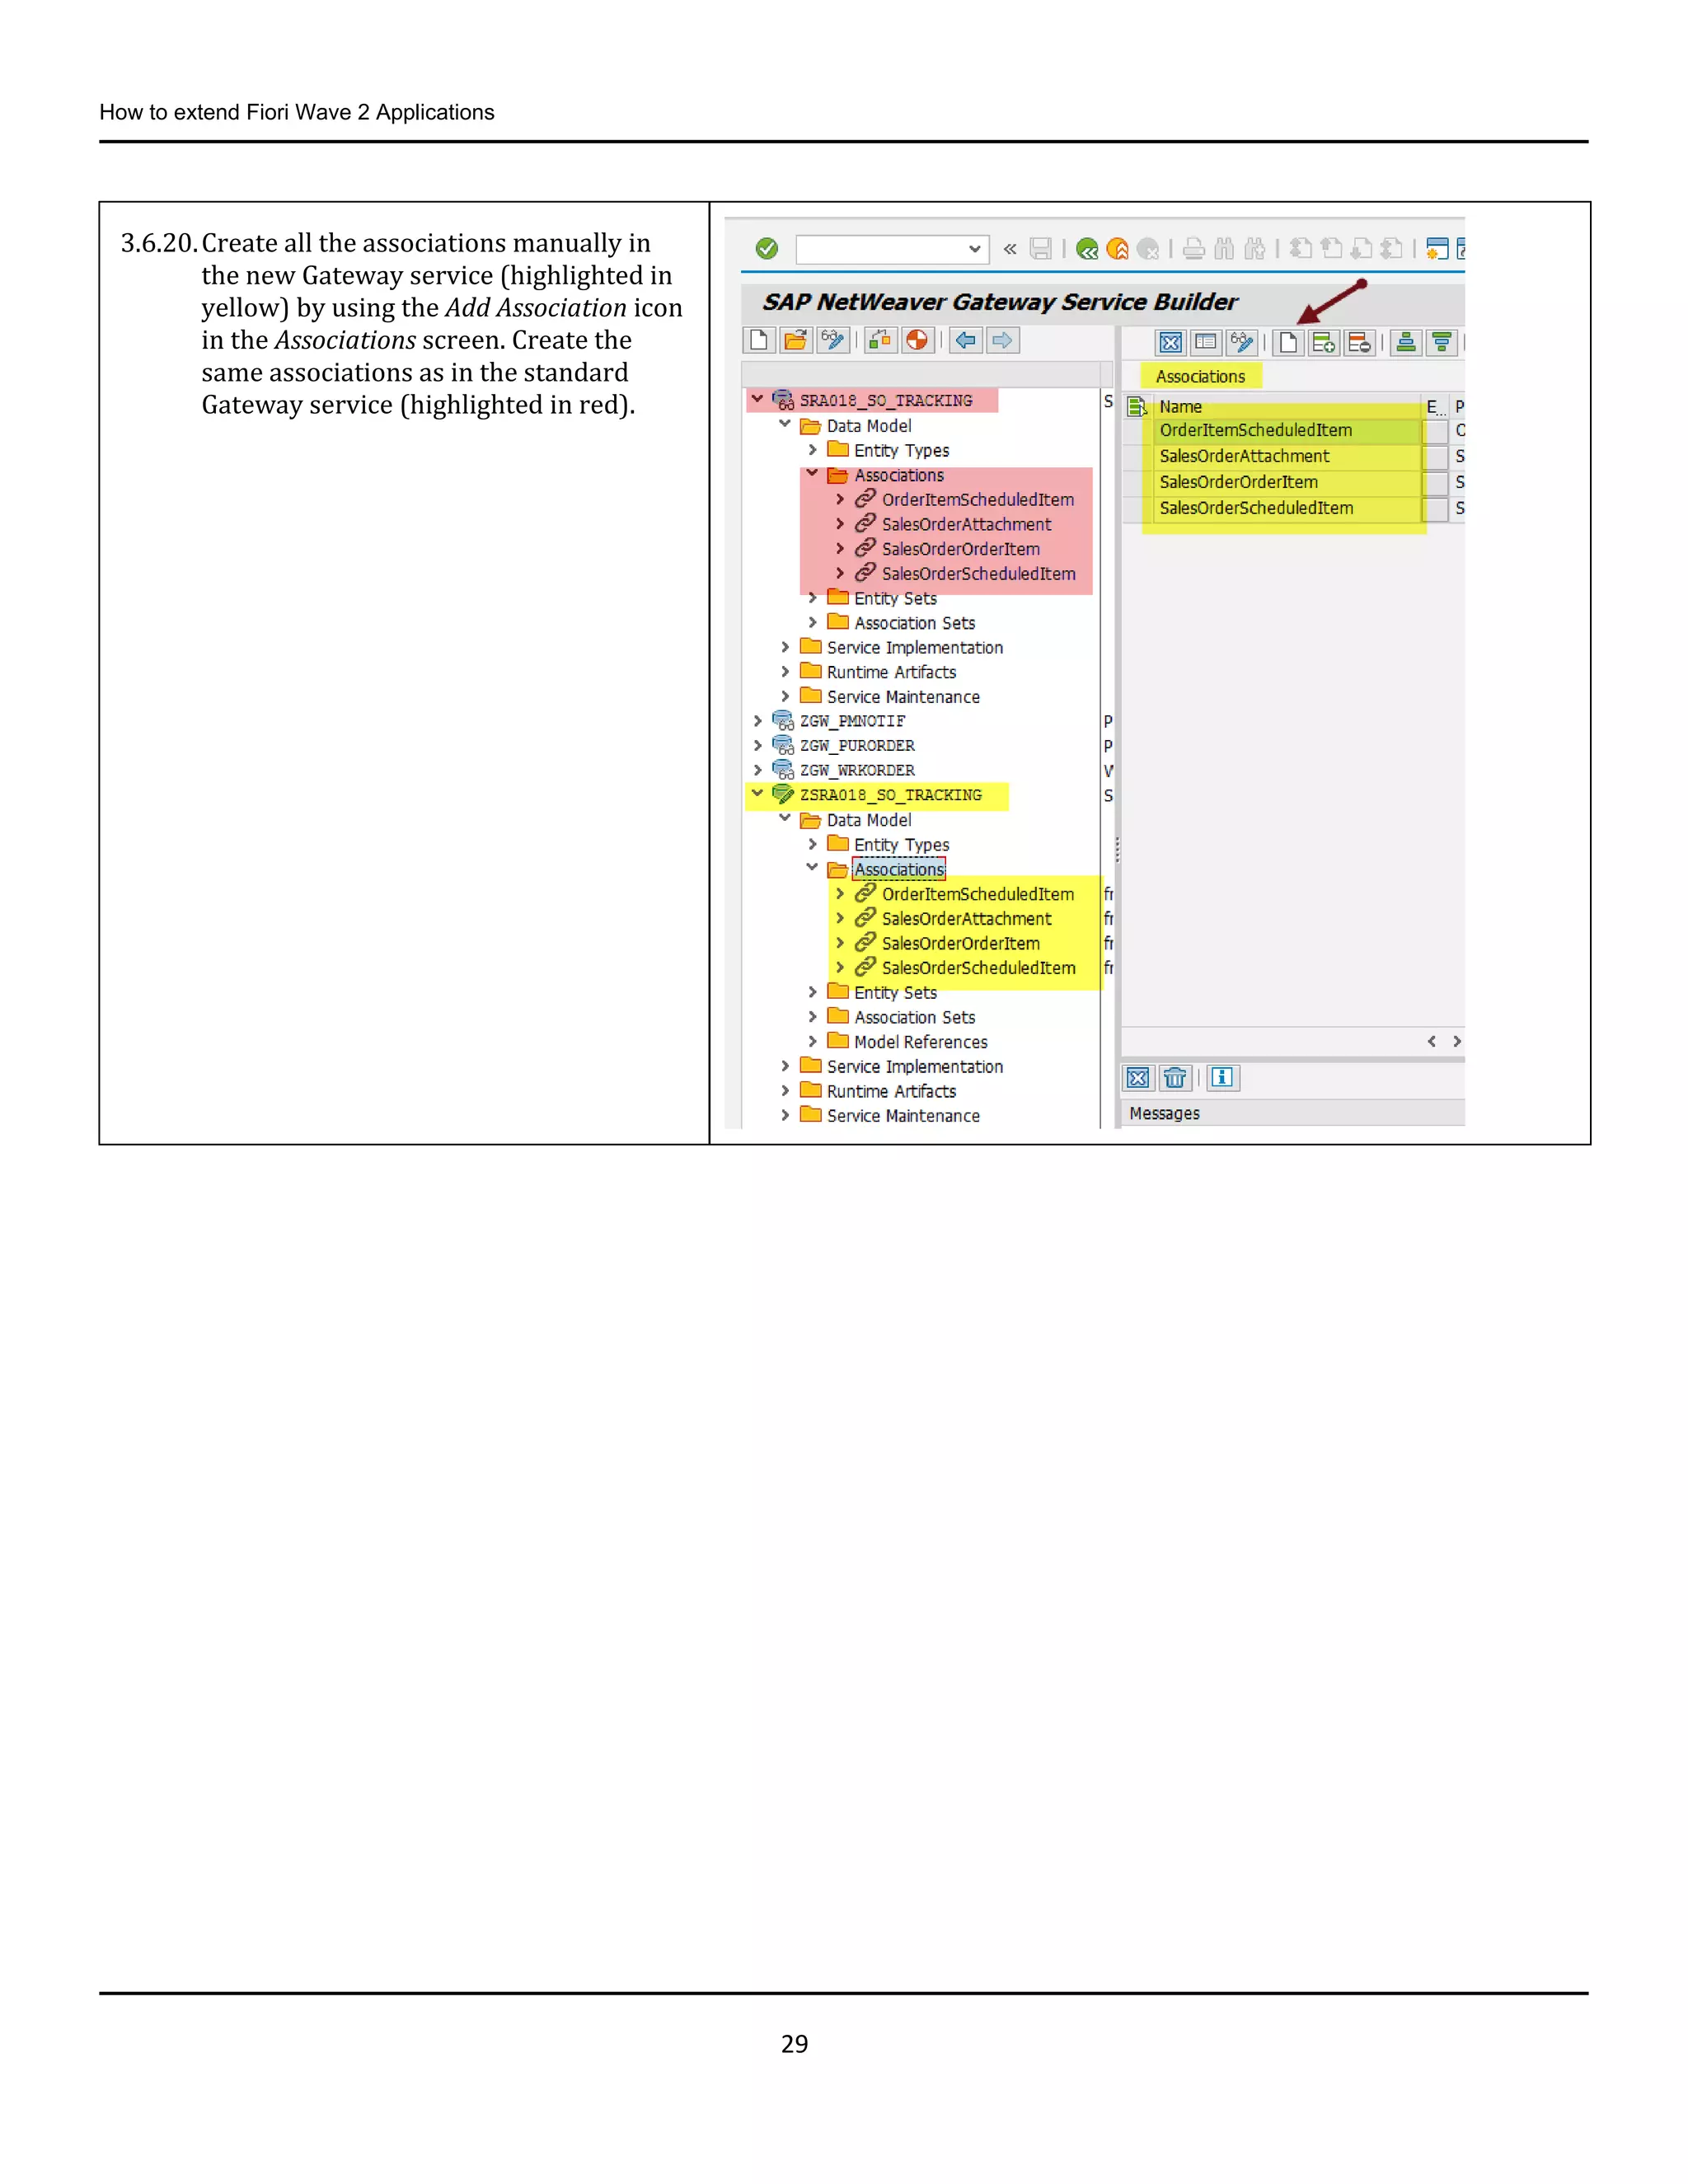
3.6.20.Create all the associations manually in
the new Gateway service (highlighted in
yellow) by using the Add Association icon
in the Associations screen. Create the
same associations as in the standard
Gateway service (highlighted in red).
30.
How to extendFiori Wave 2 Applications
30
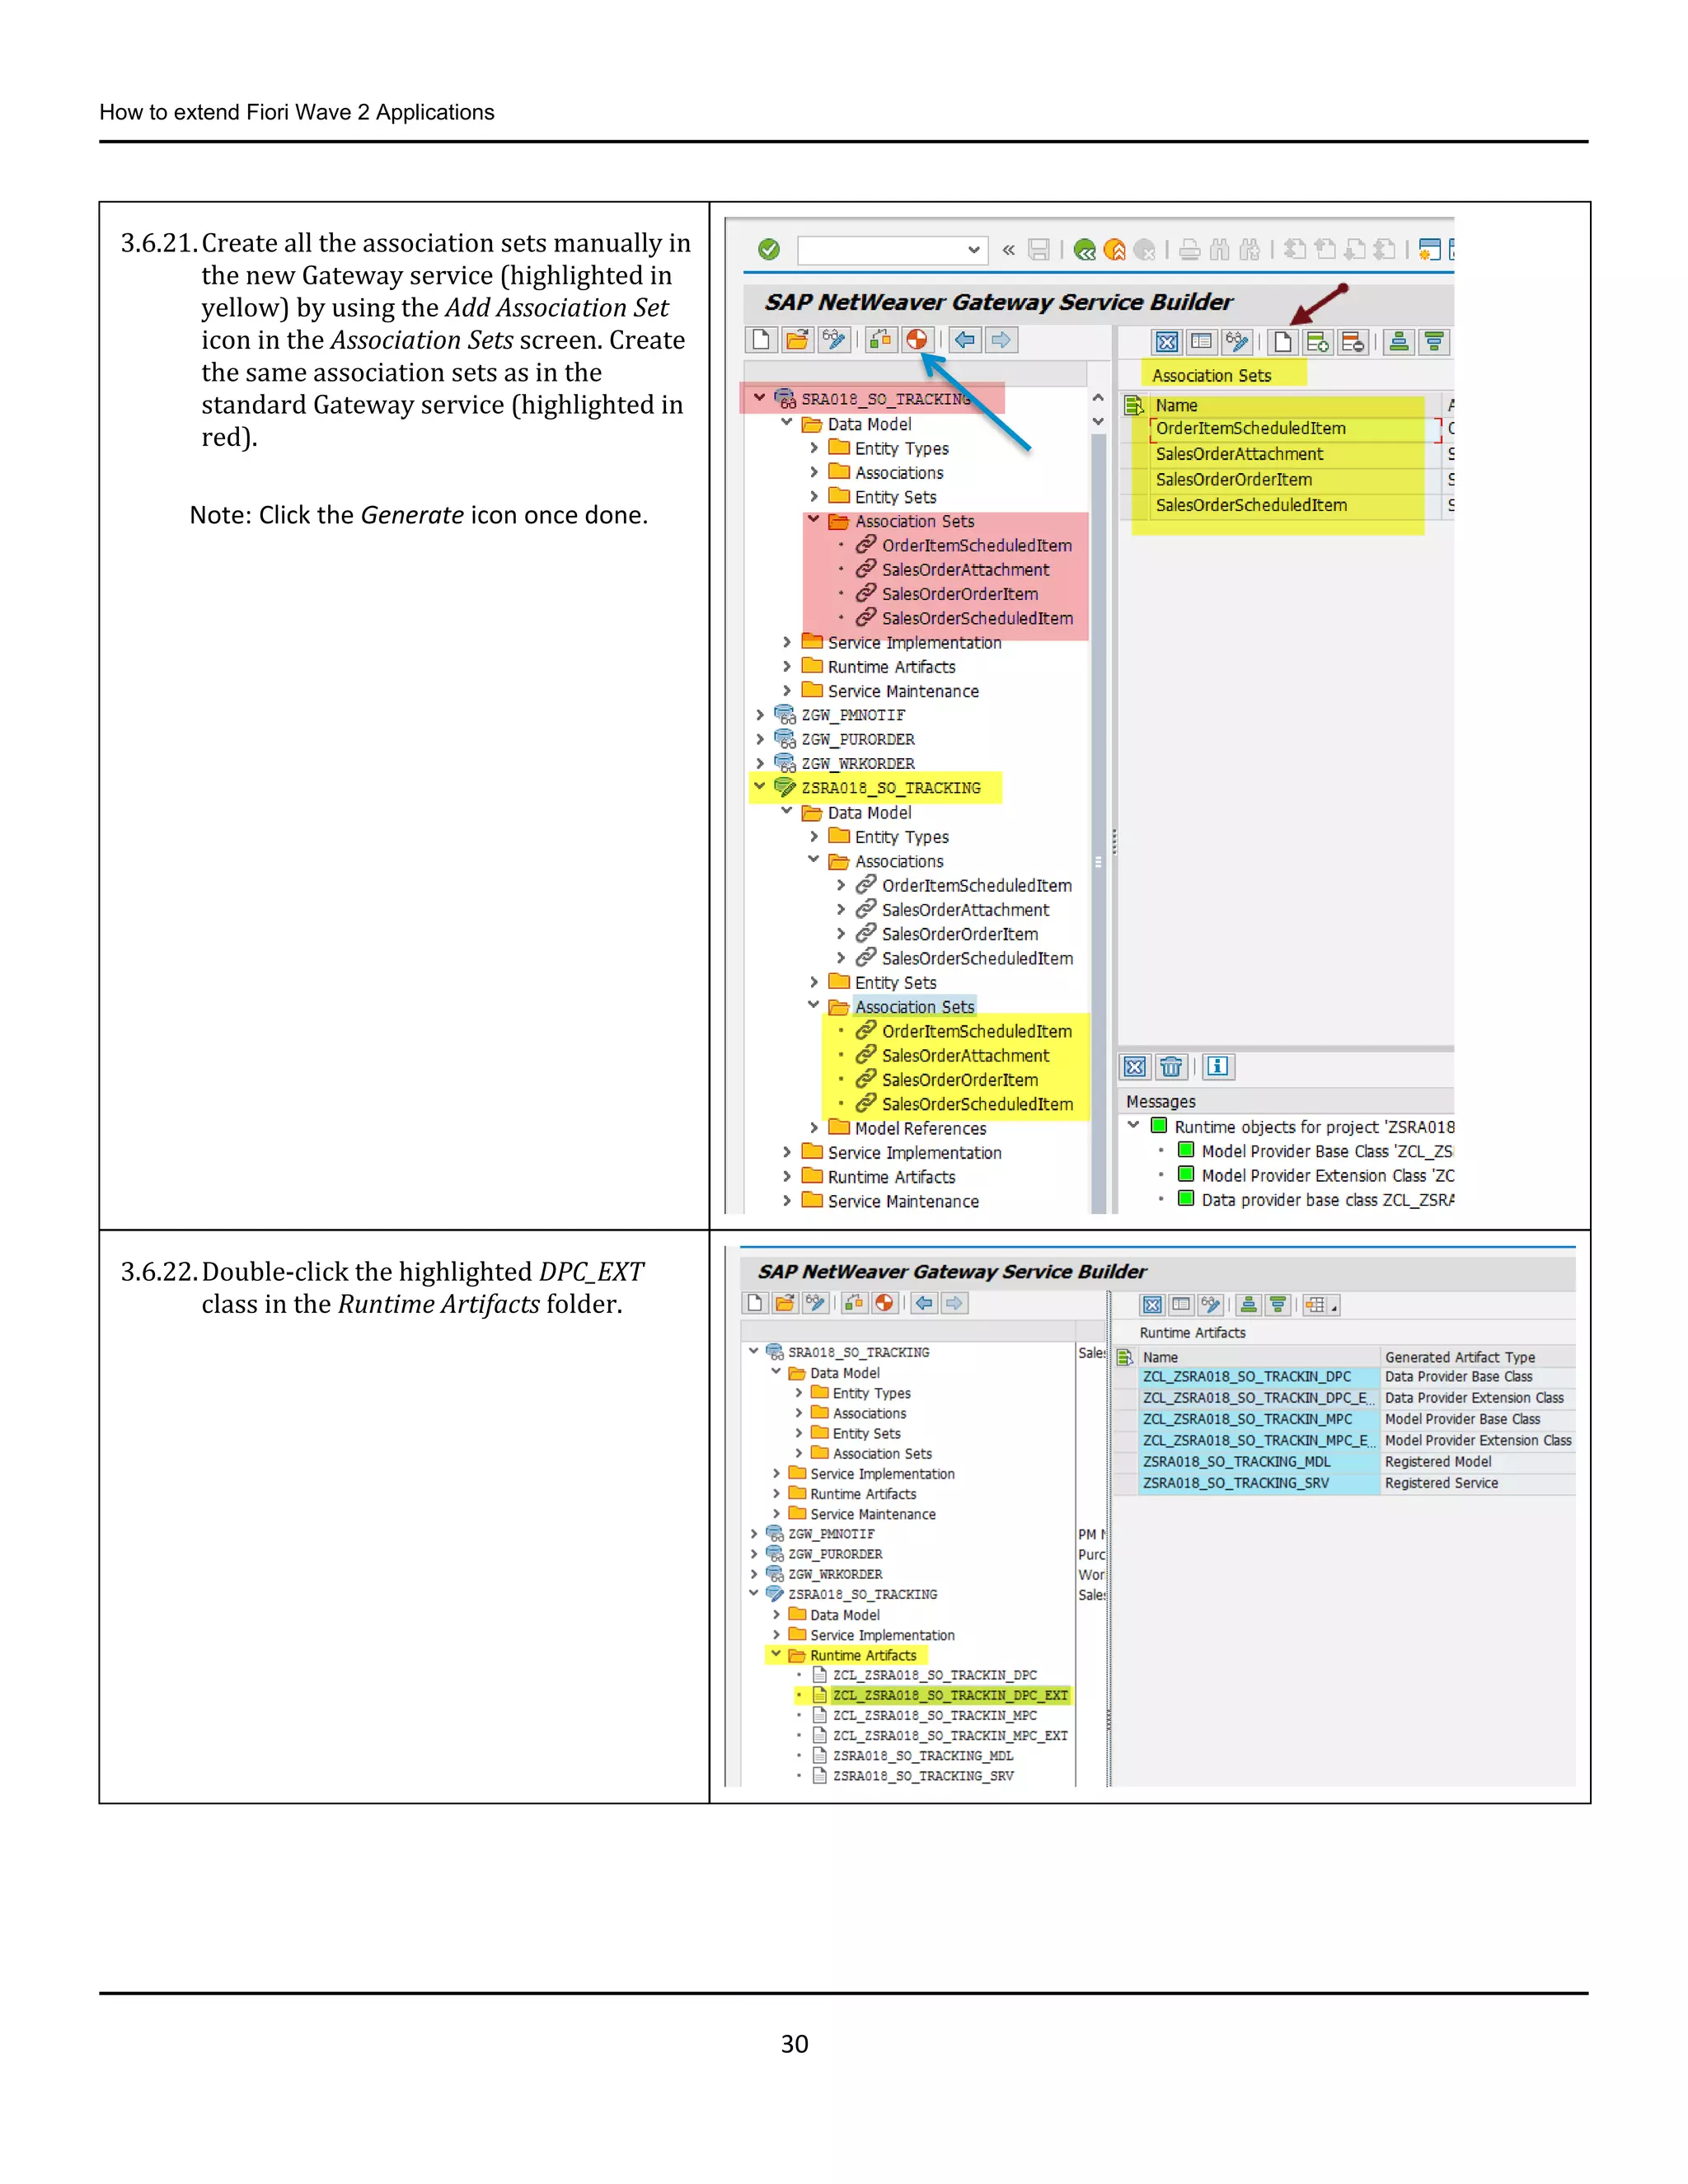
3.6.21.Create all the association sets manually in
the new Gateway service (highlighted in
yellow) by using the Add Association Set
icon in the Association Sets screen. Create
the same association sets as in the
standard Gateway service (highlighted in
red).
Note: Click the Generate icon once done.
3.6.22.Double-click the highlighted DPC_EXT
class in the Runtime Artifacts folder.
31.
How to extendFiori Wave 2 Applications
31
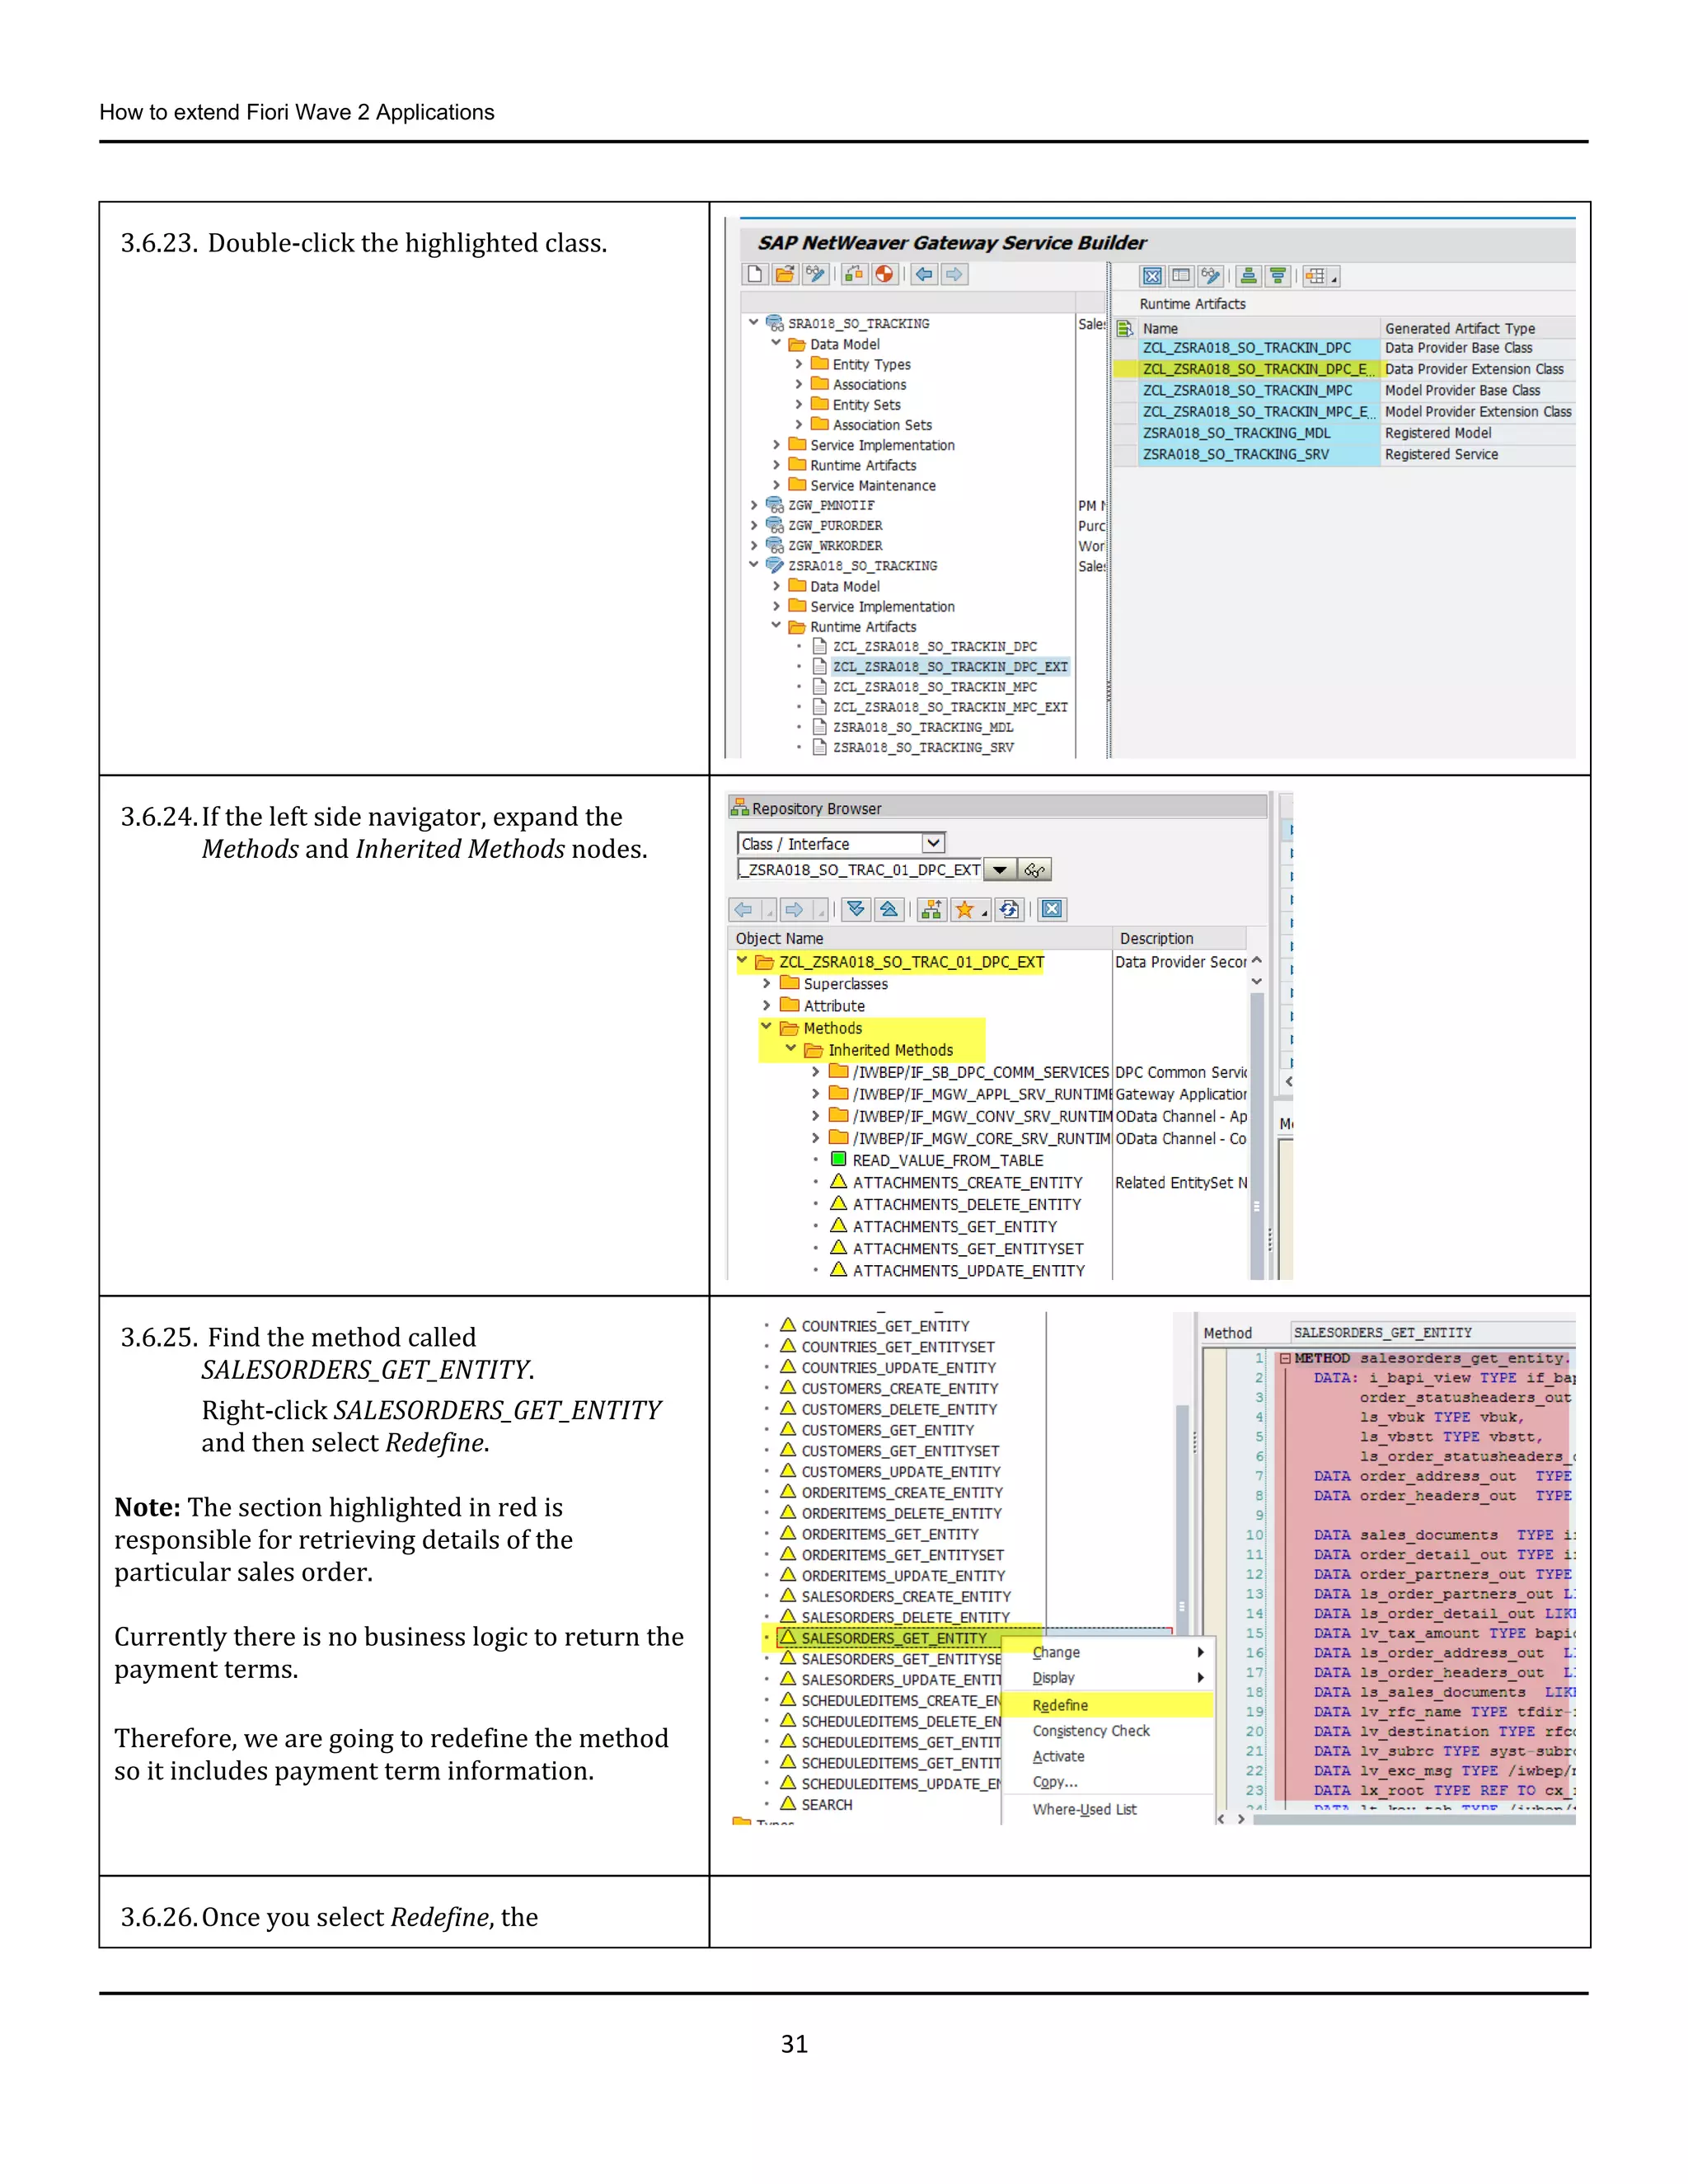
3.6.23. Double-click the highlighted class.
3.6.24.If the left side navigator, expand the
Methods and Inherited Methods nodes.
3.6.25. Find the method called
SALESORDERS_GET_ENTITY.
Right-click SALESORDERS_GET_ENTITY
and then select Redefine.
Note: The section highlighted in red is
responsible for retrieving details of the
particular sales order.
Currently there is no business logic to return the
payment terms.
Therefore, we are going to redefine the method
so it includes payment term information.
3.6.26.Once you select Redefine, the
32.
How to extendFiori Wave 2 Applications
32
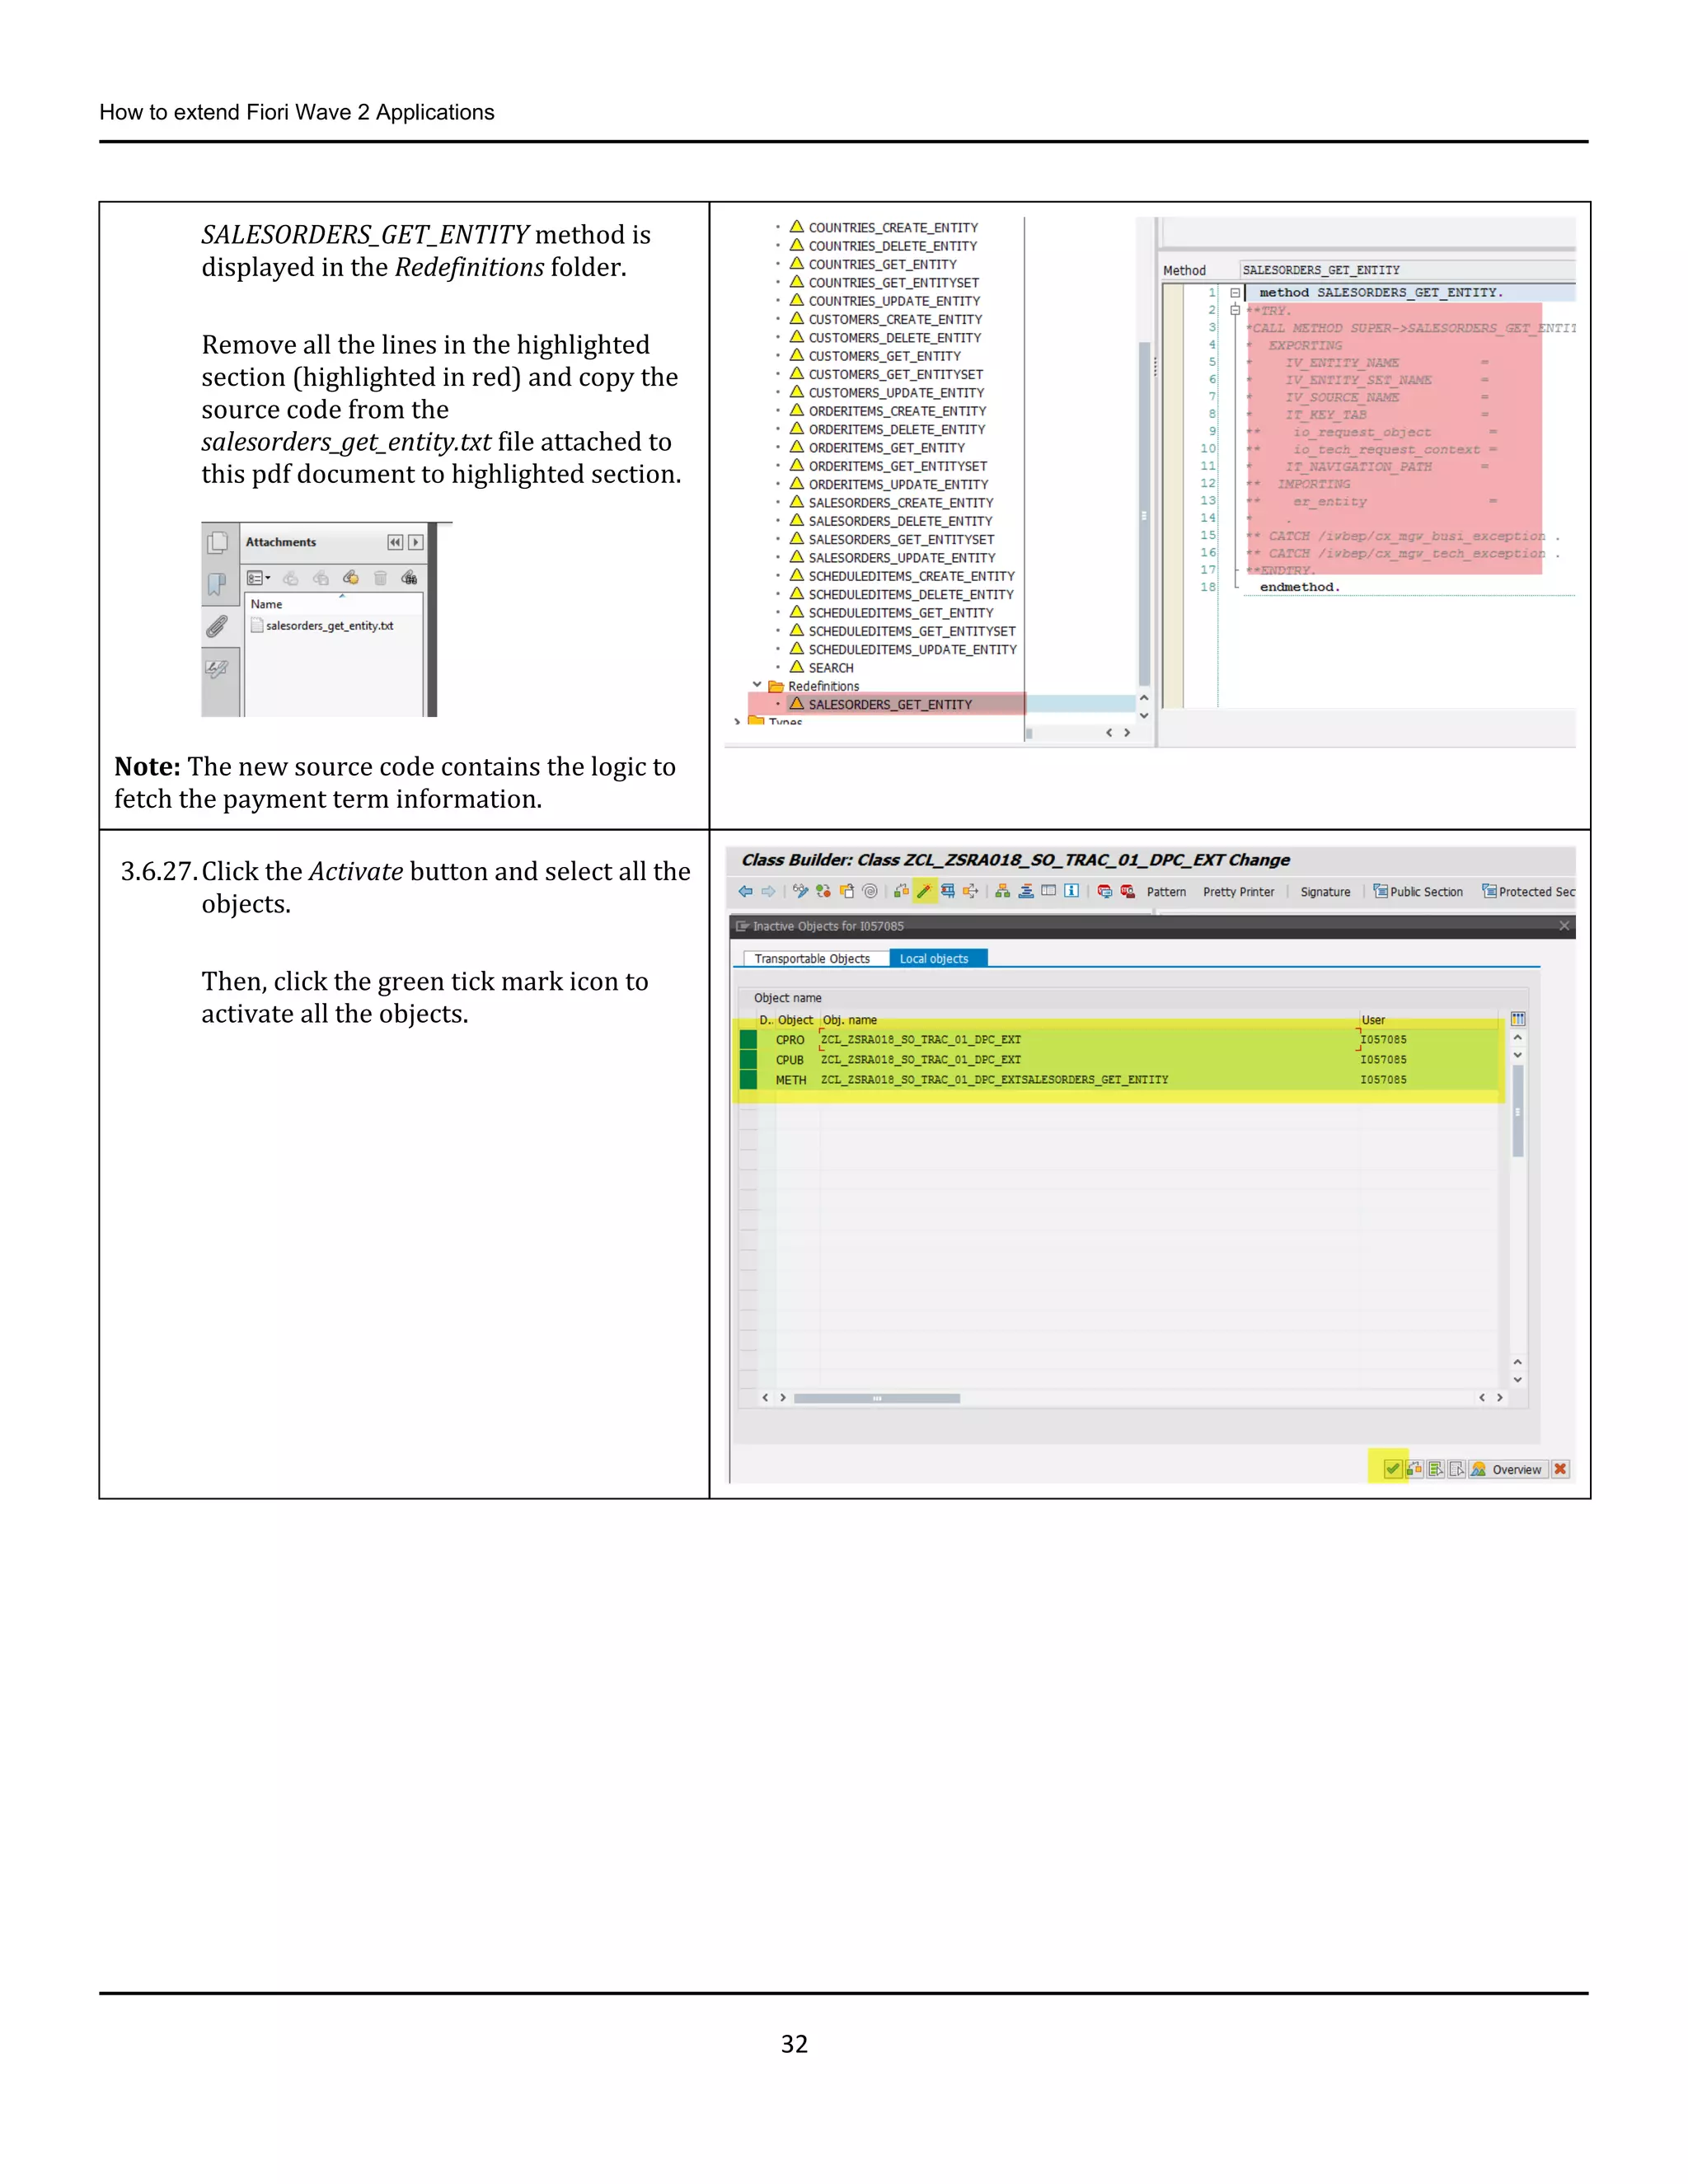
SALESORDERS_GET_ENTITY method is
displayed in the Redefinitions folder.
Remove all the lines in the highlighted
section (highlighted in red) and copy the
source code from the
salesorders_get_entity.txt file attached to
this pdf document to highlighted section.
Note: The new source code contains the logic to
fetch the payment term information.
3.6.27.Click the Activate button and select all the
objects.
Then, click the green tick mark icon to
activate all the objects.
33.
How to extendFiori Wave 2 Applications
33
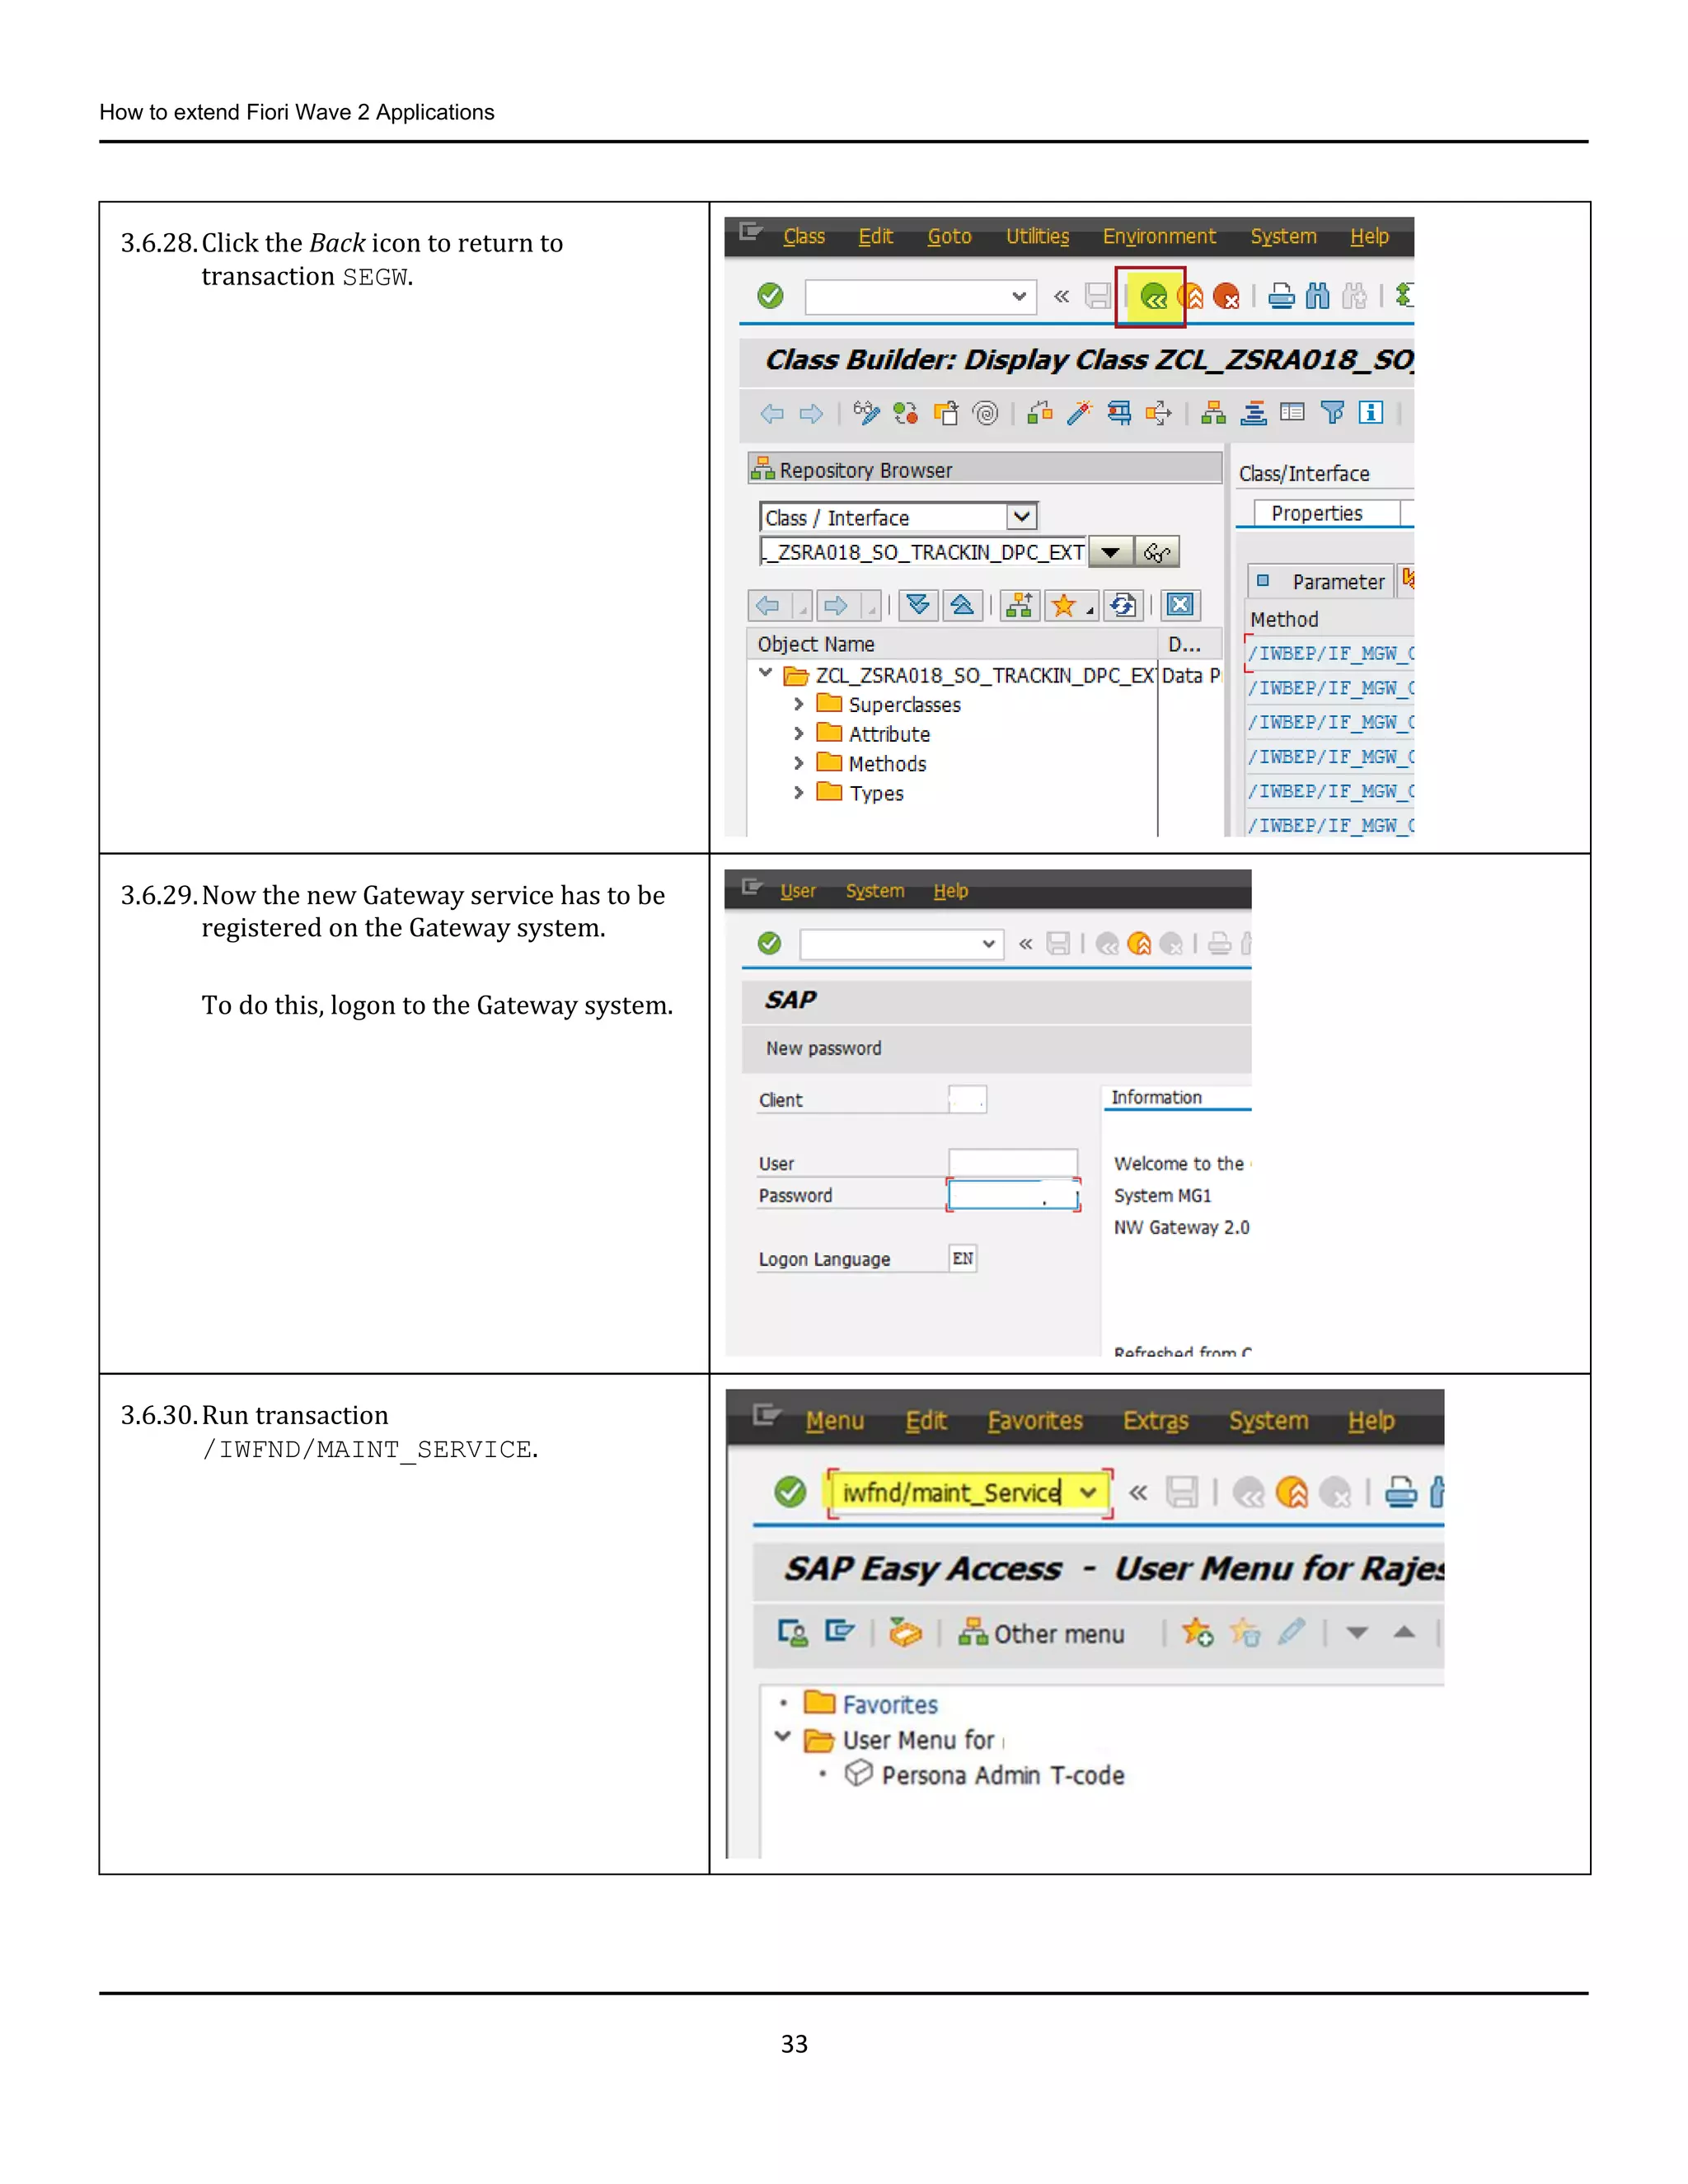
3.6.28.Click the Back icon to return to
transaction SEGW.
3.6.29.Now the new Gateway service has to be
registered on the Gateway system.
To do this, logon to the Gateway system.
3.6.30.Run transaction
/IWFND/MAINT_SERVICE.
34.
How to extendFiori Wave 2 Applications
34
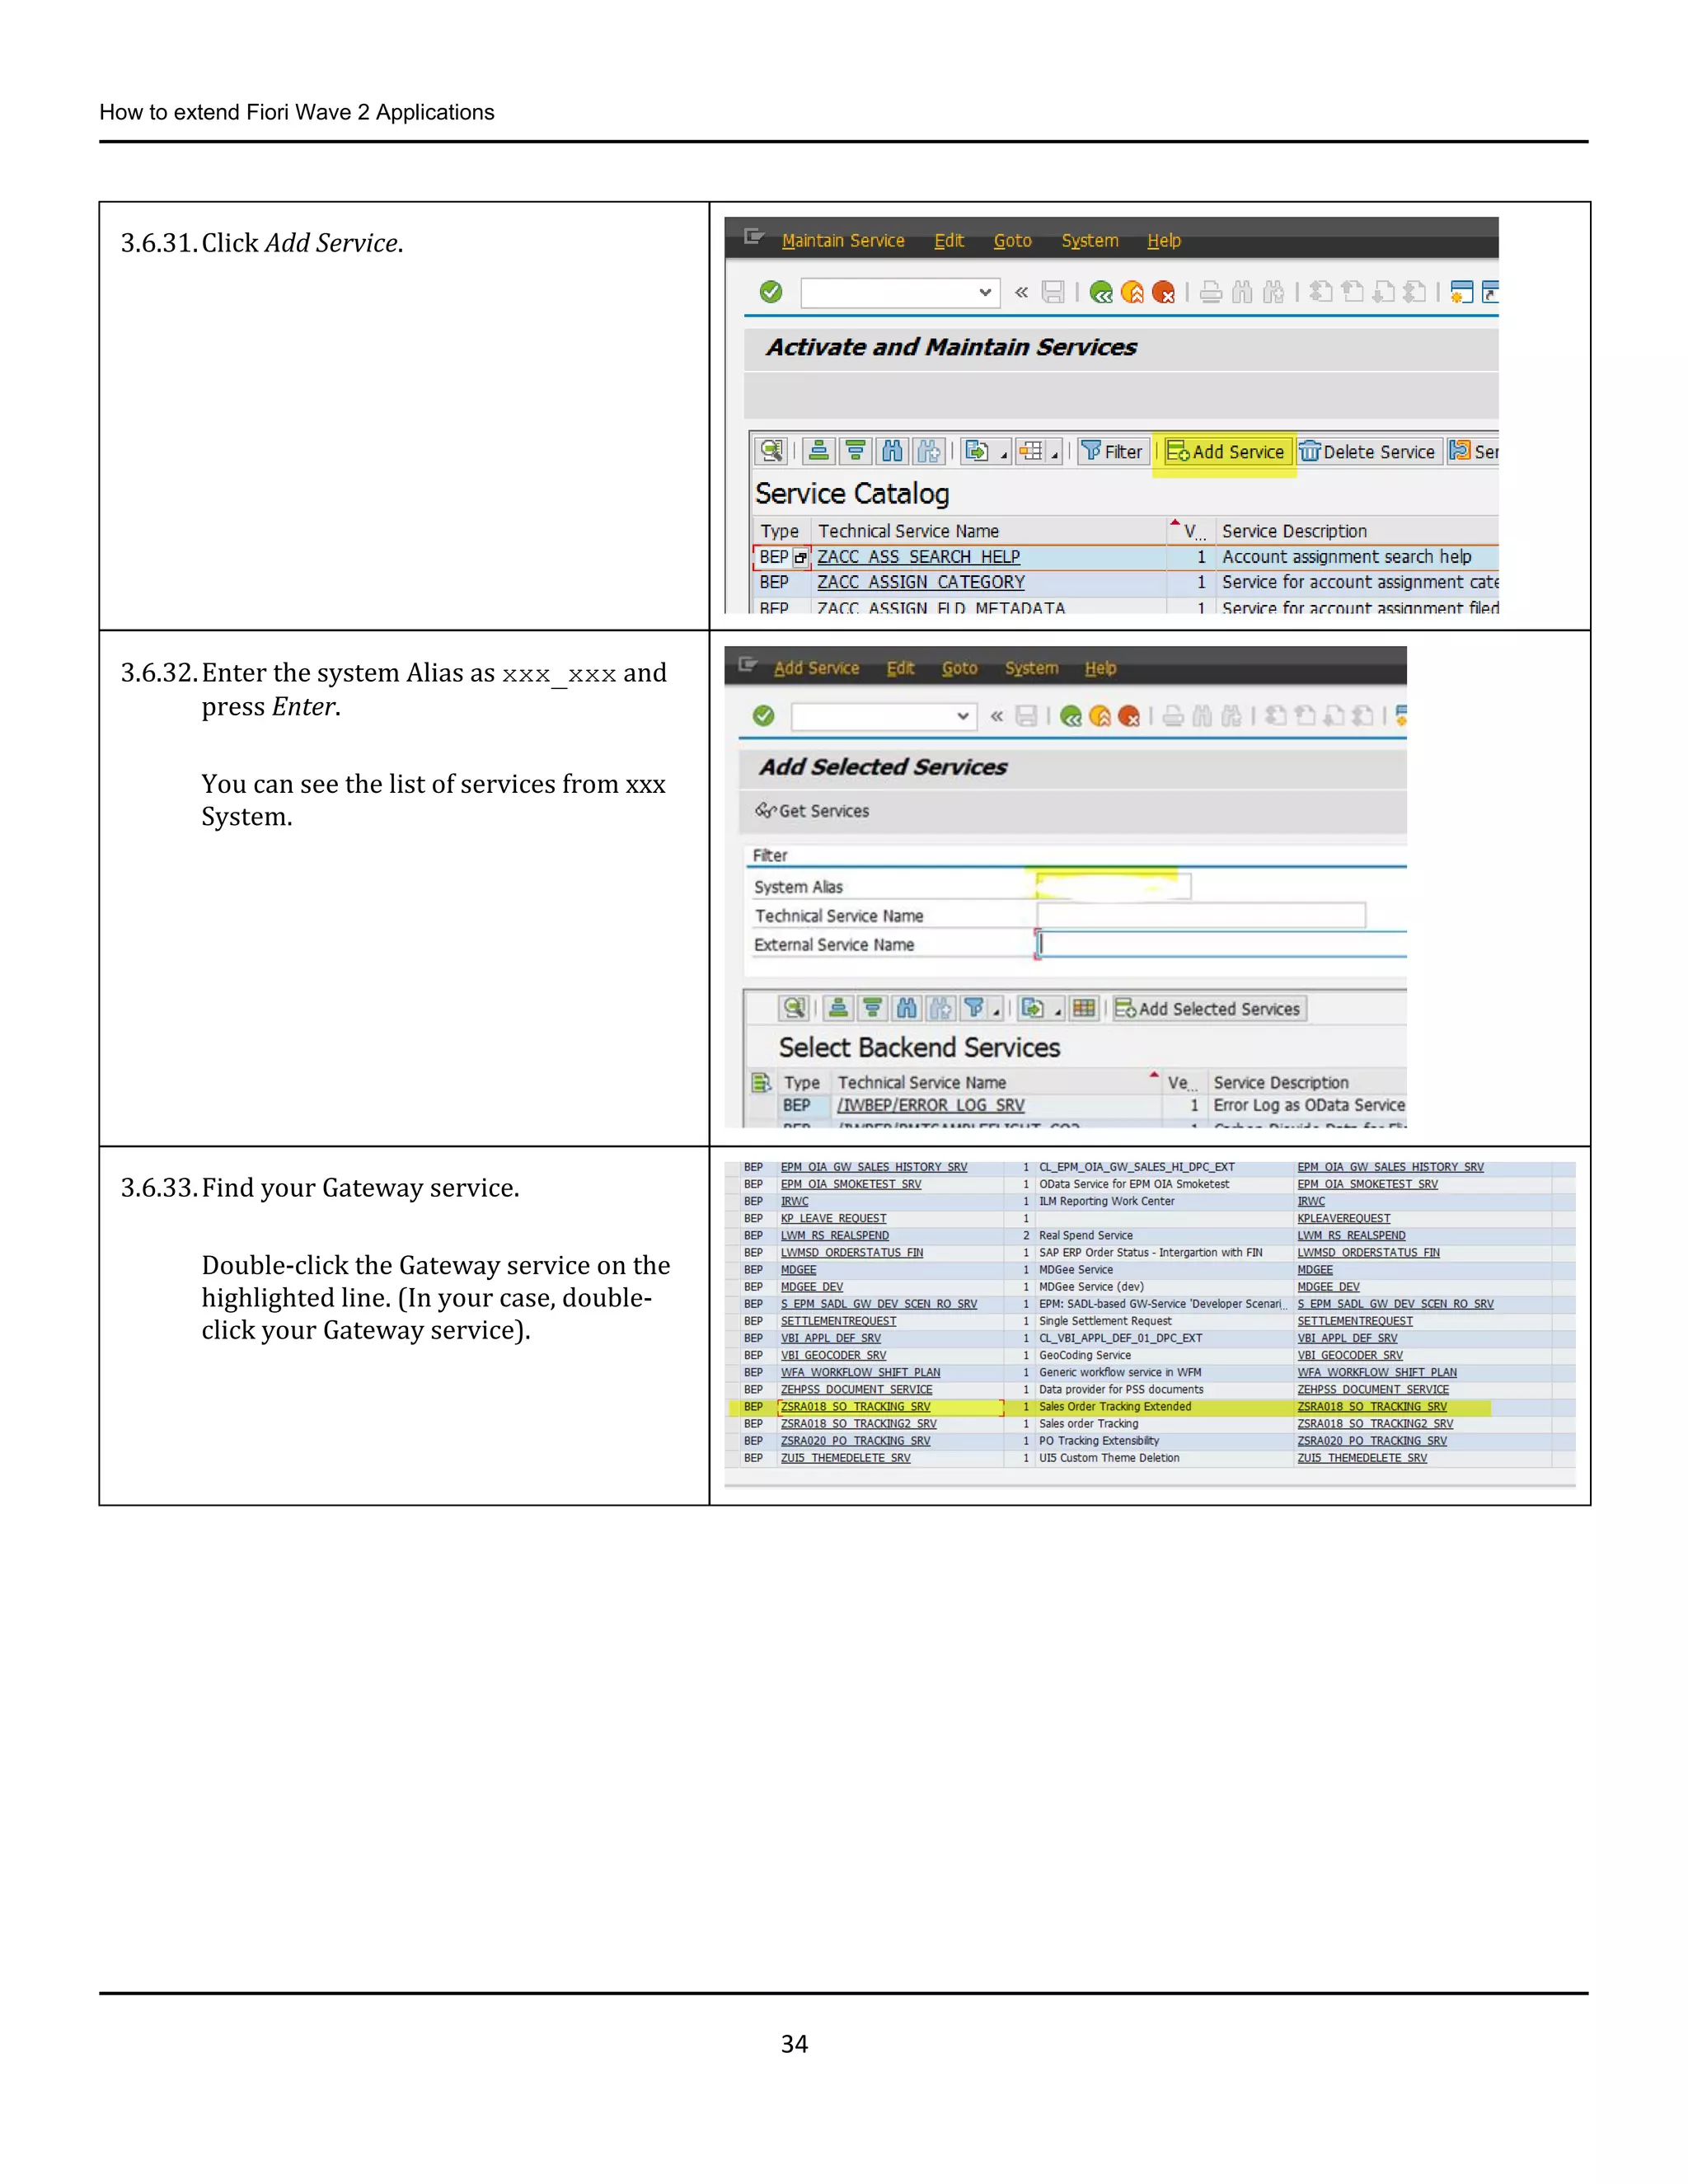
3.6.31.Click Add Service.
3.6.32.Enter the system Alias as xxx_xxx and
press Enter.
You can see the list of services from xxx
System.
3.6.33.Find your Gateway service.
Double-click the Gateway service on the
highlighted line. (In your case, double-
click your Gateway service).
35.
How to extendFiori Wave 2 Applications
35
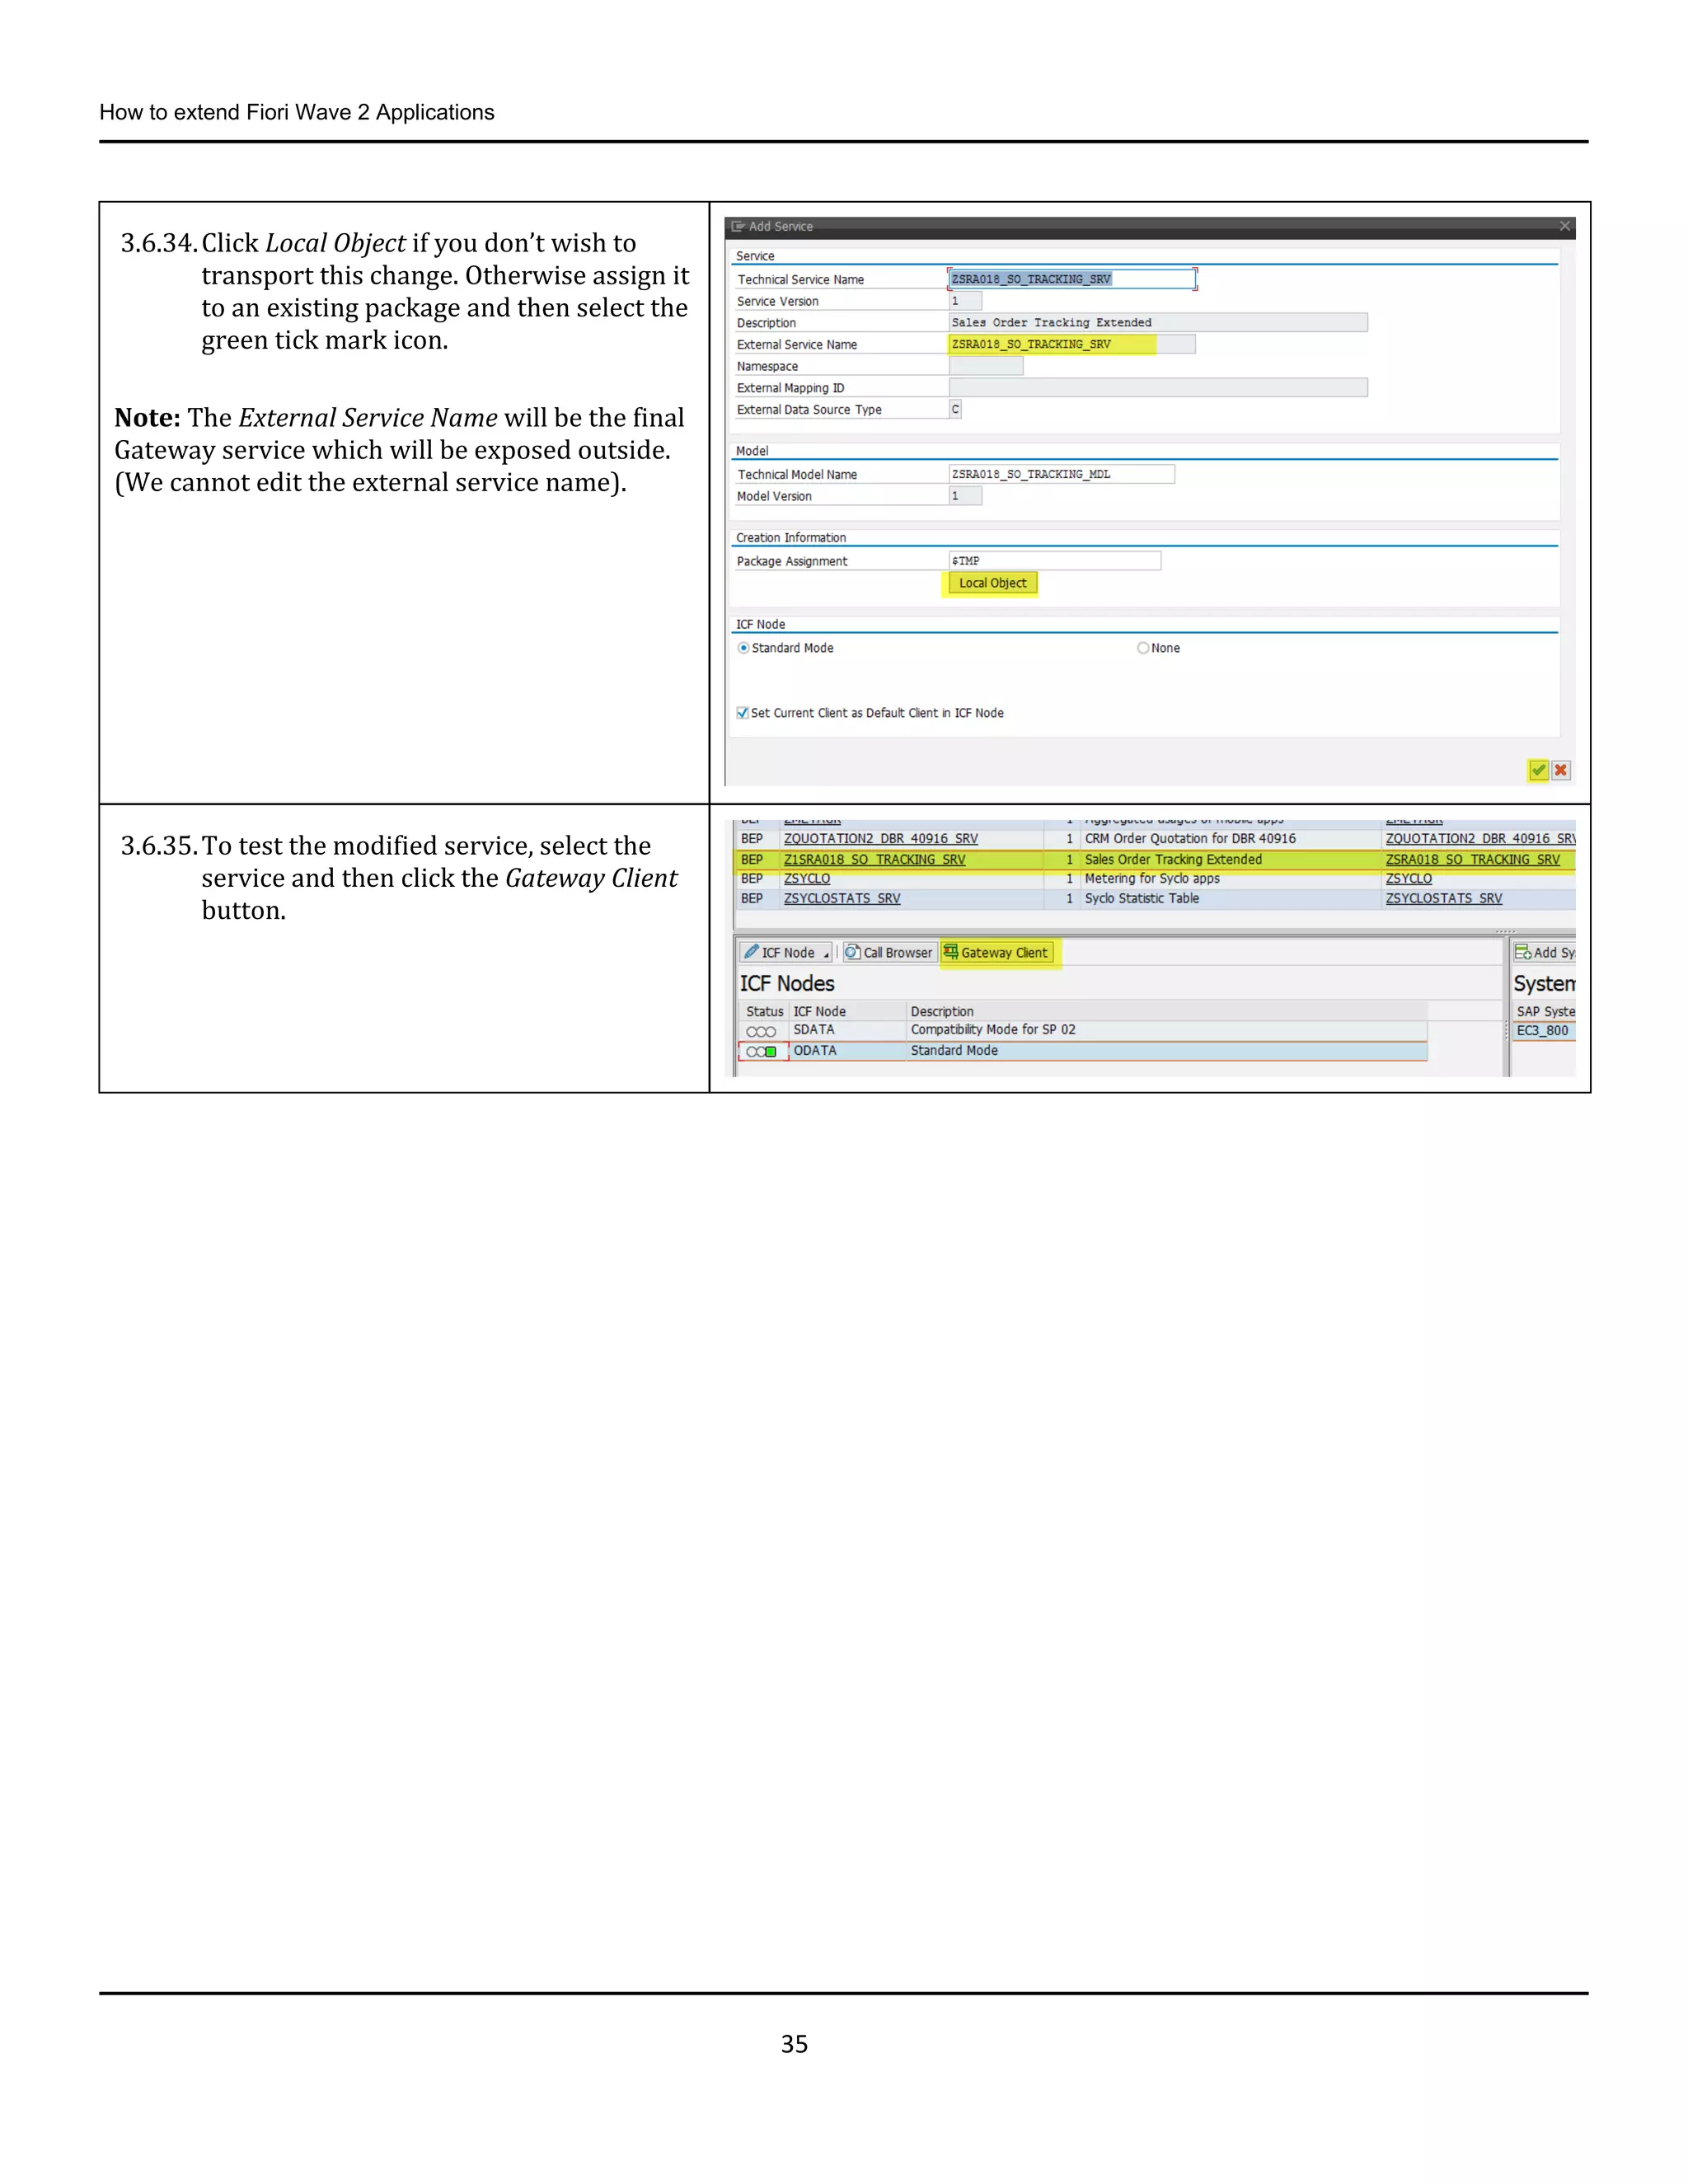
3.6.34.Click Local Object if you don’t wish to
transport this change. Otherwise assign it
to an existing package and then select the
green tick mark icon.
Note: The External Service Name will be the final
Gateway service which will be exposed outside.
(We cannot edit the external service name).
3.6.35.To test the modified service, select the
service and then click the Gateway Client
button.
36.
How to extendFiori Wave 2 Applications
36
3.7. Creating a New Enhancement SAPUI5 Project
You need to create a new enhancement project using the SAP Fiori Toolkit where you can add or modify the existing views. By
doing this, you can achieve the goal without changing the existing content.
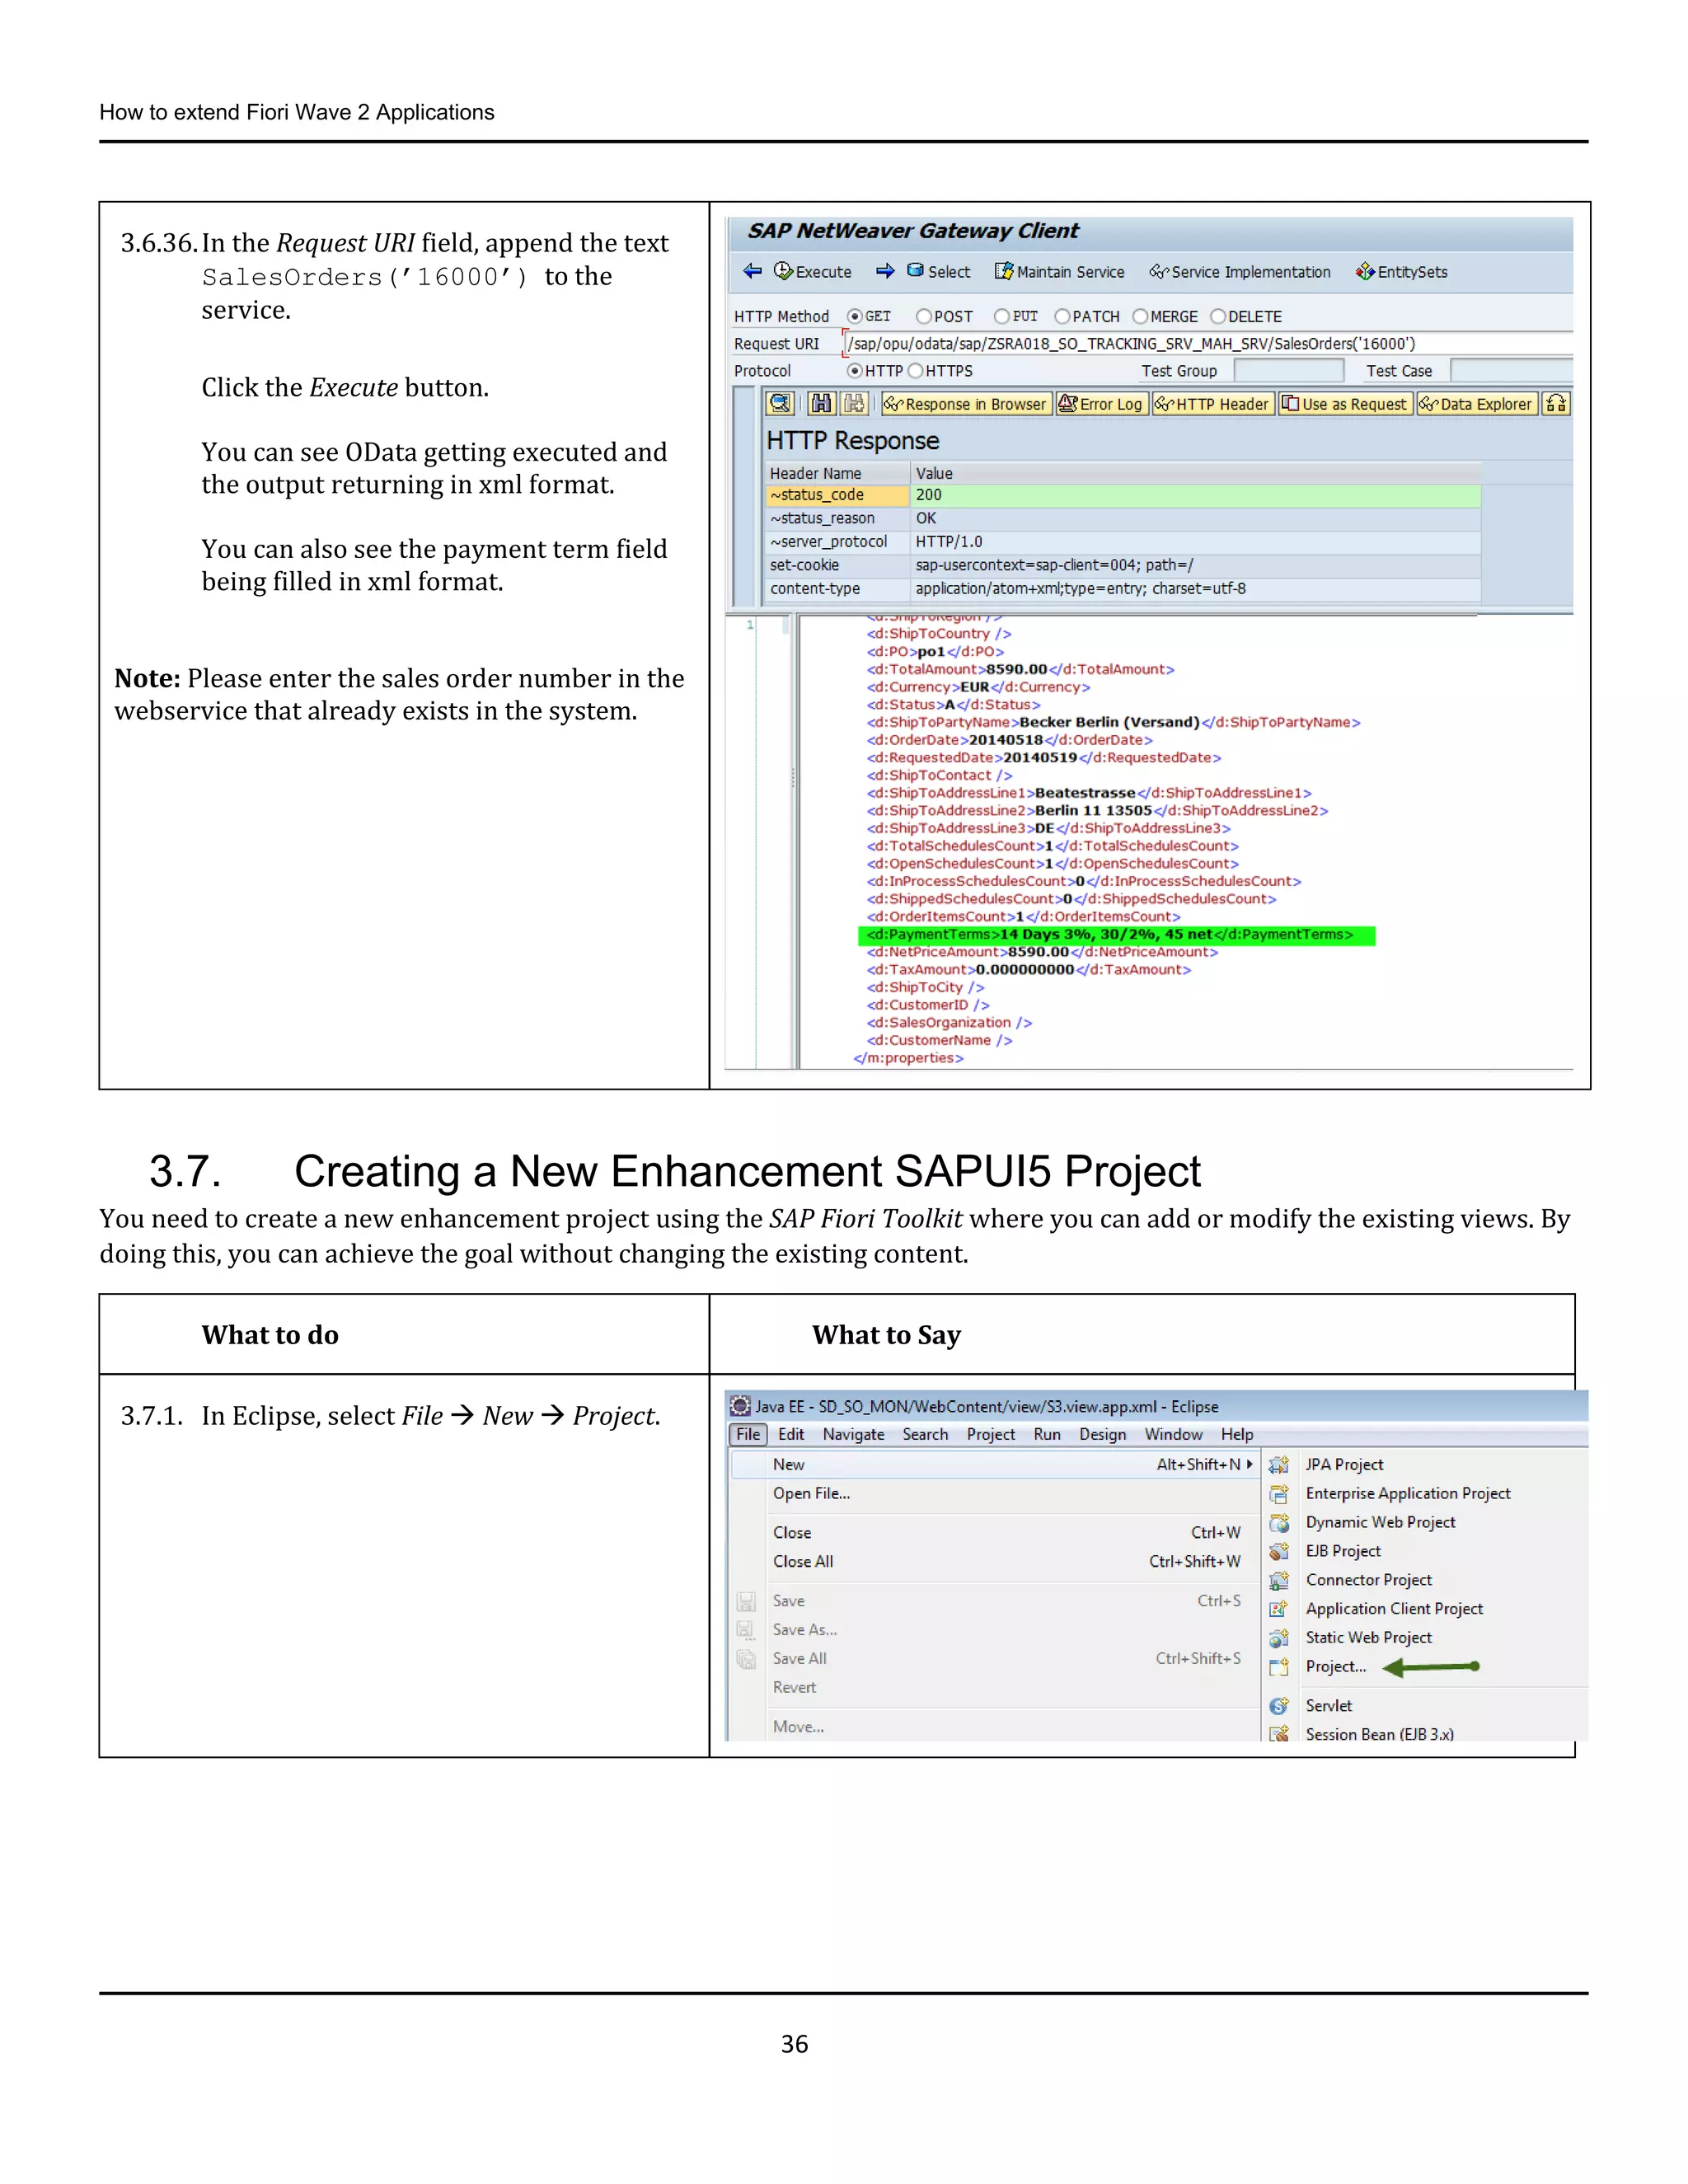
3.6.36.In the Request URI field, append the text
SalesOrders(’16000’) to the
service.
Click the Execute button.
You can see OData getting executed and
the output returning in xml format.
You can also see the payment term field
being filled in xml format.
Note: Please enter the sales order number in the
webservice that already exists in the system.
What to do What to Say
3.7.1. In Eclipse, select File New Project.
37.
How to extendFiori Wave 2 Applications
37
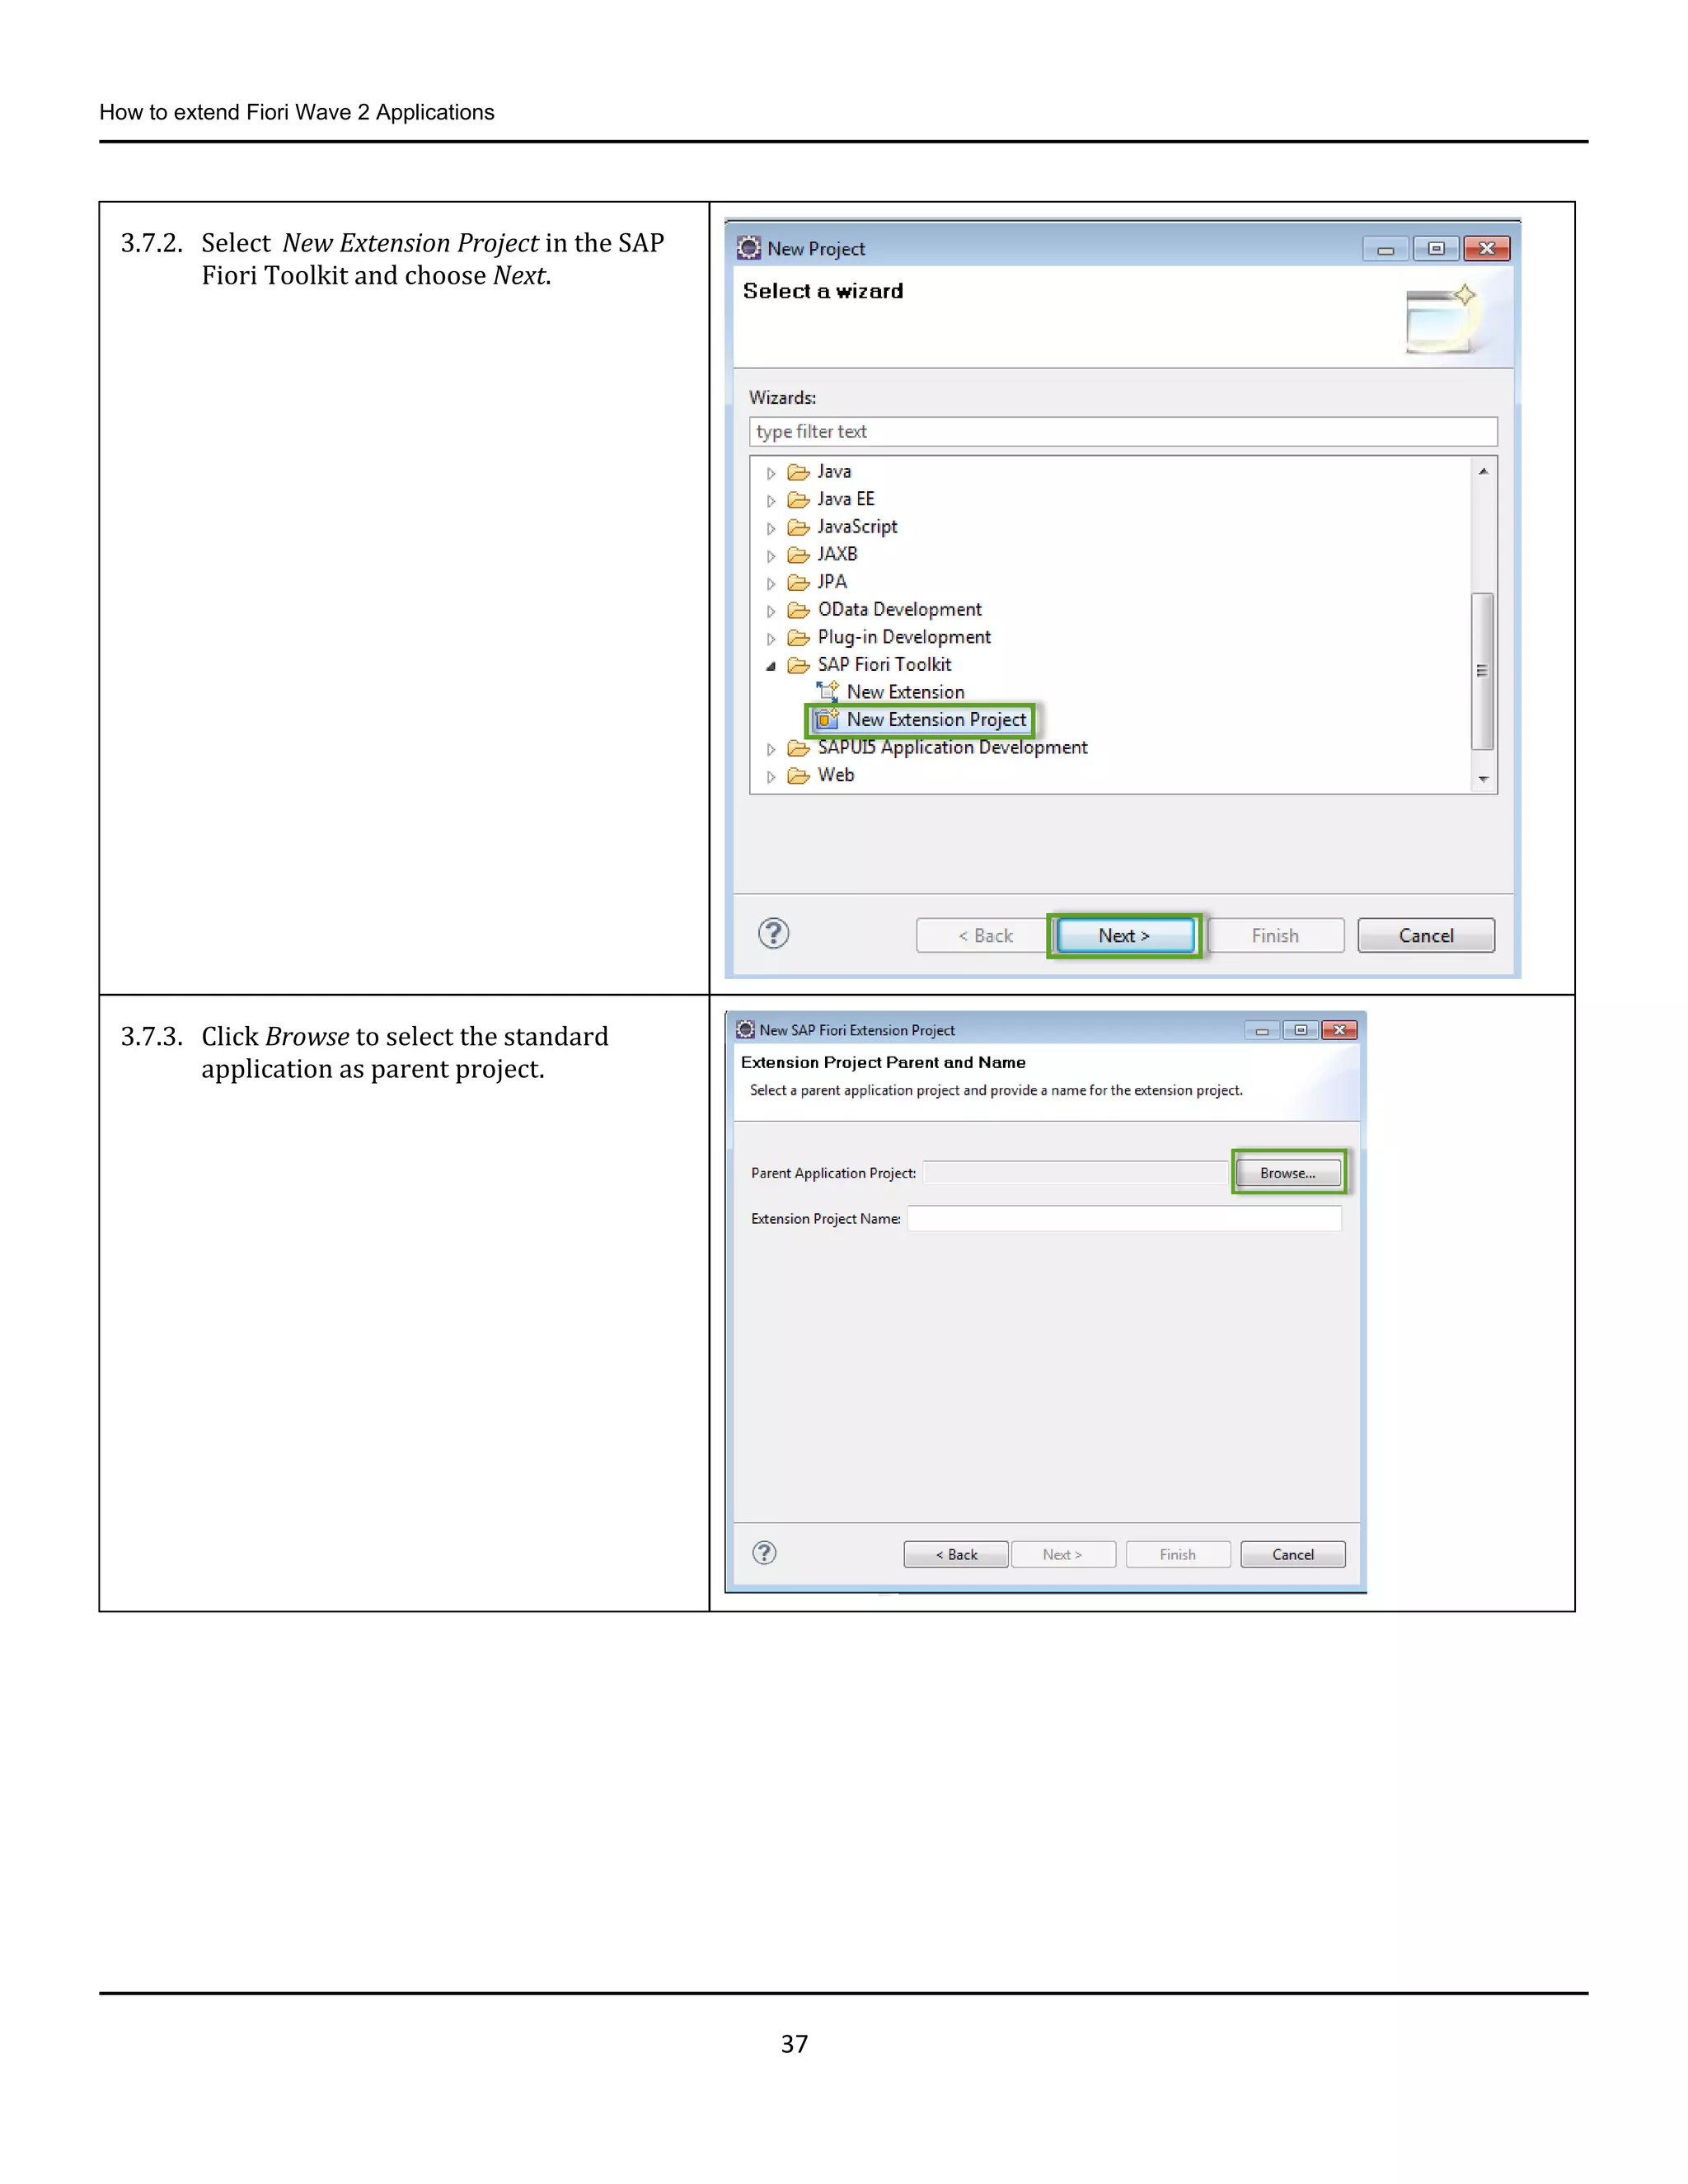
3.7.2. Select New Extension Project in the SAP
Fiori Toolkit and choose Next.
3.7.3. Click Browse to select the standard
application as parent project.
38.
How to extendFiori Wave 2 Applications
38
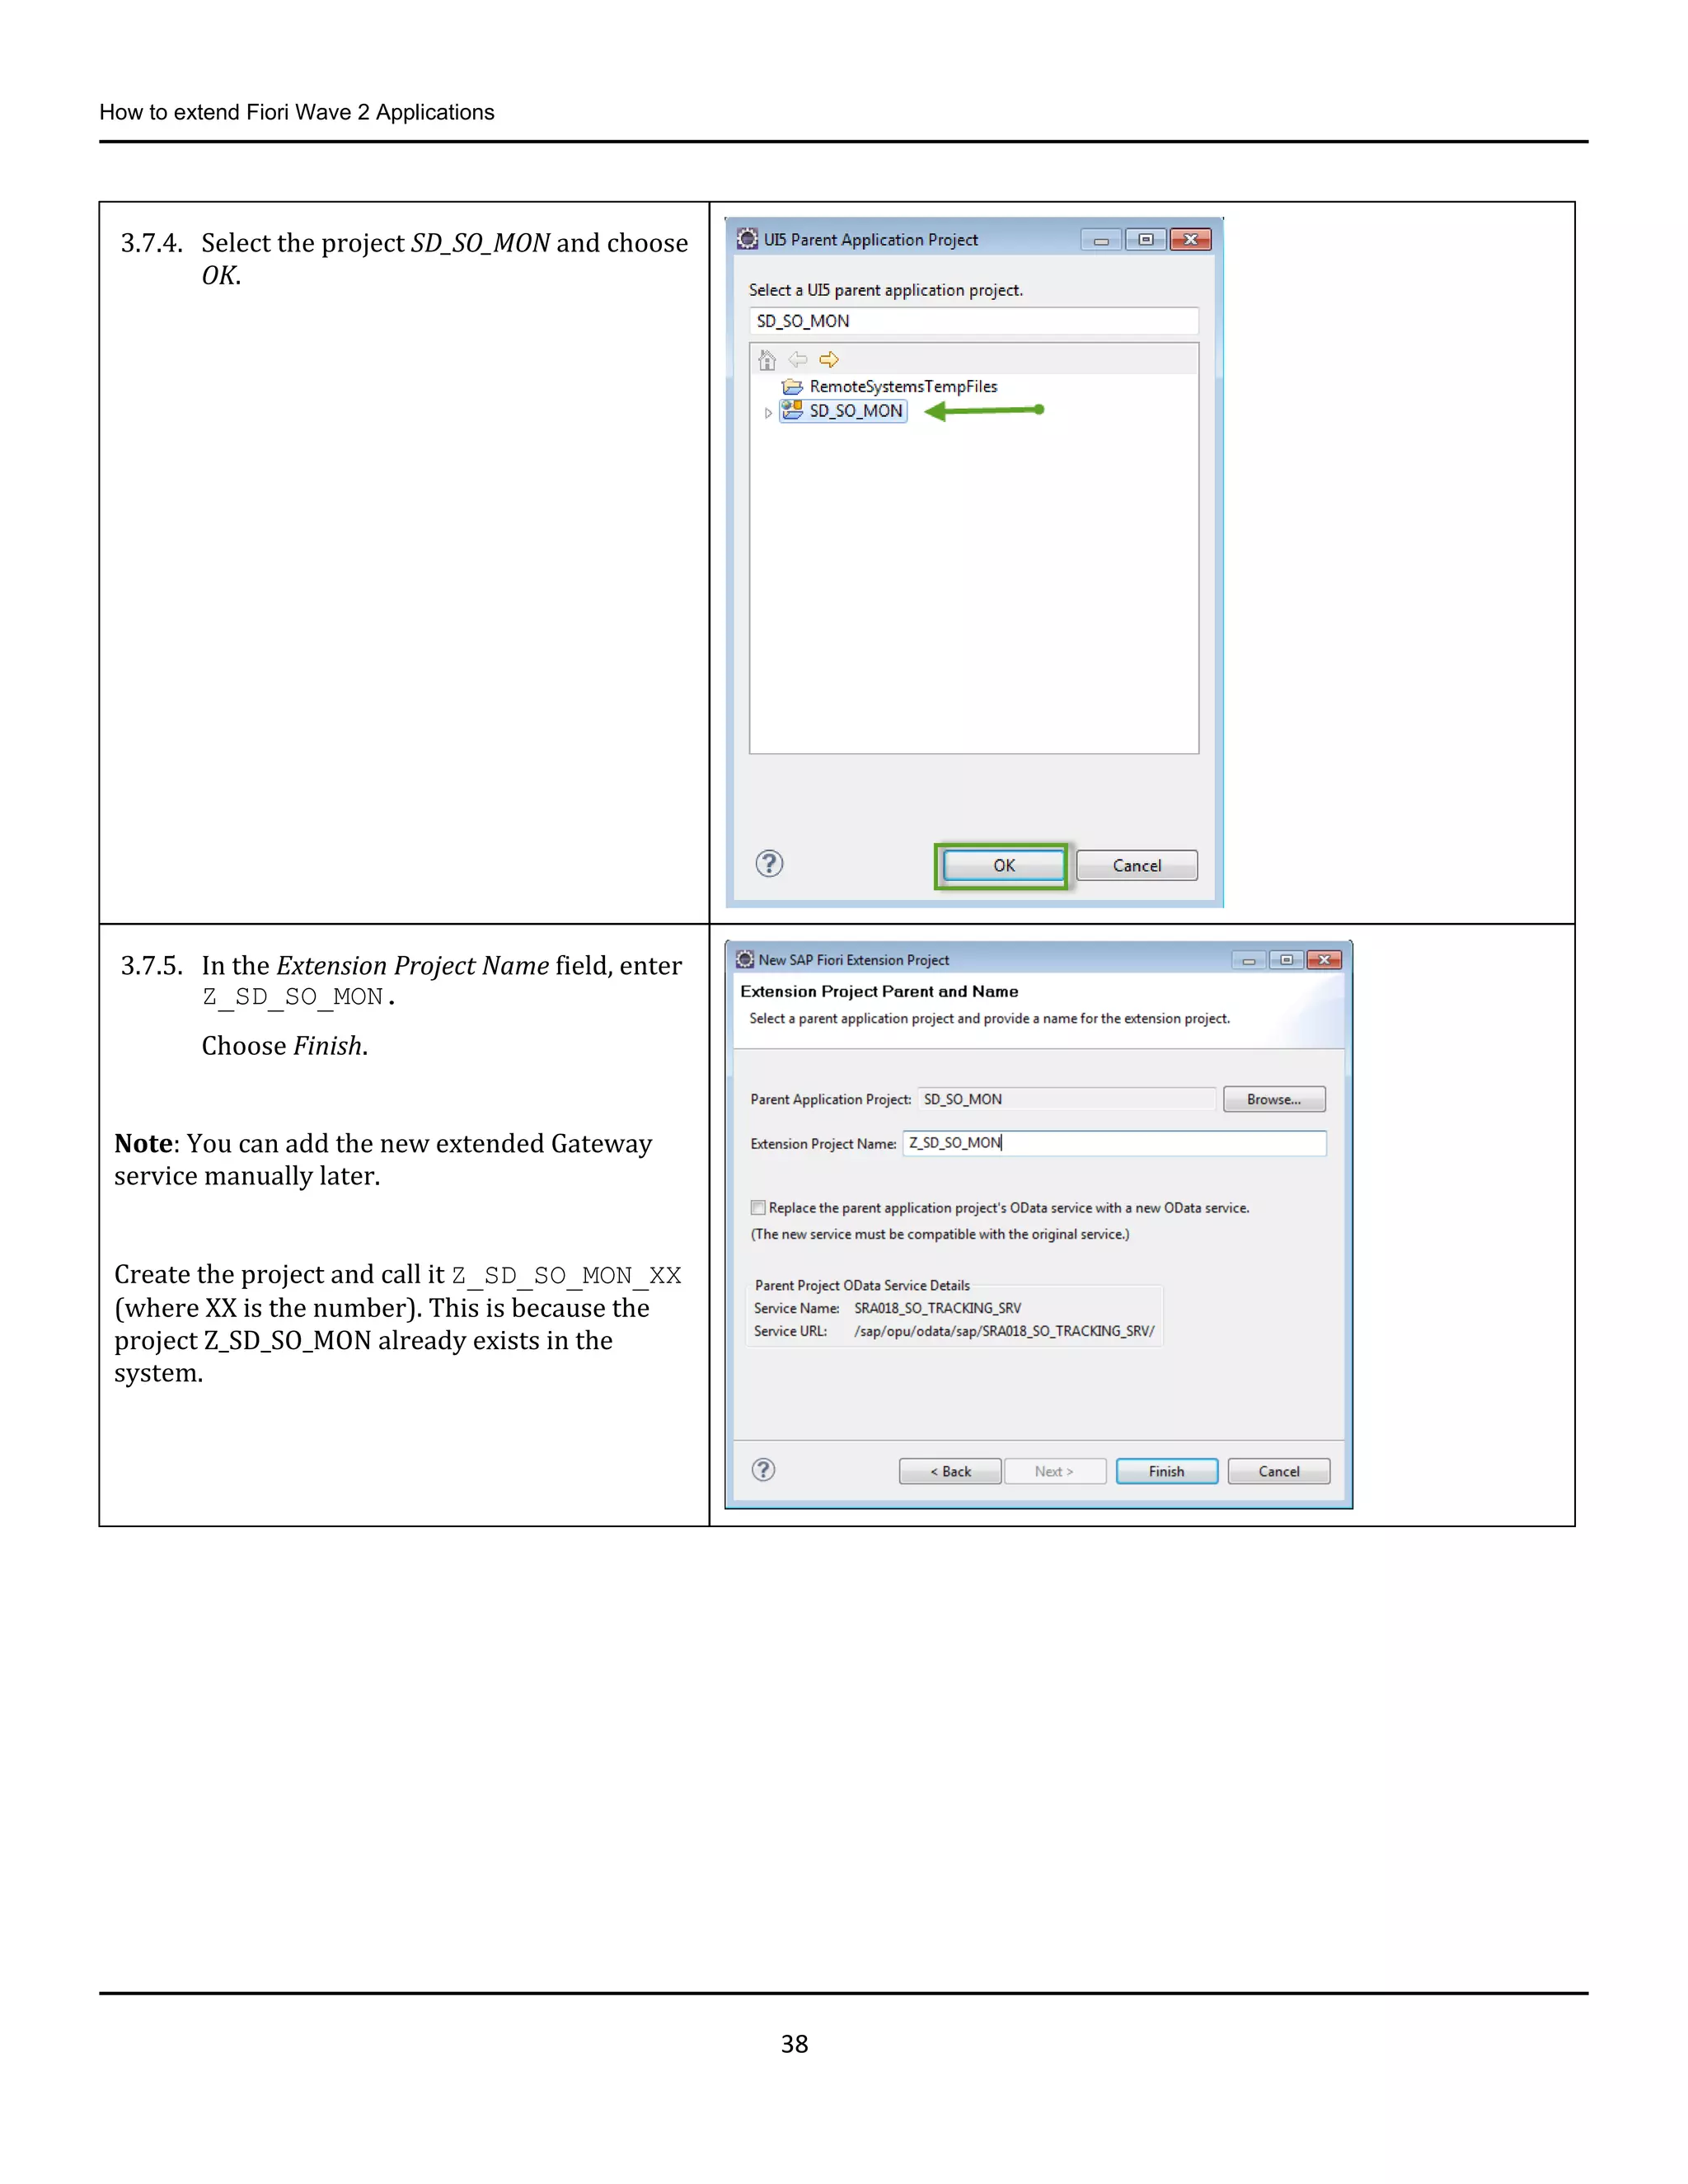
3.7.4. Select the project SD_SO_MON and choose
OK.
3.7.5. In the Extension Project Name field, enter
Z_SD_SO_MON.
Choose Finish.
Note: You can add the new extended Gateway
service manually later.
Create the project and call it Z_SD_SO_MON_XX
(where XX is the number). This is because the
project Z_SD_SO_MON already exists in the
system.
39.
How to extendFiori Wave 2 Applications
39
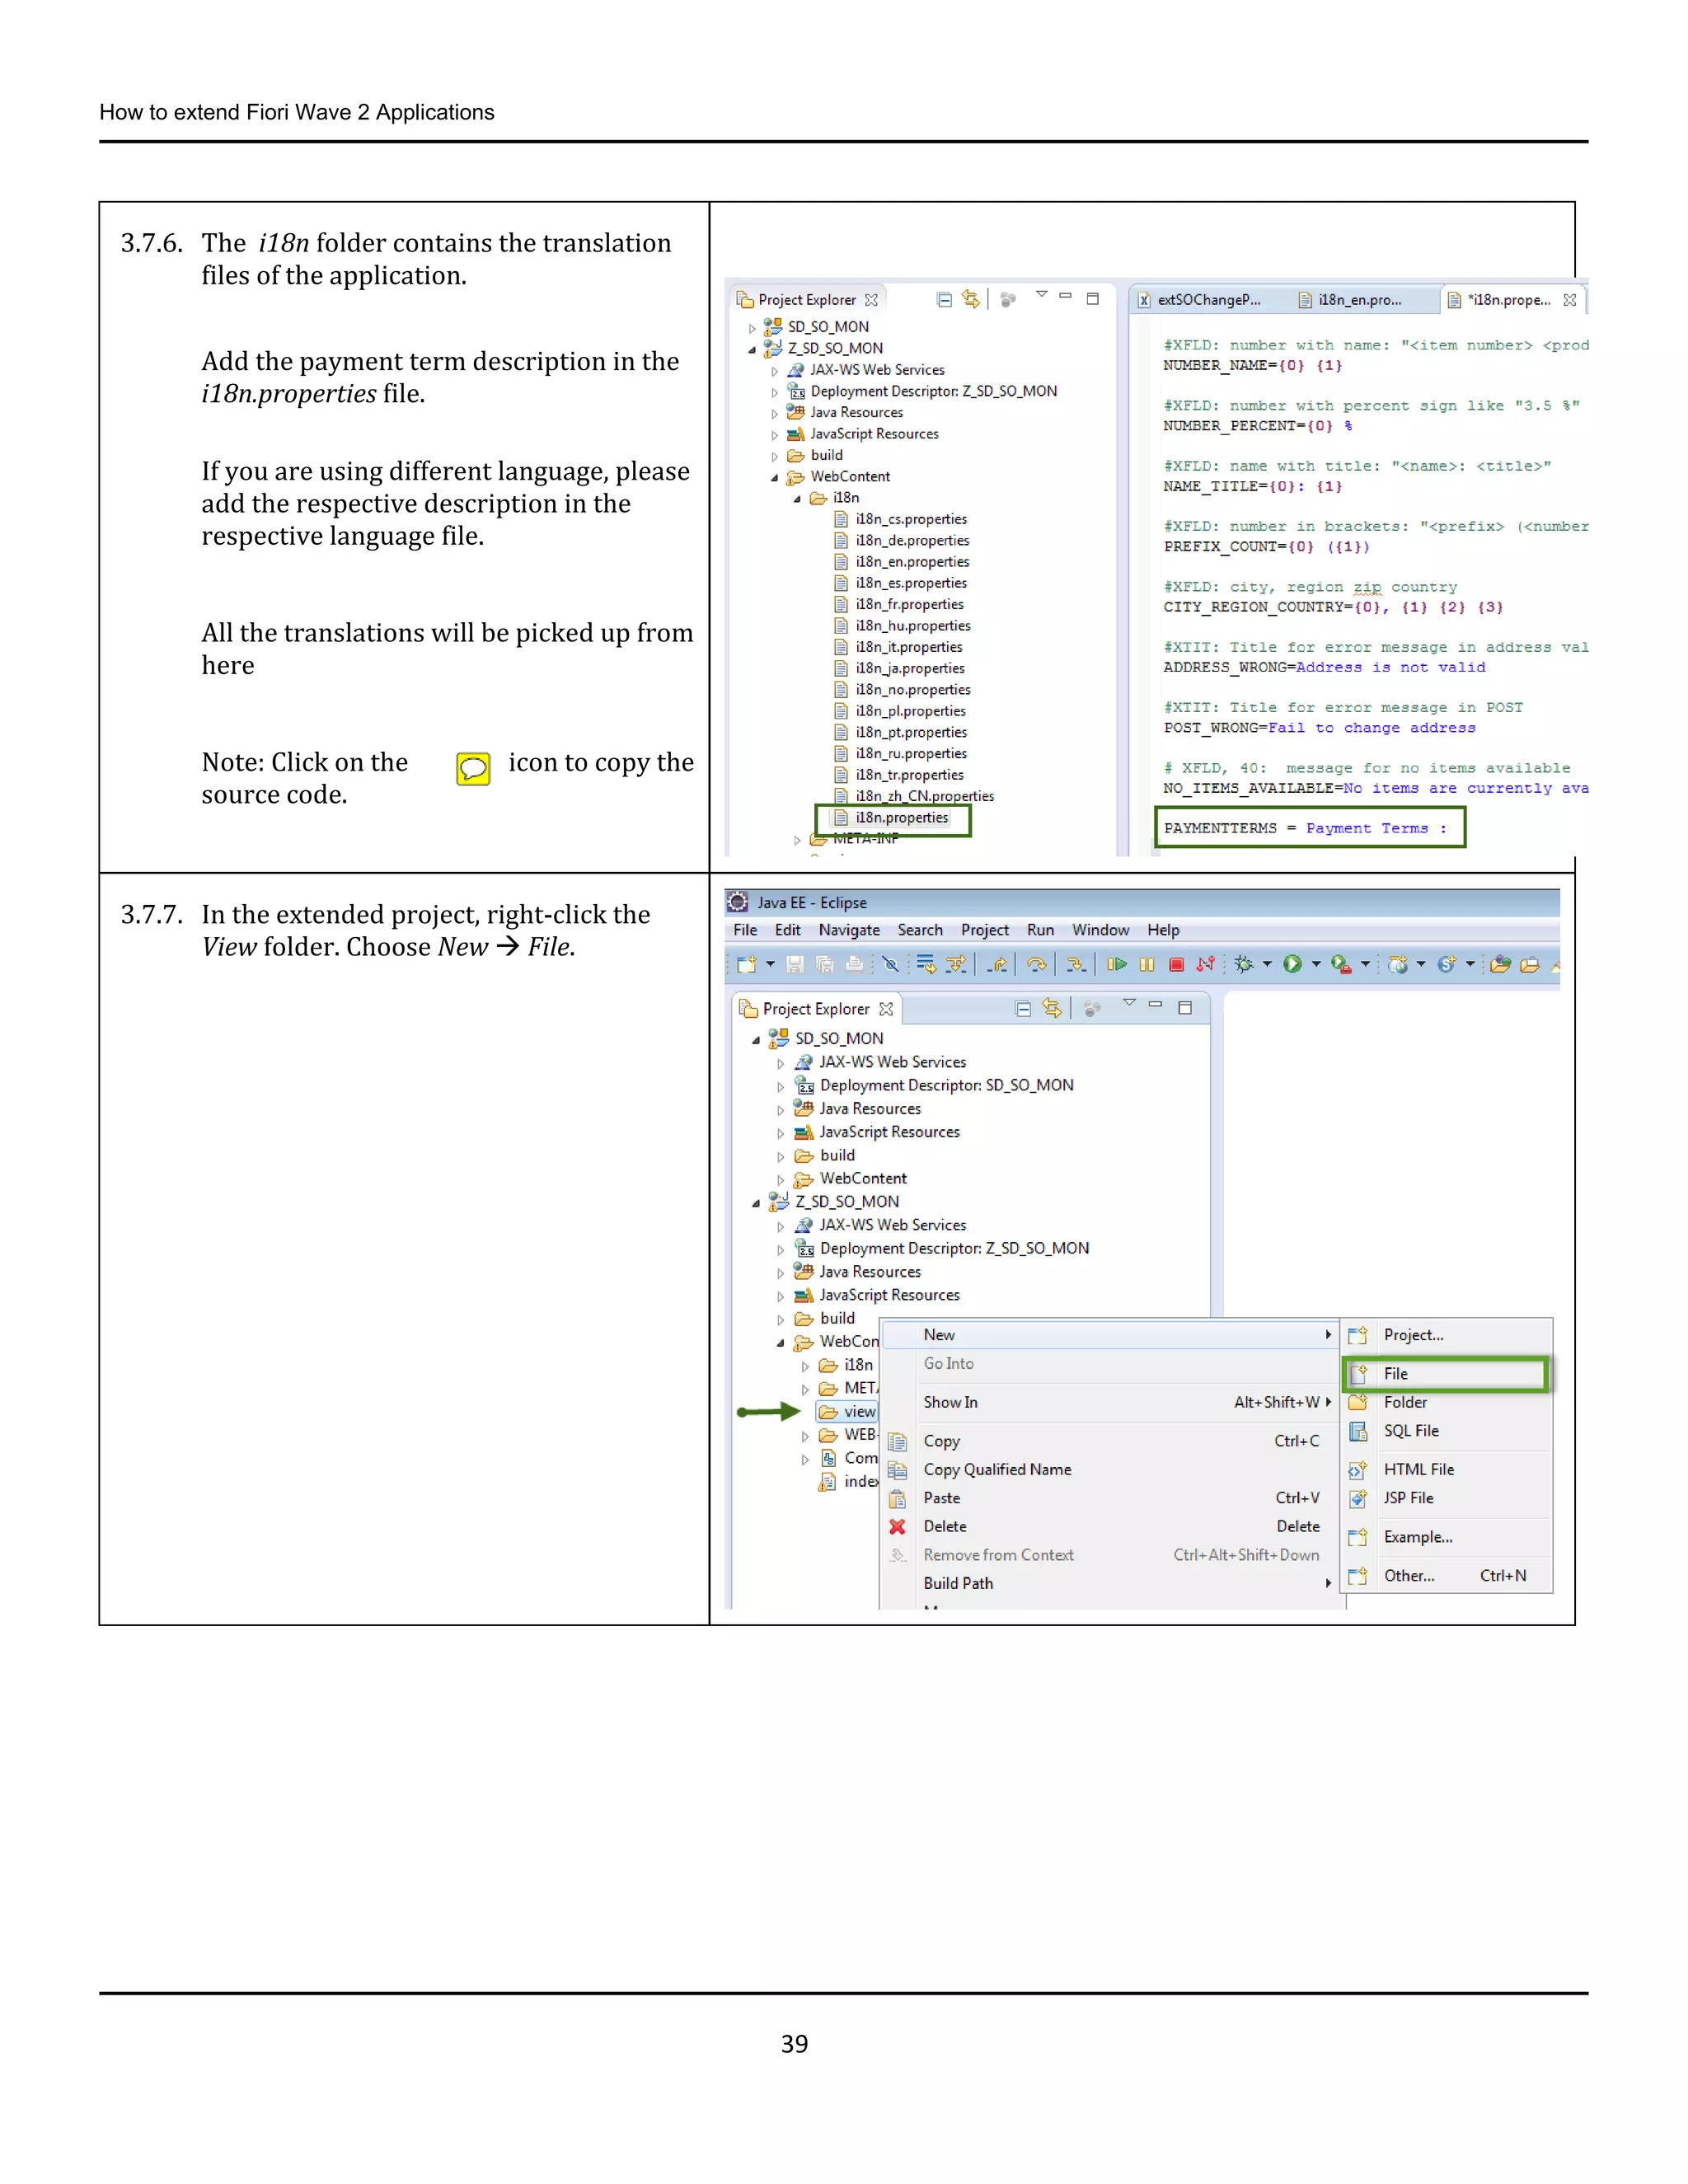
3.7.6. The i18n folder contains the translation
files of the application.
Add the payment term description in the
i18n.properties file.
If you are using different language, please
add the respective description in the
respective language file.
All the translations will be picked up from
here
Note: Click on the icon to copy the
source code.
3.7.7. In the extended project, right-click the
View folder. Choose New File.
40.
How to extendFiori Wave 2 Applications
40
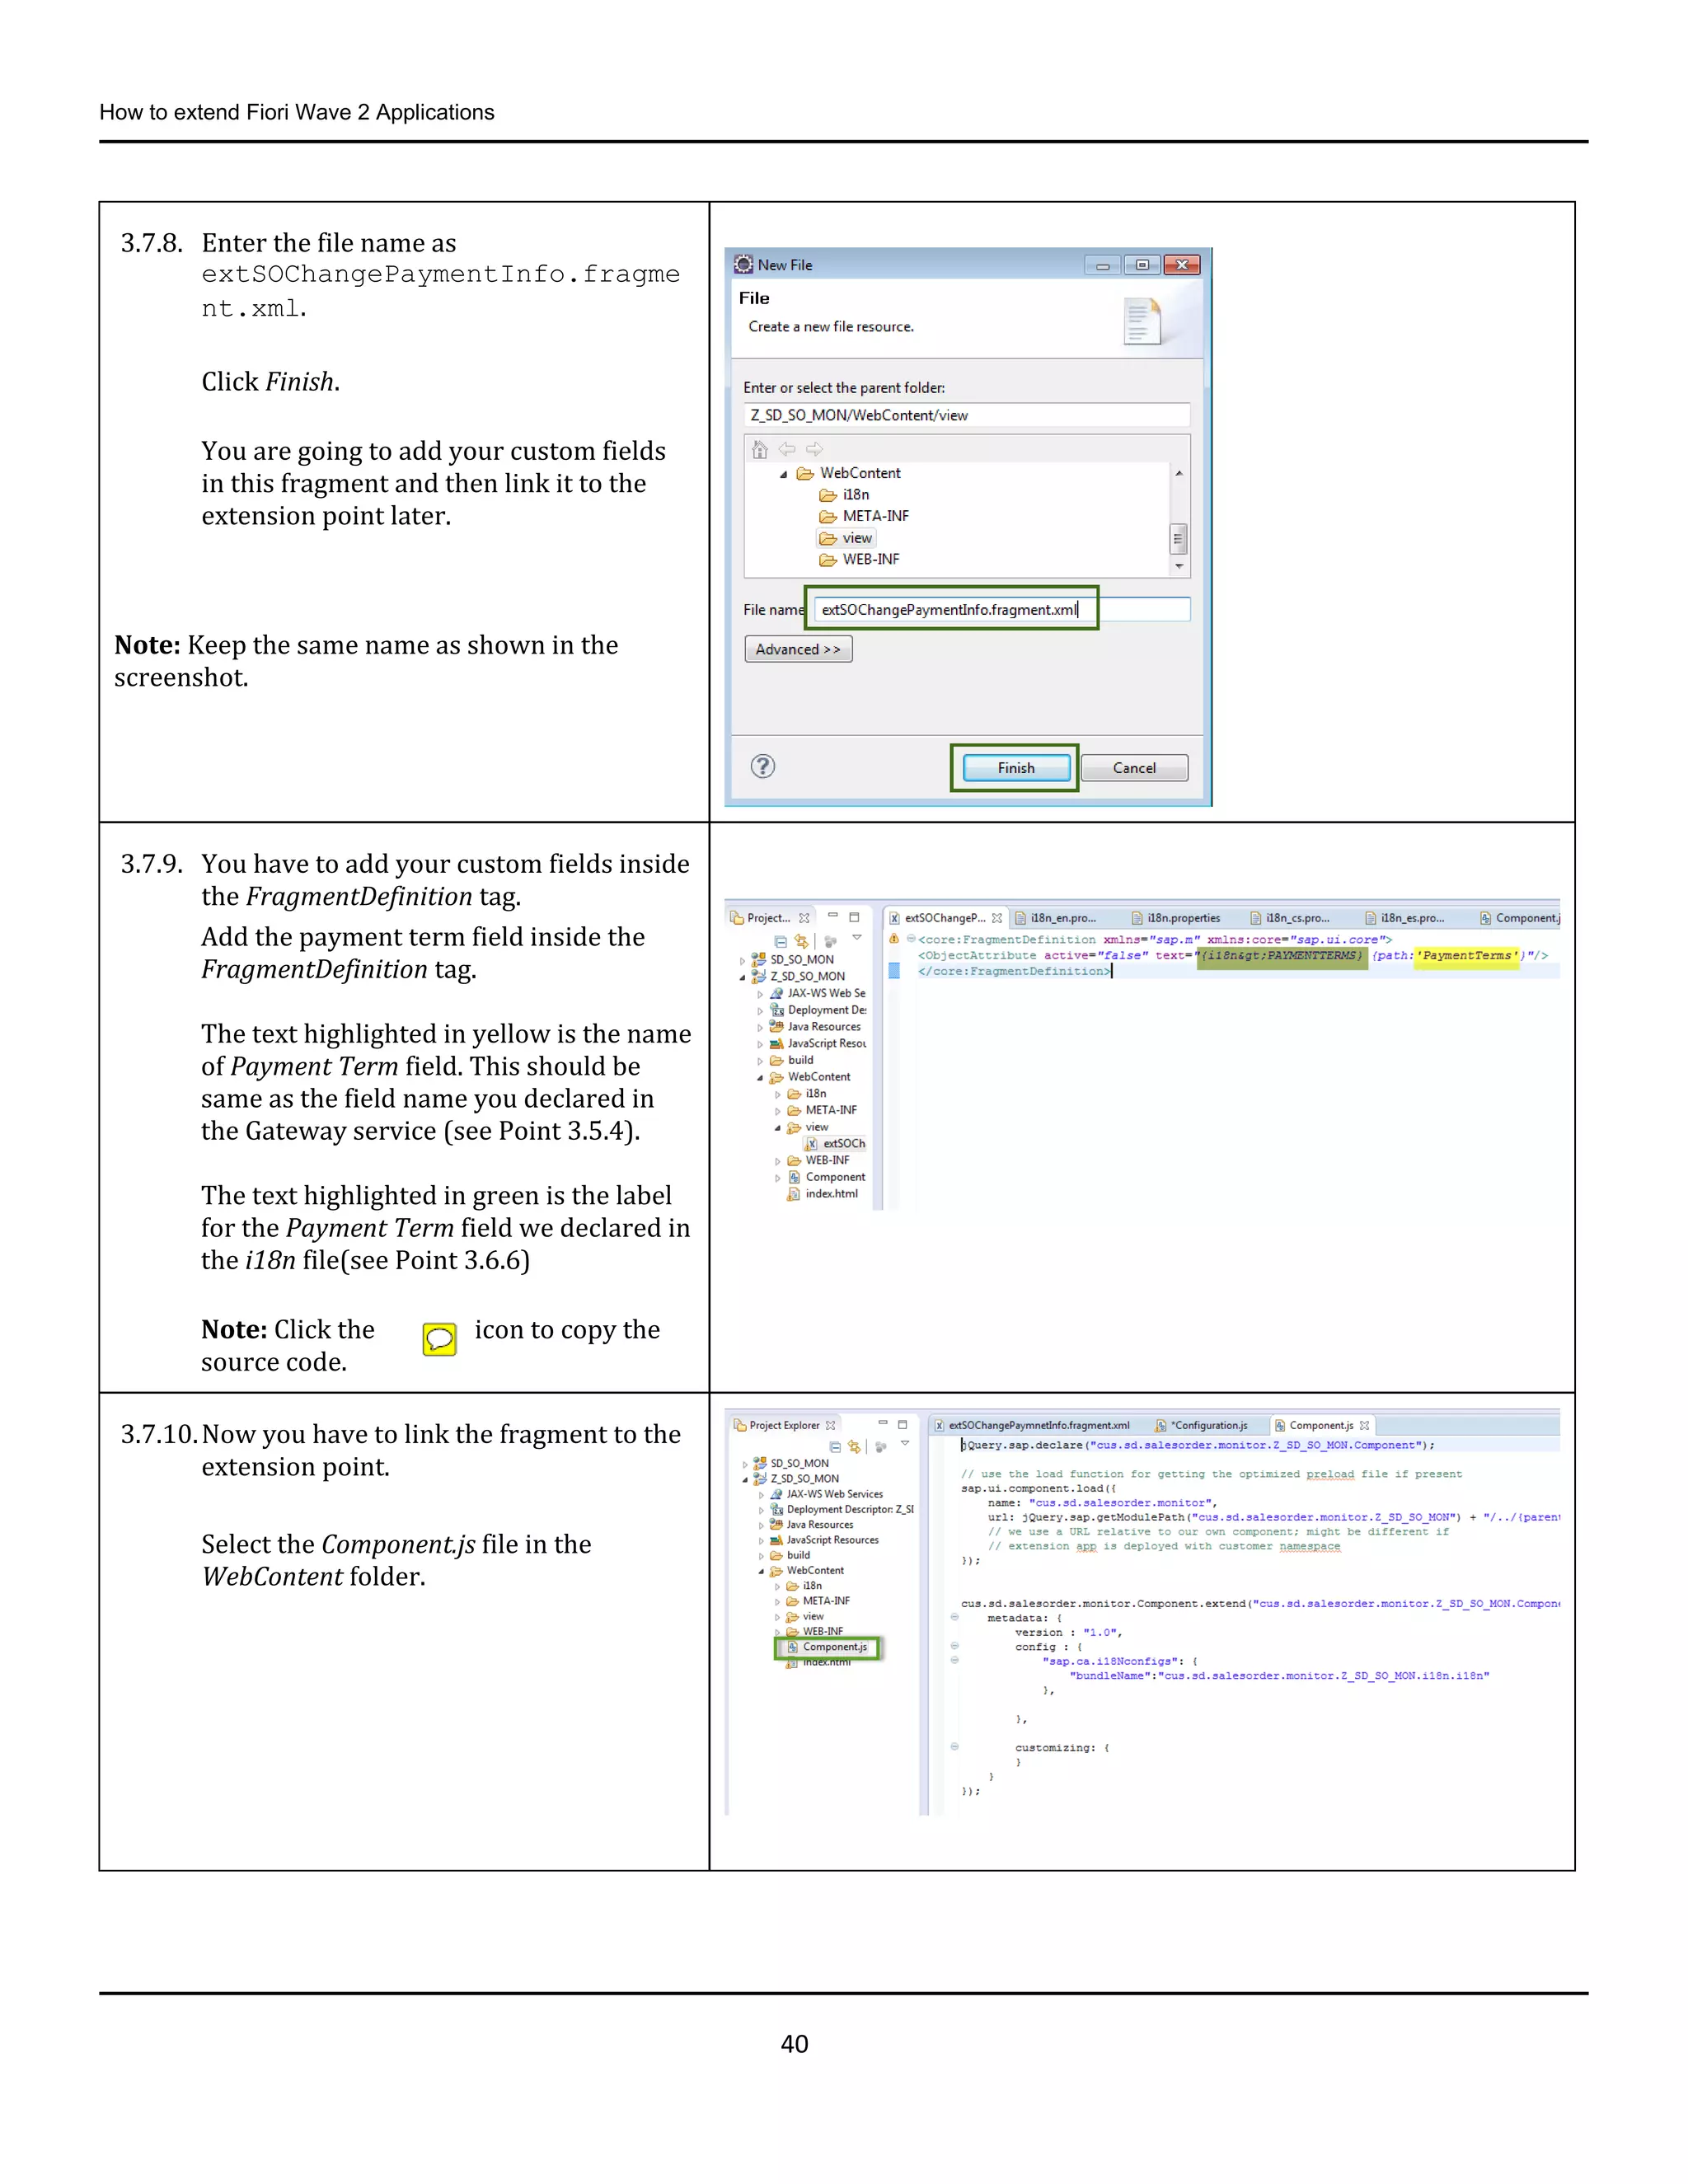
3.7.8. Enter the file name as
extSOChangePaymentInfo.fragme
nt.xml.
Click Finish.
You are going to add your custom fields
in this fragment and then link it to the
extension point later.
Note: Keep the same name as shown in the
screenshot.
3.7.9. You have to add your custom fields inside
the FragmentDefinition tag.
Add the payment term field inside the
FragmentDefinition tag.
The text highlighted in yellow is the name
of Payment Term field. This should be
same as the field name you declared in
the Gateway service (see Point 3.5.4).
The text highlighted in green is the label
for the Payment Term field we declared in
the i18n file(see Point 3.6.6)
Note: Click the icon to copy the
source code.
3.7.10.Now you have to link the fragment to the
extension point.
Select the Component.js file in the
WebContent folder.
41.
How to extendFiori Wave 2 Applications
41
3.7.11.Modify the code in Component.js as
shown in the screenshot.
Click Save All.
Source Code Explanation
Section Highlighted in Yellow
We are declaring a new module path. Each Fiori
application has a specific module path. As it is a
custom application, we are declaring with Z
namespace.
Section highlighted in Green
This section is the reference to the standard
application.
Section highlighted in Grey
Declaration for including the new changes.
Section highlighted in Blue
We are including our custom gateway service.
This has to be included to create a new,
enhanced gateway service.
This section also contains the new Gateway
service name. If you created your new Gateway
service please replace the text
ZSRA018_SO_TRACKING_SRV with your Gateway
service name. (Refer to points 3.6.35 or 3.6.36
for the external service name).
Section Highlighted in Orange
In this section we are linking fragment to the
EnhancementPoint. (Refer to point 3.4.15).
Section Highlighted in Red
We are also making the container
SO_OH_ITEMDETAIL invisible in the S4view
(Refer to point 3.4.17).
Note: Click the icon to copy the source
code.
42.
How to extendFiori Wave 2 Applications
42
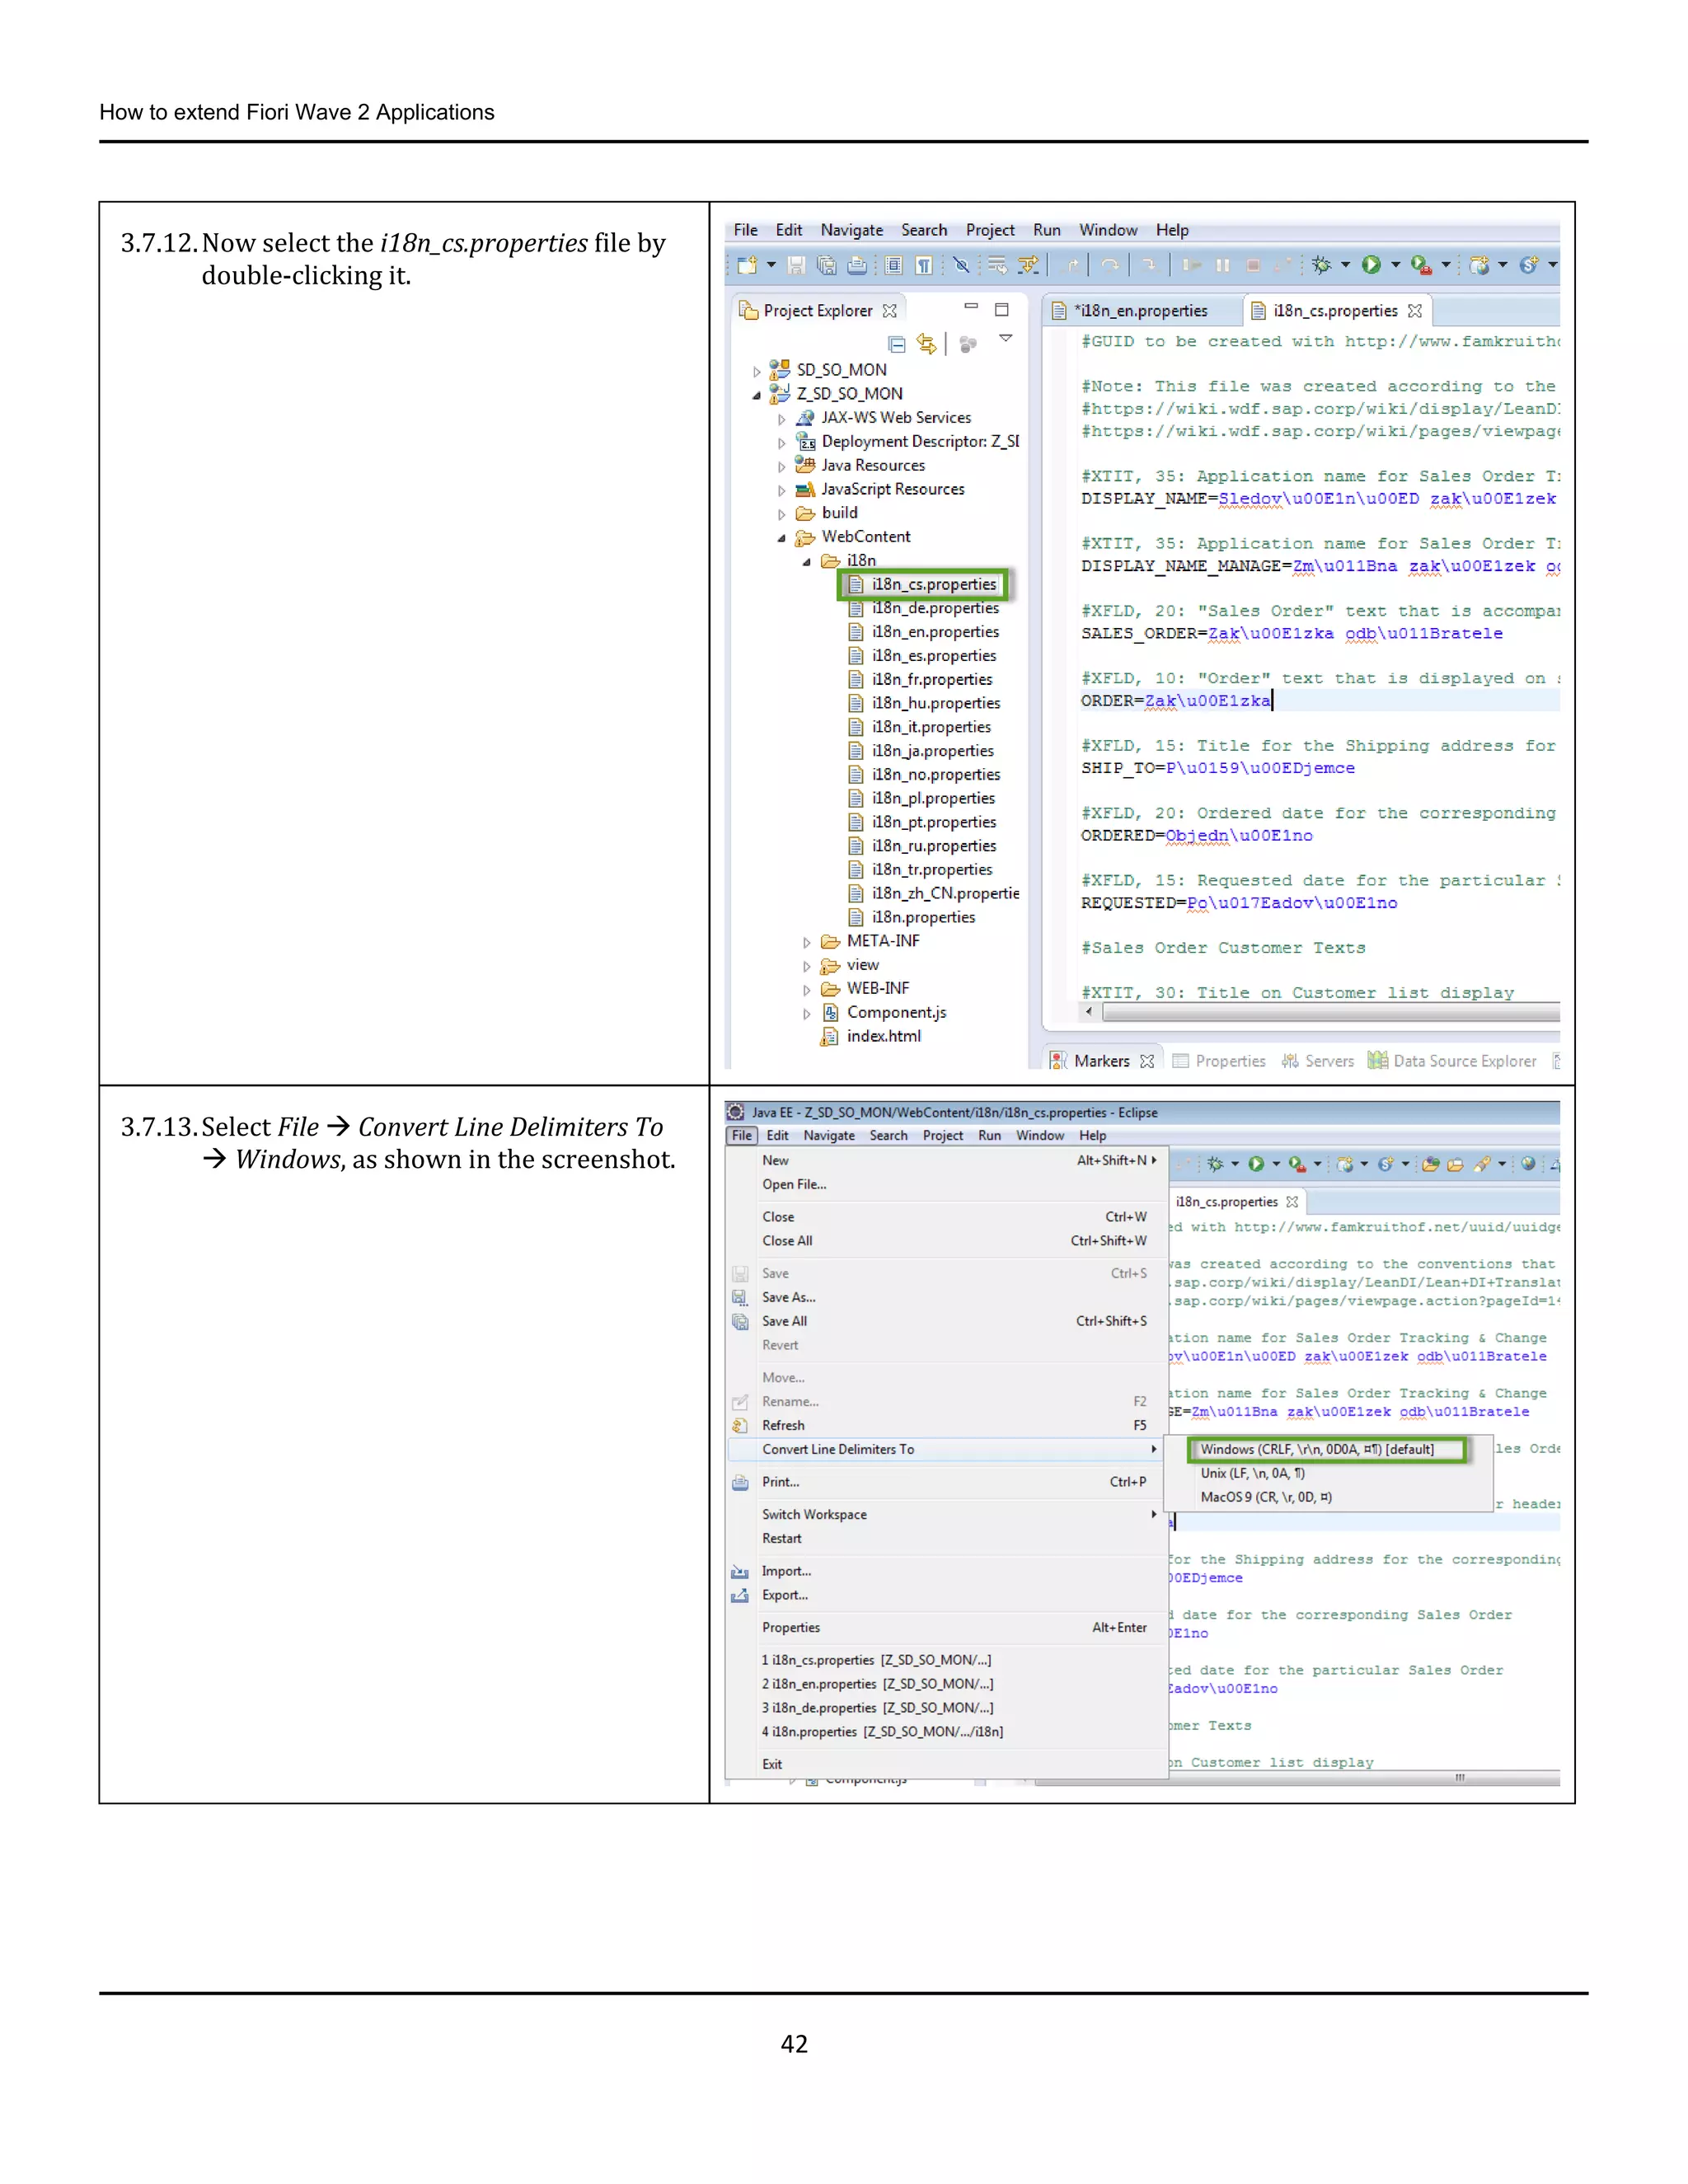
3.7.12.Now select the i18n_cs.properties file by
double-clicking it.
3.7.13.Select File Convert Line Delimiters To
Windows, as shown in the screenshot.
43.
How to extendFiori Wave 2 Applications
43
3.8. Testing the Application Locally before Uploading
Some changes have to be done in the application to test locally.
Note: Ensure you undo these changes before uploading the application to the SAP system.
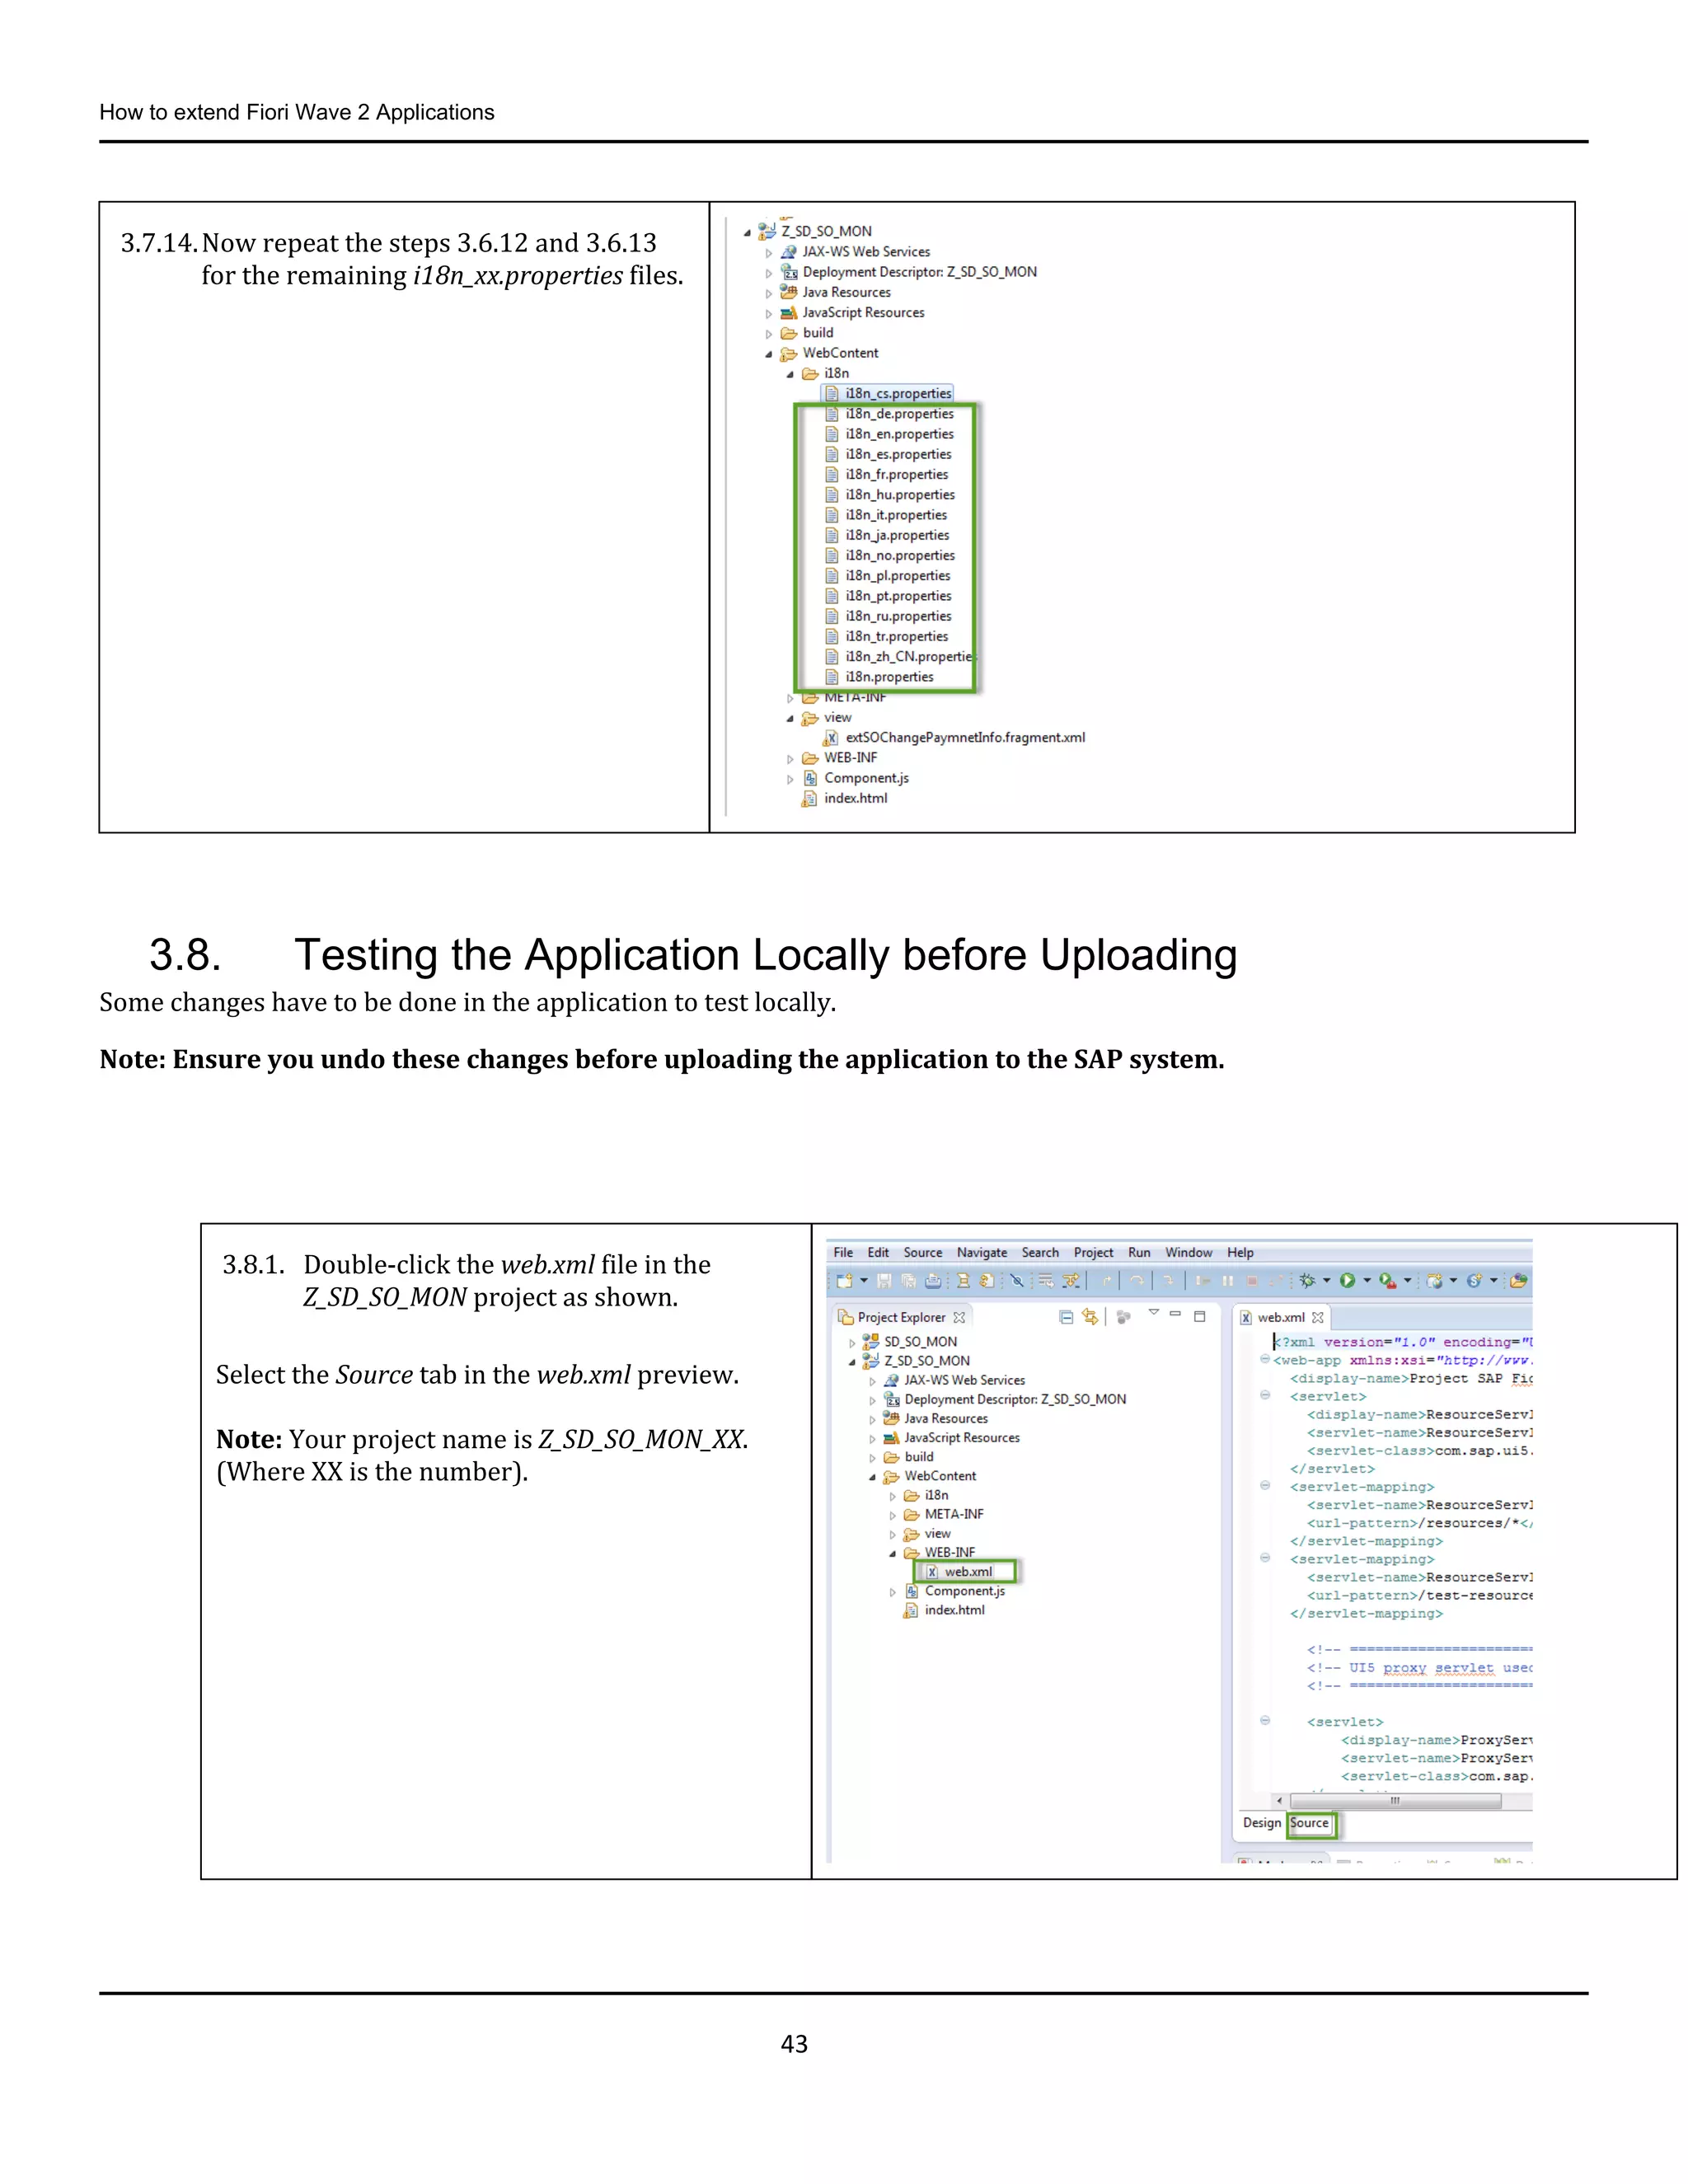
3.7.14.Now repeat the steps 3.6.12 and 3.6.13
for the remaining i18n_xx.properties files.
3.8.1. Double-click the web.xml file in the
Z_SD_SO_MON project as shown.
Select the Source tab in the web.xml preview.
Note: Your project name is Z_SD_SO_MON_XX.
(Where XX is the number).
44.
How to extendFiori Wave 2 Applications
44
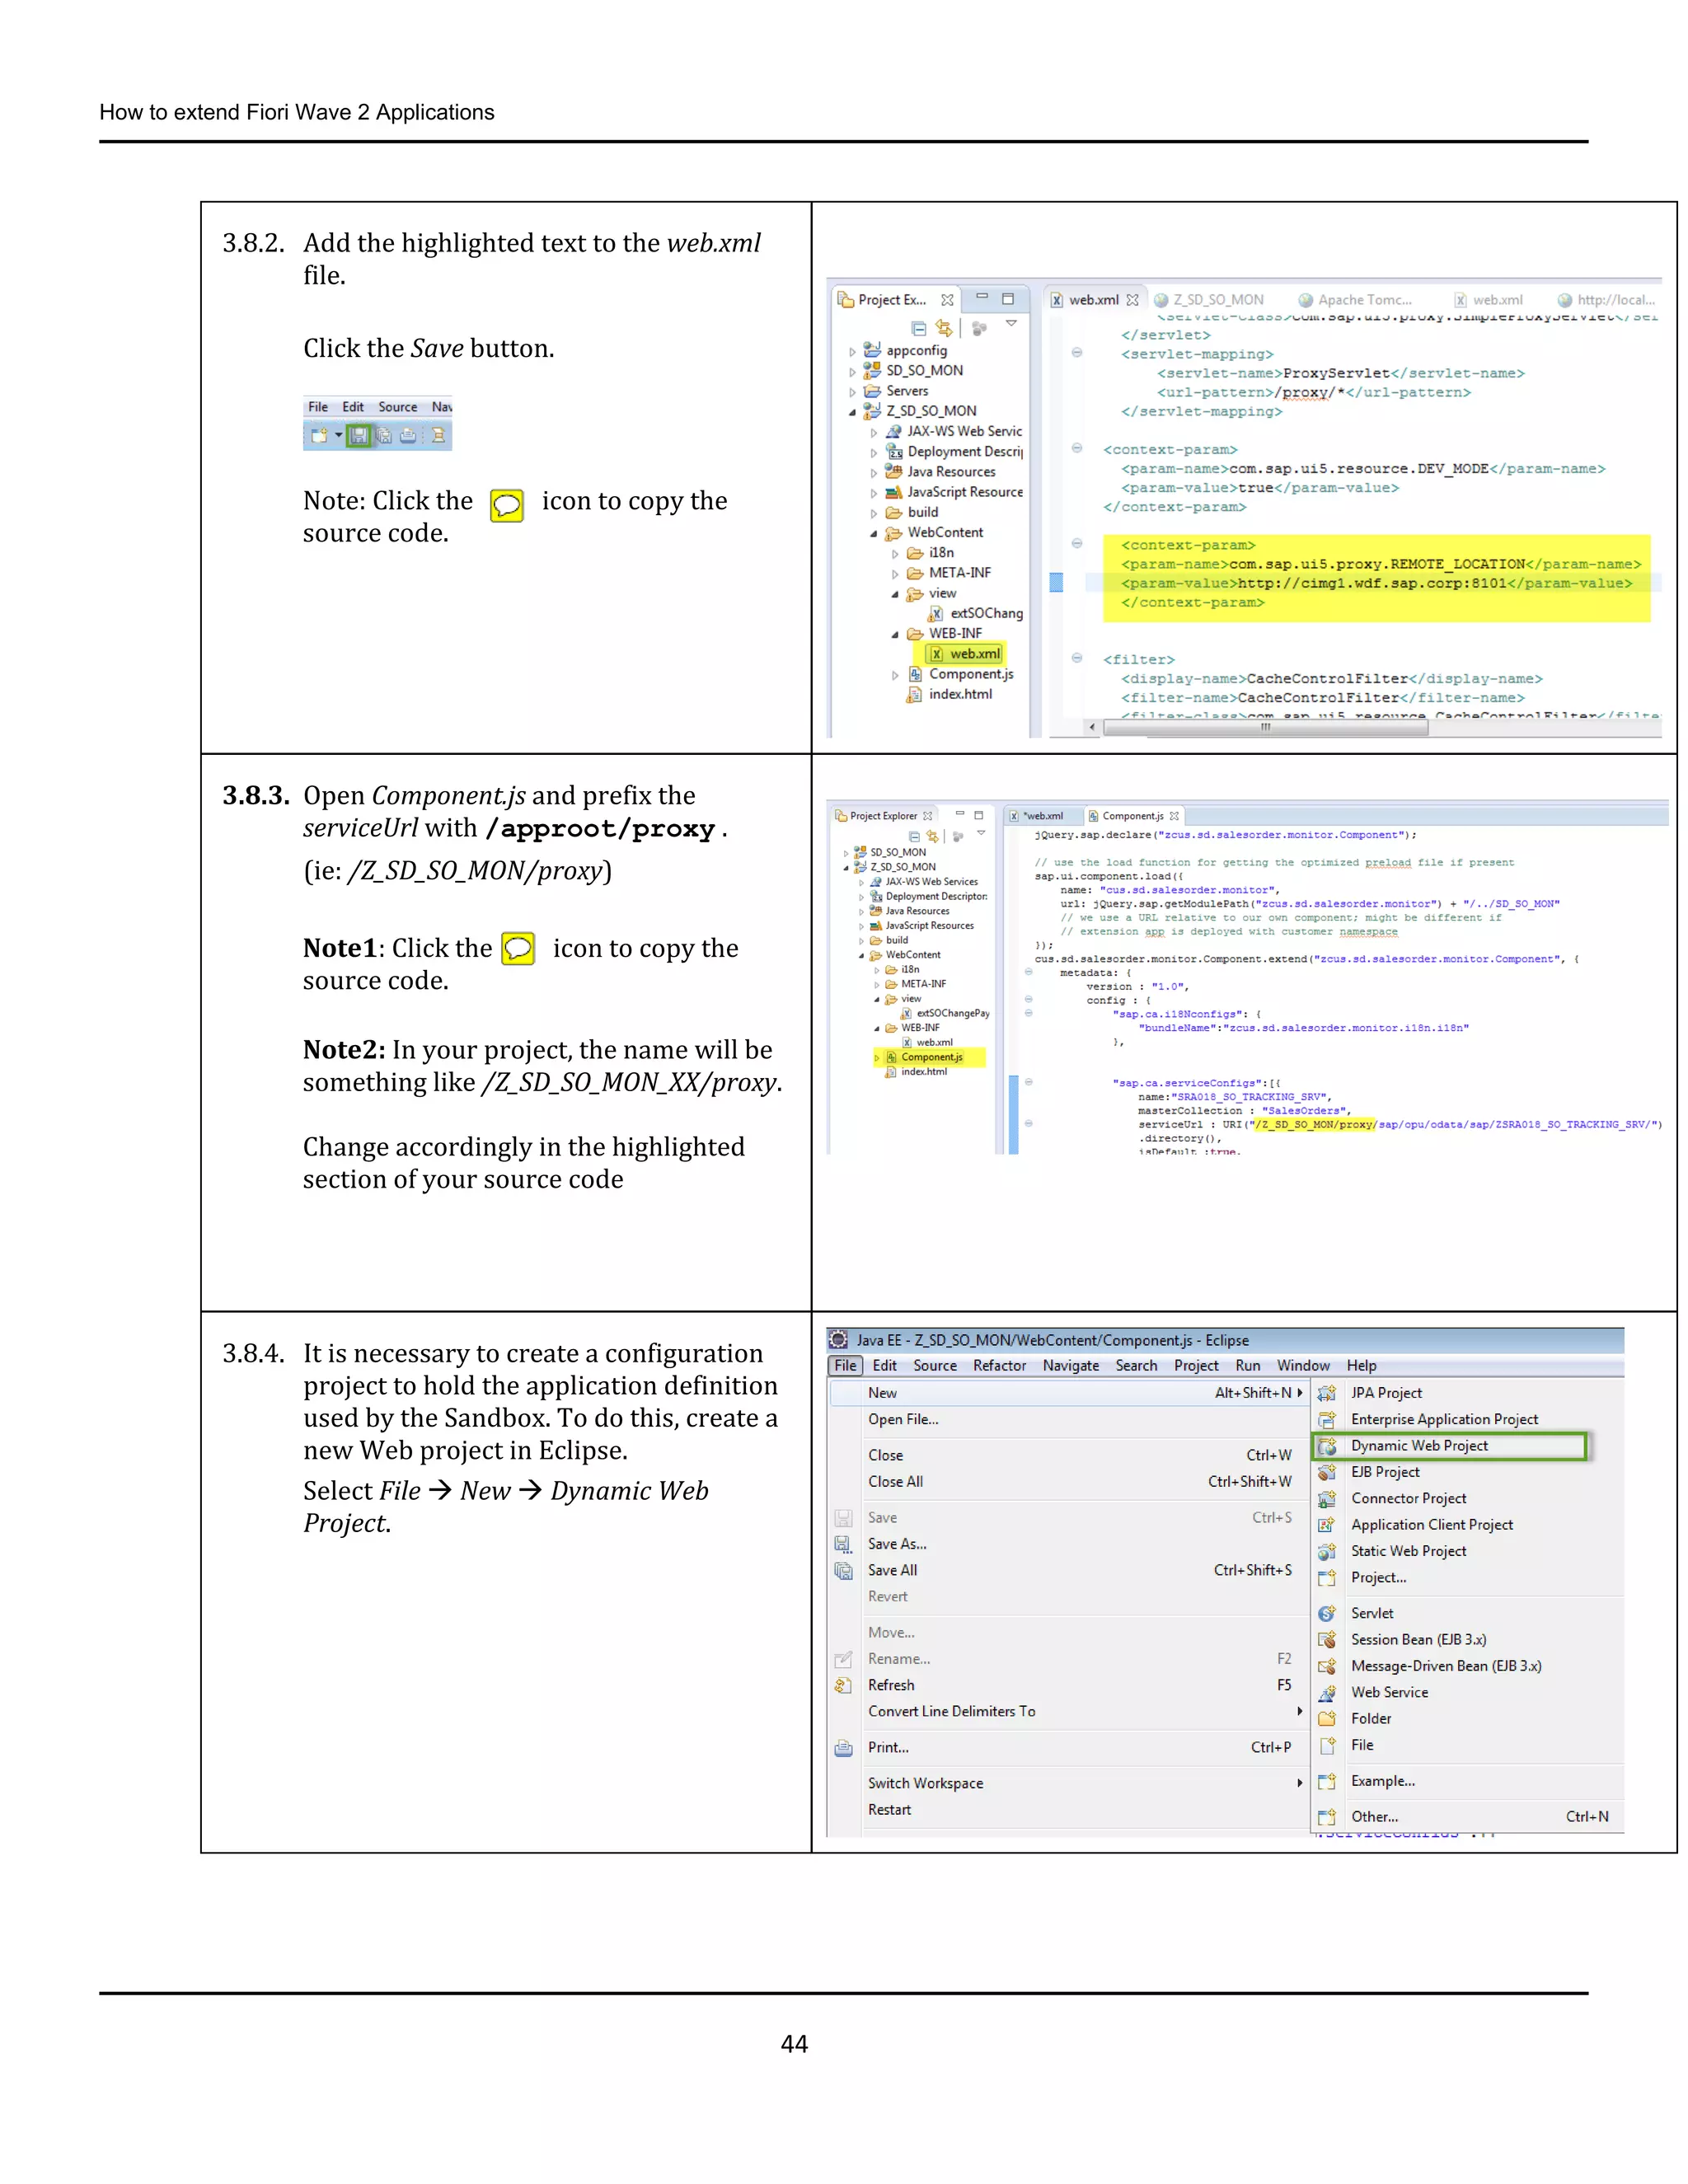
3.8.2. Add the highlighted text to the web.xml
file.
Click the Save button.
Note: Click the icon to copy the
source code.
3.8.3. Open Component.js and prefix the
serviceUrl with /approot/proxy .
(ie: /Z_SD_SO_MON/proxy)
Note1: Click the icon to copy the
source code.
Note2: In your project, the name will be
something like /Z_SD_SO_MON_XX/proxy.
Change accordingly in the highlighted
section of your source code
3.8.4. It is necessary to create a configuration
project to hold the application definition
used by the Sandbox. To do this, create a
new Web project in Eclipse.
Select File New Dynamic Web
Project.
45.
How to extendFiori Wave 2 Applications
45
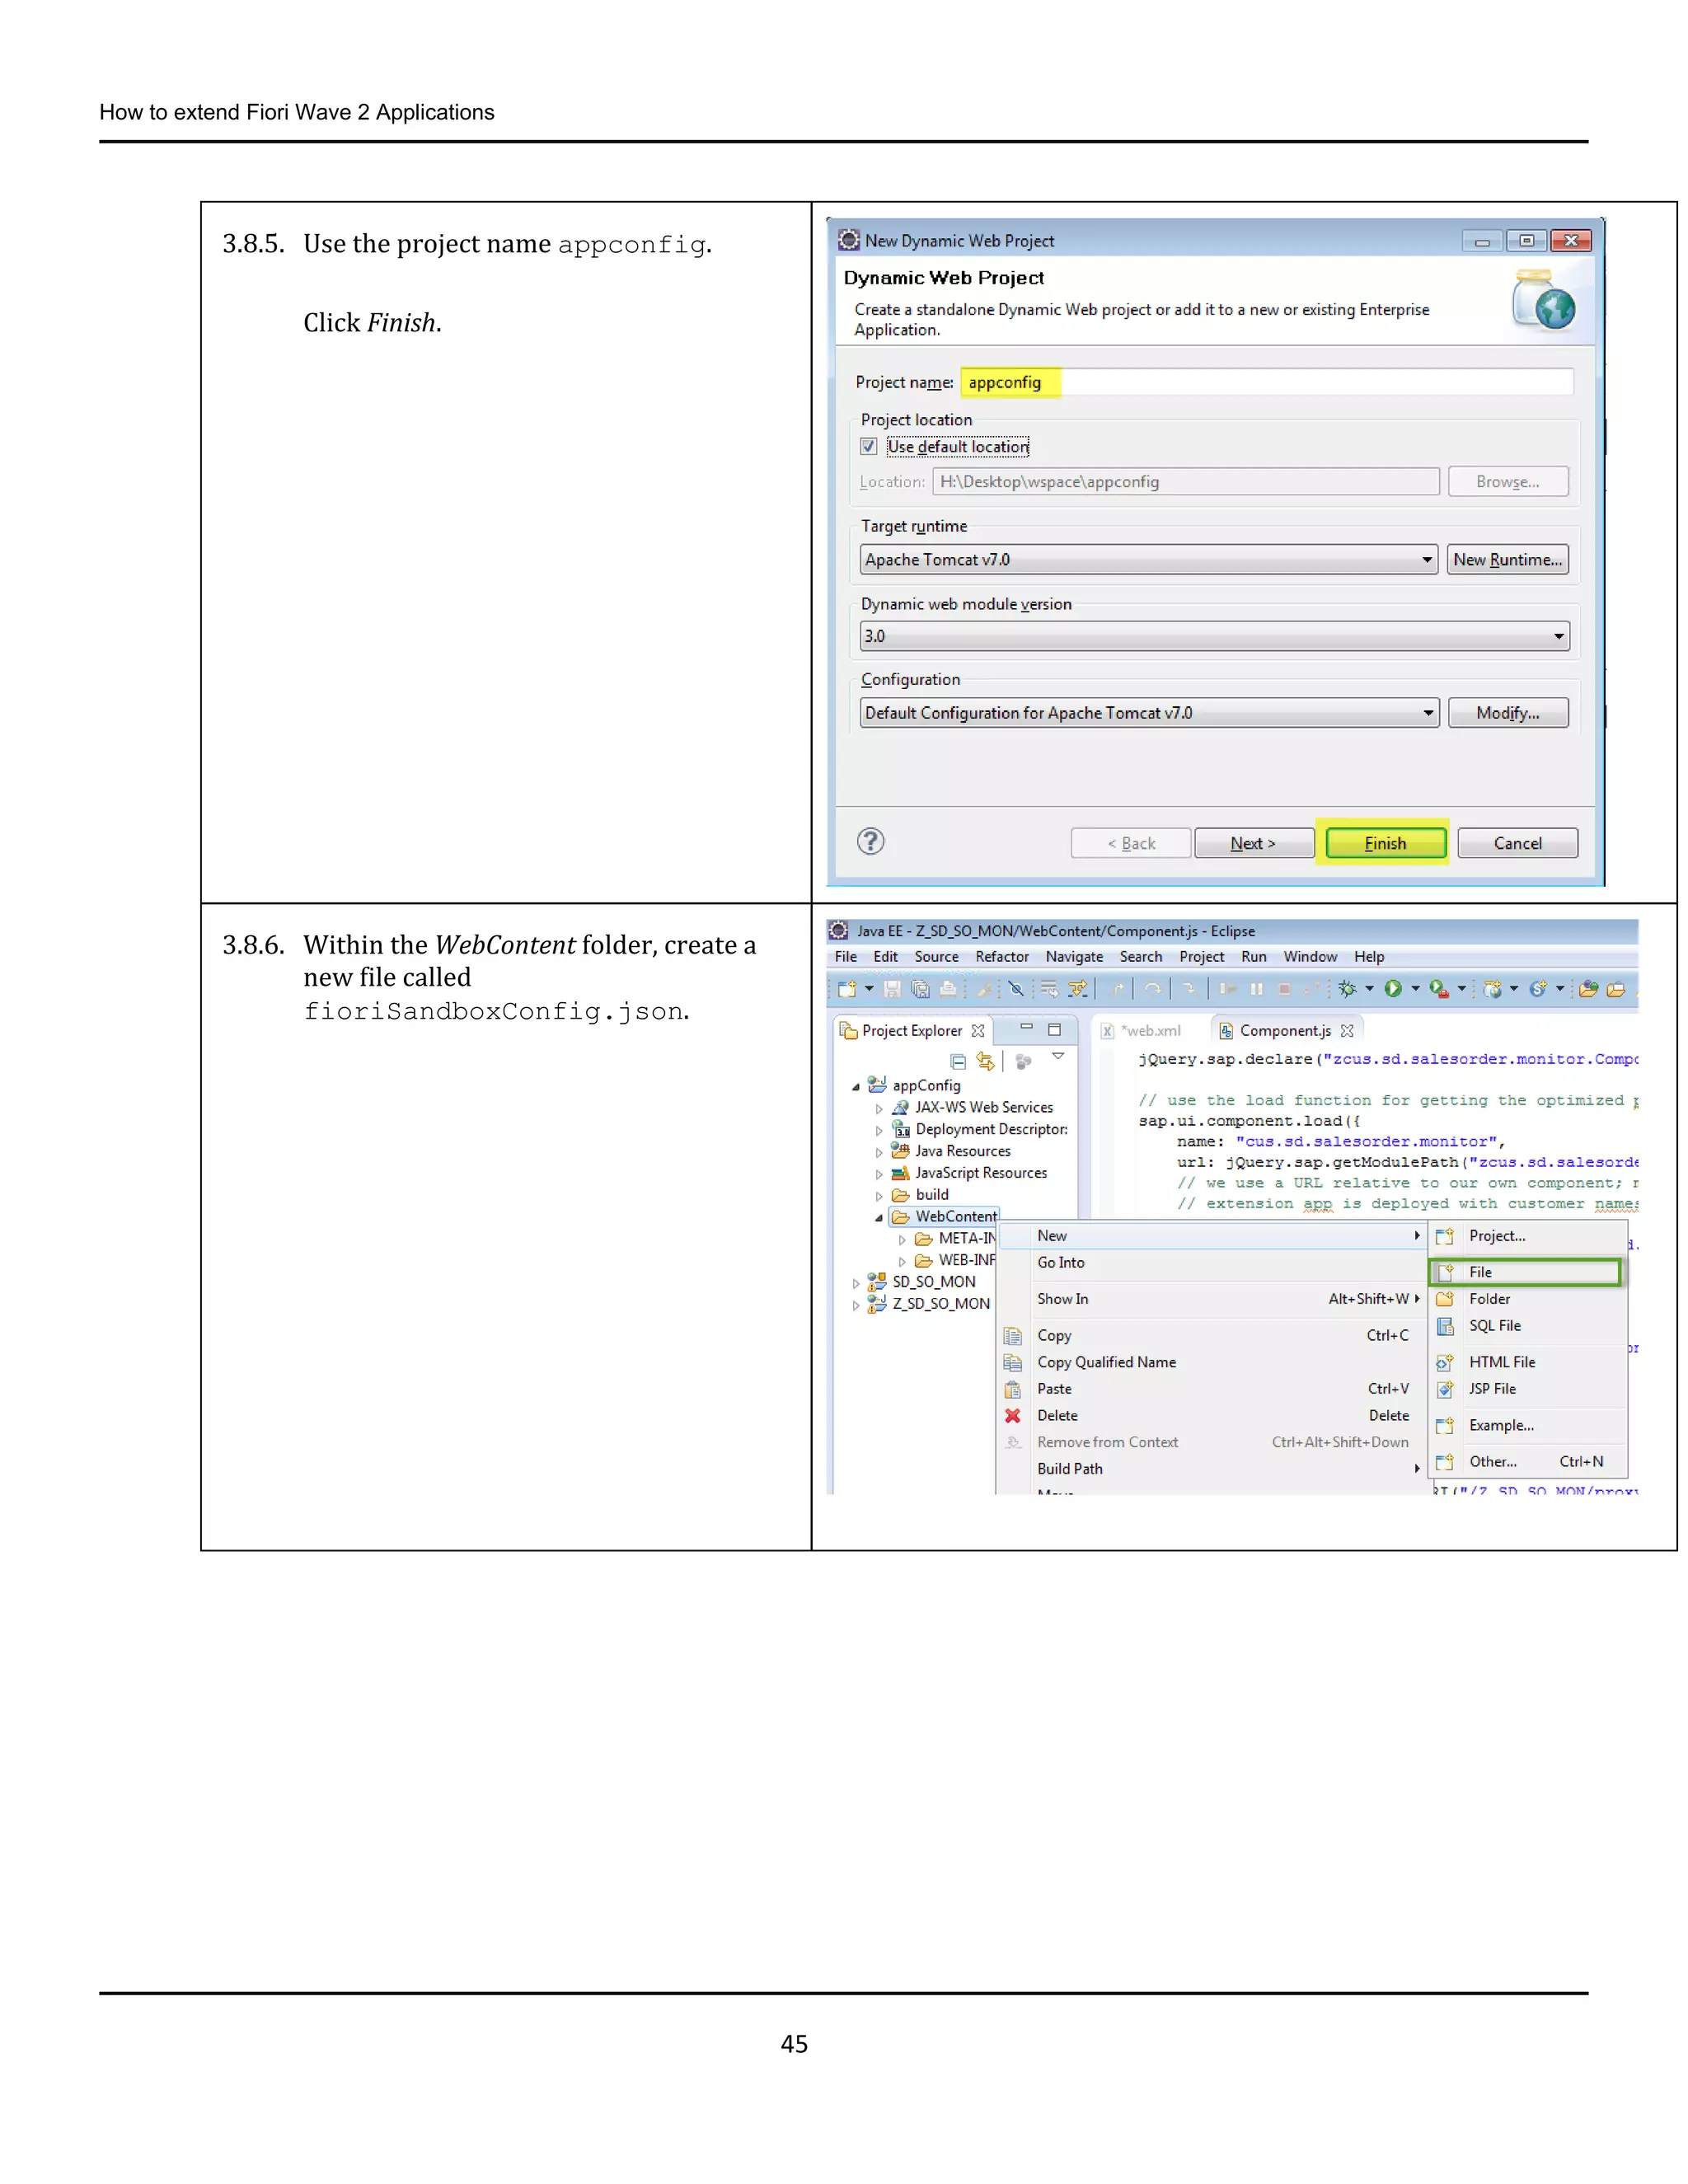
3.8.5. Use the project name appconfig.
Click Finish.
3.8.6. Within the WebContent folder, create a
new file called
fioriSandboxConfig.json.
46.
How to extendFiori Wave 2 Applications
46
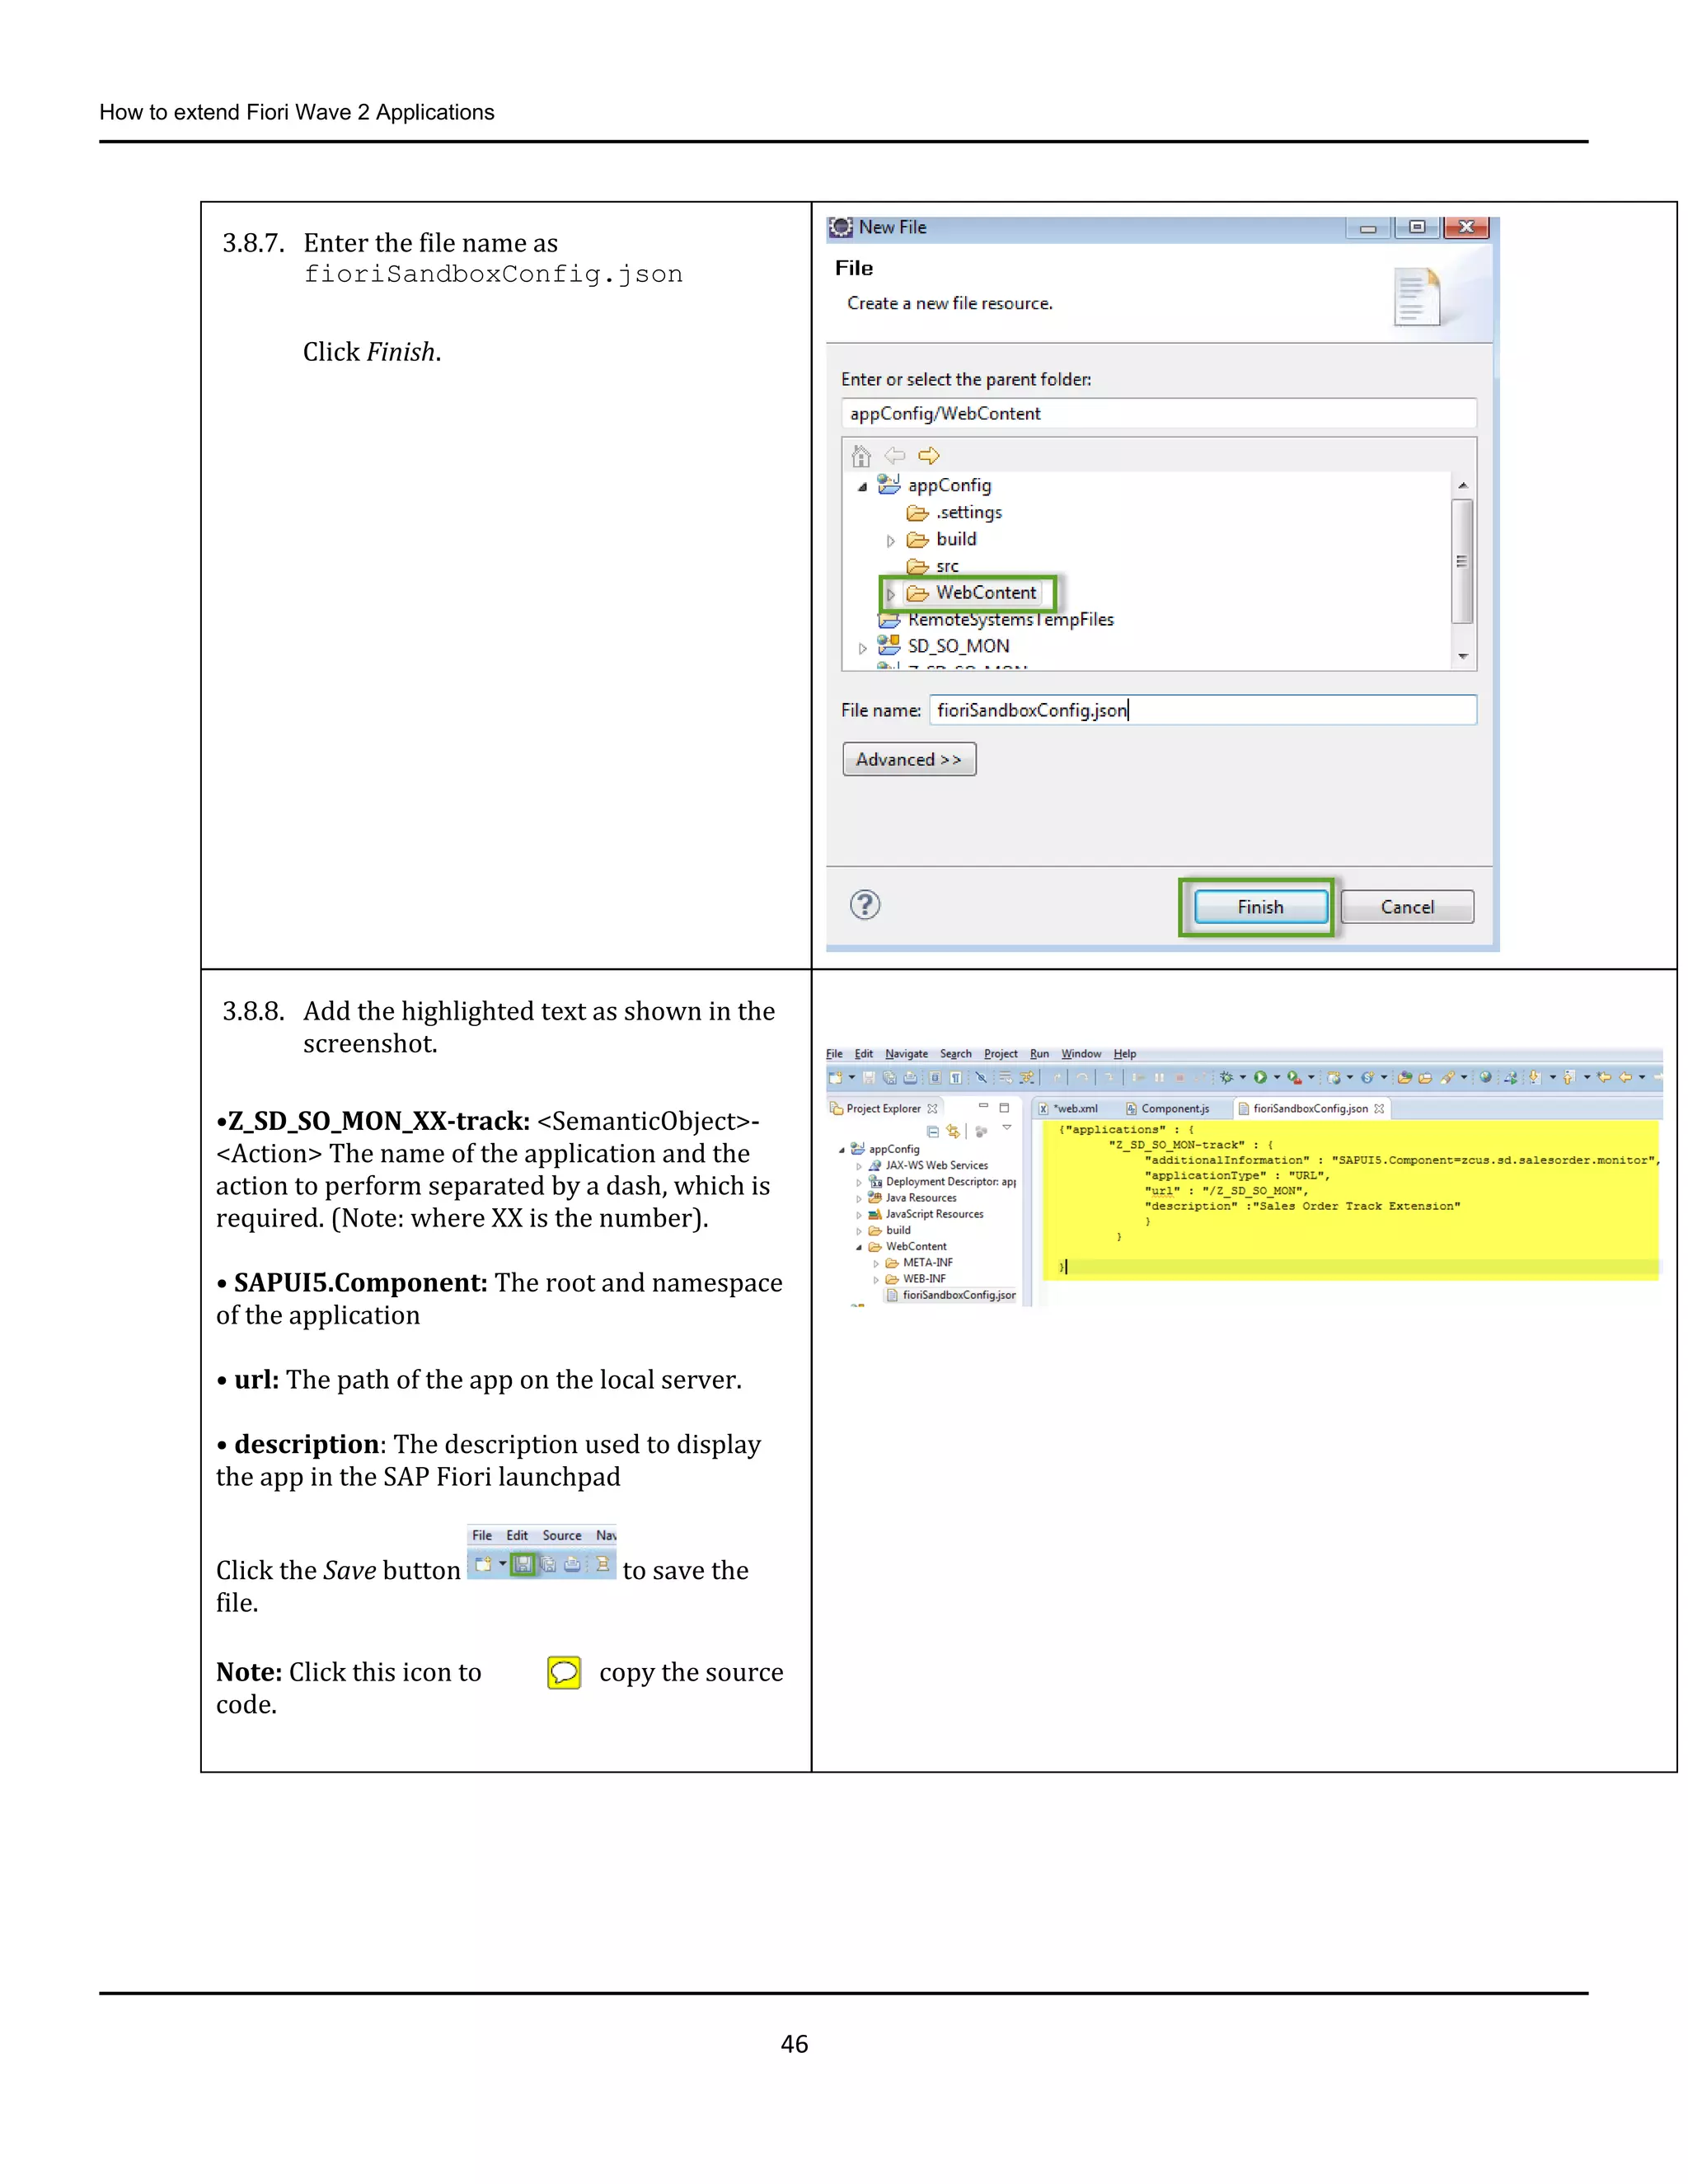
3.8.7. Enter the file name as
fioriSandboxConfig.json
Click Finish.
3.8.8. Add the highlighted text as shown in the
screenshot.
•Z_SD_SO_MON_XX-track: <SemanticObject>-
<Action> The name of the application and the
action to perform separated by a dash, which is
required. (Note: where XX is the number).
• SAPUI5.Component: The root and namespace
of the application
• url: The path of the app on the local server.
• description: The description used to display
the app in the SAP Fiori launchpad
Click the Save button to save the
file.
Note: Click this icon to copy the source
code.
47.
How to extendFiori Wave 2 Applications
47
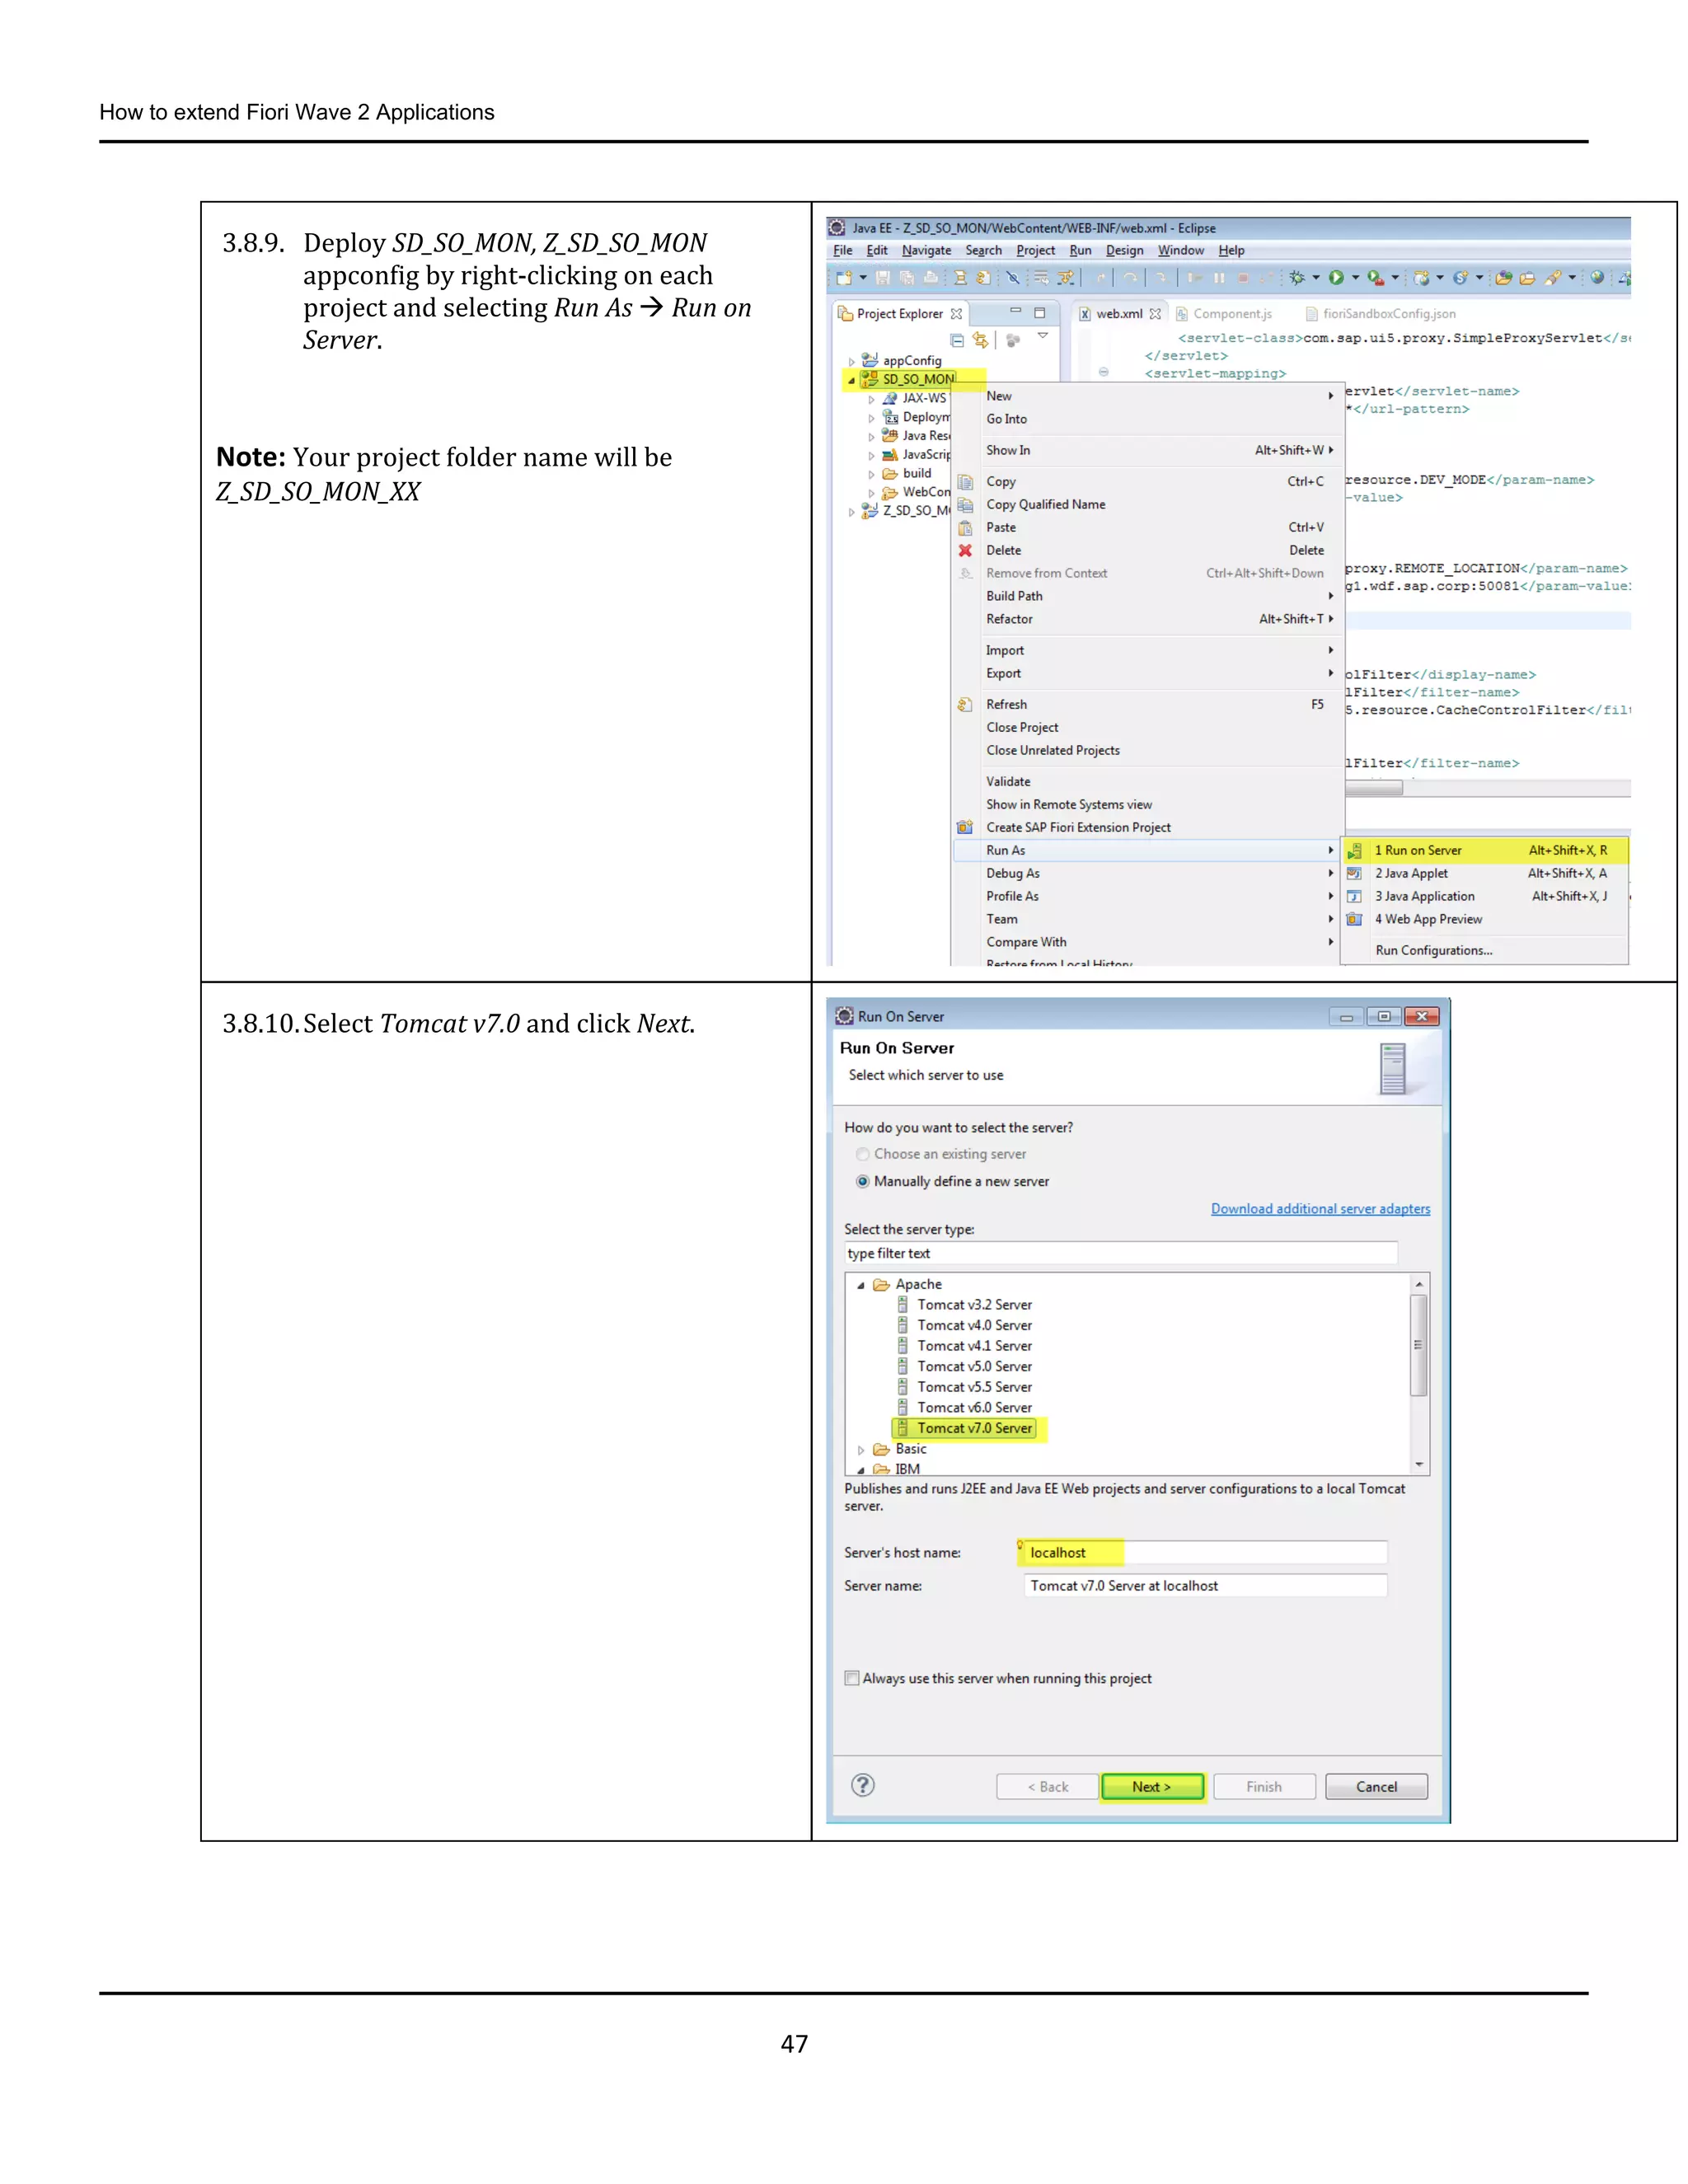
3.8.9. Deploy SD_SO_MON, Z_SD_SO_MON
appconfig by right-clicking on each
project and selecting Run As Run on
Server.
Note: Your project folder name will be
Z_SD_SO_MON_XX
3.8.10.Select Tomcat v7.0 and click Next.
48.
How to extendFiori Wave 2 Applications
48
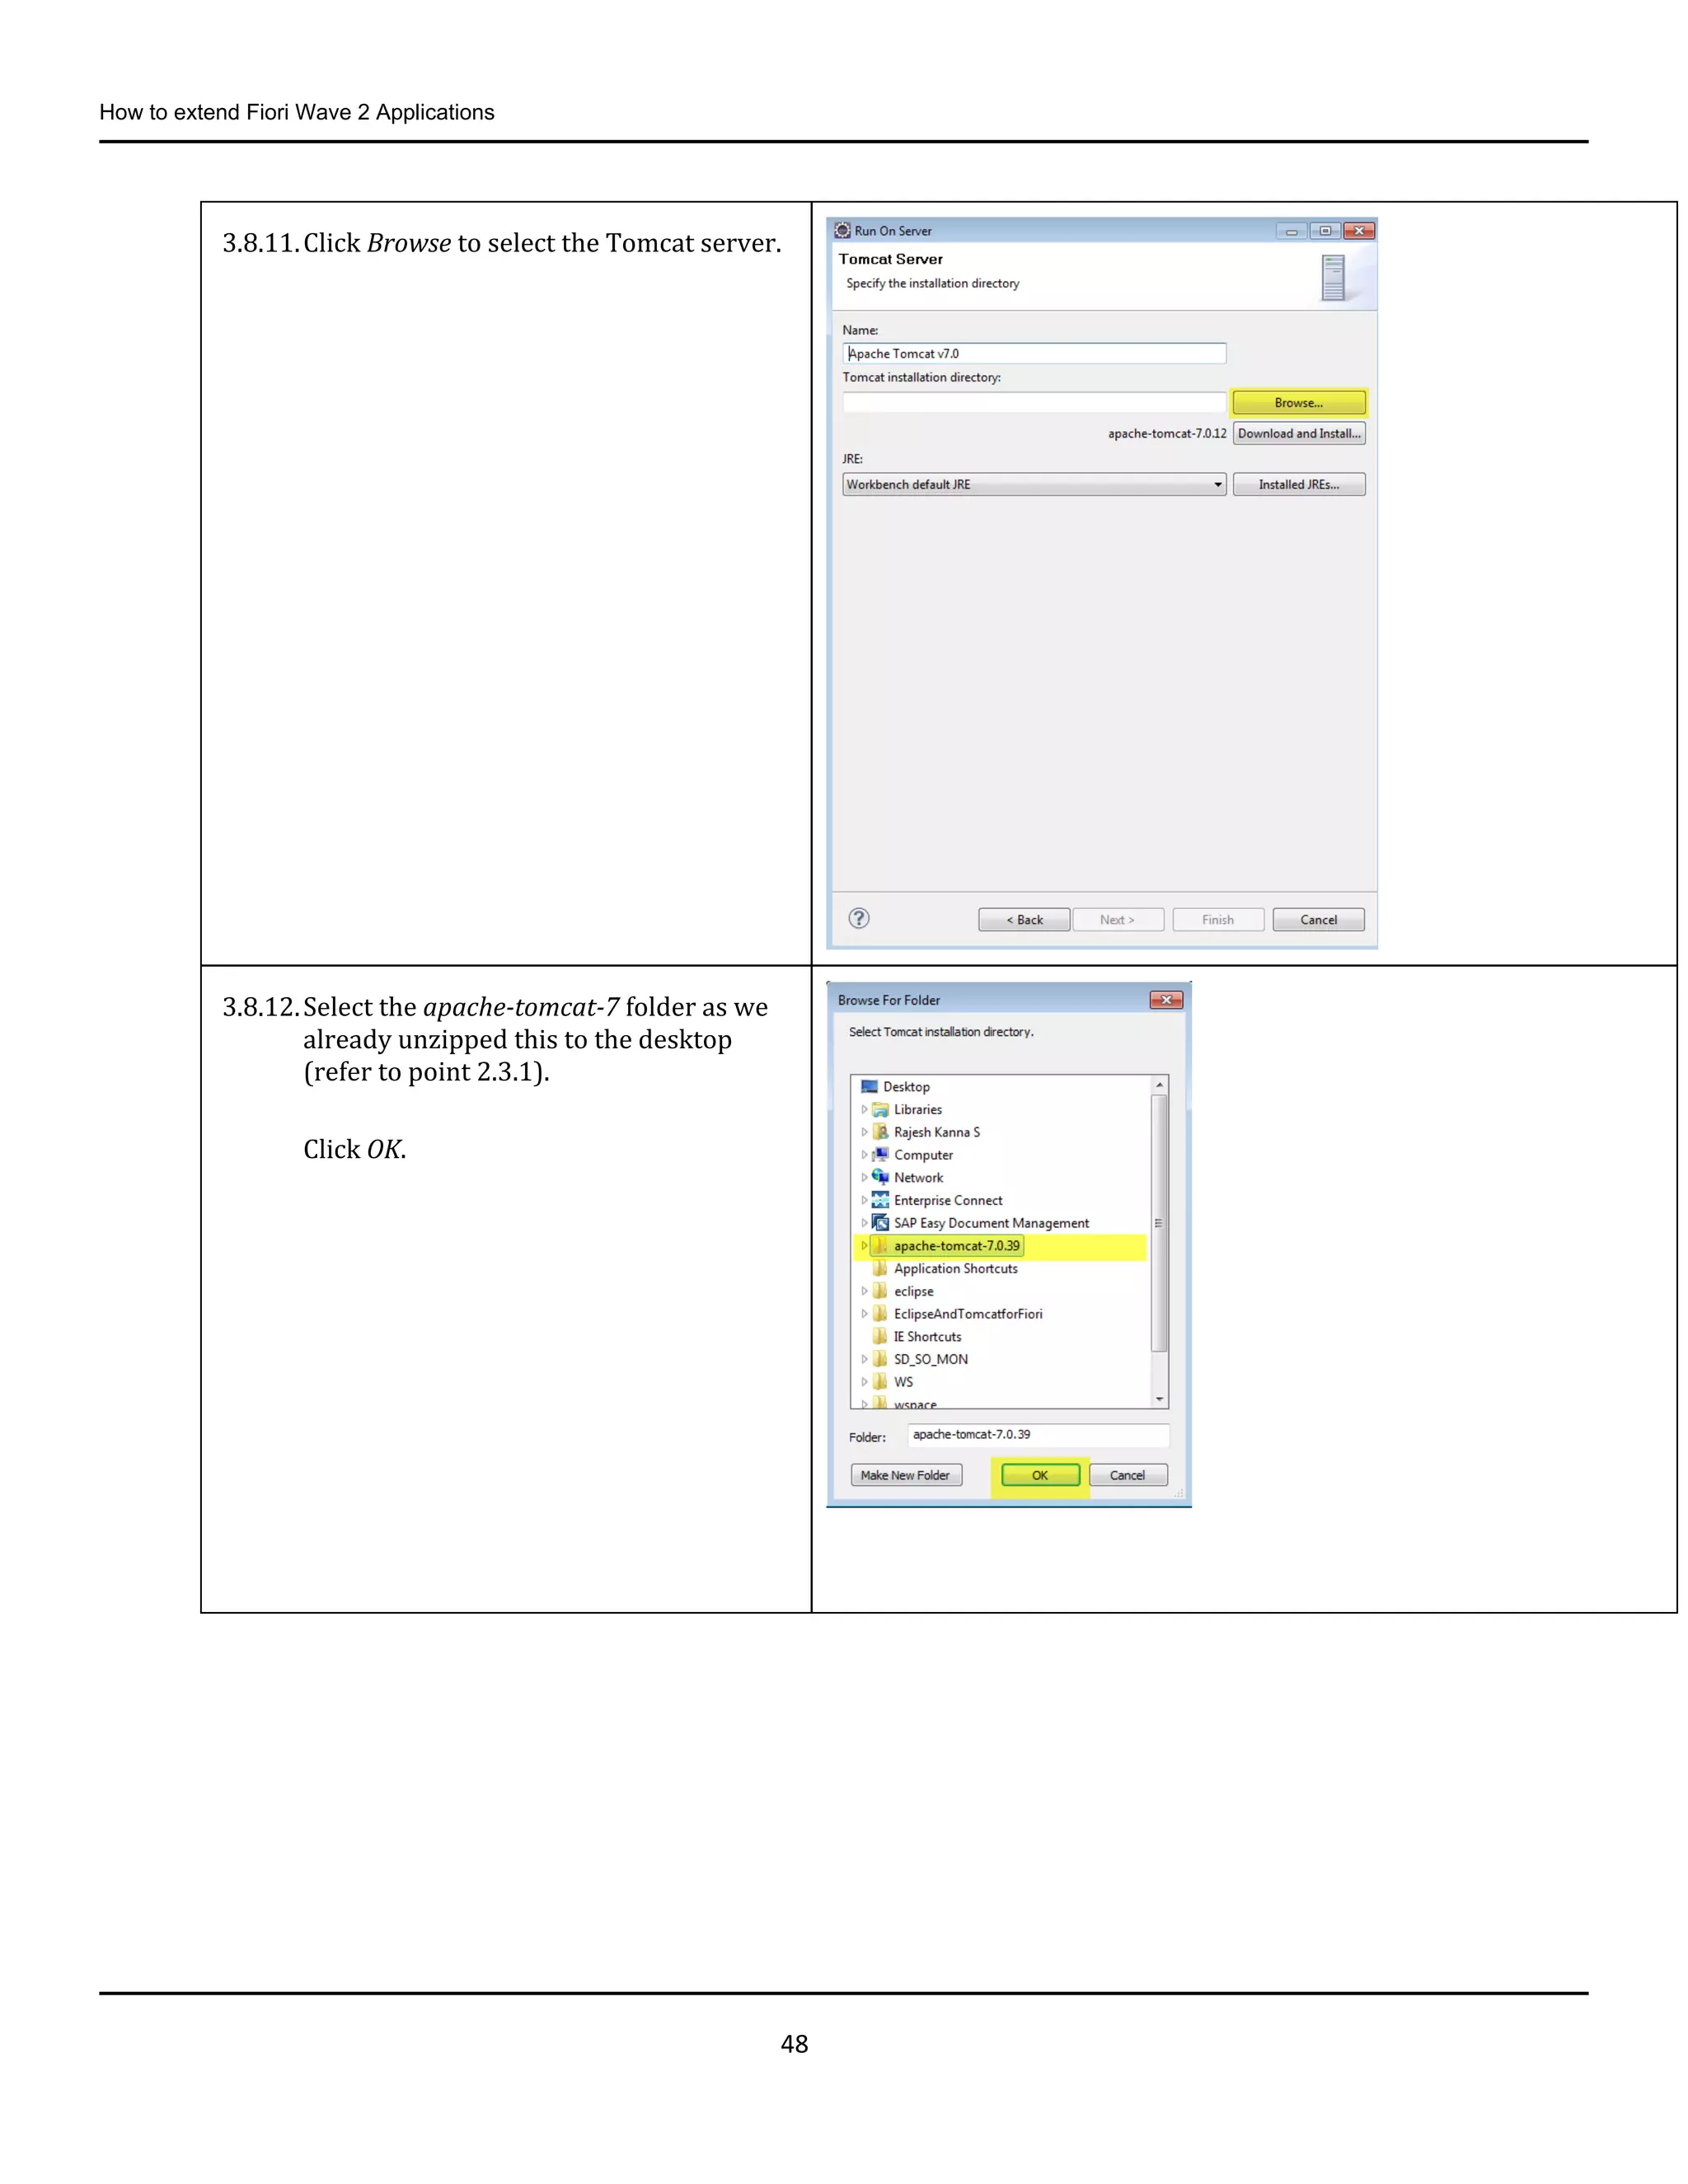
3.8.11.Click Browse to select the Tomcat server.
3.8.12.Select the apache-tomcat-7 folder as we
already unzipped this to the desktop
(refer to point 2.3.1).
Click OK.
49.
How to extendFiori Wave 2 Applications
49
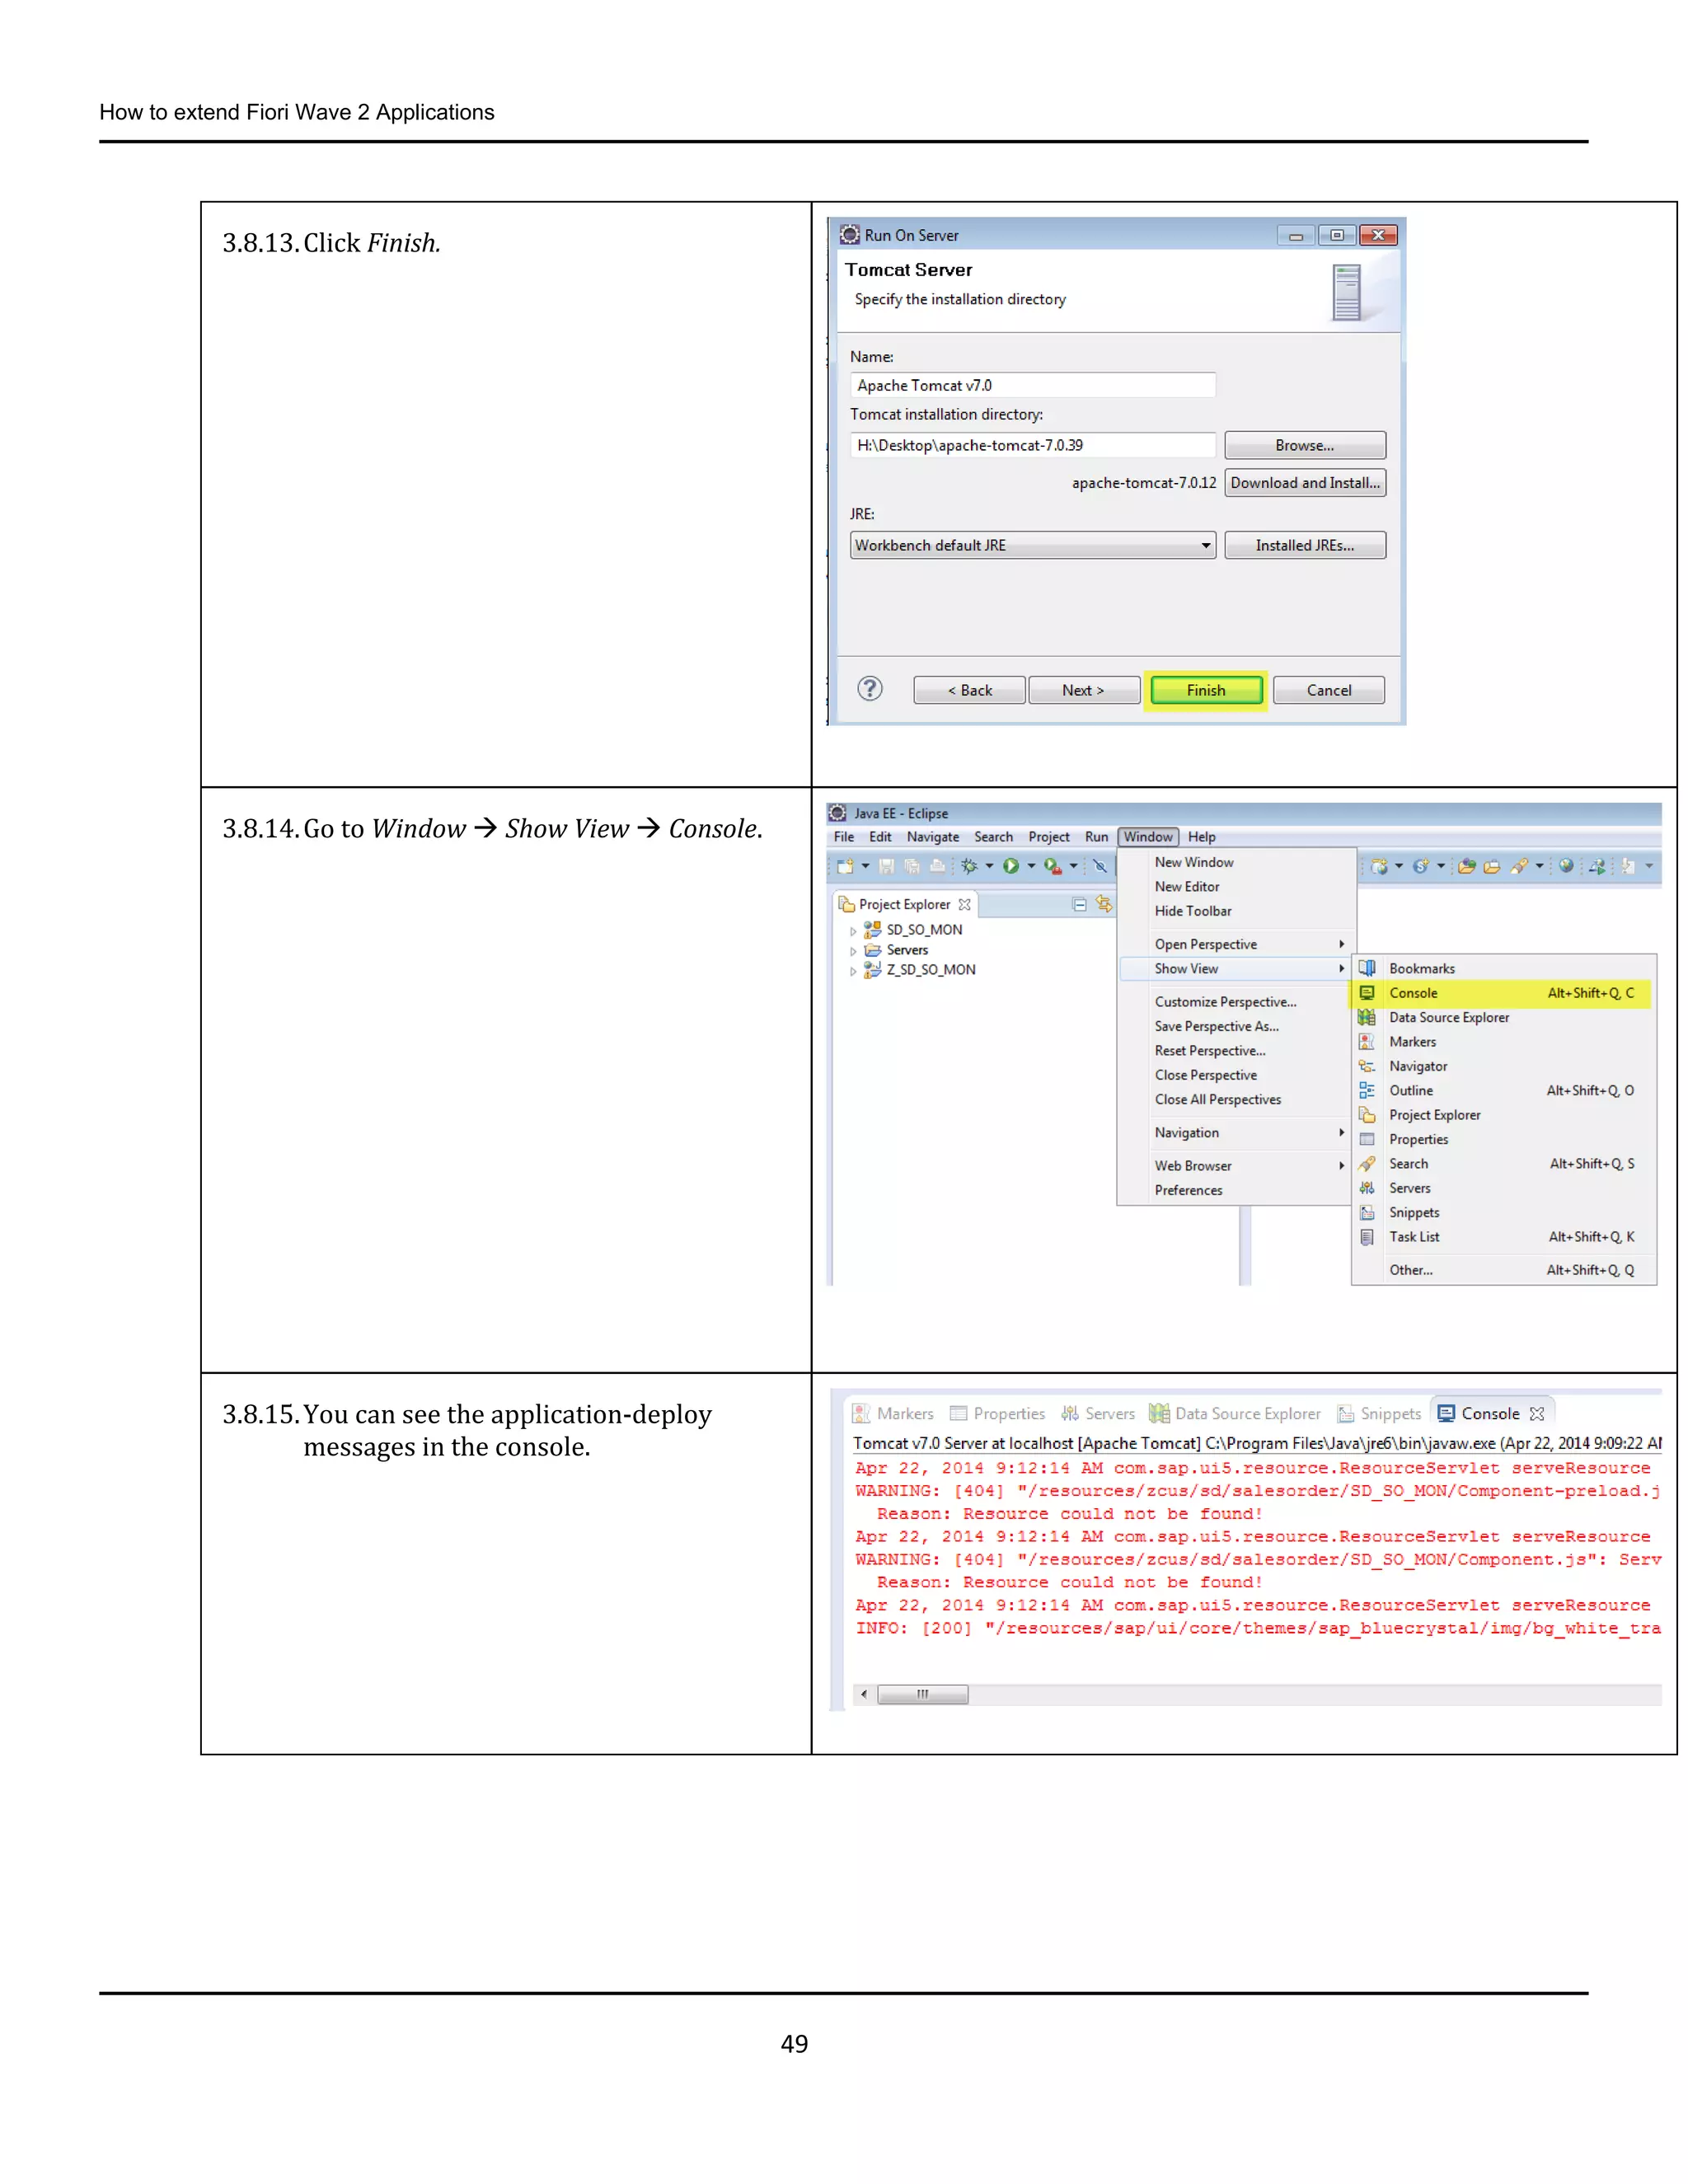
3.8.13.Click Finish.
3.8.14.Go to Window Show View Console.
3.8.15.You can see the application-deploy
messages in the console.
50.
How to extendFiori Wave 2 Applications
50
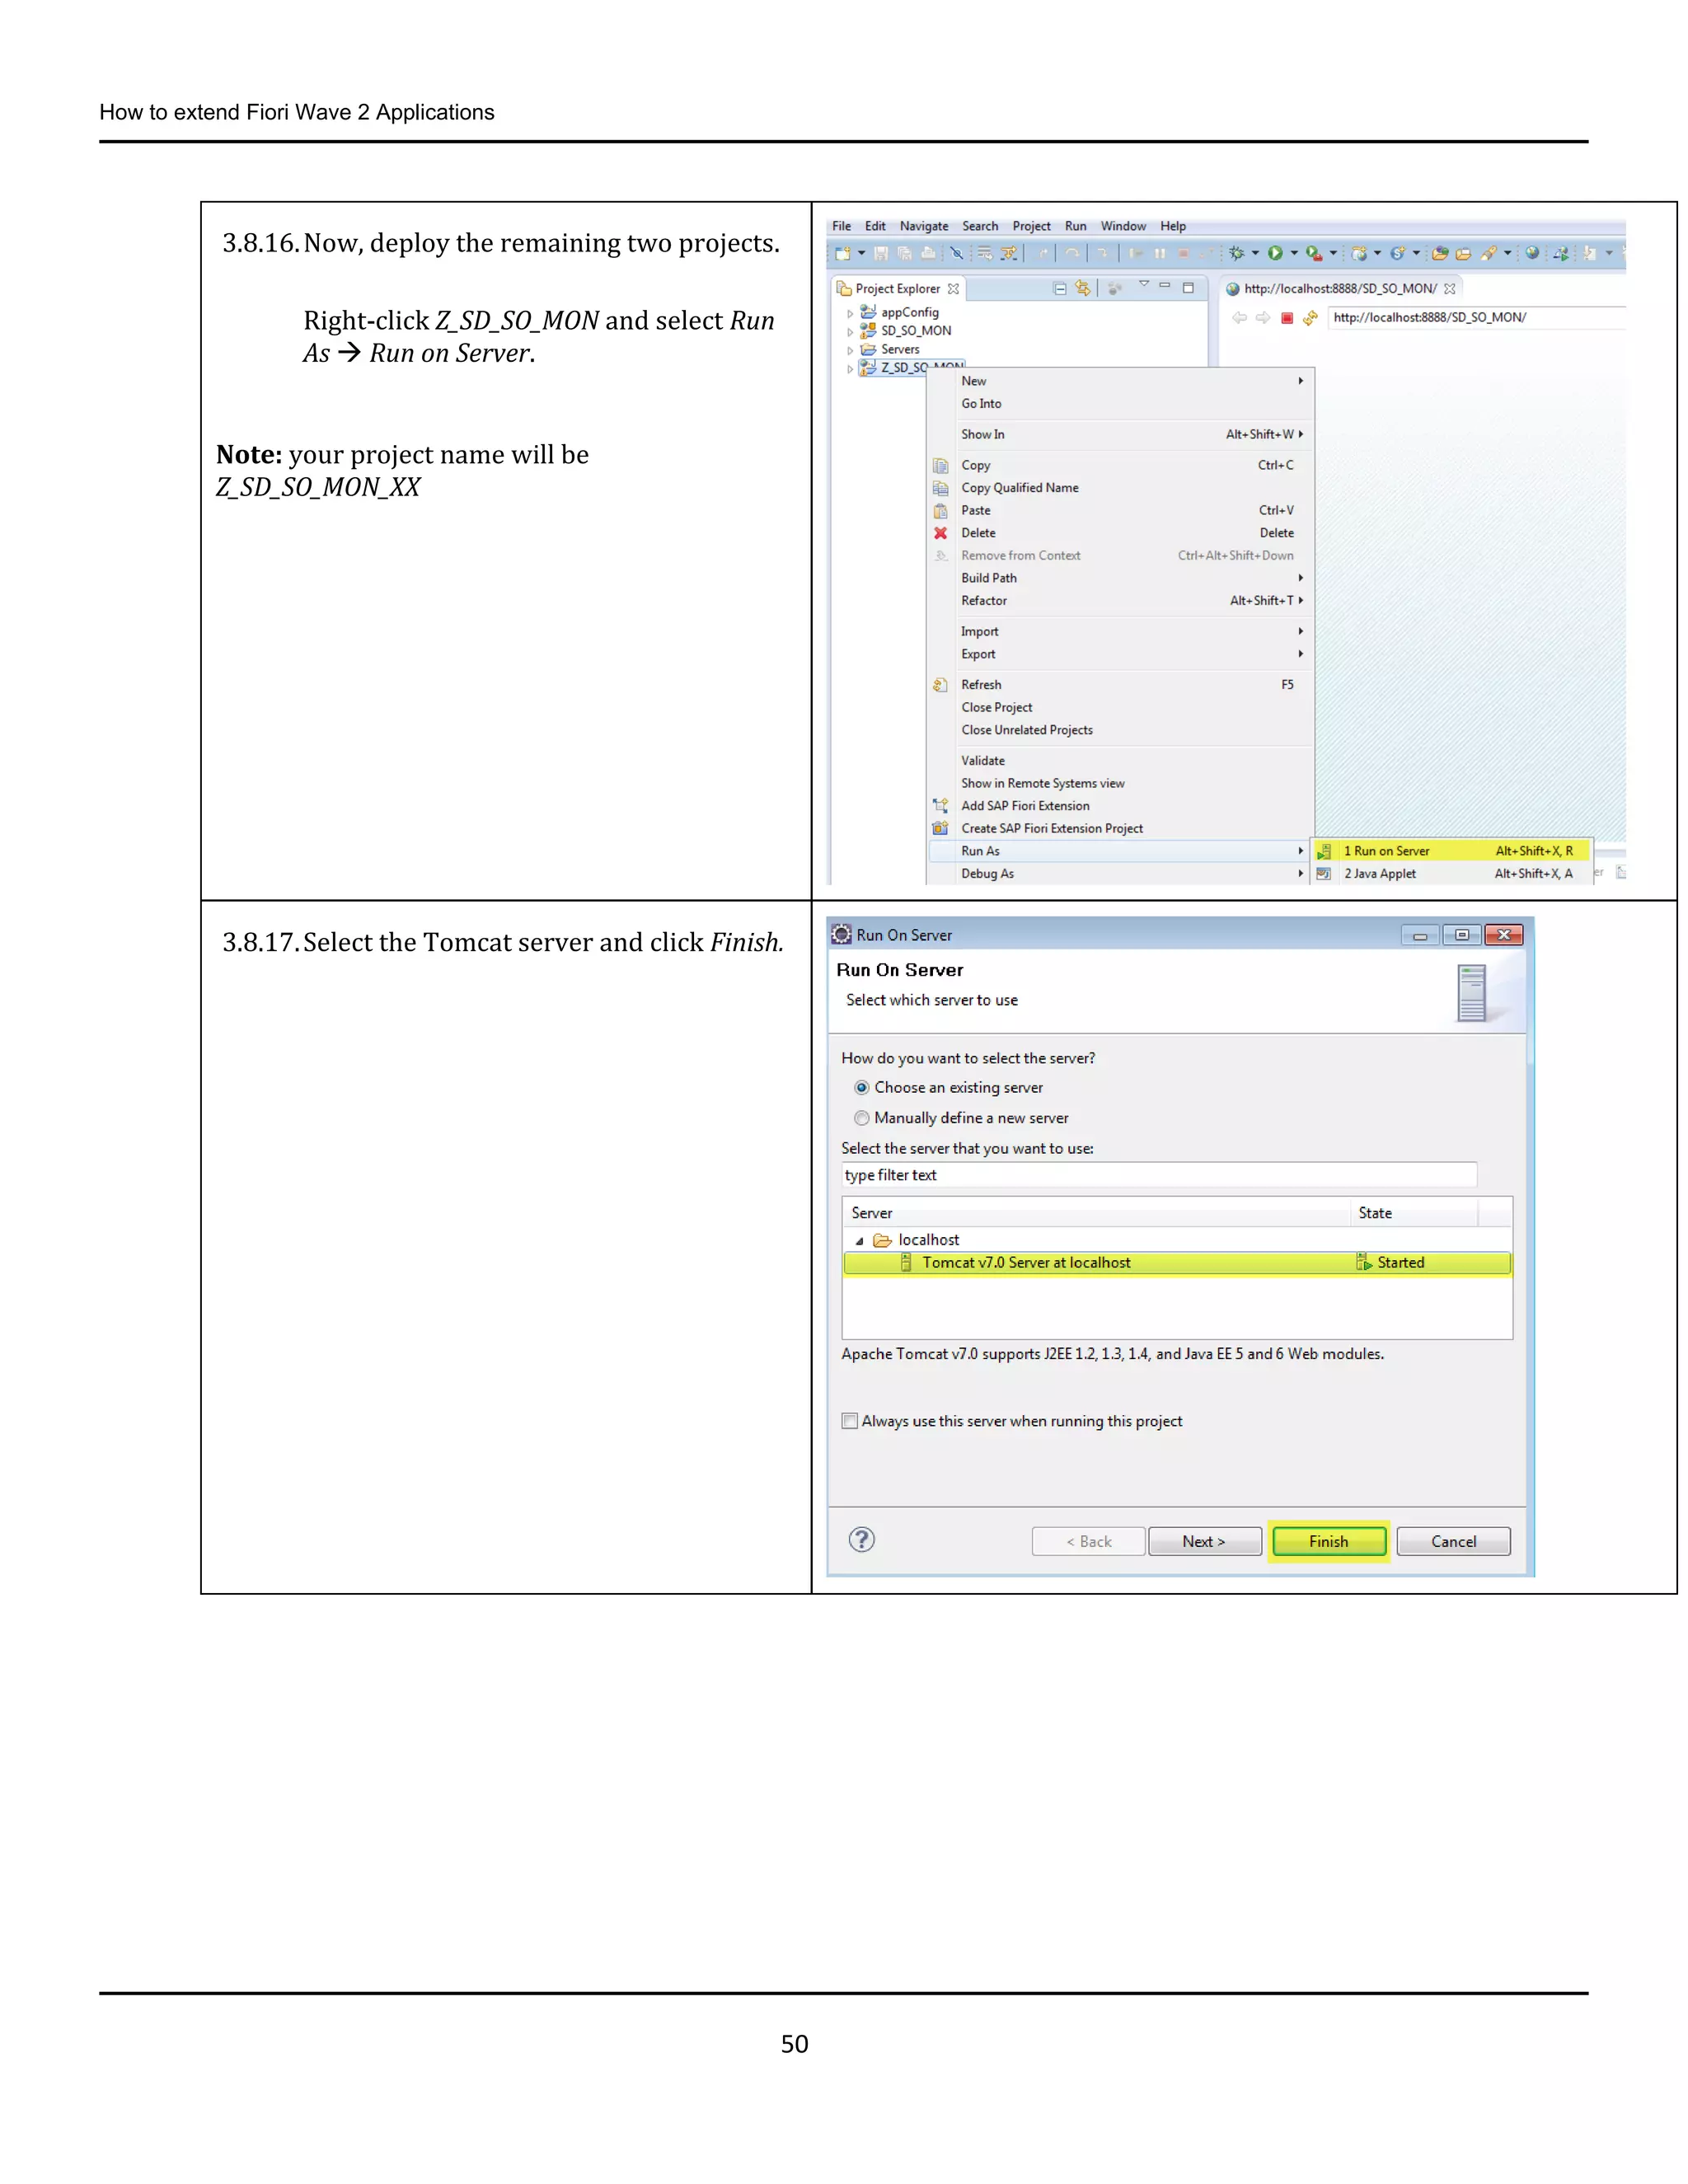
3.8.16.Now, deploy the remaining two projects.
Right-click Z_SD_SO_MON and select Run
As Run on Server.
Note: your project name will be
Z_SD_SO_MON_XX
3.8.17.Select the Tomcat server and click Finish.
51.
How to extendFiori Wave 2 Applications
51
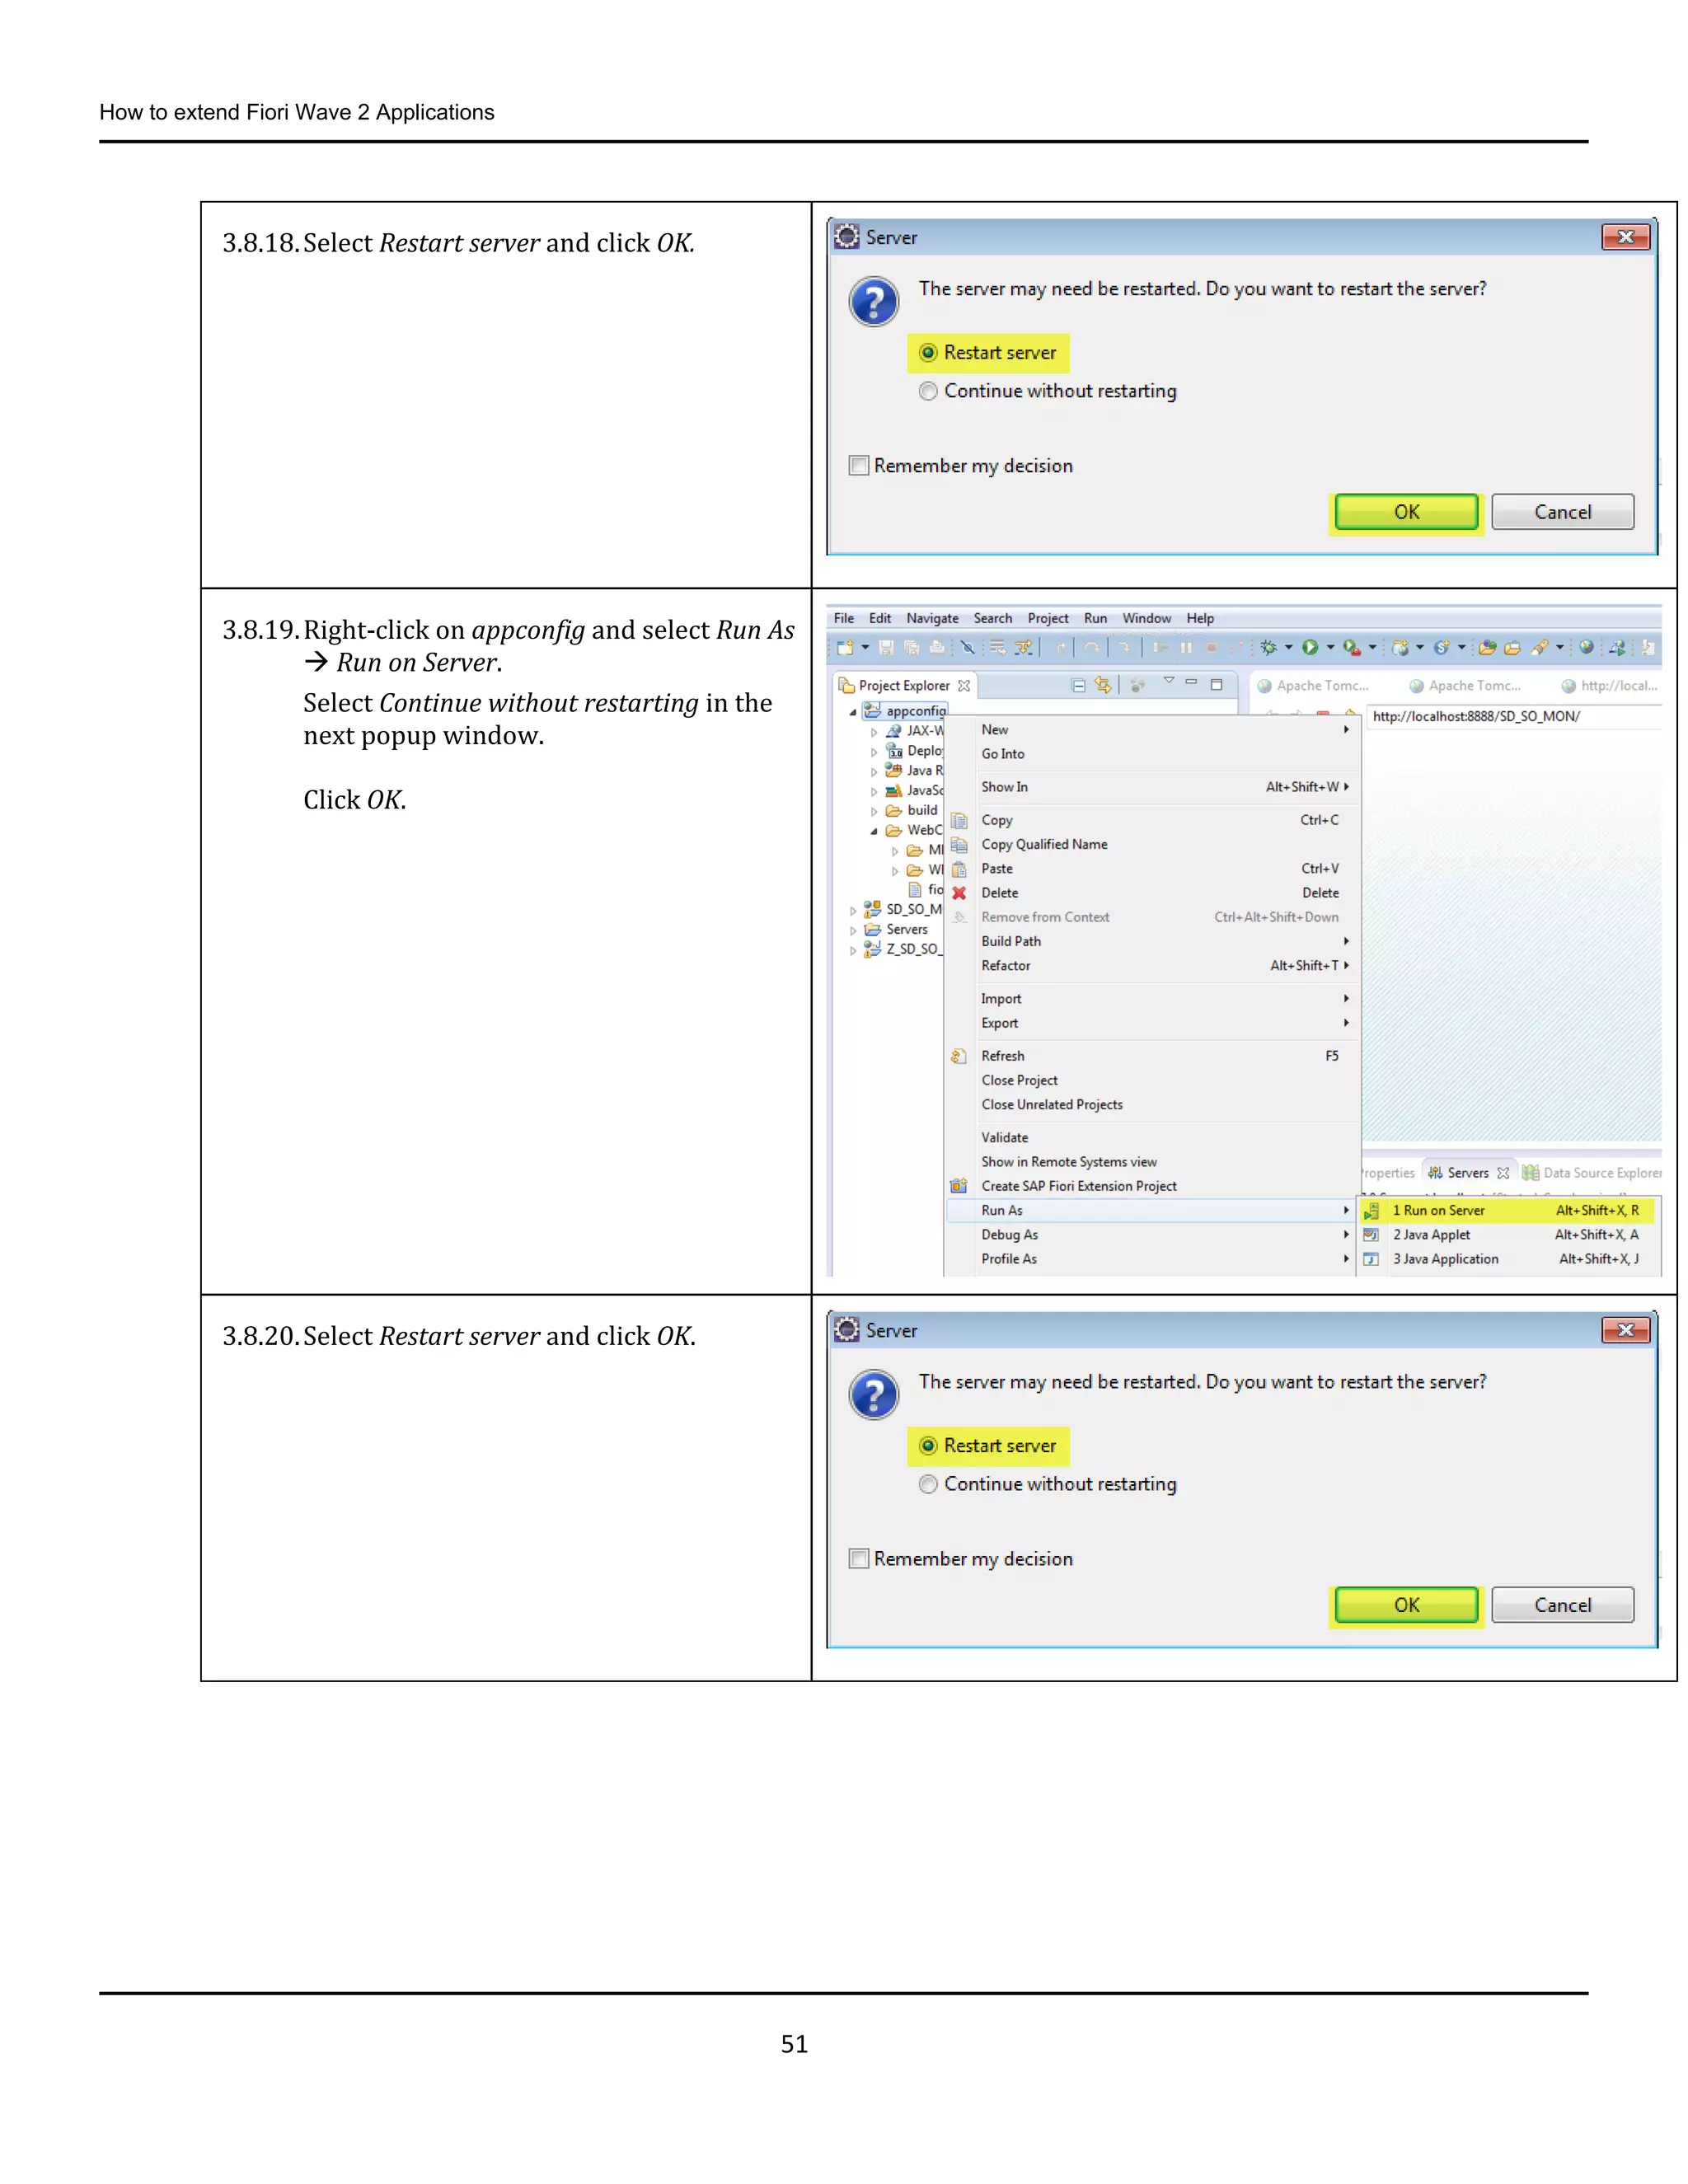
3.8.18.Select Restart server and click OK.
3.8.19.Right-click on appconfig and select Run As
Run on Server.
Select Continue without restarting in the
next popup window.
Click OK.
3.8.20.Select Restart server and click OK.
52.
How to extendFiori Wave 2 Applications
52
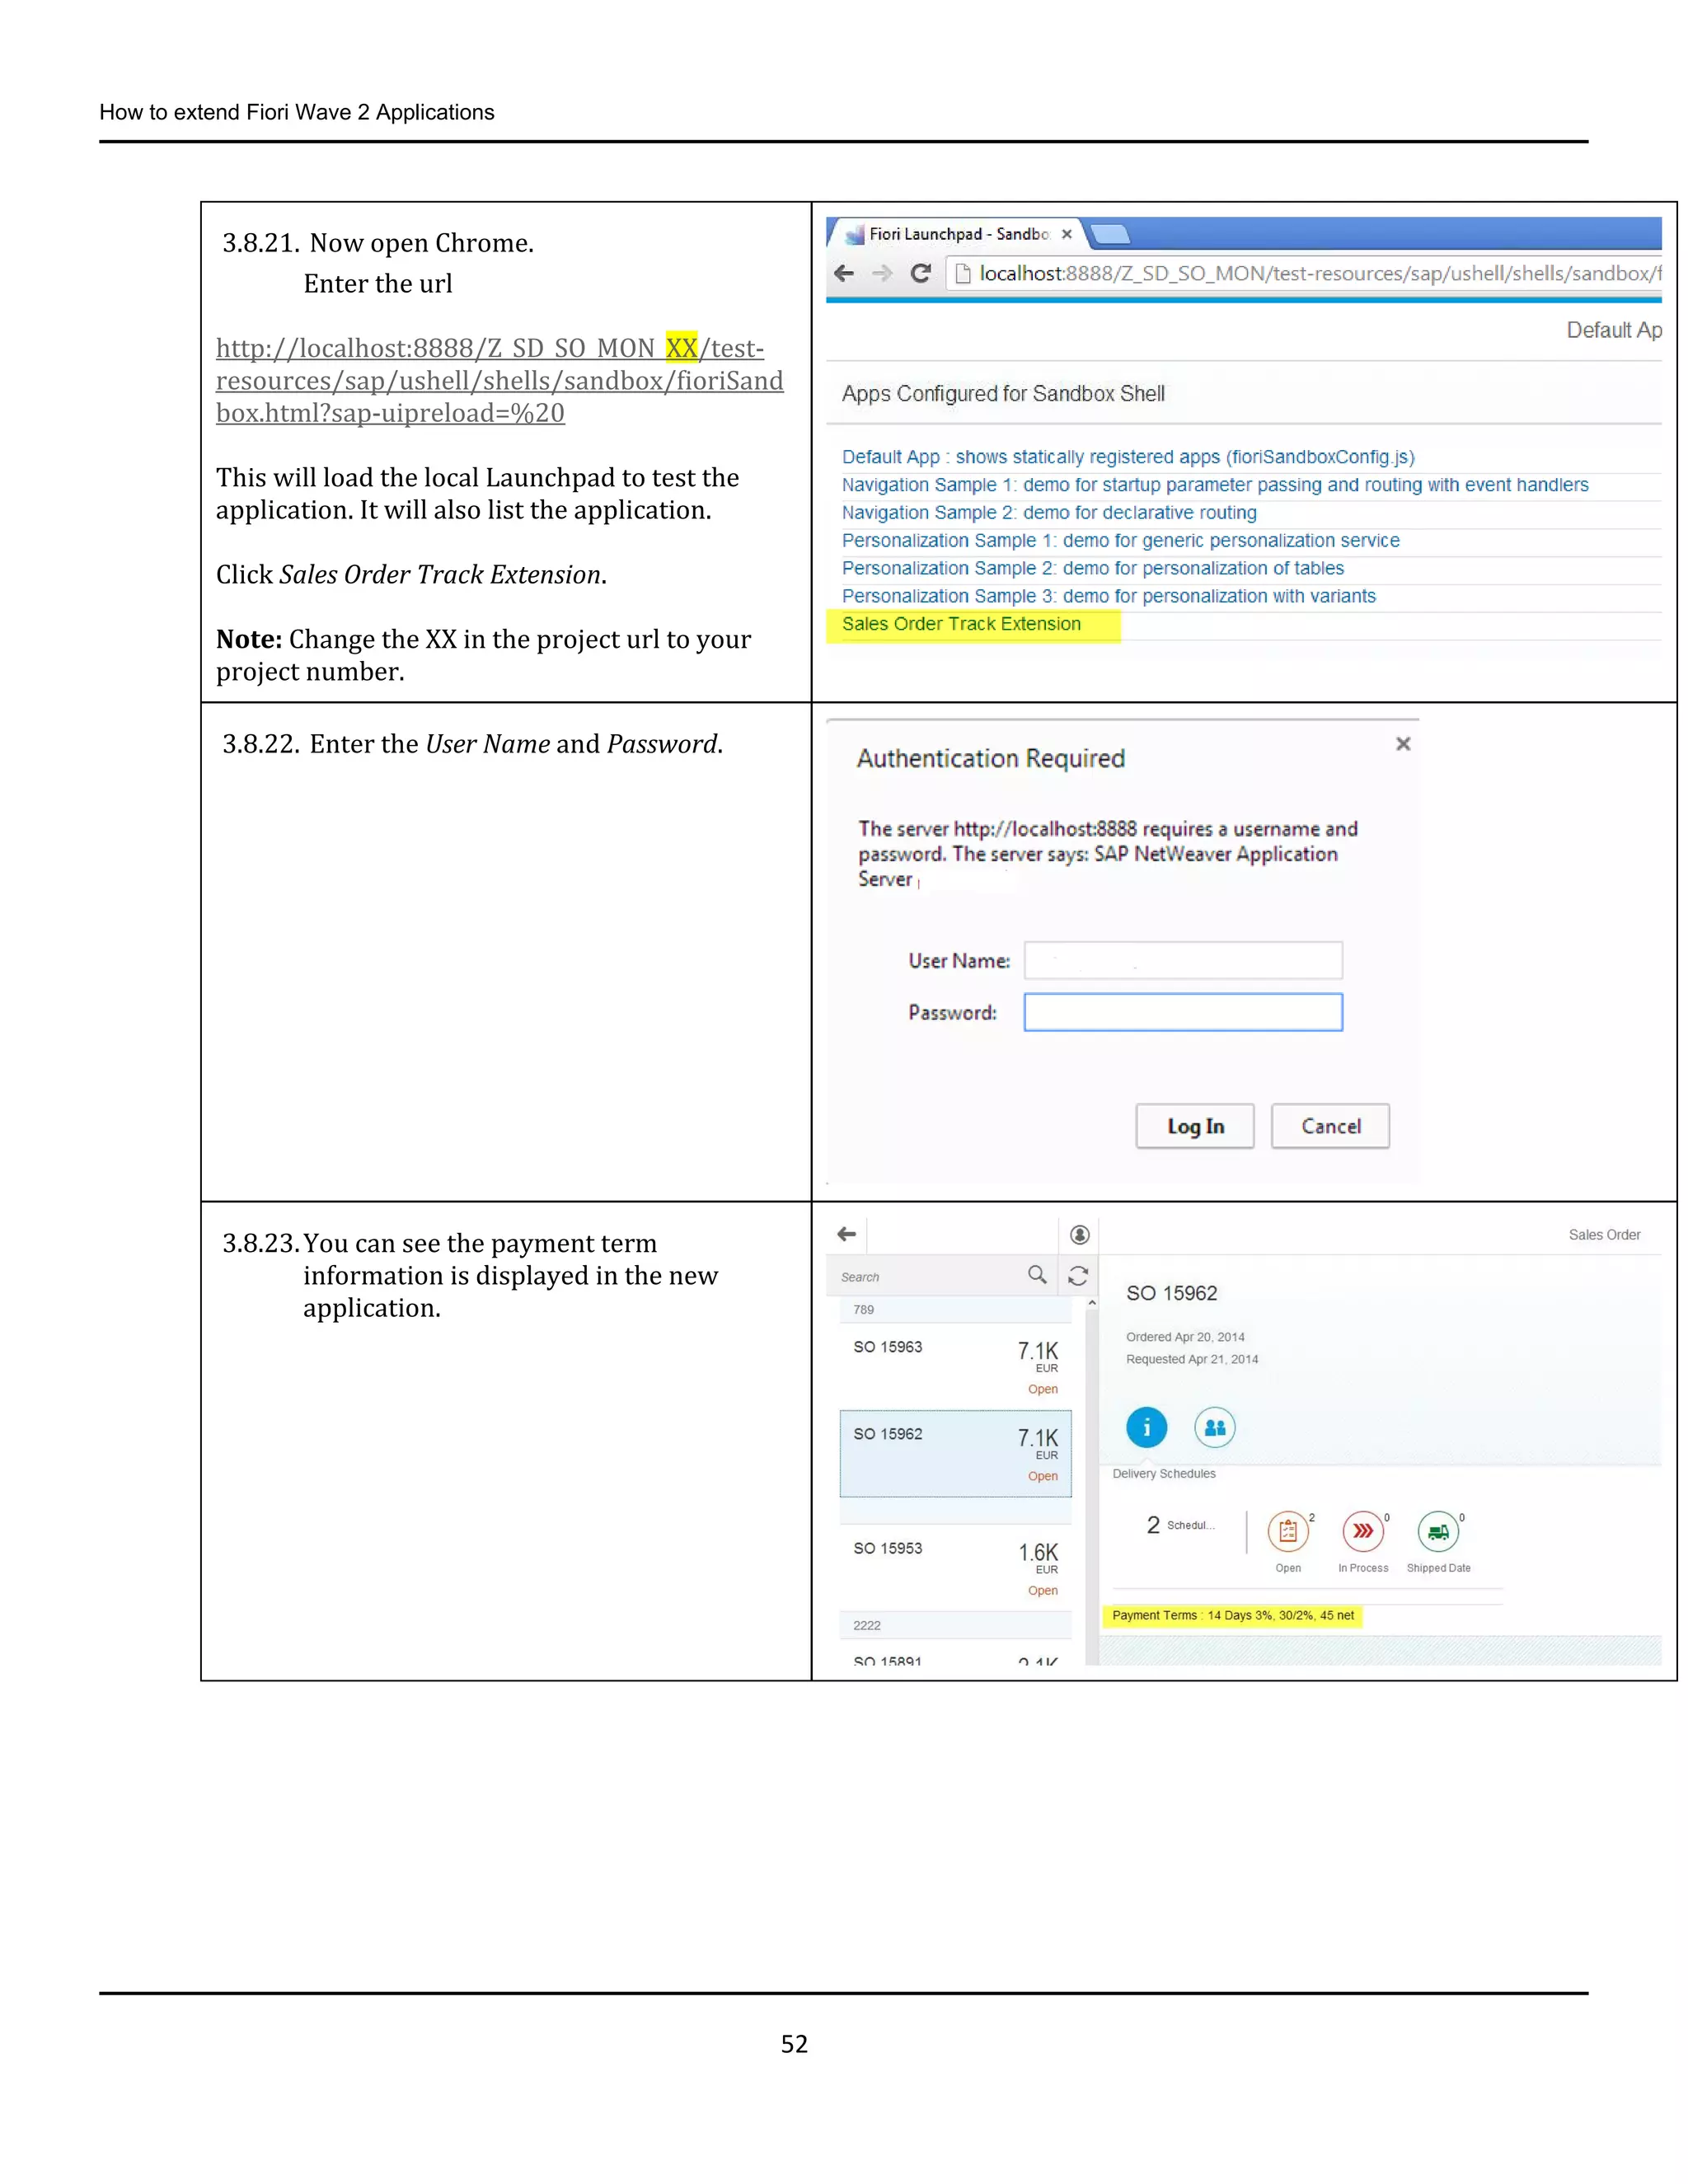
3.8.21. Now open Chrome.
Enter the url
http://localhost:8888/Z_SD_SO_MON_XX/test-
resources/sap/ushell/shells/sandbox/fioriSand
box.html?sap-uipreload=%20
This will load the local Launchpad to test the
application. It will also list the application.
Click Sales Order Track Extension.
Note: Change the XX in the project url to your
project number.
3.8.22. Enter the User Name and Password.
3.8.23.You can see the payment term
information is displayed in the new
application.
53.
How to extendFiori Wave 2 Applications
53
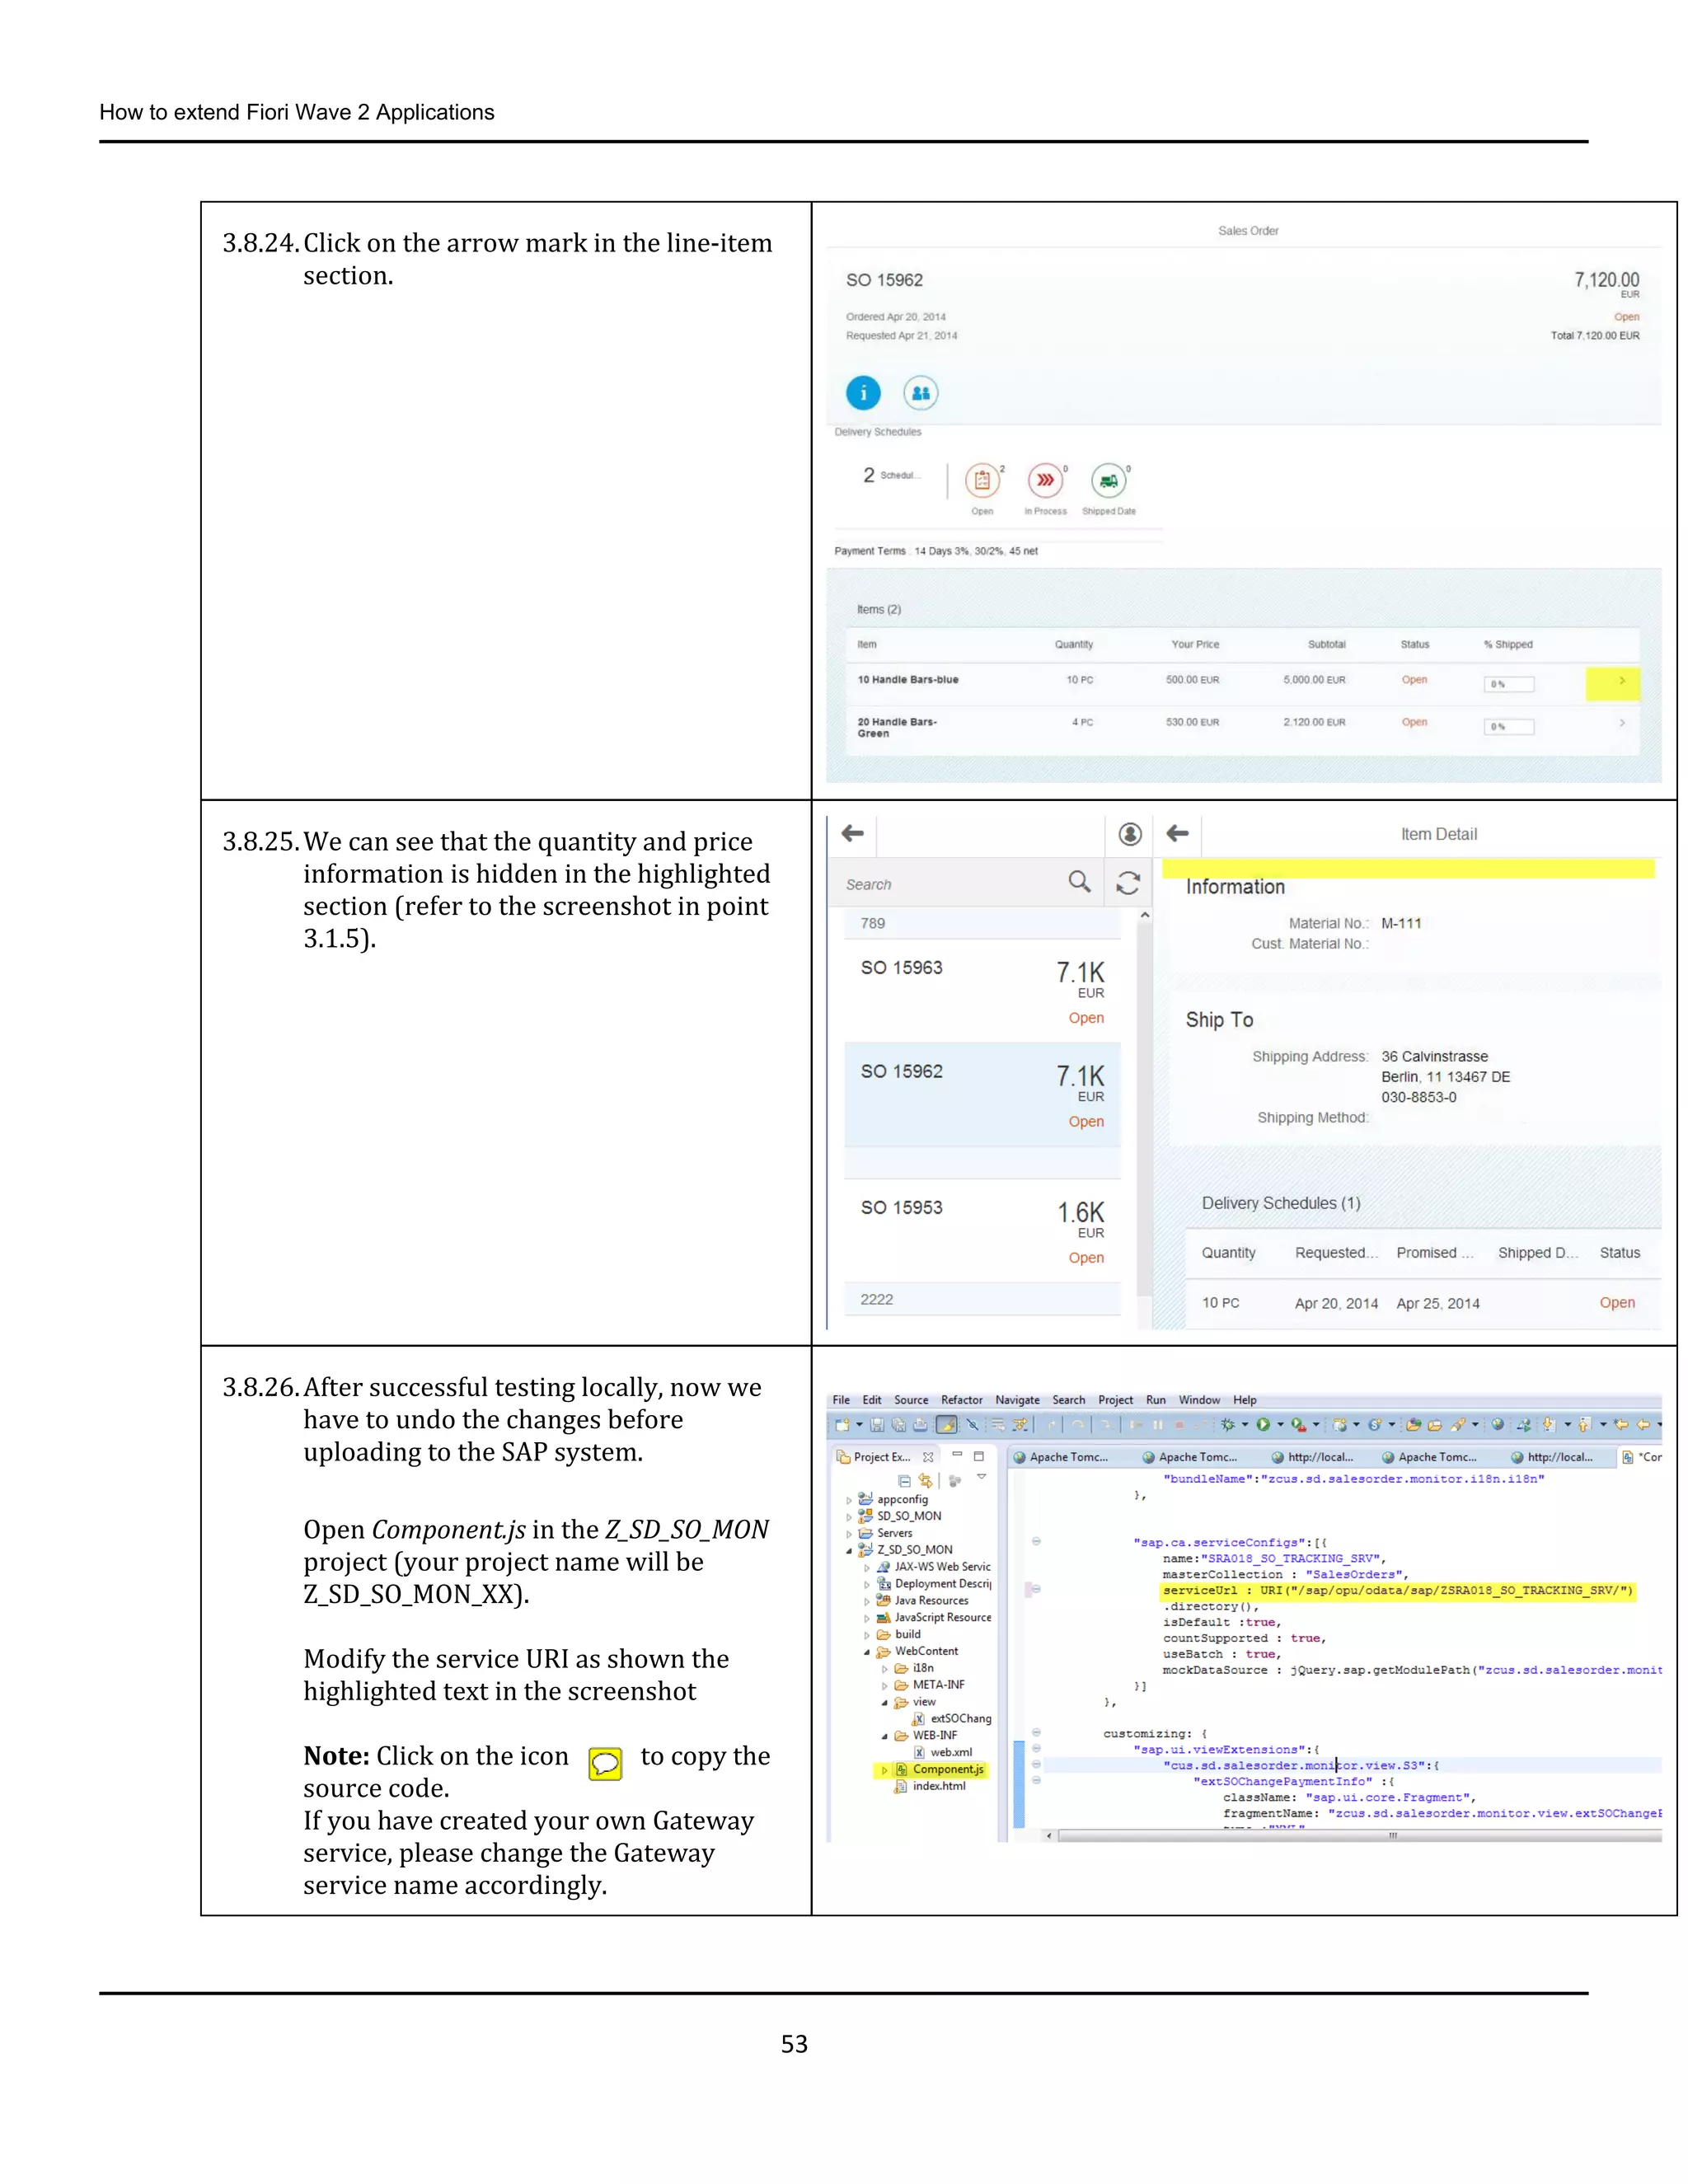
3.8.24.Click on the arrow mark in the line-item
section.
3.8.25.We can see that the quantity and price
information is hidden in the highlighted
section (refer to the screenshot in point
3.1.5).
3.8.26.After successful testing locally, now we
have to undo the changes before
uploading to the SAP system.
Open Component.js in the Z_SD_SO_MON
project (your project name will be
Z_SD_SO_MON_XX).
Modify the service URI as shown the
highlighted text in the screenshot
Note: Click on the icon to copy the
source code.
If you have created your own Gateway
service, please change the Gateway
service name accordingly.
54.
How to extendFiori Wave 2 Applications
54
3.9. Upload the Application into the SAP System
What to do What to say
3.9.1. Login to the SAP Gateway system with
the appropriate user and password.
3.9.2. Before uploading/re-uploading the
application, you have to make sure that
there is no application with the same BSP
name in the system.
You are going to upload the application
with the name Z_SD_SO_MON.
So first you have make sure that there is
no BSP application in the system with the
name Z_SD_SO_MON.
To do this run transaction SE80.
Note: In your case the project name will
be Z_SD_SO_MON_XX (where XX is your
appended number).
55.
How to extendFiori Wave 2 Applications
55
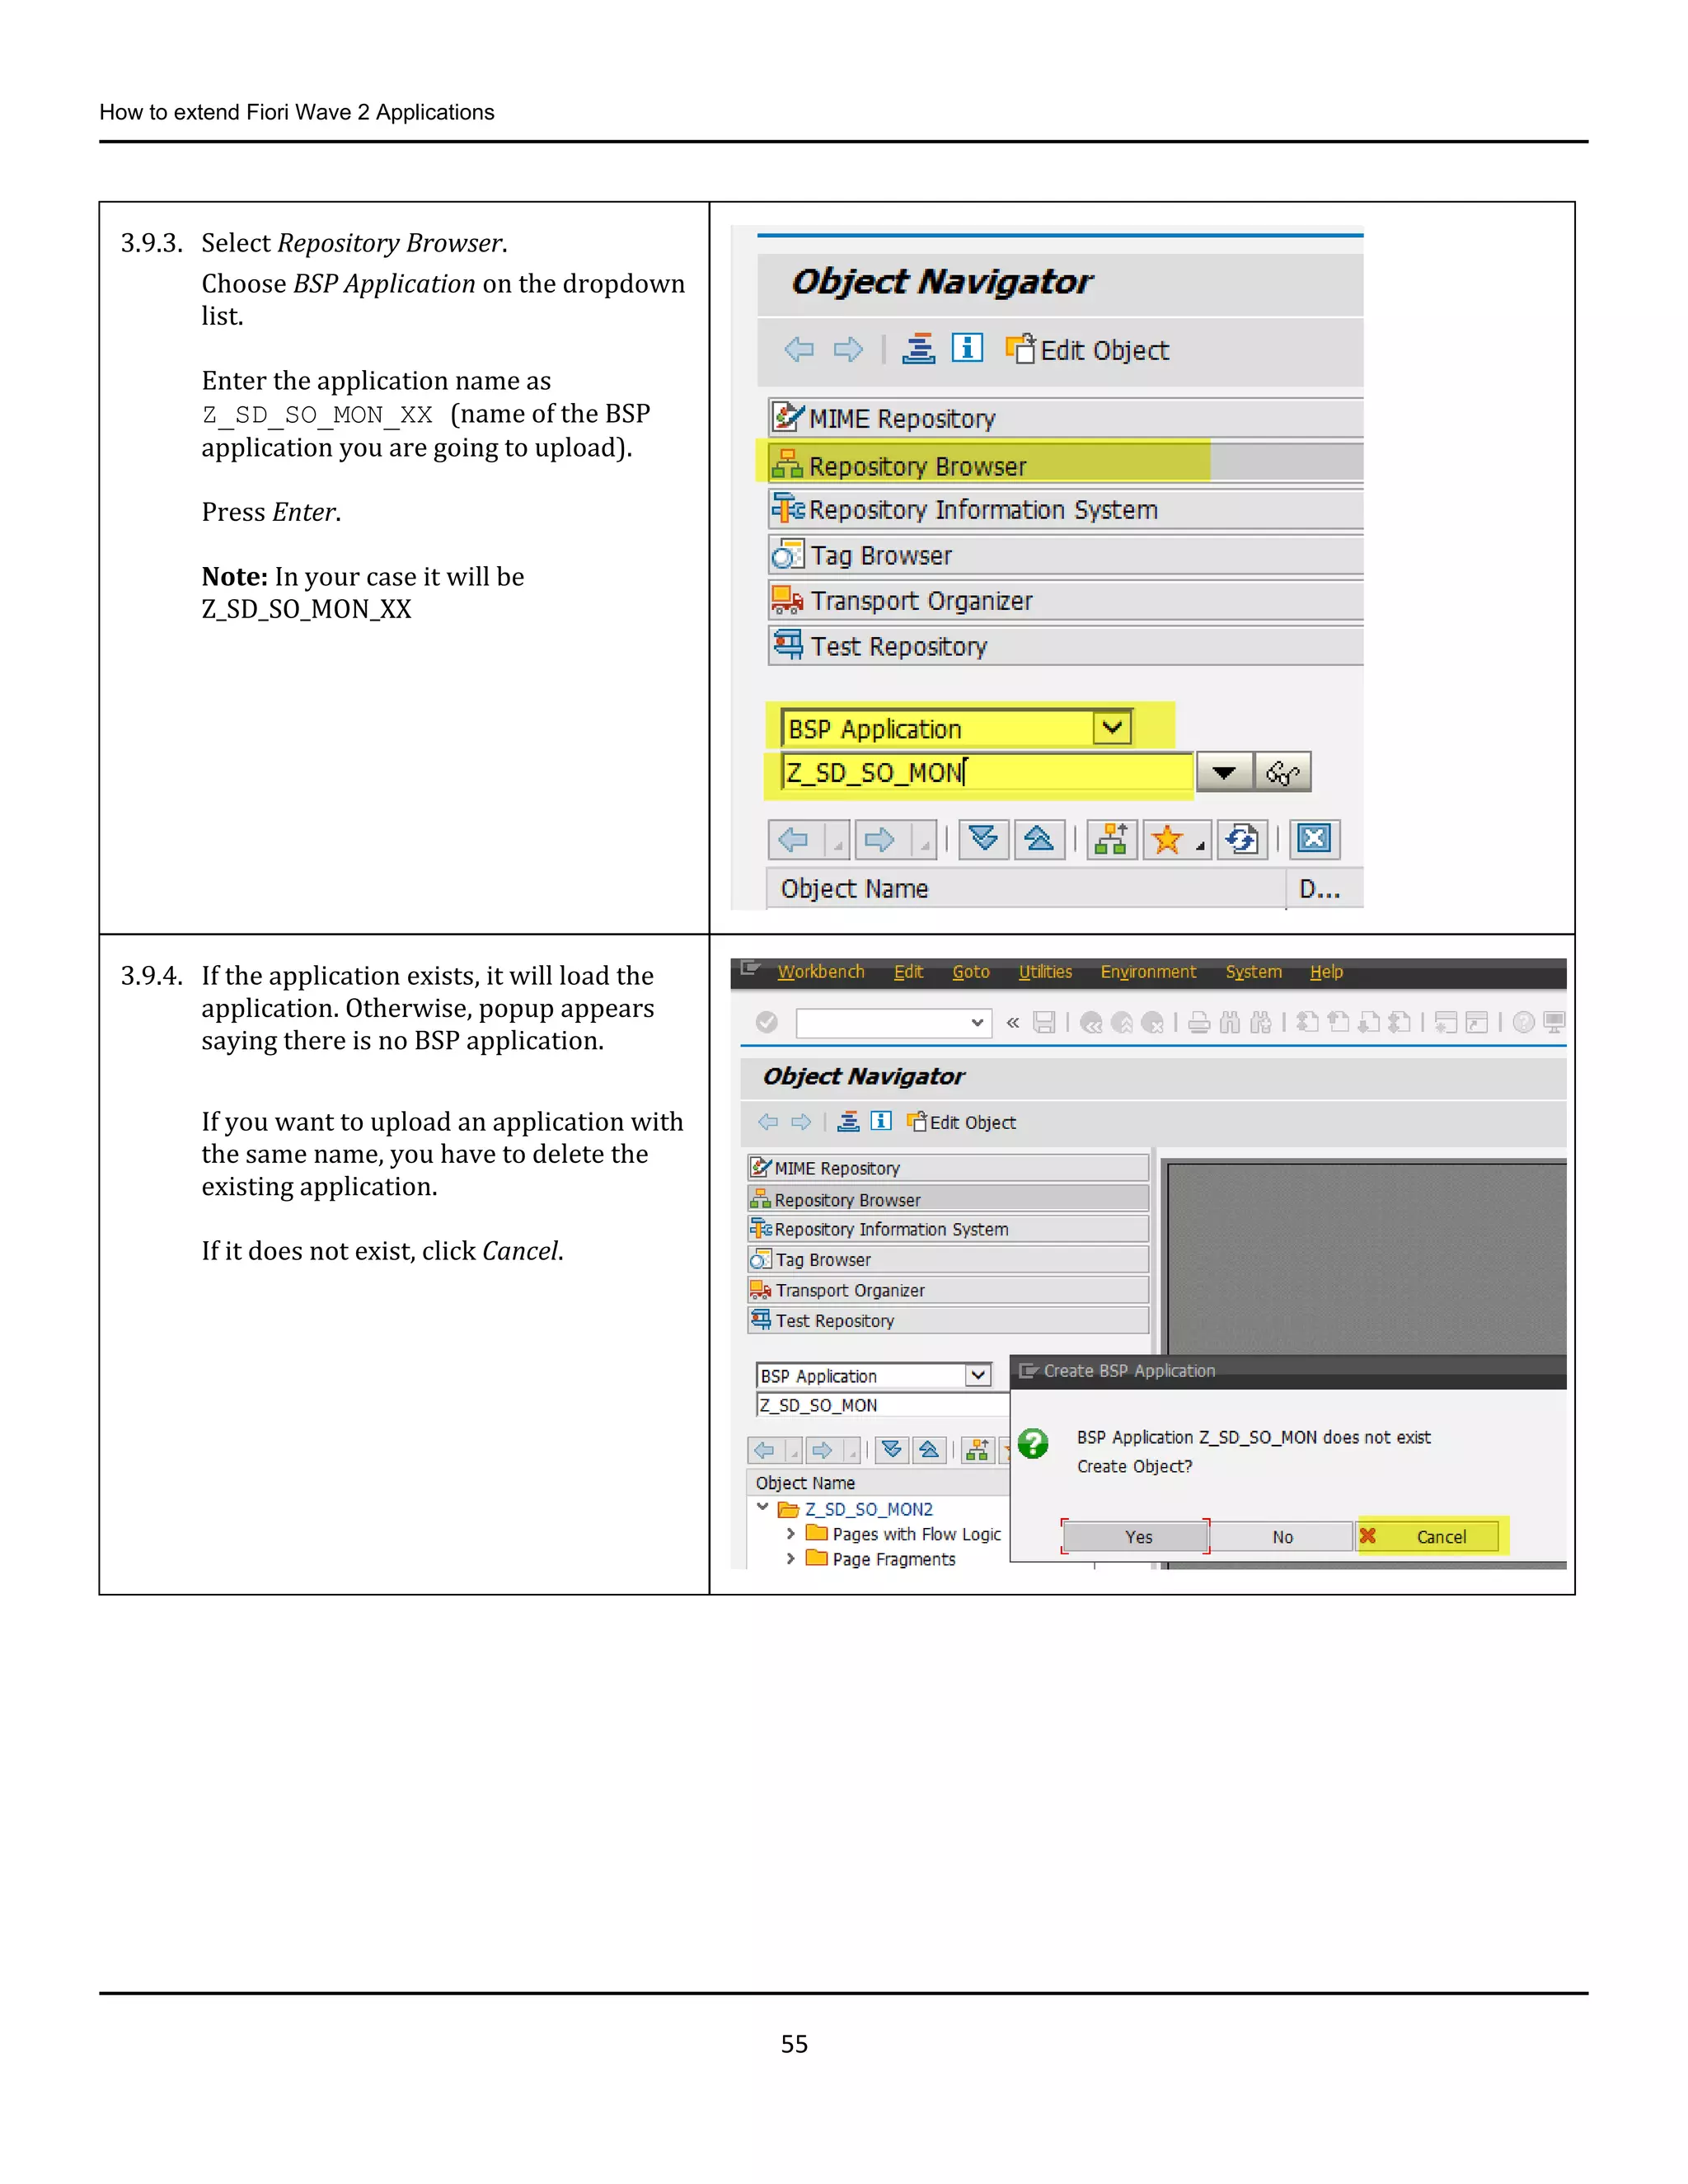
3.9.3. Select Repository Browser.
Choose BSP Application on the dropdown
list.
Enter the application name as
Z_SD_SO_MON_XX (name of the BSP
application you are going to upload).
Press Enter.
Note: In your case it will be
Z_SD_SO_MON_XX
3.9.4. If the application exists, it will load the
application. Otherwise, popup appears
saying there is no BSP application.
If you want to upload an application with
the same name, you have to delete the
existing application.
If it does not exist, click Cancel.
56.
How to extendFiori Wave 2 Applications
56
3.9.5. To delete an application, right-click the
application and choose Delete.
3.9.6. Run transaction SE38.
3.9.7. In the Program field, enter
/UI5/UI5_REPOSITORY_LOAD and
click the Execute button.
57.
How to extendFiori Wave 2 Applications
57
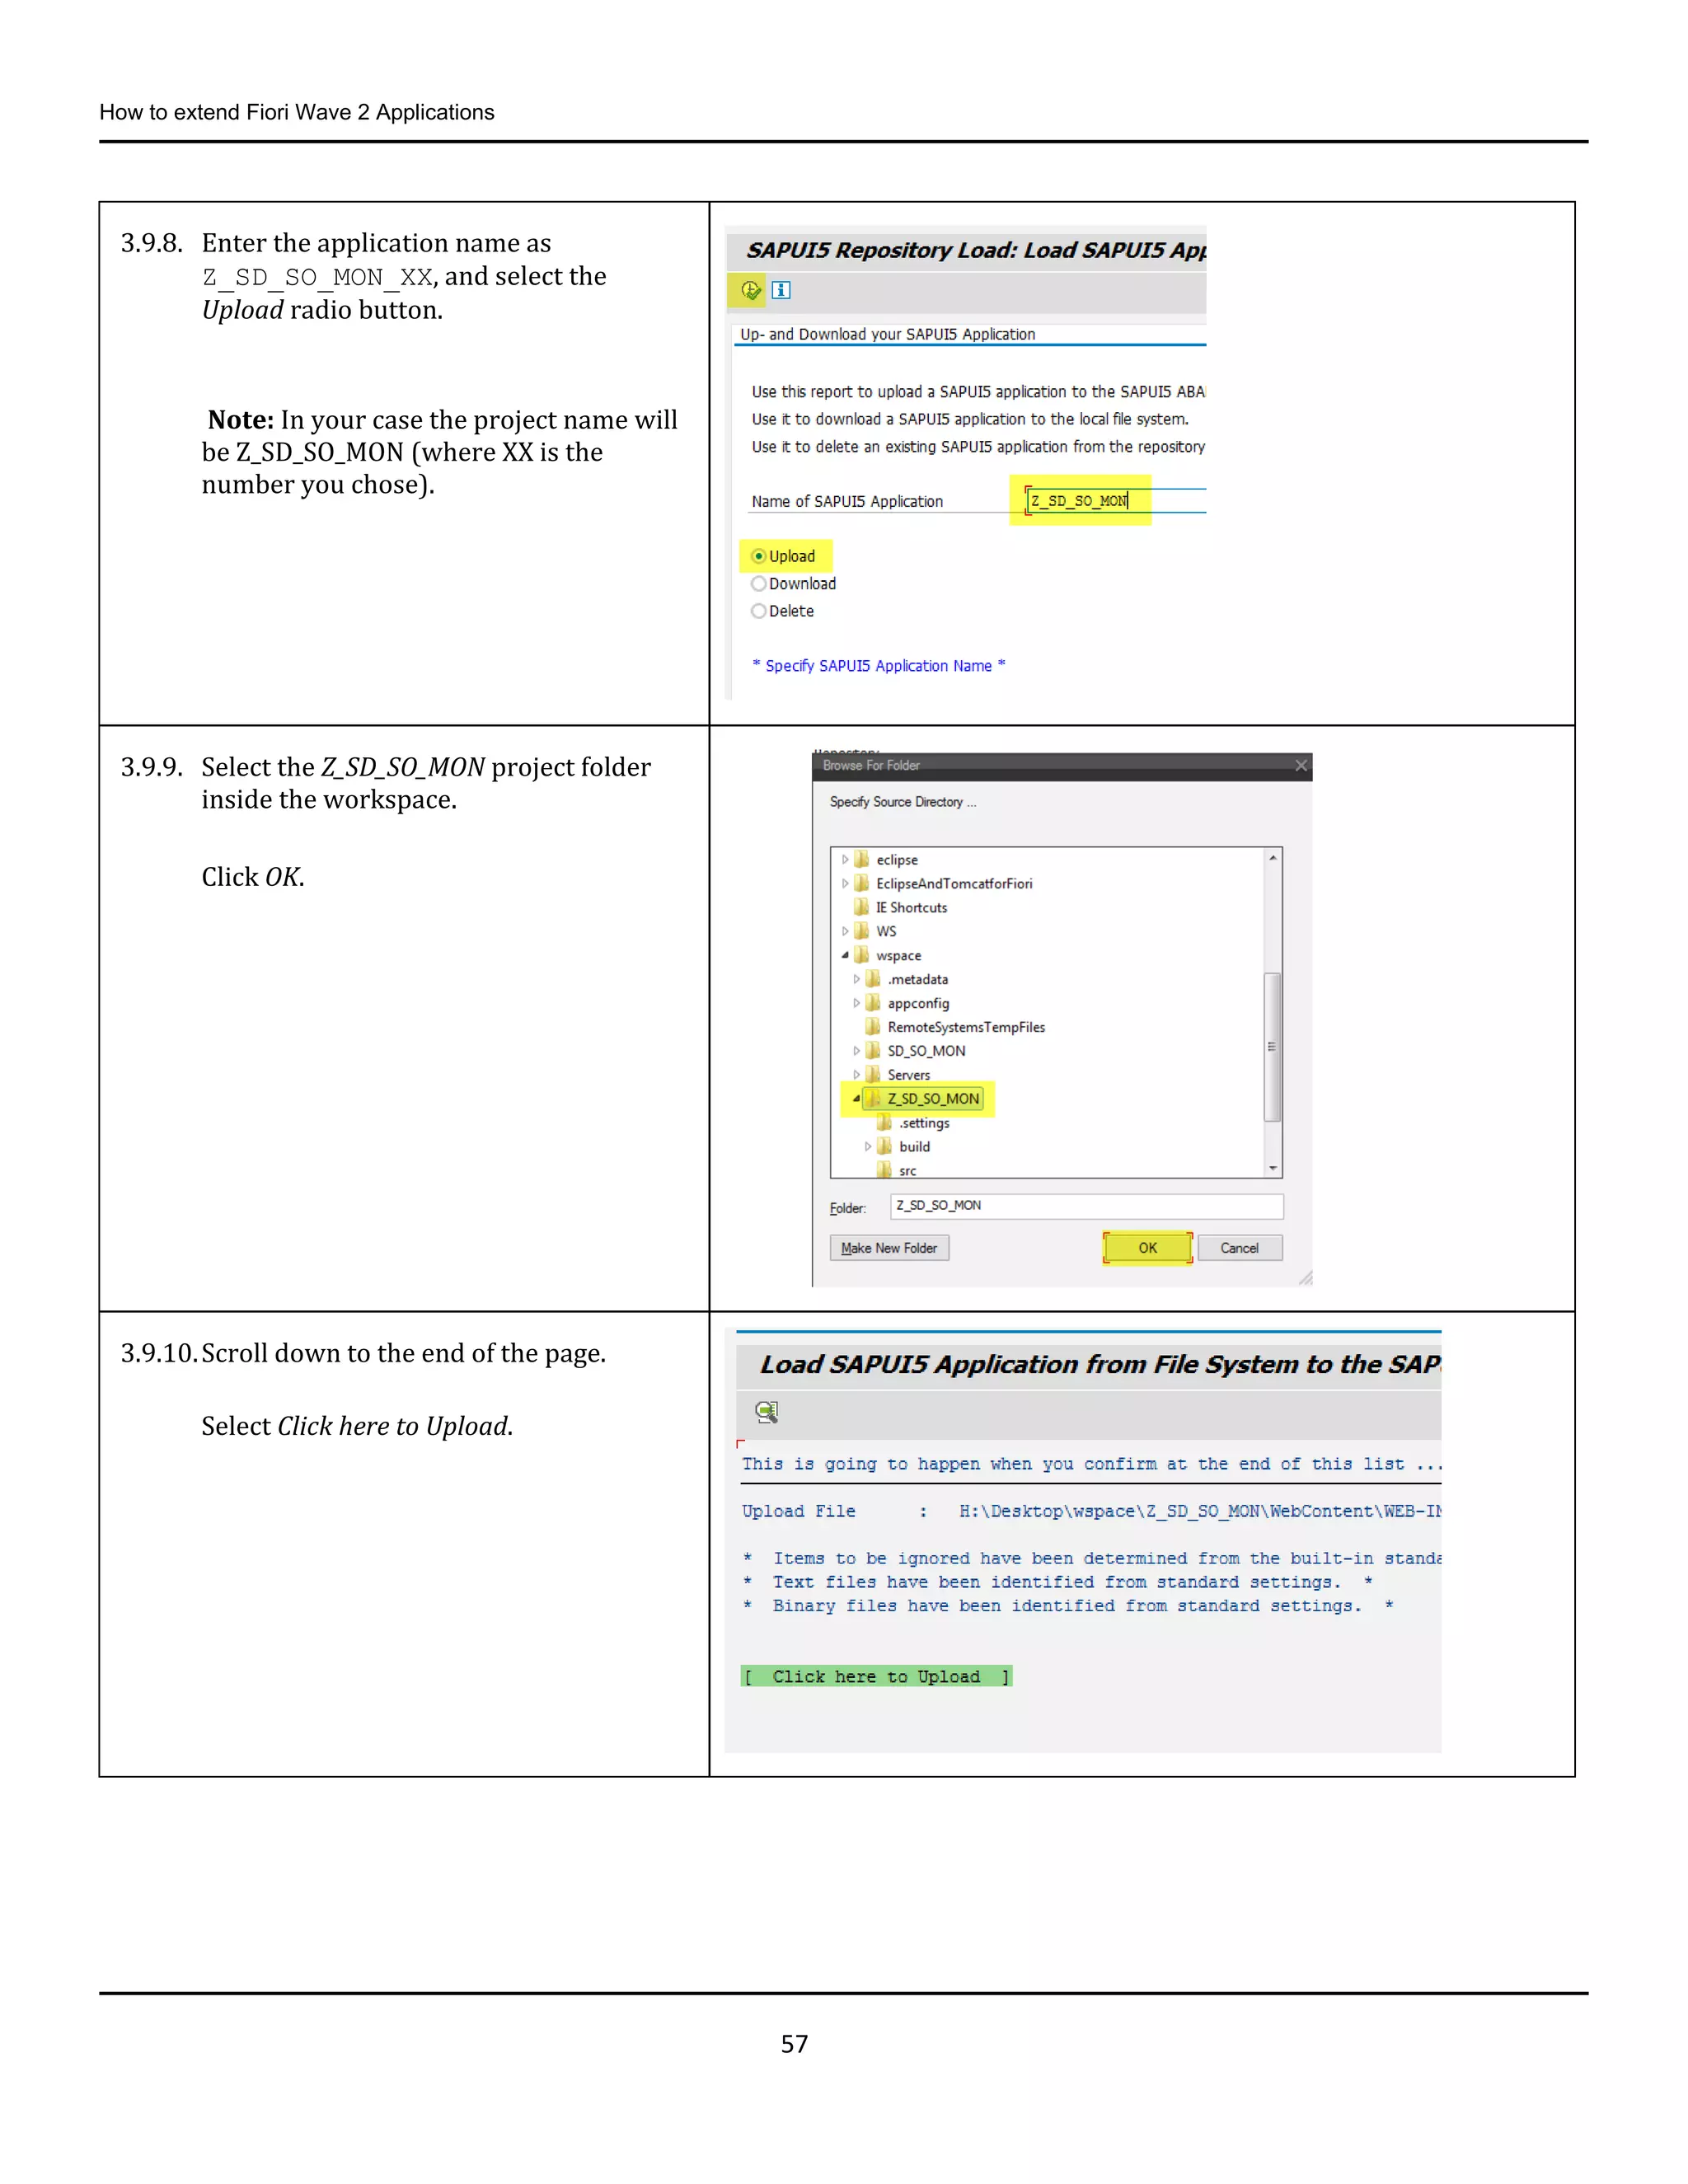
3.9.8. Enter the application name as
Z_SD_SO_MON_XX, and select the
Upload radio button.
Note: In your case the project name will
be Z_SD_SO_MON (where XX is the
number you chose).
3.9.9. Select the Z_SD_SO_MON project folder
inside the workspace.
Click OK.
3.9.10.Scroll down to the end of the page.
Select Click here to Upload.
58.
How to extendFiori Wave 2 Applications
58
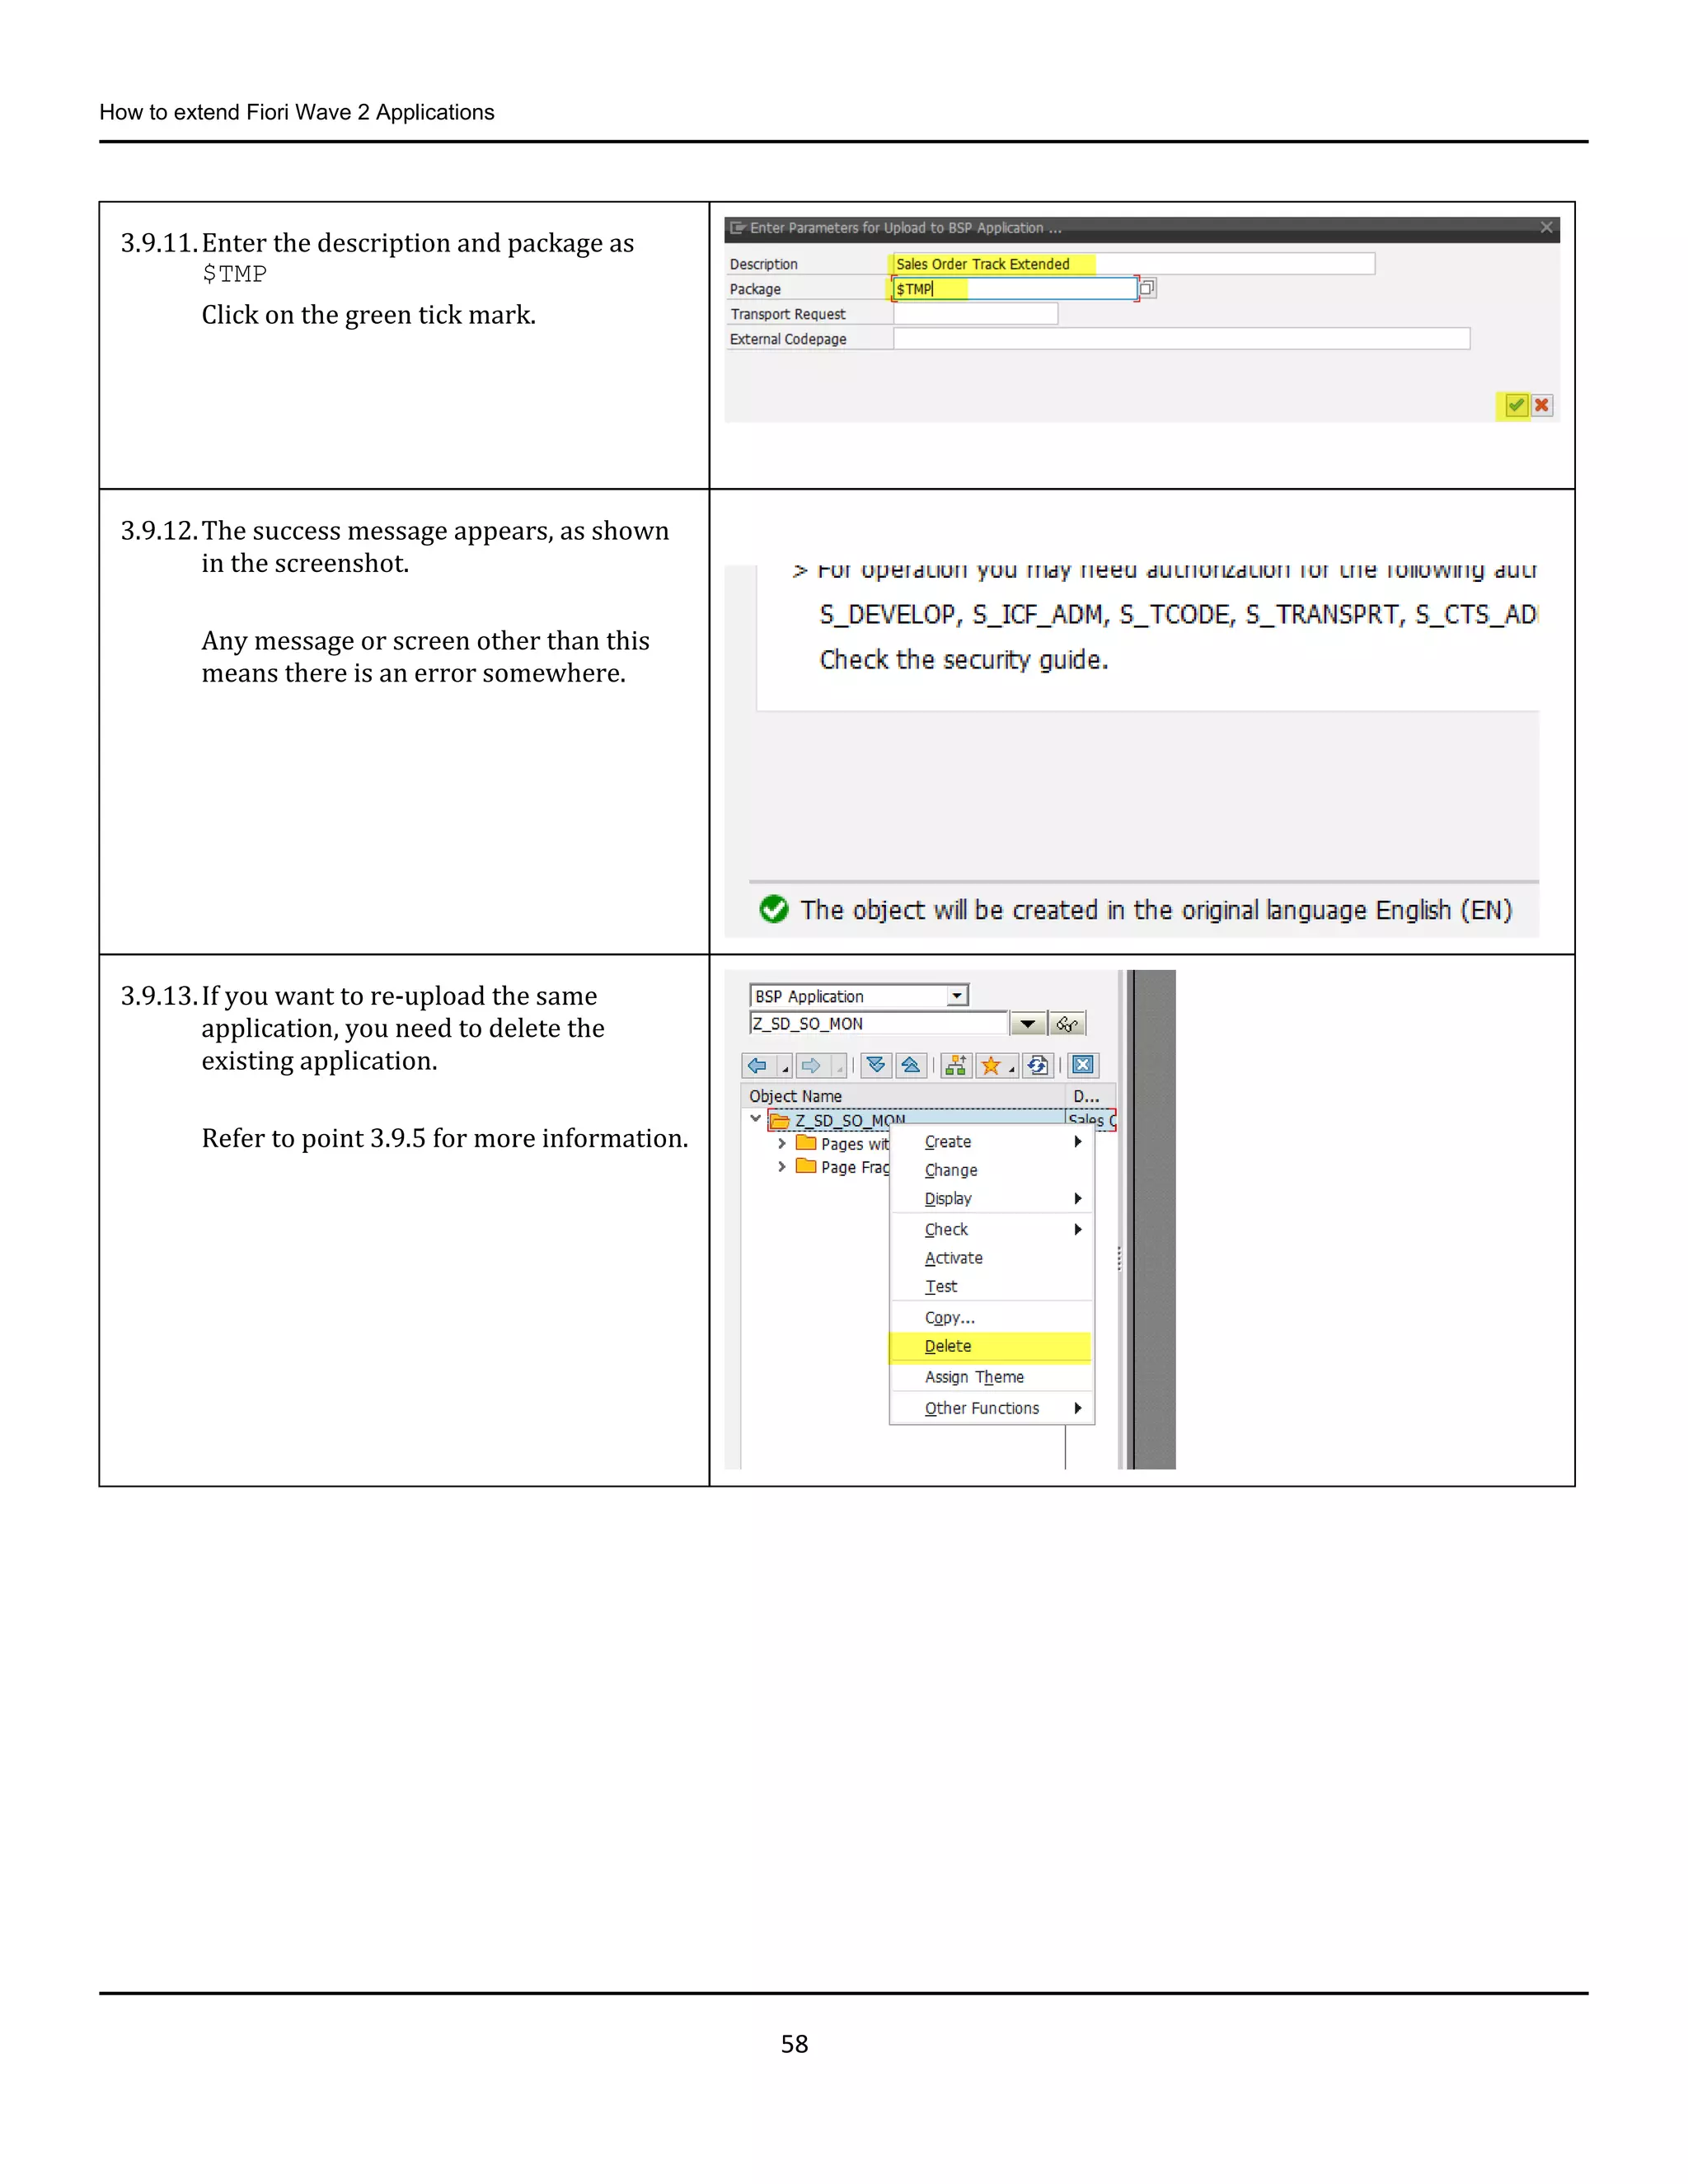
3.9.11.Enter the description and package as
$TMP
Click on the green tick mark.
3.9.12.The success message appears, as shown
in the screenshot.
Any message or screen other than this
means there is an error somewhere.
3.9.13.If you want to re-upload the same
application, you need to delete the
existing application.
Refer to point 3.9.5 for more information.
59.
How to extendFiori Wave 2 Applications
59
3.10. Configuring the New Application in the SAP Fiori Launchpad
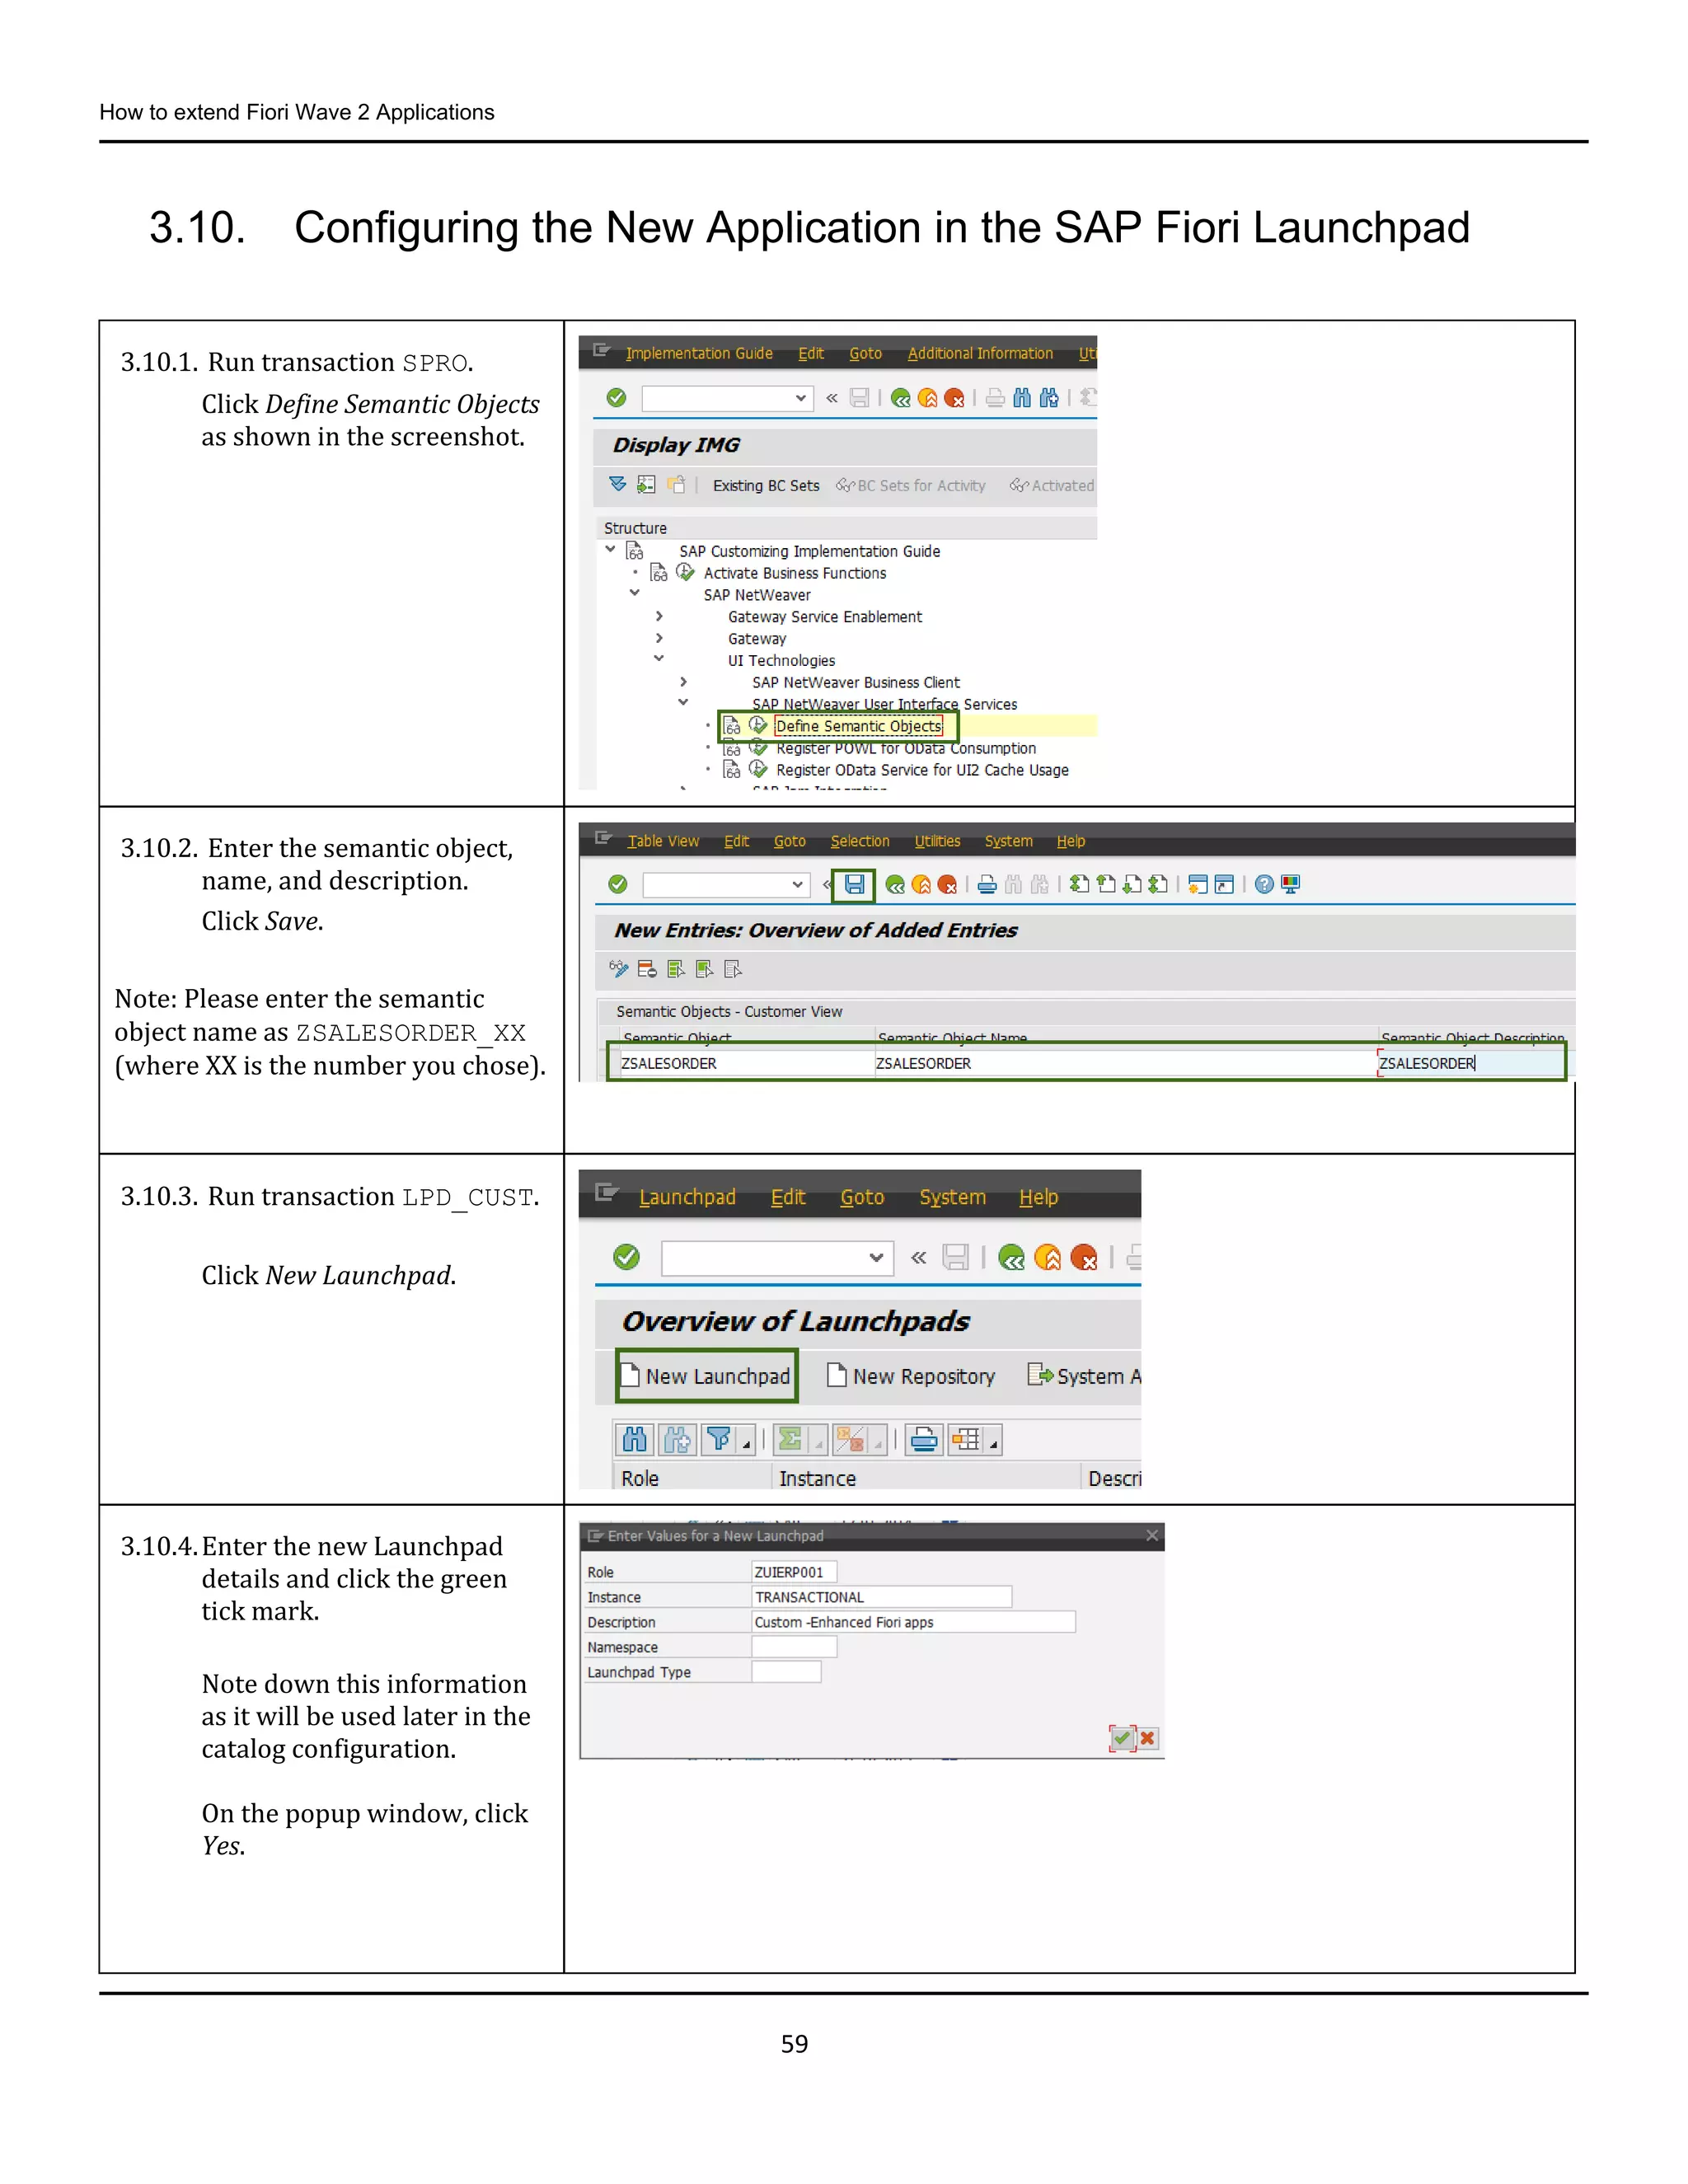
3.10.1. Run transaction SPRO.
Click Define Semantic Objects
as shown in the screenshot.
3.10.2. Enter the semantic object,
name, and description.
Click Save.
Note: Please enter the semantic
object name as ZSALESORDER_XX
(where XX is the number you chose).
3.10.3. Run transaction LPD_CUST.
Click New Launchpad.
3.10.4.Enter the new Launchpad
details and click the green
tick mark.
Note down this information
as it will be used later in the
catalog configuration.
On the popup window, click
Yes.
60.
How to extendFiori Wave 2 Applications
60
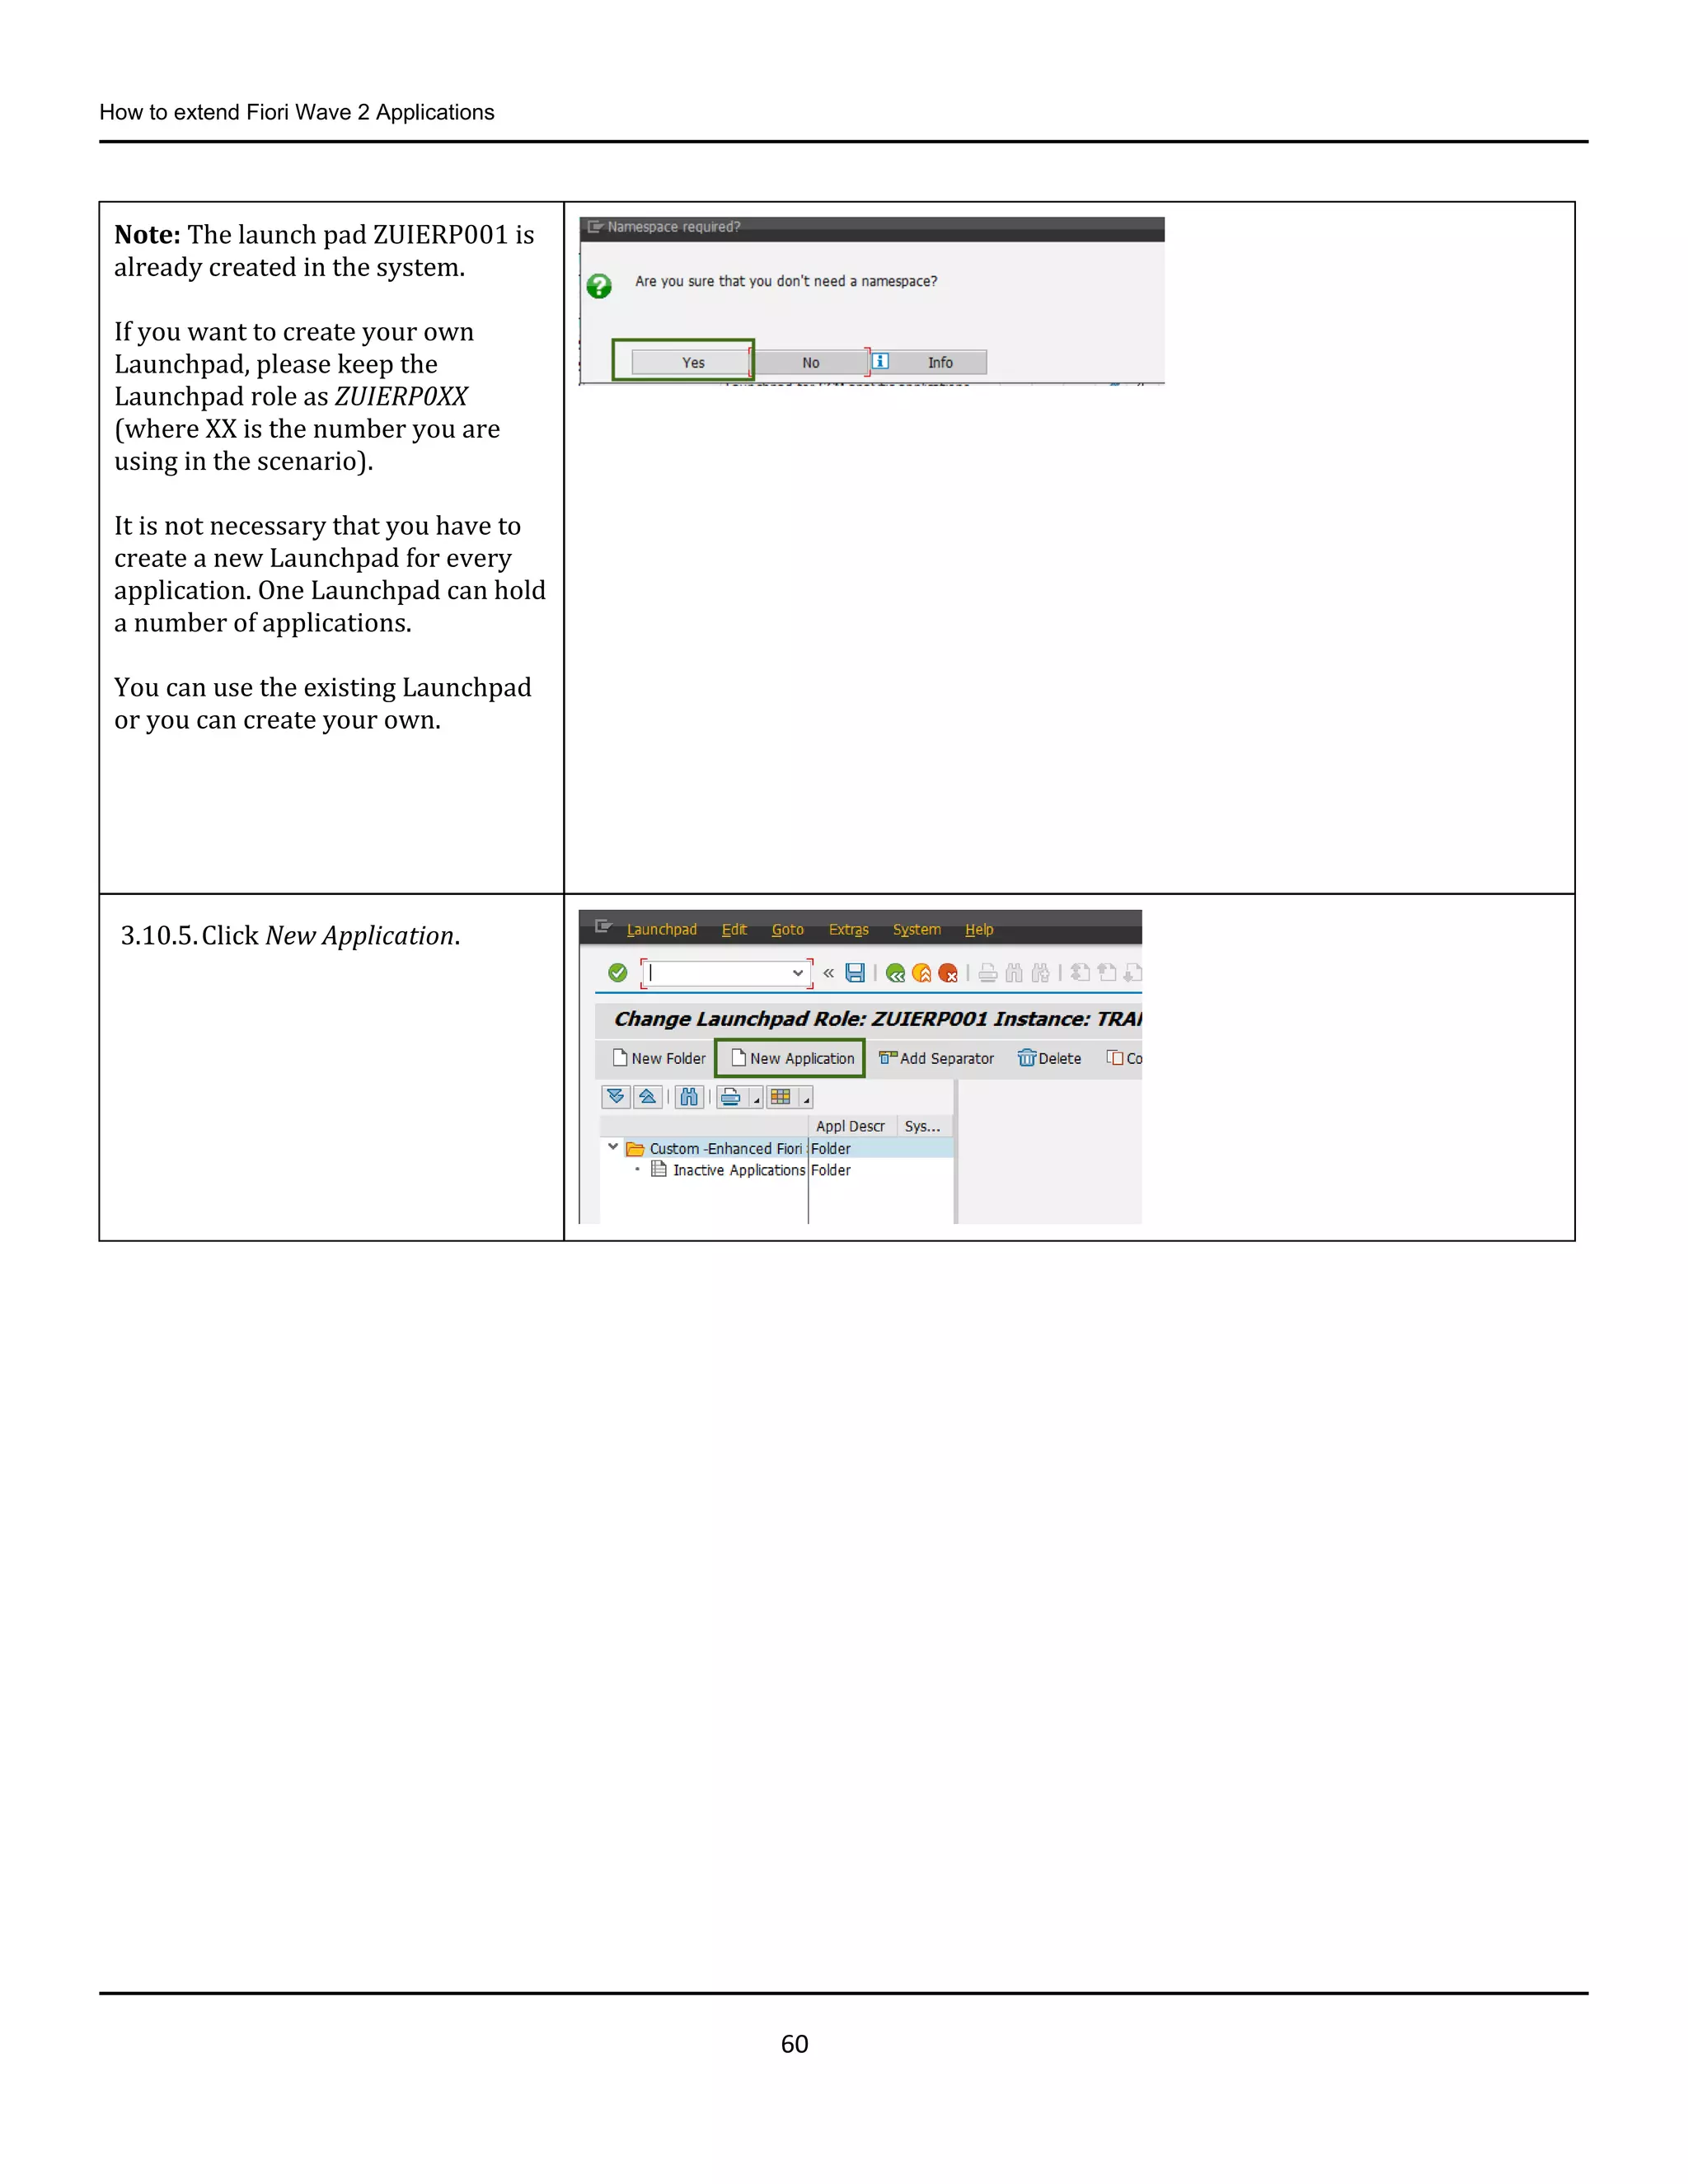
Note: The launch pad ZUIERP001 is
already created in the system.
If you want to create your own
Launchpad, please keep the
Launchpad role as ZUIERP0XX
(where XX is the number you are
using in the scenario).
It is not necessary that you have to
create a new Launchpad for every
application. One Launchpad can hold
a number of applications.
You can use the existing Launchpad
or you can create your own.
3.10.5.Click New Application.
61.
How to extendFiori Wave 2 Applications
61
3.10.6.Enter the application details
as shown in the screenshot.
Note:
Enter the project name of yours such
as Z_SD_SO_MON_XX (where XX is
the number) in the URL section.
3.10.7.Click Save and then the Back
button.
3.10.8. Go to the Fiori Admin page.
Login with User Name and
Password.
Replace < your_ABAP_URL>
with http://<ABAP
server>:<port>
Admin page url -
http://<your_ABAP_URL>/sap/bc/ui5_ui5/sap/arsrvc_upb_admn/main.html?scope=CUST
62.
How to extendFiori Wave 2 Applications
62
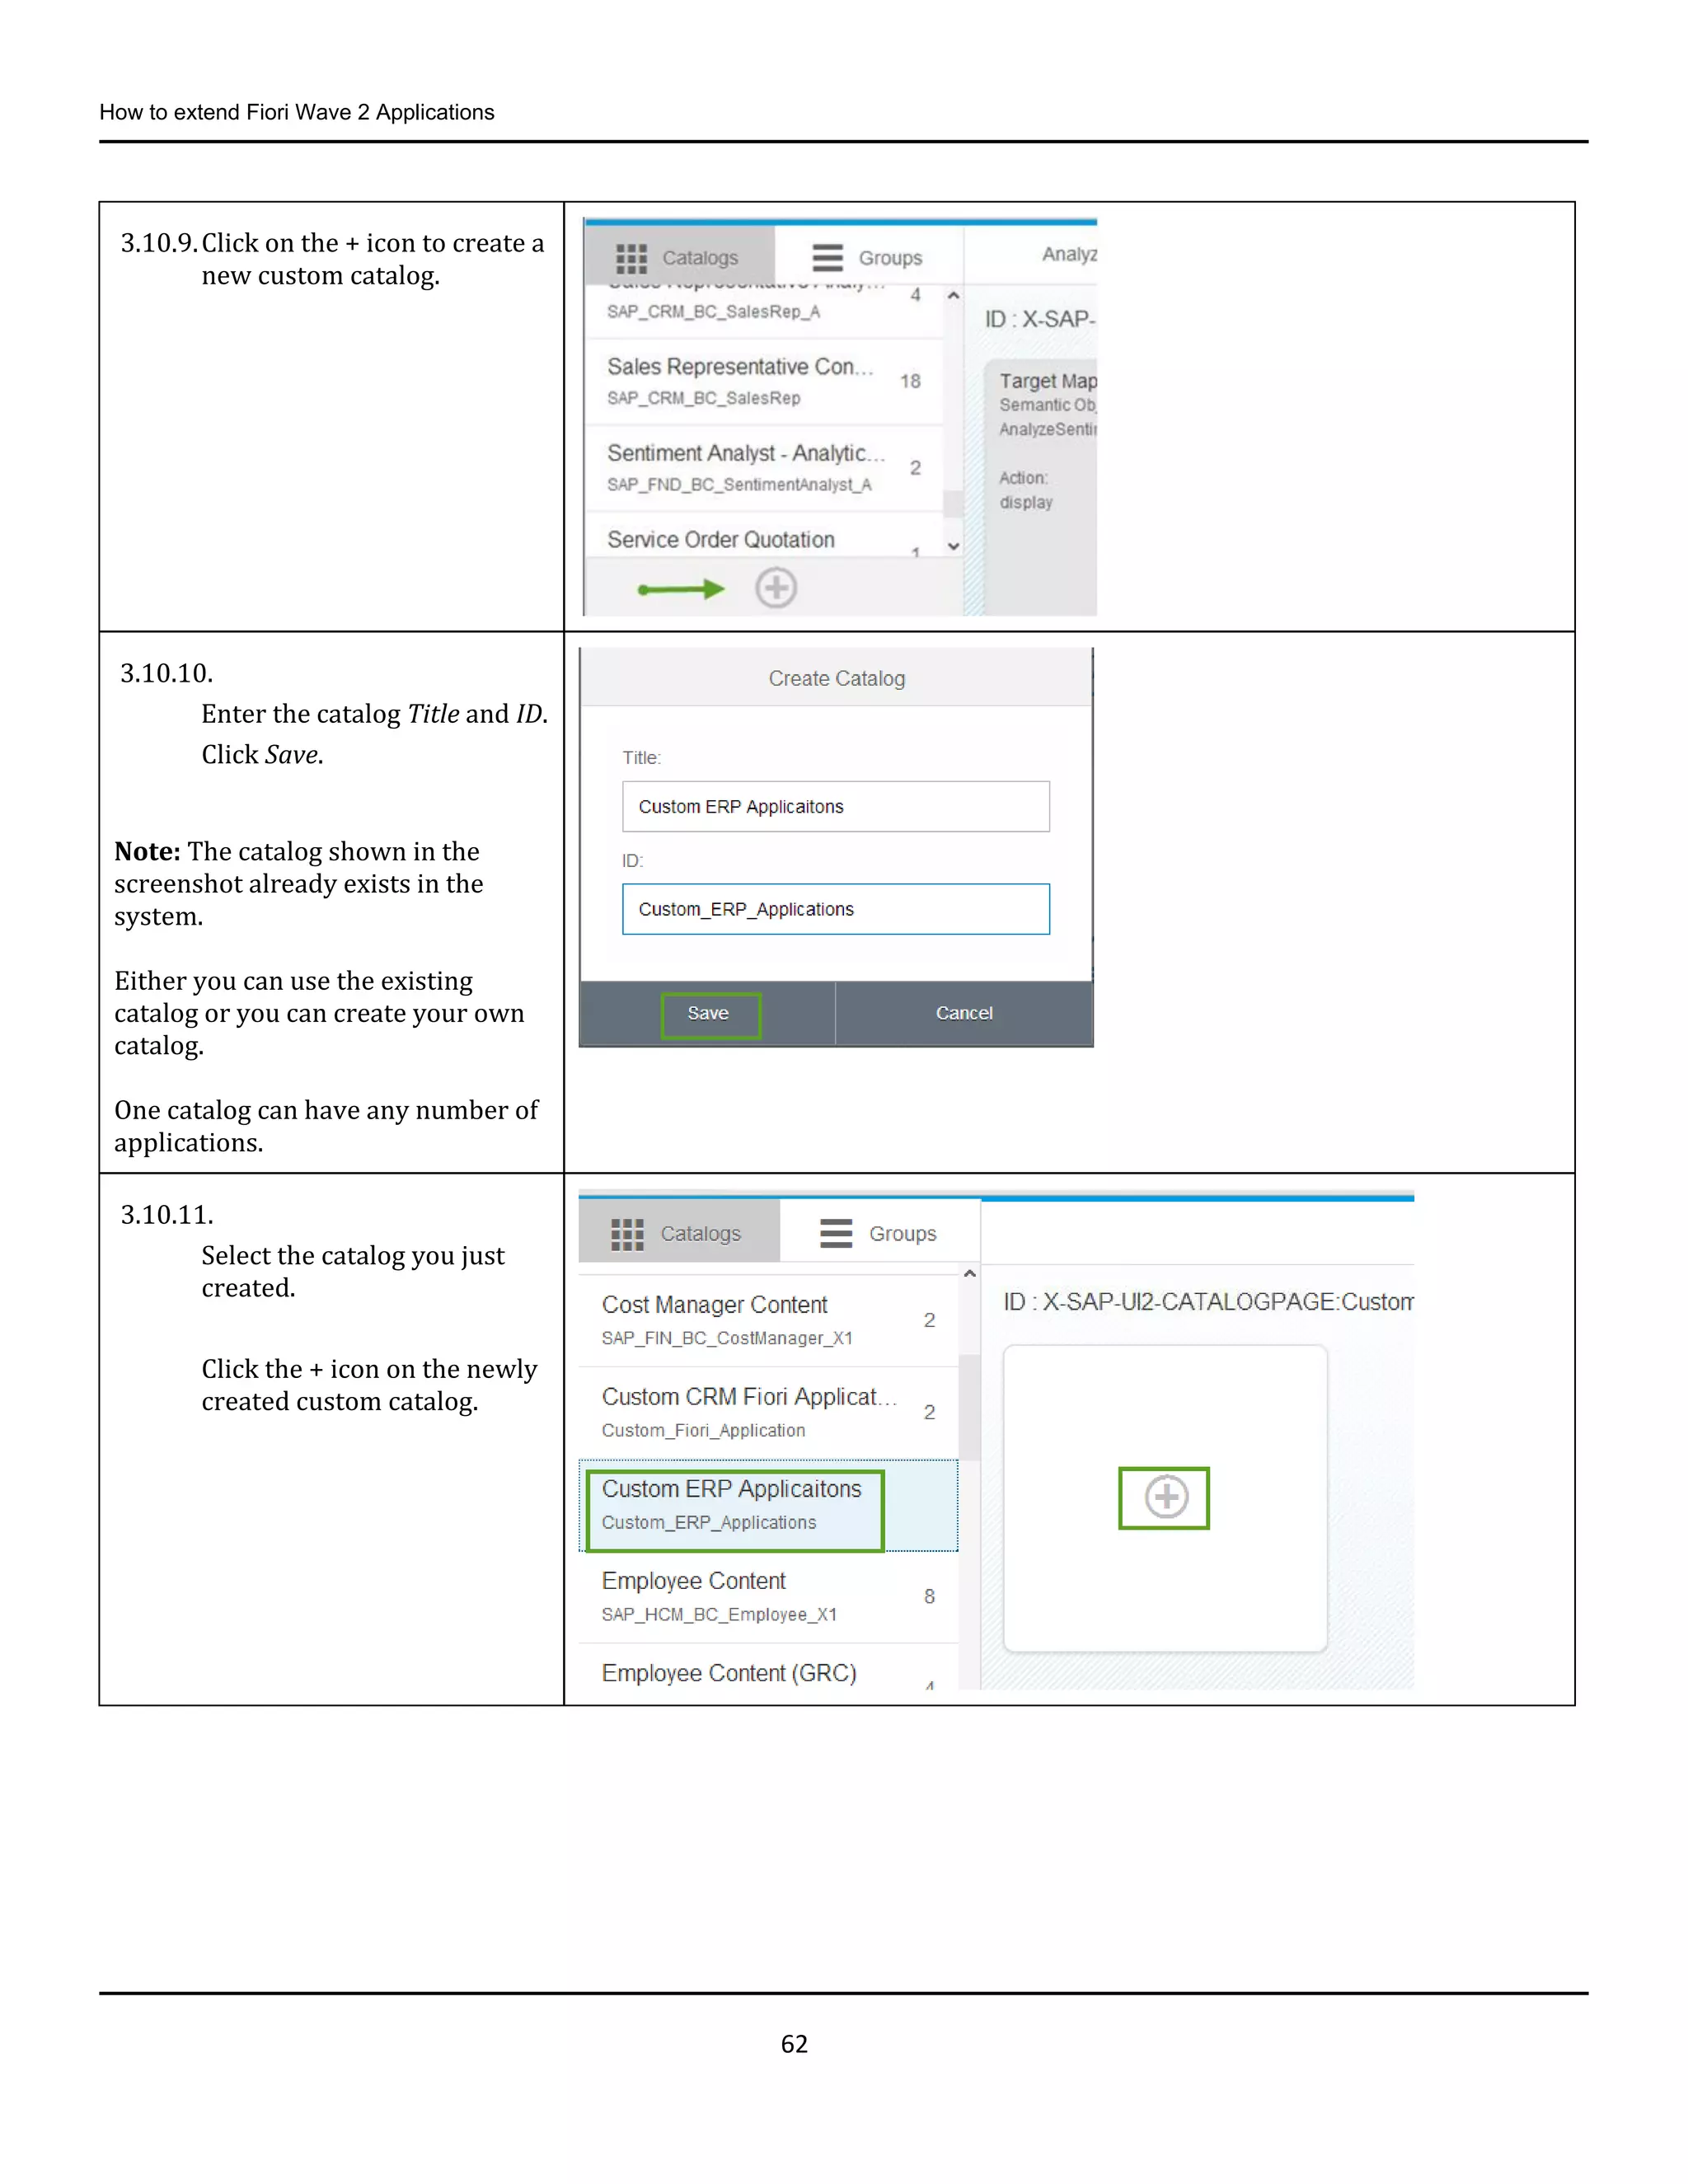
3.10.9.Click on the + icon to create a
new custom catalog.
3.10.10.
Enter the catalog Title and ID.
Click Save.
Note: The catalog shown in the
screenshot already exists in the
system.
Either you can use the existing
catalog or you can create your own
catalog.
One catalog can have any number of
applications.
3.10.11.
Select the catalog you just
created.
Click the + icon on the newly
created custom catalog.
63.
How to extendFiori Wave 2 Applications
63
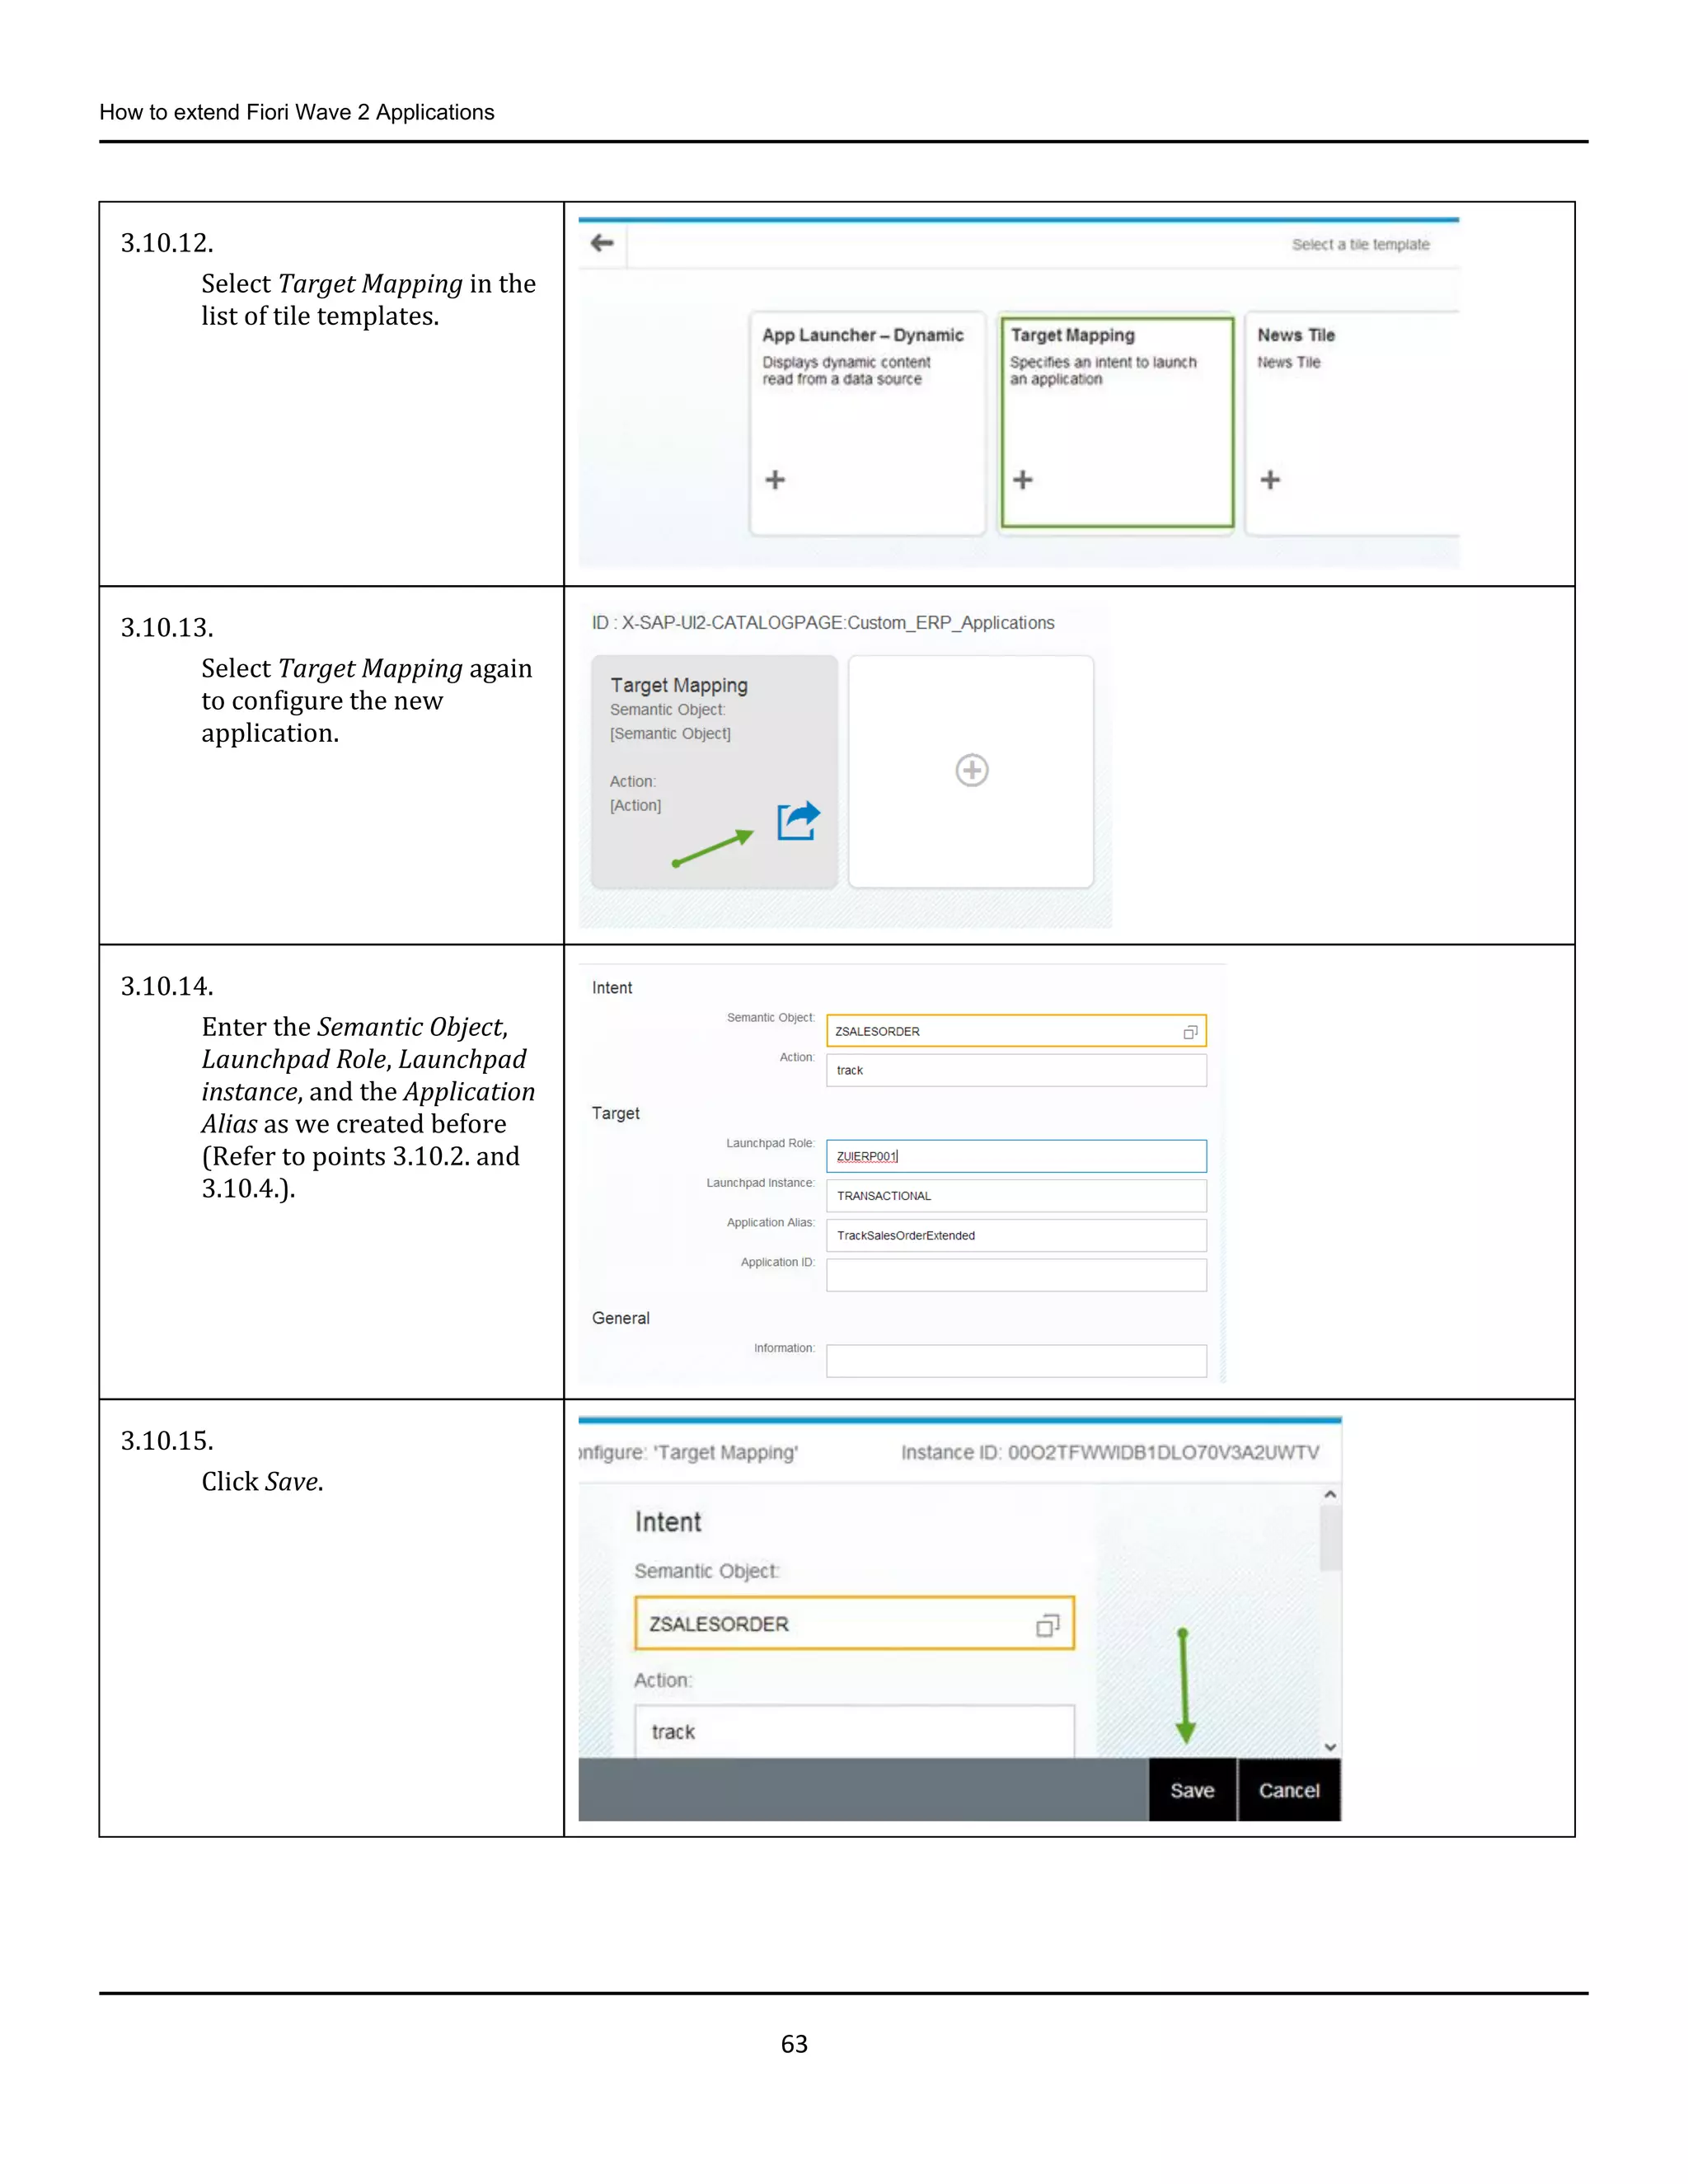
3.10.12.
Select Target Mapping in the
list of tile templates.
3.10.13.
Select Target Mapping again
to configure the new
application.
3.10.14.
Enter the Semantic Object,
Launchpad Role, Launchpad
instance, and the Application
Alias as we created before
(Refer to points 3.10.2. and
3.10.4.).
3.10.15.
Click Save.
64.
How to extendFiori Wave 2 Applications
64
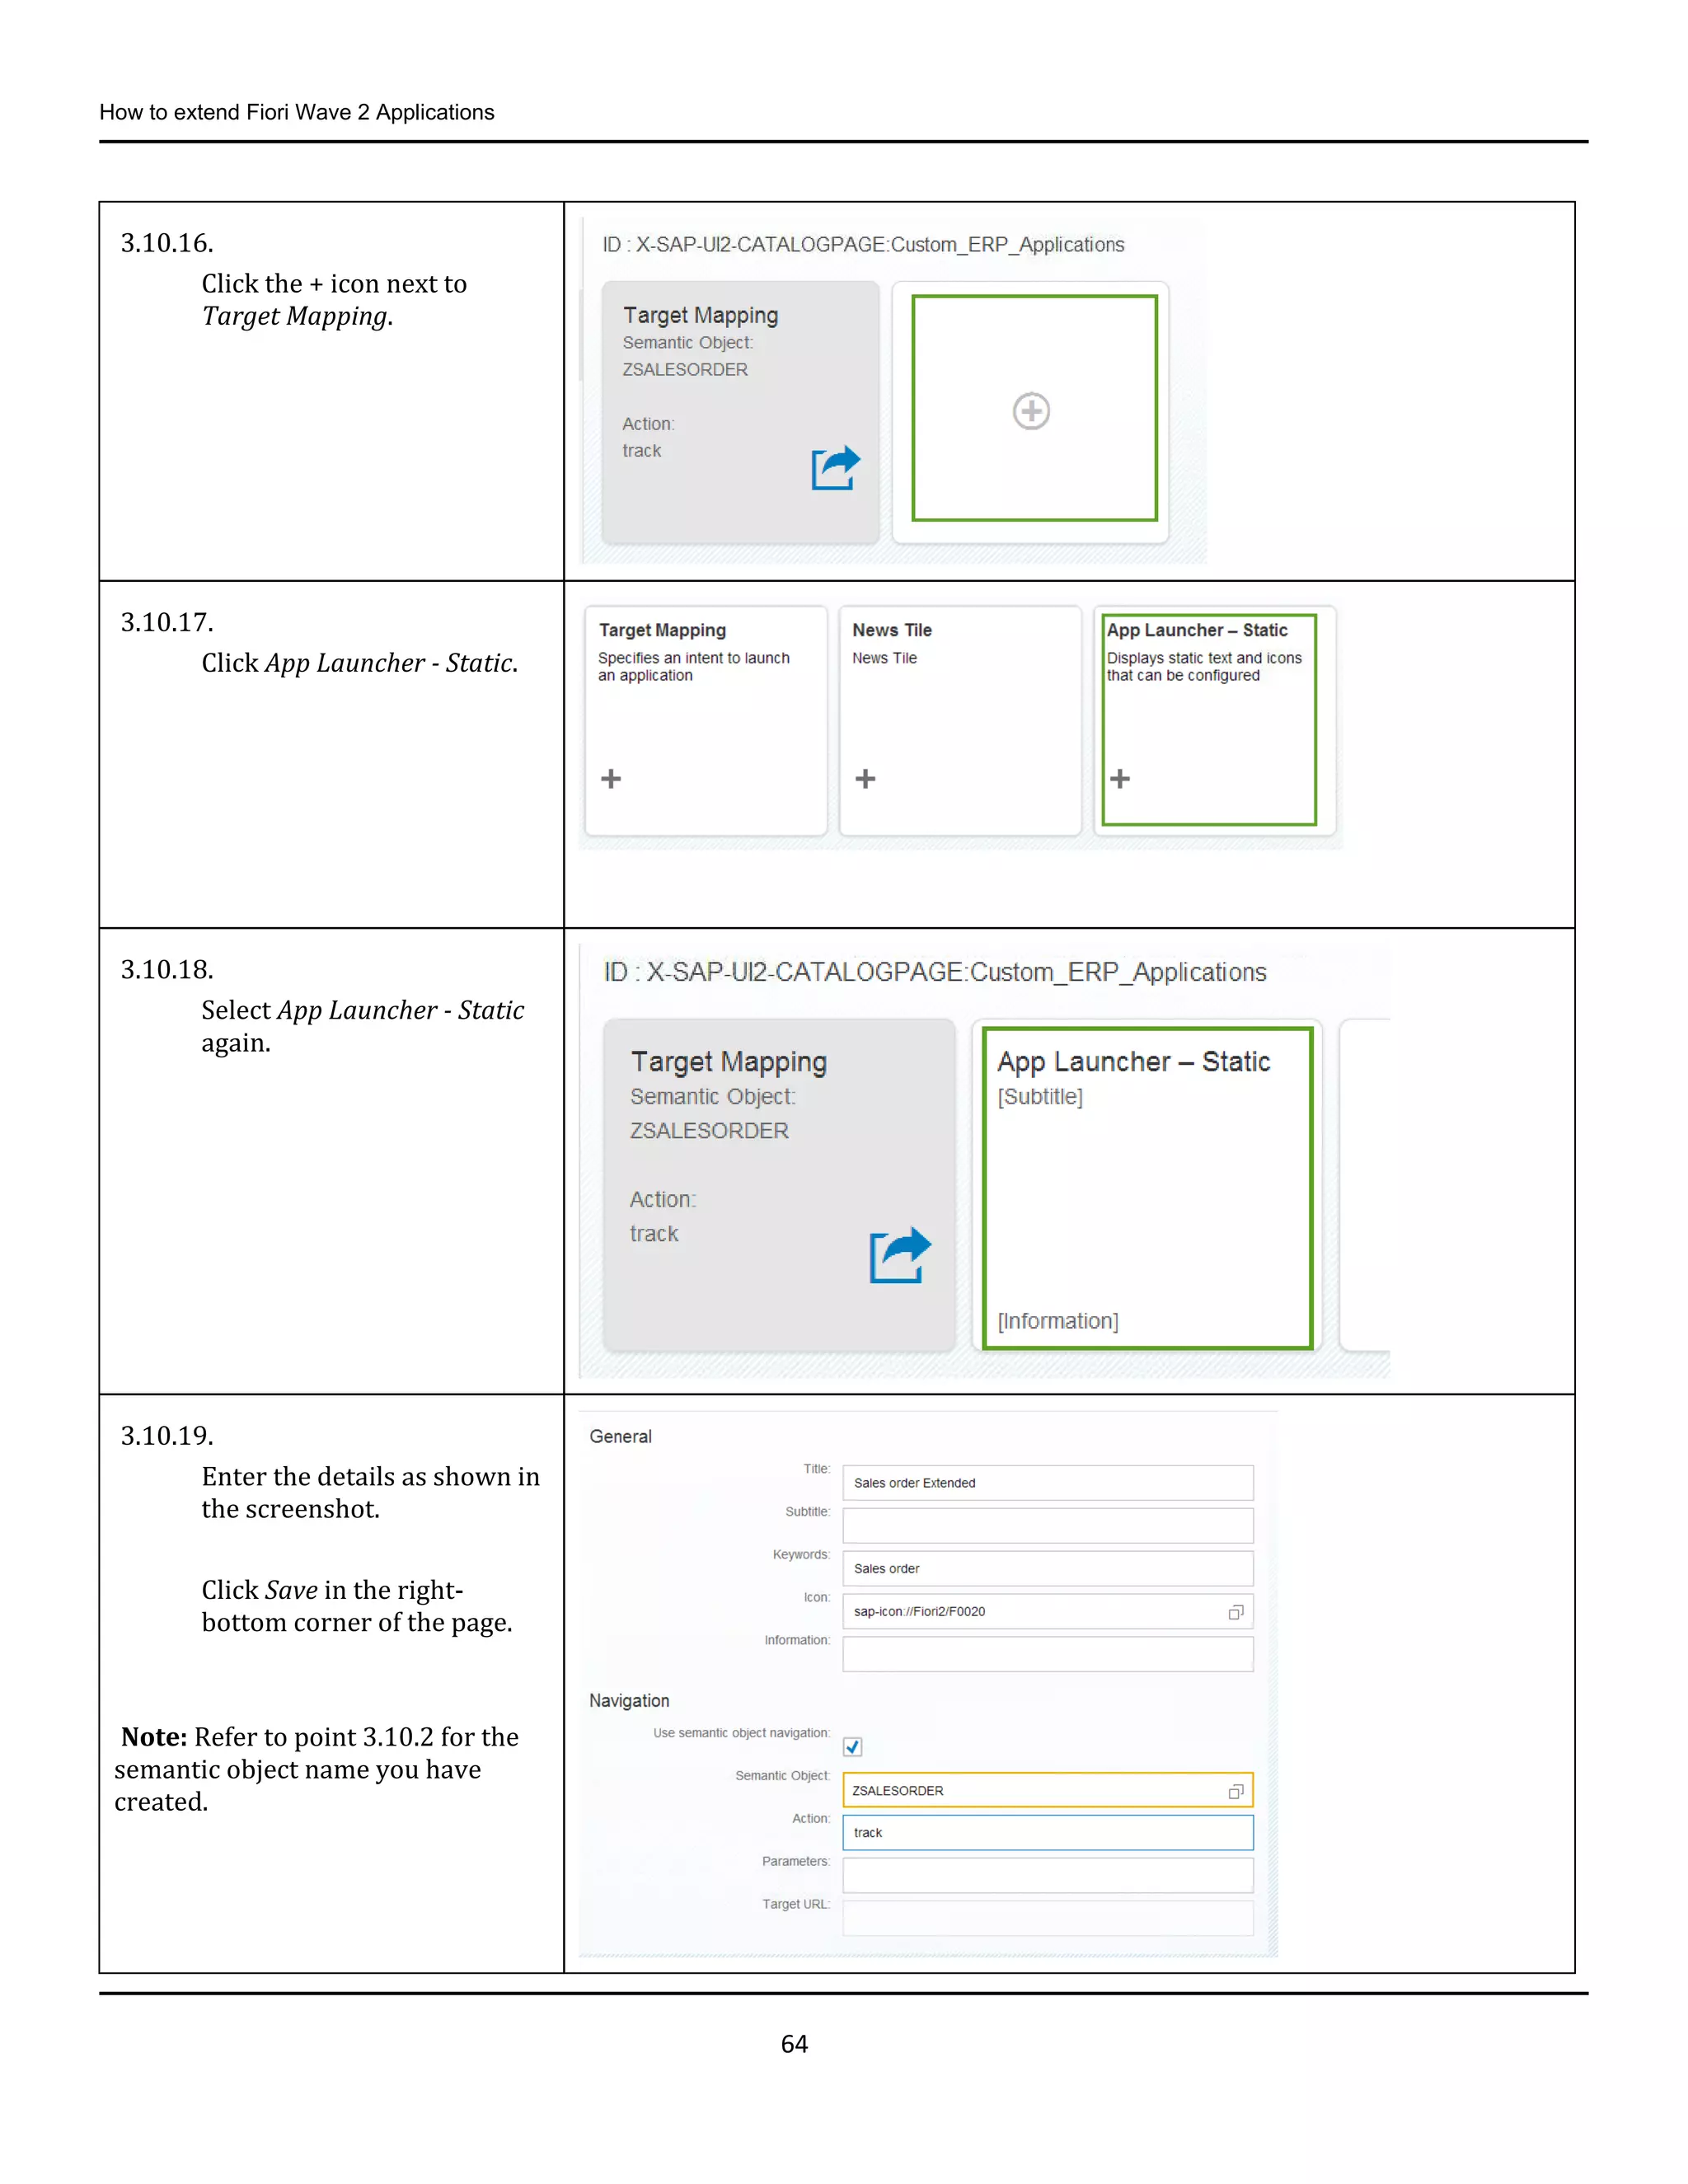
3.10.16.
Click the + icon next to
Target Mapping.
3.10.17.
Click App Launcher - Static.
3.10.18.
Select App Launcher - Static
again.
3.10.19.
Enter the details as shown in
the screenshot.
Click Save in the right-
bottom corner of the page.
Note: Refer to point 3.10.2 for the
semantic object name you have
created.
65.
How to extendFiori Wave 2 Applications
65
3.10.20.
Now we need to assign the
catalog to profiles.
To do this login back to the
Gateway system.
Run transaction PFCG.
Enter the role name and click
Single Role.
Note: The role shown in the
screenshot is already available in the
system.
You can either use existing Role or
you can create your own Role such
as Z_CUSTOM_FIORI_APPS_XX
(Where XX is the number.)
One Role can have n number catalog
profiles.
3.10.21.
Enter the description and
click Save.
66.
How to extendFiori Wave 2 Applications
66
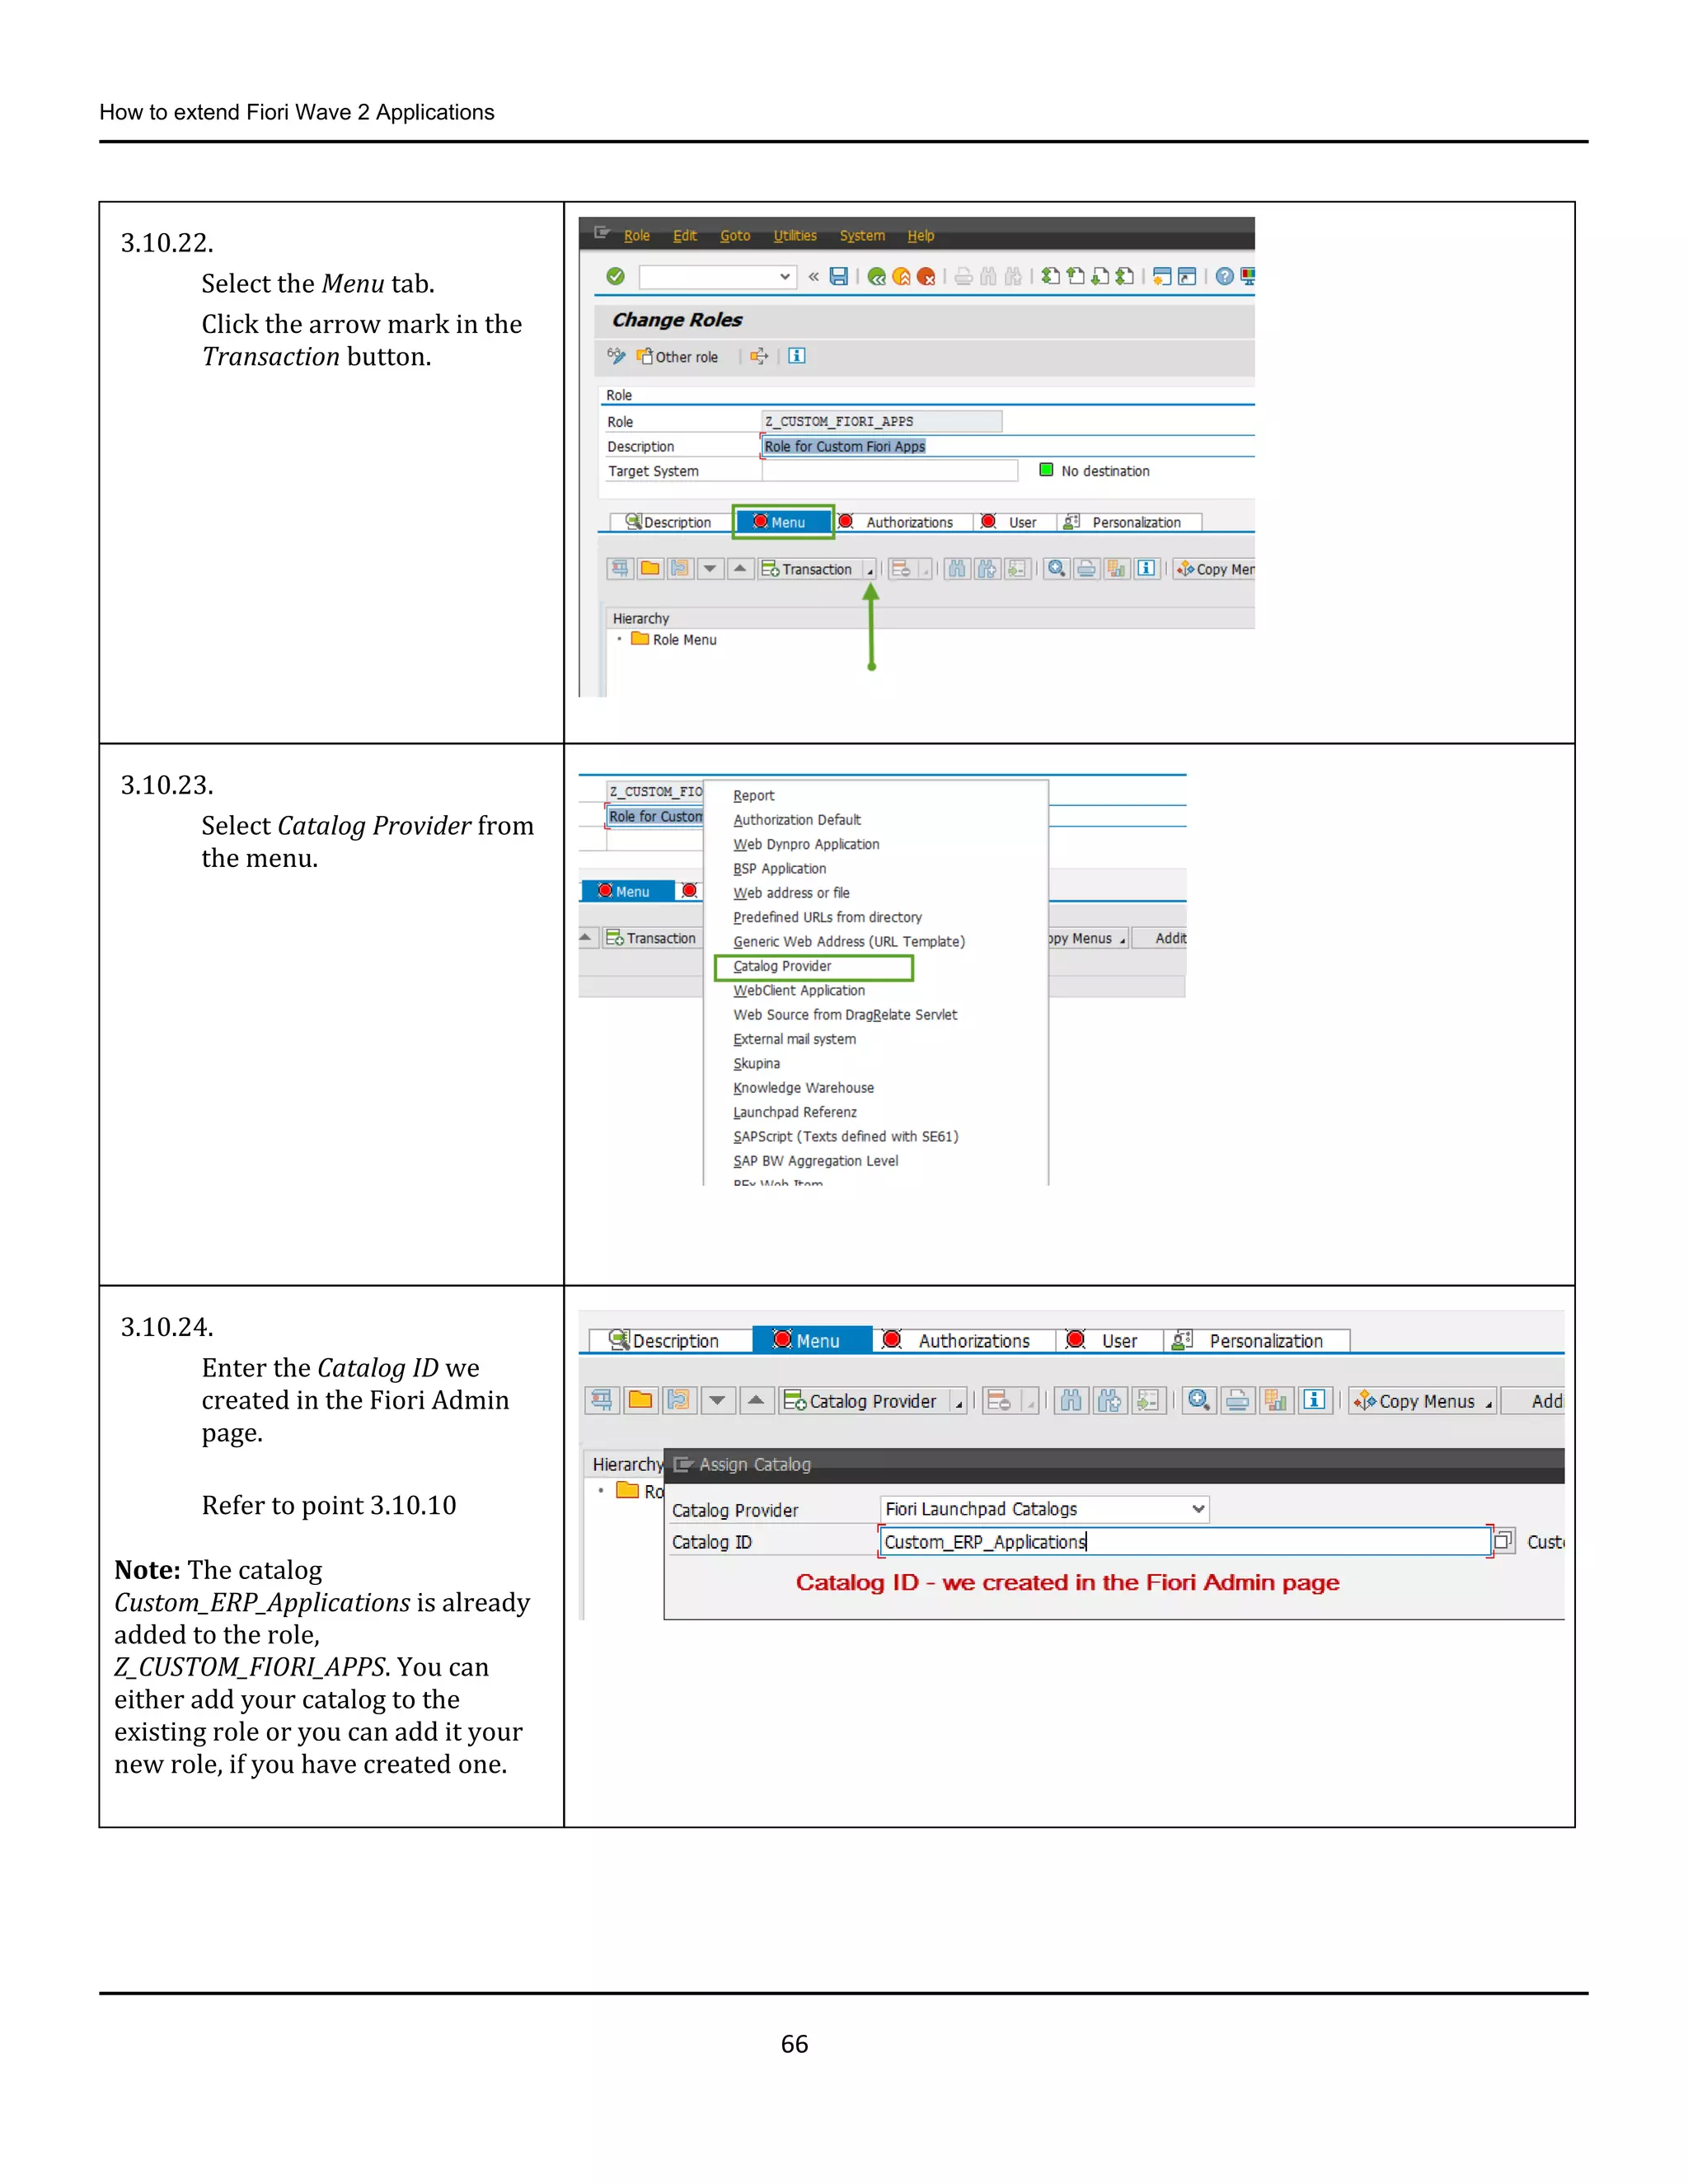
3.10.22.
Select the Menu tab.
Click the arrow mark in the
Transaction button.
3.10.23.
Select Catalog Provider from
the menu.
3.10.24.
Enter the Catalog ID we
created in the Fiori Admin
page.
Refer to point 3.10.10
Note: The catalog
Custom_ERP_Applications is already
added to the role,
Z_CUSTOM_FIORI_APPS. You can
either add your catalog to the
existing role or you can add it your
new role, if you have created one.
67.
How to extendFiori Wave 2 Applications
67
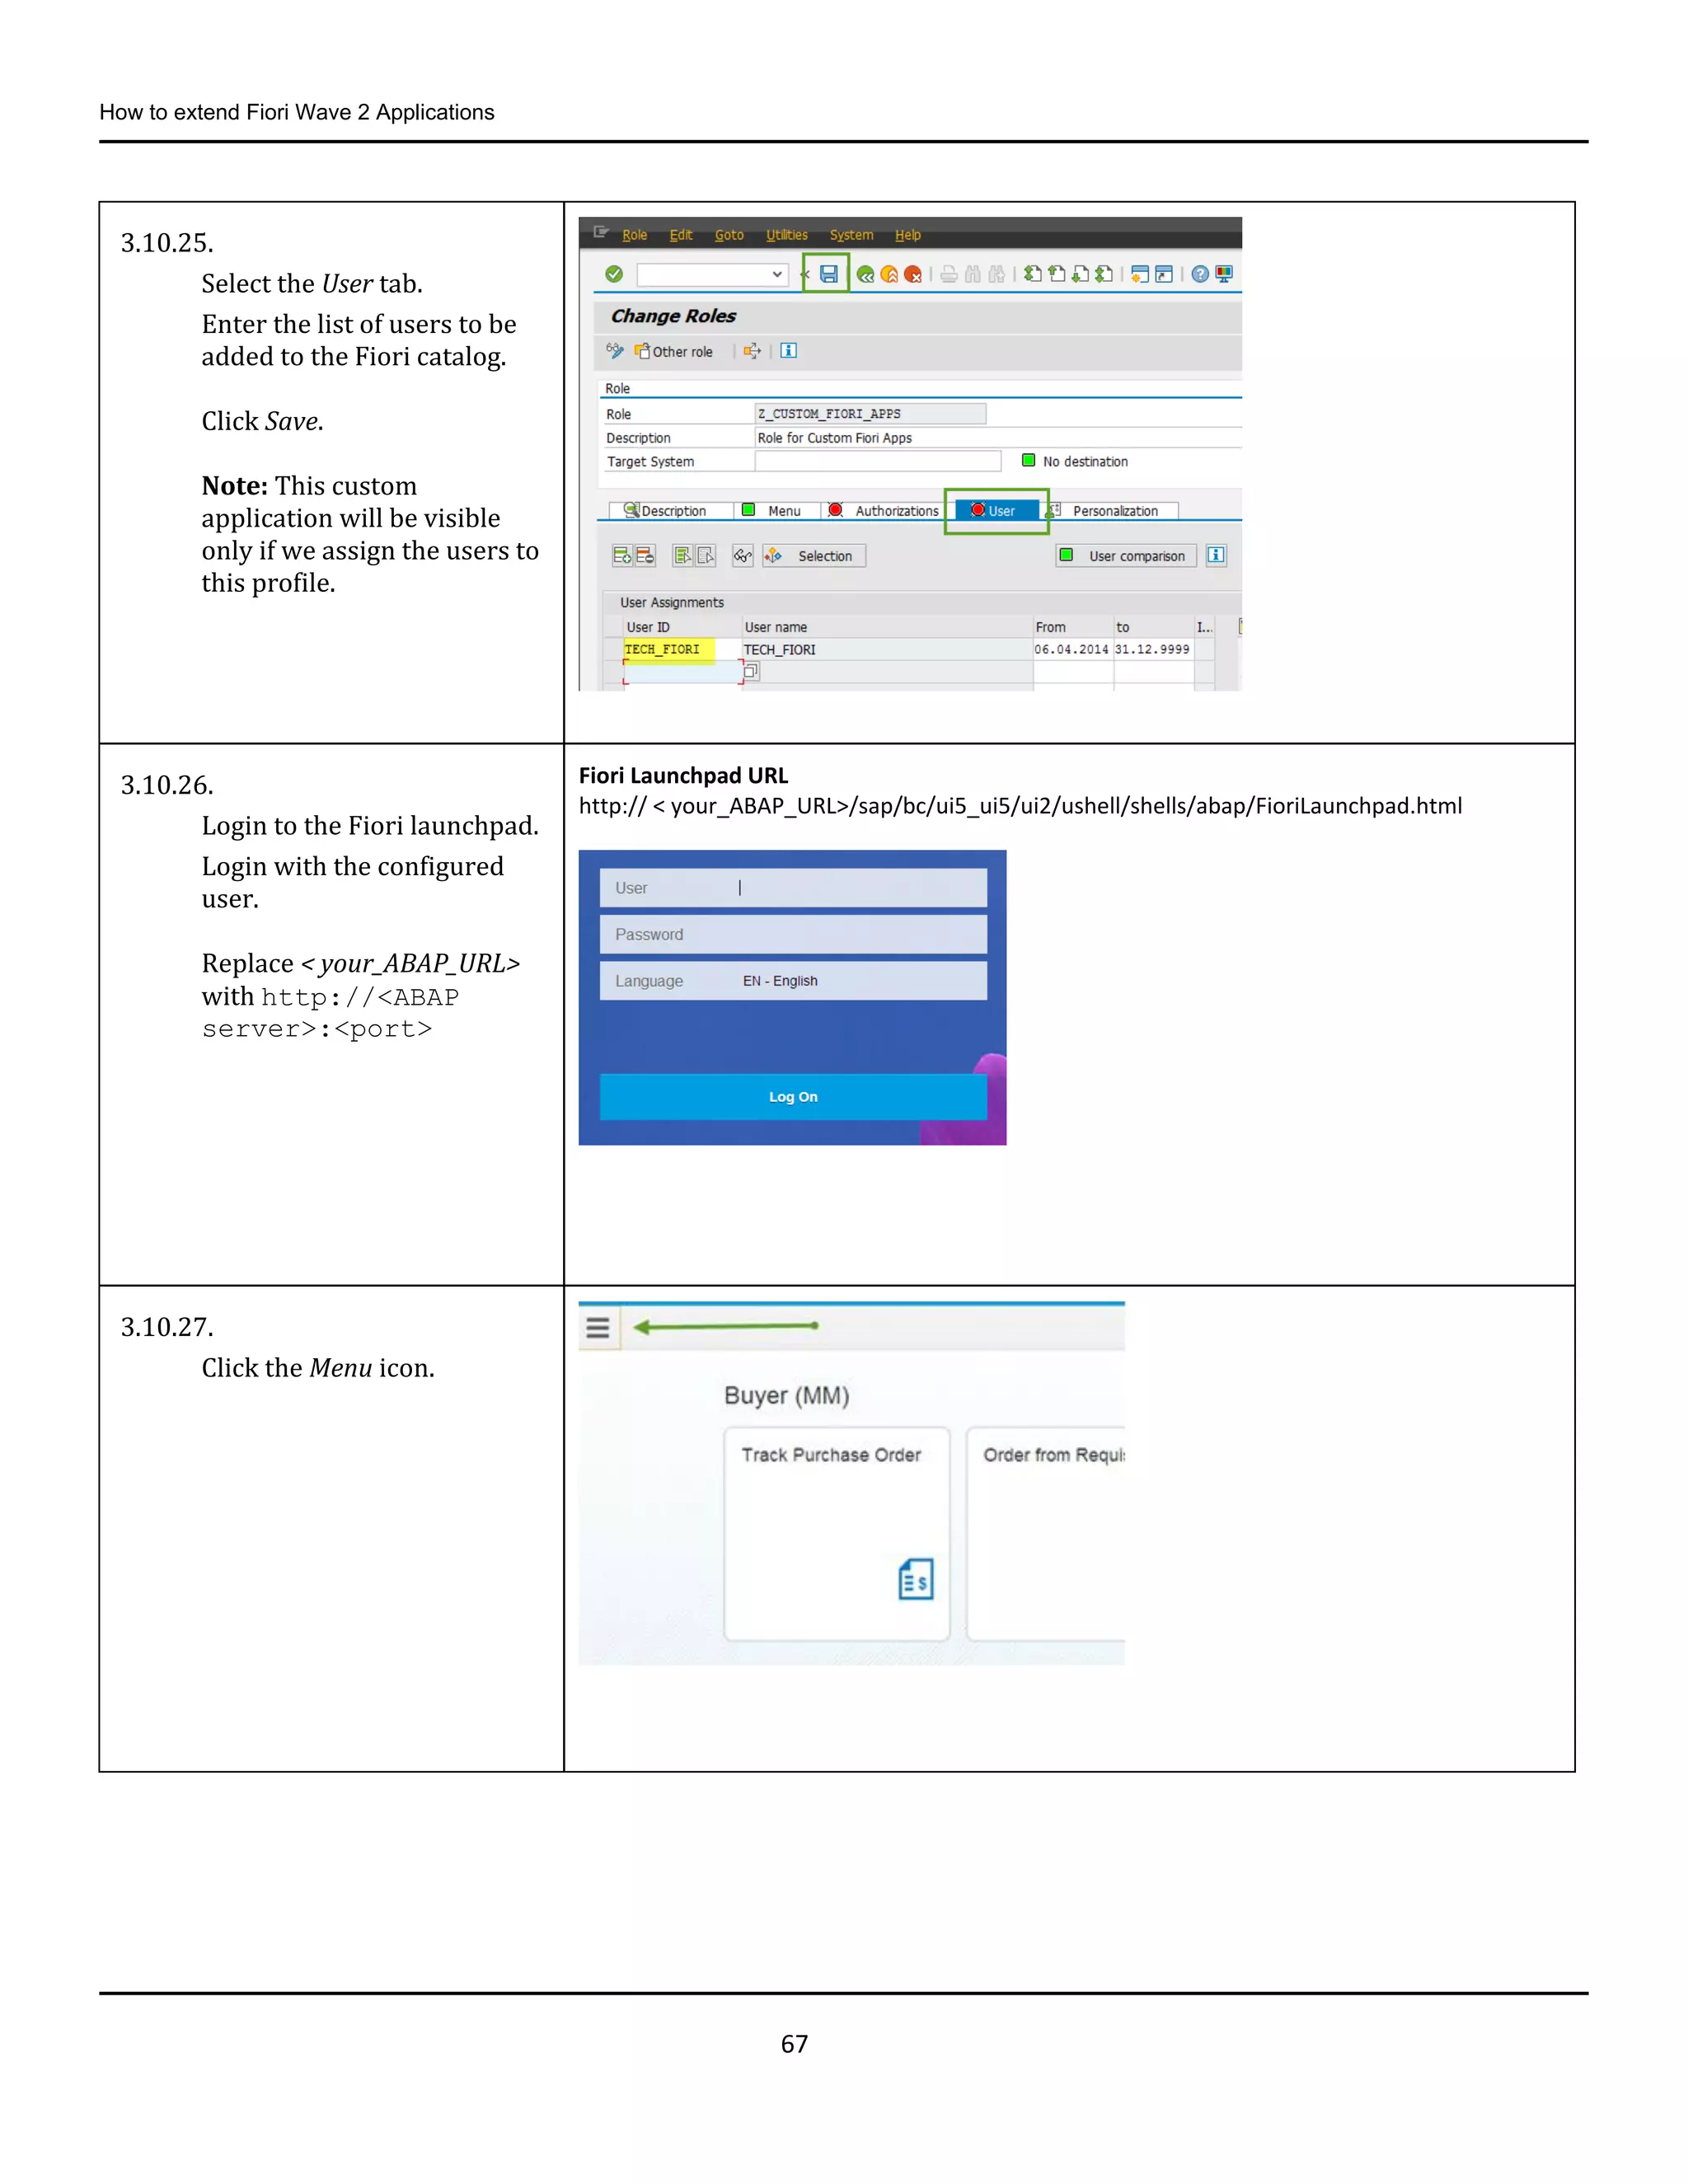
3.10.25.
Select the User tab.
Enter the list of users to be
added to the Fiori catalog.
Click Save.
Note: This custom
application will be visible
only if we assign the users to
this profile.
3.10.26.
Login to the Fiori launchpad.
Login with the configured
user.
Replace < your_ABAP_URL>
with http://<ABAP
server>:<port>
Fiori Launchpad URL
http:// < your_ABAP_URL>/sap/bc/ui5_ui5/ui2/ushell/shells/abap/FioriLaunchpad.html
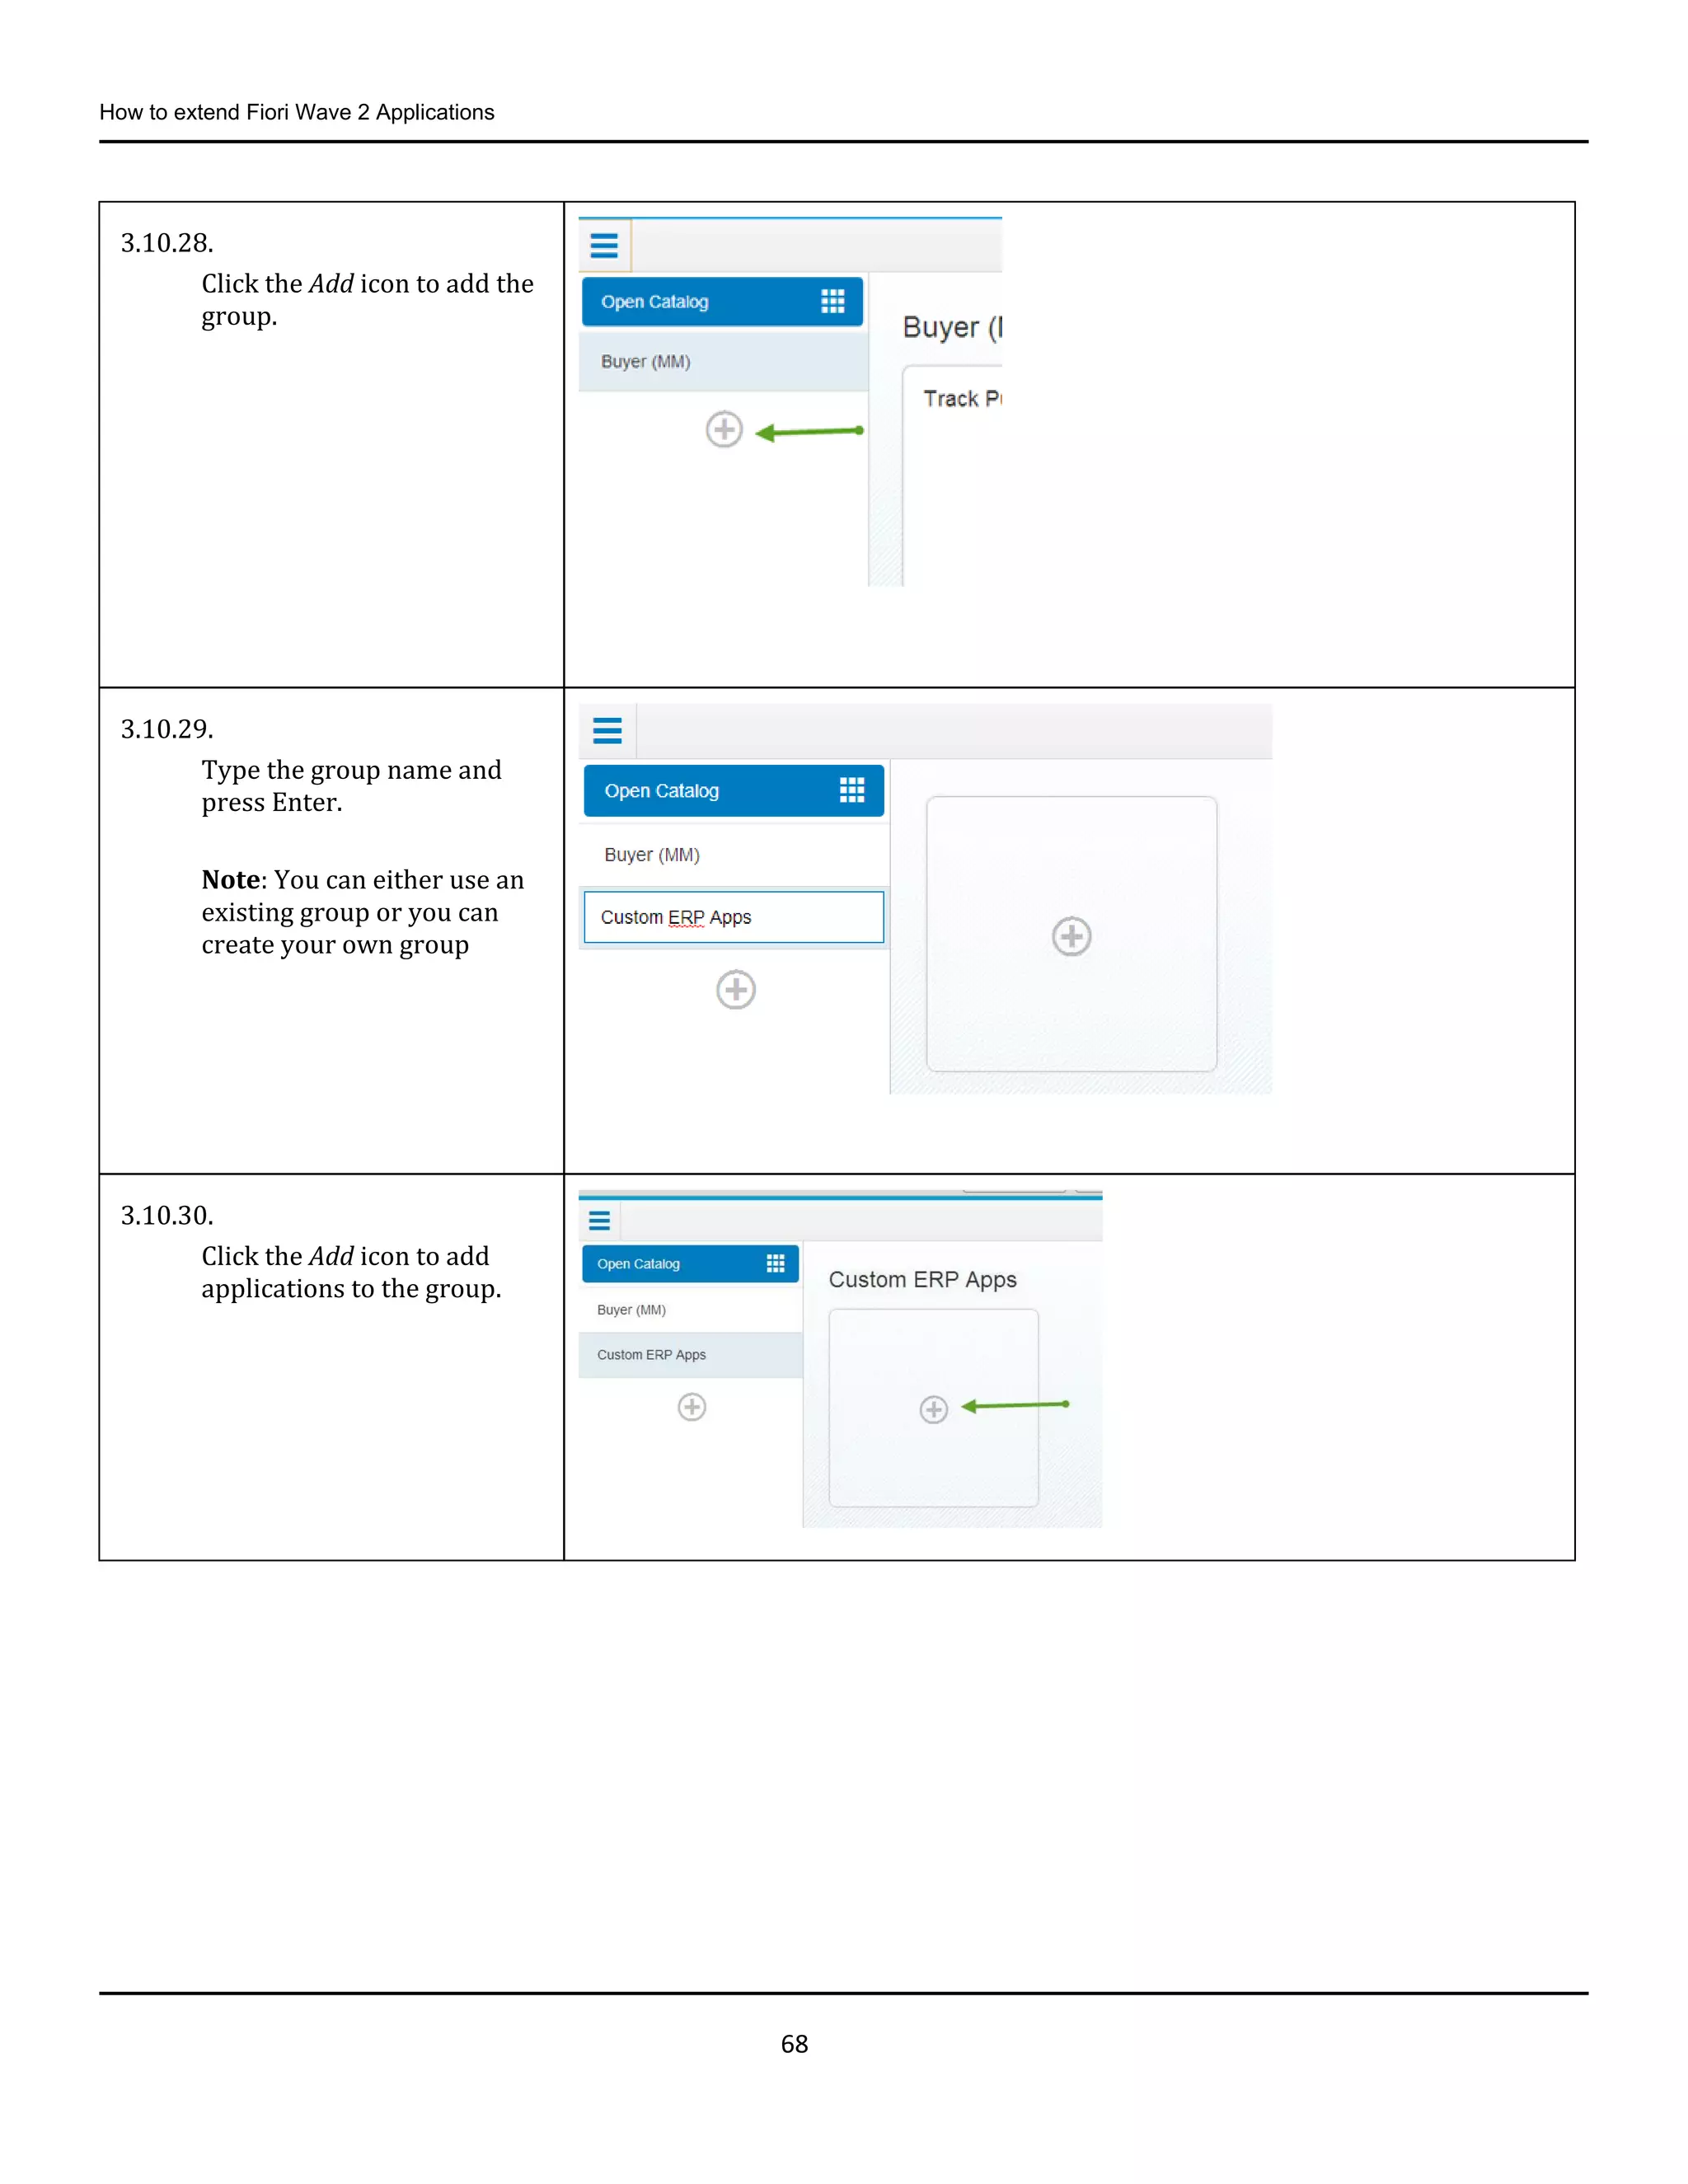
3.10.27.
Click the Menu icon.
68.
How to extendFiori Wave 2 Applications
68
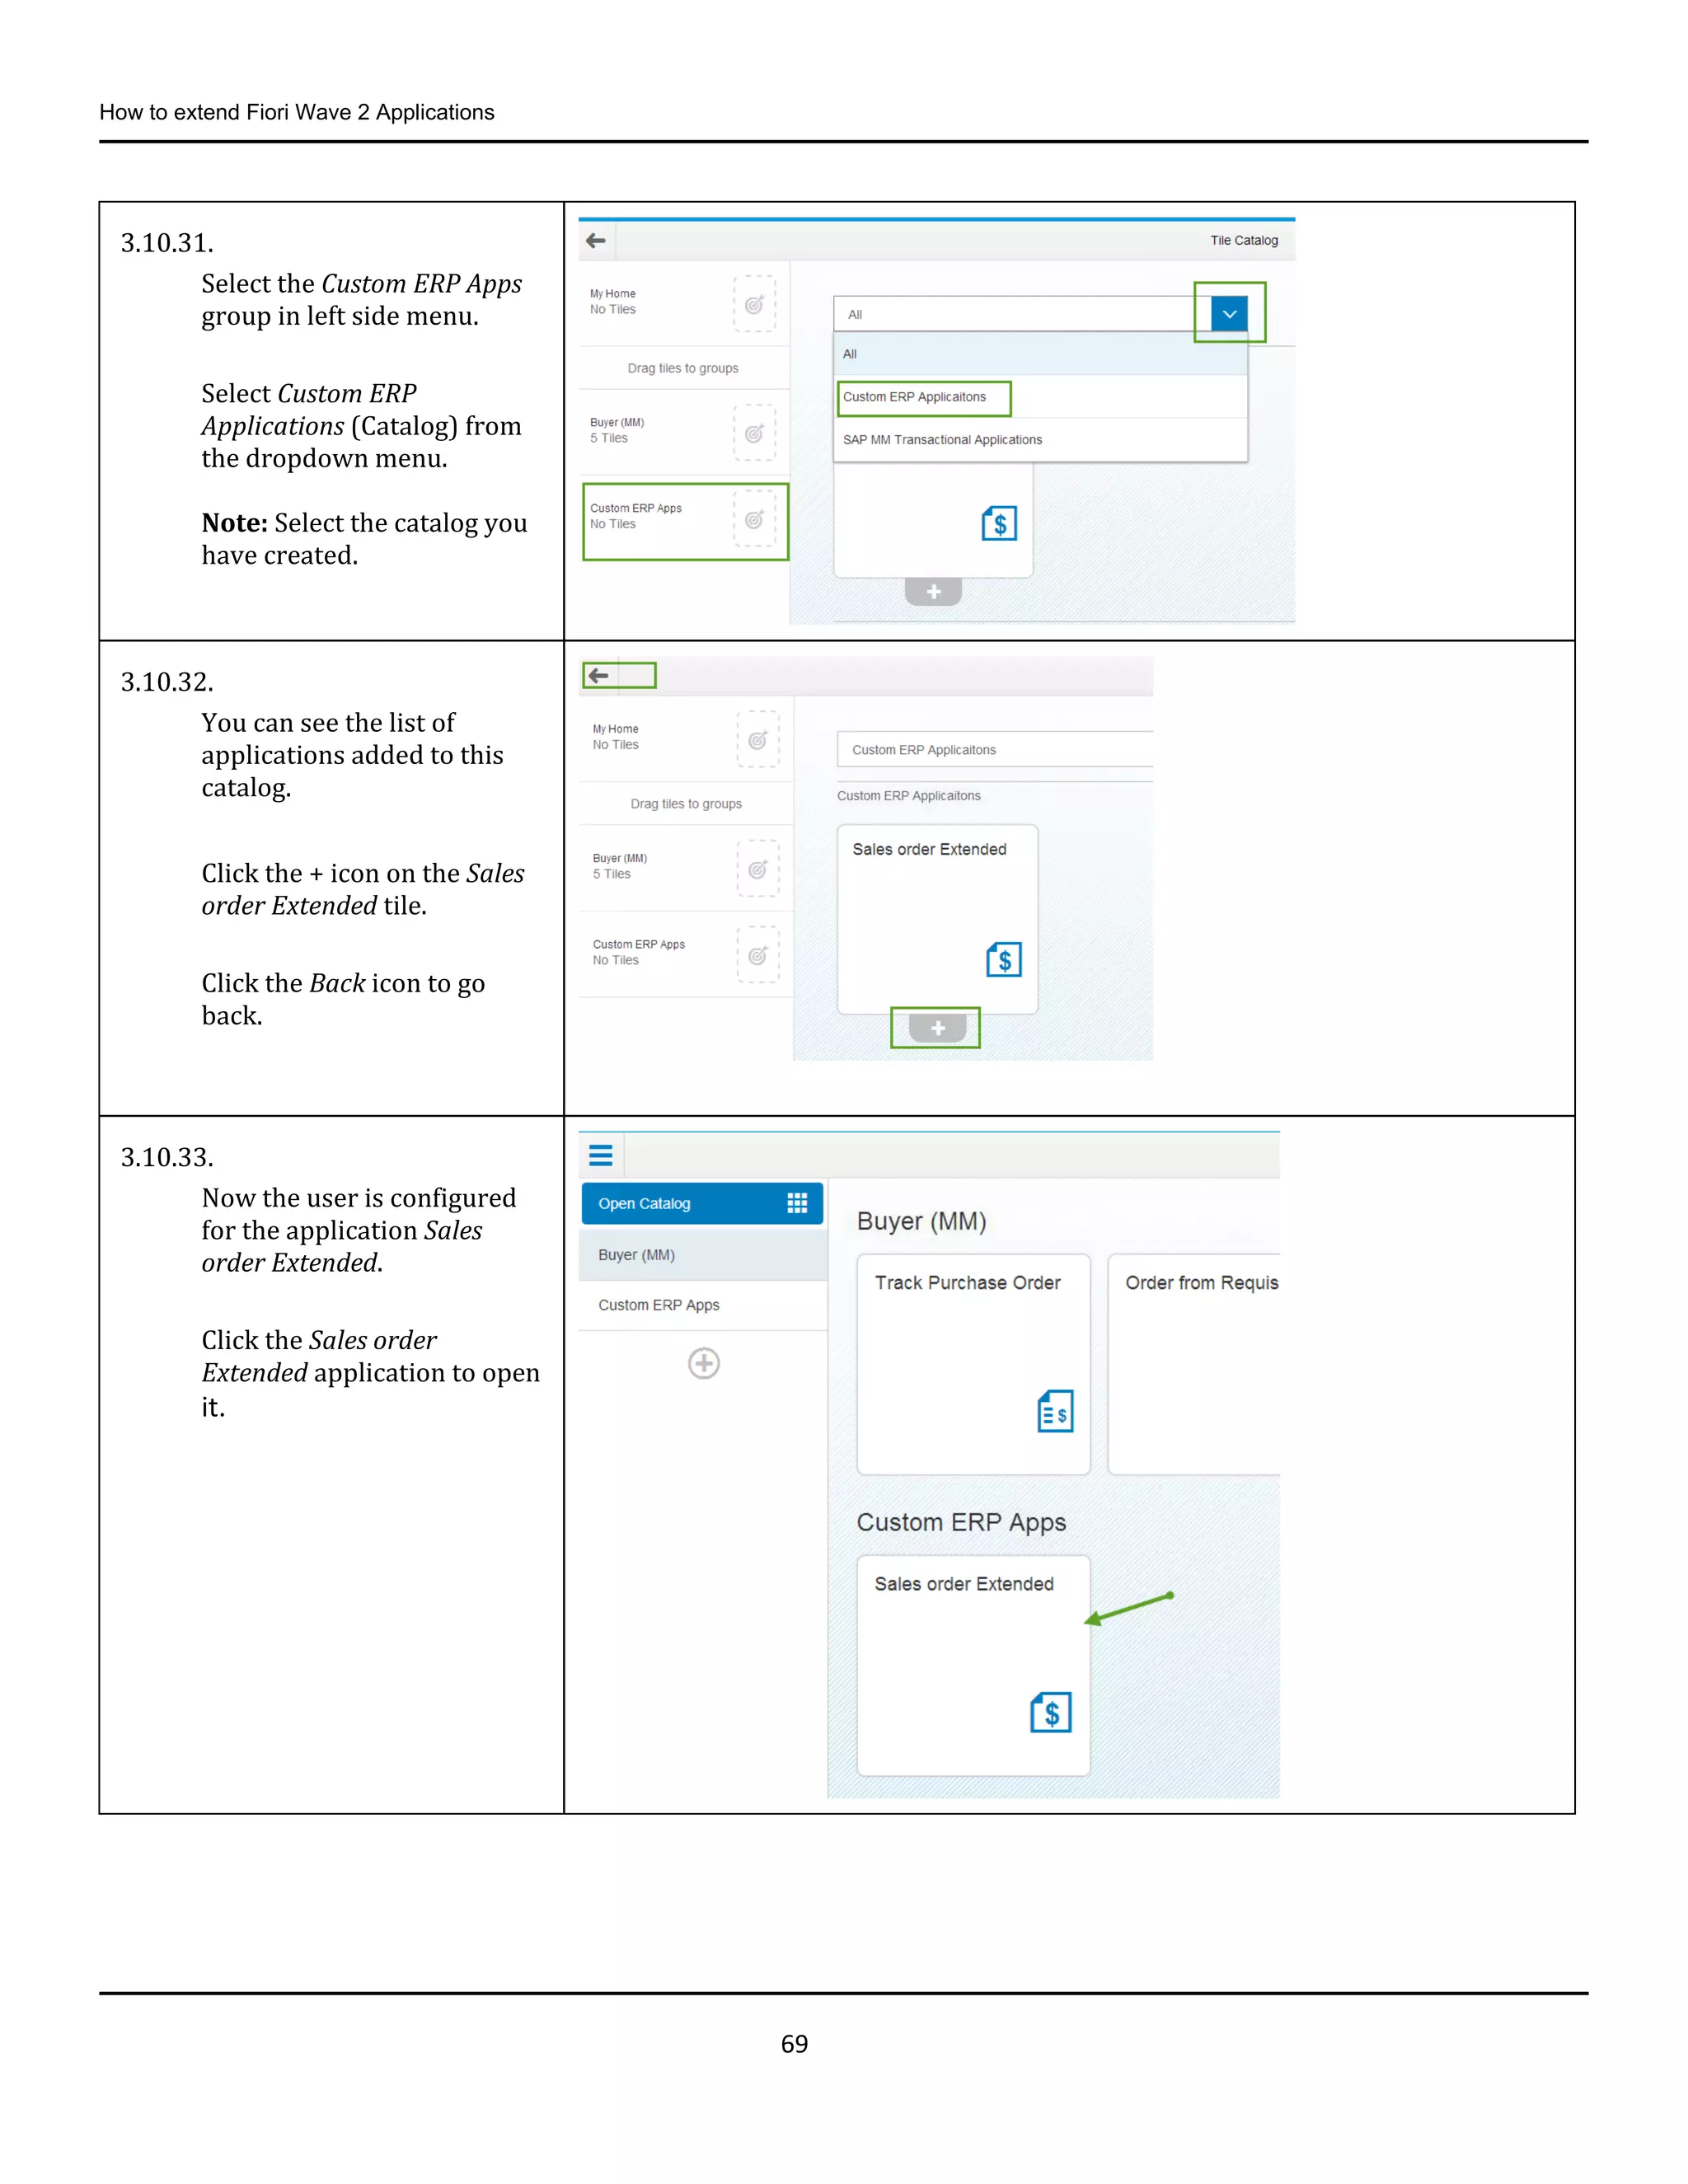
3.10.28.
Click the Add icon to add the
group.
3.10.29.
Type the group name and
press Enter.
Note: You can either use an
existing group or you can
create your own group
3.10.30.
Click the Add icon to add
applications to the group.
69.
How to extendFiori Wave 2 Applications
69
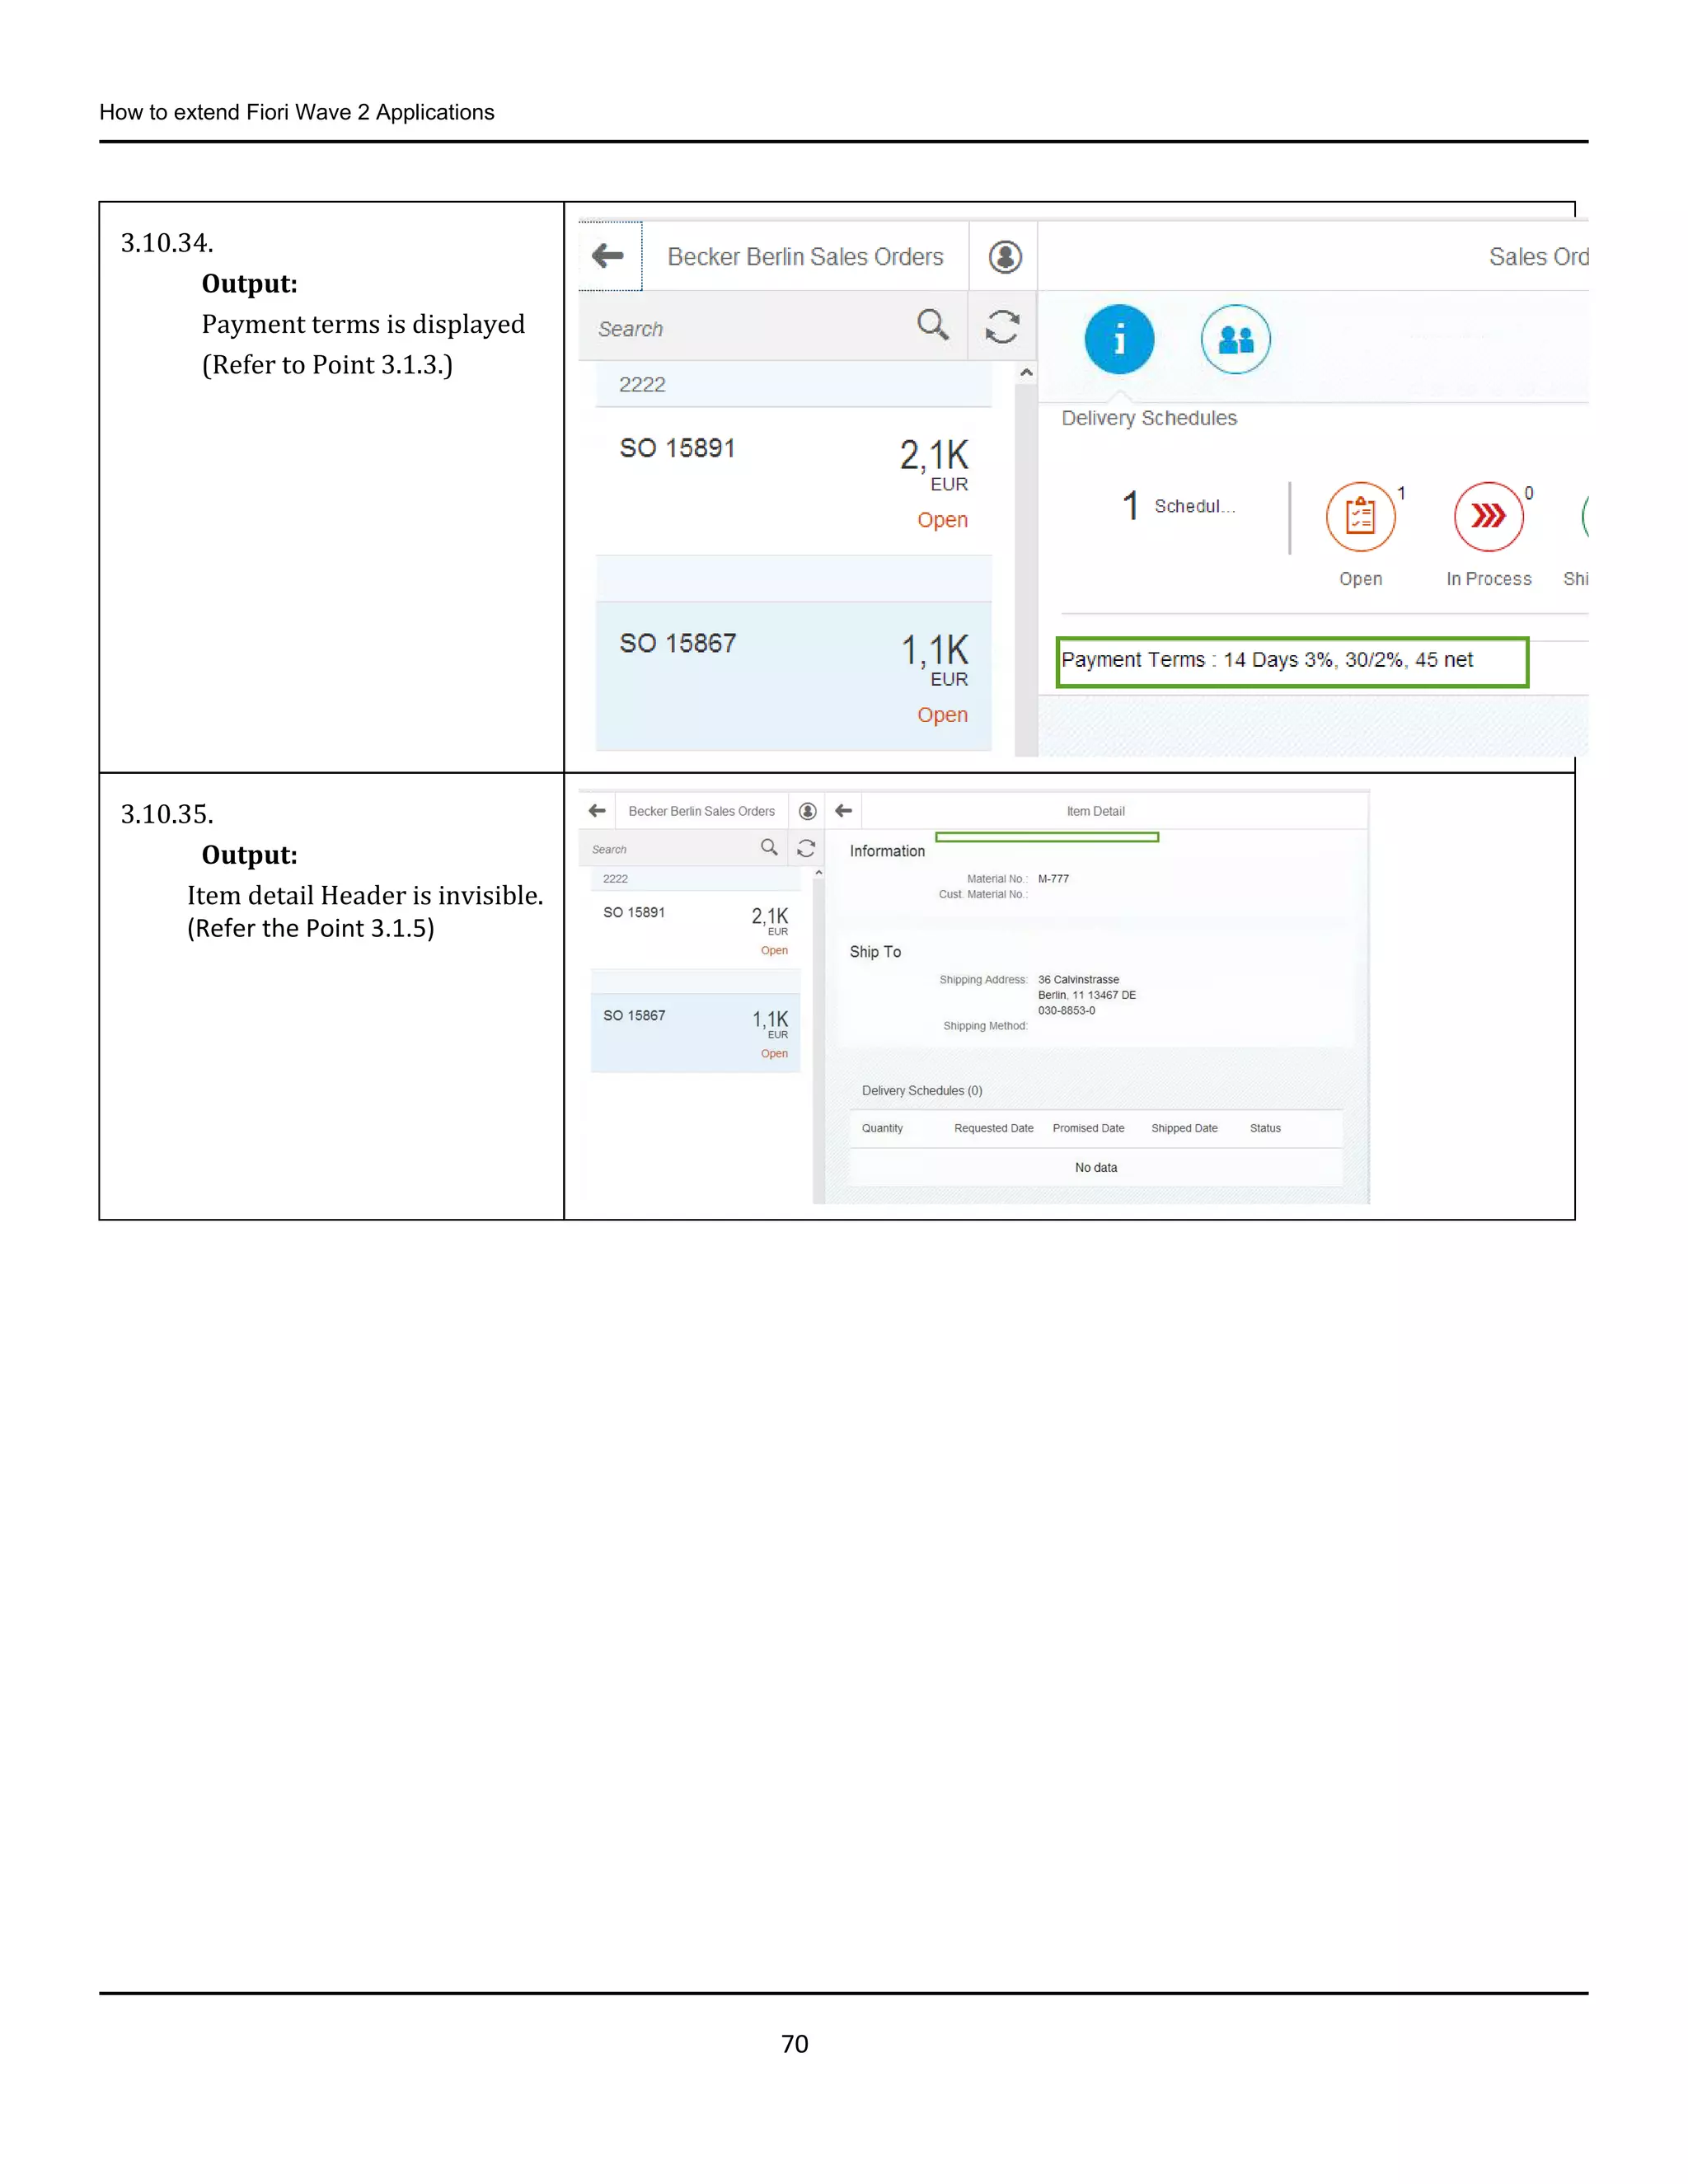
3.10.31.
Select the Custom ERP Apps
group in left side menu.
Select Custom ERP
Applications (Catalog) from
the dropdown menu.
Note: Select the catalog you
have created.
3.10.32.
You can see the list of
applications added to this
catalog.
Click the + icon on the Sales
order Extended tile.
Click the Back icon to go
back.
3.10.33.
Now the user is configured
for the application Sales
order Extended.
Click the Sales order
Extended application to open
it.
70.
How to extendFiori Wave 2 Applications
70
3.10.34.
Output:
Payment terms is displayed
(Refer to Point 3.1.3.)
3.10.35.
Output:
Item detail Header is invisible.
(Refer the Point 3.1.5)
How to extendFiori Wave 2 Applications
72
QR Code is a registered trademark of Denso Wave Incorporated.
RIM, BlackBerry, BBM, BlackBerry Curve, BlackBerry Bold, BlackBerry Pearl, BlackBerry Torch, BlackBerry Storm, BlackBerry Storm2, BlackBerry PlayBook, and
BlackBerry AppWorld are trademarks or registered trademarks of Research in Motion Limited.
SAVO is a registered trademark of The Savo Group Ltd.
The Skype name is a trademark of Skype or related entities.
Twitter and Tweet are trademarks or registered trademarks of Twitter.
UNIX, X/Open, OSF/1, and Motif are registered trademarks of the Open Group.
Wi-Fi is a registered trademark of Wi-Fi Alliance.
SAP, R/3, ABAP, BAPI, SAP NetWeaver, Duet, PartnerEdge, ByDesign, SAP BusinessObjects Explorer, StreamWork, SAP HANA, the Business Objects logo,
BusinessObjects, Crystal Reports, Crystal Decisions, Web Intelligence, Xcelsius, Sybase, Adaptive Server, Adaptive Server Enterprise, iAnywhere, Sybase 365,
SQL Anywhere, Crossgate, B2B 360° and B2B 360° Services, m@gic EDDY, Ariba, the Ariba logo, Quadrem, b-process, Ariba Discovery, SuccessFactors,
Execution is the Difference, BizX Mobile Touchbase, It's time to love work again, SuccessFactors Jam and BadAss SaaS, and other SAP products and services
mentioned herein as well as their respective logos are trademarks or registered trademarks of SAP AG in Germany or an SAP affiliate company.
All other product and service names mentioned are the trademarks of their respective companies. Data contained in this document serves informational purposes
only. National product specifications may vary.
These materials are subject to change without notice. These materials are provided by SAP AG and its affiliated companies ("SAP Group") for informational
purposes only, without representation or warranty of any kind, and SAP Group shall not be liable for errors or omissions with respect to the materials. The only
warranties for SAP Group products and services are those that are set forth in the express warranty statements accompanying such products and services, if any.
Nothing herein should be construed as constituting an additional warranty.


![2008 brokerage 08 game technology and experience [compatibility mode]](https://cdn.slidesharecdn.com/ss_thumbnails/2008brokerage08-gametechnologyandexperiencecompatibilitymode-100413034101-phpapp02-thumbnail.jpg?width=640&height=640&fit=bounds)


![Vibe Coding vs. Spec-Driven Development [Free Meetup]](https://cdn.slidesharecdn.com/ss_thumbnails/vibecodingvsspecdrivendevelopment-251209105622-43f455e7-thumbnail.jpg?width=640&height=640&fit=bounds)


