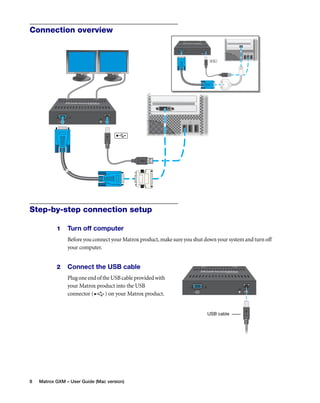
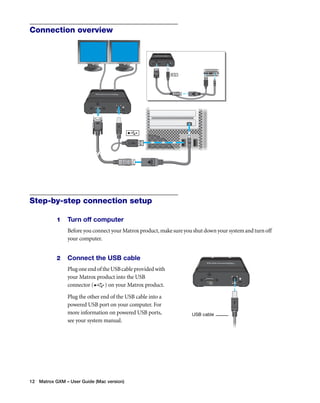
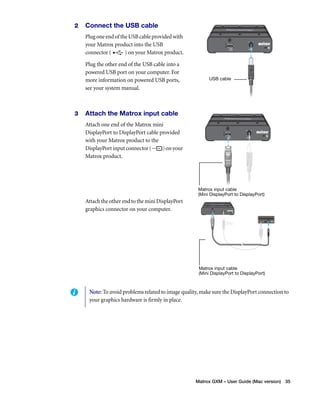
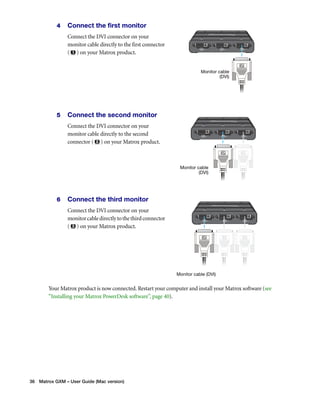
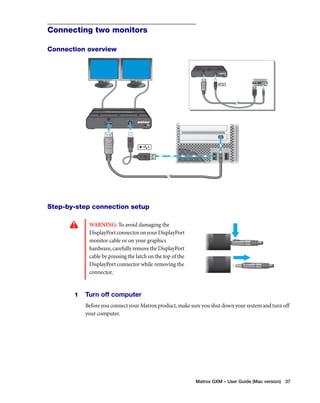
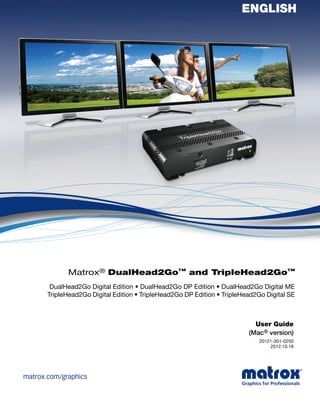
This document provides an overview and instructions for connecting and using various Matrox DualHead2Go and TripleHead2Go multiple monitor expansion products for Mac systems. It includes information on the hardware and software supplied with each product, as well as step-by-step instructions for connecting 2-3 monitors to the Mac using different connection types. The document also provides information on installing the Matrox PowerDesk software and configuring display settings.
This document provides instructions for configuring a DeviceNet network. It discusses choosing between a single network or subnets, selecting a scanner, and bridging networks. It also covers connecting devices to the network, setting node addresses, and configuring the network both offline and online using RSNetWorx software. A section on automatically configuring the network with AutoScan is also included.
The document provides an overview of the network features and capabilities of the Brother HL-2150N and HL-2170W multi-function printers, including:
- Network printing via Ethernet or wireless (HL-2170W only) connections using TCP/IP protocols
- Management utilities like BRAdmin Light and BRAdmin Professional for configuring network settings
- Support for printing from Windows and Macintosh operating systems
The document provides an overview and user manual for the NETGEAR Digital Entertainer Elite media player models EVA9000 and EVA9150. The Digital Entertainer Elite allows users to centralize their digital media libraries and view photos, listen to music, and watch videos stored on computers or an optional internal hard disk drive. Key features include support for Windows, Mac, and Linux operating systems, parental controls, and the ability for multiple Digital Entertainer Elites to share media playback across a home network. The user manual provides instructions for setup, navigation, media playback and customization options.
The document is a maintenance and service guide for the HP Compaq nc8000 Business Notebook and nw8000 Mobile Workstation. It provides information on identifying notebook features and components, troubleshooting problems, and performing disassembly procedures. The guide contains sections on product description, troubleshooting, illustrated parts catalog, removal and replacement procedures, specifications, and more.
This document is a maintenance and service guide for the HP Compaq nc8000 Business Notebook and nw8000 Mobile Workstation. It provides information on identifying system components, troubleshooting issues, disassembly procedures, and part numbers for replacement parts. The guide includes specifications, connector pinouts, power requirements, and screw listings to aid in servicing the notebooks.
Ap 51xx access point product reference guide (part no. 72 e-113664-01 rev. b)Advantec Distribution
This document provides a product reference guide for the AP-51xx Access Point. It describes the new features of the access point, including WIPS support, trusted host management, adaptive AP, rogue AP enhancements, and bandwidth management enhancements. It also provides an overview of the key features of the access point, such as single or dual mode radio options, separate LAN and WAN ports, multiple mounting options, antenna support, sixteen configurable WLANs, quality of service support, industry leading data security, and multiple management accessibility options. The document contains detailed information about the capabilities and specifications of the AP-51xx Access Point.
The IPSec protocol provides secure IP connections by enabling integrity of data, confidentiality of data, and user authentication. It operates at the IP layer to generically support these security policies. The main goals of IPSec are to ensure data has not been modified in transit, encrypt data on non-trusted network sections, and authenticate the communicating parties.
This document is the user guide for Deep Freeze Standard. It provides information about installing, configuring, and using Deep Freeze Standard to protect computers by making their configurations indestructible and reverting them to a known good state after each reboot. The guide covers topics such as system requirements, attended and silent installation and uninstallation methods, installing over existing versions of Deep Freeze, and using features like the status tab and password tab.
This document is a maintenance and service guide for HP Pavilion dv1000, HP Compaq nx4800, and Compaq Presario V2000 notebook models. It provides information on identifying components, troubleshooting problems, and performing disassembly procedures. The guide covers notebook features, power management, external components, and removal and replacement procedures.
This document provides a troubleshooting guide for Informatica PowerCenter version 8.1.1. It includes error messages that may occur in the PowerCenter client, administration console, and various PowerCenter components like transformations, connectors, and workflows. The guide contains overviews of the different types of error messages and chapters with detailed listings of specific error codes, causes, and resolutions for each PowerCenter module.
Ru@!~!Watch England v India Final ICC Champions Trophy Free here >>opikorim391
St: @!@ Champions Trophy final England vs India Live Free HD Streaming Online currently.
Watch England v India Final ICC Champions Trophy Free here >>
http://bitly.com/freeICCfinallivefree
www.bitly.com/freeICCfinallivefree
http://bitly.com/freeICCfinallivefree
All dear cricket fans are cordially invited to watch Champions Trophy final England vs India Live Free HD Streaming Online from here. You can get 100 % hd and free streaming for Champions Trophy final England vs India Live Free HD Streaming Online. So don't miss to watch this hot and super exciting cricket game free online coverage. Champions Trophy final England vs India Live Free HD Streaming Online England v India Final ICC Champions Trophy Free England v India Final ICC Champions Trophy Free England v India Final ICC Champions Trophy Free
This document provides an introduction to the Dekart RSA Cryptographic Provider. It discusses why information security is necessary in the modern digital world. It then describes how the Cryptographic Provider uses certificates, certification authorities, and public/private key cryptography to provide encryption, digital signatures, and other cryptographic functions. It also gives an overview of the Cryptographic Provider's hardware and software requirements, components, and capabilities.
Netgear Aircard 785S Mobile Broadband Hotspot User GuideTelephones Online
This document is the user manual for the NETGEAR AirCard 785S Mobile Hotspot. It provides instructions on how to set up, connect to, and use the mobile hotspot device. The manual covers topics such as installing the SIM card and battery, connecting devices to the hotspot's WiFi network, monitoring data usage, updating settings and security, and troubleshooting issues. It also includes an appendix with frequently asked questions and their answers.
IP Office Release 5 is Avaya's business communications solution for small and mid-sized businesses. It provides integrated voice, data, and messaging capabilities on a single platform. Key features include advanced call handling, contact center functionality, voicemail, conferencing, and support for IP phones and applications. The solution offers scalability from just a few users up to hundreds and can be customized for different business needs. Avaya provides tools to simplify ongoing administration and management of the IP Office system.
This document provides instructions for installing and configuring Insight Tech Console and Report Server. It covers supported operating systems, installation procedures for Windows and Mac computers, updating Tech Console and managed machines, configuring Tech Console preferences, and basic usage instructions. The guide is intended to help IT and technical staff use Tech Console's central management capabilities for tasks like hardware and software inventory, updating systems, monitoring security, and generating utilization reports.
The document is a user guide that provides an overview of the Versatile Data Acquisition System (VDAS). It describes the VDAS hardware which includes different interface types (VDAS-B, VDAS-F, VDAS-FC, and onboard). It also describes the VDAS software and how to install and operate the hardware and software. Key sections of the hardware are outlined, including the digital/analog input section and modular boards. Installation procedures and an overview of the software interface are also provided.
A- LES CONCEPTS
Comprehension du bim.
Travailler dans différentes vues.
Classement et hierarchie des éléments dans Revit.
B-L'ENVIRONNEMENT DE TRAVAIL
Page des fichiers rescents et grand R.
Le ruban.
Fenêtre des propriétés.
Explorateur du projet.
Navigation dans un modèle.(zoom, rotation et panoramique).
Selection des objets, et verouillage.
C-DEMARRAGE D'UN PROJET.
Les gabarits.
Travail collaboratif.
Configuration d'un nouveau projet.
Manipulation des niveaux.
Manipulation des files de projet.
Utilisation des cotes temporaires.
C- MODELISATION PAR OBJETS:
Ajout des murs.
Propriété et type de murs.
Utilisation des accroches.
Ajouts de poteaux et poutres.
Ajout de portes et fenêtres.
Ajout d'élements de plomberie et d'électricité.
Utilisation de la jonction entre murs.
Utilisation des contraintes.
D- LIENS, IMPORTS ET GROUPES:
Lier fichiers DWG/DXF/SKP
Création de topogrpahie d'un site à partir d'un fichier.
Création et gestion des groupes.
Création et gestion des liens Revit.
Utilisation du partage d'emplacement.
E- MODELISATION PAR ESQUISSE:
Sols., toits et plafonds.
Toit par extrusion.
Ouvertures.
F-ESCALIERS.
Edition avancée d'escalier.
Edition avancée de gardes corps.
G- EDITION AVANCEE DES MURS:
Création d'un nouveau type de murs..
Création et gestion des murs empilés.
Création et gestion des murs rideaux.
.
H- GESTION DES GRAPHISMES:
Gestion du style des objets.
Gestion du remplacement de la visibilité et du graphisme des éléments.
Création et application des gabarits de vue.
Cacher et isoler les éléments.
Cadrage de la vue.
Plage de vue et entendues.
Vue isométrique d'une selection.
Option d'affichage des graphismes.
I- PIECES:
Création et gestion des pièces.
J- NOMENCLATURE ET ETIQUETTES:
Gestion des étiquettes.
Création et gestion des nomenclatures.
Modification des nomenclatures.
Enrichissement des VCCTP par les nomenclatures.
K-ANNOTATIONS.
Textes.
Dimensions
Symboles.
Légendes.
Détails.
Définir ses annotations.
L- PARAMETRIQUE ET FAMILLES
Utilisation des paramètres en mode projet.
Concept de famille.
Création d'une famille.
Utilisation des contraintes.
Utilisation des formes solides.
M- FEUILLE, IMPRESSION, PUBLICATION:
Création d'une feuille d'impression.
Export CAO.
Publication.
Impression PDF.
N- TRUCS ET ASTUCES.
A découvrir en formation.
This document provides a summary of the HiPath 4000 V6 system software components, including:
- Descriptions of hardware configurations, licensing, applications, and the hard disk layout.
- Details on the HiPath 4000 Assistant, including its applications, user accounts, and notification mechanisms.
- An overview of the HiPath 4000 CSTA software component.
The document contains technical information on the various software aspects that make up the HiPath 4000 V6 communication system.
This document provides instructions for installing MathWorks products and related software. It discusses downloading and installing products using an internet connection or offline using a file installation key. It also covers installing documentation, installing products on a network license, noninteractive installation, and having end users install products. The document is regularly revised to cover the latest MathWorks releases.
EasyTune 5 Pro
Norton Internet Security (OEM version)
CyberLink DVD Suite (OEM version)
Adobe Reader (OEM version)
Windows VistaTM Ready
Microsoft® Windows® VistaTM Premium Ready
Operating System Support for Microsoft ® Windows® 2000/XP/VistaTM
Form Factor ATX Form Factor; 30.5cm x 24.4cm
(12.0" x 9.6" , Extended ATX)
Specifications are subject to change without notice.
Notes:
1. Due to Windows Vista/XP 32-bit operating system limitation, when more than 4 GB of physical memory is installed, the actual memory size displayed will be less than 4 GB.
This document provides instructions for deploying and managing Palo Alto Networks VM-Series firewalls in virtualized environments. It covers topics such as licensing VM-Series firewalls, high availability configurations, upgrading software versions, and installing a VM-Series firewall on a VMware ESXi server. The document is intended for network and security professionals deploying VM-Series firewalls.
This document provides instructions for setting up and configuring the network connection and functions of an imageRUNNER device. It includes information on optional equipment requirements, system requirements for various network functions, and step-by-step instructions for configuring settings like TCP/IP settings, E-mail/I-Fax settings, and setting up computers and servers on the network. The document is divided into chapters that cover settings common to all network protocols, using TCP/IP networks, and examples of connecting different types of computer systems to the network.
This document provides an overview and instructions for installing and using Hitachi Storage Navigator Modular 2 (Navigator 2). It includes information on:
- Key features of Navigator 2 and how it integrates with Hitachi storage systems
- System requirements and pre-installation steps
- Installing Navigator 2 on Windows, Solaris, and Linux operating systems
- Performing initial configuration steps like adding arrays, creating volumes, and mapping volumes to hosts
- Using basic Navigator 2 interface elements and functions
- Managing users, permissions, and passwords
- Providing a quick tour of common Navigator 2 activities
Service manual-acer-travel mate-5730-extensa-5630-seriesDaniel Blanco
This service guide provides information for technicians servicing TravelMate 5730/Extensa 5630 Series notebooks. It includes specifications, disassembly and replacement procedures, BIOS utilities information, and service updates which are made available on the ACER/CSD website. Technicians are instructed to check the ACER website for the most up-to-date part numbers and any revisions to the guide. The document provides copyright information and guidelines for the safe and proper servicing of Acer notebook computers.
This installation guide provides information about installing PowerChute Business Edition, including:
- PowerChute Business Edition monitors UPS devices and allows shutdown of connected systems in the event of a power outage. It must be installed on each system connected to a UPS.
- Supported operating systems include Windows and Linux. Compatibility depends on the UPS model, and connections can be made via serial or USB cable.
- System requirements include a 64-bit OS, 512MB RAM, 1.3GHz processor and active network connection. The guide outlines installation procedures for Windows and Linux.
- Troubleshooting tips are provided for issues that may occur during or after installation, such as communications problems or unexpected shutdown behavior.
This document is the user manual for DisplayLink USB Graphics software version 7.5. It provides instructions on installing the DisplayLink software and configuring DisplayLink displays for Windows 8.1, Windows 8, Windows 7, Windows Vista and Windows XP. The document covers PC system requirements, installation steps for each operating system, configuring display settings like resolution and extend/mirror modes, uninstalling the software, audio configuration and additional troubleshooting information.
Learn about Program Directory for IBM Ported Tools for z/OS. This program directory is intended for the system programmers who are responsible for program
installation and maintenance. It contains information about the material and procedures associated with
the installation of IBM Ported Tools for z/OS. For more information on IBM System z, visit http://ibm.co/PNo9Cb.
Visit the official Scribd Channel of IBM India Smarter Computing at http://bit.ly/VwO86R to get access to more documents.
Yokogawa Model GX10/GX20/GP10/GP20 Paperless Recorder First Step GuidePower Specialties, Inc.
The GP series is an industry-first multi-point touch panel, to improve intuitive and smart operator control. Users can scroll, pan, zoom historical data, and even write freehand messages on its dust-proof and water-proof display. It delivers industry leading reliability and measurement accuracy. The GP series is ideally suited for monitoring or troubleshooting long term physical or electrical trends.
The GX series is an industry-first multi-point touch panel, to improve intuitive and smart operator control. Users can scroll, pan, zoom historical data, and even write freehand messages on its dust-proof and water-proof display. The Yokogawa GX series delivers industry leading reliability and measurement accuracy. Its custom graphics accommodates application or process-specific displays, while a wide range of communication protocols guarantee compatibility with your network architecture. It's simple for operators to view and retrieve past data with automatic email and FTP notifications.
This document is a user's guide for Datacolor MATCHTextile software. It provides an overview of the software's capabilities such as working with basic data like quality, product and customer information. It also describes managing colorant sets, calculating recipe matches, performing corrections, and using the SmartMatch feature. The guide covers installation, configuration, administration, importing and exporting data and settings, backup procedures, and other tools.
hp StorageWorks host bus adapter for Windows and Linux ...webhostingguy
This document provides installation and configuration instructions for an HP StorageWorks host bus adapter (HBA) for Windows and Linux platforms. It describes how to install the HBA hardware, install device drivers for Windows Server 2003 and various Linux distributions, and use diagnostic utilities to test and configure the HBA. The guide covers hardware installation, driver installation, troubleshooting, and how to use utilities to diagnose and configure the HBA.
This document is a user guide for the CV41 vehicle mount computer running Windows CE. It provides information about operating and maintaining the computer such as attaching and removing it from the mounting dock, using accessories like the touchscreen and keypad, connecting power and antennas, transferring files, and understanding the user interface and included applications. The guide also describes how to manage the computer within a network using Intermec's SmartSystems Foundation software and how to develop and install custom applications.
인터맥산업용PC Intermec CV61 12.1인치 차량탑재용 산업용패널PC 매뉴얼HION IT
인터맥 CV61은 차량탑재 (지게차 또는 자동차) 모바일 컴퓨터 중에 하나입니다.
강력한 64 비트 1.8GHz 인텔 ® 아톰 프로세서가 적용된 CV61은 Windows 7 Professional 또는 Windows XP 운영 체제 중에서 선택할 수 있습니다.
또한 CV61은 메모리를 많이 차지하는 ERP 및 창고관리시스템 (WMS) 을 지원하기 위해 최대 3GB RAM을 제공합니다.
드롭 인 교체가 쉽고 경제적입니다.
현재 인터맥 CV60 차량 탑재 컴퓨터를 사용중인 경우 CV61은 가장 빠르고 쉬운 마이그레이션 경로를 제공합니다.
CV60 마운팅, 케이블 링, 키보드, 트레이, 스캐너 및 프린터와 호환되도록 설계된 CV61은 비용과 설치 시간을 절약 해줍니다.
내장 된 9-60 VDC 전원 공급 장치는 설치 비용을 낮추고 지게차 배터리가 고장 나더라도 백업을 제공합니다. 옵션으로 제공되는 외부 고전압 및성에 제거 장치 전력 변환기는 물론 기존 CV60 전력 변환기와 함께 사용할 수있는 어댑터 케이블도 제공됩니다.
또한 IT 관리자는 사용자 관리, 보안, 안티 바이러스, 방화벽, 그룹 정책 및 소프트웨어 업데이트를위한 표준 엔터프라이즈 PC 관리 도구를 지원하므로 CV61을 사용하기가 쉽습니다. CV61 옵션 인 Intermec Client Pack 터미널 에뮬레이션 및 산업용 브라우저 소프트웨어는 창고관리시스템 (WMS) 에 빠르고 안정적이며 안전한 연결을 제공합니다. 또한 Intermec 개발자 툴킷을 사용하면 다중 장치 환경에서 응용 프로그램 소프트웨어를 마이그레이션하는 데 드는 시간을 절약 할 수 있습니다.
CV61은 편안하고 친숙하며 쉽게 습득 할 수 있습니다. 매우 밝은 12.1 인치 터치 스크린 디스플레이는 희미하게 빛나는 창고 환경과 햇빛이 비치는 야외에서 쉽게 읽을 수 있습니다. 터치 스크린과 견고한 외부 백라이트 키보드는 장갑을 낀 손으로 쉽게 데이터를 입력 할 수 있도록 설계되었습니다.
안정적인 성능
CV61은 네트워크 보안, 관리 시스템 및 회사 표준과 통합되도록 설계되었습니다.
포괄적 인 네트워크 옵션으로는 시스코® CCXv4 인증을 갖춘 802.11 a / b / g / n과 낮은 신호 레벨을 경험할 수있는 지역에서도 동급 최고의 무선 범위, 로밍 안정성 및 보안을위한 통합 EDR 2.1 Class 1.5 블루투스®가 포함됩니다. 간헐적인 연결. 또한 CV61은 Intermec의 Vocollect VoiceCatalyst ™로 핸즈프리 음성 작업의 정확성, 생산성 및 안전성을 제공합니다.
극한의 온도에 견디도록 제작 된 CV61은 -20 ° C ~ + 50 ° C (-4 ° F ~ + 122 ° F)에서 작동하며 냉장 보관 및 냉동실 환경을 위해 옵션으로 제공되는 터치 스크린 디프 로스터 (-30 ° C까지 -22F).
IP66 등급은 방진 및 압력 세척 기능을 통해 하드웨어를 보호하며 사용자가 교체 할 수있는 SSD (Solid State Disk) 스토리지는 가혹하고 진동이 심한 환경에서도 데이터 무결성을 유지합니다.
CV61과 호환되는 Intermec SR61 제품군의 산업용 핸드헬드 바코드 스캐너를 사용하여 작업배정, 위치확인, 로트추적을 하거나 예외적인 관리를 할 수 있습니다. 온도 변화, 낙하, 먼지 및 날씨와 같은 거친 현실을 견딜 수 있도록 설계되었습니다. 여분의 장거리 스캐닝을위한 옵션이있어 작업자가 지게차의 자리를 떠나지 않고 멀리서도 스캔 할 수 있으며 테더형 또는 블루투스 모델 중 하나에서 사용할 수 있습니다.
PHYSICAL CHARACTERISTICS
Dimensions : 높이: 27.4cm (10.8”) x 폭: 34.3cm (13.5”) x 깊이: 8.4cm (3.3”)
Weight : 5.2 kg (11.5 lbs)
Display : 12.1”, XGA 1024x768, LED backlit
PERFORMANCE CHARACTERISTICS
CPU : Intel® Atom 64-bit D425 1.8GHz
Operating System : Choice of Microsoft Windows® 7 Professional or Windows XP Professional
Memory :
Standard 1GB DDR2 for Windows XP
tandard 2GB DDR2 for Windows 7
User-upgradeable up to 3GB memory total
WIRELESS COMMUNICATIONS
Wireless LAN : 802.11a/b/g/n
Security : WIFI Certified; WPA and WPA2 Security
Authentication : 802.1x
Cisco Compatibility : CCXv4 Certified
Antenna : Dual internal MIMO antennas or optional external primary antenna with auto-sensing feature
Bluetooth : Integrated Bluetooth 2.0+EDR, Class 1.5 (30m range)
INTERFACE
2 USB 2.0 ports with locking breakout cable, 2 RS-232 COM ports with +5V power, CAN-BUS port,
Mic/ Headset port, Stereo Speaker output, DC power input, WiFi primary antenna port with auto-sensing,
RJ45 10/100 Ethernet port, Legacy PS/2 keyboard input
>하이온아이티
주소 : 서울 금천구 가산디지털2로 165, 1304호 (백상스타타워2차)
대표번호 : 02-2038-0018 / 이메일 : hion@hionit.com
홈페이지 : http://hionsmart.com
This document is a user guide for the CV61 vehicle mount computer running Windows 7. It provides information about setting up and using the CV61, including how to mount, power, and connect accessories to the computer. It also describes the user interface, available Intermec applications, how to manage and configure the computer through Intermec Settings, and how to develop and install additional applications. The guide contains information about operating and maintaining the CV61 in a vehicle mount environment.
This document provides a checklist for designing a logo. It contains 5 points: 1) Keep the logo simple so it can be easily recognized, 2) Carefully select colors that are appropriate for the business and look good on different backgrounds, 3) Choose a tidy typography by selecting a clear, easy-to-read font, 4) Avoid special effects and keep the logo flat, and 5) Ensure the logo is scalable and flexible so it can be used in different contexts and sizes. The checklist aims to help create the best logo design.
The document discusses updates to major email clients in 2016 including Gmail now supporting <style>, responsive design, and display: none allowing for faster email production and fewer bugs, however rendering issues still exist for POP/IMAP accounts in Gmail and mobile browsers; it recommends taking advantage of responsive design to optimize emails for all devices and avoiding CSS inlining now that Gmail supports styles in the <head>.
The document outlines the research and design process for redesigning the Brompton bicycle company's global online presence. It describes conducting stakeholder workshops, international user research, identifying key audience types and issues to address such as a fragmented digital presence and people not understanding product benefits. The design decisions section explains how they addressed these issues by developing a clearer multi-channel customer journey, amalgamating existing sites, personalizing content, amplifying product offerings and designing an improved bike chooser tool. Testing showed a 46% increase in traffic, 291% increase in subscribers and over 100% increases in other key metrics.
This document provides an overview of wireframing for product design. It discusses who uses wireframes, including designers, developers, product managers, and others. Wireframes are used to communicate the structure, content, hierarchy, functionality, and behavior of a product interface. The document then covers different styles of wireframing, from low to high fidelity. It also discusses tools for both non-digital and digital wireframing. The goal is to help readers better understand how to use wireframing in the product design and development process.
This document provides an overview of prototyping and why it is important for product design. It discusses:
- 5 key reasons to prototype including improving communication, reducing waste, selling ideas, earlier testing, and prioritizing design.
- How prototypes improve collaboration and communication by allowing stakeholders to interact with ideas rather than just hear descriptions.
- How prototyping adds balance to the design process by merging conceptual goals with practical feedback.
- How prototyping enables earlier and easier usability testing which is important for refining a design.
- Why prototyping is especially important for mobile products due to the greater number of use cases and environments mobile devices are used in.
The document provides tips for designing high-performing emails, recommending that email creators consider the five W's of who, what, when, where, and why when sending a message. It also advises optimizing envelope fields like the from name, subject line, and preview text to build trust and encourage opens, and using a content hierarchy with headlines, subheads, body copy, calls to action, and graphics to inspire clicks and meet goals. The document concludes by suggesting email designers sketch out their next email to define strategies for the inbox and content.
The document provides tips on how to effectively tell stories through UX portfolios, including telling stories tailored to different audiences like designers, developers, and product managers. It recommends telling stories visually with concise explanations that keep the audience engaged. Stories should have a clear problem, process, and outcome. Both "big stories" covering large projects and "small stories" covering iterations are suggested. The document cautions against including small screenshots without context or wireframes without research details. Examples of effective portfolios are also provided.
The document discusses the benefits of exercise for mental health. Regular physical activity can help reduce anxiety and depression and improve mood and cognitive functioning. Exercise causes chemical changes in the brain that may help protect against mental illness and improve symptoms.
Este manual do usuário fornece instruções sobre como baixar o manual em diferentes idiomas no site da GoPro, e descreve brevemente os principais recursos, modos e configurações da câmera GoPro HERO3+.
O documento fornece dicas para anúncios e páginas do Facebook, incluindo usar múltiplos ativos criativos nos anúncios, testar versões diferentes, usar imagens cativantes, relacionar eventos a causas, e promover páginas com anúncios de envolvimento. Também recomenda simplificar o conteúdo da página, inovar, estabelecer uma voz consistente e interagir com os fãs.
Este manual de instruções ensina como usar o flash Canon Speedlite 580EX de forma totalmente automática ou personalizada. Explica como montar o flash na máquina, ligá-lo, e usar os modos de flash automático E-TTL II e E-TTL. Também fornece detalhes sobre o uso do flash em modo manual ou wireless.
This document provides guidelines for Apple channel affiliates and Apple-certified individuals on properly using Apple's identity, including Apple channel signatures, product photography, and marketing messages. It outlines requirements for displaying Apple logos and signatures on various communications and materials. The guidelines aim to ensure a consistent representation of Apple's brand while allowing affiliates and certified individuals to promote their relationship with Apple.
O documento fornece informações sobre o perfil do empreendedor digital brasileiro, incluindo que a maioria são homens com idade média de 26 anos localizados em grandes cidades como São Paulo e Rio de Janeiro, e que operam principalmente negócios informais de serviços com faturamento anual entre R$36 mil e R$240 mil. Além disso, discute as vantagens de se ter um negócio digital e as fontes de informações e aprendizado utilizadas por esses empreendedores.
This document provides instructions for the Canon EF8-15mm f/4L Fisheye USM lens. It describes the lens's key features such as its use with multiple sensor sizes, aspherical lens elements for sharp images, and coatings to reduce flare. The instructions cover autofocus and manual focus operation, and limitations when using the lens such as its susceptibility to dirt on the front element due to the short focal length. Markings on the zoom ring indicate optimal zoom positions to avoid vignetting depending on the camera sensor size.
O documento apresenta uma tabela referencial de valores para freelas em design com o objetivo de auxiliar estudantes e profissionais a definirem preços para seus trabalhos freelance. A tabela contém valores médios para diversos tipos de serviços de design como identidade visual, ilustração, web design, entre outros, baseados em respostas de estudantes e profissionais.
Este manual fornece instruções sobre o funcionamento básico da Canon EOS 5D Mark II, uma câmera digital SLR full-frame de 21.1 megapixels. Inclui informações sobre carregar a bateria, instalar memória, colocar a lente, configurar definições básicas e fazer fotografias no modo automático. Também fornece detalhes sobre controles avançados e funções como qualidade de imagem, balanço de brancos, foco automático e manual, exposição e reprodução.
The document provides guidelines for using Apple's Mac logo to identify Mac-compatible hardware and software products. It specifies that the Mac logo must only be used by authorized licensees and Apple employees to promote products that are optimized for the Mac platform. The guidelines outline allowed uses of the logo, required sizing and clear space, placement on packaging and marketing materials, and specifications for color versus grayscale versions. It states the logo must be used consistently and not altered, and provides resources for obtaining approved artwork files.
1) El documento describe las funciones del medidor de exposición digital AUTO METER VF de MINOLTA, incluyendo mediciones de luz ambiental y de flash, funciones de memoria y cálculo, y modo de ajustes personalizados.
2) Explica cómo realizar mediciones de luz incidente y luz reflejada usando diferentes accesorios como el Difusor Esférico o Mini Receptor.
3) Proporciona instrucciones sobre el ajuste de la sensibilidad de la película, selección del método de medición, y col
Building Production Ready Search Pipelines with Spark and MilvusZilliz
Spark is the widely used ETL tool for processing, indexing and ingesting data to serving stack for search. Milvus is the production-ready open-source vector database. In this talk we will show how to use Spark to process unstructured data to extract vector representations, and push the vectors to Milvus vector database for search serving.
Threats to mobile devices are more prevalent and increasing in scope and complexity. Users of mobile devices desire to take full advantage of the features
available on those devices, but many of the features provide convenience and capability but sacrifice security. This best practices guide outlines steps the users can take to better protect personal devices and information.
Webinar: Designing a schema for a Data WarehouseFederico Razzoli
Are you new to data warehouses (DWH)? Do you need to check whether your data warehouse follows the best practices for a good design? In both cases, this webinar is for you.
A data warehouse is a central relational database that contains all measurements about a business or an organisation. This data comes from a variety of heterogeneous data sources, which includes databases of any type that back the applications used by the company, data files exported by some applications, or APIs provided by internal or external services.
But designing a data warehouse correctly is a hard task, which requires gathering information about the business processes that need to be analysed in the first place. These processes must be translated into so-called star schemas, which means, denormalised databases where each table represents a dimension or facts.
We will discuss these topics:
- How to gather information about a business;
- Understanding dictionaries and how to identify business entities;
- Dimensions and facts;
- Setting a table granularity;
- Types of facts;
- Types of dimensions;
- Snowflakes and how to avoid them;
- Expanding existing dimensions and facts.
GraphRAG for Life Science to increase LLM accuracyTomaz Bratanic
GraphRAG for life science domain, where you retriever information from biomedical knowledge graphs using LLMs to increase the accuracy and performance of generated answers
AI 101: An Introduction to the Basics and Impact of Artificial IntelligenceIndexBug
Imagine a world where machines not only perform tasks but also learn, adapt, and make decisions. This is the promise of Artificial Intelligence (AI), a technology that's not just enhancing our lives but revolutionizing entire industries.
TrustArc Webinar - 2024 Global Privacy SurveyTrustArc
How does your privacy program stack up against your peers? What challenges are privacy teams tackling and prioritizing in 2024?
In the fifth annual Global Privacy Benchmarks Survey, we asked over 1,800 global privacy professionals and business executives to share their perspectives on the current state of privacy inside and outside of their organizations. This year’s report focused on emerging areas of importance for privacy and compliance professionals, including considerations and implications of Artificial Intelligence (AI) technologies, building brand trust, and different approaches for achieving higher privacy competence scores.
See how organizational priorities and strategic approaches to data security and privacy are evolving around the globe.
This webinar will review:
- The top 10 privacy insights from the fifth annual Global Privacy Benchmarks Survey
- The top challenges for privacy leaders, practitioners, and organizations in 2024
- Key themes to consider in developing and maintaining your privacy program
Cosa hanno in comune un mattoncino Lego e la backdoor XZ?Speck&Tech
ABSTRACT: A prima vista, un mattoncino Lego e la backdoor XZ potrebbero avere in comune il fatto di essere entrambi blocchi di costruzione, o dipendenze di progetti creativi e software. La realtà è che un mattoncino Lego e il caso della backdoor XZ hanno molto di più di tutto ciò in comune.
Partecipate alla presentazione per immergervi in una storia di interoperabilità, standard e formati aperti, per poi discutere del ruolo importante che i contributori hanno in una comunità open source sostenibile.
BIO: Sostenitrice del software libero e dei formati standard e aperti. È stata un membro attivo dei progetti Fedora e openSUSE e ha co-fondato l'Associazione LibreItalia dove è stata coinvolta in diversi eventi, migrazioni e formazione relativi a LibreOffice. In precedenza ha lavorato a migrazioni e corsi di formazione su LibreOffice per diverse amministrazioni pubbliche e privati. Da gennaio 2020 lavora in SUSE come Software Release Engineer per Uyuni e SUSE Manager e quando non segue la sua passione per i computer e per Geeko coltiva la sua curiosità per l'astronomia (da cui deriva il suo nickname deneb_alpha).
Unlock the Future of Search with MongoDB Atlas_ Vector Search Unleashed.pdfMalak Abu Hammad
Discover how MongoDB Atlas and vector search technology can revolutionize your application's search capabilities. This comprehensive presentation covers:
* What is Vector Search?
* Importance and benefits of vector search
* Practical use cases across various industries
* Step-by-step implementation guide
* Live demos with code snippets
* Enhancing LLM capabilities with vector search
* Best practices and optimization strategies
Perfect for developers, AI enthusiasts, and tech leaders. Learn how to leverage MongoDB Atlas to deliver highly relevant, context-aware search results, transforming your data retrieval process. Stay ahead in tech innovation and maximize the potential of your applications.
#MongoDB #VectorSearch #AI #SemanticSearch #TechInnovation #DataScience #LLM #MachineLearning #SearchTechnology
Introduction of Cybersecurity with OSS at Code Europe 2024Hiroshi SHIBATA
I develop the Ruby programming language, RubyGems, and Bundler, which are package managers for Ruby. Today, I will introduce how to enhance the security of your application using open-source software (OSS) examples from Ruby and RubyGems.
The first topic is CVE (Common Vulnerabilities and Exposures). I have published CVEs many times. But what exactly is a CVE? I'll provide a basic understanding of CVEs and explain how to detect and handle vulnerabilities in OSS.
Next, let's discuss package managers. Package managers play a critical role in the OSS ecosystem. I'll explain how to manage library dependencies in your application.
I'll share insights into how the Ruby and RubyGems core team works to keep our ecosystem safe. By the end of this talk, you'll have a better understanding of how to safeguard your code.
HCL Notes and Domino License Cost Reduction in the World of DLAUpanagenda
Webinar Recording: https://www.panagenda.com/webinars/hcl-notes-and-domino-license-cost-reduction-in-the-world-of-dlau/
The introduction of DLAU and the CCB & CCX licensing model caused quite a stir in the HCL community. As a Notes and Domino customer, you may have faced challenges with unexpected user counts and license costs. You probably have questions on how this new licensing approach works and how to benefit from it. Most importantly, you likely have budget constraints and want to save money where possible. Don’t worry, we can help with all of this!
We’ll show you how to fix common misconfigurations that cause higher-than-expected user counts, and how to identify accounts which you can deactivate to save money. There are also frequent patterns that can cause unnecessary cost, like using a person document instead of a mail-in for shared mailboxes. We’ll provide examples and solutions for those as well. And naturally we’ll explain the new licensing model.
Join HCL Ambassador Marc Thomas in this webinar with a special guest appearance from Franz Walder. It will give you the tools and know-how to stay on top of what is going on with Domino licensing. You will be able lower your cost through an optimized configuration and keep it low going forward.
These topics will be covered
- Reducing license cost by finding and fixing misconfigurations and superfluous accounts
- How do CCB and CCX licenses really work?
- Understanding the DLAU tool and how to best utilize it
- Tips for common problem areas, like team mailboxes, functional/test users, etc
- Practical examples and best practices to implement right away
Ivanti’s Patch Tuesday breakdown goes beyond patching your applications and brings you the intelligence and guidance needed to prioritize where to focus your attention first. Catch early analysis on our Ivanti blog, then join industry expert Chris Goettl for the Patch Tuesday Webinar Event. There we’ll do a deep dive into each of the bulletins and give guidance on the risks associated with the newly-identified vulnerabilities.
Driving Business Innovation: Latest Generative AI Advancements & Success StorySafe Software
Are you ready to revolutionize how you handle data? Join us for a webinar where we’ll bring you up to speed with the latest advancements in Generative AI technology and discover how leveraging FME with tools from giants like Google Gemini, Amazon, and Microsoft OpenAI can supercharge your workflow efficiency.
During the hour, we’ll take you through:
Guest Speaker Segment with Hannah Barrington: Dive into the world of dynamic real estate marketing with Hannah, the Marketing Manager at Workspace Group. Hear firsthand how their team generates engaging descriptions for thousands of office units by integrating diverse data sources—from PDF floorplans to web pages—using FME transformers, like OpenAIVisionConnector and AnthropicVisionConnector. This use case will show you how GenAI can streamline content creation for marketing across the board.
Ollama Use Case: Learn how Scenario Specialist Dmitri Bagh has utilized Ollama within FME to input data, create custom models, and enhance security protocols. This segment will include demos to illustrate the full capabilities of FME in AI-driven processes.
Custom AI Models: Discover how to leverage FME to build personalized AI models using your data. Whether it’s populating a model with local data for added security or integrating public AI tools, find out how FME facilitates a versatile and secure approach to AI.
We’ll wrap up with a live Q&A session where you can engage with our experts on your specific use cases, and learn more about optimizing your data workflows with AI.
This webinar is ideal for professionals seeking to harness the power of AI within their data management systems while ensuring high levels of customization and security. Whether you're a novice or an expert, gain actionable insights and strategies to elevate your data processes. Join us to see how FME and AI can revolutionize how you work with data!
For the full video of this presentation, please visit: https://www.edge-ai-vision.com/2024/06/building-and-scaling-ai-applications-with-the-nx-ai-manager-a-presentation-from-network-optix/
Robin van Emden, Senior Director of Data Science at Network Optix, presents the “Building and Scaling AI Applications with the Nx AI Manager,” tutorial at the May 2024 Embedded Vision Summit.
In this presentation, van Emden covers the basics of scaling edge AI solutions using the Nx tool kit. He emphasizes the process of developing AI models and deploying them globally. He also showcases the conversion of AI models and the creation of effective edge AI pipelines, with a focus on pre-processing, model conversion, selecting the appropriate inference engine for the target hardware and post-processing.
van Emden shows how Nx can simplify the developer’s life and facilitate a rapid transition from concept to production-ready applications.He provides valuable insights into developing scalable and efficient edge AI solutions, with a strong focus on practical implementation.
In the rapidly evolving landscape of technologies, XML continues to play a vital role in structuring, storing, and transporting data across diverse systems. The recent advancements in artificial intelligence (AI) present new methodologies for enhancing XML development workflows, introducing efficiency, automation, and intelligent capabilities. This presentation will outline the scope and perspective of utilizing AI in XML development. The potential benefits and the possible pitfalls will be highlighted, providing a balanced view of the subject.
We will explore the capabilities of AI in understanding XML markup languages and autonomously creating structured XML content. Additionally, we will examine the capacity of AI to enrich plain text with appropriate XML markup. Practical examples and methodological guidelines will be provided to elucidate how AI can be effectively prompted to interpret and generate accurate XML markup.
Further emphasis will be placed on the role of AI in developing XSLT, or schemas such as XSD and Schematron. We will address the techniques and strategies adopted to create prompts for generating code, explaining code, or refactoring the code, and the results achieved.
The discussion will extend to how AI can be used to transform XML content. In particular, the focus will be on the use of AI XPath extension functions in XSLT, Schematron, Schematron Quick Fixes, or for XML content refactoring.
The presentation aims to deliver a comprehensive overview of AI usage in XML development, providing attendees with the necessary knowledge to make informed decisions. Whether you’re at the early stages of adopting AI or considering integrating it in advanced XML development, this presentation will cover all levels of expertise.
By highlighting the potential advantages and challenges of integrating AI with XML development tools and languages, the presentation seeks to inspire thoughtful conversation around the future of XML development. We’ll not only delve into the technical aspects of AI-powered XML development but also discuss practical implications and possible future directions.
How to Get CNIC Information System with Paksim Ga.pptxdanishmna97
Pakdata Cf is a groundbreaking system designed to streamline and facilitate access to CNIC information. This innovative platform leverages advanced technology to provide users with efficient and secure access to their CNIC details.
Salesforce Integration for Bonterra Impact Management (fka Social Solutions A...Jeffrey Haguewood
Sidekick Solutions uses Bonterra Impact Management (fka Social Solutions Apricot) and automation solutions to integrate data for business workflows.
We believe integration and automation are essential to user experience and the promise of efficient work through technology. Automation is the critical ingredient to realizing that full vision. We develop integration products and services for Bonterra Case Management software to support the deployment of automations for a variety of use cases.
This video focuses on integration of Salesforce with Bonterra Impact Management.
Interested in deploying an integration with Salesforce for Bonterra Impact Management? Contact us at sales@sidekicksolutionsllc.com to discuss next steps.
Salesforce Integration for Bonterra Impact Management (fka Social Solutions A...
En gxm mac_user_guide
1. ENGLISH
Matrox® DualHead2Go™ and TripleHead2Go™
DualHead2Go Digital Edition • DualHead2Go DP Edition • DualHead2Go Digital ME
TripleHead2Go Digital Edition • TripleHead2Go DP Edition • TripleHead2Go Digital SE
User Guide
(Mac® version)
20121-301-0250
2012.10.18
2. Contents
Overview...................................................................................................................4
Hardware supplied....................................................................................................................................4
Optional hardware (sold separately)........................................................................................................6
Software supplied......................................................................................................................................6
Installation overview.................................................................................................................................6
More information .....................................................................................................................................6
Connecting your DualHead2Go Digital Edition product.........................................7
Before you begin .......................................................................................................................................7
Connection overview................................................................................................................................8
Step-by-step connection setup .................................................................................................................8
Connecting your DualHead2Go DP Edition product ............................................11
Before you begin .....................................................................................................................................11
Connection overview..............................................................................................................................12
Step-by-step connection setup ...............................................................................................................12
Connecting your DualHead2Go Digital ME product.............................................15
Before you begin .....................................................................................................................................15
Connection overview..............................................................................................................................16
Step-by-step connection setup ...............................................................................................................16
Connecting your TripleHead2Go Digital Edition product .....................................19
Before you begin .....................................................................................................................................19
Connecting three monitors ....................................................................................................................20
Connecting two monitors ......................................................................................................................23
Connecting your TripleHead2Go DP Edition product...........................................26
Before you begin .....................................................................................................................................26
Connecting three monitors ....................................................................................................................27
Connecting two monitors ......................................................................................................................30
Connecting your TripleHead2Go
Digital SE product ..................................................................................................33
Before you begin .....................................................................................................................................33
Connecting three monitors ....................................................................................................................34
Connecting two monitors ......................................................................................................................37
2 Matrox GXM – User Guide (Mac version)
3. Installing your Matrox PowerDesk software ........................................................ 40
Obtaining Matrox PowerDesk software ................................................................................................40
Installing your Matrox PowerDesk software .........................................................................................40
Starting the Matrox quick setup utility .................................................................................................40
Matrox PowerDesk for Mac .................................................................................. 41
Accessing Matrox PowerDesk software..................................................................................................41
Accessing Matrox PowerDesk help ........................................................................................................41
Quitting Matrox PowerDesk ..................................................................................................................41
About.......................................................................................................................................................41
Configuring PowerDesk for Mac........................................................................... 42
Quick Setup.............................................................................................................................................42
Desktop Management Preferences.........................................................................................................44
EDID Management.................................................................................................................................45
Information and Troubleshooting.........................................................................................................47
Product information............................................................................................... 49
Specifications ..........................................................................................................................................49
Environmental ....................................................................................................................................51
Notes........................................................................................................................................................51
Terms...................................................................................................................... 52
Customer support ................................................................................................. 53
Matrox Web.............................................................................................................................................53
Technical support ...................................................................................................................................53
Driver and software download...............................................................................................................54
View your warranty information...........................................................................................................54
Register your Matrox product................................................................................................................54
Software license agreement ................................................................................. 55
Index ...................................................................................................................... 56
Matrox GXM – User Guide (Mac version) 3
4. Overview
Thank you for purchasing this Matrox GXM product. DualHead2Go and TripleHead2Go products
enable you to connect two to three analog, digital, or DisplayPort™ monitors at a time to your Mac
system.
Hardware supplied*
DualHead2Go Digital Edition
Matrox hardware Matrox input cable
DualHead2Go DP Edition
* The hardware supplied with your Matrox product may vary depending on the SKU or part number of your product. For more
information, contact your Matrox representative.
4 Matrox GXM – User Guide (Mac version)
(HD-15 to HD-15)
USB cable
Matrox hardware Matrox input cable
(DisplayPort to DisplayPort)
USB cable Thunderbolt™/Mini
DisplayPort to DisplayPort
adapter
5. Matrox GXM – User Guide (Mac version) 5
DualHead2Go Digital ME
Matrox hardware Matrox input cable
(Mini DisplayPort to DisplayPort)
TripleHead2Go Digital Edition
TripleHead2Go DP Edition
TripleHead2Go Digital SE
USB cable
Matrox hardware Matrox input cable
(HD-15 to HD-15)
Matrox input cable
(DVI to DVI)
USB cable
Matrox hardware Matrox input cable
(DisplayPort to DisplayPort)
USB cable Thunderbolt/Mini
DisplayPort to DisplayPort
adapter
Matrox hardware Matrox input cable
(DisplayPort to DisplayPort)
USB cable Mini DisplayPort to
DisplayPort cable
6. Optional hardware (sold separately)
Depending on your connection setup, you may also need any of the following hardware:
„ DVI to HD-15 (VGA) adapter
„ Micro-DVI to VGA adapter
„ Mini-DVI to VGA adapter
„ DisplayPort to DVI adapter
For more information on connecting your product, see the “Connection setup” section for your
Matrox product. To purchase any Matrox cables or adapters not included with your Matrox product,
see the Matrox online store (shopmatrox.com). To purchase any optional Apple® cables or adapters,
see your Apple retailer.
Software supplied
„ Matrox PowerDesk – to use your Matrox product. Matrox PowerDesk software supports
Mac OS X®. Matrox makes new software available on the Matrox Technical Support Web
site (www.matrox.com/graphics/en/support/gxm/software).
Installation overview
To install your Matrox product:
1 Connect your product – see the “Connection setup” section for your Matrox product.
2 Install the software – see page 40.
3 Configure your PowerDesk software – see page 42.
More information
We provide additional information in help and Readme files. Be sure to check for any last-minute
release notes included with your product. Also, check the Matrox Web site
(www.matrox.com/graphics/en/support/gxm) for the latest Matrox software, technical support, and
product information.
6 Matrox GXM – User Guide (Mac version)
7. Connecting your DualHead2Go Digital
Edition product
This section describes how to connect two (2) digital (DVI-I) or analog monitors to your Matrox
product.
Note: To purchase any Matrox cables or adapters not included with your product, see the
Matrox online store (shopmatrox.com). To purchase any optional Apple cables or
adapters, see your Apple retailer.
Matrox GXM – User Guide (Mac version) 7
Before you begin
To avoid possible problems that could damage your monitors or prevent you from using your Matrox
product, read the following guidelines before connecting your Matrox product.
„ Whenever you change your connection setup, make sure you’re using the correct
connectors and that all connectors are properly fastened.
„ Don’t change monitor connections while your computer is turned on. While your
computer is turned on, it may be using monitor settings that are specific to the current
monitor connections. Some devices may be permanently damaged if incorrect settings
are used.
„ To get the most out of your Matrox product, we recommend you use two (2) identical
monitors (that is, monitors that support the same settings such as display resolution and
refresh rate). For information on the settings your monitor supports, see your monitor
documentation.
8. Connection overview
Step-by-step connection setup
1 Turn off computer
Before you connect your Matrox product, make sure you shut down your system and turn off
your computer.
2 Connect the USB cable
Plug one end of the USB cable provided with
your Matrox product into the USB
connector ( ) on your Matrox product.
8 Matrox GXM – User Guide (Mac version)
USB cable
9. Plug the other end of the USB cable into a powered USB port on your computer. For more
information on powered USB ports, see your system manual.
Note: If your computer doesn’t have a powered USB port, you’ll need a separate adapter.
To purchase a Matrox power adapter for your product, see the Matrox online store
(shopmatrox.com).
Matrox GXM – User Guide (Mac version) 9
3 Attach the Matrox input cable
Attach one end of the cable provided with
your Matrox product to the input connector
( ) on your Matrox product.
If the graphics hardware on your computer
has a DVI connector, use a DVI to HD-15
adapter (sold separately) to attach the other
end of your Matrox input cable to your
computer.
If the graphics hardware on your computer
has a mini-DVI connector, use a mini-DVI
to VGA adapter (sold separately). Attach the
other end of your Matrox input cable to your
mini-DVI to VGA adapter, then connect
your adapter to your computer.
Matrox input cable
(HD-15 to HD-15)
DVI to HD-15 adapter
DVI connector
Mini-DVI to VGA adapter
Mini-DVI connector
Note: If your computer has a micro-DVI connector, use a micro-DVI to VGA adapter (sold
separately) instead.
10. 4 Connect the first monitor
If your monitor has a DVI connector, use
your monitor cable to connect your monitor
directly to the first connector ( ) on
your Matrox product.
If your monitor has an HD-15 connector,
use a DVI to HD-15 adapter (sold
separately) to connect your monitor to the
connector.
5 Connect the second monitor
If your monitor has a DVI connector, use
your monitor cable to connect your monitor
directly to the second connector ( ) on
your Matrox product.
If your monitor has an HD-15 connector,
use a DVI to HD-15 adapter (sold
separately) to connect your monitor to the
connector.
Your Matrox product is now connected. Restart your computer and install your Matrox software (see
“Installing your Matrox PowerDesk software”, page 40).
10 Matrox GXM – User Guide (Mac version)
Monitor cable
(DVI)
Monitor cable
(DVI)
11. Connecting your DualHead2Go DP
Edition product
This section describes how to connect two (2) DisplayPort or digital (DVI) monitors to your Matrox
product.
Note: To purchase any Matrox cables or adapters not included with your product, see the
Matrox online store (shopmatrox.com). To purchase any optional Apple cables or
adapters, see your Apple retailer.
Matrox GXM – User Guide (Mac version) 11
WARNING: To avoid damaging the
DisplayPort connector on your DisplayPort
monitor cable or on your Matrox product,
carefully remove the DisplayPort cable by
pressing the latch on the top of the DisplayPort
connector while removing the connector.
Before you begin
To avoid possible problems that could damage your monitors or prevent you from using your Matrox
product, read the following guidelines before connecting your Matrox product.
„ Whenever you change your connection setup, make sure you’re using the correct
connectors and that all connectors are properly fastened.
„ Don’t change monitor connections while your computer is turned on. While your
computer is turned on, it may be using monitor settings that are specific to the current
monitor connections. Some devices may be permanently damaged if incorrect settings
are used.
„ To get the most out of your Matrox product, we recommend you use two (2) identical
monitors (that is, monitors that support the same settings such as display resolution and
refresh rate). For information on the settings your monitor supports, see your monitor
documentation.
12. Connection overview
Step-by-step connection setup
1 Turn off computer
Before you connect your Matrox product, make sure you shut down your system and turn off
your computer.
2 Connect the USB cable
Plug one end of the USB cable provided with
your Matrox product into the USB
connector ( ) on your Matrox product.
Plug the other end of the USB cable into a
powered USB port on your computer. For
more information on powered USB ports,
see your system manual.
12 Matrox GXM – User Guide (Mac version)
USB cable
13. Thunderbolt/Mini
Matrox GXM – User Guide (Mac version) 13
3 Attach the Matrox input cable
Attach one end of the Matrox DisplayPort to
DisplayPort cable provided with your
Matrox product to the DisplayPort input
connector ( ) on your Matrox product.
Attach one end of the Thunderbolt/Mini
DisplayPort to DisplayPort adapter
provided with your Matrox product to the
DisplayPort connector on your Matrox
input cable. Attach the other end to the mini
DisplayPort graphics connector on your
computer.
4 Connect the first monitor
Use your monitor cable to connect your
monitor directly to the first connector ( )
on your Matrox product.
Matrox input cable
(DisplayPort to DisplayPort)
Matrox input cable
(DisplayPort to DisplayPort)
DisplayPort to
DisplayPort adapter
Note: Thunderbolt – If your system has a Thunderbolt connector,
attach the other end of the mini DisplayPort to DisplayPort adapter to
the Thunderbolt connector on your computer instead.
Note: To avoid problems related to image quality, make sure the DisplayPort connection to
your graphics hardware is firmly in place.
Monitor cable
(DisplayPort)
14. If your monitor has a DVI connector, use a
DisplayPort to DVI adapter (sold separately)
to connect your monitor to the connector.
5 Connect the second monitor
Use your monitor cable to connect your
monitor directly to the second connector
( ) on your Matrox product.
If your monitor has a DVI connector, use a
DisplayPort to DVI adapter (sold separately)
to connect your monitor to the connector.
Your Matrox product is now connected. Restart your computer and install your Matrox software (see
“Installing your Matrox PowerDesk software”, page 40).
14 Matrox GXM – User Guide (Mac version)
DisplayPort to DVI
adapter
Monitor cable
(DVI)
Monitor cable
(DisplayPort)
Monitor cable
(DVI)
DisplayPort to DVI
adapter
15. Connecting your DualHead2Go
Digital ME product
This section describes how to connect two (2) digital (DVI-D) monitors to your Matrox product.
Note: To purchase any Matrox cables or adapters not included with your product, see the
Matrox online store (shopmatrox.com). To purchase any optional Apple cables or
adapters, see your Apple retailer.
Matrox GXM – User Guide (Mac version) 15
WARNING: To avoid damaging the
DisplayPort connector on your DisplayPort
monitor cable or on your graphics
hardware, carefully remove the DisplayPort
cable by pressing the latch on the top of the
DisplayPort connector while removing the
connector.
Before you begin
To avoid possible problems that could damage your monitors or prevent you from using your Matrox
product, read the following guidelines before connecting your Matrox product.
„ Whenever you change your connection setup, make sure you’re using the correct
connectors and that all connectors are properly fastened.
„ Don’t change monitor connections while your computer is turned on. While your
computer is turned on, it may be using monitor settings that are specific to the current
monitor connections. Some devices may be permanently damaged if incorrect settings
are used.
„ To get the most out of your Matrox product, we recommend you use two (2) identical
monitors (that is, monitors that support the same settings such as display resolution and
refresh rate). For information on the settings your monitor supports, see your monitor
documentation.
16. Connection overview
Step-by-step connection setup
1 Turn off computer
Before you connect your Matrox product, make sure you shut down your system and turn off
your computer.
2 Connect the USB cable
Plug one end of the USB cable provided with
your Matrox product into the USB
connector ( ) on your Matrox product.
Plug the other end of the USB cable into a
powered USB port on your computer. For
more information on powered USB ports,
see your system manual.
16 Matrox GXM – User Guide (Mac version)
USB cable
17. Matrox GXM – User Guide (Mac version) 17
3 Attach the Matrox input cable
Attach one end of the Matrox mini
DisplayPort to DisplayPort cable provided
with your Matrox product to the
DisplayPort input connector ( ) on your
Matrox product.
Attach the other end to the mini DisplayPort
graphics connector on your computer.
Matrox input cable
(Mini DisplayPort to DisplayPort)
Matrox input cable
(Mini DisplayPort to DisplayPort)
Note: Thunderbolt – If your system has a Thunderbolt connector,
attach the other end of the mini DisplayPort to DisplayPort adapter to
the Thunderbolt connector on your computer instead.
Note: To avoid problems related to image quality, make sure the DisplayPort connection to
your graphics hardware is firmly in place.
18. 4 Connect the first monitor
Connect the DVI connector on your
monitor cable directly to the first connector
( ) on your Matrox product.
5 Connect the second monitor
Connect the DVI connector on your
monitor cable directly to the second
connector ( ) on your Matrox product.
Your Matrox product is now connected. Restart your computer and install your Matrox software (see
“Installing your Matrox PowerDesk software”, page 40).
18 Matrox GXM – User Guide (Mac version)
Monitor cable
(DVI)
Monitor cable
(DVI)
19. Connecting your TripleHead2Go Digital
Edition product
This section describes how to connect up to three (3) digital (DVI-I) or analog monitors to your
Matrox product.
„ To connect three (3) monitors, see “Connecting three monitors”, page 20.
„ To connect two (2) monitors, see “Connecting two monitors”, page 23.
Note: To purchase any Matrox cables or adapters not included with your product, see the
Matrox online store (shopmatrox.com). To purchase any optional Apple cables or
adapters, see your Apple retailer.
Matrox GXM – User Guide (Mac version) 19
Before you begin
To avoid possible problems that could damage your monitors or prevent you from using your Matrox
product, read the following guidelines before connecting your Matrox product.
„ Whenever you change your connection setup, make sure you’re using the correct
connectors and that all connectors are properly fastened.
„ Don’t change monitor connections while your computer is turned on. While your
computer is turned on, it may be using monitor settings that are specific to the current
monitor connections. Some devices may be permanently damaged if incorrect settings
are used.
„ To get the most out of your Matrox product, we recommend you use three (3) identical
monitors (that is, monitors that support the same settings such as display resolution and
refresh rate). For information on the settings your monitor supports, see your monitor
documentation.
„ While using the DVI input connector on your Matrox product, the highest display
resolutions are available only with graphics hardware that supports dual-link DVI. For
information on the capabilities of your graphics hardware, see its documentation.
20. Connecting three monitors
Connection overview
Step-by-step connection setup
1 Turn off computer
Before you connect your Matrox product, make sure you shut down your system and turn off
your computer.
2 Connect the USB cable
Plug one end of the USB cable provided with
your Matrox product into the USB
connector ( ) on your Matrox product.
20 Matrox GXM – User Guide (Mac version)
USB cable
21. Plug the other end of the USB cable into a powered USB port on your computer. For more
information on powered USB ports, see your system manual.
Note: If your computer doesn’t have a powered USB port, you’ll need a separate adapter.
To purchase a Matrox power adapter for your product, see the Matrox online store
(shopmatrox.com).
Matrox GXM – User Guide (Mac version) 21
3 Attach the Matrox input cable
If your graphics hardware has a DVI
connector, attach one end of the Matrox
DVI to DVI cable provided with your
Matrox product to the graphics connector
on your computer. Attach the other end of
the cable to the DVI input connector ( )
on your Matrox product.
If your graphics hardware has a mini-DVI
connector, use a mini-DVI to VGA adapter
(sold separately) to connect your Matrox
product to the graphics connector on your
computer.
Attach one end of the HD-15 to HD-15
cable provided with your Matrox product to
the input connector ( ) on your Matrox
product.
Attach the other end of the cable to your
mini-DVI to VGA adapter, then connect the
other end of the adapter to the graphics
connector on your computer.
Matrox input cable
(DVI to DVI)
Matrox input cable
(HD-15 to HD-15)
Mini-DVI to VGA adapter
Mini-DVI connector
Note: Using a mini-DVI to DVI adapter to connect your Matrox product to your computer
only provides a limited number of display modes.
22. 4 Connect the first monitor
If your monitor has a DVI connector, use
your monitor cable to connect your first
monitor directly to the first connector
( ) on your Matrox product.
If your monitor has an HD-15 connector,
use a DVI to HD-15 adapter (sold
separately) to connect your monitor to the
connector.
5 Connect the second monitor
If your monitor has a DVI connector, use
your monitor cable to connect your second
monitor directly to the second connector
( ) on your Matrox product.
If your monitor has an HD-15 connector,
use a DVI to HD-15 adapter (sold
separately) to connect your monitor to the
connector.
6 Connect the third monitor
If your monitor has a DVI connector, use
your monitor cable to connect your third
monitor directly to the third connector
( ) on your Matrox product.
If your monitor has an HD-15 connector,
use a DVI to HD-15 adapter (sold
separately) to connect your monitor to the
connector.
Your Matrox product is now connected. Restart your computer and install your Matrox software (see
“Installing your Matrox PowerDesk software”, page 40).
22 Matrox GXM – User Guide (Mac version)
Monitor cable
(DVI)
Monitor cable
(DVI)
Monitor cable
(DVI)
23. Matrox GXM – User Guide (Mac version) 23
Connecting two monitors
Connection overview
Step-by-step connection setup
1 Turn off computer
Before you connect your Matrox product, make sure you shut down your system and turn off
your computer.
2 Connect the USB cable
Plug one end of the USB cable provided with
your Matrox product into the USB
connector ( ) on your Matrox product.
Plug the other end of the USB cable into a
powered USB port on your computer. For
more information on powered USB ports,
see your system manual.
USB cable
24. Note: If your computer doesn’t have a powered USB port, you’ll need a separate adapter.
To purchase a Matrox power adapter for your product, see the Matrox online store
(shopmatrox.com).
3 Attach the Matrox input cable
If your graphics hardware has a DVI
connector, attach one end of the Matrox
DVI to DVI cable provided with your
Matrox product to the graphics connector
on your computer. Attach the other end of
the cable to the DVI input connector ( )
on your Matrox product.
If your graphics hardware has a mini-DVI
connector, use a mini-DVI to VGA adapter
(sold separately) to connect your Matrox
product to the graphics connector on your
computer.
Attach one end of the HD-15 to HD-15
cable provided with your Matrox product to
the input connector ( ) on your Matrox
product.
Attach the other end of the cable to your
mini-DVI to VGA adapter, then connect the
other end of the adapter to the graphics
connector on your computer.
24 Matrox GXM – User Guide (Mac version)
Matrox input cable
(DVI to DVI)
Matrox input cable
(HD-15 to HD-15)
Mini-DVI to VGA adapter
Note: Using a mini-DVI to DVI adapter to connect your Matrox product to your computer
only provides a limited number of display modes.
25. Monitor cable
(DVI)
Monitor cable
(DVI)
Matrox GXM – User Guide (Mac version) 25
4 Connect the first monitor
If your monitor has a DVI connector, use
your monitor cable to connect your first
monitor directly to the first connector
( ) on your Matrox product.
If your monitor has an HD-15 connector,
use a DVI to HD-15 adapter (sold
separately) to connect your monitor to the
connector.
5 Connect the second monitor
If your monitor has a DVI connector, use
your monitor cable to connect your second
monitor directly to the third connector
( ) on your Matrox product.
If your monitor has an HD-15 connector,
use a DVI to HD-15 adapter (sold
separately) to connect your monitor to the
connector.
Your Matrox product is now connected. Restart your computer and install your Matrox software (see
“Installing your Matrox PowerDesk software”, page 40).
26. Connecting your TripleHead2Go DP
Edition product
This section describes how to connect up to three (3) DisplayPort or digital (DVI) monitors to your
Matrox product.
„ To connect three (3) monitors, see “Connecting three monitors”, page 27.
„ To connect two (2) monitors, see “Connecting two monitors”, page 30.
WARNING: To avoid damaging the
DisplayPort connector on your DisplayPort
monitor cable or on your Matrox product,
carefully remove the DisplayPort cable by
pressing the latch on the top of the DisplayPort
connector while removing the connector.
Note: To purchase any Matrox cables or adapters not included with your product, see the
Matrox online store (shopmatrox.com). To purchase any optional Apple cables or
adapters, see your Apple retailer.
Before you begin
To avoid possible problems that could damage your monitors or prevent you from using your Matrox
product, read the following guidelines before connecting your Matrox product.
„ Whenever you change your connection setup, make sure you’re using the correct
connectors and that all connectors are properly fastened.
„ Don’t change monitor connections while your computer is turned on. While your
computer is turned on, it may be using monitor settings that are specific to the current
monitor connections. Some devices may be permanently damaged if incorrect settings
are used.
„ To get the most out of your Matrox product, we recommend you use three (3) identical
monitors (that is, monitors that support the same settings such as display resolution and
refresh rate). For information on the settings your monitor supports, see your monitor
documentation.
26 Matrox GXM – User Guide (Mac version)
27. Matrox GXM – User Guide (Mac version) 27
Connecting three monitors
Connection overview
Step-by-step connection setup
1 Turn off computer
Before you connect your Matrox product, make sure you shut down your system and turn off
your computer.
2 Connect the USB cable
Plug one end of the USB cable provided with
your Matrox product into the USB
connector ( ) on your Matrox product.
Plug the other end of the USB cable into a
powered USB port on your computer. For
more information on powered USB ports,
see your system manual.
USB cable
28. 3 Attach the Matrox input cable
Attach one end of the Matrox DisplayPort to
DisplayPort cable provided with your
Matrox product to the DisplayPort input
connector ( ) on your Matrox product.
Attach one end of the Thunderbolt/Mini
DisplayPort to DisplayPort adapter
provided with your Matrox product to the
DisplayPort connector on your Matrox
input cable. Attach the other end to the mini
DisplayPort graphics connector on your
computer.
4 Connect the first monitor
Use your monitor cable to connect your first
monitor directly to the first connector ( )
on your Matrox product.
28 Matrox GXM – User Guide (Mac version)
Matrox input cable
(DisplayPort to DisplayPort)
Thunderbolt/Mini
DisplayPort to DisplayPort
Matrox input cable
(DisplayPort to DisplayPort)
adapter
Note: Thunderbolt – If your system has a Thunderbolt connector, attach
the other end of the mini DisplayPort to DisplayPort to adapter the
Thunderbolt connector on your computer instead.
Note: To avoid problems related to image quality, make sure the DisplayPort connection to
your graphics hardware is firmly in place.
Monitor cable
(DisplayPort)
29. DisplayPort to DVI
Matrox GXM – User Guide (Mac version) 29
If your monitor has a DVI connector, use a
DisplayPort to DVI adapter (sold separately)
to connect your monitor to the connector.
5 Connect the second monitor
Use your monitor cable to connect your
second monitor directly to the second
connector ( ) on your Matrox product.
If your monitor has a DVI connector, use a
DisplayPort to DVI adapter (sold separately)
to connect your monitor to the connector.
6 Connect the third monitor
Use your monitor cable to connect your
third monitor directly to the third connector
( ) on your Matrox product.
Monitor cable
(DVI)
DisplayPort to DVI
adapter
Monitor cable
(DisplayPort)
Monitor cable
(DVI)
adapter
Monitor cable
(DisplayPort)
30. If your monitor has a DVI connector, use a
DisplayPort to DVI adapter (sold
separately) to connect your monitor to the
connector.
Your Matrox product is now connected. Restart your computer and install your Matrox software (see
“Installing your Matrox PowerDesk software”, page 40).
Connecting two monitors
Connection overview
Step-by-step connection setup
1 Turn off computer
Before you connect your Matrox product, make sure you shut down your system and turn off
your computer.
30 Matrox GXM – User Guide (Mac version)
Monitor cable
(DVI)
DisplayPort to DVI
adapter
31. Thunderbolt/Mini
DisplayPort to DisplayPort
Matrox GXM – User Guide (Mac version) 31
2 Connect the USB cable
Plug one end of the USB cable provided with
your Matrox product into the USB
connector ( ) on your Matrox product.
Plug the other end of the USB cable into a
powered USB port on your computer. For
more information on powered USB ports,
see your system manual.
3 Attach the Matrox input cable
Attach one end of the Matrox DisplayPort to
DisplayPort cable provided with your
Matrox product to the DisplayPort input
connector ( ) on your Matrox product.
Attach one end of the Thunderbolt/Mini
DisplayPort to DisplayPort adapter
provided with your Matrox product to the
DisplayPort connector on your Matrox
input cable. Attach the other end to the mini
DisplayPort graphics connector on your
computer.
USB cable
Matrox input cable
(DisplayPort to DisplayPort)
Matrox input cable
(DisplayPort to DisplayPort)
adapter
Note: Thunderbolt – If your system has a Thunderbolt connector, attach
the other end of the mini DisplayPort to DisplayPort adapter to the
Thunderbolt connector on your computer instead.
Note: To avoid problems related to image quality, make sure the DisplayPort connection to
your graphics hardware is firmly in place.
32. 4 Connect the first monitor
Use your monitor cable to connect your first
monitor directly to the first connector ( )
on your Matrox product.
If your monitor has a DVI connector, use a
DisplayPort to DVI adapter (sold separately)
to connect your monitor to the connector.
5 Connect the second monitor
Use your monitor cable to connect your
second monitor directly to the third
connector ( ) on your Matrox product.
If your monitor has a DVI connector, use a
DisplayPort to DVI adapter (sold separately)
to connect your monitor to the connector.
Your Matrox product is now connected. Restart your computer and install your Matrox software (see
“Installing your Matrox PowerDesk software”, page 40).
32 Matrox GXM – User Guide (Mac version)
Monitor cable
(DisplayPort)
Monitor cable
(DVI)
DisplayPort to DVI
adapter
Monitor cable
(DisplayPort)
Monitor cable
(DVI)
DisplayPort to DVI
adapter
33. Connecting your TripleHead2Go Digital
SE product
This section describes how to connect up to three digital (DVI-D) monitors to your Matrox product.
„ To connect three monitors, see “Connecting three monitors”, page 34.
„ To connect two monitors, see “Connecting two monitors”, page 37.
Note: To purchase any Matrox cables or adapters not included with your product, see the
Matrox online store (shopmatrox.com).
Matrox GXM – User Guide (Mac version) 33
WARNING: To avoid damaging the
DisplayPort connector on your DisplayPort
monitor cable or on your Matrox product,
carefully remove the DisplayPort cable by
pressing the latch on the top of the DisplayPort
connector while removing the connector.
Before you begin
To avoid possible problems that could damage your monitors or prevent you from using your Matrox
product, read the following guidelines before connecting your Matrox product.
„ Whenever you change your connection setup, make sure you’re using the correct
connectors and that all connectors are properly fastened.
„ Don’t change monitor connections while your computer is turned on. While your
computer is turned on, it may be using monitor settings that are specific to the current
monitor connections. Some devices may be permanently damaged if incorrect settings
are used.
„ To get the most out of your Matrox product, we recommend you use two identical
monitors (that is, monitors that support the same settings such as display resolution and
refresh rate). For information on the settings your monitor supports, see your monitor
documentation.
34. Connecting three monitors
Connection overview
Step-by-step connection setup
WARNING: To avoid damaging the
DisplayPort connector on your DisplayPort
monitor cable or on your graphics
hardware, carefully remove the DisplayPort
cable by pressing the latch on the top of the
DisplayPort connector while removing the
connector.
1 Turn off computer
Before you connect your Matrox product, make sure you shut down your system and turn off
your computer.
34 Matrox GXM – User Guide (Mac version)
35. Matrox GXM – User Guide (Mac version) 35
2 Connect the USB cable
Plug one end of the USB cable provided with
your Matrox product into the USB
connector ( ) on your Matrox product.
Plug the other end of the USB cable into a
powered USB port on your computer. For
more information on powered USB ports,
see your system manual.
3 Attach the Matrox input cable
Attach one end of the Matrox mini
DisplayPort to DisplayPort cable provided
with your Matrox product to the
DisplayPort input connector ( ) on your
Matrox product.
Attach the other end to the mini DisplayPort
graphics connector on your computer.
USB cable
Matrox input cable
(Mini DisplayPort to DisplayPort)
Matrox input cable
(Mini DisplayPort to DisplayPort)
Note: To avoid problems related to image quality, make sure the DisplayPort connection to
your graphics hardware is firmly in place.
36. 4 Connect the first monitor
Connect the DVI connector on your
monitor cable directly to the first connector
( ) on your Matrox product.
5 Connect the second monitor
Connect the DVI connector on your
monitor cable directly to the second
connector ( ) on your Matrox product.
6 Connect the third monitor
Connect the DVI connector on your
monitor cable directly to the third connector
( ) on your Matrox product.
Your Matrox product is now connected. Restart your computer and install your Matrox software (see
“Installing your Matrox PowerDesk software”, page 40).
36 Matrox GXM – User Guide (Mac version)
Monitor cable
(DVI)
Monitor cable
(DVI)
Monitor cable (DVI)
37. Matrox GXM – User Guide (Mac version) 37
Connecting two monitors
Connection overview
Step-by-step connection setup
WARNING: To avoid damaging the
DisplayPort connector on your DisplayPort
monitor cable or on your graphics
hardware, carefully remove the DisplayPort
cable by pressing the latch on the top of the
DisplayPort connector while removing the
connector.
1 Turn off computer
Before you connect your Matrox product, make sure you shut down your system and turn off
your computer.
38. 2 Connect the USB cable
Plug one end of the USB cable provided with
your Matrox product into the USB
connector ( ) on your Matrox product.
Plug the other end of the USB cable into a
powered USB port on your computer. For
more information on powered USB ports,
see your system manual.
3 Attach the Matrox input cable
Attach one end of the Matrox mini
DisplayPort to DisplayPort cable provided
with your Matrox product to the
DisplayPort input connector ( ) on your
Matrox product.
Attach the other end to the mini DisplayPort
graphics connector on your computer.
38 Matrox GXM – User Guide (Mac version)
USB cable
Matrox input cable
(DisplayPort to DisplayPort)
Matrox input cable
(Mini DisplayPort to DisplayPort)
Note: To avoid problems related to image quality, make sure the DisplayPort connection to
your graphics hardware is firmly in place.
39. Monitor cable
(DVI)
Monitor cable
(DVI)
Matrox GXM – User Guide (Mac version) 39
4 Connect the first monitor
Connect the DVI connector on your
monitor cable directly to the first connector
( ) on your Matrox product.
5 Connect the second monitor
Connect the DVI connector on your
monitor cable directly to the second
connector ( ) on your Matrox product.
Your Matrox product is now connected. Restart your computer and install your Matrox software (see
“Installing your Matrox PowerDesk software”, page 40).
40. Installing your Matrox PowerDesk
software
This section describes how to install Matrox software for Mac OS X®.
Obtaining Matrox PowerDesk software
Matrox makes the latest software available on the Matrox Technical Support Web site
(www.matrox.com/graphics/en/support/gxm/software).
Installing your Matrox PowerDesk software
To install Matrox PowerDesk software for Mac:
1 Download the Matrox_PowerDesk.dmg file, then double-click its icon to unpack the
software.
2 Browse to the Matrox PowerDesk folder, then double-click the .pkg file to start the
installation.
3 Follow the on-screen instructions.
Starting the Matrox quick setup utility
Matrox provides an easy way for you to set up and configure your Matrox product. The quick setup
utility starts automatically after you install your PowerDesk software.
Your Matrox PowerDesk software is now installed. To access PowerDesk features and controls, see
“Matrox PowerDesk for Mac”, page 41.
40 Matrox GXM – User Guide (Mac version)
41. Matrox PowerDesk for Mac
Matrox PowerDesk software helps you get the most out of your Matrox
product. Use Matrox PowerDesk software to change certain display
settings or access Matrox features.
Accessing Matrox PowerDesk software
To access PowerDesk features and controls, click Matrox PowerDesk on your toolbar.
Matrox GXM – User Guide (Mac version) 41
Accessing Matrox PowerDesk help
Get help information for your Matrox graphics hardware and software. To access Matrox PowerDesk
help, click Matrox PowerDesk Help on your toolbar.
Quitting Matrox PowerDesk
To close Matrox PowerDesk software, choose Quit Matrox PowerDesk on your toolbar.
About
Get information on your Matrox PowerDesk software version and Matrox GXM product. If you have
an Internet connection, you can click the buttons to open the Matrox GXM Web pages.
For information on configuring PowerDesk features and controls, see “Configuring PowerDesk for
Mac”, page 35.
42. Configuring PowerDesk for Mac
Use Matrox PowerDesk software to change certain display settings or access Matrox features. For
information on a specific PowerDesk feature or control, choose one of the following:
„ Quick Setup – Use this option to quickly set up, check the connections, and change the
display settings of your Matrox DualHead2Go or TripleHead2Go product.
„ Desktop Management Preferences – Use desktop management features to control how
and where your windows appear on your desktop.
„ EDID Management – Use this option to edit your display modes, choose the number of
displays you want to use, and change the aspect ratio of your displays.
„ Information and Troubleshooting – View information and get help for your
DualHead2Go or TripleHead2Go product.
Quick Setup
Helps you quickly set up, check the connections, and change the display settings of your Matrox
DualHead2Go or TripleHead2Go product.
Connection setup
Provides information on the connection status of your Matrox DualHead2Go or TripleHead2Go
product.
To check your connection setup, click Detect. You
can view your setup in the Preview area. If a monitor
isn’t detected (for example, if your monitor wasn’t
properly connected), that monitor will be identified
with a question mark.
To fix this, follow the instructions provided in the
Connection Setup section.
Display Settings
Use this option to quickly change your current display setting or to choose a new one.
To use multiple displays, you need to choose a stretched mode resolution. In stretched mode, your
desktop spans across all your monitors to increase your screen real estate. For example, if you choose
2 * 800×600 60 Hz, you’ll be using two displays (DualHead), each with a resolution of 800 × 600 and
a refresh rate of 60 Hz.
42 Matrox GXM – User Guide (Mac version)
43. Note: Depending on the system you’re using, this option may not be available.
Matrox GXM – User Guide (Mac version) 43
You can choose one of the following options:
„ Use the recommended display setting – PowerDesk automatically selects the best
possible display setting based on your setup.
„ Use a selected display setting – You manually select the display setting you want to use.
When you’re done, click Apply for your changes to take effect. When you apply your change, you may
be prompted to confirm your new display setting. If you’re prompted, click Confirm to accept your
new display setting or Revert to revert to your previous display setting. If you don’t respond to the
on-screen prompt within 15 seconds, your display will return to its previous setting.
Location of menu bar and external displays
You can use this to customize where you want to locate your menu bar and how you want your
multi-display setup to appear. For example, if you want your menu bar to appear on your notebook
and your external displays to be to the right of your notebook, choose On notebook display and To
the right of the notebook display.
Your multi-display setup would look like this:
You can also view your setup in the Preview area.
44. After choosing your new settings, click Apply for your changes to take effect. When you apply your
changes, you’ll be prompted to confirm your new display setting. Click Confirm to accept your new
display setting or Revert to revert to your previous display setting. If you don’t respond to the
on-screen prompt within 15 seconds, your display will return to its previous setting.
Desktop Management Preferences
Use desktop management features to control how and where your windows appear on your desktop.
You can also define keyboard shortcuts to quickly move your active windows.
Enable swap active window keyboard shortcut
Use this to quickly move an active window from one display to another and resize it to fit the entire
display.
„ To assign a keyboard
shortcut to this feature,
enable the Enable swap
active window keyboard
shortcut check box, and
choose one or more of the
modifier keys listed
(Option, Control, or Shift).
„ To move your window to another display press the Command key, the modifier key(s)
you selected, and a display number. This also resizes the window to fit the entire display.
„ To remove the keyboard shortcut, clear the Enable swap active window keyboard
shortcut check box.
Dock Position
Use this to change the position of the Dock.
„ Start places the Dock
on the bottom left of
your display.
„ Middle places the Dock on the bottom middle of your display.
„ End places the Dock on the bottom right of your display.
44 Matrox GXM – User Guide (Mac version)
45. Matrox GXM – User Guide (Mac version) 45
Desktop Divider
Matrox Desktop Divider helps you get the most out of your desktop space by enabling you to divide
your display.
To get started, select a display next to For display.
To identify the cells on your desktop, click Identify Displays.
„ Use default settings – Select this to use the default number of cells for your display. The
Use default settings option is enabled by default.
„ Use custom settings – Select this to manually set how your desktop is divided into cells
of equal size. Select a display, then enter how many cells you want wide and how many
you want high. For example, choosing a 3 × 3 configuration will divide your 1 desktop
into 9 cells of equal size.
EDID Management
Use this option to edit your display modes, choose the number of displays you want to use, and
change the aspect ratio of your displays.
Edit Resolution List
Your Matrox DualHead2Go or TripleHead2Go product has four (4) predefined “active” resolutions.
You can use these predefined resolutions, or you can change them by choosing from among your
product’s “supported” resolutions. Your DualHead2Go or TripleHead2Go product can provide
fouractive resolutions at a time.
Note: If you’re using a fixed sync monitor with your Matrox DualHead2Go or TripleHead2Go
product (for example, an Apple Cinema Display), editing the resolution list isn’t supported.
46. To edit your display modes:
1 Remove any display modes you don’t need. In the Active Resolutions and Refresh Rates
list, choose a display mode, then click the (<-) button to remove it from the list. Repeat
this step for each display mode you want to remove from this list.
2 Add the display modes you want to use. In the Supported Resolutions and Refresh
Rates list, choose a display mode, then click the (->) button to add this mode to the list
of active display modes. Additional resolutions are available by clicking in the Supported
Resolutions and Refresh Rates list or by choosing a different aspect ratio (standard or
wide). Repeat this step for each display mode you want to add to this list.
Note: To quickly edit your display modes, enable the Configure Based on Attached
Displays option (depending on your product, you may need to click the Configure
Based on Attached Displays button instead). This automatically populates the active
resolution list with the best possible modes supported by the monitors currently
connected to your GXM product. Depending on your monitors, up to four modes at a
time will be listed.
3 Click Apply Changes to update your DualHead2Go or TripleHead2Go product with the
new display mode list. Your displays go blank for a few seconds while your DualHead2Go
or TripleHead2Go product is being updated.
46 Matrox GXM – User Guide (Mac version)
47. To undo your last change, click Undo Changes.
4 Choose a new display mode. Click Matrox PowerDesk on the toolbar, then choose
Change Display Setting. You can change your current display setting by choosing a new
one from the list and clicking Apply.
Note: If you edited your display modes using the GXM Control Panel, make sure your
new resolutions appear in the Change Display Setting dialog box. If your new
resolutions don’t appear, restart your computer, then re-open the Change Display
Setting dialog box.
Matrox GXM – User Guide (Mac version) 47
Information and Troubleshooting
Get help and troubleshooting information for your Matrox graphics hardware and software.
Product Information
Provides information on your Matrox GXM product, Matrox software versions, and hardware status.
This information is helpful when troubleshooting problems.
System Information
Provides your system information (such as your OS version, system model, and graphics chipset).
This information is helpful when troubleshooting problems.
Connections
„ Detect – Detects the number of monitors currently connected to your product.
„ Open Quick Setup – Helps you quickly set up your Matrox DualHead or TripleHead2Go
product.
Product Update
„ Reset to Manufacturer Settings – Restores the list of display modes to the manufacturer
default settings.
„ Update Firmware – Downloads and installs the latest firmware for your Matrox
DualHead or TripleHead2Go product.
„ Uninstall PowerDesk – Removes Matrox PowerDesk software from your system.
48. Image Quality
„ Adjust – Adjusts the image quality of your displays. Your displays go blank for a few
seconds while the image quality is being adjusted. This feature is available only while
using the VGA (HD-15) input connector on your Matrox DualHead2Go or
TripleHead2Go product.
48 Matrox GXM – User Guide (Mac version)
49. 3840 × 1200 @ 60 Hz
3360 × 1050 @ 60 Hz
2880 × 900 @ 60 Hz
2560 × 1024 @ 60 Hz
3840 × 1200 @ 60 Hz
3360 × 1050 @ 60 Hz
2880 × 900 @ 60 Hz
2560 × 1024 @ 60 Hz
Input connectors 1× HD-15 1× DisplayPort 1× DisplayPort
Output connectors 2× DVI-I 2× DisplayPort 2× DVI-D
Analog (VGA)
monitor support 9†
— —
Digital (DVI) monitor
support 9 9† 9
DisplayPort monitor
support — 9 —
Clone mode support — 9 9
HDCP compliant — — 9
Power supply USB USB and DisplayPort USB
3.5" × 3.54" × 1.1"
(8.9 cm × 9 cm × 2.8 cm)
3.85" × 2.5" × 1.1"
(9.78 cm × 6.35 cm × 2.8 cm)
Matrox GXM – User Guide (Mac version) 49
Product information
Specifications
DualHead2Go
DualHead2Go
Digital Edition
DualHead2Go
DP Edition
DualHead2Go
Digital ME
Supported operating
systems Mac OS X 10.5 and later
Supported
resolutions*
3840 × 1200 @ 58Hz
3200 × 1200 @ 60 Hz
2560 × 1024 @ 60 Hz
2048 × 768 @ 60 Hz
Dimensions 4.4" × 5.5" × 1.1"
(11.3 cm × 14 cm × 2.8 cm)
* Your Matrox product ships with four default display modes. Additional display modes are available through Matrox PowerDesk
software. For more information, see “Edit Resolution List”, page 46.
† Requires adapter (sold separately). To purchase an adapter for your Matrox product, see the Matrox online store
(shopmatrox.com).
50. TripleHead2Go
TripleHead2Go
Digital Edition
3840 × 1024† @ 60 Hz
3072 × 768 @ 60 Hz
2400 × 600 @ 60 Hz
1920 × 480 @ 60 Hz
Digital (DVI) monitor
support 9 9‡ 9
DisplayPort monitor
support — 9 —
Clone mode support — 9 9
HDCP compliant — — 9
Power supply USB USB and DisplayPort USB
Dimensions 4.4" × 5.5" × 1.1"
(11.3 cm × 14 cm × 2.8 cm)
50 Matrox GXM – User Guide (Mac version)
TripleHead2Go
DP Edition
TripleHead2Go
Digital SE
Supported operating
systems Mac OS X 10.5 and later
Supported
resolutions*
4080 × 768 @ 60 Hz
3840 × 1024 @ 60 Hz
3072 × 768 @ 60 Hz
2400 × 600 @ 60 Hz
— —
3.5" × 3.54" × 1.1"
(8.9 cm × 9 cm × 2.8 cm)
5.25" × 2.5" × 1.1"
(13.34 cm × 6.35 cm × 2.8 cm)
* Your Matrox product ships with four default display modes. Additional display modes are available through Matrox PowerDesk
software. For more information, see “Edit Resolution List”, page 46.
† Available only with graphics hardware that supports HD-15 or dual-link DVI connections.
4080 × 768 @ 60 Hz
3840 × 1024 @ 60 Hz
3072 × 768 @ 60 Hz
2400 × 600 @ 60 Hz
Input connectors 1× DVI-DL or 1× HD-15 1× DisplayPort 1× DisplayPort
Output connectors 3× DVI-I 3× DisplayPort 3× DVI-D
Analog (VGA)
monitor support 9‡
‡ Requires adapter (sold separately). To purchase an adapter for your Matrox product, see the Matrox online store
(shopmatrox.com).
51. 5 to 45 ºC (41 to 113 ºF)
(near box ambient)
Temperature, non-operational
storage and transportation -40 to 70 ºC (-40 to 158 ºF)
Humidity, operational (indoor) 20 to 80% (non-condensing)
Humidity, non-operational storage
and transportation 5 to 95% (non-condensing)
Atmospheric pressure, operational 650hPa (3,580 meters / 11,745 feet)
to 1013hPa (0 meters / 0 feet)
192hPa (12,000 meters / 39,370 feet)
to 1020hPa (-50 meters / -164 feet)
Matrox GXM – User Guide (Mac version) 51
Environmental
Temperature, operational
Atmospheric pressure,
non-operational and transportation
Notes
„ For the latest information on your Matrox DualHead2Go or TripleHead2Go product,
see the Matrox Web site (www.matrox.com/graphics/gxm).
„ While using certain graphics hardware and software, certain limitations may apply. To
view a list of compatible systems and supported resolutions, use the GXM System
Compatibility Wizard (www.matrox.com/graphics/en/support/compatibility).
„ The resolutions and refresh rates available depend on your monitor and software
monitor settings. For more information on the capabilities of your monitor, see your
monitor documentation.
„ DualHead2Go Digital ME and TripleHead2Go Digital SE – In clone mode, your Matrox
product supports a maximum display resolution of 1920 × 1200.
„ While an unsupported display mode is selected, your displays may be unavailable.
52. Terms
The following are definitions for key terms used in this guide.
Aspect ratio
The aspect ratio of a monitor describes the ratio of the monitor’s width to its height. For example, a
standard monitor has an aspect ratio of 4:3. This means the image is 4 units wide for every 3 units of
height. A wide-screen monitor, however, has an aspect ratio of 16:9. This means the image is 16 units
wide for every 9 units of height. A wide-screen monitor is wider than a standard monitor.
Color palette
The number of simultaneous colors the software can show. This number is based on the number of
bits used to store the color information for each pixel. The higher the number of bits, the more
simultaneous colors the software can show.
Display mode
The combination of a resolution and refresh rate. For example, a 1280 × 1024 60 Hz display mode is
1280 pixels wide by 1024 pixels high and uses a refresh rate of 60 Hz.
GXM (Graphics Expansion Module)
DualHead2Go and TripleHead2Go are external multi-monitor adapters that let you connect two or
three monitors to your laptop or desktop computer.
Refresh rate
This usually refers to the vertical refresh rate. The “vertical refresh rate” is the number of times that a
screen is updated in a second. This is measured in cycles per second (Hertz). A higher vertical refresh
rate may result in less noticeable flicker in your display, but also requires more bandwidth from your
graphics hardware.
Resolution
The number of horizontal by vertical pixels shown on your display. For example, a 640 × 480
resolution is 640 pixels wide by 480 pixels high. Higher resolutions can show more detail or
information.
52 Matrox GXM – User Guide (Mac version)
53. Matrox GXM – User Guide (Mac version) 53
Customer support
Matrox Web
Our Web site has product literature, press releases, technical material, a sales office list, trade show
information, and other relevant material. Visit the Matrox Graphics Web site at
www.matrox.com/graphics.
Technical support
Matrox values your business and offers professional support for your Matrox product.
If your product was purchased through a Matrox dealer, contact your dealer for product support. This
is the quickest and most effective method of technical assistance. Your dealer is familiar with your
complete system.
If your product was purchased through Matrox, contact your Matrox representative or visit our
technical support Web site at www.matrox.com/graphics/support.
Information we need
Please give a complete description of the problem, and include:
„ Matrox card serial number, model number, revision number, BIOS number, driver type
and version, and memory address at which the Matrox card is installed.
„ Computer brand and model name.
„ Monitor brand and model name.
„ Operating system, version, and service pack.
„ Brand and model of any other cards and devices installed on your system.
Program specific problems
If a problem appears with a specific program, please give us the following information:
„ Display settings (color palette, display resolution, and so on) applied when the problem
occurs.
„ If possible, take note of the file and segment address that caused the problem.
„ Detailed steps known to cause the bug, so we can reproduce it.
54. Driver and software download
A more recent display driver may support more features and may offer increased capabilities (such as
higher display resolutions). Matrox makes the latest display drivers, software, and system utilities
available on the Matrox Technical Support Web site (www.matrox.com/graphics/en/support/drivers).
View your warranty information
Matrox makes warranty information available on the Matrox site
(www.matrox.com/graphics/en/about/warranty).
Register your Matrox product
Please register online (www.matrox.com/graphics/en/registration) to be eligible for customer
support, new product announcements, and information on special offers and upcoming events.
54 Matrox GXM – User Guide (Mac version)
55. Software license agreement
Single User Products This Matrox software (the “Software”) is copyrighted by Matrox Graphics Inc. All rights are
reserved. The purchaser is granted a license to use the software only, subject to the following restrictions and limitations:
1. The license is for the original purchaser only, and is not transferable without written permission of Matrox.
2. The original purchaser may use the Software on a single computer owned or leased by the original purchaser. You
may not use the Software on more than a single computer, even if you own or lease more than one computer, without
written consent of Matrox.
3. The original purchaser may make back-up copies of the Software for his or her own use only, subject to the use
Matrox GXM – User Guide (Mac version) 55
limitations of this license.
4. The original purchaser may not engage in, nor permit third parties to engage in, any of the following:
• Providing or disclosing the Software to third parties.
• Providing use of the Software in a computer service business, network, time-sharing, multiple CPU or multi-user
arrangement to users who are not individually licensed by Matrox.
• Making alterations or copies of any kind in the Software (except as specifically permitted above).
• Attempting to unassemble, de-compile or reverse engineer the Software in any way.
• Granting sublicenses, leases, or other rights in the Software to others.
• Making copies, or verbal or media translations, of the user’s guide.
• Making telecommunication data transmissions of the Software.
Matrox reserves the right to terminate this license if there is a violation of its term or default by the Original Purchaser.
Upon termination, for any reason, all copies of the Software must be immediately returned to Matrox, and the Original
Purchaser shall be liable to Matrox for any and all damages suffered as a result of the violation or default.
Limited warranty Matrox warrants to you, for a period of 90 days normal use from your date of purchase, that:
1. The CD/disks on which the software is furnished and the documentation are not defective.
2. The Software is properly recorded upon the CD/disks included.
3. The documentation is substantially complete and contains all the information Matrox deems necessary to use the
software.
4. The Software functions substantially as described in the documentation.
Matrox’s entire liability and your exclusive remedy shall be the replacement of any CD/Disks or documentation not
meeting these warranties, which is returned to Matrox or an authorized dealer, together with a copy of your paid receipt.
The above is the only warranty of any kind, either express or implied, including, but not limited to the implied warranties
of merchantability and fitness for a particular use that is made by Matrox on this Licensed Software. In no event shall
Matrox be liable to you or to any third party for consequential, special, indirect or incidental damages which you may
incur as a result of using the licensed software, including, but not limited to, loss of data, or information of any kind which
you may experience.
56. Index
C
Clone mode 49, 50
Connection setup
Digital SE 33–37
DisplayPort 16, 34, 37
DualHead2Go Digital Edition
7–10
DualHead2Go Digital ME
15–18
DualHead2Go DP Edition
11–14
TripleHead2Go Digital Edition
19–25
TripleHead2Go DP Edition
26–32
Connector
DisplayPort 11, 15, 26, 33,
34, 37, 49, 50
DVI 10, 18, 36, 39, 49, 50
HD-15 10, 49, 50
Thunderbolt 13, 17, 28, 31
Customer support 53–54
D
Digital SE 33–37
DualHead2Go Digital Edition
7–10
DualHead2Go Digital ME
15–18
DualHead2Go DP Edition
11–14
E
Environtmental
Specifications 51
H
Hardware (sold separately) 6
DisplayPort to DVI adapter 6
DVI to VGA adapter 6
Micro-DVI to VGA adapter 6
Mini-DVI to VGA adapter 6
Hardware supplied 4
USB cable 4, 5
HDCP 49, 50
Help file 6, 41
I
Image quality 48
M
Monitor
Connection setup 7–10,
11–14, 15–18, 19–25,
26–32, 33–37
P
Power supply 49, 50
Connection 8, 12, 16, 35, 38
PowerDesk 6, 41
Accessing 41
Change Display Setting 42
Configuring 42–48
Desktop management
preferences 44
Help 41
Installing software 40
Quitting 41
Product information 47, 49–51
Q
Quick setup utility 40
56 Matrox GXM – User Guide (Mac version)
R
Registration 54
Resolution list 45
S
Software
Download 54
Installation 40
Quick setup 40
Specifications 49
Environmental 51
T
Technical support 53
Terms 52
Thunderbolt 13, 17, 28, 31
Thunderbolt/Mini DisplayPort to
DisplayPort adapter 13, 28, 31
TripleHead2Go Digital Edition
19–25
TripleHead2Go DP Edition
26–32
U
USB
Cable 4, 8, 12, 16, 20, 23, 27,
31, 35, 38
Powered port 9, 12, 16, 21,
23, 27, 31, 35, 38
W
Warning 26, 33
Warranty 54
Web, Matrox 53
57. USA
FCC Compliance Statement
Remark for the Matrox hardware products supported by this guide This equipment has been tested
and found to comply with the limits for a Class B digital device, pursuant to Part 15 of the FCC Rules. These
limits are designed to provide reasonable protection against harmful interference in a residential installation. This
equipment generates, uses and can radiate radio frequency energy and, if not installed and used in accordance with the
instructions, may cause harmful interference to radio communications. However, there is no guarantee that interference
will not occur in a particular installation. If this equipment causes harmful interference to radio or television reception,
which can be determined by turning the equipment off and on, the user is encouraged to try to correct the interference
by one or more of the following measures: • Reorient or relocate the receiving antenna • Increase the separation between
the equipment and receiver • Connect the equipment into an outlet on a circuit different from that to which the receiver
is connected • Consult the dealer or an experienced radio/TV technician for help.
WARNING Changes or modifications to this unit not expressly approved by the party responsible for the compliance
could void the user’s authority to operate this equipment. The use of shielded cables for connection of the monitor to
the card is required to meet FCC requirements.
Declaration of conformity of a Class B digital device according to the FCC rules
We, the Responsible Party Matrox, 625 State Route 3, Unit B, Plattsburg, NY 12901 • Telephone: (514) 822-6000
(extension 2026) • Attention: Conformity Group Matrox
Declaration The Matrox hardware products supported by this guide comply with Part 15 of the FCC Rules. Operation
is subject to the following two conditions: (1) these devices may not cause harmful interference, and (2) these devices
must accept any interference received, including interference that may cause undesired operation. Any question
regarding this declaration should be forwarded to the above coordinates.
CANADA
(English) Industry Canada Compliance Statement
Remark for the Matrox hardware products supported by this guide These digital devices do not exceed the Class
B limits for radio noise emission from digital devices set out in the Radio Interference Regulation of Industry Canada.
(Français) Conformité avec les exigences du ministère de l’Industrie Canada
Remarque sur les produits matériels Matrox couverts par ce guide Ces appareils numériques n’émettent aucun
bruit radioélectrique dépassant les limites applicables aux appareils numériques de Classe B prescrites dans le
Règlement sur le brouillage radioélectrique édicté par Industrie Canada.
JAPAN
VCCI Compliance Statement
Remark for the Matrox hardware products supported by this guide This is a Class B product based on
the standard of the Voluntary Control Council for Interference from Information Technology Equipment
(VCCI). If this is used near a radio or television receiver in a domestic environment, it may cause radio interference. Install
and use the equipment according to the instruction manual.
58. KOREA
KCC 전자파 적합 등록 안내 (Class B)
이 기기는 가정용 (B급 ) 으로 전자파적합등록을 한 기기로 주거 지역에서는 물론 모든 지역
에서 사용할 수 있습니다 .
EUROPE
(English) European user’s information – Declaration of Conformity
Remark for the Matrox hardware products supported by this guide These devices comply with EC
Directive 2004/108/EC for a Class B digital device. They have been tested and found to comply with
EN55022/CISPR22 and EN55024/CISPR24. In a domestic environment these products may cause radio interference in
which case the user may be required to take adequate measures. To meet EC requirements, shielded cables must be
used to connect the monitor and other peripherals to the card. These products have been tested in a typical class B
compliant host system. It is assumed that these products will also achieve compliance in any class B compliant system.
(Français) Informations aux utilisateurs Européens – Déclaration de conformité
Remarque sur les produits matériels Matrox couverts par ce guide Ces unités sont conformes à la directive
communautaire 2004/108/EC pour les unités numériques de classe B. Les tests effectués ont prouvé qu’elles sont
conformes aux normes EN55022/CISPR22 et EN55024/CISPR24. Le fonctionnement de ces produits dans un
environnement résidentiel peut causer des interférences radio, dans ce cas l’utilisateur peut être amené à prendre les
mesures appropriées. Pour respecter les impératifs communautaires, les câbles de connexion entre le moniteur ou
autres périphériques et la carte doivent être blindés. Ces produits ont été testés dans un système hôte typique
compatible classe B. On suppose qu’ils présenteront la même compatibilité dans tout système compatible classe B.
(Deutsch) Information für europäische Anwender – Konformitätserklärung
Anmerkung für die Matrox Hardware-Produktunterstützung durch dieses Handbuch Diese Geräte entsprechen
EC Direktive 2004/108/EC für ein digitales Gerät Klasse B. Sie wurden getestet und entsprechen demnach
EN55022/CISPR22 und EN55024/CISPR24. In einer Wohnumgebung können diese Produkte Funkinterferenzen
erzeugen, und der Benutzer kann genötigt sein, entsprechende Maßnahmen zu ergreifen. Um EG-Anforderungen zu
entsprechen, müssen zum Anschließen des Monitors und anderer Peripheriegeräte an die Karte abgeschirmte Kabel
verwendet werden. Diese Produkt wurden in einem typischen, der Klasse B entsprechenden, Host-System getestet. Es
wird davon ausgegangen, daß diese Produkte auch in jedem Klasse B entsprechenden System entsprechend
funktionieren.
(Italiano) Informazioni per gli utenti europei – Dichiarazione di conformità
Nota per i prodotti hardware Matrox supportati da questa guida Questi dispositivi sono conformi alla direttiva
CEE 2004/108/EC relativamente ai dispositivi digitali di Classe B. Sono stati provati e sono risultati conformi alle norme
EN55022/CISPR22 e EN55024/CISPR24. In un ambiente domestico, questi prodotti possono causare radiointerferenze,
nel qual caso all’utente potrebbe venire richiesto di prendere le misure adeguate. Per soddisfare i requisiti CEE, il monitor
e le altre periferiche vanno collegati alla scheda grafica con cavi schermati. Questi prodotti sono stati provati in un tipico
sistema host conforme alla classe B. Inoltre, si dà per scontato che questi prodotti acquisiranno la conformità in
qualsiasi sistema conforme alla classe B.
(Español) Información para usuarios europeos – Declaración de conformidad
Observación referente a los productos de hardware de Matrox apoyados por este manual Estos dispositivos
cumplen con la directiva de la CE 2004/108/EC para dispositivos digitales de Clase B. Dichos dispositivos han sido
sometidos a prueba y se ha comprobado que cumplen con las normas EN55022/CISPR22 y EN55024/CISPR24. En
entornos residenciales, estos productos pueden causar interferencias en las comunicaciones por radio; en tal caso el
usuario deberá adoptar las medidas adecuadas. Para satisfacer las disposiciones de la CE, deberán utilizarse cables
apantallados para conectar el monitor y demás periféricos a la tarjeta. Estos productos han sido sometidos a prueba en
un típico sistema anfitrión que responde a los requisitos de la clase B. Se supone que estos productos cumplirán
también con las normas en cualquier sistema que responda a los requisitos de la clase B.
ROVI CORPORATION
(English) This item incorporates copy protection technology that is protected by U.S. patent(s) and other intellectual
property rights of Rovi Corporation. Reverse engineering and disassembly are prohibited.
59. (Français) Ce produit intègre une technologie de protection des droits d’auteur qui est protégée par un ou plusieurs
brevets américains et par d’autres droits de propriété intellectuelle de Rovi Corporation. L’ingénierie inverse et le
désassemblage sont interdits.
(Deutsch) Dieses Produkt enthält Kopierschutztechnologien, die durch US-Patent(e) und andere Rechte am geistigen
Eigentum der Rovi Corporation geschützt ist. Reverse Engineering und Demontage sind verboten.
(Italiano) Questo prodotto incorpora la tecnologia di protezione di copia protetta da uno o più brevetti USA e da altri
diritti di proprietà intellettuale di Rovi Corporation. È vietato decodificare o disassemblare il prodotto.
(Español) Este producto incorpora tecnología de protección de copia que está protegida por patente(s) de EE. UU. y
por otros derechos de propiedad intelectual de Rovi Corporation. La ingeniería inversa y el desmontaje están prohibidos.
EUROPE
(English) European user’s information – Directive on Waste Electrical and
Electronic Equipment (WEEE)
Please refer to the Matrox Web site (www.matrox.com/environment/en/weee) for recycling information.
(Français) Informations aux utilisateurs Européens – Règlementation des
déchets d’équipements électriques et électroniques (DEEE)
Se référer au site Web de Matrox (www.matrox.com/environment/en/weee) pour l’information concernant le recyclage.
(Deutsch) Information für europäische Anwender – Europäische Regelungen zu Elektro-und
Elektronikaltgeräten (WEEE)
Bitte wenden Sie sich an der Matrox-Website (www.matrox.com/environment/en/weee) für Recycling-Informationen.
(Italiano) Informazioni per gli utenti europei – Direttiva sui rifiuti di apparecchiature
elettriche ed elettroniche (RAEE)
Si prega di riferirsi al sito Web Matrox (www.matrox.com/environment/en/weee) per le informazioni di riciclaggio.
FRANCE
Avertissement sur l’épilepsie
À lire avant toute utilisation d’un jeu vidéo par vous-même ou votre enfant Certaines personnes sont
susceptibles de faire des crises d’épilepsie ou d’avoir des pertes de conscience à la vue de certains types de lumières
clignotantes ou d’éléments fréquents dans notre environnement quotidien. Ces personnes s’exposent à des crises
lorsqu’elles regardent certaines images télévisées ou qu’elles jouent à certains jeux vidéo. Ces phénomènes peuvent
apparaître alors même que le sujet n’a pas d’antécédent médical ou n’a jamais été confronté à une crise d’épilepsie.
Si vous-même ou un membre de votre famille avez déjà présenté des symptômes liés à l’épilepsie (crise ou perte de
conscience) en présence de stimulations lumineuses, veuillez consulter votre médecin avant toute utilisation.
Nous conseillons aux parents d’être attentifs à leurs enfants lorsqu’ils jouent avec des jeux vidéo. Si vous-même ou votre
enfant présentez un des symptômes suivants: vertige, trouble de la vision, contraction des yeux ou des muscles, perte
de conscience, trouble de l’orientation, mouvement involontaire ou convulsion, veuillez immédiatement cesser de jouer
et consultez un médecin.
Précautions à prendre dans tous les cas pour l’utilisation d’un jeu vidéo Ne vous tenez pas trop près de l’écran.
• Jouez à bonne distance de l’écran de TV et aussi loin que le permet le cordon de raccordement. • Utilisez de
préférence les jeux de vidéo sur un écran de petite taille. • Évitez de jouer si vous êtes fatigué ou si vous manquez de
sommeil. • Assurez-vous que vous jouez dans une pièce bien éclairée. • En cours d’utilisation, faites des pauses de dix
à quinze minutes toutes les heures.
61. (English) Disclaimer
THE INFORMATION IN THIS GUIDE IS SUBJECT TO CHANGE AT ANY TIME AND WITHOUT NOTICE.
Matrox Graphics Inc. reserves the right to make changes in specifications at any time and without notice. The
information provided by this document is believed to be accurate and reliable at the time it is written. However, no
responsibility is assumed by Matrox Graphics Inc. for its use, for its reproduction and/or distribution, in whole or in part;
nor for any infringements of patents or other rights of third parties resulting from its use.
(Français) Responsabilité
LES INFORMATIONS CONTENUES DANS CE MANUEL PEUVENT ÊTRE MODIFIÉES EN TOUT TEMPS ET CE SANS
PRÉAVIS.
Les Graphiques Matrox Inc. se réserve le droit de modifier les spécifications en tout temps et ce sans préavis
quelconque. Les informations contenues dans ce manuel sont reconnues comme étant précises et fiables à la date de
rédaction. Cependant, Matrox Graphics Inc. n’assume aucune responsabilité concernant leur utilisation, leur
reproduction et/ou distribution, en tout ou en partie, ni leur contrefaçon de brevets ou de tout autre droit appartenant à
des tiers résultant de leur utilisation. Aucune licence n’est accordée sur aucun brevet ou droit d’exploiter un brevet de
Matrox Graphics Inc.
(Deutsch) Haftungsablehnungserklärung
DIE IN DIESEM HANDBUCH ENTHALTENEN ANGABEN UND DATEN KÖNNEN OHNE VORHERIGE ANKÜNDIGUNG
GEÄNDERT WERDEN.
Die Matrox Graphics Inc. behält sich das Recht vor, jederzeit und ohne Ankündigung technische Daten zu ändern. Zum
Zeitpunkt der Erstellung dieses Handbuchs sind die Inhalte korrekt und verlässlich. Weiterhin übernimmt Matrox
Graphics Inc. keinerlei Verantwortung für die Benutzung dieses Handbuchs, die Vervielfältigung und/oder Verteilung im
Ganzen oder zum Teil; weder für Verstöße gegen Patentrechte noch für andere Rechte Dritter, die aus seinem Gebrauch
resultieren mögen. Es werden keinerlei Lizenzrechte gewährt für sämtliche Patente oder Patentrechte der Matrox
Graphics Inc.
(Italiano) Discrezionalità
LE INFORMAZIONI CONTENUTE NEL PRESENTE DOCUMENTO SONO SOGGETTE A MODIFICHE IN QUALUNQUE
MOMENTO E SENZA PREAVVISO.
Matrox Graphics Inc. si riserva il diritto di apportare variazioni di qualunque tipo alle specifiche tecniche in qualunque
momento e senza alcun preavviso. Le informazioni contenute in questa documentazione sono ritenute corrette e
attendibili al momento della pubblicazione. In ogni caso, non è imputabile a Matrox Graphics Inc. nessuna responsabilità
per il loro utilizzo, per la loro distribuzione e/o riproduzione completa o in parte, come nessuna violazione a brevetti o
diritti di altri produttori derivante dal loro utilizzo.
(Español) Renuncia
LA INFORMACION QUE CONTIENE EL PRESENTE MANUAL ESTA SUJETA A CAMBIOS SIN PREVIO AVISO EN
CUALQUIER MOMENTO.
Matrox Graphics Inc. se reserva el derecho de realizar modificaciones en cualquier momento y sin previo aviso. La
información facilitada en este documento se considera que es exacta y fiable hasta la fecha de publicación. Sin
embargo, Matrox Graphics Inc. no asume ninguna responsabilidad por su uso, por su reproducción y/o distribución
parcial o total; ni por cualquier infracción de patentes u otros derechos de terceras partes derivados de su uso. No se
concede ninguna licencia bajo cualesquiera patentes o derechos de patentes de Matrox Graphics Inc.
62. Matrox Graphics Inc.
1055 Saint Regis Boulevard
Dorval, Quebec, Canada H9P 2T4
North America: 1-800-361-1408
International: (514) 822-6000
Email: graphics@matrox.com
Web site: www.matrox.com/graphics
Technical support:
www.matrox.com/graphics/support
To locate the sales office nearest you, visit
www.matrox.com/graphics/contact