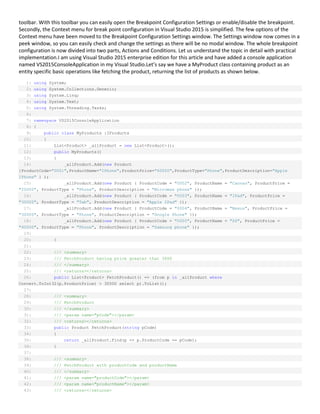
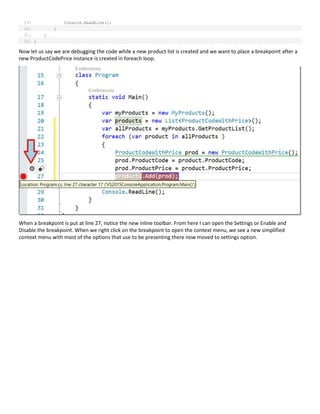
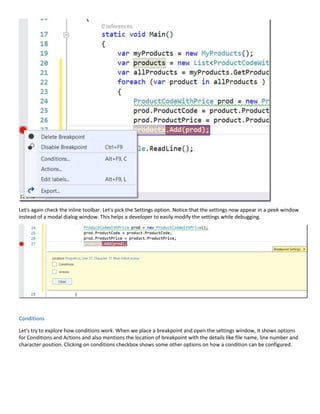
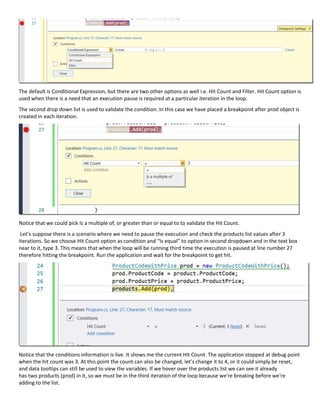
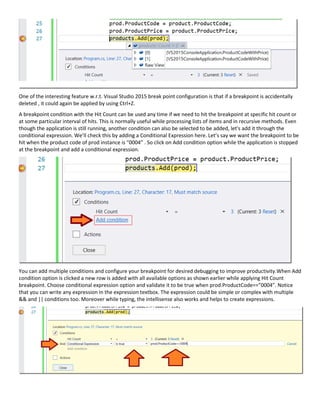
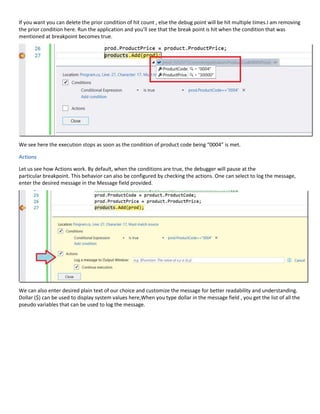
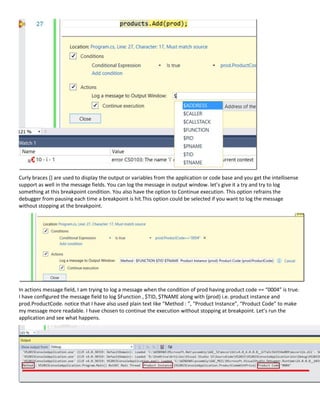
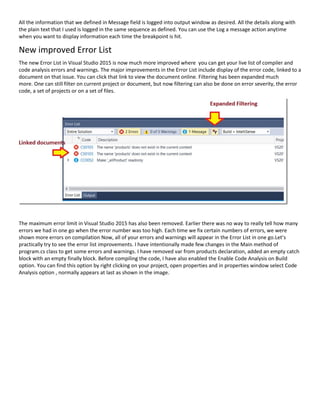
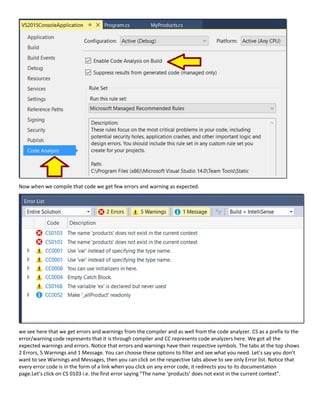
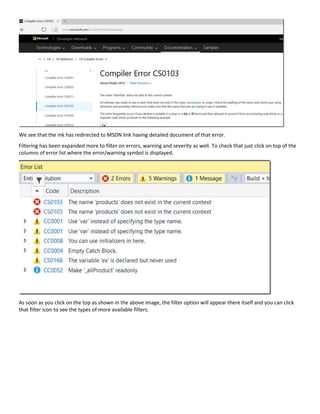
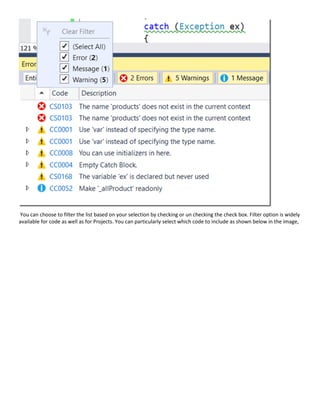
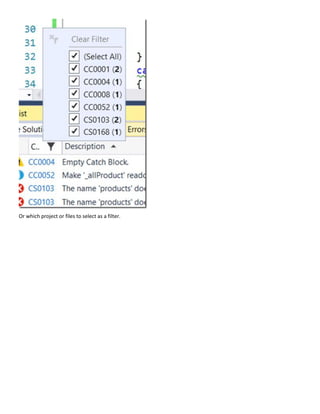
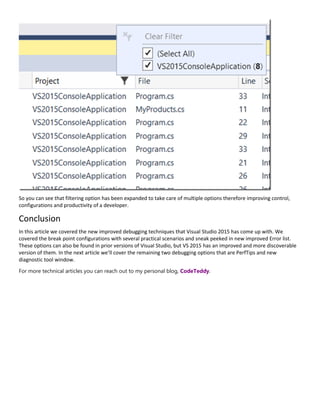
The document discusses new and improved debugging features in Visual Studio 2015, including easier breakpoint configuration with an inline toolbar, simplified context menus, and settings windows that appear as peek windows. It also covers breakpoint conditions that allow hitting a breakpoint based on the number of hits or a conditional expression. Breakpoint actions allow logging messages to the output window. Additionally, the improved Error List in VS 2015 displays all errors at once, allows filtering by severity and error code, and links error codes to documentation.
Android User Interface Tutorial: DatePicker, TimePicker & SpinnerAhsanul Karim
These slides are for self-learners and trainees of my BASIS and DIIT Android course.
I have used information, content and images from various sources. As these materials are for non-commercial use, I think they won’t infringe any copyright issue.
Originally published as part of the Eclipse Newsletter, June 2020 edition: https://www.eclipse.org/community/eclipse_newsletter/2020/june/1.php
With more frequent Java releases, it’s an exciting time to be a Java developer. Java 14 is out and the 2020-06 Eclipse IDE release provides integrated support.
The Eclipse Compiler for Java implements all of the new language enhancements, existing functionality has been updated to blend with the new language features, and new functionality has been added to help developers working with these language constructs.
A comprehensive guide on developing responsive and common react filter componentKaty Slemon
A blog that will help you develop a responsive and common React Filter Component for both desktop and mobile views to maintain consistency across the UI.
AUTOCODECOVERGEN: PROTOTYPE OF DATA DRIVEN UNIT TEST GENRATION TOOL THAT GUAR...acijjournal
Unit testing has become an integral part of software development process as it ensures all your individual
functions behave in a way they should behave. Obtaining 100% code coverage out of unit test suit is
essential to ensure that all code paths are covered. This paper proposes a tool AutoCodeCoverGen that guarantees 100% code coverage. It also discusses the core idea behind tool and evolution of the tool Also, it shows how the tool differs from existing tools and what benefits it reaps for its users.
What does OOP stand for?
When Object Oriented Programming(OOP) is taught so extensively, do computer programmers, specifically within games development, realise what it's possibly doing to productivity and performance? I explain my own view from experience in personal projects and professional work.
This talk was given to the Edinburgh meet of IGDA Scotland, on 2011/07/27.
PT1420 Decision Structures in Pseudocode and Visual Basic .docxamrit47
PT1420: Decision Structures in Pseudocode and Visual Basic
Page 1
This lab requires you to think about the steps that take place in a program by writing
pseudocode. Read the following program prior to completing the lab.
Career Tech Placement is hiring employees for placement at technology firms across the
city. Prior to granting an interview, the company has a 100-point test that is used to
determine if the candidate should be interviewed. Depending on the candidate’s score,
he or she will be placed in 1 of 4 categories for possible employment and flagging for an
interview:
Score Employment Category Interview Possibility
85 or above Definite Yes
70 – 84 Likely Yes
60 – 69 Maybe Yes
59 or below No No
Career Tech Placement has asked you to write a program that will allow the company to
enter a test score and then set the employment category and the interview possibility
variables based on the chart above.
Given the major task involved in this program, you decide your program should have three
variables and three modules:
Variable Name Purpose
Declare Integer testScore = 0 Stores the test score of the candidate.
Declare String category = “ “ Stores Definite, Likely, Maybe, or No
Declare String interview = “ “ Stores Yes or No
PT1420: Decision Structures in Pseudocode and Visual Basic
Page 2
Module Name Purpose
Module getScore() Allows the user to enter the test score
Module employCat() Determines the employment category
Module interviewPoss() This module will determine if a day off should
be awarded.
Module displayInfo() Displays the testScore, category, and interview
variables.
Step 1: Complete the pseudocode by writing the missing lines. When writing your modules and
making calls, be sure to pass necessary variables as arguments and accept them as reference
parameters if they need to be modified in the module (Reference: Testing a Series of
Conditions, page 138 from your textbook, Starting Out with Programming Logic & Design.).
Main Module()
//Declare variables on the next 3 lines
//Make Module calls and pass necessary variables on the next 4 lines
End Main
Module getScore(Integer Ref testScore)
//Ask the user to enter a test score
End Module
Module employCat(Integer testScore, String Ref category)
//Determine what employment category they are in based on their test score
//Similar to if the score is less than 60, then category is “No”
PT1420: Decision Structures in Pseudocode and Visual Basic
...
This article provides a comparison of the Classic (Cucumber/Gherkin) and Technical (Karate/Gherkin) uses of the BDD style. It turns out that they are very complimentary.
This paper’s aim is to point out the RAD ( Rapid application development) elements present in the Microsoft’s MVC 3 and WCF 4.0 using Microsoft Visual Studio 2010. It will describe why creating a new web application using MVC 3 and WCF 4.0 is a easy and fast and also present simple ways to develop such applications.
Lab StepsSTEP 1 Login Form1. In order to do this lab, we need.docxsmile790243
Lab Steps
STEP 1: Login Form
1. In order to do this lab, we need to assign a primary key to the tblUserLogin table. This will allow us to modify the user login table from our Manage Users form that we will create later. Go to Windows Explorer and open the PayrollSystem_DB.accdb. Set the UserID as the Primary key and save the table. Close the database.
2. Open Microsoft Visual Studio.NET.
3. Click the ASP.NET website named PayrollSystem to open it.
4. Create a new Web form named frmLogin.
5. Add the ACIT logo to the top of the frmLogin page. Do not hyperlink the logo.
6. Under the login controls, you will see Login. Drop the Login control onto the form. Set the properties of the login control as follows:
Property
Value
DestinationPageUrl
frmMain.aspx
TitleText
Please enter your UserName and Password in order to log in to the system.
7. Highlight everything in the form, then click Format, Justify, Center. Save your work.
8. Go to the
Solution
Explorer, right-click on frmLogin, and left-click on Set As Start Page.
Then run the website to check if the Web form appears correctly.
If you receive an error, add the following code to the web.config file right above the </configuration> line:
<appSettings>
<add key="ValidationSettings:UnobtrusiveValidationMode" value="None" />
</appSettings>
STEP 2: Login Check
9. Create a new DataSet called dsUser. Use the table tblUserLogin as the database table for this dataset. Do this in the same way that you added datasets in the previous labs.
10. Open the clsDataLayer and add the following function:
// This function verifies a user in the tblUser table
public static dsUser VerifyUser(string Database, string UserName, string UserPassword)
{
// Add your comments here
dsUser DS;
OleDbConnection sqlConn;
OleDbDataAdapter sqlDA;
// Add your comments here
sqlConn = new OleDbConnection("PROVIDER=Microsoft.ACE.OLEDB.12.0;" +
"Data Source=" + Database);
// Add your comments here
sqlDA = new OleDbDataAdapter("Select SecurityLevel from tblUserLogin " +
"where UserName like '" + UserName + "' " +
"and UserPassword like '" + UserPassword + "'", sqlConn);
// Add your comments here
DS = new dsUser();
// Add your comments here
sqlDA.Fill(DS.tblUserLogin);
// Add your comments here
return DS;
}
11. Double-click on the login control that you added. Add the following code to the login control Authenticate event handler:
// Add your comments here
dsUser dsUserLogin;
// Add your comments here
string SecurityLevel;
// Add your comments here
dsUserLogin = clsDataLayer.VerifyUser(Server.MapPath("PayrollSystem_DB.accdb"),
Login1.UserName, Login1.Password);
// Add your comments here
if (dsUserLogin.tblUserLogin.Count < 1)
{
e.Authenticated = false;
return;
}
// Add your comments here
SecurityLevel = dsUserLogin.tblUserLogin[0].SecurityLevel.ToString();
// Add your comments here
switch (SecurityLevel)
{
case "A":
// Add your comments here
e.Authenticated = true;
Session["SecurityLevel"] = "A";
break;
case "U":
// Add your comments ...
This presentation provide information to understand factory method pattern, it’s various implementation and Applicability. Major focus is on implementation of factory method pattern using reflection and without reflection.
Validating, Generating, Deploying, and Executing Objects: Validating,
Validating in the Design Center, Validating from the editors, Validating in
the Data Object Editor, Validating in the Mapping, Editor, Generating,
Generating in the Design Center, Generating from the editors, Generating in
the Data Object Editor, Generating in the Mapping Editor, Deploying, The
Control Center Service, Deploying in the Design Center and Data Object
Editor, The Control Center Manager, The Control Center Manager window
overview, Deploying in the Control Center ,Manager, Executing, Deploying
and executing remaining objects, Deployment Order, Execution order.
need help completing week 6 ilab.. i will upload what I currently ha.docxniraj57
need help completing week 6 ilab.. i will upload what I currently have if you know the material please let me know. what the person to add on to what I currently have started.
iLab 6 of 7: Login and Security Levels (30 Points)
Submit your assignment to the Dropbox located on the silver tab at the top of this page.
(See Syllabus "Due Dates for Assignments & Exams" for due dates.)
i L A B O V E R V I E W
Scenario/Summary
In this week's lab, we will create a login form, validate a user based on their login name and password, and allow them to access the system or not. We will assign a session variable to determine the level of security the user has and allow certain functions to be displayed or not displayed in the existing frmPersonnel form depending on the assigned security level. (NOTE: In some cases the instructions for this lab will be less specific than in earlier labs, because you are expected to apply what you have learned in earlier weeks. Refer to the detailed instructions in previous weeks' labs if you need to do so.)
Instructions for Week 6 iLab: Login and Security Levels
Click on the link above to view the tutorial.
Please watch this tutorial before beginning the iLab.
The tutorial has audio.
Deliverables
When you try to log in, if you use User Name = Mickey and Password = Mouse, the frmMain form should open with all links visible. If you use User Name = Minnie and Password = Mouse, the frmMain form should open with only the Salary Calculator, View Personnel, and Search options should be available. You will have a new option called Manage Users that will allow you to add new users and remove or update existing users. Once you have verified that it works, save your website, zip up all files, and submit in the Dropbox.
Note on database connections: We are using a SQLDataSource control for the Edit employees feature we added. You should be using the connection string stored in the web.config file for your database connection for this control. Rather than creating a new connection each time, just use this connection. If you change the folder where your website is (e.g., you copy each week's work to a new location), you will need to update the web.config. The advantage of using the database connection in the web.config is that you only have to set the configuration in one location.
Before starting this week's lab, make sure everything is working and that all database connections are properly configured.
i L A B S T E P S
STEP 1: Login Form (10 points)
Open Microsoft Visual Studio.NET 2008.
Click the ASP.NET website named PayrollSystem to open it.
Create a new web form named frmLogin.
Drop a login control onto the form.
Set the properties of the login control as follows:
PROPERTY
VALUE
DestinationPageUrl
frmMain.aspx
TitleText
Please enter your UserName and Password in order to log into the system
Add the
Cool
Biz
Productions
, Inc.
logo to the frmLogin form. Do not hylerlink the logo.
Highlight everything in the form, then c.
Diving in OOP (Day 1) : Polymorphism and Inheritance (Early Binding/Compile T...Akhil Mittal
I have been writing a lot about advanced topics like MVC, Entity Framework, Repository Patterns etc., my priority always remains to cover the topic as a whole, so that a reader do not have to search for missing links anywhere else. My this article will cover almost every OOPS concept that a novice/beginner developer hunt for, and not only beginners, the article’s purpose is to be helpful to experience professionals also who need to sometimes brush-up their concepts or who prepare for interviews .
Custom URL Re-Writing/Routing using Attribute Routes in MVC 4 Web APIsAkhil Mittal
We have already learnt a lot on WebAPI. I have already explained how to create WebAPI, connect it with database using Entity Framework, resolving dependencies using Unity Container as well as using MEF. In all our sample applications we were using default route that MVC provides us for CRUD operations. In this article I’ll explain how to write your own custom routes using Attribute Routing. We’ll deal with Action level routing as well as Controller level routing. I’ll explain this in detail with the help of a sample application. My new readers can use any Web API sample they have, else you can also use the sample applications we developed in my previous articles.
Resolve dependency of dependencies using Inversion of Control and dependency ...Akhil Mittal
In my last two articles I explained how to create a RESTful service using ASP.NET Web API working with Entity Framework and resolving dependencies using Unity Container. In this article I’ll explain how to create a loosely coupled system with Unity Container and MEF(Managed Extensibility Framework) using Inversion of Control. I’ll not be explaining much theory but rather focus more on practical implementations. For the readers who are following this series, they can use their existing solution that they have created till time. For my new readers of this article, I have provided the download link for the previous source code and current source code as well.
For theory and understanding of DI and IOC you can follow the following links: Unity and Inversion of Control(IOC).
Inversion of control using dependency injection in Web APIs using Unity Conta...Akhil Mittal
My article will explain how we can make our Web API service architecture loosely coupled and more flexible. We already learnt that how we can create a RESTful service using Asp.net Web API and Entity framework in my last article. If you remember we ended up in a solution with a design flaw, we’ll try to overcome that flaw by resolving the dependencies of dependent components. For those who have not followed my previous article, they can learn by having the sample project attached as a test application from my first article.
Diving in OOP (Day 6): Understanding Enums in C# (A Practical Approach)Akhil Mittal
My article of the series “Diving in OOP” will explain enum datatype in C#. We’ll learn by doing hands on lab and not only by theory. We’ll explore the power of enum and will cover almost every scenario in which we can use enum. We’ll follow a practical approach of learning to understand this concept. We may come across complex examples to understand the concept more deeply.
Diving into OOP (Day 5): All About C# Access Modifiers (Public/Private/Protec...Akhil Mittal
Access modifiers (or access specifiers) are keywords in object-oriented languages that set the accessibility of classes, methods, and other members. Access modifiers are a specific part of programming language syntax used to facilitate the encapsulation of components.
Diving into OOP (Day 5): All About C# Access Modifiers (Public/Private/Protec...
Diving into VS 2015 Day5
1. Diving into Visual Studio 2015 (Day #5): Debugging
Improvements in Visual Studio 2015 (Part 1)
-Akhil Mittal
Introduction
Visual Studio has always been a great IDE for code debugging. It provides a numerous features for debugging and
configuring the code. Being a developer we always spend a lot of time spend time in running and debugging the
code, therefore improvements to debugging features can have a big impact on our productivity. This article covers the
debugging improvements that Visual Studio 2015 has come up with. Following are the few of the major features that
will be covered in this article
Breakpoint configuration improvements
New improved Error List
Tool window support for LINQ and lambda expressions
New PerfTips displaying execution time in the code editor
New Diagnostic Tools window
Breakpoint configuration improvements
The earlier versions of Visual Studio already provided the feature of breakpoint configuration , so it’s not new to
developer. The only thing new in Visual Studio 2015 is the user experience and ease of using the configurations.
Breakpoint configuration is now more easier to use and reachable. Visual tudio 2015 introduces a new inline
2. toolbar. With this toolbar you can easily open the Breakpoint Configuration Settings or enable/disable the breakpoint.
Secondly, the Context menu for break point configuration in Visual Studio 2015 is simplified. The few options of the
Context menu have been moved to the Breakpoint Configuration Settings window. The Settings window now comes in a
peek window, so you can easily check and change the settings as there will be no modal window. The whole breakpoint
configuration is now divided into two parts, Actions and Conditions. Let us understand the topic in detail with practical
implementation.I am using Visual Studio 2015 enterprise edition for this article and have added a console application
named VS2015ConsoleApplication in my Visual Studio.Let’s say we have a MyProduct class containing product as an
entity specific basic operations like fetching the product, returning the list of products as shown below.
1: using System;
2: using System.Collections.Generic;
3: using System.Linq;
4: using System.Text;
5: using System.Threading.Tasks;
6:
7: namespace VS2015ConsoleApplication
8: {
9: public class MyProducts :IProducts
10: {
11: List<Product> _allProduct = new List<Product>();
12: public MyProducts()
13: {
14: _allProduct.Add(new Product
{ProductCode="0001",ProductName="IPhone",ProductPrice="60000",ProductType="Phone",ProductDescription="Apple
IPhone" } );
15: _allProduct.Add(new Product { ProductCode = "0002", ProductName = "Canvas", ProductPrice =
"20000", ProductType = "Phone", ProductDescription = "Micromax phone" });
16: _allProduct.Add(new Product { ProductCode = "0003", ProductName = "IPad", ProductPrice =
"30000", ProductType = "Tab", ProductDescription = "Apple IPad" });
17: _allProduct.Add(new Product { ProductCode = "0004", ProductName = "Nexus", ProductPrice =
"30000", ProductType = "Phone", ProductDescription = "Google Phone" });
18: _allProduct.Add(new Product { ProductCode = "0005", ProductName = "S6", ProductPrice =
"40000", ProductType = "Phone", ProductDescription = "Samsung phone" });
19:
20: }
21:
22: /// <summary>
23: /// FetchProduct having price greater that 3000
24: /// </summary>
25: /// <returns></returns>
26: public List<Product> FetchProduct() => (from p in _allProduct where
Convert.ToInt32(p.ProductPrice) > 30000 select p).ToList();
27:
28: /// <summary>
29: /// FetchProduct
30: /// </summary>
31: /// <param name="pCode"></param>
32: /// <returns></returns>
33: public Product FetchProduct(string pCode)
34: {
35: return _allProduct.Find(p => p.ProductCode == pCode);
36: }
37:
38: /// <summary>
39: /// FetchProduct with productCode and productName
40: /// </summary>
41: /// <param name="productCode"></param>
42: /// <param name="productName"></param>
43: /// <returns></returns>
3. 44: public Product FetchProduct(string productCode, string productName)
45: {
46: return _allProduct.Find(p => p.ProductCode == productCode && p.ProductName==productName);
47: }
48:
49: public List<Product> GetProductList()
50: {
51: return _allProduct;
52: }
53: }
54: }
where IProducts is a simple interface.
1: using System;
2: using System.Collections.Generic;
3: using System.Linq;
4: using System.Text;
5: using System.Threading.Tasks;
6:
7: namespace VS2015ConsoleApplication
8: {
9: interface IProducts
10: {
11: Product FetchProduct(string productCode);
12: Product FetchProduct(string productCode,string productName);
13: List<Product> GetProductList();
14: }
15: }
In the following Program class, we are just fetching all the products and creating a new list of products for a new entity
named ProductCodeWithPrice, where we list only the product code and price of products.
1: using System;
2: using System.Collections.Generic;
3: using System.Linq;
4: using System.Text;
5: using System.Threading.Tasks;
6:
7: namespace VS2015ConsoleApplication
8: {
9: public class ProductCodeWithPrice
10: {
11: public string ProductCode { get; set; }
12: public string ProductPrice { get; set; }
13:
14: }
15: class Program
16: {
17: static void Main()
18: {
19: var myProducts = new MyProducts();
20: var products = new List<ProductCodeWithPrice>();
21: var allProducts = myProducts.GetProductList();
22: foreach (var product in allProducts )
23: {
24: ProductCodeWithPrice prod = new ProductCodeWithPrice();
25: prod.ProductCode = product.ProductCode;
26: prod.ProductPrice = product.ProductPrice;
27: products.Add(prod);
28: }
4. 29: Console.ReadLine();
30: }
31: }
32: }
Now let us say we are debugging the code while a new product list is created and we want to place a breakpoint after a
new ProductCodePrice instance is created in foreach loop.
When a breakpoint is put at line 27, notice the new inline toolbar. From here I can open the Settings or Enable and
Disable the breakpoint. When we right click on the breakpoint to open the context menu, we see a new simplified
context menu with most of the options that use to be presenting there now moved to settings option.
5. Let's again check the inline toolbar. Let's pick the Settings option. Notice that the settings now appear in a peek window
instead of a modal dialog window. This helps a developer to easily modify the settings while debugging.
Conditions
Let's try to explore how conditions work. When we place a breakpoint and open the settings window, it shows options
for Conditions and Actions and also mentions the location of breakpoint with the details like file name, line number and
character position. Clicking on conditions checkbox shows some other options on how a condition can be configured.
6. The default is Conditional Expression, but there are two other options as well i.e. Hit Count and Filter. Hit Count option is
used when there is a need that an execution pause is required at a particular iteration in the loop.
The second drop down list is used to validate the condition. In this case we have placed a breakpoint after prod object is
created in each iteration.
Notice that we could pick Is a multiple of, or greater than or equal to to validate the Hit Count.
Let’s suppose there is a scenario where we need to pause the execution and check the products list values after 3
iterations. So we choose Hit Count option as condition and “Is equal” to option in second dropdown and in the text box
near to it, type 3. This means that when the loop will be running third time the execution is paused at line number 27
therefore hitting the breakpoint. Run the application and wait for the breakpoint to get hit.
Notice that the conditions information is live. It shows me the current Hit Count. The application stopped at debug point
when the hit count was 3. At this point the count can also be changed, let’s change it to 4, or it could simply be reset,
and data tooltips can still be used to view the variables. If we hover over the products list we can see it already
has two products (prod) in it, so we must be in the third iteration of the loop because we're breaking before we're
adding to the list.
7. One of the interesting feature w.r.t. Visual Studio 2015 break point configuration is that if a breakpoint is accidentally
deleted , it could again be applied by using Ctrl+Z.
A breakpoint condition with the Hit Count can be used any time if we need to hit the breakpoint at specific hit count or
at some particular interval of hits. This is normally useful while processing lists of items and in recursive methods. Even
though the application is still running, another condition can also be selected to be added, let's add it through the
conditional expression. We’ll check this by adding a Conditional Expression here. Let’s say we want the breakpoint to be
hit when the product code of prod instance is “0004” . So click on Add condition option while the application is stopped
at the breakpoint and add a conditional expression.
You can add multiple conditions and configure your breakpoint for desired debugging to improve productivity.When Add
condition option is clicked a new row is added with all available options as shown earlier while applying Hit Count
breakpoint. Choose conditional expression option and validate it to be true when prod.ProductCode==”0004”. Notice
that you can write any expression in the expression textbox. The expression could be simple or complex with multiple
&& and || conditions too. Moreover while typing, the intellisense also works and helps to create expressions.
8. If you want you can delete the prior condition of hit count , else the debug point will be hit multiple times.I am removing
the prior condition here. Run the application and you’ll see that the break point is hit when the condition that was
mentioned at breakpoint becomes true.
We see here the execution stops as soon as the condition of product code being “0004” is met.
Actions
Let us see how Actions work. By default, when the conditions are true, the debugger will pause at the
particular breakpoint. This behavior can also be configured by checking the actions. One can select to log the message,
enter the desired message in the Message field provided.
We can also enter desired plain text of our choice and customize the message for better readability and understanding.
Dollar ($) can be used to display system values here,When you type dollar in the message field , you get the list of all the
pseudo variables that can be used to log the message.
9. Curly braces {} are used to display the output or variables from the application or code base and you get the intellisense
support as well in the message fields. You can log the message in output window. let’s give it a try and try to log
something at this breakpoint condition. You also have the option to Continue execution. This option refrains the
debugger from pausing each time a breakpoint is hit.This option could be selected if you want to log the message
without stopping at the breakpoint.
In actions message field, I am trying to log a message when the condition of prod having product code == “0004” is true.
I have configured the message field to log $Function , $TID, $TNAME along with {prod} i.e. product instance and
prod.ProductCode. notice that I have also used plain text like “Method : ”, “Product Instance”, “Product Code” to make
my message more readable. I have chosen to continue the execution without stopping at breakpoint. Let’s run the
application and see what happens.
10. All the information that we defined in Message field is logged into output window as desired. All the details along with
the plain text that I used is logged in the same sequence as defined. You can use the Log a message action anytime
when you want to display information each time the breakpoint is hit.
New improved Error List
The new Error List in Visual Studio 2015 is now much more improved where you can get your live list of compiler and
code analysis errors and warnings. The major improvements in the Error List include display of the error code, linked to a
document on that issue. You can click that link to view the document online. Filtering has been expanded much
more. One can still filter on current project or document, but now filtering can also be done on error severity, the error
code, a set of projects or on a set of files.
The maximum error limit in Visual Studio 2015 has also been removed. Earlier there was no way to really tell how many
errors we had in one go when the error number was too high. Each time we fix certain numbers of errors, we were
shown more errors on compilation Now, all of your errors and warnings will appear in the Error List in one go.Let’s
practically try to see the error list improvements. I have intentionally made few changes in the Main method of
program.cs class to get some errors and warnings. I have removed var from products declaration, added an empty catch
block with an empty finally block. Before compiling the code, I have also enabled the Enable Code Analysis on Build
option. You can find this option by right clicking on your project, open properties and in properties window select Code
Analysis option , normally appears at last as shown in the image.
11. Now when we compile that code we get few errors and warning as expected.
we see here that we get errors and warnings from the compiler and as well from the code analyzer. CS as a prefix to the
error/warning code represents that it is through compiler and CC represents code analyzers here. We got all the
expected warnings and errors. Notice that errors and warnings have their respective symbols. The tabs at the top shows
2 Errors, 5 Warnings and 1 Message. You can choose these options to filter and see what you need. Let’s say you don’t
want to see Warnings and Messages, then you can click on the respective tabs above to see only Error list. Notice that
every error code is in the form of a link when you click on any error code, it redirects you to its documentation
page.Let’s click on CS 0103 i.e. the first error saying “The name ‘products’ does not exist in the current context”.
12. We see that the ink has redirected to MSDN link having detailed document of that error.
Filtering has been expanded more to filter on errors, warning and severity as well. To check that just click on top of the
columns of error list where the error/warning symbol is displayed.
As soon as you click on the top as shown in the above image, the filter option will appear there itself and you can click
that filter icon to see the types of more available filters.
13. You can choose to filter the list based on your selection by checking or un checking the check box. Filter option is widely
available for code as well as for Projects. You can particularly select which code to include as shown below in the image,
15. So you can see that filtering option has been expanded to take care of multiple options therefore improving control,
configurations and productivity of a developer.
Conclusion
In this article we covered the new improved debugging techniques that Visual Studio 2015 has come up with. We
covered the break point configurations with several practical scenarios and sneak peeked in new improved Error list.
These options can also be found in prior versions of Visual Studio, but VS 2015 has an improved and more discoverable
version of them. In the next article we’ll cover the remaining two debugging options that are PerfTips and new
diagnostic tool window.
For more technical articles you can reach out to my personal blog, CodeTeddy.