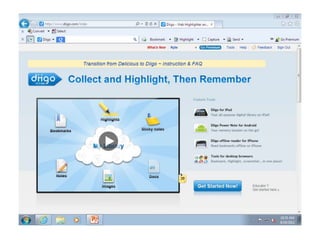
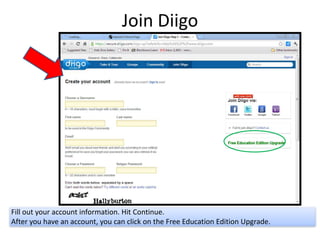
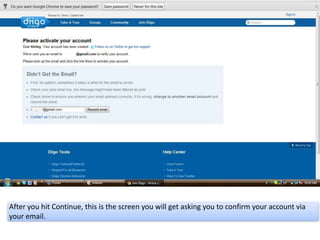
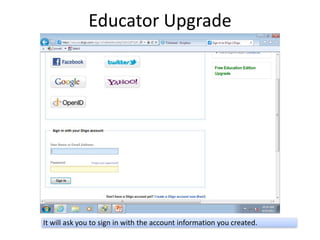
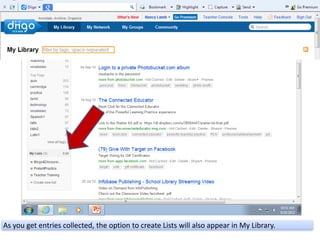
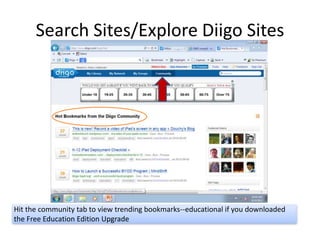
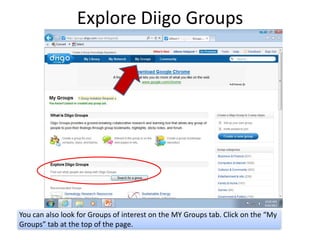
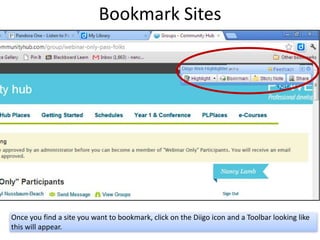
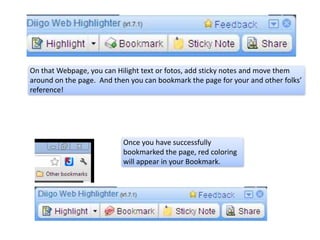
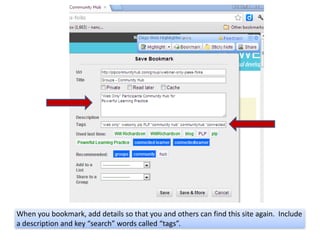
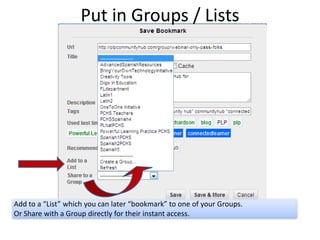
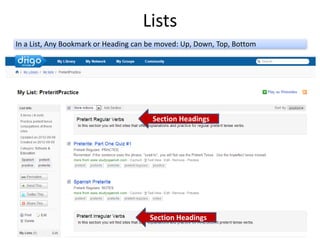
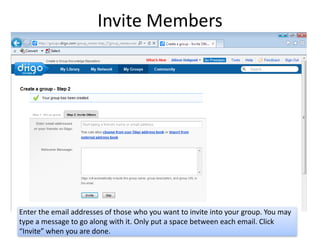
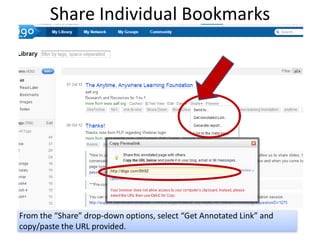
Diigo Basics
     Diigo’s opening page looks like this:
Join Diigo


Fill out your account information. Hit Continue.
After you have an account, you can click on the Free Education Edition Upgrade.
After you hit Continue, this is the screen you will get asking you to confirm your account via
your email.
Educator Upgrade


It will ask you to sign in with the account information you created.
Advantages of Educator Account
Diigo is a great enabler for active reading, project-based
learning, and better collaboration, particularly with respect to:
• how students and teachers acquire, research and organize
   information
• how students can engage in active and critical reading
   online
• how teachers and students can engage each other
   collaboratively in reading, researching, interpreting, and
   critiquing information
• how students can work effectively as a team, in project-
   based learning, that requires the team to acquire, analyze
   and synthesize information from a variety of resources
Download the Toolbar


Step 1 is to get the toolbar on your computer.
To do this later, or on another computer, go to TOOLS / Diigo Toolbar.
Once the toolbar is installed a blue Box with a “d” will appear & stay on your computer.
(Note: it may also appear inside the “Other Bookmarks” toolbar across the top.)
Create Groups


Click on the “My Groups” tab at the top of the page. Then click “Create a new
group” button on the right.
Fill out the form and click “Create my group” at the bottom when you are done.
Create Lists


Click on the “Diigo” drop down bar in the Diigo toolbar. Go to the “My Lists” sidebar, and
click “Create a List..”
After clicking on “Create a list,” you will get this window. Title your list and then
click “OK.”
As you get entries collected, the option to create Lists will also appear in My Library.
Search Sites/Explore Diigo Sites


Hit the community tab to view trending bookmarks--educational if you downloaded
the Free Education Edition Upgrade
Explore Diigo Groups


You can also look for Groups of interest on the MY Groups tab. Click on the “My
Groups” tab at the top of the page.
Bookmark Sites


Once you find a site you want to bookmark, click on the Diigo icon and a Toolbar looking like
this will appear.
On that Webpage, you can Hilight text or fotos, add sticky notes and move them
around on the page. And then you can bookmark the page for your and other folks’
reference!


                           Once you have successfully
                           bookmarked the page, red coloring
                           will appear in your Bookmark.
When you bookmark, add details so that you and others can find this site again. Include
a description and key “search” words called “tags”.
Put in Groups / Lists


Add to a “List” which you can later “bookmark” to one of your Groups.
Or Share with a Group directly for their instant access.
Lists
In a List, Any Bookmark or Heading can be moved: Up, Down, Top, Bottom


                                       Section Headings


                                       Section Headings
Invite Members


Enter the email addresses of those who you want to invite into your group. You may
type a message to go along with it. Only put a space between each email. Click
“Invite” when you are done.
Share Individual Bookmarks


From the “Share” drop-down options, select “Get Annotated Link” and
copy/paste the URL provided.
Use Diigo for sharing sites of/for:
   Explanation
   Practice
   Resources
   Tutoring
   Extra info
   Original Sources
   Personal interest
   Discussions
   Compiled sites (like a webquest)
   Sites to analyze (alone or collaboratively)
Students Use Diigo for:
   Research (even record MLA formatting in
   Description box)
   Collaboration:
      Group project research/resources—espec.
      hilights, stickynotes
   Finding practices/tutoring/help
   Critical reading
   Independent learning
   Practicing tagging

Diigo Basics

  • 1.
    Diigo Basics Diigo’s opening page looks like this:
  • 3.
    Join Diigo Fill outyour account information. Hit Continue. After you have an account, you can click on the Free Education Edition Upgrade.
  • 4.
    After you hitContinue, this is the screen you will get asking you to confirm your account via your email.
  • 5.
    Educator Upgrade It willask you to sign in with the account information you created.
  • 6.
    Advantages of EducatorAccount Diigo is a great enabler for active reading, project-based learning, and better collaboration, particularly with respect to: • how students and teachers acquire, research and organize information • how students can engage in active and critical reading online • how teachers and students can engage each other collaboratively in reading, researching, interpreting, and critiquing information • how students can work effectively as a team, in project- based learning, that requires the team to acquire, analyze and synthesize information from a variety of resources
  • 7.
    Download the Toolbar Step1 is to get the toolbar on your computer.
  • 8.
    To do thislater, or on another computer, go to TOOLS / Diigo Toolbar.
  • 9.
    Once the toolbaris installed a blue Box with a “d” will appear & stay on your computer. (Note: it may also appear inside the “Other Bookmarks” toolbar across the top.)
  • 10.
    Create Groups Click onthe “My Groups” tab at the top of the page. Then click “Create a new group” button on the right.
  • 11.
    Fill out theform and click “Create my group” at the bottom when you are done.
  • 12.
    Create Lists Click onthe “Diigo” drop down bar in the Diigo toolbar. Go to the “My Lists” sidebar, and click “Create a List..”
  • 13.
    After clicking on“Create a list,” you will get this window. Title your list and then click “OK.”
  • 14.
    As you getentries collected, the option to create Lists will also appear in My Library.
  • 15.
    Search Sites/Explore DiigoSites Hit the community tab to view trending bookmarks--educational if you downloaded the Free Education Edition Upgrade
  • 16.
    Explore Diigo Groups Youcan also look for Groups of interest on the MY Groups tab. Click on the “My Groups” tab at the top of the page.
  • 17.
    Bookmark Sites Once youfind a site you want to bookmark, click on the Diigo icon and a Toolbar looking like this will appear.
  • 18.
    On that Webpage,you can Hilight text or fotos, add sticky notes and move them around on the page. And then you can bookmark the page for your and other folks’ reference! Once you have successfully bookmarked the page, red coloring will appear in your Bookmark.
  • 19.
    When you bookmark,add details so that you and others can find this site again. Include a description and key “search” words called “tags”.
  • 20.
    Put in Groups/ Lists Add to a “List” which you can later “bookmark” to one of your Groups. Or Share with a Group directly for their instant access.
  • 21.
    Lists In a List,Any Bookmark or Heading can be moved: Up, Down, Top, Bottom Section Headings Section Headings
  • 22.
    Invite Members Enter theemail addresses of those who you want to invite into your group. You may type a message to go along with it. Only put a space between each email. Click “Invite” when you are done.
  • 23.
    Share Individual Bookmarks Fromthe “Share” drop-down options, select “Get Annotated Link” and copy/paste the URL provided.
  • 24.
    Use Diigo forsharing sites of/for: Explanation Practice Resources Tutoring Extra info Original Sources Personal interest Discussions Compiled sites (like a webquest) Sites to analyze (alone or collaboratively)
  • 25.
    Students Use Diigofor: Research (even record MLA formatting in Description box) Collaboration: Group project research/resources—espec. hilights, stickynotes Finding practices/tutoring/help Critical reading Independent learning Practicing tagging