SQL Scripts
SQL Scripts
Script: text file that contains a sequence of SQL
Script: text file that contains a sequence of SQL
commands
commands
Usually have .sql extension
Usually have .sql extension
To run from SQL*Plus:
To run from SQL*Plus:
Start full file path
Start full file path
SQL> START path_to_script_file;
SQL> START path_to_script_file;
@ full file path
@ full file path (
(SQL>
SQL> @
@ path_to_script_file;)
path_to_script_file;)
Extension can be omitted if it is .sql
Extension can be omitted if it is .sql
Path cannot contain any blank spaces
Path cannot contain any blank spaces
4.
Objectives
Objectives
After completingthis lesson, you should be
After completing this lesson, you should be
able to do the following
able to do the following:
:
List the capabilities of SQL SELECT
List the capabilities of SQL SELECT
statements
statements
Execute a basic SELECT statement
Execute a basic SELECT statement
Differentiate between SQL statements and
Differentiate between SQL statements and
SQL
SQL*
*Plus commands
Plus commands
Basic SELECT Statement
BasicSELECT Statement
SELECT [DISTINCT] {*, column [alias],...}
FROM table;
SELECT identifies
SELECT identifies what
what columns
columns.
.
FROM identifies
FROM identifies which
which table
table.
.
7.
Writing SQL Statements
WritingSQL Statements
SQL statements are not case sensitive
SQL statements are not case sensitive.
.
SQL statements can be on one or
SQL statements can be on one or
more lines
more lines.
.
Keywords cannot be abbreviated or split
Keywords cannot be abbreviated or split
across lines
across lines.
.
Clauses are usually placed on separate lines
Clauses are usually placed on separate lines.
.
Tabs and indents are used to enhance
Tabs and indents are used to enhance
readability
readability.
.
8.
Selecting All Columns
SelectingAll Columns
DEPTNO DNAME LOC
--------- -------------- -------------
10 ACCOUNTING NEW YORK
20 RESEARCH DALLAS
30 SALES CHICAGO
40 OPERATIONS BOSTON
SQL> SELECT *
2 FROM dept;
9.
Selecting Specific Columns
SelectingSpecific Columns
DEPTNO LOC
--------- -------------
10 NEW YORK
20 DALLAS
30 CHICAGO
40 BOSTON
SQL> SELECT deptno, loc
2 FROM dept;
10.
Column Heading Defaults
ColumnHeading Defaults
Default justification
Default justification
Left
Left:
: Date and character data
Date and character data
Right
Right:
: Numeric data
Numeric data
Default display
Default display:
: Uppercase
Uppercase
11.
Arithmetic Expressions
Arithmetic Expressions
Create expressions on NUMBER and DATE
Create expressions on NUMBER and DATE
data by using arithmetic operators
data by using arithmetic operators.
.
Operator
+
-
*
/
Description
Add
Subtract
Multiply
Divide
12.
Using Arithmetic Operators
UsingArithmetic Operators
SQL> SELECT ename, sal, sal+300
2 FROM emp;
ENAME SAL SAL+300
---------- --------- ---------
KING 5000 5300
BLAKE 2850 3150
CLARK 2450 2750
JONES 2975 3275
MARTIN 1250 1550
ALLEN 1600 1900
...
14 rows selected.
13.
Operator Precedence
Operator Precedence
Multiplication and division take priority over
Multiplication and division take priority over
addition and subtraction
addition and subtraction.
.
Operators of the same priority are evaluated
Operators of the same priority are evaluated
from left to right
from left to right.
.
Parentheses are used to force prioritized
Parentheses are used to force prioritized
evaluation and to clarify statements
evaluation and to clarify statements.
.
*
* /
/ +
+ _
_
14.
Operator Precedence
Operator Precedence
SQL>SELECT ename, sal, 12*sal+100
2 FROM emp;
ENAME SAL 12*SAL+100
---------- --------- ----------
KING 5000 60100
BLAKE 2850 34300
CLARK 2450 29500
JONES 2975 35800
MARTIN 1250 15100
ALLEN 1600 19300
...
14 rows selected.
15.
Using Parentheses
Using Parentheses
SQL>SELECT ename, sal, 12*(sal+100)
2 FROM emp;
ENAME SAL 12*(SAL+100)
---------- --------- -----------
KING 5000 61200
BLAKE 2850 35400
CLARK 2450 30600
JONES 2975 36900
MARTIN 1250 16200
...
14 rows selected.
16.
Defining a NullValue
Defining a Null Value
A null is a value that is unavailable,
A null is a value that is unavailable,
unassigned, unknown, or inapplicable
unassigned, unknown, or inapplicable.
.
A null is not the same as zero or a blank space
A null is not the same as zero or a blank space.
.
ENAME JOB SAL COMM
---------- --------- --------- ---------
KING PRESIDENT 5000
BLAKE MANAGER 2850
...
TURNER SALESMAN 1500 0
...
14 rows selected.
SQL> SELECT ename, job, sal, comm
2 FROM emp;
17.
Null Values
Null Values
inArithmetic Expressions
in Arithmetic Expressions
Arithmetic expressions containing a null
Arithmetic expressions containing a null
value evaluate to null
value evaluate to null.
.
SQL> select ename, 12*sal+comm
2 from emp
3 WHERE ename='KING';
ENAME 12*SAL+COMM
---------- -----------
KING
18.
Defining a ColumnAlias
Defining a Column Alias
Renames a column heading
Renames a column heading
Is useful with calculations
Is useful with calculations
Immediately follows column name; optional
Immediately follows column name; optional
AS keyword between column name and alias
AS keyword between column name and alias
Requires double quotation marks if it contains
Requires double quotation marks if it contains
spaces or special characters or is case sensitive
spaces or special characters or is case sensitive
19.
Using Column Aliases
UsingColumn Aliases
SQL> SELECT ename AS name, sal salary
2 FROM emp;
NAME SALARY
------------- ---------
...
SQL> SELECT ename "Name",
2 sal*12 "Annual Salary"
3 FROM emp;
Name Annual Salary
------------- -------------
...
20.
Concatenation Operator
Concatenation Operator
Concatenates columns or character strings to
Concatenates columns or character strings to
other columns
other columns
Is represented by two vertical bars
Is represented by two vertical bars (
(||
||)
)
Creates a resultant column that is a character
Creates a resultant column that is a character
expression
expression
21.
Using the Concatenation
Usingthe Concatenation
Operator
Operator
SQL> SELECT ename||job AS "Employees"
2 FROM emp;
Employees
-------------------
KINGPRESIDENT
BLAKEMANAGER
CLARKMANAGER
JONESMANAGER
MARTINSALESMAN
ALLENSALESMAN
...
14 rows selected.
22.
Literal Character Strings
LiteralCharacter Strings
A literal is a character, a number, or a date
A literal is a character, a number, or a date
included in the SELECT list
included in the SELECT list.
.
Date and character literal values must be
Date and character literal values must be
enclosed within single quotation marks
enclosed within single quotation marks.
.
Each character string is output once for each
Each character string is output once for each
row returned
row returned.
.
23.
Using Literal CharacterStrings
Using Literal Character Strings
Employee Details
-------------------------
KING is a PRESIDENT
BLAKE is a MANAGER
CLARK is a MANAGER
JONES is a MANAGER
MARTIN is a SALESMAN
...
14 rows selected.
SQL> SELECT ename ||' is a '||job
2 AS "Employee Details"
3 FROM emp;
24.
Duplicate Rows
Duplicate Rows
The default display of queries is all rows,
The default display of queries is all rows,
including duplicate rows
including duplicate rows.
.
SQL> SELECT deptno
2 FROM emp;
DEPTNO
---------
10
30
10
20
...
14 rows selected.
25.
Eliminating Duplicate Rows
EliminatingDuplicate Rows
Eliminate duplicate rows by using the
Eliminate duplicate rows by using the
DISTINCT keyword in the SELECT clause
DISTINCT keyword in the SELECT clause.
.
SQL> SELECT DISTINCT deptno
2 FROM emp;
DEPTNO
---------
10
20
30
26.
SQL and SQL
SQLand SQL*
*Plus Interaction
Plus Interaction
SQL
SQL*
*Plus
Plus
SQL Statements
SQL Statements
Buffer
Buffer
SQL Statements
SQL Statements
Server
Query Results
Query Results
SQL
SQL*
*Plus
Plus
Commands
Commands
Formatted Report
Formatted Report
27.
SQL Statements Versus
SQLStatements Versus
SQL
SQL*
*Plus Commands
Plus Commands
SQL
SQL
statements
statements
SQL
SQL
• A language
A language
• ANSI standard
ANSI standard
• Keyword cannot be
Keyword cannot be
abbreviated
abbreviated
• Statements manipulate
Statements manipulate
data and table
data and table
definitions in the
definitions in the
database
database
SQL
SQL*
*Plus
Plus
• An environment
An environment
• Oracle proprietary
Oracle proprietary
• Keywords can be
Keywords can be
abbreviated
abbreviated
• Commands do not
Commands do not
allow manipulation of
allow manipulation of
values in the database
values in the database
SQL
SQL
buffer
buffer
SQL
SQL*
*Plus
Plus
commands
commands
SQL
SQL*
*Plus
Plus
buffer
buffer
28.
Log into SQL
Log in to SQL*
*Plus
Plus.
.
Describe the table structure
Describe the table structure.
.
Edit your SQL statement
Edit your SQL statement.
.
Execute SQL from SQL
Execute SQL from SQL*
*Plus
Plus.
.
Save SQL statements to files and append SQL
Save SQL statements to files and append SQL
statements to files
statements to files.
.
Execute saved files
Execute saved files.
.
Load commands from file to buffer
Load commands from file to buffer
to edit
to edit.
.
Overview of SQL
Overview of SQL*
*Plus
Plus
29.
Logging In toSQL
Logging In to SQL*
*Plus
Plus
From Windows environment
From Windows environment:
:
From command line
From command line:
:
sqlplus
sqlplus [
[username
username[/
[/password
password
[
[@
@database
database]]]
]]]
30.
Displaying Table Structure
DisplayingTable Structure
Use the SQL
Use the SQL*
*Plus DESCRIBE command to
Plus DESCRIBE command to
display the structure of a table
display the structure of a table.
.
DESC[RIBE] tablename
31.
Displaying Table Structure
DisplayingTable Structure
SQL> DESCRIBE dept
Name Null? Type
----------------- -------- ------------
DEPTNO NOT NULL NUMBER(2)
DNAME VARCHAR2(14)
LOC VARCHAR2(13)
32.
SQL
SQL*
*Plus Editing Commands
PlusEditing Commands
A
A[
[PPEND
PPEND]
] text
text
C
C[
[HANGE
HANGE] /
] / old
old /
/ new
new
C
C[
[HANGE
HANGE] /
] / text
text /
/
CL
CL[
[EAR
EAR]
] BUFF
BUFF[
[ER
ER]
]
DEL
DEL
DEL
DEL n
n
DEL
DEL m n
m n
33.
SQL
SQL*
*Plus Editing Commands
PlusEditing Commands
I
I[
[NPUT
NPUT]
]
I
I[
[NPUT
NPUT]
] text
text
L
L[
[IST
IST]
]
L
L[
[IST
IST]
] n
n
L
L[
[IST
IST]
] m n
m n
R
R[
[UN
UN]
]
n
n
n
n text
text
0
0 text
text
34.
SQL
SQL*
*Plus File Commands
PlusFile Commands
SAVE
SAVE filename
filename
GET
GET filename
filename
START
START filename
filename
@
@ filename
filename
EDIT
EDIT filename
filename
SPOOL
SPOOL filename
filename
EXIT
EXIT
35.
Summary
Summary
Use SQL
UseSQL*
*Plus as an environment to
Plus as an environment to:
:
Execute SQL statements
Execute SQL statements
Edit SQL statements
Edit SQL statements
SELECT [DISTINCT] {*,column [alias],...}
FROM table;
Objectives
Objectives
After completingthis lesson, you should be able
After completing this lesson, you should be able
to do the following
to do the following:
:
Limit the rows retrieved by a query
Limit the rows retrieved by a query
Sort the rows retrieved by a query
Sort the rows retrieved by a query
39.
Limiting Rows Usinga Selection
Limiting Rows Using a Selection
"
"…retrieve all
…retrieve all
employees
employees
in department 10
in department 10"
"
EMP
EMP
EMPNO ENAME JOB ... DEPTNO
7839 KING PRESIDENT 10
7698 BLAKE MANAGER 30
7782 CLARK MANAGER 10
7566 JONES MANAGER 20
...
EMP
EMP
EMPNO ENAME JOB ... DEPTNO
7839 KING PRESIDENT 10
7782 CLARK MANAGER 10
7934 MILLER CLERK 10
40.
Limiting Rows Selected
LimitingRows Selected
Restrict the rows returned by using the
Restrict the rows returned by using the
WHERE clause
WHERE clause.
.
The WHERE clause follows the FROM
The WHERE clause follows the FROM
clause
clause.
.
SELECT [DISTINCT] {*| column [alias], ...}
FROM table
[WHERE condition(s)];
41.
Using the WHEREClause
Using the WHERE Clause
SQL> SELECT ename, job, deptno
2 FROM emp
3 WHERE job='CLERK';
ENAME JOB DEPTNO
---------- --------- ---------
JAMES CLERK 30
SMITH CLERK 20
ADAMS CLERK 20
MILLER CLERK 10
42.
Character Strings andDates
Character Strings and Dates
Character strings and date values are enclosed
Character strings and date values are enclosed
in single quotation marks
in single quotation marks.
.
Character values are case sensitive and date
Character values are case sensitive and date
values are format sensitive
values are format sensitive.
.
The default date format is DD
The default date format is DD-
-MON
MON-
-YY
YY.
.
SQL> SELECT ename, job, deptno
2 FROM emp
3 WHERE ename = ;
'JAMES'
Using the ComparisonOperators
Using the Comparison Operators
SQL> SELECT ename, sal, comm
2 FROM emp
3 WHERE sal<=comm;
ENAME SAL COMM
---------- --------- ---------
MARTIN 1250 1400
45.
Other Comparison Operators
OtherComparison Operators
Operator
BETWEEN
...AND...
IN(list)
LIKE
IS NULL
Meaning
Between two values (inclusive)
Match any of a list of values
Match a character pattern
Is a null value
46.
Using the BETWEENOperator
Using the BETWEEN Operator
ENAME SAL
---------- ---------
MARTIN 1250
TURNER 1500
WARD 1250
ADAMS 1100
MILLER 1300
SQL> SELECT ename, sal
2 FROM emp
3 WHERE sal BETWEEN 1000 AND 1500;
Lower
limit
Higher
limit
Use the BETWEEN operator to display
Use the BETWEEN operator to display
rows based on a range of values
rows based on a range of values.
.
47.
Using the INOperator
Using the IN Operator
Use the IN operator to test for values in a
Use the IN operator to test for values in a
list
list.
.
SQL> SELECT empno, ename, sal, mgr
2 FROM emp
3 WHERE mgr IN (7902, 7566, 7788);
EMPNO ENAME SAL MGR
--------- ---------- --------- ---------
7902 FORD 3000 7566
7369 SMITH 800 7902
7788 SCOTT 3000 7566
7876 ADAMS 1100 7788
48.
Using the LIKEOperator
Using the LIKE Operator
• Use the LIKE operator to perform
wildcard searches of valid search string
values.
• Search conditions can contain either
literal characters or numbers.
– % denotes zero or many characters.
– _ denotes one character.
SQL> SELECT ename
2 FROM emp
3 WHERE ename LIKE 'S%';
49.
Using the LIKEOperator
Using the LIKE Operator
You can combine pattern
You can combine pattern-
-matching characters
matching characters.
.
You can use the ESCAPE identifier to search
You can use the ESCAPE identifier to search
for
for "%"
"%" or
or "
"_
_".
".
SQL> SELECT ename
2 FROM emp
3 WHERE ename LIKE '_A%';
ENAME
----------
MARTIN
JAMES
WARD
50.
Using the ISNULL Operator
Using the IS NULL Operator
Test for null values with the IS NULL
Test for null values with the IS NULL
operator
operator.
.
SQL> SELECT ename, mgr
2 FROM emp
3 WHERE mgr IS NULL;
ENAME MGR
---------- ---------
KING
Using the ANDOperator
Using the AND Operator
AND requires both conditions to be TRUE
AND requires both conditions to be TRUE.
.
SQL> SELECT empno, ename, job, sal
2 FROM emp
3 WHERE sal>=1100
4 AND job='CLERK';
EMPNO ENAME JOB SAL
--------- ---------- --------- ---------
7876 ADAMS CLERK 1100
7934 MILLER CLERK 1300
53.
Using the OROperator
Using the OR Operator
OR requires either condition to be TRUE
OR requires either condition to be TRUE.
.
SQL> SELECT empno, ename, job, sal
2 FROM emp
3 WHERE sal>=1100
4 OR job='CLERK';
EMPNO ENAME JOB SAL
--------- ---------- --------- ---------
7839 KING PRESIDENT 5000
7698 BLAKE MANAGER 2850
7782 CLARK MANAGER 2450
7566 JONES MANAGER 2975
7654 MARTIN SALESMAN 1250
...
7900 JAMES CLERK 950
...
14 rows selected.
54.
Using the NOTOperator
Using the NOT Operator
SQL> SELECT ename, job
2 FROM emp
3 WHERE job NOT IN ('CLERK','MANAGER','ANALYST');
ENAME JOB
---------- ---------
KING PRESIDENT
MARTIN SALESMAN
ALLEN SALESMAN
TURNER SALESMAN
WARD SALESMAN
55.
Rules of Precedence
Rulesof Precedence
Override rules of precedence by using
Override rules of precedence by using
parentheses
parentheses.
.
Order Evaluated Operator
1 All comparison
operators
2 NOT
3 AND
4 OR
56.
Rules of Precedence
Rulesof Precedence
ENAME JOB SAL
---------- --------- ---------
KING PRESIDENT 5000
MARTIN SALESMAN 1250
ALLEN SALESMAN 1600
TURNER SALESMAN 1500
WARD SALESMAN 1250
SQL> SELECT ename, job, sal
2 FROM emp
3 WHERE job='SALESMAN'
4 OR job='PRESIDENT'
5 AND sal>1500;
57.
Rules of Precedence
Rulesof Precedence
ENAME JOB SAL
---------- --------- ---------
KING PRESIDENT 5000
ALLEN SALESMAN 1600
Use parentheses to force priority
Use parentheses to force priority.
.
SQL> SELECT ename, job, sal
2 FROM emp
3 WHERE (job='SALESMAN'
4 OR job='PRESIDENT')
5 AND sal>1500;
58.
ORDER BY Clause
ORDERBY Clause
Sort rows with the ORDER BY clause
Sort rows with the ORDER BY clause
ASC
ASC:
: ascending order, default
ascending order, default
DESC
DESC:
: descending order
descending order
The ORDER BY clause comes last in the
The ORDER BY clause comes last in the
SELECT statement
SELECT statement.
.
SQL> SELECT ename, job, deptno, hiredate
2 FROM emp
3 ORDER BY hiredate;
ENAME JOB DEPTNO HIREDATE
---------- --------- --------- ---------
SMITH CLERK 20 17-DEC-80
ALLEN SALESMAN 30 20-FEB-81
...
14 rows selected.
59.
Sorting in DescendingOrder
Sorting in Descending Order
SQL> SELECT ename, job, deptno, hiredate
2 FROM emp
3 ORDER BY hiredate DESC;
ENAME JOB DEPTNO HIREDATE
---------- --------- --------- ---------
ADAMS CLERK 20 12-JAN-83
SCOTT ANALYST 20 09-DEC-82
MILLER CLERK 10 23-JAN-82
JAMES CLERK 30 03-DEC-81
FORD ANALYST 20 03-DEC-81
KING PRESIDENT 10 17-NOV-81
MARTIN SALESMAN 30 28-SEP-81
...
14 rows selected.
60.
Sorting by ColumnAlias
Sorting by Column Alias
SQL> SELECT empno, ename, sal*12 annsal
2 FROM emp
3 ORDER BY annsal;
EMPNO ENAME ANNSAL
--------- ---------- ---------
7369 SMITH 9600
7900 JAMES 11400
7876 ADAMS 13200
7654 MARTIN 15000
7521 WARD 15000
7934 MILLER 15600
7844 TURNER 18000
...
14 rows selected.
61.
Sorting by MultipleColumns
Sorting by Multiple Columns
The order of ORDER BY list is the order of sort
The order of ORDER BY list is the order of sort.
.
• You can sort by a column that is not in the
SELECT list.
SQL> SELECT ename, deptno, sal
2 FROM emp
3 ORDER BY deptno, sal DESC;
ENAME DEPTNO SAL
---------- --------- ---------
KING 10 5000
CLARK 10 2450
MILLER 10 1300
FORD 20 3000
...
14 rows selected.
Practice Overview
Practice Overview
Selecting data and changing the order of rows displayed
Selecting data and changing the order of rows displayed
Restricting rows by using the WHERE clause
Restricting rows by using the WHERE clause
Using the double quotation marks in column aliases
Using the double quotation marks in column aliases
Objectives
Objectives
After completingthis lesson, you should be
After completing this lesson, you should be
able to do the following
able to do the following:
:
Describe various types of functions available
Describe various types of functions available
in SQL
in SQL
Use character, number, and date functions in
Use character, number, and date functions in
SELECT statements
SELECT statements
Describe the use of conversion functions
Describe the use of conversion functions
Two Types ofSQL Functions
Two Types of SQL Functions
Functions
Functions
Single
Single-
-row
row
functions
functions
Multiple
Multiple-
-row
row
functions
functions
69.
Single
Single-
-Row Functions
Row Functions
Manipulate data items
Manipulate data items
Accept arguments and return one value
Accept arguments and return one value
Act on each row returned
Act on each row returned
Return one result per row
Return one result per row
May modify the datatype
May modify the datatype
Can be nested
Can be nested
function_name (column|expression, [arg1, arg2,...])
Character Functions
Character Functions
CONCAT – joins 2 character strings
CONCAT – joins 2 character strings
INITCAP – returns a string with the initial letter only uppercase
INITCAP – returns a string with the initial letter only uppercase
LENGTH – returns the length of a string
LENGTH – returns the length of a string
LPAD, RPAD – returns a string with a specific number of
LPAD, RPAD – returns a string with a specific number of
characters added on the left or right side
characters added on the left or right side
LTRIM, RTRIM – returns a string with all instances of a specific
LTRIM, RTRIM – returns a string with all instances of a specific
character trimmed from the left or right side
character trimmed from the left or right side
REPLACE – replaces all instances of a character with another
REPLACE – replaces all instances of a character with another
character
character
UPPER/LOWER – returns a string in all upper/lower case
UPPER/LOWER – returns a string in all upper/lower case
letters
letters
SUBSTR
SUBSTR
INSTR
INSTR
73.
Function Result
Case ConversionFunctions
Case Conversion Functions
Convert case for character strings
Convert case for character strings
LOWER('SQL Course')
UPPER('SQL Course')
INITCAP('SQL Course')
sql course
SQL COURSE
Sql Course
74.
Using Case Conversion
UsingCase Conversion
Functions
Functions
Display the employee number, name, and
Display the employee number, name, and
department number for employee Blake
department number for employee Blake.
.
SQL> SELECT empno, ename, deptno
2 FROM emp
3 WHERE ename = 'blake';
no rows selected
no rows selected
EMPNO ENAME DEPTNO
--------- ---------- ---------
7698 BLAKE 30
SQL> SELECT empno, ename, deptno
2 FROM emp
3 WHERE ename = UPPER('blake');
Using the Character
Usingthe Character
Manipulation Functions
Manipulation Functions
SQL> SELECT ename, CONCAT (ename, job), LENGTH(ename),
2 INSTR(ename, 'A')
3 FROM emp
4 WHERE SUBSTR(job,1,5) = 'SALES';
ENAME CONCAT(ENAME,JOB) LENGTH(ENAME) INSTR(ENAME,'A')
---------- ------------------- ------------- ----------------
MARTIN MARTINSALESMAN 6 2
ALLEN ALLENSALESMAN 5 1
TURNER TURNERSALESMAN 6 0
WARD WARDSALESMAN 4 2
77.
Number Functions
Number Functions
ABS - absolute value
ABS - absolute value
CEIL – rounds a number up to the next integer
CEIL – rounds a number up to the next integer
FLOOR – rounds a number down to the previous
FLOOR – rounds a number down to the previous
integer
integer
MOD – returns the remainder of a number and a
MOD – returns the remainder of a number and a
divisor
divisor
POWER - raises a number to an exponent
POWER - raises a number to an exponent
ROUND - rounds a number
ROUND - rounds a number
SQRT – returns the square root of a value
SQRT – returns the square root of a value
TRUNC - truncates a number to the nearest whole
TRUNC - truncates a number to the nearest whole
number
number
78.
Number Functions
Number Functions
ROUND
ROUND:
: Rounds value to specified
Rounds value to specified
decimal
decimal
ROUND
ROUND(
(45.926, 2
45.926, 2)
)
45.93
45.93
TRUNC
TRUNC:
: Truncates value to specified
Truncates value to specified
decimal
decimal
TRUNC
TRUNC(
(45.926, 2
45.926, 2)
)
45.92
45.92
MOD
MOD:
: Returns remainder of division
Returns remainder of division
MOD
MOD(
(1600, 300
1600, 300)
)
79.
Using the ROUNDFunction
Using the ROUND Function
SQL> SELECT ROUND(45.923,2), ROUND(45.923,0),
2 ROUND(45.923,-1)
3 FROM DUAL;
ROUND(45.923,2) ROUND(45.923,0) ROUND(45.923,-1)
--------------- -------------- -----------------
45.92 46 50
80.
SQL> SELECT TRUNC(45.923,2),TRUNC(45.923),
2 TRUNC(45.923,-1)
3 FROM DUAL;
TRUNC(45.923,2) TRUNC(45.923) TRUNC(45.923,-1)
--------------- ------------- ---------------
45.92 45 40
Using the TRUNC Function
Using the TRUNC Function
81.
Using the MODFunction
Using the MOD Function
Calculate the remainder of the ratio of
Calculate the remainder of the ratio of
salary to commission for all employees
salary to commission for all employees
whose job title is salesman
whose job title is salesman.
.
SQL> SELECT ename, sal, comm, MOD(sal, comm)
2 FROM emp
3 WHERE job = 'SALESMAN';
ENAME SAL COMM MOD(SAL,COMM)
---------- --------- --------- -------------
MARTIN 1250 1400 1250
ALLEN 1600 300 100
TURNER 1500 0 1500
WARD 1250 500 250
82.
Working with Dates
Workingwith Dates
Oracle stores dates in an internal numeric
Oracle stores dates in an internal numeric
format
format:
: century, year, month, day, hours,
century, year, month, day, hours,
minutes, seconds
minutes, seconds.
.
The default date format is DD
The default date format is DD-
-MON
MON-
-YY
YY.
.
SYSDATE is a function returning date and
SYSDATE is a function returning date and
time
time.
.
DUAL is a dummy table used to view
DUAL is a dummy table used to view
SYSDATE
SYSDATE.
.
83.
Arithmetic with Dates
Arithmeticwith Dates
Add or subtract a number to or from a date
Add or subtract a number to or from a date
for a resultant
for a resultant date
date value
value.
.
Subtract two dates to find the
Subtract two dates to find the number
number of days
of days
between those dates
between those dates.
.
Add
Add hours
hours to a date by dividing the number of
to a date by dividing the number of
hours by 24
hours by 24.
.
84.
Date Arithmetic
Date Arithmetic
To find a date that is a specific number of
To find a date that is a specific number of
days before or after a known date, add or
days before or after a known date, add or
subtract the number from the known date
subtract the number from the known date
Example:
Example:
SELECT order_date + 30
SELECT order_date + 30
FROM cust_order;
FROM cust_order;
85.
Date Arithmetic
Date Arithmetic
To find the number of days between two
To find the number of days between two
known dates, subtract the later date from
known dates, subtract the later date from
the earlier date
the earlier date
Example:
Example:
SELECT SYSDATE – s_dob
SELECT SYSDATE – s_dob
FROM my_students;
FROM my_students;
86.
Using Arithmetic Operators
UsingArithmetic Operators
with Dates
with Dates
SQL> SELECT ename, (SYSDATE-hiredate)/7 WEEKS
2 FROM emp
3 WHERE deptno = 10;
ENAME WEEKS
---------- ---------
KING 830.93709
CLARK 853.93709
MILLER 821.36566
87.
Date Functions
Date Functions
Numberof months
between two dates
MONTHS_BETWEEN
ADD_MONTHS
NEXT_DAY
LAST_DAY
ROUND
TRUNC
Add calendar months to
date
Next day of the date
specified
Last day of the month
Round date
Truncate date
Function Description
Date Functions
Date Functions
ADD_MONTHS
ADD_MONTHS
returns a date that is a specific number of months
returns a date that is a specific number of months
after a given date
after a given date
Example:
Example:
SELECT ADD_MONTHS(SYSDATE, 6)
SELECT ADD_MONTHS(SYSDATE, 6)
FROM dual;
FROM dual;
91.
Date Functions
Date Functions
LAST_DATE
LAST_DATE
Returns the date that is the last day of the month
Returns the date that is the last day of the month
specified in the current date
specified in the current date
Example:
Example:
SELECT LAST_DATE(order_date)
SELECT LAST_DATE(order_date)
FROM cust_order
FROM cust_order
WHERE order_id = 1057;
WHERE order_id = 1057;
92.
Date Functions
Date Functions
MONTHS_BETWEEN
MONTHS_BETWEEN
Returns the number of months between two
Returns the number of months between two
input dates
input dates
Example:
Example:
SELECT MONTHS_BETWEEN(order_date,
SELECT MONTHS_BETWEEN(order_date,
SYSDATE)
SYSDATE)
FROM cust_order
FROM cust_order
WHERE order_id = 1057;
WHERE order_id = 1057;
Implicit Datatype Conversion
ImplicitDatatype Conversion
For assignments, the Oracle Server can
For assignments, the Oracle Server can
automatically convert the following
automatically convert the following:
:
VARCHAR2 or CHAR
From To
VARCHAR2 or CHAR
NUMBER
DATE
NUMBER
DATE
VARCHAR2
VARCHAR2
95.
Implicit Datatype Conversion
ImplicitDatatype Conversion
For expression evaluation, the Oracle Server
For expression evaluation, the Oracle Server
can automatically convert the following
can automatically convert the following:
:
VARCHAR2 or CHAR
From To
VARCHAR2 or CHAR
NUMBER
DATE
96.
Explicit Datatype Conversion
ExplicitDatatype Conversion
NUMBER
NUMBER CHARACTER
CHARACTER
TO_CHAR
TO_CHAR
TO_NUMBER
TO_NUMBER
DATE
DATE
TO_CHAR
TO_CHAR
TO_DATE
TO_DATE
97.
TO_CHAR Function withDates
TO_CHAR Function with Dates
The format model:
Must be enclosed in single quotation marks and is
Must be enclosed in single quotation marks and is
case sensitive
case sensitive
Can include any valid date format element
Can include any valid date format element
Has an
Has an fm
fm element to remove padded blanks or
element to remove padded blanks or
suppress leading zeros
suppress leading zeros
Is separated from the date value by a comma
Is separated from the date value by a comma
TO_CHAR(date, 'fmt')
98.
YYYY
Elements of DateFormat Model
Elements of Date Format Model
YEAR
MM
MONTH
DY
DAY
Full year in numbers
Year spelled out
Two-digit value for month
Three-letter abbreviation of the
day of the week
Full name of the day
Full name of the month
99.
Elements of DateFormat Model
Elements of Date Format Model
Time elements format the time portion of
Time elements format the time portion of
the date
the date.
.
Add character strings by enclosing them in
Add character strings by enclosing them in
double quotation marks
double quotation marks.
.
Number suffixes spell out numbers
Number suffixes spell out numbers.
.
HH24:MI:SS AM 15:45:32 PM
DD "of" MONTH 12 of OCTOBER
ddspth fourteenth
100.
Using TO_CHAR Function
UsingTO_CHAR Function
with Dates
with Dates
SQL> SELECT ename,
2 TO_CHAR(hiredate, 'fmDD Month YYYY') HIREDATE
3 FROM emp;
ENAME HIREDATE
---------- -----------------
KING 17 November 1981
BLAKE 1 May 1981
CLARK 9 June 1981
JONES 2 April 1981
MARTIN 28 September 1981
ALLEN 20 February 1981
...
14 rows selected.
101.
TO_CHAR Function withNumbers
TO_CHAR Function with Numbers
Use these formats with the TO_CHAR function
Use these formats with the TO_CHAR function
to display a number value as a character
to display a number value as a character:
:
TO_CHAR(number, 'fmt')
9
0
$
L
.
,
Represents a number
Forces a zero to be displayed
Places a floating dollar sign
Uses the floating local currency symbol
Prints a decimal point
Prints a thousand indicator
102.
Using TO_CHAR Function
UsingTO_CHAR Function
with Numbers
with Numbers
SQL> SELECT TO_CHAR(sal,'$99,999') SALARY
2 FROM emp
3 WHERE ename = 'SCOTT';
SALARY
--------
$3,000
103.
TO_NUMBER and
TO_NUMBER and
TO_DATEFunctions
TO_DATE Functions
Convert a character string to a number format
Convert a character string to a number format
using the
using the TO_NUMBER
TO_NUMBER function
function
TO_NUMBER(char[, 'fmt'])
• Convert a character string to a date
format using the TO_DATE function
TO_DATE(char[, 'fmt'])
104.
NVL Function
NVL Function
Converts null to an actual value
Converts null to an actual value
Datatypes that can be used are date, character,
Datatypes that can be used are date, character,
and number
and number.
.
Datatypes must match
Datatypes must match
NVL
NVL(
(comm,0
comm,0)
)
NVL
NVL(
(hiredate,'01-JAN-97'
hiredate,'01-JAN-97')
)
NVL
NVL(
(job,'No Job Yet'
job,'No Job Yet')
)
105.
SQL> SELECT ename,sal, comm, (sal*12)+NVL(comm,0)
2 FROM emp;
Using the NVL Function
Using the NVL Function
ENAME SAL COMM (SAL*12)+NVL(COMM,0)
---------- --------- --------- --------------------
KING 5000 60000
BLAKE 2850 34200
CLARK 2450 29400
JONES 2975 35700
MARTIN 1250 1400 16400
ALLEN 1600 300 19500
...
14 rows selected.
106.
Nesting Functions
Nesting Functions
Single
Single-
-row functions can be nested to any level
row functions can be nested to any level.
.
Nested functions are evaluated from deepest level to
Nested functions are evaluated from deepest level to
the least
the least-
-deep level
deep level.
.
F3(F2(F1(col,arg1),arg2),arg3)
Step 1 = Result 1
Step 2 = Result 2
Step 3 = Result 3
107.
Nesting Functions
Nesting Functions
SQL>SELECT ename,
2 NVL(TO_CHAR(mgr),'No Manager')
3 FROM emp
4 WHERE mgr IS NULL;
ENAME NVL(TO_CHAR(MGR),'NOMANAGER')
---------- -----------------------------
KING No Manager
108.
Summary
Summary
Use functionsto do the following
Use functions to do the following:
:
Perform calculations on data
Perform calculations on data
Modify individual data items
Modify individual data items
Manipulate output for groups of rows
Manipulate output for groups of rows
Alter date formats for display
Alter date formats for display
Convert column datatypes
Convert column datatypes
Objectives
Objectives
After completingthis lesson, you should be
After completing this lesson, you should be
able to do the following
able to do the following:
:
Identify the available group functions
Identify the available group functions
Describe the use of group functions
Describe the use of group functions
Group data using the GROUP BY clause
Group data using the GROUP BY clause
Include or exclude grouped rows by using the
Include or exclude grouped rows by using the
HAVING clause
HAVING clause
112.
What Are GroupFunctions?
What Are Group Functions?
Group functions operate on sets of rows to give
Group functions operate on sets of rows to give
one result per group
one result per group.
.
EMP
EMP
“
“maximum
maximum
salary in
salary in
the EMP table”
the EMP table”
DEPTNO SAL
--------- ---------
10 2450
10 5000
10 1300
20 800
20 1100
20 3000
20 3000
20 2975
30 1600
30 2850
30 1250
30 950
30 1500
30 1250
MAX(SAL)
---------
5000
113.
Types of GroupFunctions
Types of Group Functions
AVG
AVG
COUNT
COUNT
COUNT(*)
COUNT(*)
MAX
MAX
MIN
MIN
SUM
SUM
114.
Using Group Functions
UsingGroup Functions
SELECT [column,] group_function(column)
FROM table
[WHERE condition]
[GROUP BY column]
[ORDER BY column];
115.
Using AVG andSUM Functions
Using AVG and SUM Functions
AVG(SAL) MAX(SAL) MIN(SAL) SUM(SAL)
-------- --------- --------- ---------
1400 1600 1250 5600
You can use AVG and SUM for numeric data
You can use AVG and SUM for numeric data.
.
SQL> SELECT AVG(sal), MAX(sal),
2 MIN(sal), SUM(sal)
3 FROM emp
4 WHERE job LIKE 'SALES%';
116.
Using MIN andMAX Functions
Using MIN and MAX Functions
You can use MIN and MAX for any datatype
You can use MIN and MAX for any datatype.
.
SQL> SELECT MIN(hiredate), MAX(hiredate)
2 FROM emp;
MIN(HIRED MAX(HIRED
--------- ---------
17-DEC-80 12-JAN-83
117.
Using the COUNTFunction
Using the COUNT Function
COUNT(*)
---------
6
SQL> SELECT COUNT(*)
2 FROM emp
3 WHERE deptno = 30;
COUNT
COUNT(*)
(*) returns the number of rows in a
returns the number of rows in a
table
table.
.
118.
Using the COUNTFunction
Using the COUNT Function
COUNT
COUNT(
(expr
expr)
) returns the number of
returns the number of
nonnull rows
nonnull rows.
.
SQL> SELECT COUNT(comm)
2 FROM emp
3 WHERE deptno = 30;
COUNT(COMM)
-----------
4
119.
Group Functions andNull
Group Functions and Null
Values
Values
Group functions ignore null values in the
Group functions ignore null values in the
column
column.
.
SQL> SELECT AVG(comm)
2 FROM emp;
AVG(COMM)
---------
550
120.
Using the NVLFunction
Using the NVL Function
with Group Functions
with Group Functions
The NVL function forces group functions to
The NVL function forces group functions to
include null values
include null values.
.
SQL> SELECT AVG(NVL(comm,0))
2 FROM emp;
AVG(NVL(COMM,0))
----------------
157.14286
121.
Creating Groups ofData
Creating Groups of Data
EMP
EMP
“
“average
average
salary
salary
in EMP
in EMP
table
table
for each
for each
department”
department”
2916.6667
2916.6667
2175
2175
1566.6667
1566.6667
DEPTNO SAL
--------- ---------
10 2450
10 5000
10 1300
20 800
20 1100
20 3000
20 3000
20 2975
30 1600
30 2850
30 1250
30 950
30 1500
30 1250
DEPTNO AVG(SAL)
------- ---------
10 2916.6667
20 2175
30 1566.6667
122.
Creating Groups ofData
Creating Groups of Data:
:
GROUP BY Clause
GROUP BY Clause
SELECT column, group_function(column)
FROM table
[WHERE condition]
[GROUP BY group_by_expression]
[ORDER BY column];
Divide rows in a table into smaller groups by
Divide rows in a table into smaller groups by
using the GROUP BY clause
using the GROUP BY clause.
.
123.
Using the GROUPBY Clause
Using the GROUP BY Clause
All columns in the SELECT list that are not
All columns in the SELECT list that are not
in group functions must be in the GROUP
in group functions must be in the GROUP
BY clause
BY clause.
.
SQL> SELECT deptno, AVG(sal)
2 FROM emp
3 GROUP BY deptno;
DEPTNO AVG(SAL)
--------- ---------
10 2916.6667
20 2175
30 1566.6667
124.
Using the GROUPBY Clause
Using the GROUP BY Clause
The GROUP BY column does not have to
The GROUP BY column does not have to
be in the SELECT list
be in the SELECT list.
.
SQL> SELECT AVG(sal)
2 FROM emp
3 GROUP BY deptno;
AVG(SAL)
---------
2916.6667
2175
1566.6667
125.
Grouping by More
Groupingby More
Than One Column
Than One Column
EMP
EMP
“
“sum salaries in
sum salaries in
the EMP table
the EMP table
for each job,
for each job,
grouped by
grouped by
department”
department”
DEPTNO JOB SAL
--------- --------- ---------
10 MANAGER 2450
10 PRESIDENT 5000
10 CLERK 1300
20 CLERK 800
20 CLERK 1100
20 ANALYST 3000
20 ANALYST 3000
20 MANAGER 2975
30 SALESMAN 1600
30 MANAGER 2850
30 SALESMAN 1250
30 CLERK 950
30 SALESMAN 1500
30 SALESMAN 1250
JOB SUM(SAL)
--------- ---------
CLERK 1300
MANAGER 2450
PRESIDENT 5000
ANALYST 6000
CLERK 1900
MANAGER 2975
CLERK 950
MANAGER 2850
SALESMAN 5600
DEPTNO
--------
10
10
10
20
20
20
30
30
30
126.
Using the GROUPBY Clause
Using the GROUP BY Clause
on Multiple Columns
on Multiple Columns
SQL> SELECT deptno, job, sum(sal)
2 FROM emp
3 GROUP BY deptno, job;
DEPTNO JOB SUM(SAL)
--------- --------- ---------
10 CLERK 1300
10 MANAGER 2450
10 PRESIDENT 5000
20 ANALYST 6000
20 CLERK 1900
...
9 rows selected.
127.
Illegal Queries
Illegal Queries
UsingGroup Functions
Using Group Functions
Any column or expression in the SELECT
Any column or expression in the SELECT
list that is not an aggregate function must be
list that is not an aggregate function must be
in the GROUP BY clause
in the GROUP BY clause.
.
SQL> SELECT deptno, COUNT(ename)
2 FROM emp;
SELECT deptno, COUNT(ename)
*
ERROR at line 1:
ORA-00937: not a single-group group function
Column missing in the GROUP BY clause
Column missing in the GROUP BY clause
128.
Illegal Queries
Illegal Queries
UsingGroup Functions
Using Group Functions
You cannot use the WHERE clause to restrict groups
You cannot use the WHERE clause to restrict groups.
.
You use the HAVING clause to restrict groups
You use the HAVING clause to restrict groups.
.
SQL> SELECT deptno, AVG(sal)
2 FROM emp
3 WHERE AVG(sal) > 2000
4 GROUP BY deptno;
WHERE AVG(sal) > 2000
*
ERROR at line 3:
ORA-00934: group function is not allowed here
Cannot use the WHERE clause
Cannot use the WHERE clause
to restrict groups
to restrict groups
129.
Excluding Group Results
ExcludingGroup Results
“
“maximum
maximum
salary
salary
per department
per department
greater than
greater than
$2900”
$2900”
EMP
EMP
5000
5000
3000
3000
2850
2850
DEPTNO SAL
--------- ---------
10 2450
10 5000
10 1300
20 800
20 1100
20 3000
20 3000
20 2975
30 1600
30 2850
30 1250
30 950
30 1500
30 1250
DEPTNO MAX(SAL)
--------- ---------
10 5000
20 3000
130.
Excluding Group Results
ExcludingGroup Results:
:
HAVING Clause
HAVING Clause
Use the HAVING clause to restrict groups
Use the HAVING clause to restrict groups
Rows are grouped
Rows are grouped.
.
The group function is applied
The group function is applied.
.
Groups matching the HAVING clause are
Groups matching the HAVING clause are
displayed
displayed.
.
SELECT column, group_function
FROM table
[WHERE condition]
[GROUP BY group_by_expression]
[HAVING group_condition]
[ORDER BY column];
131.
Using the HAVINGClause
Using the HAVING Clause
SQL> SELECT deptno, max(sal)
2 FROM emp
3 GROUP BY deptno
4 HAVING max(sal)>2900;
DEPTNO MAX(SAL)
--------- ---------
10 5000
20 3000
132.
Using the HAVINGClause
Using the HAVING Clause
SQL> SELECT job, SUM(sal) PAYROLL
2 FROM emp
3 WHERE job NOT LIKE 'SALES%'
4 GROUP BY job
6 ORDER BY SUM(sal);
JOB PAYROLL
--------- ---------
ANALYST 6000
MANAGER 8275
5 HAVING SUM(sal)>5000
133.
Nesting Group Functions
NestingGroup Functions
SQL> SELECT max(avg(sal))
2 FROM emp
3 GROUP BY deptno;
MAX(AVG(SAL))
-------------
2916.6667
Display the maximum average salary
Display the maximum average salary.
.
134.
Summary
Summary
SELECT column, group_function(column)
FROMtable
[WHERE condition]
[GROUP BY group_by_expression]
[HAVING group_condition]
[ORDER BY column];
Order of evaluation of the clauses
Order of evaluation of the clauses:
:
WHERE clause
WHERE clause
GROUP BY clause
GROUP BY clause
HAVING clause
HAVING clause
Objectives
Objectives
After completingthis lesson, you should be
After completing this lesson, you should be
able to do the following
able to do the following:
:
Describe each DML statement
Describe each DML statement
Insert rows into a table
Insert rows into a table
Update rows in a table
Update rows in a table
Delete rows from a table
Delete rows from a table
Control transactions
Control transactions
138.
Data Manipulation Language
DataManipulation Language
A DML statement is executed when you
A DML statement is executed when you:
:
Add new rows to a table
Add new rows to a table
Modify existing rows in a table
Modify existing rows in a table
Remove existing rows from a table
Remove existing rows from a table
A
A transaction
transaction consists of a collection of DML
consists of a collection of DML
statements that form a logical unit of work
statements that form a logical unit of work.
.
139.
Transactions
Transactions
Transaction
Transaction: seriesof action queries that represent a logical unit
: series of action queries that represent a logical unit
of work
of work
consisting of one or more SQL DML commands
consisting of one or more SQL DML commands
INSERT, UPDATE, DELETE
INSERT, UPDATE, DELETE
All transaction commands must succeed or none can succeed
All transaction commands must succeed or none can succeed
User can commit (save) changes
User can commit (save) changes
User can roll back (discard) changes
User can roll back (discard) changes
Pending transaction
Pending transaction: a transaction waiting to be committed or
: a transaction waiting to be committed or
rolled back
rolled back
Oracle DBMS locks records associated with pending transactions
Oracle DBMS locks records associated with pending transactions
Other users cannot view or modify locked records
Other users cannot view or modify locked records
140.
Adding a NewRow to a Table
Adding a New Row to a Table
DEPT
DEPT
DEPTNO DNAME LOC
------ ---------- --------
10 ACCOUNTING NEW YORK
20 RESEARCH DALLAS
30 SALES CHICAGO
40 OPERATIONS BOSTON
New row
New row
50 DEVELOPMENT DETROIT
DEPT
DEPT
DEPTNO DNAME LOC
------ ---------- --------
10 ACCOUNTING NEW YORK
20 RESEARCH DALLAS
30 SALES CHICAGO
40 OPERATIONS BOSTON
“…
“…insert a new row
insert a new row
into DEPT table…”
into DEPT table…”
50 DEVELOPMENT DETROIT
141.
The INSERT Statement
TheINSERT Statement
Add new rows to a table by using the INSERT
Add new rows to a table by using the INSERT
statement
statement.
.
Only one row is inserted at a time with this
Only one row is inserted at a time with this
syntax
syntax.
.
INSERT INTO table [(column [, column...])]
VALUES (value [, value...]);
142.
Inserting New Rows
InsertingNew Rows
Insert a new row containing values for each
Insert a new row containing values for each
column
column.
.
List values in the default order of the columns
List values in the default order of the columns
in the table
in the table.
.
Optionally list the columns in the INSERT
Optionally list the columns in the INSERT
clause
clause.
.
Enclose character and date values within single
Enclose character and date values within single
quotation marks
quotation marks.
.
SQL> INSERT INTO dept (deptno, dname, loc)
2 VALUES (50, 'DEVELOPMENT', 'DETROIT');
1 row created
1 row created.
.
143.
Inserting Rows withNull Values
Inserting Rows with Null Values
Implicit method
Implicit method:
: Omit the column from the
Omit the column from the
column list
column list.
.
SQL> INSERT INTO dept (deptno, dname )
2 VALUES (60, 'MIS');
1 row created
1 row created.
.
• Explicit method: Specify the NULL
keyword.
SQL> INSERT INTO dept
2 VALUES (70, 'FINANCE', NULL);
1 row created
1 row created.
.
144.
Inserting Special Values
InsertingSpecial Values
The SYSDATE function records the
The SYSDATE function records the
current date and time
current date and time.
.
SQL> INSERT INTO emp (empno, ename, job,
2 mgr, hiredate, sal, comm,
3 deptno)
4 VALUES (7196, 'GREEN', 'SALESMAN',
5 7782, SYSDATE, 2000, NULL,
6 10);
1 row created
1 row created.
.
145.
Inserting Specific DateValues
Inserting Specific Date Values
Add a new employee
Add a new employee.
.
SQL> INSERT INTO emp
2 VALUES (2296,'AROMANO','SALESMAN',7782,
3 TO_DATE('FEB 3, 1997', 'MON DD, YYYY'),
4 1300, NULL, 10);
1 row created
1 row created.
.
• Verify your addition.
EMPNO ENAME JOB MGR HIREDATE SAL COMM DEPTNO
----- ------- -------- ---- --------- ---- ---- ------
2296 AROMANO SALESMAN 7782 03-FEB-97 1300 10
146.
Inserting Values byUsing
Inserting Values by Using
Substitution Variables
Substitution Variables
Create an interactive script by using SQL
Create an interactive script by using SQL*
*Plus
Plus
substitution parameters
substitution parameters.
.
SQL> INSERT INTO dept (deptno, dname, loc)
2 VALUES (&department_id,
3 '&department_name', '&location');
Enter value for department_id: 80
80
Enter value for department_name: EDUCATION
EDUCATION
Enter value for location: ATLANTA
ATLANTA
1 row created.
147.
Creating a Script
Creatinga Script
with Customized Prompts
with Customized Prompts
ACCEPT stores the value in a variable
ACCEPT stores the value in a variable.
.
PROMPT displays your customized text
PROMPT displays your customized text.
.
ACCEPT department_id PROMPT 'Please enter the -
department number:'
ACCEPT department_name PROMPT 'Please enter -
the department name:'
ACCEPT location PROMPT 'Please enter the -
location:'
INSERT INTO dept (deptno, dname, loc)
VALUES (&department_id, '&department_name',
'&location');
148.
Copying Rows
Copying Rows
fromAnother Table
from Another Table
Write your INSERT statement with a
Write your INSERT statement with a
subquery
subquery.
.
Do not use the VALUES clause
Do not use the VALUES clause.
.
Match the number of columns in the INSERT
Match the number of columns in the INSERT
clause to those in the subquery
clause to those in the subquery.
.
SQL> INSERT INTO managers(id, name, salary, hiredate)
2 SELECT empno, ename, sal, hiredate
3 FROM emp
4 WHERE job = 'MANAGER';
3 rows created
3 rows created.
.
149.
Changing Data ina Table
Changing Data in a Table
EMP
EMP
“…
“…update a row
update a row
in EMP table…”
in EMP table…”
EMP
EMP
EMPNO ENAME JOB ... DEPTNO
7839 KING PRESIDENT 10
7698 BLAKE MANAGER 30
7782 CLARK MANAGER 10
7566 JONES MANAGER 20
...
20
EMPNO ENAME JOB ... DEPTNO
7839 KING PRESIDENT 10
7698 BLAKE MANAGER 30
7782 CLARK MANAGER 10
7566 JONES MANAGER 20
...
150.
The UPDATE Statement
TheUPDATE Statement
Modify existing rows with the UPDATE
Modify existing rows with the UPDATE
statement
statement.
.
Update more than one row at a time, if
Update more than one row at a time, if
required
required.
.
UPDATE table
SET column = value [, column = value, ...]
[WHERE condition];
151.
Updating Rows ina Table
Updating Rows in a Table
Specific row or rows are modified when you
Specific row or rows are modified when you
specify the WHERE clause
specify the WHERE clause.
.
All rows in the table are modified if you omit
All rows in the table are modified if you omit
the WHERE clause
the WHERE clause.
.
SQL> UPDATE emp
2 SET deptno = 20
3 WHERE empno = 7782;
1 row updated
1 row updated.
.
SQL> UPDATE employee
2 SET deptno = 20;
14 rows updated
14 rows updated.
.
152.
Updating with
Updating with
Multiple
Multiple-
-ColumnSubquery
Column Subquery
SQL> UPDATE emp
2 SET (job, deptno) =
3 (SELECT job, deptno
4 FROM emp
5 WHERE empno = 7499)
6 WHERE empno = 7698;
1 row updated
1 row updated.
.
Update employee 7698’s job and department
Update employee 7698’s job and department
to match that of employee 7499
to match that of employee 7499.
.
153.
Updating Rows Based
UpdatingRows Based
on Another Table
on Another Table
Use subqueries in UPDATE statements to
Use subqueries in UPDATE statements to
update rows in a table based on values from
update rows in a table based on values from
another table
another table.
.
SQL> UPDATE employee
2 SET deptno = (SELECT deptno
3 FROM emp
4 WHERE empno = 7788)
5 WHERE job = (SELECT job
6 FROM emp
7 WHERE empno = 7788);
2 rows updated
2 rows updated.
.
154.
UPDATE emp
*
ERROR atline 1:
ORA-02291: integrity constraint (USR.EMP_DEPTNO_FK)
violated - parent key not found
SQL> UPDATE emp
2 SET deptno = 55
3 WHERE deptno = 10;
Updating Rows
Updating Rows:
:
Integrity Constraint Error
Integrity Constraint Error
Department number 55 does not exist
Department number 55 does not exist
155.
“…
“…delete a row
deletea row
from DEPT table…”
from DEPT table…”
Removing a Row from a Table
Removing a Row from a Table
DEPT
DEPT
DEPTNO DNAME LOC
------ ---------- --------
10 ACCOUNTING NEW YORK
20 RESEARCH DALLAS
30 SALES CHICAGO
40 OPERATIONS BOSTON
50 DEVELOPMENT DETROIT
60 MIS
...
DEPT
DEPT
DEPTNO DNAME LOC
------ ---------- --------
10 ACCOUNTING NEW YORK
20 RESEARCH DALLAS
30 SALES CHICAGO
40 OPERATIONS BOSTON
60 MIS
...
156.
The DELETE Statement
TheDELETE Statement
You can remove existing rows from a table by
You can remove existing rows from a table by
using the DELETE statement
using the DELETE statement.
.
DELETE [FROM] table
[WHERE condition];
157.
Specific rowsare deleted when you specify the
Specific rows are deleted when you specify the
WHERE clause
WHERE clause.
.
All rows in the table are deleted if you omit
All rows in the table are deleted if you omit
the WHERE clause
the WHERE clause.
.
Deleting Rows from a Table
Deleting Rows from a Table
SQL> DELETE FROM department
2 WHERE dname = 'DEVELOPMENT';
1 row deleted
1 row deleted.
.
SQL> DELETE FROM department;
4 rows deleted
4 rows deleted.
.
158.
Deleting Rows Based
DeletingRows Based
on Another Table
on Another Table
Use subqueries in DELETE statements to
Use subqueries in DELETE statements to
remove rows from a table based on values from
remove rows from a table based on values from
another table
another table.
.
SQL> DELETE FROM employee
2 WHERE deptno =
3 (SELECT deptno
4 FROM dept
5 WHERE dname ='SALES');
6 rows deleted
6 rows deleted.
.
159.
Deleting Rows
Deleting Rows:
:
IntegrityConstraint Error
Integrity Constraint Error
SQL> DELETE FROM dept
2 WHERE deptno = 10;
DELETE FROM dept
*
ERROR at line 1:
ORA-02292: integrity constraint (USR.EMP_DEPTNO_FK)
violated - child record found
You cannot delete a row
You cannot delete a row
that contains a primary key
that contains a primary key
that is used as a foreign key
that is used as a foreign key
in another table
in another table.
.
160.
Database Transactions
Database Transactions
Consist of one of the following statements
Consist of one of the following statements:
:
DML statements that make up one consistent
DML statements that make up one consistent
change to the data
change to the data
One DDL statement
One DDL statement
One DCL statement
One DCL statement
161.
Database Transactions
Database Transactions
Begin when the first executable SQL
Begin when the first executable SQL
statement is executed
statement is executed
End with one of the following events
End with one of the following events:
:
COMMIT or ROLLBACK is issued
COMMIT or ROLLBACK is issued
DDL or DCL statement executes
DDL or DCL statement executes (
(automatic
automatic
commit
commit)
)
User exits
User exits
System crashes
System crashes
162.
Advantages of COMMIT
Advantagesof COMMIT
and ROLLBACK Statements
and ROLLBACK Statements
Ensure data consistency
Ensure data consistency
Preview data changes before making changes
Preview data changes before making changes
permanent
permanent
Group logically related operations
Group logically related operations
163.
DELETE
DELETE
Controlling Transactions
Controlling Transactions
Transaction
Transaction
Savepoint A
Savepoint A
ROLLBACK to Savepoint B
ROLLBACK to Savepoint B
DELETE
DELETE
Savepoint B
Savepoint B
COMMIT
COMMIT
INSERT
INSERT
UPDATE
UPDATE
ROLLBACK to Savepoint A
ROLLBACK to Savepoint A
INSERT
INSERT
UPDATE
UPDATE
INSERT
INSERT
ROLLBACK
ROLLBACK
INSERT
INSERT
164.
An automaticcommit occurs under the
An automatic commit occurs under the
following circumstances
following circumstances:
:
DDL statement is issued
DDL statement is issued
DCL statement is issued
DCL statement is issued
Normal exit from SQL
Normal exit from SQL*
*Plus, without explicitly
Plus, without explicitly
issuing COMMIT or ROLLBACK
issuing COMMIT or ROLLBACK
An automatic rollback occurs under an
An automatic rollback occurs under an
abnormal termination of SQL
abnormal termination of SQL*
*Plus or a
Plus or a
system failure
system failure.
.
Implicit Transaction Processing
Implicit Transaction Processing
165.
State of theData Before
State of the Data Before
COMMIT or ROLLBACK
COMMIT or ROLLBACK
The previous state of the data can be recovered
The previous state of the data can be recovered.
.
The current user can review the results of the DML
The current user can review the results of the DML
operations by using the SELECT statement
operations by using the SELECT statement.
.
Other users
Other users cannot
cannot view the results of the DML
view the results of the DML
statements by the current user
statements by the current user.
.
The affected rows are
The affected rows are locked
locked; other users cannot
; other users cannot
change the data within the affected rows
change the data within the affected rows.
.
166.
State of theData After COMMIT
State of the Data After COMMIT
Data changes are made permanent in the
Data changes are made permanent in the
database
database.
.
The previous state of the data is permanently lost
The previous state of the data is permanently lost.
.
All users can view the results
All users can view the results.
.
Locks on the affected rows are released; those
Locks on the affected rows are released; those
rows are available for other users to manipulate
rows are available for other users to manipulate.
.
All savepoints are erased
All savepoints are erased.
.
167.
Committing Data
Committing Data
SQL>UPDATE emp
2 SET deptno = 10
3 WHERE empno = 7782;
1 row updated
1 row updated.
.
Make the changes
Make the changes.
.
• Commit the changes.
SQL> COMMIT;
Commit complete
Commit complete.
.
168.
State of theData After ROLLBACK
State of the Data After ROLLBACK
Discard all pending changes by using the
Discard all pending changes by using the
ROLLBACK statement
ROLLBACK statement.
.
Data changes are undone
Data changes are undone.
.
Previous state of the data is restored
Previous state of the data is restored.
.
Locks on the affected rows are released
Locks on the affected rows are released.
.
SQL> DELETE FROM employee;
14 rows deleted
14 rows deleted.
.
SQL> ROLLBACK;
Rollback complete
Rollback complete.
.
169.
Rolling Back Changes
RollingBack Changes
to a Marker
to a Marker
Create a marker in a current transaction by using the
Create a marker in a current transaction by using the
SAVEPOINT statement
SAVEPOINT statement.
.
Roll back to that marker by using the ROLLBACK
Roll back to that marker by using the ROLLBACK
TO SAVEPOINT statement
TO SAVEPOINT statement.
.
SQL> UPDATE...
SQL> SAVEPOINT update_done;
Savepoint created
Savepoint created.
.
SQL> INSERT...
SQL> ROLLBACK TO update_done;
Rollback complete
Rollback complete.
.
170.
Truncating Tables
Truncating Tables
Removes all table data without saving any
Removes all table data without saving any
rollback information
rollback information
Advantage: fast way to delete table data
Advantage: fast way to delete table data
Disadvantage: can’t be undone
Disadvantage: can’t be undone
Syntax:
Syntax:
TRUNCATE TABLE
TRUNCATE TABLE tablename
tablename;
;
171.
Summary
Summary
Description
Adds a newrow to the table
Modifies existing rows in the table
Removes existing rows from the table
Makes all pending changes permanent
Allows a rollback to the savepoint marker
Discards all pending data changes
Statement
INSERT
UPDATE
DELETE
COMMIT
SAVEPOINT
ROLLBACK
Editor's Notes
#1 Lesson Aim
To extract data from the database, you need to use the structured query language (SQL) SELECT statement. You may need to restrict the columns that are displayed. This lesson describes all the SQL statements that you need to perform these actions.
You may want to create SELECT statements that can be used time and time again. This lesson also covers the use of SQL*Plus commands to execute SQL statements.
#2 Lesson Aim
To extract data from the database, you need to use the structured query language (SQL) SELECT statement. You may need to restrict the columns that are displayed. This lesson describes all the SQL statements that you need to perform these actions.
You may want to create SELECT statements that can be used time and time again. This lesson also covers the use of SQL*Plus commands to execute SQL statements.
#4 Lesson Aim
To extract data from the database, you need to use the structured query language (SQL) SELECT statement. You may need to restrict the columns that are displayed. This lesson describes all the SQL statements that you need to perform these actions.
You may want to create SELECT statements that can be used time and time again. This lesson also covers the use of SQL*Plus commands to execute SQL statements.
#5 Capabilities of SQL SELECT Statements
A SELECT statement retrieves information from the database. Using a SELECT statement, you can do the following:
Selection: You can use the selection capability in SQL to choose the rows in a table that you want returned by a query. You can use various criteria to selectively restrict the rows that you see.
Projection: You can use the projection capability in SQL to choose the columns in a table that you want returned by your query. You can choose as few or as many columns of the table as you require.
Join: You can use the join capability in SQL to bring together data that is stored in different tables by creating a link between them. You will learn more about joins in a later lesson.
Instructor Note
Inform students that selection and projection are often considered horizontal and vertical partitioning.
#6 Basic SELECT Statement
In its simplest form, a SELECT statement must include the following:
A SELECT clause, which specifies the columns to be displayed
A FROM clause, which specifies the table containing the columns listed in the SELECT clause
In the syntax:
SELECT is a list of one or more columns.
DISTINCT suppresses duplicates.
* selects all columns.
column selects the named column.
alias gives selected columns different headings.
FROM table specifies the table containing the columns.
Note: Throughout this course, the words keyword, clause, and statement are used.
A keyword refers to an individual SQL element.
For example, SELECT and FROM are keywords.
A clause is a part of a SQL statement.
For example, SELECT empno, ename, ... is a clause.
A statement is a combination of two or more clauses.
For example, SELECT * FROM emp is a SQL statement.
#7 Writing SQL Statements
Using the following simple rules and guidelines, you can construct valid statements that are both easy to read and easy to edit:
• SQL statements are not case sensitive, unless indicated.
SQL statements can be entered on one or many lines.
• Keywords cannot be split across lines or abbreviated.
Clauses are usually placed on separate lines for readability and ease of editing.
• Tabs and indents can be used to make code more readable.
Keywords typically are entered in uppercase; all other words, such as table names and columns, are entered in lowercase.
• Within SQL*Plus, a SQL statement is entered at the SQL prompt, and the subsequent lines are numbered. This is called the SQL buffer. Only one statement can be current at any time within the buffer.
Executing SQL Statements
Place a semicolon (;) at the end of the last clause.
Place a slash on the last line in the buffer.
Place a slash at the SQL prompt.
Issue a SQL*Plus RUN command at the SQL prompt.
#8 Selecting All Columns, All Rows
You can display all columns of data in a table by following the SELECT keyword with an asterisk (*). In the example on the slide, the department table contains three columns: DEPTNO, DNAME, and LOC. The table contains four rows, one for each department.
You can also display all columns in the table by listing all the columns after the SELECT keyword. For example, the following SQL statement, like the example on the slide, displays all columns and all rows of the DEPT table:
Instructor Note
Let the students know that details of all the tables are given in Appendix B.
#9 Selecting Specific Columns, All Rows
You can use the SELECT statement to display specific columns of the table by specifying the column names, separated by commas. The example on the slide displays all the department numbers and locations from the DEPT table.
In the SELECT clause, specify the columns that you want to see, in the order in which you want them to appear in the output. For example, to display location before department number, you use the following statement:
Instructor Note
You can also select from pseudocolumns. A pseudocolumn behaves like a table column but is not actually stored in the table. You cannot insert or delete values of the pseudocolumns. The available pseudocolumns are CURRVAL, NEXTVAL, LEVEL, ROWID, and ROWNUM.
#10 Column Heading Defaults
Character column heading and data as well as date column heading and data are left-justified within a column width. Number headings and data are right-justified.
Character and date column headings can be truncated, but number headings cannot be truncated. The column headings appear in uppercase by default. You can override the column heading display with an alias. Column aliases are covered later in this lesson.
#11 Arithmetic Expressions
You may need to modify the way in which data is displayed, perform calculations, or look at what-if scenarios. This is possible using arithmetic expressions. An arithmetic expression may contain column names, constant numeric values, and the arithmetic operators.
Arithmetic Operators
The slide lists the arithmetic operators available in SQL. You can use arithmetic operators in any clause of a SQL statement except the FROM clause.
Instructor Note
You can use only the addition and subtraction operators with DATE datatypes.
#12 Using Arithmetic Operators
The example in the slide uses the addition operator to calculate a salary increase of $300 for all employees and displays a new SAL+300 column in the output.
Note that the resultant calculated column SAL+300 is not a new column in the EMP table; it is for display only. By default, the name of a new column comes from the calculation that generated it—in this case, sal+300.
Note: SQL*Plus ignores blank spaces before and after the arithmetic operator.
#13 Operator Precedence
If an arithmetic expression contains more than one operator, multiplication and division are evaluated first. If operators within an expression are of same priority, then evaluation is done from left to right.
You can use parentheses to force the expression within parentheses to be evaluated first.
#14 Operator Precedence (continued)
The example on the slide displays the name, salary, and annual compensation of employees. It calculates the annual compensation as 12 multiplied by the monthly salary, plus a one-time bonus of $100. Notice that multiplication is performed before addition.
Note: Use parentheses to reinforce the standard order of precedence and to improve clarity. For example, the expression above can be written as (12*sal)+100 with no change in the result.
Instructor Note
Demo: l1prec1.sql, l1prec2.sql
Purpose: To illustrate viewing a query containing no parentheses and executing a query with parentheses to override rules of precedence.
#15 Using Parentheses
You can override the rules of precedence by using parentheses to specify the order in which operators are executed.
The example on the slide displays the name, salary, and annual compensation of employees. It calculates the annual compensation as monthly salary plus a monthly bonus of $100, multiplied by 12. Because of the parentheses, addition takes priority over multiplication.
#16 Null Values
If a row lacks the data value for a particular column, that value is said to be null, or to contain null.
A null value is a value that is unavailable, unassigned, unknown, or inapplicable. A null value is not the same as zero or a space. Zero is a number, and a space is a character.
Columns of any datatype can contain null values, unless the column was defined as NOT NULL or as PRIMARY KEY when the column was created.
In the COMM column in the EMP table, you notice that only a SALESMAN can earn commission. Other employees are not entitled to earn commission. A null value represents that fact. Turner, who is a salesman, does not earn any commission. Notice that his commission is zero and not null.
Instructor Note
Demo: l1null.sql
Purpose: To illustrate calculating with null values.
#17 Null Values (continued)
If any column value in an arithmetic expression is null, the result is null. For example, if you attempt to perform division with zero, you get an error. However, if you divide a number by null, the result is a null or unknown.
In the example on the slide, employee KING is not in SALESMAN and does not get any commission. Because the COMM column in the arithmetic expression is null, the result is null.
For more information, see Oracle Server SQL Reference, Release 8, “Elements of SQL.”
#18 Column Aliases
When displaying the result of a query, SQL*Plus normally uses the name of the selected column as the column heading. In many cases, this heading may not be descriptive and hence is difficult to understand. You can change a column heading by using a column alias.
Specify the alias after the column in the SELECT list using a space as a separator. By default, alias headings appear in uppercase. If the alias contains spaces, special characters (such as # or $), or is case sensitive, enclose the alias in double quotation marks (" ").
Instructor Note
Within a SQL statement, a column alias can be used in both the SELECT clause and the ORDER BY clause. You cannot use column aliases in the WHERE clause. Both alias features comply with the ANSI SQL 92 standard.
Demo: l1alias.sql
Purpose: To illustrate the use of aliases in expressions.
#19 Column Aliases (continued)
The first example displays the name and the monthly salary of all the employees. Notice that the optional AS keyword has been used before the column alias name. The result of the query would be the same whether the AS keyword is used or not. Also notice that the SQL statement has the column aliases, name and salary, in lowercase, whereas the result of the query displays the column headings in uppercase. As mentioned in the last slide, column headings appear in uppercase by default.
The second example displays the name and annual salary of all the employees. Because Annual Salary contains spaces, it has been enclosed in double quotation marks. Notice that the column heading in the output is exactly the same as the column alias.
Instructor Note
Point out the optional AS keyword in the first example and the double quotation marks in the second example. Also show that the aliases always appear in uppercase, unless enclosed within double quotation marks.
#20 Concatenation Operator
You can link columns to other columns, arithmetic expressions, or constant values to create a character expression by using the concatenation operator (||). Columns on either side of the operator are combined to make a single output column.
#21 Concatenation Operator (continued)
In the example, ENAME and JOB are concatenated, and they are given the alias Employees. Notice that the employee number and job are combined to make a single output column.
The AS keyword before the alias name makes the SELECT clause easier to read.
#22 Literal Character Strings
A literal is character, a number, or a date included in the SELECT list that is not a column name or a column alias. It is printed for each row returned. Literal strings of free-format text can be included in the query result and are treated the same as a column in the SELECT list.
Date and character literals must be enclosed within single quotation marks (' '); number literals must not.
#23 Literal Character Strings (continued)
The example on the slide displays names and jobs of all employees. The column has the heading Employee Details. Notice the spaces between the single quotation marks in the SELECT statement. The spaces improve the readability of the output.
In the following example, the name and salary for each employee is concatenated with a literal to give the returned rows more meaning.
#24 Duplicate Rows
Unless you indicate otherwise, SQL*Plus displays the results of a query without eliminating duplicate rows. The example on the slide displays all the department numbers from the EMP table. Notice that the department numbers are repeated.
#25 Duplicate Rows (continued)
To eliminate duplicate rows in the result, include the DISTINCT keyword in the SELECT clause immediately after the SELECT keyword. In the example on the slide, the EMP table actually contains fourteen rows but there are only three unique department numbers in the table.
You can specify multiple columns after the DISTINCT qualifier. The DISTINCT qualifier affects all the selected columns, and the result represents a distinct combination of the columns.
DEPTNO JOB
------ ---------
10 CLERK
10 MANAGER
10 PRESIDENT
20 ANALYST
...
9 rows selected.
#26 SQL and SQL*Plus
SQL is a command language for communication with the Oracle Server from any tool or application. Oracle SQL contains many extensions. When you enter a SQL statement, it is stored in a part of memory called the SQL buffer and remains there until you enter a new statement.
SQL*Plus is an Oracle tool that recognizes and submits SQL statements to the Oracle Server for execution and contains its own command language.
Features of SQL
Can be used by a range of users, including those with little or no programming experience
Is a nonprocedural language
Reduces the amount of time required for creating and maintaining systems
Is an English-like language
Features of SQL*Plus
Accepts ad hoc entry of statements
Accepts SQL input from files
Provides a line editor for modifying SQL statements
Controls environmental settings
Formats query results into a basic report
Accesses local and remote databases
#27 SQL and SQL*Plus (continued)
The following table compares SQL and SQL*Plus:
#28 SQL*Plus
SQL*Plus is an environment in which you can do the following:
Execute SQL statements to retrieve, modify, add, and remove data from the database
Format, perform calculations on, store, and print query results in the form of reports
Create script files to store SQL statements for repetitive use in the future
SQL*Plus commands can be divided into the following main categories:
Instructor Note (for page 1-27)
Snippet: “Establishing a Database Session”
Logging in to SQL*Plus: Release number may vary, depending on the version installed.
#29 Logging In to SQL*Plus
How you invoke SQL*Plus depends on which type of operating system or Windows environment you are running.
To log in through a Windows environment:
1. Click Start—>Programs—>Oracle for Windows NT—>SQL*Plus 8.0.
2. Fill in username, password, and database.
To log in through a command-line environment:
1. Log on to your machine.
2. Enter the SQL*Plus command as shown in the slide.
In the command:
username is your database username
password is your database password (if you enter your password here, it is visible)
@database is the database connect string
Note: To ensure the integrity of your password, do not enter it at the operating system prompt. Instead, enter only your username. Enter your password at the Password prompt.
Once you are successfully logged in to SQL*Plus, you see the following message:
#30 Displaying Table Structure
In SQL*Plus, you can display the structure of a table using the DESCRIBE command. The result of the command is to see the column names and datatypes as well as whether a column must contain data.
In the syntax:
tablename is the name of any existing table, view, or synonym accessible to the user
#31 Displaying Table Structure (continued)
The example on the slide displays the information about the structure of the DEPT table.
In the result:
Null? indicates whether a column must contain data; NOT NULL indicates that a column must contain data
Type displays the datatype for a column
The datatypes are described in the following table:
Instructor Note
Inform students that the column sequence in DESCRIBE tablename is the same as that in SELECT * FROM tablename . The order in which the columns are displayed is determined when the table is created.
#32 SQL*Plus Editing Commands
SQL*Plus commands are entered one line at a time and are not stored in the SQL buffer.
Guidelines
If you press [Return] before completing a command, SQL*Plus prompts you with a line number.
You terminate the SQL buffer by either entering one of the terminator characters (semicolon or slash) or pressing [Return] twice. You then see the SQL prompt.
#33 SQL*Plus Editing Commands (continued)
You can enter only one SQL*Plus command per SQL prompt. SQL*Plus commands are not stored in the buffer. To continue a SQL*Plus command on the next line, end the current line with a hyphen (-).
Instructor Note
Show students the use of the commonly used editing commands, such as A[PPEND], C[HANGE], DEL, L[IST], and R[UN].
#34 SQL*Plus File Commands
SQL statements communicate with the Oracle Server. SQL*Plus commands control the environment, format query results, and manage files. You can use the commands identified in the following table:
#35 SELECT Statement
In this lesson, you have learned about retrieving data from a database table with the SELECT statement.
SQL*Plus
SQL*Plus is an execution environment that you can use to send SQL statements to the database server and to edit and save SQL statements. Statements can be executed from the SQL prompt or from a script file.
#36 SELECT Statement
In this lesson, you have learned about retrieving data from a database table with the SELECT statement.
SQL*Plus
SQL*Plus is an execution environment that you can use to send SQL statements to the database server and to edit and save SQL statements. Statements can be executed from the SQL prompt or from a script file.
#37 Lesson Aim
While retrieving data from the database, you may need to restrict the rows of data that are displayed or specify the order in which the rows are displayed. This lesson explains the SQL statements that you will use to perform these actions.
#38 Lesson Aim
While retrieving data from the database, you may need to restrict the rows of data that are displayed or specify the order in which the rows are displayed. This lesson explains the SQL statements that you will use to perform these actions.
#39 Limiting Rows Using a Selection
In the example on the slide, assume that you want to display all the employees in department 10. The highlighted set of rows with a value of 10 in DEPTNO column are the only ones returned. This method of restriction is the basis of the WHERE clause in SQL.
#40 Limiting Rows Selected
You can restrict the rows returned from the query by using the WHERE clause. A WHERE clause contains a condition that must be met, and it directly follows the FROM clause.
In the syntax:
WHERE restricts the query to rows that meet a condition
condition is composed of column names, expressions, constants, and a comparison operator
The WHERE clause can compare values in columns, literal values, arithmetic expressions, or functions. The WHERE clause consists of three elements:
Column name
Comparison operator
Column name, constant, or list of values
#41 Using the WHERE Clause
In the example, the SELECT statement retrieves the name, job title, and department number of all employees whose job title is CLERK.
Note that the job title CLERK has been specified in uppercase to ensure that the match is made with the job column in the EMP table. Character strings are case sensitive.
Instructor Note
Snippet: “Processing a Query”
#42 Character Strings and Dates
Character strings and dates in the WHERE clause must be enclosed in single quotation marks (''). Number constants, however, should not.
All character searches are case sensitive. In the following example, no rows are returned because the EMP table stores all the data in uppercase:
SQL> SELECT ename, empno, job, deptno
2 FROM emp
3 WHERE job='clerk';
Oracle stores dates in an internal numeric format, representing the century, year, month, day, hours, minutes, and seconds. The default date display is DD-MON-YY.
Note: Changing default date format will be covered in a subsequent lesson.
Number values are not enclosed within quotation marks.
Instructor Note
Some students may ask how to override the case sensitivity. Later in the course, we will cover the use of single-row functions such as UPPER and LOWER to override the case sensitivity.
#43 Comparison Operators
Comparison operators are used in conditions that compare one expression to another. They are used in the WHERE clause in the following format:
Syntax
… WHERE expr operator value
Examples
… WHERE hiredate='01-JAN-95'
… WHERE sal>=1500
… WHERE ename='SMITH'
Instructor Note
Remind students that the expr cannot be an alias. Mention in brief about the date TO_DATE function, when the date is to be entered in a format other than the default format. This is required for practice 4.
#44 Using the Comparison Operators
In the example, the SELECT statement retrieves name, salary, and commission from the EMP table, where the employee salary is less than or equal to the commission amount. Note that there is no explicit value supplied to the WHERE clause. The two values being compared are taken from the SAL and COMM columns in the EMP table.
Instructor Note
Rows that have a null value in the COMM column result in a null value for the comparison expression and are effectively not part of the result.
#46 The BETWEEN Operator
You can display rows based on a range of values using the BETWEEN operator. The range that you specify contains a lower range and an upper range.
The SELECT statement on the slide returns rows from the EMP table for any employee whose salary is between $1000 and $1500.
Values specified with the BETWEEN operator are inclusive. You must specify the lower limit first.
Instructor Note
Emphasize that the values specified with the BETWEEN operator in the example are inclusive. Point out that Turner, who earns $1500 (higher limit), is included in the output. Explain that BETWEEN … AND … are actually translated by Oracle server to a pair of AND conditions, (a >= lower limit) and (a <= higher limit). So using BETWEEN … AND … has no performance benefits and can be used for logical simplicity.
Demo: l2betw.sql
Purpose: To illustrate using the BETWEEN operator.
#47 The IN Operator
To test for values in a specified list, use the IN operator.
The slide example displays employee number, name, salary, and manager’s employee number of all the employees whose manager’s employee number is 7902, 7566, or 7788.
The IN operator can be used with any datatype. The following example returns a row from the EMP table for any employee whose name is included in the list of names in the WHERE clause:
SQL> SELECT empno, ename, mgr, deptno
2 FROM emp
3 WHERE ename IN ('FORD' , 'ALLEN');
If characters or dates are used in the list, they must be enclosed in single quotation marks ('').
Instructor Note
Explain that the IN ( … ) is actually translated by Oracle server to a set of OR conditions (a = value1 OR a = value2 OR a = value3 ). So using IN ( … ) has no performance benefits and can be used for logical simplicity.
Demo: l2in.sql
Purpose: To illustrate using the IN operator.
#48 The LIKE Operator
You may not always know the exact value to search for. You can select rows that match a character pattern by using the LIKE operator. The character pattern-matching operation is referred to as a wildcard search. Two symbols can be used to construct the search string.
The SELECT statement above returns the employee name from the EMP table for any employee whose name begins with an “S.” Note the uppercase “S.” Names beginning with an “s” will not be returned.
The LIKE operator can be used as a shortcut for some BETWEEN comparisons. The following example displays names and hire dates of all employees who joined between January 1981 and December 1981:
SQL> SELECT ename, hiredate
2 FROM emp
3 WHERE hiredate LIKE '%1981';
#49 Combining Wildcard Characters
The % and _ symbols can be used in any combination with literal characters. The example on the slide displays the names of all employees whose name has an “A” as the second character.
The ESCAPE Option
When you need to have an exact match for the actual ‘%’ and ‘_’ characters, use the ESCAPE option. This option specifies what the ESCAPE character is. If you have HEAD_QUARTERS as a department name, you would search for it using the following SQL statement:
The ESCAPE option identifies the backslash (\) as the escape character. In the pattern, the escape character precedes the underscore (_). This causes the Oracle Server to interpret the underscore literally.
#50 The IS NULL Operator
The IS NULL operator tests for values that are null. A null value means the value is unavailable, unassigned, unknown, or inapplicable. Therefore, you cannot test with (=) because a null value cannot be equal or unequal to any value. The slide example retrieves the name and manager of all employees who do not have a manager.
For example, to display name, job title, and commission for all employees who are not entitled to get a commission, use the following SQL statement:
#51 Logical Operators
A logical operator combines the result of two component conditions to produce a single result based on them or to invert the result of a single condition. Three logical operators are available in SQL:
AND
OR
NOT
All the examples so far have specified only one condition in the WHERE clause. You can use several conditions in one WHERE clause using the AND and OR operators.
#52 The AND Operator
In the example, both conditions must be true for any record to be selected. Therefore, an employee who has a job title of CLERK and earns more than $1100 will be selected.
All character searches are case sensitive. No rows are returned if CLERK is not in uppercase. Character strings must be enclosed in quotation marks.
AND Truth Table
The following table shows the results of combining two expressions with AND:
Instructor Note
Demo: l2and.sql
Purpose: To illustrate using the AND operator.
#53 The OR Operator
In the example, either condition can be true for any record to be selected. Therefore, an employee who has a job title of CLERK or earns more than $1100 will be selected.
The OR Truth Table
The following table shows the results of combining two expressions with OR:
Instructor Note
Demo: l2or.sql
Purpose: To illustrate using the OR operator.
#54 The NOT Operator
The slide example displays name and job title of all the employees whose job title is not CLERK, MANAGER, or ANALYST.
The NOT Truth Table
The following table shows the result of applying the NOT operator to a condition:
Note: The NOT operator can also be used with other SQL operators, such as BETWEEN, LIKE, and NULL.
... WHERE job NOT IN ('CLERK', 'ANALYST')
... WHERE sal NOT BETWEEN 1000 AND 1500
... WHERE ename NOT LIKE '%A%'
... WHERE comm IS NOT NULL
#56 Example of Precedence of AND Operator
In the slide example, there are two conditions:
The first condition is that job is PRESIDENT and salary is greater than 1500.
The second condition is that job is SALESMAN.
Therefore, the SELECT statement reads as follows:
“Select the row if an employee is a PRESIDENT and earns more than $1500 or if the employee is a SALESMAN.”
Instructor Note
Demo: l2sal1.sql
Purpose: To illustrate the rules of precedence.
#57 Using Parentheses
In the example, there are two conditions:
The first condition is that job is PRESIDENT or SALESMAN.
The second condition is that salary is greater than 1500.
Therefore, the SELECT statement reads as follows:
“Select the row if an employee is a PRESIDENT or a SALESMAN and if the employee earns more than $1500.”
Instructor Note
Demo: l2sal2.sql
Purpose: To illustrate the rules of precedence.
#58 The ORDER BY Clause
The order of rows returned in a query result is undefined. The ORDER BY clause can be used to sort the rows. If you use the ORDER BY clause, you must place last. You can specify an expression or an alias to sort.
Syntax
SELECT expr
FROM table
[WHERE condition(s)]
[ORDER BY {column, expr} [ASC|DESC]];
where: ORDER BY specifies the order in which the retrieved rows are displayed
ASC orders the rows in ascending order (this is the default order)
DESC orders the rows in descending order
If the ORDER BY clause is not used, the sort order is undefined, and the Oracle Server may not fetch rows in the same order for the same query twice. Use the ORDER BY clause to display the rows in a specific order.
Instructor Note
Let the students know that the ORDER BY clause is executed last in query execution.
#59 Default Ordering of Data
The default sort order is ascending:
Numeric values are displayed with the lowest values first—for example, 1–999.
Date values are displayed with the earliest value first—for example, 01-JAN-92 before
01-JAN-95.
Character values are displayed in alphabetical order—for example, A first and Z last.
Null values are displayed last for ascending sequences and first for descending sequences.
Reversing the Default Order
To reverse the order in which rows are displayed, specify the keyword DESC after the column name in the ORDER BY clause. The slide example sorts the result by the most recently hired employee.
Instructor Note
Let the students know that you can also sort by a column number in the SELECT list. The example below will sort the output in the descending order by salary.
#60 Sorting by Column Aliases
You can use a column alias in the ORDER BY clause. The slide example sorts the data by annual salary.
#61 Sorting by Multiple Columns
You can sort query results by more than one column. The sort limit is the number of columns in the given table.
In the ORDER BY clause, specify the columns, and separate the column names using commas. If you want to reverse the order of a column, specify DESC after its name. You can order by columns that are not included in the SELECT clause.
Example
Display name and salary of all employees. Order the result by department number and then descending order by salary.
Instructor Note
Show that the DEPTNO column is sorted in ascending order and the SAL column in descending order.
#62 Summary
In this lesson, you have learned about restricting and sorting rows returned by the SELECT statement. You have also learned how to implement various operators.
#63 Practice Overview
This practice gives you a variety of exercises using the WHERE clause and the ORDER BY clause.
#64 Practice 2
1. Create a query to display the name and salary of employees earning more than $2850.
Save your SQL statement to a file named p2q1.sql. Run your query.
ENAME SAL
-------- ----
KING 5000
JONES 2975
FORD 3000
SCOTT 3000
2. Create a query to display the employee name and department number for employee number
7566.
ENAME DEPTNO
------ ------
JONES 20
3. Modify p2q1.sql to display the name and salary for all employees whose salary is not in the range of $1500 and $2850. Resave your SQL statement to a file named p2q3.sql. Rerun your query.
ENAME SAL
------- -----
KING 5000
JONES 2975
MARTIN 1250
JAMES 950
WARD 1250
FORD 3000
SMITH 800
SCOTT 3000
ADAMS 1100
MILLER 1300
10 rows selected.
#65 Lesson Aim
Functions make the basic query block more powerful and are used to manipulate data values. This is the first of two lessons that explore functions. You will focus on single-row character, number, and date functions, as well as those functions that convert data from one type to another—for example, character data to numeric.
#66 Lesson Aim
Functions make the basic query block more powerful and are used to manipulate data values. This is the first of two lessons that explore functions. You will focus on single-row character, number, and date functions, as well as those functions that convert data from one type to another—for example, character data to numeric.
#67 SQL Functions
Functions are a very powerful feature of SQL and can be used to do the following:
Perform calculations on data
Modify individual data items
Manipulate output for groups of rows
Format dates and numbers for display
Convert column datatypes
SQL functions may accept arguments and always return a value.
Note: Most of the functions described in this lesson are specific to Oracle’s version of SQL.
Instructor Note
This lesson does not discuss all functions in great detail. It presents the most common functions with a brief explanation of them.
#68 SQL Functions (continued)
There are two distinct types of functions:
Single-row functions
Multiple-row functions
Single-Row Functions
These functions operate on single rows only and return one result per row. There are different types of single-row functions. This lesson covers the following ones:
Character
Number
Date
Conversion
Multiple-Row Functions
These functions manipulate groups of rows to give one result per group of rows.
For more information, see Oracle Server SQL Reference, Release 8, for the complete list of available functions and syntax.
#69 Single-Row Functions
Single-row functions are used to manipulate data items. They accept one or more arguments and return one value for each row returned by the query. An argument can be one of the following:
User-supplied constant
Variable value
Column name
Expression
Features of single-row functions:
Act on each row returned in the query
Return one result per row
May return a data value of a different type than that referenced
May expect one or more arguments
Can be used in SELECT, WHERE, and ORDER BY clauses; can be nested
In the syntax:
function_name is the name of the function
column is any named database column
expression is any character string or calculated expression
arg1, arg2 is any argument to be used by the function
#70 Single-Row Functions (continued)
This lesson covers the following single-row functions:
Character functionsccept character input and can return both character and number values
Number functionsAccept numeric input and return numeric values
Date functionsOperate on values of the date datatype (All date functions return a value of date datatype except the MONTHS_BETWEEN function, which returns a number.)
Conversion functionsConvert a value from one datatype to another
General functions:
NVL function
DECODE function
#74 Case Conversion Functions
LOWER, UPPER, and INITCAP are the three case conversion functions.
LOWERConverts mixed case or uppercase character string to lowercase
UPPERConverts mixed case or lowercase character string to uppercase
INITCAPConverts first letter of each word to uppercase and remaining letters to lowercase
EMPLOYEE DETAILS
-----------------------------------------
The job title for King is president
The job title for Blake is manager
The job title for Clark is manager
...
14 rows selected.
#75 Case Conversion Functions (continued)
The slide example displays the employee number, name, and department number of employee BLAKE.
The WHERE clause of the first SQL statement specifies the employee name as 'blake.' Since all the data in the EMP table is stored in uppercase, the name 'blake' does not find a match in the EMP table and as a result no rows are selected.
The WHERE clause of the second SQL statement specifies that the employee name in the EMP table is compared to 'blake',converted to upper case. Since both the names are in uppercase now, a match is found and one row is selected. The WHERE clause can be rewritten in the following manner to produce the same result:
The name in the output appears as it was stored in the database. To display the name with the first letter capitalized, use the INITCAP function in the SELECT statement.
#76 Character Manipulation Functions
CONCAT, SUBSTR, LENGTH, INSTR, LPAD, and TRIM are the six character manipulation functions covered in this lesson.
CONCATJoins values together (You are limited to using two parameters with CONCAT.)
SUBSTRExtracts a string of determined length
LENGTHShows the length of a string as a numeric value
INSTRFinds numeric position of a named character
LPADPads the character value right-justified
Note: RPAD character manipulation function pads the character value left-justified
TRIM: Trims heading or trailing characters (or both) from a character string. If trim_character or trim_source is a character literal, you must enclose it in single quotes.
Instructor Note
Be sure to point out RPAD to the students, because this function will be needed in a practice exercise. Also, TRIM, which is a new function in Oracle8i, does the job of both LTRIM and the RTRIM functions.
#77 Character Manipulation Functions (continued)
The slide example displays employee name and job joined together, length of the employee name, and the numeric position of the letter A in the employee name, for all employees who are in sales.
Example
Modify the SQL statement on the slide to display the data for those employees whose names end with an N.
#79 Number Functions
Number functions accept numeric input and return numeric values. This section describes some of the number functions.
Note: This list is a subset of the available number functions.
For more information, see Oracle Server SQL Reference, Release 8, “Number Functions.”
#80 ROUND Function
The ROUND function rounds the column, expression, or value to n decimal places. If the second argument is 0 or is missing, the value is rounded to zero decimal places. If the second argument is 2, the value is rounded to two decimal places. Conversely, if the second argument is -2, the value is rounded to two decimal places to the left.
The ROUND function can also be used with date functions. You will see examples later in this lesson.
The DUAL is a dummy table. More about this will be covered later.
#81 TRUNC Function
The TRUNC function truncates the column, expression, or value to n decimal places.
The TRUNC function works with arguments similar to those of the ROUND function. If the second argument is 0 or is missing, the value is truncated to zero decimal places. If the second argument is 2, the value is truncated to two decimal places. Conversely, if the second argument is -2, the value is truncated to two decimal places to the left.
Like the ROUND function, the TRUNC function can be used with date functions.
#82 MOD Function
The MOD function finds the remainder of value1 divided by value2. The slide example calculates the remainder of the ratio of salary to commission for all employees whose job title is salesman.
#83 Oracle Date Format
Oracle stores dates in an internal numeric format, representing the century, year, month, day, hours, minutes, and seconds.
The default display and input format for any date is DD-MON-YY. Valid Oracle dates are between January 1, 4712 B.C., and December 31, 9999 A.D.
SYSDATE
SYSDATE is a date function that returns the current date and time. You can use SYSDATE just as you would use any other column name. For example, you can display the current date by selecting SYSDATE from a table. It is customary to select SYSDATE from a dummy table called DUAL.
DUAL
The DUAL table is owned by the user SYS and can be accessed by all users. It contains one column, DUMMY, and one row with the value X. The DUAL table is useful when you want to return a value once only—for instance, the value of a constant, pseudocolumn, or expression that is not derived from a table with user data. The DUAL table is generally used for SELECT clause syntax completeness, because both SELECT and FROM clauses are mandatory, and several calculations do not need to select from actual tables.
Example
Display the current date using the DUAL table.
#84 Arithmetic with Dates
Since the database stores dates as numbers, you can perform calculations using arithmetic operators such as addition and subtraction. You can add and subtract number constants as well as dates.
You can perform the following operations:
#87 Arithmetic with Dates (continued)
The example on the slide displays the name and the number of weeks employed for all employees in department 10. It subtracts the current date (SYSDATE) from the date on which the employee was hired and divides the result by 7 to calculate the number of weeks that a worker has been employed.
Note: SYSDATE is a SQL function that returns the current date and time. Your results may differ from the example.
Instructor Note
If an older date is subtracted from a more current date, the difference is a negative number.
#88 Date Functions
Date functions operate on Oracle dates. All date functions return a value of DATE datatype except MONTHS_BETWEEN, which returns a numeric value.
MONTHS_BETWEEN(date1, date2)Finds the number of months between date1 and date2. The result can be positive or negative. If date1 is later than date2, the result is positive; if date1 is earlier than date2, the result is negative. The noninteger part of the result represents a portion of the month.
ADD_MONTHS(date, n)Adds n number of calendar months to date. The value of n must be an integer and can be negative.
NEXT_DAY(date, 'char')Finds the date of the next specified day of the week ('char') following date. The value of char may be a number representing a day or a character string.
LAST_DAY(date)Finds the date of the last day of the month that contains date.
ROUND(date[,'fmt'])Returns date rounded to the unit specified by the format model fmt. If the format model fmt is omitted, date is rounded to the nearest day.
TRUNC(date[, 'fmt'])Returns date with the time portion of the day truncated to the unit specified by the format model fmt. If the format model fmt is omitted, date is truncated to the nearest day.
This list is a subset of the available date functions. The format models are covered later in this lesson. Examples of format models are month and year.
#89 Date Functions (continued)
For all employees employed for fewer than 200 months, display the employee number, hire date, number of months employed, six-month review date, first Friday after hire date, and last day of the month when hired.
SQL> SELECT empno, hiredate,
2 MONTHS_BETWEEN(SYSDATE, hiredate) TENURE,
3 ADD_MONTHS(hiredate, 6) REVIEW,
4 NEXT_DAY(hiredate, 'FRIDAY'), LAST_DAY(hiredate)
5 FROM emp
6 WHERE MONTHS_BETWEEN (SYSDATE, hiredate)<200;
#90 Date Functions (continued)
The ROUND and TRUNC functions can be used for number and date values. When used with dates, these functions round or truncate to the specified format model. Therefore, you can round dates to the nearest year or month.
Example
Compare the hire dates for all employees who started in 1982. Display the employee number, hire date, and month started using the ROUND and TRUNC functions.
SQL> SELECT empno, hiredate,
2 ROUND(hiredate, 'MONTH'), TRUNC(hiredate, 'MONTH')
3 FROM emp
4 WHERE hiredate like '%1982';
EMPNO HIREDATE ROUND(HIR TRUNC(HIR
--------- --------- --------- ---------
7788 09-DEC-82 01-DEC-82 01-DEC-82
7934 23-JAN-82 01-FEB-82 01-JAN-82
#94 Conversion Functions
In addition to Oracle datatypes, columns of tables in an Oracle8 database can be defined using ANSI, DB2, and SQL/DS datatypes. However, the Oracle Server internally converts such datatypes to Oracle8 datatypes.
In some cases, Oracle Server allows data of one datatype where it expects data of a different datatype. This is allowed when Oracle Server can automatically convert the data to the expected datatype. This datatype conversion can be done implicitly by Oracle Server or explicitly by the user.
Implicit datatype conversions work according to the rules explained in next two slides.
Explicit datatype conversions are done by using the conversion functions. Conversion functions convert a value from one datatype to another. Generally, the form of the function names follows the convention datatype TO datatype. The first datatype is the input datatype; the last datatype is the output.
Note: Although implicit datatype conversion is available, it is recommended that you do explicit datatype conversion to ensure reliability of your SQL statements.
#95 Implicit datatype Conversion
The assignment succeeds if the Oracle Server can convert the datatype of the value used in the assignment to that of the assignment target.
#96 Implicit Datatype Conversion
In general, the Oracle Server uses the rule for expression when a datatype conversion is needed in places not covered by a rule for assignment conversions.
Note: CHAR to NUMBER conversions succeed only if the character string represents a valid number. CHAR to DATE conversions succeed only if the character string has the default format DD-MON-YY.
Instructor Note
Implicit data conversion is not solely performed on the datatypes mentioned. Other implicit data conversions can also be done. For example, VARCHAR2 can be implicitly converted to ROWID.
#97 Explicit Datatype Conversion
SQL provides three functions to convert a value from one datatype to another:
#99 Explicit Datatype Conversion (continued)
Note: The list of functions mentioned in this lesson are a subset of the available conversion functions.
For more information, see Oracle8 Server SQL Reference, Release 8.0, “Conversion Functions.”
Instructor Note
An additional conversion function is CHR(number) which returns the character having the binary equivalent of number as a VARCHAR2 value in the database character set.
Let students know that the CAST function converts one built-in datatype or collection-typed value into another built-in datatype or collection-typed value. You can cast an unnamed operand (such as a date or the result set of a subquery) or a named collection (such as a varray or a nested table) into a type-compatible datatype or named collection. The type_name must be the name of a built-in datatype or collection type and the operand must be a built-in datatype or must evaluate to a collection value. For example:
SQL> SELECT CAST ('1997-10-22' AS DATE) FROM DUAL;
SQL> SELECT * FROM t1 WHERE CAST (ROWID AS VARCHAR2) = '01234';
For more information, refer to:
Oracle8i SQL Reference, Release 8.1.5, “CAST Expressions.” and to:
http://st-doc.us.oracle.com/8.0/815/server.815/a67779/expressi.htm#1017895
#100 Displaying a Date in a Specific Format
Previously, all Oracle date values were displayed in the DD-MON-YY format. The TO_CHAR function allows you to convert a date from this default format to one specified by you.
Guidelines
The format model must be enclosed in single quotation marks and is case sensitive.
The format model can include any valid date format element. Be sure to separate the date value from the format model by a comma.
The names of days and months in the output are automatically padded with blanks.
To remove padded blanks or to suppress leading zeros, use the fill mode fm element.
You can resize the display width of the resulting character field with the SQL*Plus COLUMN command.
The resultant column width is 80 characters by default.
#101 Sample Elements of Valid Date Formats
Instructor Note
Emphasize the format D, as the students will need it for practice 10.
#102 Time Formats
Use the formats listed in the following tables to display time information and literals and to change numerals to spelled numbers.
Other Formats
Specifying Suffixes to Influence Number Display
#103 TO_CHAR Function with Dates
The SQL statement on the slide displays the name and hire dates for all the employees. The hire date appears as 17 November 1981.
Example
Modify the slide example to display the dates in a format that appears as Seventh of February 1981 08:00:00 AM.
Notice that the month follows the format model specified, in other words, the first letter is capitalized and the rest in lower case.
#104 TO_CHAR Function with Numbers
When working with number values such as character strings, you should convert those numbers to the character datatype using the TO_CHAR function, which translates a value of NUMBER datatype to VARCHAR2 datatype. This technique is especially useful with concatenation.
Number Format Elements
If you are converting a number to character datatype, you can use the following elements:
#105 Guidelines
The Oracle Server displays a string of pound signs (#) in place of a whole number whose digits exceed the number of digits provided in the format model.
The Oracle Server rounds the stored decimal value to the number of decimal spaces provided in the format model.
#106 TO_NUMBER and TO_DATE Functions
You may want to convert a character string to either a number or a date. To accomplish this task, you use the TO_NUMBER or TO_DATE functions. The format model you choose will be based on the previously demonstrated format elements.
Example
Display the names and hire dates of all the employees who joined on February 22, 1981.
#107 The NVL Function
To convert a null value to an actual value, use the NVL function.
Syntax
NVL (expr1, expr2)
where: expr1 is the source value or expression that may contain null
expr2 is the target value for converting null
You can use the NVL function to convert any datatype, but the return value is always the same as the datatype of expr1.
NVL Conversions for Various Datatypes
#108 NVL Function
To calculate the annual compensation of all employees, you need to multiply the monthly salary by 12 and then add the commission to it.
Notice that the annual compensation is calculated only for those employees who earn a commission. If any column value in an expression is null, the result is null. To calculate values for all employees, you must convert the null value to a number before applying the arithmetic operator. In the example on the slide, the NVL function to is used to convert null values to zero.
#109 Nesting Functions
Single-row functions can be nested to any depth. Nested functions are evaluated from the innermost level to the outermost level. Some examples follow to show you the flexibility of these functions.
#110 Nesting Functions (continued)
The slide example displays the head of the company, who has no manager. The evaluation of the SQL statement involves two steps:
1. Evaluate the inner function to convert a number value to a character string.
Result1 = TO_CHAR(mgr)
2. Evaluate the outer function to replace the null value with a text string.
NVL(Result1, 'No Manager')
The entire expression becomes the column heading because no column alias was given.
Example
Display the date of the next Friday that is six months from the hire date. The resulting date should appear as Friday, March 12th, 1982. Order the results by hire date.
Instructor Note
Demo: l3nest.sql
Purpose: To illustrate nesting of several single row functions.
#111 Single-Row Functions
Single-row functions can be nested to any level. Single-row functions can manipulate the following:
Character data: LOWER, UPPER, INITCAP, CONCAT, SUBSTR, INSTR, LENGTH
Number data: ROUND, TRUNC, MOD
Date data: MONTHS_BETWEEN, ADD_MONTHS, NEXT_DAY, LAST_DAY, ROUND, TRUNC
Date values can also use arithmetic operators.
Conversion functions can convert character, date, and numeric values: TO_CHAR, TO_DATE, TO_NUMBER
SYSDATE and DUAL
SYSDATE is a date function that returns the current date and time. It is customary to select SYSDATE from a dummy table called DUAL.
#113 Lesson Aim
This lesson further addresses functions. It focuses on obtaining summary information, such as averages, for groups of rows. It discusses how to group rows in a table into smaller sets and how to specify search criteria for groups of rows.
#114 Lesson Aim
This lesson further addresses functions. It focuses on obtaining summary information, such as averages, for groups of rows. It discusses how to group rows in a table into smaller sets and how to specify search criteria for groups of rows.
#115 Group Functions
Unlike single-row functions, group functions operate on sets of rows to give one result per group. These sets may be the whole table or the table split into groups.
#116 Group Functions (continued)
Each of the functions accepts an argument. The following table identifies the options that you can use in the syntax:
#117 Guidelines for Using Group Functions
DISTINCT makes the function consider only nonduplicate values; ALL makes it consider every value including duplicates. The default is ALL and therefore does not need to be specified.
The datatypes for the arguments may be CHAR, VARCHAR2, NUMBER, or DATE where expr is listed.
All group functions except COUNT(*) ignore null values. To substitute a value for null values, use the NVL function.
The Oracle Server implicitly sorts the result set in ascending order when using a GROUP BY clause. To override this default ordering, DESC can be used in an ORDER BY clause.
Instructor Note
Stress the use of DISTINCT and group functions ignoring null values. ALL is the default and is very rarely specified.
#118 Group Functions
You can use AVG, SUM, MIN, and MAX functions against columns that can store numeric data. The example on the slide displays the average, highest, lowest, and sum of monthly salaries for all salespeople.
#119 Group Functions (continued)
You can use MAX and MIN functions for any datatype. The slide example displays the most junior and most senior employee.
The following example displays the employee name that is first and the employee name that is the last in an alphabetized list of all employees.
Note: AVG, SUM, VARIANCE, and STDDEV functions can be used only with numeric datatypes.
#120 The COUNT Function
The COUNT function has two formats:
COUNT(*)
COUNT(expr)
COUNT(*) returns the number of rows in a table, including duplicate rows and rows containing null values in any of the columns. If a WHERE clause is included in the SELECT statement, COUNT(*) returns the number of rows that satisfies the condition in the WHERE clause.
In contrast, COUNT(expr) returns the number of nonnull rows in the column identified by expr.
The slide example displays the number of employees in department 30.
Instructor Note
Demo: l5count1.sql, l5count2.sql
Purpose: To illustrate using the COUNT(*) and COUNT(expr) functions.
#121 The COUNT Function (continued)
The slide example displays the number of employees in department 30 who can earn a commission. Notice that the result gives the total number of rows to be four because two employees in department 30 cannot earn a commission and contain a null value in the COMM column.
Example
Display the number of departments in the EMP table.
Display the number of distinct departments in the EMP table.
#122 Group Functions and Null Values
All group functions except COUNT (*) ignore null values in the column. In the slide example, the average is calculated based only on the rows in the table where a valid value is stored in the COMM column. The average is calculated as total commission being paid to all employees divided by the number of employees receiving commission (4).
#123 Group Functions and Null Values (continued)
The NVL function forces group functions to include null values. In the slide example, the average is calculated based on all rows in the table regardless of whether null values are stored in the COMM column. The average is calculated as total commission being paid to all employees divided by the total number of employees in the company (14).
#124 Groups of Data
Until now, all group functions have treated the table as one large group of information. At times, you need to divide the table of information into smaller groups. This can be done by using the GROUP BY clause.
#125 The GROUP BY Clause
You can use the GROUP BY clause to divide the rows in a table into groups. You can then use the group functions to return summary information for each group.
In the syntax:
group_by_expression specifies columns whose values determine the basis for
grouping rows
Guidelines
If you include a group function in a SELECT clause, you cannot select individual results as well unless the individual column appears in the GROUP BY clause. You will receive an error message if you fail to include the column list.
Using a WHERE clause, you can preexclude rows before dividing them into groups.
You must include the columns in the GROUP BY clause.
You cannot use the column alias in the GROUP BY clause.
By default, rows are sorted by ascending order of the columns included in the GROUP BY list. You can override this by using the ORDER BY clause.
#126 The GROUP BY Clause (continued)
When using the GROUP BY clause, make sure that all columns in the SELECT list that are not in the group functions are included in the GROUP BY clause. The example on the slide displays the department number and the average salary for each department. Here is how this SELECT statement, containing a GROUP BY clause, is evaluated:
The SELECT clause specifies the columns to be retrieved:
Department number column in the EMP table
The average of all the salaries in the group you specified in the GROUP BY clause
The FROM clause specifies the tables that the database must access: the EMP table.
The WHERE clause specifies the rows to be retrieved. Since there is no WHERE clause, by default all rows are retrieved.
The GROUP BY clause specifies how the rows should be grouped. The rows are being grouped by department number, so the AVG function that is being applied to the salary column will calculate the average salary for each department.
Instructor Note
GROUP results are sorted implicitly, on the grouping column. You can use the ORDER BY to specify a different sort order, remembering to only use group functions, or the grouping column.
#127 The GROUP BY Clause (continued)
The GROUP BY column does not have to be in the SELECT clause. For example, the SELECT statement on the slide displays the average salaries for each department without displaying the respective department numbers. Without the department numbers, however, the results do not look meaningful.
You can use the group function in the ORDER BY clause.
Instructor Note
Demonstrate the query with and without the DEPTNO in the SELECT statement.
#128 Groups Within Groups
Sometimes there is a need to see results for groups within groups. The slide shows a report that displays the total salary being paid to each job title, within each department.
The EMP table is grouped first by department number, and within that grouping, it is grouped by job title. For example, the two clerks in department 20 are grouped together and a single result (total salary) is produced for all salespeople within the group.
Instructor Note
Demo: l5order1.sql, l5order2.sql
Purpose: To illustrate ordering columns that are grouped by DEPTNO first and ordering columns that are grouped by JOB first.
#129 Groups Within Groups (continued)
You can return summary results for groups and subgroups by listing more than one GROUP BY column. You can determine the default sort order of the results by the order of the columns in the GROUP BY clause. Here is how the SELECT statement on the slide, containing a GROUP BY clause, is evaluated:
The SELECT clause specifies the column to be retrieved:
Department number in the EMP table
Job title in the EMP table
The sum of all the salaries in the group that you specified in the
GROUP BY clause
The FROM clause specifies the tables that the database must access: the EMP table.
The GROUP BY clause specifies how you must group the rows:
First, the rows are grouped by department number.
Second, within the department number groups, the rows are grouped by job title.
So the SUM function is being applied to the salary column for all job titles within each department number group.
#130 Illegal Queries Using Group Functions
Whenever you use a mixture of individual items (DEPTNO) and group functions (COUNT) in the same SELECT statement, you must include a GROUP BY clause that specifies the individual items (in this case, DEPTNO). If the GROUP BY clause is missing, then the error message “not a single-group group function” appears and an asterisk (*) points to the offending column. You can correct the error on the slide by adding the GROUP BY clause.
Any column or expression in the SELECT list that is not an aggregate function must be in the GROUP BY clause.
Instructor Note
Demo: l5error.sql
Purpose: To illustrate executing a SELECT statement with no GROUP BY clause.
#132 Restricting Group Results
In the same way that you use the WHERE clause to restrict the rows that you select, you use the HAVING clause to restrict groups. To find the maximum salary of each department, but show only the departments that have a maximum salary of more than $2900, you need to do the following:
Find the average salary for each department by grouping by department number.
Restrict the groups to those departments with a maximum salary greater than $2900.
#133 The HAVING Clause
You use the HAVING clause to specify which groups are to be displayed. Therefore, you further restrict the groups on the basis of aggregate information.
In the syntax:
group_condition restricts the groups of rows returned to those groups for which
the specified condition is TRUE
The Oracle Server performs the following steps when you use the HAVING clause:
Rows are grouped.
The group function is applied to the group.
The groups that match the criteria in the HAVING clause are displayed.
The HAVING clause can precede the GROUP BY clause, but it is recommended that you place the GROUP BY clause first because it is more logical. Groups are formed and group functions are calculated before the HAVING clause is applied to the groups in the SELECT list.
#134 The HAVING Clause (continued)
The slide example displays department numbers and maximum salary for those departments whose maximum salary is greater than $2900.
You can use the GROUP BY clause without using a group function in the SELECT list.
If you restrict rows based on the result of a group function, you must have a GROUP BY clause as well as the HAVING clause.
The following example displays the department numbers and average salary for those departments whose maximum salary is greater than $2900:
#135 The HAVING Clause (continued)
The slide example displays the job title and total monthly salary for each job title with a total payroll exceeding $5000. The example excludes salespeople and sorts the list by the total monthly salary.
Instructor Note
Demo: l5job1.sql, l5job2.sql
Purpose: To illustrate using a WHERE clause to restrict rows by JOB and using a HAVING clause to restrict groups by SUM(SAL).
#136 Nesting Group Functions
Group functions can be nested to a depth of two. The slide example displays the maximum average salary.
#137 Summary
Seven group functions are available in SQL:
AVG
COUNT
MAX
MIN
SUM
STDDEV
VARIANCE
You can create subgroups by using the GROUP BY clause. Groups can be excluded using the HAVING clause.
Place the HAVING and GROUP BY clauses after the WHERE clause in a statement. Place the ORDER BY clause last.
The Oracle Server evaluates the clauses in the following order:
If the statement contains a WHERE clause, the server establishes the candidate rows.
The server identifies the groups specified in the GROUP BY clause.
The HAVING clause further restricts result groups that do not meet the group criteria in the HAVING clause.
#138 Practice Overview
At the end of this practice, you should be familiar with using group functions and selecting groups of data.
Paper-Based Questions
For questions 1–3, circle either True or False.
Note: Column aliases are used for the queries.
Instructor Note
Hint for Practice #7: Advise the students to think about the MGR column in EMP when determining the number of managers, rather than the JOB column.
#139 Lesson Aim
In this lesson, you will learn how to insert rows into a table, update existing rows in a table, and delete existing rows from a table. You will also learn how to control transactions with the COMMIT, SAVEPOINT, and ROLLBACK statements.
#140 Lesson Aim
In this lesson, you will learn how to insert rows into a table, update existing rows in a table, and delete existing rows from a table. You will also learn how to control transactions with the COMMIT, SAVEPOINT, and ROLLBACK statements.
#141 Data Manipulation Language
Data manipulation language (DML) is a core part of SQL. When you want to add, update, or delete data in the database, you execute a DML statement. A collection of DML statements that form a logical unit of work is called a transaction.
Consider a banking database. When a bank customer transfers money from a savings account to a checking account, the transaction might consist of three separate operations: decrease the savings account, increase the checking account, and record the transaction in the transaction journal. The Oracle Server must guarantee that all three SQL statements are performed to maintain the accounts in proper balance. When something prevents one of the statements in the transaction from executing, the other statements of the transaction must be undone.
Instructor Note
DML statements can be issued directly in SQL*Plus, performed automatically by tools such as Oracle Developer or programmed with tools such as the 3GL precompilers.
Every table has INSERT, UPDATE, and DELETE privileges associated with it. These privileges are automatically granted to the creator of the table, but in general they must be explicitly granted to other users.
Starting with Oracle 7.2, you can place a subquery in the place of the table name in an UPDATE statement, essentially the same way a view is used.
#143 Adding a New Row to a Table
The slide graphic adds a new department to the DEPT table.
#144 Adding a New Row to a Table (continued)
You can add new rows to a table by issuing the INSERT statement.
In the syntax:
table is the name of the table
column is the name of the column in the table to populate
value is the corresponding value for the column
Note: This statement with the VALUES clause adds only one row at a time to a table.
#145 Adding a New Row to a Table (continued)
Because you can insert a new row that contains values for each column, the column list is not required in the INSERT clause. However, if you do not use the column list, the values must be listed according to the default order of the columns in the table.
SQL> DESCRIBE dept
Name Null? Type
------------------------------- -------- ------------
DEPTNO NOT NULL NUMBER(2)
DNAME VARCHAR2(14)
LOC VARCHAR2(13)
For clarity, use the column list in the INSERT clause.
Enclose character and date values within single quotation marks; do not enclose numeric values within single quotation marks.
Instructor Note
Number values should not be enclosed in single quotes, because implicit conversion may take place for numeric values assigned to NUMBER datatype columns if single quotes are included.
#146 Methods for Inserting Null Values
Be sure that the targeted column allows null values by verifying the Null? status from the SQL*Plus DESCRIBE command.
The Oracle Server automatically enforces all datatypes, data ranges, and data integrity constraints. Any column that is not listed explicitly obtains a null value in the new row.
Instructor Note
Common errors that can occur during user input:
Mandatory value missing for a NOT NULL column
Duplicate value violates uniqueness constraint
Foreign key constraint violated
CHECK constraint violated
Datatype mismatch
Value too wide to fit in column
#147 Inserting Special Values by Using SQL Functions
You can use pseudocolumns to enter special values in your table.
The slide example records information for employee Green in the EMP table. It supplies the current date and time in the HIREDATE column. It uses the SYSDATE function for current date and time.
You can also use the USER function when inserting rows in a table. The USER function records the current username.
Confirming Additions to the Table
SQL> SELECT empno, ename, job, hiredate, comm
2 FROM emp
3 WHERE empno = 7196;
#148 Inserting Specific Date and Time Values
The format DD-MON-YY is usually used to insert a date value. With this format, recall that the century defaults to the current century. Because the date also contains time information, the default time is midnight (00:00:00).
If a date must be entered in a format other than the default format—for example, another century and/or a specific time—you must use the TO_DATE function.
The example on the slide records information for employee Aromano in the EMP table. It sets the HIREDATE column to be February 3, 1997.
If the RR format is set, the century may not be the current one.
#149 Inserting Values by Using Substitution Variables
You can produce an INSERT statement that allows the user to add values interactively by using SQL*Plus substitution variables.
The slide example records information for a department in the DEPT table. It prompts the user for the department number, department name, and location.
For date and character values, the ampersand and the variable name are enclosed in single quotation marks.
Instructor Note
Be sure to mention the following points about the example:
The names of the SQL*Plus substitution parameters do not have to match the corresponding column names.
Substitution parameters are lexical variables. Whatever characters the user enters are substituted as text for the variable name.
The SQL*Plus SET VERIFY command lists the substitution before executing the statement.
#150 Creating a Script to Manipulate Data
You can save your command with substitution variables to a file and execute the file. Each time you execute the command, it will prompt you for new values. Customize the prompts by using the SQL*Plus ACCEPT command.
The example on the slide records information for a department in the DEPT table. It prompts the user for the department number, department name, and location by using customized prompt messages.
Please enter the department number: 90
Please enter the department name: PAYROLL
Please enter the location: HOUSTON
1 row created.
Do not prefix the SQL*Plus substitution parameter with the ampersand (&) when referencing it in the ACCEPT command. Use a dash (-) to continue a SQL*Plus command on the next line.
Instructor Note
Be sure to mention the following points about the script:
Do not prefix the SQL*Plus substitution parameter with the ampersand in the ACCEPT command.
Use a dash to continue a SQL*Plus command on the next line.
Add a space after the colon in the PROMPT command.
#151 Copying Rows from Another Table
You can use the INSERT statement to add rows to a table where the values are derived from existing tables. In place of the VALUES clause, you use a subquery.
Syntax
INSERT INTO table [ column (, column) ]
subquery;
where: table is the table name
column is the name of the column in the table to populate
subquery is the subquery that returns rows into the table
For more information, see Oracle Server SQL Reference, Release 8, “SELECT,” Subqueries section.
The number of columns and their datatypes in the column list of the INSERT clause must match the number of values and their datatypes in the subquery.
Instructor Note
Please run the script lab9_12.sql to create the managers table. Do not get into too many details on copying rows from another table.
#152 Changing Data in a Table
The slide graphic changes the department number for Clark from 10 to 20.
#153 Updating Rows
You can modify existing rows by using the UPDATE statement.
In the above syntax:
table is the name of the table
column is the name of the column in the table to populate
value is the corresponding value or subquery for the column
condition identifies the rows to be updated and is composed of column names expressions, constants, subqueries, and comparison operators
Confirm the update operation by querying the table to display the updated rows.
For more information, see Oracle Server SQL Reference, Release 8, “UPDATE.”
Note: In general, use the primary key to identify a single row. Using other columns may unexpectedly cause several rows to be updated. For example, identifying a single row in the EMP table by name is dangerous because more than one employee may have the same name.
Instructor Note
Demo: l9sel.sql, l9upd.sql
Purpose: To illustrate displaying the initial state of data, performing updates, and viewing results.
#154 Updating Rows (continued)
The UPDATE statement modifies specific rows, if the WHERE clause is specified. The slide example transfers employee 7782 (Clark) to department 20.
If you omit the WHERE clause, all the rows in the table are modified.
Note: The EMPLOYEE table has the same data as the EMP table.
#155 Updating Rows with a Multiple-Column Subquery
Multiple-column subqueries can be implemented in the SET clause of an UPDATE statement.
Syntax
Instructor Note
It may be worth showing participants that the results would be the same for the example on the slide if two different subqueries were used in the SET clause as illustrated below:
SQL> UPDATE emp
2 SET job = (SELECT job FROM emp
3 WHERE empno = 7499),
4 deptno = (SELECT deptno FROM dept
5 WHERE dname = 'SALES')
6 WHERE empno = 7698;
#156 Updating Rows Based on Another Table
You can use subqueries in UPDATE statements to update rows in a table. The example on the slide updates the EMPLOYEE table based on the values from the EMP table. It changes the department number of all employees with employee 7788’s job title to employee 7788’s current department number.
#157 Integrity Constraint Error
If you attempt to update a record with a value that is tied to an integrity constraint, you will experience an error.
In the example on the slide, department number 55 does not exist in the parent table, DEPT, and so you receive the parent key violation ORA-02291.
Note: Integrity constraints ensure that the data adheres to a predefined set of rules. A subsequent lesson will cover integrity constraints in greater depth.
Instructor Note
Explain integrity constraints and review the concept of primary key and foreign key.
#158 Removing a Row from a Table
The slide graphic removes the DEVELOPMENT department from the DEPT table (assuming that there are no constraints defined on the DEPT table).
Instructor Note
After all the rows have been eliminated with the DELETE statement, only the data structure of the table remains. A more efficient method of emptying a table is with the TRUNCATE statement.
You can use the TRUNCATE statement to quickly remove all rows from a table or cluster. Removing rows with the TRUNCATE statement is faster than removing them with the DELETE statement for the following reasons:
The TRUNCATE statement is a data definition language (DDL) statement and generates no rollback information. It will be covered in a subsequent lesson.
Truncating a table does not fire the DELETE triggers of the table.
If the table is the parent of a referential integrity constraint, you cannot truncate the table. Disable the constraint before issuing the TRUNCATE statement.
#159 Deleting Rows
You can remove existing rows by using the DELETE statement.
In the syntax:
table is the table name
condition identifies the rows to be deleted and is composed of column names, expressions, constants, subqueries, and comparison operators
For more information, see Oracle Server SQL Reference, Release 8, “DELETE.”
Instructor Note
The DELETE statement does not ask for confirmation. However, the delete operation is not made permanent until the data transaction is committed. Therefore, you can undo the operation with the ROLLBACK statement if you make a mistake.
#160 Deleting Rows (continued)
You can delete specific rows by specifying the WHERE clause in the DELETE statement. The slide example deletes the DEVELOPMENT department from the DEPARTMENT table. You can confirm the delete operation by displaying the deleted rows using the SELECT statement.
Example
Remove all employees who started after January 1, 1997.
If you omit the WHERE clause, all rows in the table are deleted. The second example on the slide deletes all the rows from the DEPARTMENT table because no WHERE clause has been specified.
Note: The DEPARTMENT table has the same data as the DEPT table.
#161 Deleting Rows Based on Another Table
You can use subqueries to delete rows from a table based on values from another table. The example on the slide deletes all the employees who are in department 30. The subquery searches the DEPT table to find the department number for the SALES department. The subquery then feeds the department number to the main query, which deletes rows of data from the EMPLOYEE table based on this department number.
#162 Integrity Constraint Error
If you attempt to delete a record with a value that is tied to an integrity constraint, you will experience an error.
The example on the slide tries to delete department number 10 from the DEPT table, but it results in an error because department number is used as a foreign key in the EMP table. If the parent record that you attempt to delete has child records, then you receive the child record found violation ORA-02292.
Instructor Note
If referential integrity constraints are in use, you might receive an Oracle Server error message when you attempt to delete a row. However, if the referential integrity constraint contains the ON DELETE CASCADE option, then the selected row and its children are deleted from their respective tables.
#163 Database Transactions
The Oracle Server ensures data consistency based on transactions. Transactions give you more flexibility and control when changing data, and they ensure data consistency in the event of user process failure or system failure.
Transactions consist of DML statements that make up one consistent change to the data. For example, a transfer of funds between two accounts should include the debit to one account and the credit to another account in the same amount. Both actions should either fail or succeed together. The credit should not be committed without the debit.
Transaction Types
#164 When Does a Transaction Start and End?
A transaction begins when the first executable SQL statement is encountered and terminates when one of the following occurs:
A COMMIT or ROLLBACK statement is issued
A DDL statement, such as CREATE, is issued
A DCL statement is issued
The user exits SQL*Plus
A machine fails or the system crashes
After one transaction ends, the next executable SQL statement automatically starts the next transaction.
A DDL statement or a DCL statement is automatically committed and therefore implicitly ends a transaction.
#166 Explicit Transaction Control Statements
You can control the logic of transactions by using the COMMIT, SAVEPOINT, and ROLLBACK statements.
Note: SAVEPOINT is not ANSI standard SQL.
Instructor Note
Savepoints are not schema objects and cannot be referenced in the data dictionary.
#168 Committing Changes
Every data change made during the transaction is temporary until the transaction is committed.
State of the data before COMMIT or ROLLBACK is issued:
Data manipulation operations primarily affect the database buffer; therefore, the previous state of the data can be recovered.
The current user can review the results of the data manipulation operations by querying the tables.
Other users cannot view the results of the data manipulation operations made by the current user. The Oracle Server institutes read consistency to ensure that each user sees data as it existed at the last commit.
The affected rows are locked; other users cannot change the data in the affected rows.
Instructor Note
With the Oracle Server, data changes may actually be written to the database files before COMMIT, but they are still only temporary.
If a number of users are making changes simultaneously to the same table, then each user sees only his or her changes until other users commit their changes.
Other users see data as it is committed in the database (in other words, before changes).
By default, the Oracle Server has row-level locking. It is possible to alter the default locking mechanism.
#169 Committing Changes (continued)
Make all pending changes permanent by using the COMMIT statement. Following a COMMIT:
State of the data after a COMMIT is issued:
Data changes are written to the database.
The previous state of the data is permanently lost.
All users can view the results of the transaction.
The locks on the affected rows are released; the rows are now available for other users to perform new data changes.
All savepoints are erased.
#170 Committing Changes (continued)
The slide example updates the EMP table and sets the department number for employee 7782 (Clark)
to 10. It then makes the change permanent by issuing the COMMIT statement.
Example
Create a new ADVERTISING department with at least one employee. Make the data change permanent.
Instructor Note
Use this example to explain how COMMIT ensures that two related operations should occur together or not at all. In this case, COMMIT prevents empty departments from being created.
Instructor Note (for page 9-32)
Please run the script lab9_32.sql to create the test table and insert data into the table.
#171 Rolling Back Changes
Discard all pending changes by using the ROLLBACK statement. Following a ROLLBACK:
Data changes are undone.
The previous state of the data is restored.
The locks on the affected rows are released.
Example
While attempting to remove a record from the TEST table, you can accidentally empty the table. You can correct the mistake, reissue the proper statement, and make the data change permanent.
#172 Rolling Back Changes to a Savepoint
You can create a marker in the current transaction by using the SAVEPOINT statement. The transaction therefore can be divided into smaller sections. You can then discard pending changes up to that marker by using the ROLLBACK TO SAVEPOINT statement.
If you create a second savepoint with the same name as an earlier savepoint, the earlier savepoint is deleted.
Instructor Note
Savepoints are especially useful in PL/SQL or a 3GL program in which recent changes can be undone conditionally based on runtime conditions.
#174 Summary
Manipulate data in the Oracle database by using the INSERT, UPDATE, and DELETE statements. Control data changes by using the COMMIT, SAVEPOINT, and ROLLBACK statements.
The Oracle Server guarantees a consistent view of data at all times.
Locking can be implicit or explicit.
Instructor Note (for page 9-37)
Please read the Instructor Note on page 9-43.
For more information on locking refer to Oracle8i Concepts, Release 8.1.5, “Data Concurrency and Consistency,” and to:
http://st-doc.us.oracle.com/8.0/815/server.815/a67781/c01intro.htm#4014
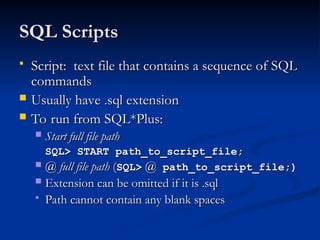
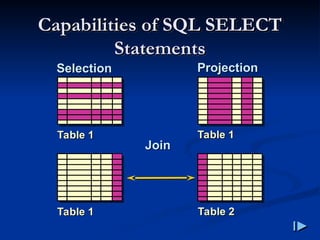
![Basic SELECT Statement
Basic SELECT Statement
SELECT [DISTINCT] {*, column [alias],...}
FROM table;
SELECT identifies
SELECT identifies what
what columns
columns.
.
FROM identifies
FROM identifies which
which table
table.
.](https://image.slidesharecdn.com/dmlsql-251122053918-d62895a3/85/DataBase-DML-SQL-This-content-about-SQL-6-320.jpg)
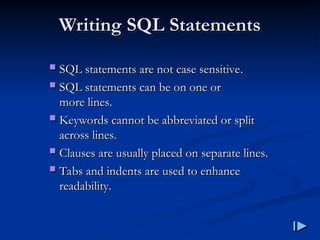
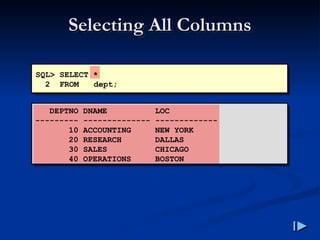
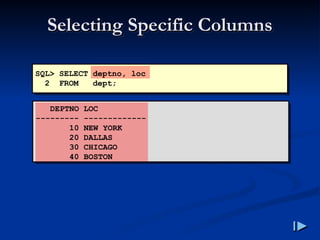
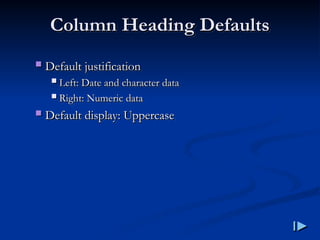
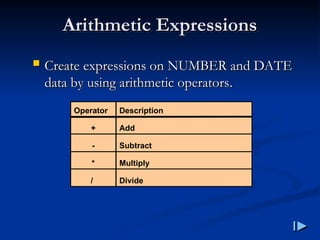
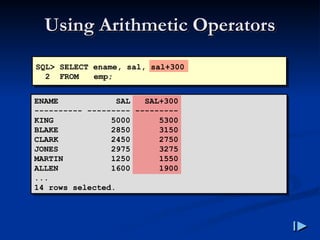
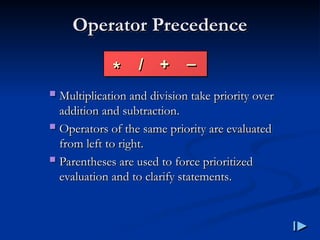
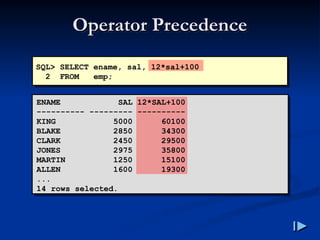
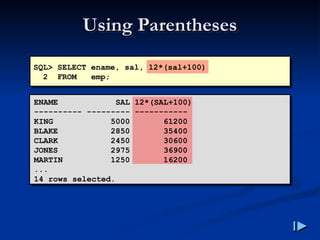
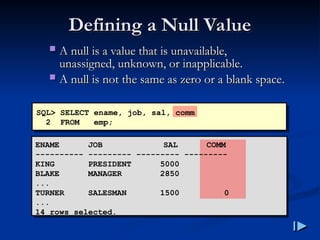
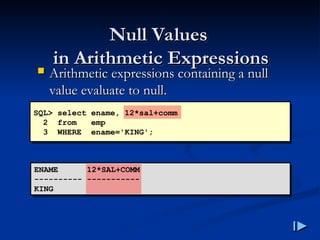
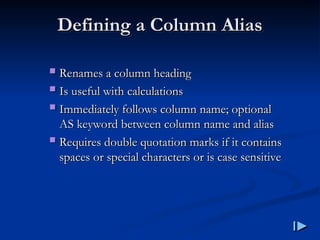
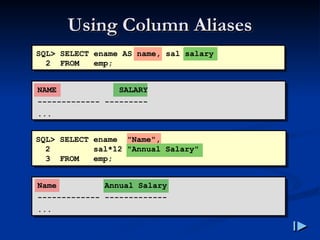
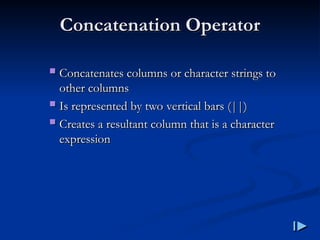
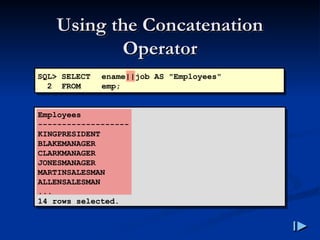
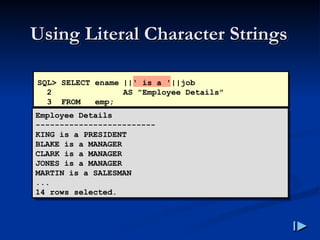
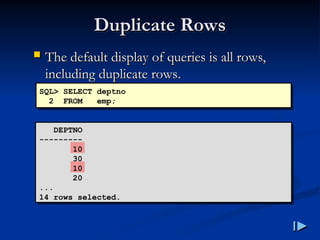
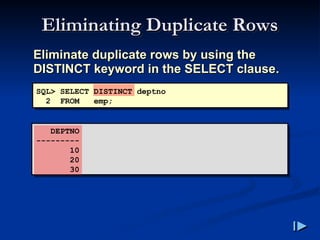
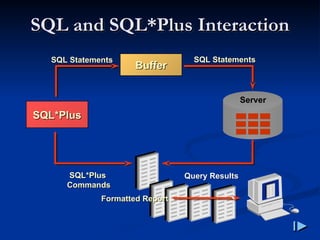
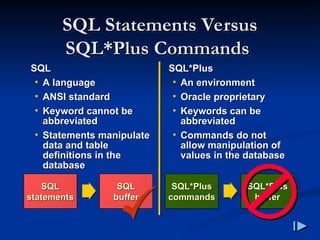
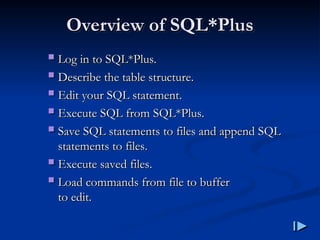
![Logging In to SQL
Logging In to SQL*
*Plus
Plus
From Windows environment
From Windows environment:
:
From command line
From command line:
:
sqlplus
sqlplus [
[username
username[/
[/password
password
[
[@
@database
database]]]
]]]](https://image.slidesharecdn.com/dmlsql-251122053918-d62895a3/85/DataBase-DML-SQL-This-content-about-SQL-29-320.jpg)
![Displaying Table Structure
Displaying Table Structure
Use the SQL
Use the SQL*
*Plus DESCRIBE command to
Plus DESCRIBE command to
display the structure of a table
display the structure of a table.
.
DESC[RIBE] tablename](https://image.slidesharecdn.com/dmlsql-251122053918-d62895a3/85/DataBase-DML-SQL-This-content-about-SQL-30-320.jpg)
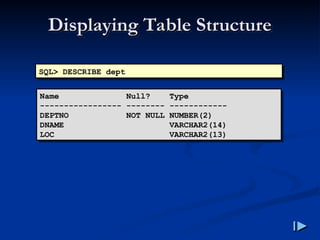
![SQL
SQL*
*Plus Editing Commands
Plus Editing Commands
A
A[
[PPEND
PPEND]
] text
text
C
C[
[HANGE
HANGE] /
] / old
old /
/ new
new
C
C[
[HANGE
HANGE] /
] / text
text /
/
CL
CL[
[EAR
EAR]
] BUFF
BUFF[
[ER
ER]
]
DEL
DEL
DEL
DEL n
n
DEL
DEL m n
m n](https://image.slidesharecdn.com/dmlsql-251122053918-d62895a3/85/DataBase-DML-SQL-This-content-about-SQL-32-320.jpg)
![SQL
SQL*
*Plus Editing Commands
Plus Editing Commands
I
I[
[NPUT
NPUT]
]
I
I[
[NPUT
NPUT]
] text
text
L
L[
[IST
IST]
]
L
L[
[IST
IST]
] n
n
L
L[
[IST
IST]
] m n
m n
R
R[
[UN
UN]
]
n
n
n
n text
text
0
0 text
text](https://image.slidesharecdn.com/dmlsql-251122053918-d62895a3/85/DataBase-DML-SQL-This-content-about-SQL-33-320.jpg)
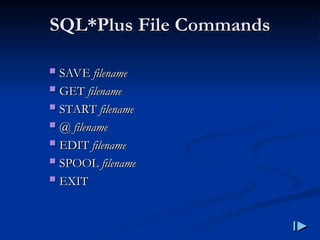
![Summary
Summary
Use SQL
Use SQL*
*Plus as an environment to
Plus as an environment to:
:
Execute SQL statements
Execute SQL statements
Edit SQL statements
Edit SQL statements
SELECT [DISTINCT] {*,column [alias],...}
FROM table;](https://image.slidesharecdn.com/dmlsql-251122053918-d62895a3/85/DataBase-DML-SQL-This-content-about-SQL-35-320.jpg)


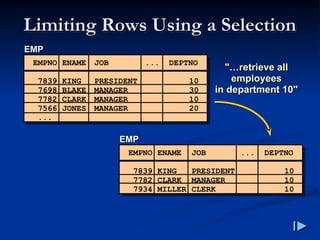
![Limiting Rows Selected
Limiting Rows Selected
Restrict the rows returned by using the
Restrict the rows returned by using the
WHERE clause
WHERE clause.
.
The WHERE clause follows the FROM
The WHERE clause follows the FROM
clause
clause.
.
SELECT [DISTINCT] {*| column [alias], ...}
FROM table
[WHERE condition(s)];](https://image.slidesharecdn.com/dmlsql-251122053918-d62895a3/85/DataBase-DML-SQL-This-content-about-SQL-40-320.jpg)
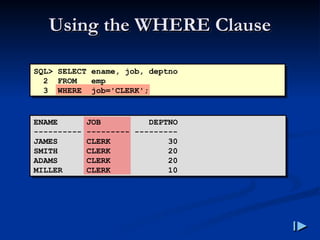
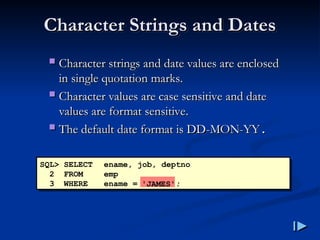
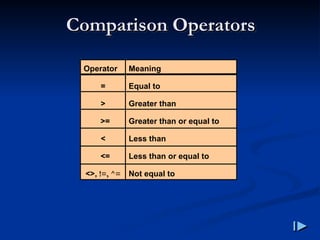
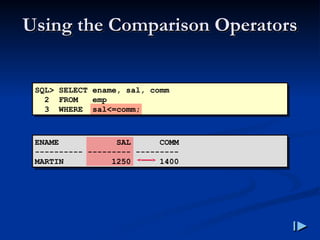
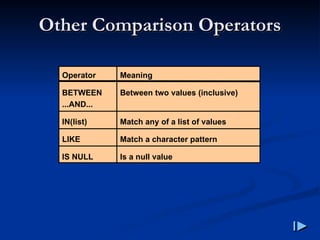
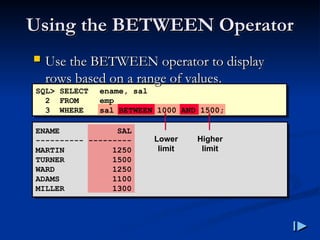
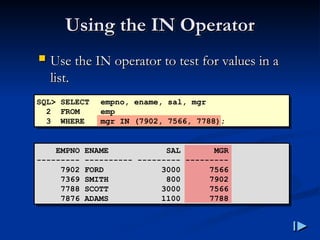
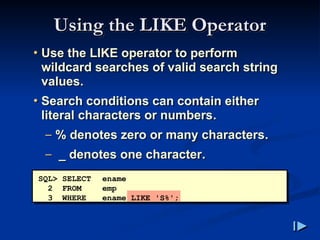
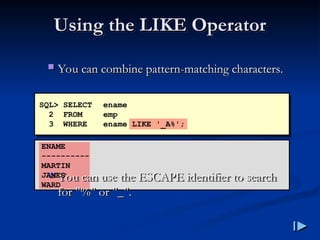
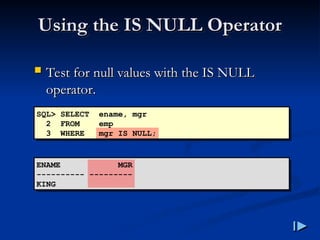
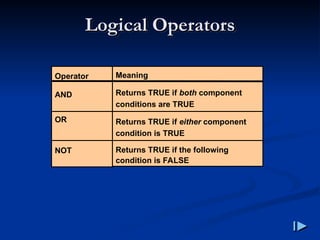
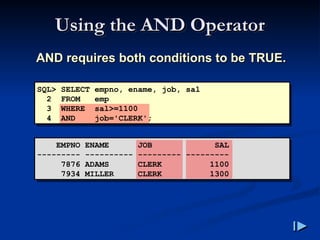
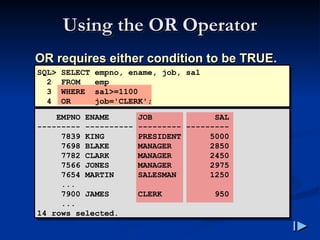
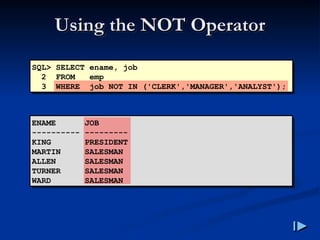
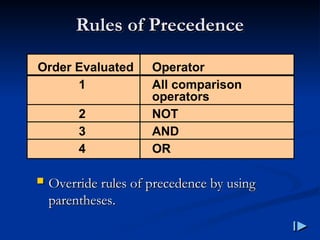
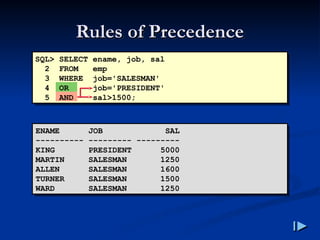
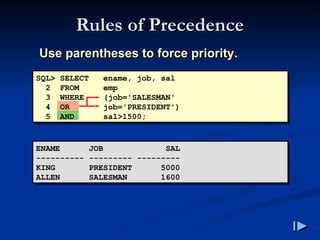
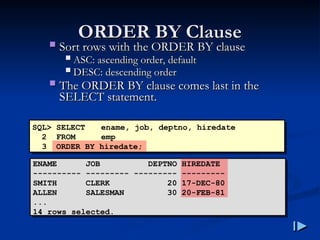
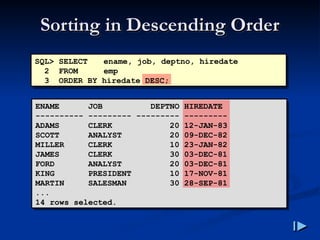
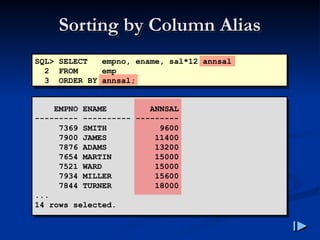
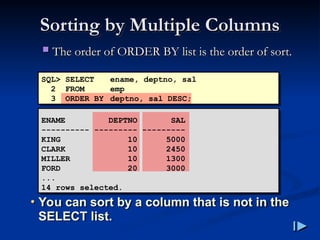
![Summary
Summary
SELECT [DISTINCT] {*| column [alias], ...}
FROM table
[WHERE condition(s)]
[ORDER BY {column, expr, alias} [ASC|DESC]];](https://image.slidesharecdn.com/dmlsql-251122053918-d62895a3/85/DataBase-DML-SQL-This-content-about-SQL-62-320.jpg)


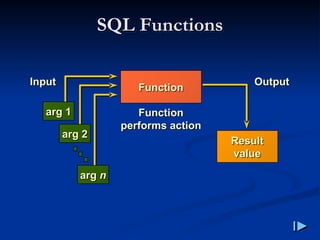
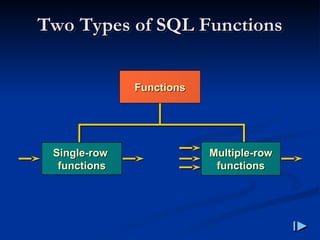
![Single
Single-
-Row Functions
Row Functions
Manipulate data items
Manipulate data items
Accept arguments and return one value
Accept arguments and return one value
Act on each row returned
Act on each row returned
Return one result per row
Return one result per row
May modify the datatype
May modify the datatype
Can be nested
Can be nested
function_name (column|expression, [arg1, arg2,...])](https://image.slidesharecdn.com/dmlsql-251122053918-d62895a3/85/DataBase-DML-SQL-This-content-about-SQL-69-320.jpg)
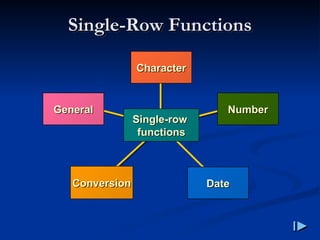
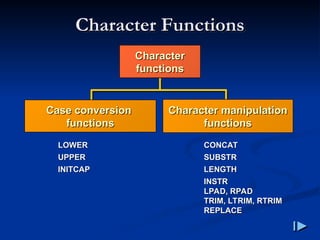
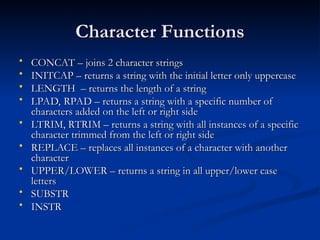
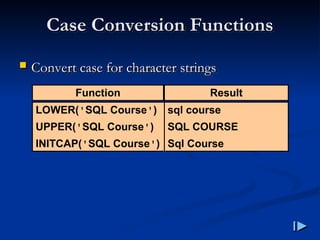
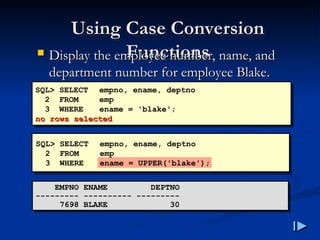
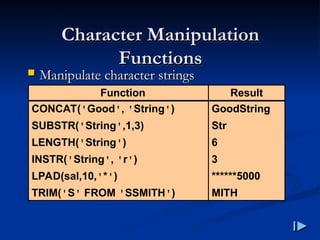
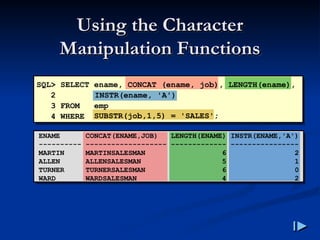
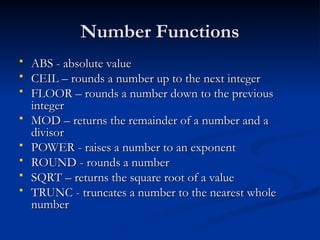
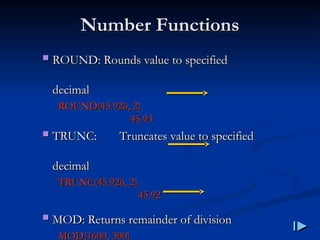
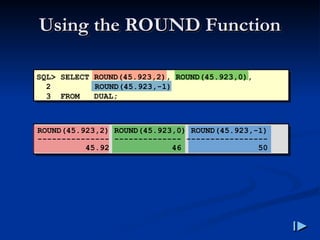

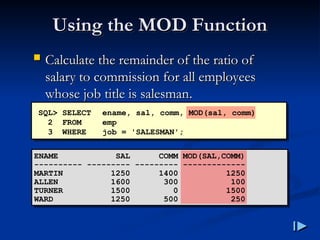
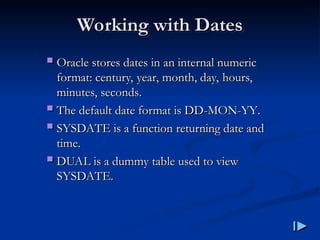
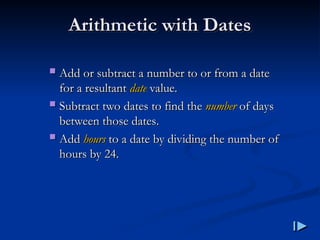
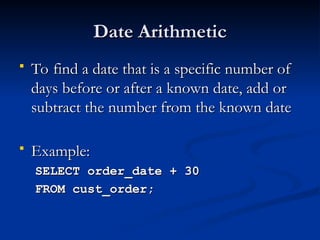
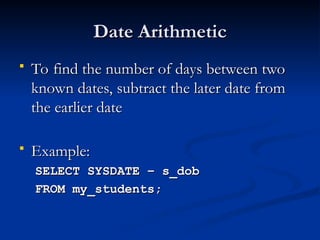
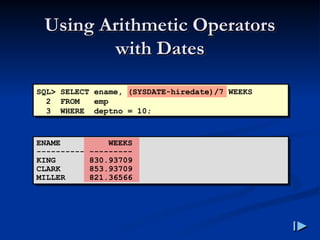
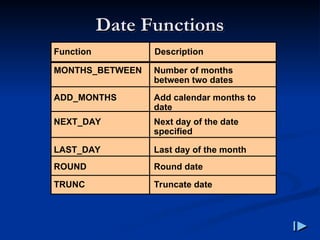
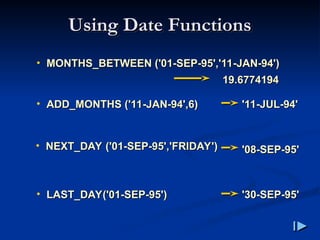

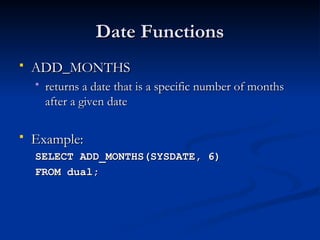
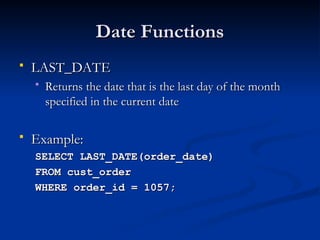
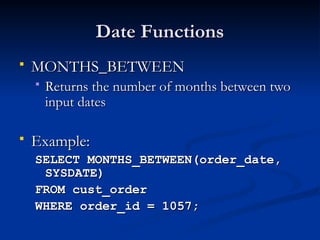
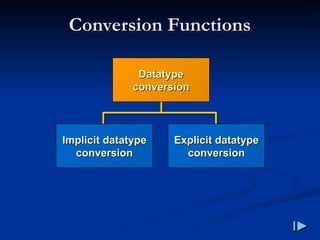
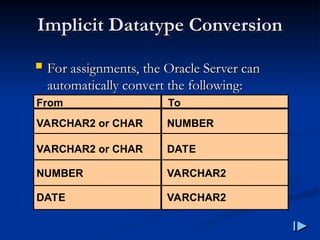
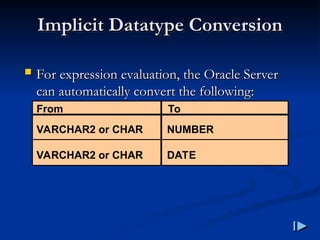
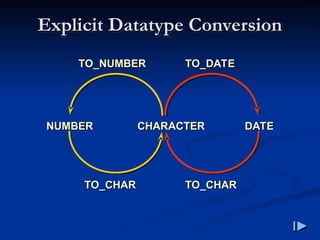

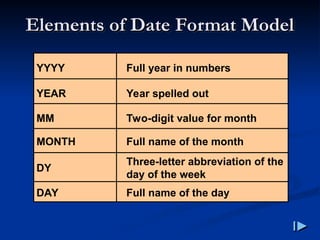
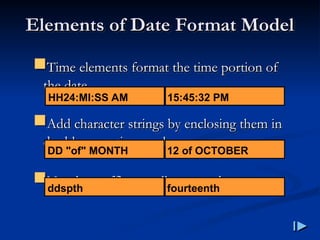
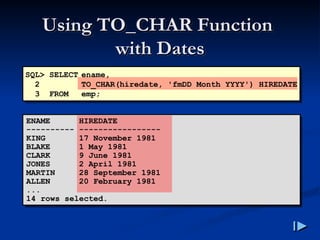
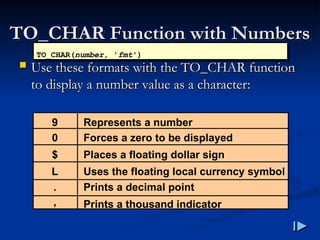
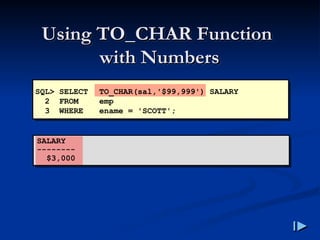
![TO_NUMBER and
TO_NUMBER and
TO_DATE Functions
TO_DATE Functions
Convert a character string to a number format
Convert a character string to a number format
using the
using the TO_NUMBER
TO_NUMBER function
function
TO_NUMBER(char[, 'fmt'])
• Convert a character string to a date
format using the TO_DATE function
TO_DATE(char[, 'fmt'])](https://image.slidesharecdn.com/dmlsql-251122053918-d62895a3/85/DataBase-DML-SQL-This-content-about-SQL-103-320.jpg)
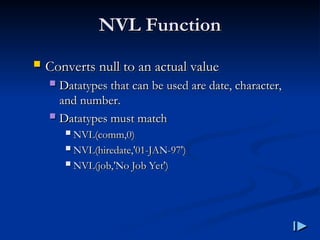
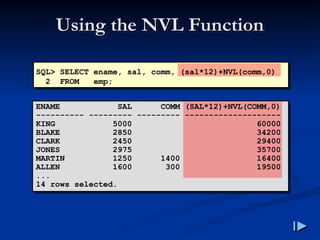
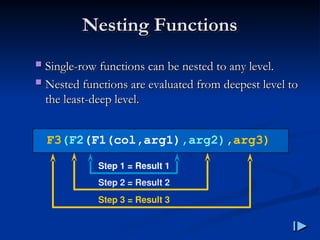
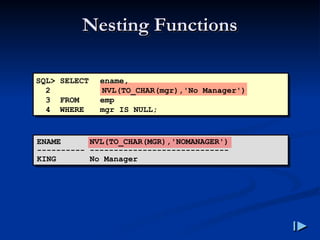
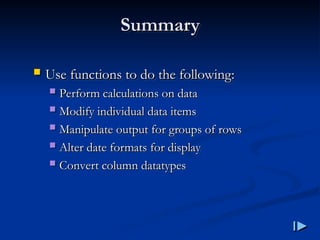

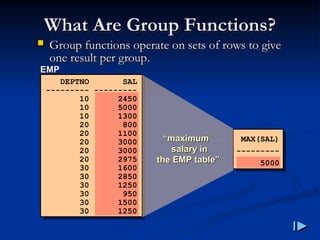
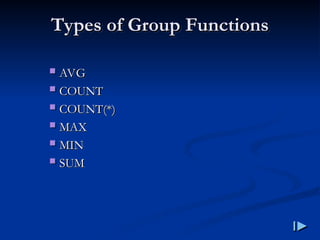
![Using Group Functions
Using Group Functions
SELECT [column,] group_function(column)
FROM table
[WHERE condition]
[GROUP BY column]
[ORDER BY column];](https://image.slidesharecdn.com/dmlsql-251122053918-d62895a3/85/DataBase-DML-SQL-This-content-about-SQL-114-320.jpg)
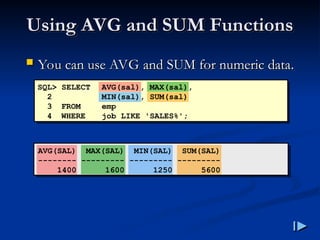
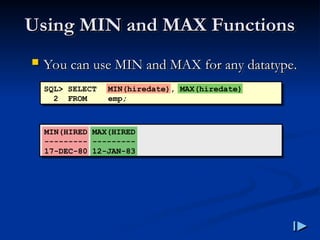
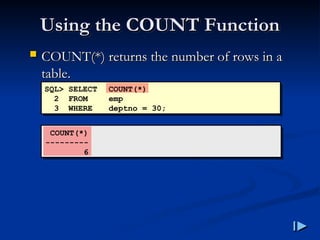
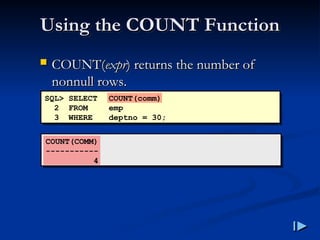
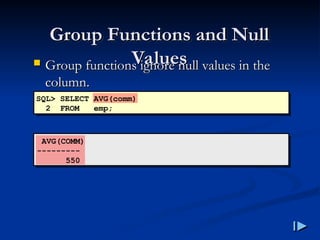
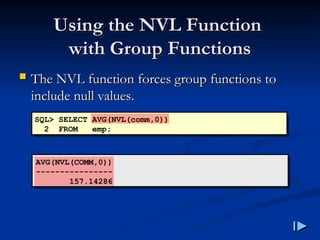
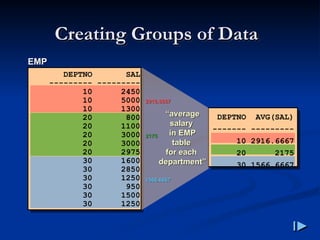
![Creating Groups of Data
Creating Groups of Data:
:
GROUP BY Clause
GROUP BY Clause
SELECT column, group_function(column)
FROM table
[WHERE condition]
[GROUP BY group_by_expression]
[ORDER BY column];
Divide rows in a table into smaller groups by
Divide rows in a table into smaller groups by
using the GROUP BY clause
using the GROUP BY clause.
.](https://image.slidesharecdn.com/dmlsql-251122053918-d62895a3/85/DataBase-DML-SQL-This-content-about-SQL-122-320.jpg)
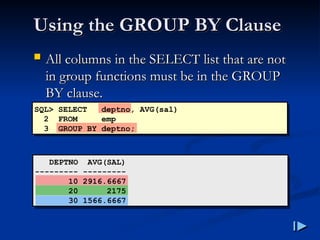
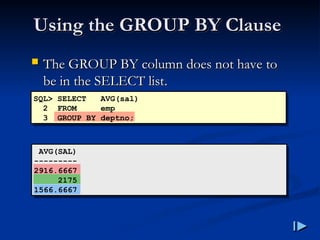
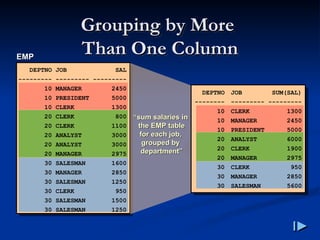
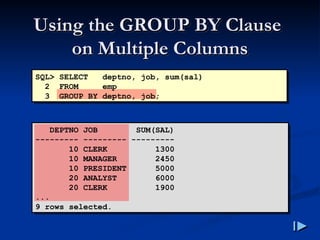
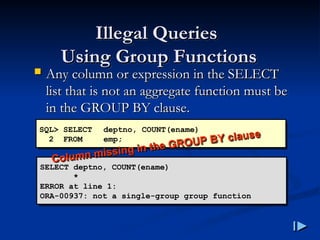
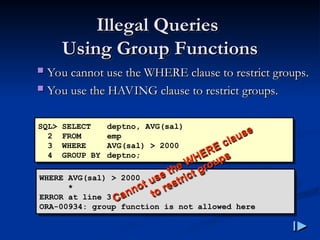

![Excluding Group Results
Excluding Group Results:
:
HAVING Clause
HAVING Clause
Use the HAVING clause to restrict groups
Use the HAVING clause to restrict groups
Rows are grouped
Rows are grouped.
.
The group function is applied
The group function is applied.
.
Groups matching the HAVING clause are
Groups matching the HAVING clause are
displayed
displayed.
.
SELECT column, group_function
FROM table
[WHERE condition]
[GROUP BY group_by_expression]
[HAVING group_condition]
[ORDER BY column];](https://image.slidesharecdn.com/dmlsql-251122053918-d62895a3/85/DataBase-DML-SQL-This-content-about-SQL-130-320.jpg)
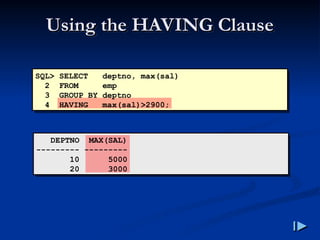
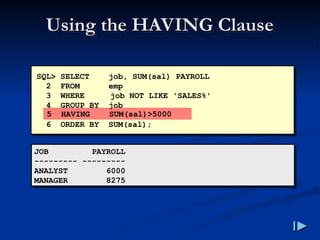
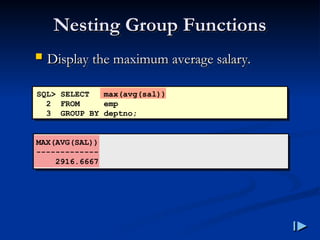
![Summary
Summary
SELECT column, group_function(column)
FROM table
[WHERE condition]
[GROUP BY group_by_expression]
[HAVING group_condition]
[ORDER BY column];
Order of evaluation of the clauses
Order of evaluation of the clauses:
:
WHERE clause
WHERE clause
GROUP BY clause
GROUP BY clause
HAVING clause
HAVING clause](https://image.slidesharecdn.com/dmlsql-251122053918-d62895a3/85/DataBase-DML-SQL-This-content-about-SQL-134-320.jpg)


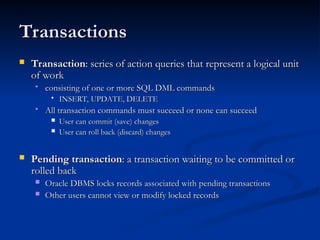
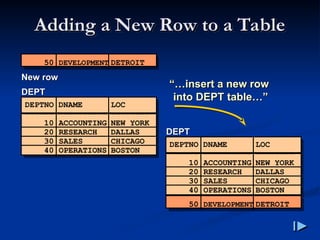
![The INSERT Statement
The INSERT Statement
Add new rows to a table by using the INSERT
Add new rows to a table by using the INSERT
statement
statement.
.
Only one row is inserted at a time with this
Only one row is inserted at a time with this
syntax
syntax.
.
INSERT INTO table [(column [, column...])]
VALUES (value [, value...]);](https://image.slidesharecdn.com/dmlsql-251122053918-d62895a3/85/DataBase-DML-SQL-This-content-about-SQL-141-320.jpg)
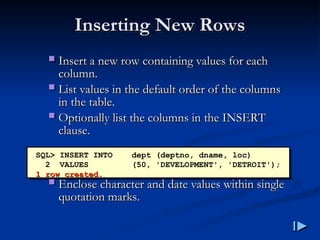
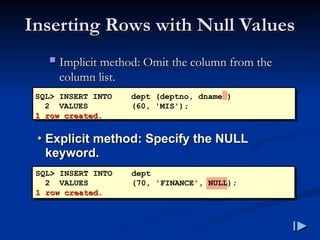
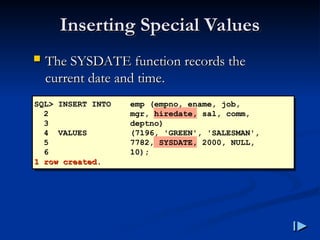
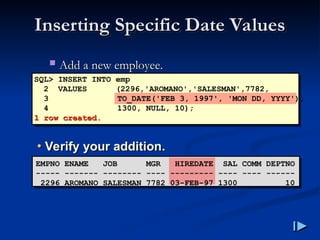

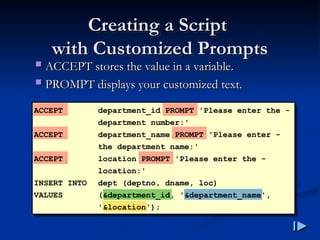
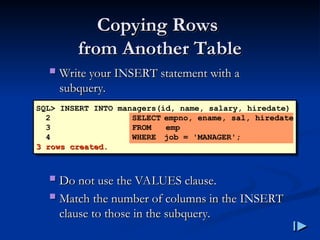
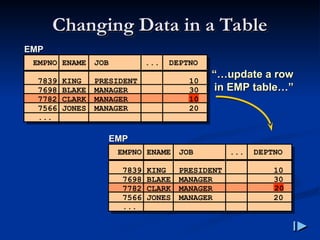
![The UPDATE Statement
The UPDATE Statement
Modify existing rows with the UPDATE
Modify existing rows with the UPDATE
statement
statement.
.
Update more than one row at a time, if
Update more than one row at a time, if
required
required.
.
UPDATE table
SET column = value [, column = value, ...]
[WHERE condition];](https://image.slidesharecdn.com/dmlsql-251122053918-d62895a3/85/DataBase-DML-SQL-This-content-about-SQL-150-320.jpg)
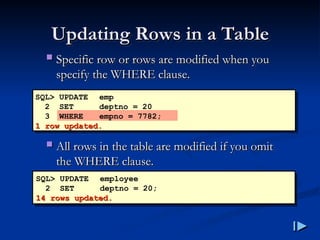


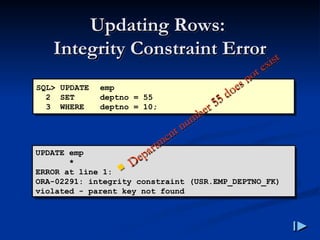
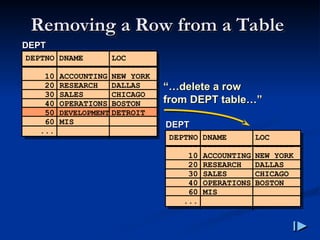
![The DELETE Statement
The DELETE Statement
You can remove existing rows from a table by
You can remove existing rows from a table by
using the DELETE statement
using the DELETE statement.
.
DELETE [FROM] table
[WHERE condition];](https://image.slidesharecdn.com/dmlsql-251122053918-d62895a3/85/DataBase-DML-SQL-This-content-about-SQL-156-320.jpg)

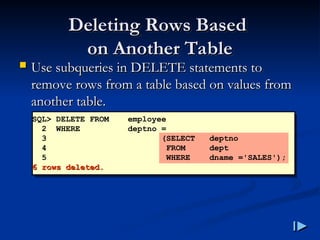
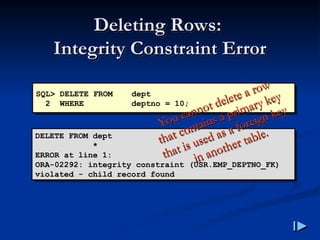
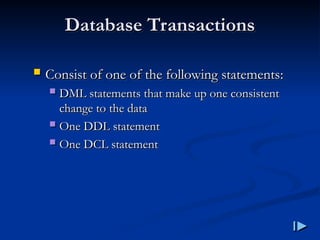
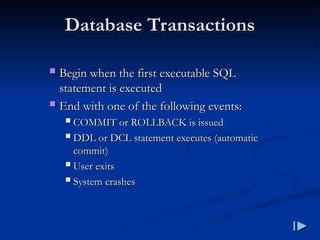
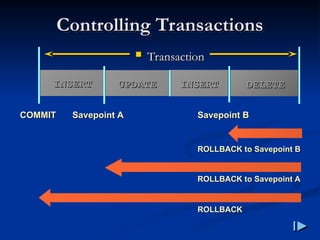
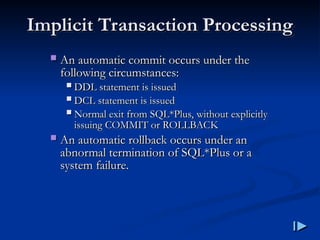
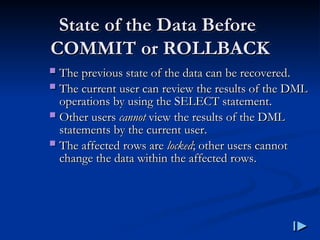
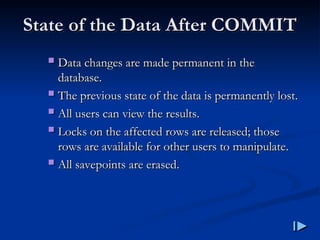
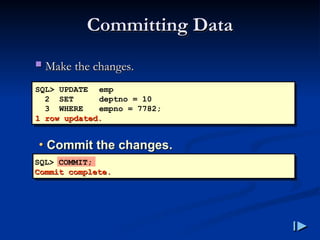
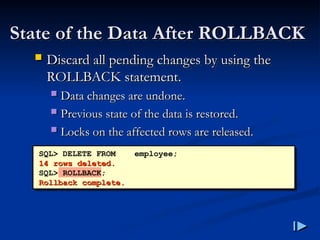
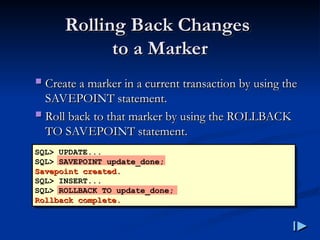
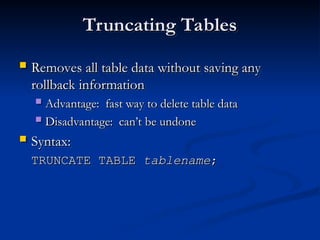
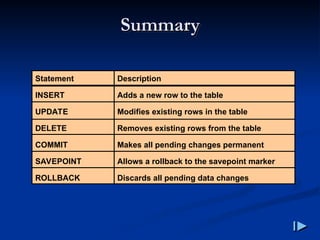


![Les01[1]Writing Basic SQL Statements](https://cdn.slidesharecdn.com/ss_thumbnails/les011-220214133635-thumbnail.jpg?width=640&height=640&fit=bounds)


![[DSC Europe 25] Paula Garcia Esteban -Building the Future: The Role of Data S...](https://cdn.slidesharecdn.com/ss_thumbnails/9ld1r1bsqpwve8qfvphy-paula-garcia-esteban-building-the-future-260122103838-4171f5cb-thumbnail.jpg?width=640&height=640&fit=bounds)


