The basic functions of Tally.ERP 9
F11: Features & F12: Configurations
Creating and Maintaining Chart of Accounts
Entering the opening balances for Ledgers
Creating Sales and Purchase vouchers in Tally is extremely easy and simple. They are often referred to as purchase entry in Tally and sales entry in Tally. Learn how to do it in this video by Attitude Academy Yamuna vihar, Delhi.
Salient Features of Tally.ERP 9
Key Components of Tally.ERP 9
How to start and exit Tally.ERP 9
Setting up a company in Tally.ERP 9
Working with companies in Tally.ERP 9
The cash book is the most important subsidiary book in any business concern. Learn about how to maintain entries in cash book while executing tally erp9 software.
Maintain Bill-wise Details
Create and maintain cost Centers
Create and maintain Multiple Currencies
Configure and compute Interest Calculations
Create and maintain Budgets and Scenarios
Generate and print various reports
The basic functions of the Tally.ERP 9 Inventory System
Creating and maintaining Inventory Masters
Creating and maintaining stock details
Creating stock items and entering opening balances.
TallyPrime is a complete business management software for small and medium business. TallyPrime helps you manage accounting, inventory, banking, taxation, banking, payroll and much more to get rid of complexities, and in turn, focus on business growth.
Advanced voucher entry tutorial in Tally ERP 9Accounts Arabia
Describe the purpose of the Tally.ERP 9 Accounting Vouchers Create and alter Accounting Vouchers
Use vouchers to enter Accounting transactions
Describe the use of Non-Accounting Vouchers
Describe the purpose of the Tally.ERP 9 Inventory vouchers
Create and alter Inventory Vouchers
Using vouchers to enter Inventory transactions
In accounting terms, a voucher is a document containing the details of a financial transaction. For
example, a purchase invoice, a sales receipt, a petty cash docket, a bank interest statement, and
so on. For every such transaction made, a voucher is used to enter the details into the ledgers to
update the financial position of the company. This feature of Tally.ERP 9 will be used most often.
1) TallyVault a Company
2) Activate Security Control for a Company
3) Create Security Levels and Assign Passwords
4) Activate TallyAudit and View the TallyAudit list of Vouchers/Ledgers
5) Backup and Restore Tally.ERP 9 Data
6) Split Company Data
7) Export and Import Data and Vouchers
8) Export Reports using ODBC
9) Use Web-Enabled, Print Preview and Online Help Features
10) Print Reports and Cheques
11) Tally.NET Features
12) Control Centre Capabilities
13) Advantages of Support Centre
Creating Altering and Deleting a company in Tally is as simple as creating altering and deleting a voucher but still many people are confused or they do not know how to create alter and delete a company in Tally.
Payroll is the process of maintaining records of all employees’ salaries.
1) The Payroll function in Tally.ERP 9 facilitates accurate and timely
employee payments.
2) The Attendance/Production Type is used to record attendance and production
data.
3) Salary components constituting Pay Structures are called Pay Heads.
4) Gratuity is a monetary benefit paid by an employer to an employee, at
the end of the employment, for the services rendered over the period of
employment.
5) Attendance voucher is a voucher type used to record attendance, overtime,
leave or production details.
6)Payroll voucher is used to record employees’ payroll related transactions.
7)Payslip is a document, issued to an employee, that itemises each component
of his/her earnings and deductions.
8)Pay Sheet is a matrix report with details of pay heads pertaining to
employees.
9) Payroll Statement helps to generate reports for specific pay heads.
10) Attendance Sheet displays information relating to employees’ attendance
or production data.
11) Gratuity Summary Report calculates the liability of a company in terms
of gratuity.
1) Configure Tally.ERP 9 to create POS Invoice
2) Create POS invoice with / without voucher class
3) Generate POS Invoice for single and multi-mode payment
4) Enter zero valued entries in POS invoice
5) Record batch-wise details in a POS Invoice
6) Print the POS Invoice
7) Generate and print POS Register
POS system is a computerised cash register which adds up the sales totals, calculates the
balance to be returned to buyer and automatically adjusts the inventory levels to reflect the
quantity sold. The equipment required for POS to work effectively are cash registers, card
readers, bar-code scanners and so on.
Configure Tally.NET Features
1) Connect Company on Tally.NET
2) Create and Authorise Remote Users
3) Access Company data Remotely
Tally.NET is an enabling framework which establishes a connection through which the remote
user can access the Client's data without copying / transferring the data. In other words, the
remote user can access the company data, provided the Company is open and connected on
Tally.NET.
Concept of Control Centre
Tally.ERP 9 provides a powerful feature named Control Centre to its users, which works as an
interface between the user and Tally.ERP 9 installed at different sites, it enables the user to
centrally configure and administer Site/User belonging to an account.
1) Manage Licenses
2) Central Configuration
3) Manage Users
4) Manage Company Profile
5) Manage Accounts (using My Tally.NET Accounts)
6) Change Passwords
7) Activity History
8) Jobs and Recruitments (Coming Soon)
9) Shop
1)Record orders placed/received
2) Make a reorder analysis of inventory
3) Create and maintain batch wise details, bill of materials and price lists
4) Display reports on various stock valuation methods and inventory ageing
analysis
5) Record zero valued entries
6) Record transactions using different actual and billed quantities
Access Support Centre
Use Support Centre
Tally.ERP 9 provides a new capability to its users known as Support Centre, wherein a user can
directly post his support queries on the functional and technical aspects of the Product. Using
Support Centre feature, the user can view all the support queries reported via Support Centre and
also through other modes viz., Email, Chat, Calls, etc.
The Multilingual capabilities of Tally.ERP 9
How to change the Interface for different languages
Generating reports and invoices in different languages
Shortcut Keys in Tally ERP 9
Tally ERP 9 provides a selection of keyboard Tally Shortcuts to access menu functionalities to increase data entry speed. You are able to either click the button in the button bar or press the appropriate function key or character underlined/double-underlined. Some links have a double-underlined means you must press CTRL + the character key. For example, in the voucher entry screen, to change the voucher type Credit Note, press CTRL + F8. (note double line under F8 Key)
Financial Statements and Reports
Account Books and Registers
Inventory Registers and Reports
Job Costing Registers and Reports
Payroll Registers and Reports
POS Registers and Reports
Basics of Accounting. Principles and concepts of Accounting
what is Double Entry System of Accounting?what Financial Statements?
Accounting is a process of identifying, recording, summarising and reporting economic information
to decision makers in the form of financial statements.
The world’s first concurrent multi-lingual business Accounting & Inventory Management Software is now available in your local language ARABIC. Tally.ERP 9 is the No. 1 Business Management, Accounting and Inventory Management Software for the last 25 years and present in the Kingdom of Saudi Arabia for the last 15 years. Awards & Recognition
1. Winner of PC Quest Users' Choice Award 12 times in a row.
2. Winner of Windows Editor's Choice Award for The Best Accounting & Inventory Management Software for Small and Medium Business Enterprises in the Middle East.
3. Tally was one of the first few software products to be accredited by the Institute of Chartered Accountants of England & Wales.
GDG Cloud Southlake #33: Boule & Rebala: Effective AppSec in SDLC using Deplo...James Anderson
Effective Application Security in Software Delivery lifecycle using Deployment Firewall and DBOM
The modern software delivery process (or the CI/CD process) includes many tools, distributed teams, open-source code, and cloud platforms. Constant focus on speed to release software to market, along with the traditional slow and manual security checks has caused gaps in continuous security as an important piece in the software supply chain. Today organizations feel more susceptible to external and internal cyber threats due to the vast attack surface in their applications supply chain and the lack of end-to-end governance and risk management.
The software team must secure its software delivery process to avoid vulnerability and security breaches. This needs to be achieved with existing tool chains and without extensive rework of the delivery processes. This talk will present strategies and techniques for providing visibility into the true risk of the existing vulnerabilities, preventing the introduction of security issues in the software, resolving vulnerabilities in production environments quickly, and capturing the deployment bill of materials (DBOM).
Speakers:
Bob Boule
Robert Boule is a technology enthusiast with PASSION for technology and making things work along with a knack for helping others understand how things work. He comes with around 20 years of solution engineering experience in application security, software continuous delivery, and SaaS platforms. He is known for his dynamic presentations in CI/CD and application security integrated in software delivery lifecycle.
Gopinath Rebala
Gopinath Rebala is the CTO of OpsMx, where he has overall responsibility for the machine learning and data processing architectures for Secure Software Delivery. Gopi also has a strong connection with our customers, leading design and architecture for strategic implementations. Gopi is a frequent speaker and well-known leader in continuous delivery and integrating security into software delivery.
JMeter webinar - integration with InfluxDB and GrafanaRTTS
Watch this recorded webinar about real-time monitoring of application performance. See how to integrate Apache JMeter, the open-source leader in performance testing, with InfluxDB, the open-source time-series database, and Grafana, the open-source analytics and visualization application.
In this webinar, we will review the benefits of leveraging InfluxDB and Grafana when executing load tests and demonstrate how these tools are used to visualize performance metrics.
Length: 30 minutes
Session Overview
-------------------------------------------
During this webinar, we will cover the following topics while demonstrating the integrations of JMeter, InfluxDB and Grafana:
- What out-of-the-box solutions are available for real-time monitoring JMeter tests?
- What are the benefits of integrating InfluxDB and Grafana into the load testing stack?
- Which features are provided by Grafana?
- Demonstration of InfluxDB and Grafana using a practice web application
To view the webinar recording, go to:
https://www.rttsweb.com/jmeter-integration-webinar
Encryption in Microsoft 365 - ExpertsLive Netherlands 2024Albert Hoitingh
In this session I delve into the encryption technology used in Microsoft 365 and Microsoft Purview. Including the concepts of Customer Key and Double Key Encryption.
State of ICS and IoT Cyber Threat Landscape Report 2024 previewPrayukth K V
The IoT and OT threat landscape report has been prepared by the Threat Research Team at Sectrio using data from Sectrio, cyber threat intelligence farming facilities spread across over 85 cities around the world. In addition, Sectrio also runs AI-based advanced threat and payload engagement facilities that serve as sinks to attract and engage sophisticated threat actors, and newer malware including new variants and latent threats that are at an earlier stage of development.
The latest edition of the OT/ICS and IoT security Threat Landscape Report 2024 also covers:
State of global ICS asset and network exposure
Sectoral targets and attacks as well as the cost of ransom
Global APT activity, AI usage, actor and tactic profiles, and implications
Rise in volumes of AI-powered cyberattacks
Major cyber events in 2024
Malware and malicious payload trends
Cyberattack types and targets
Vulnerability exploit attempts on CVEs
Attacks on counties – USA
Expansion of bot farms – how, where, and why
In-depth analysis of the cyber threat landscape across North America, South America, Europe, APAC, and the Middle East
Why are attacks on smart factories rising?
Cyber risk predictions
Axis of attacks – Europe
Systemic attacks in the Middle East
Download the full report from here:
https://sectrio.com/resources/ot-threat-landscape-reports/sectrio-releases-ot-ics-and-iot-security-threat-landscape-report-2024/
Generating a custom Ruby SDK for your web service or Rails API using Smithyg2nightmarescribd
Have you ever wanted a Ruby client API to communicate with your web service? Smithy is a protocol-agnostic language for defining services and SDKs. Smithy Ruby is an implementation of Smithy that generates a Ruby SDK using a Smithy model. In this talk, we will explore Smithy and Smithy Ruby to learn how to generate custom feature-rich SDKs that can communicate with any web service, such as a Rails JSON API.
Builder.ai Founder Sachin Dev Duggal's Strategic Approach to Create an Innova...Ramesh Iyer
In today's fast-changing business world, Companies that adapt and embrace new ideas often need help to keep up with the competition. However, fostering a culture of innovation takes much work. It takes vision, leadership and willingness to take risks in the right proportion. Sachin Dev Duggal, co-founder of Builder.ai, has perfected the art of this balance, creating a company culture where creativity and growth are nurtured at each stage.
GraphRAG is All You need? LLM & Knowledge GraphGuy Korland
Guy Korland, CEO and Co-founder of FalkorDB, will review two articles on the integration of language models with knowledge graphs.
1. Unifying Large Language Models and Knowledge Graphs: A Roadmap.
https://arxiv.org/abs/2306.08302
2. Microsoft Research's GraphRAG paper and a review paper on various uses of knowledge graphs:
https://www.microsoft.com/en-us/research/blog/graphrag-unlocking-llm-discovery-on-narrative-private-data/
Kubernetes & AI - Beauty and the Beast !?! @KCD Istanbul 2024Tobias Schneck
As AI technology is pushing into IT I was wondering myself, as an “infrastructure container kubernetes guy”, how get this fancy AI technology get managed from an infrastructure operational view? Is it possible to apply our lovely cloud native principals as well? What benefit’s both technologies could bring to each other?
Let me take this questions and provide you a short journey through existing deployment models and use cases for AI software. On practical examples, we discuss what cloud/on-premise strategy we may need for applying it to our own infrastructure to get it to work from an enterprise perspective. I want to give an overview about infrastructure requirements and technologies, what could be beneficial or limiting your AI use cases in an enterprise environment. An interactive Demo will give you some insides, what approaches I got already working for real.
Connector Corner: Automate dynamic content and events by pushing a buttonDianaGray10
Here is something new! In our next Connector Corner webinar, we will demonstrate how you can use a single workflow to:
Create a campaign using Mailchimp with merge tags/fields
Send an interactive Slack channel message (using buttons)
Have the message received by managers and peers along with a test email for review
But there’s more:
In a second workflow supporting the same use case, you’ll see:
Your campaign sent to target colleagues for approval
If the “Approve” button is clicked, a Jira/Zendesk ticket is created for the marketing design team
But—if the “Reject” button is pushed, colleagues will be alerted via Slack message
Join us to learn more about this new, human-in-the-loop capability, brought to you by Integration Service connectors.
And...
Speakers:
Akshay Agnihotri, Product Manager
Charlie Greenberg, Host
Neuro-symbolic is not enough, we need neuro-*semantic*Frank van Harmelen
Neuro-symbolic (NeSy) AI is on the rise. However, simply machine learning on just any symbolic structure is not sufficient to really harvest the gains of NeSy. These will only be gained when the symbolic structures have an actual semantics. I give an operational definition of semantics as “predictable inference”.
All of this illustrated with link prediction over knowledge graphs, but the argument is general.
Transcript: Selling digital books in 2024: Insights from industry leaders - T...BookNet Canada
The publishing industry has been selling digital audiobooks and ebooks for over a decade and has found its groove. What’s changed? What has stayed the same? Where do we go from here? Join a group of leading sales peers from across the industry for a conversation about the lessons learned since the popularization of digital books, best practices, digital book supply chain management, and more.
Link to video recording: https://bnctechforum.ca/sessions/selling-digital-books-in-2024-insights-from-industry-leaders/
Presented by BookNet Canada on May 28, 2024, with support from the Department of Canadian Heritage.
Transcript: Selling digital books in 2024: Insights from industry leaders - T...
Creating accounting masters tally erp 9
1. 29
Lesson 3: Creating Accounting Masters in
Tally.ERP 9
After creating a Company with the required information, you can now enable/ modify Accounting
& Inventory features and configurations.
3.1 F11:Features
The F11: Features are Company-specific and the F12: Configurations are applicable to all the
companies in a data directory. The F11: Features is divided into the following major categories:
Accounting Features
Inventory Features
Statutory & Taxation
Tally.NET Features
You can press F11 (functional key) from any screen of Tally.ERP 9 or you may also click on the
F11: Features button available in the button bar, to enable the required features. The F11:
Features are specific only to the company currently in use (for which the said feature is enabled),
thereby allowing flexibility of independently enabling different features for each of the company.
Go to Gateway of Tally > press F11: Features
Lesson Objectives
On completion of this lesson, you will be able to understand
The basic functions of Tally.ERP 9
F11: Features & F12: Configurations
Creating and Maintaining Chart of Accounts
Entering the opening balances for Ledgers
www.accountsarabia.com
facebook.com/accountsarabia
call Us:0530055606
2. Creating Accounting Masters in Tally.ERP 9
30
The Company Features screen is displayed as shown.
Figure 3.1 F11: Features Menu
There are various settings available under Accounting Features, Inventory Features and Statutory
& Taxation Features, which facilitates the additional information to be entered during voucher
entry.
F1: Accounting Features
The Accounting Features consists of configurations/ functionalities, which generally affects
Accounting transactions and reports. The Accounting features is further sub-divided into six
sections, namely :
General
Oustandings Management
Cost/ Profit Centres Management
Invoicing
Budgets/ Scenario Management
Other Features
Go to Gateway of Tally > F11: Features > Accounting Features or click on F1: Accounts
3. Creating Accounting Masters in Tally.ERP 9
31
The Accounting Feature screen is displayed as shown.
Figure 3.2 F11: Accounting Features Screen
Enable the required features
Press Enter to accept
F2: Inventory Features
The Inventory features comprises of configurations/ functionalities pertaining to Inventory transac-
tions and reports. The Inventory features is further sub-divided into seven sections, namely :
General
Storage & Classification
Order Processing
Invoicing
Purchase Management
Sales Management
Additional Inventory Vouchers
4. Creating Accounting Masters in Tally.ERP 9
32
Go to Gateway of Tally > F11: Features > Inventory Features or click on F2 : Inventory
The Inventory Feature screen is displayed as shown.
Figure 3.3 F11: Inventory Features Screen
Enable the required features
Press Enter to accept
F3 : Statutory & Taxation
The Statutory & Taxation features comprises of configurations/ functionalities pertaining to
statutory compliances available in Tally.ERP 9. The Statutory features are country specific and
strictly depends upon the Country selected in the Company Creation screen. The following
features are available, when India is selected in the Statutory Compliance for field in the
Company Creation screen.
Excise
Value Added Tax
Service Tax
Tax Deducted at Source
Tax Collected at Source
Fringe Benefits Tax
5. Creating Accounting Masters in Tally.ERP 9
33
Payroll
Go to Gateway of Tally > F11: Features > Statutory & Taxation or click on F3 : Statutory
The Statutory & Taxation screen is displayed as shown.
Figure 3.4 F11: Statutory & Taxation Features Screen
Enable the required features
Press Enter to accept
F4: Tally.NET Features
The Tally.NET Features screen comprises of Registration and Remote Access of company
data on Tally.NET. The Tally.NET features will be available only when, Use Security Control is
set to Yes in Company master.
Go to Gateway of Tally > F11: Features > Tally.NET Features or click on F4 : Tally.NET
3.2 F12 : Configurations
6. Creating Accounting Masters in Tally.ERP 9
34
In Tally.ERP 9, the F12: Configurations are provided for Accounting, Inventory & printing options
and are user-definable as per your requirements.
The F12: Configurations are applicable to all the companies residing in that Tally.ERP 9 Data
Directory. The F12: Configuration options vary depending upon the menu display. i.e., if you
press F12: configure from Voucher entry screen, the respective F12: Configurations screen is
displayed.
Go to Gateway of Tally > press F12: Configure
The Configuration screen is displayed as shown.
Figure 3.5 F12: Configuration Menu
There are numerous settings available under various menus in the F12: Configurations screen,
which may be configured for any additional information required to be entered during master cre-
ations, voucher entry and printing.
3.2.1 General
You can configure Country Details, Style of Names, Dates and Numbers in the General configura-
tion screen.
7. Creating Accounting Masters in Tally.ERP 9
35
Figure 3.6 General Configuration screen
3.2.2 Numeric Symbols
You can configure Number Styles and Symbols used to represent Positive Numbers, Negative
Numbers, Debit Amounts and Credit Amounts by using Numeric Symbols. This is displayed on
the Number Styles configuration screen.
8. Creating Accounting Masters in Tally.ERP 9
36
Figure 3.7 Number Styles Configuration screen
3.2.3 Accts / Inventory Info.
The fields pertaining to both Accounting and Inventory Info. can be configured from this menu.
9. Creating Accounting Masters in Tally.ERP 9
37
Figure 3.8 Accts / Inventory Info. screen
Master Configuration
Additional information can be configured by setting the options to Yes which will accordingly
appear in the masters.
Allow ALIASES along with names: This configuration helps in identifying an account by
another name.
Allow Language ALIASES along with names: This configuration helps the user to give
an alias in any local language.
Accounts Masters
Allow ADVANCED entries in Masters: This configuration displays the additional fields in
the Accounting Masters such as:
Group behaves like a Sub-Ledger ?
Set to Yes, the group behaves like a Control Account for the ledgers it contains,
wherein only the group balance is displayed. This is useful while working on groups
like the Sundry Debtors and Sundry Creditors (pre-set to Yes), where the ledger items
are numerous.
Nett Debit/Credit Balances for Reporting?
Set to Yes, this configuration displays the amount as a net figure instead of separate
debit and credit balances as shown in the reports.
10. Creating Accounting Masters in Tally.ERP 9
38
Use ADDRESSES for Ledger Accounts: This Field can be used for giving the address
and Income Tax Number of the ledger accounts.
Use CONTACT DETAILS for Ledger Accounts: This Configuration gives the user an
opportunity to fill details like Contact person, Telephone, Fax, E-Mail etc.
Add NOTES for Ledger accounts: This field helps the user to add the additional notes for
ledger accounts.
Inventory Masters
Allow ADVANCED entries in Masters: This Configuration will display additional field in
Inventory masters.
Use PART NUMBERS for Stock Items: You can enter the Part Number of the item being
created for easy identification. (In certain industries, such as automobiles, their part num-
bers identifies various parts). You can alternatively use this field for the Bin Card Number,
Code Number etc.
Use Description for Stock Items: You can enter the description of the Stock Item that
would appear in your invoices.
Use REMARKS for Stock Items: This helps to identify the product and its applications.
You can give some particulars of the Stock Item created. This will help you later when you
post a query for the stock of this item, while you decide whether the item is suitable for a
particular requirement or not.
Use ALTERNATE UNITS for Stock Items: This is another unit, apart from the main unit,
which you can use instead of the Stock Item. This is particularly useful when you need to
handle different units at different times. For example, you buy Data Cables in pieces but
sell them in packets of 5 pieces each. For alternate units, you are asked to give a conver-
sion factor (e.g. 5) so that a link is maintained between the two. What you give here is sim-
ply a conversion factor that comes up as default during a voucher entry. You may specify a
different factor during voucher entry.
Allow Std. Rates for Stock Items: Standard rates enable the valuation of an inventory at
standard purchase or standard sales prices. Moreover, these prices come up by default
during voucher entry (you may choose to override them if required). The standards are
effective from the specified dates and they continue to be used at these rates until the next
date, where the standard rate changes.
Specify Default Ledger Allocation for Invoicing: This configuration allows the user to
allocate the ledgers to be used for Purchase and Sales Invoice.
Allow component list details (Bill of Materials): The Bill of Materials contains a list of
items that are required to make up another item. In other words, it is a list of constituent
items.
Use ADDRESSES for Godowns: This configuration enables the user to give the address
for locations.
11. Creating Accounting Masters in Tally.ERP 9
39
3.2.4 Voucher Entry
Both the Accounting and Inventory Vouchers can be configured from this menu for additional
information.
Figure 3.9 Voucher Configuration screen
Accounting Vouchers
Skip Date field in Create Mode (faster entry!): Set to Yes, the Tally.ERP 9 cursor goes
directly to the Dr or Cr field depending on the voucher type. However, if set to No, the
Tally.ERP 9 cursor goes to the Date field. It is advantageous to set this option to Yes for a
faster entry if there are many entries to be made on the same date.
Use Single Entry mode for Pymt/ Rcpt/Contra: This configuration helps in selecting multiple
debits or credits depending on the type of entry.
Use Payment/Receipt as Contra: To indicate the transfer of funds from bank to cash,
bank to bank and cash to bank, Tally.ERP 9 provides a voucher type called ‘Contra’. This
configuration is activated while using payment and receipt vouchers for a ‘Contra’ transac-
tion.
Use Cr/Dr instead of To/By during Entry: This configuration gives the flexibility to use Cr/
Dr or To/By in Vouchers as per the requirement or the understanding of the user.
Warn on Negative Cash Balance: This option in Tally.ERP 9 displays a warning if the
cash balance is NIL.
12. Creating Accounting Masters in Tally.ERP 9
40
Pre-Allocate Bills for Payment/Receipt: This Configuration enables the user to select the
bills first before the total amount can be updated in the amount field. This option is
extremely useful while Cheque Printing.
Allow Cash Accounts In Journals: Journals are adjustment entries. However, in many
cases companies require journals to account for day-to-day transactions involving cash or
bank accounts.
Allow Expenses/Fixed Assets in Purchase Vouchers: This configuration helps the user
to enter the details of purchase of fixed assets in the Purchase Voucher.
Allow Income Accounts in Sales Vouchers: This configuration helps the user to allocate
the income accounts in the sales voucher.
Show Inventory Details: This configuration when set to Yes shows the name of the stock
item, quantity, rate and value details.
Show Table of Bills Details for Selection: This configuration displays a table which lists
out the references of the pending bills
Show Bill-wise Details: This configuration enables the user to view the bill-wise details in
the voucher.
Expand into multiple lines: This configuration displays the due date of repayment based
on the credit days given.
Show Ledger Current Balances: This configuration displays the current balance of the
ledger selected while an entry is made. This is a convenient feature to use since it helps to
get the information without referring to the report.
Show Balances as on Voucher Date: Set to Yes, a voucher that is viewed in the alteration
mode displays the ledger balances on the voucher screen based on the voucher date.
Inventory Vouchers
Use Ref. Number in Stock Journal: This configuration provides an additional field called
Ref. in the Stock journal, where the user can enter the reference number.
Warn on Negative Stock Balance: This configuration warns the user in cases where the
item selected reaches a negative balance in the Invoice mode.
Honor Expiry Dates usage for Batches: This configuration hides the batch details that
are redundant and have expired.
Show Balances as on Voucher Date: This configuration enables the user to view the
inventory balances according to the voucher date
Show Godownwise Details : This configuration enables the user to view Godown details.
Show Batchwise Details : This configuration enables the user to view Batch details.
3.2.5 Invoice / Orders Entry
The Invoice entry and Order entry screens can be configured for additional information such as
export details, shipping details, etc.
13. Creating Accounting Masters in Tally.ERP 9
41
3.2.6 Printing
This configuration helps the user to configure the printing screens for the reports and transac-
tions.
3.2.7 Data Configuration
This configuration helps the user to define location of Language Files, Tally Configuration File,
Export Files, Data Files and details of the companies to be loaded on startup.
3.2.8 TDL Configuration
This screen provides details regarding TDL Configuration viz., Local TDLs, Account TDLs &
Remote TDLs enabled for the product.
3.2.9 Advanced Configuration
This configuration helps the user to specify Client/Server Configuration, Connection configuration
and Proxy configuration for ODBC connectivity and Synchronisation of Data.
3.2.10 Licensing
This configuration helps the user to update, surrender, reset license and also configure existing
License.
3.3 Setting up Account Heads
Tally.ERP 9 allows you to create Account heads and groups as per your requirements. The flexi-
bility and ease of creating user-defined Account Heads and groups (Chart of Accounts) as per
nature of business or business practice makes Tally.ERP 9 suitable for businesses across indus-
tries, verticals and geographies, without changing the way they do their business.
3.3.1 Chart of Accounts
Tally.ERP 9 follows the Double Entry system of Accounting. It records accounting information by
debiting and crediting different Ledger Accounts using different voucher types depending upon
the nature of transaction. It automatically collates the debit and credit amounts and arrives at the
closing balance of each ledger / group / report.
3.3.2 Pre-defined Groups of Accounts
There are 28 predefined groups in Tally.ERP 9, which are widely used in the Chart of Accounts of
many trading organizations. Out of these, 15 groups are Primary Groups and the remaining 13
are Sub-Groups.
14. Creating Accounting Masters in Tally.ERP 9
42
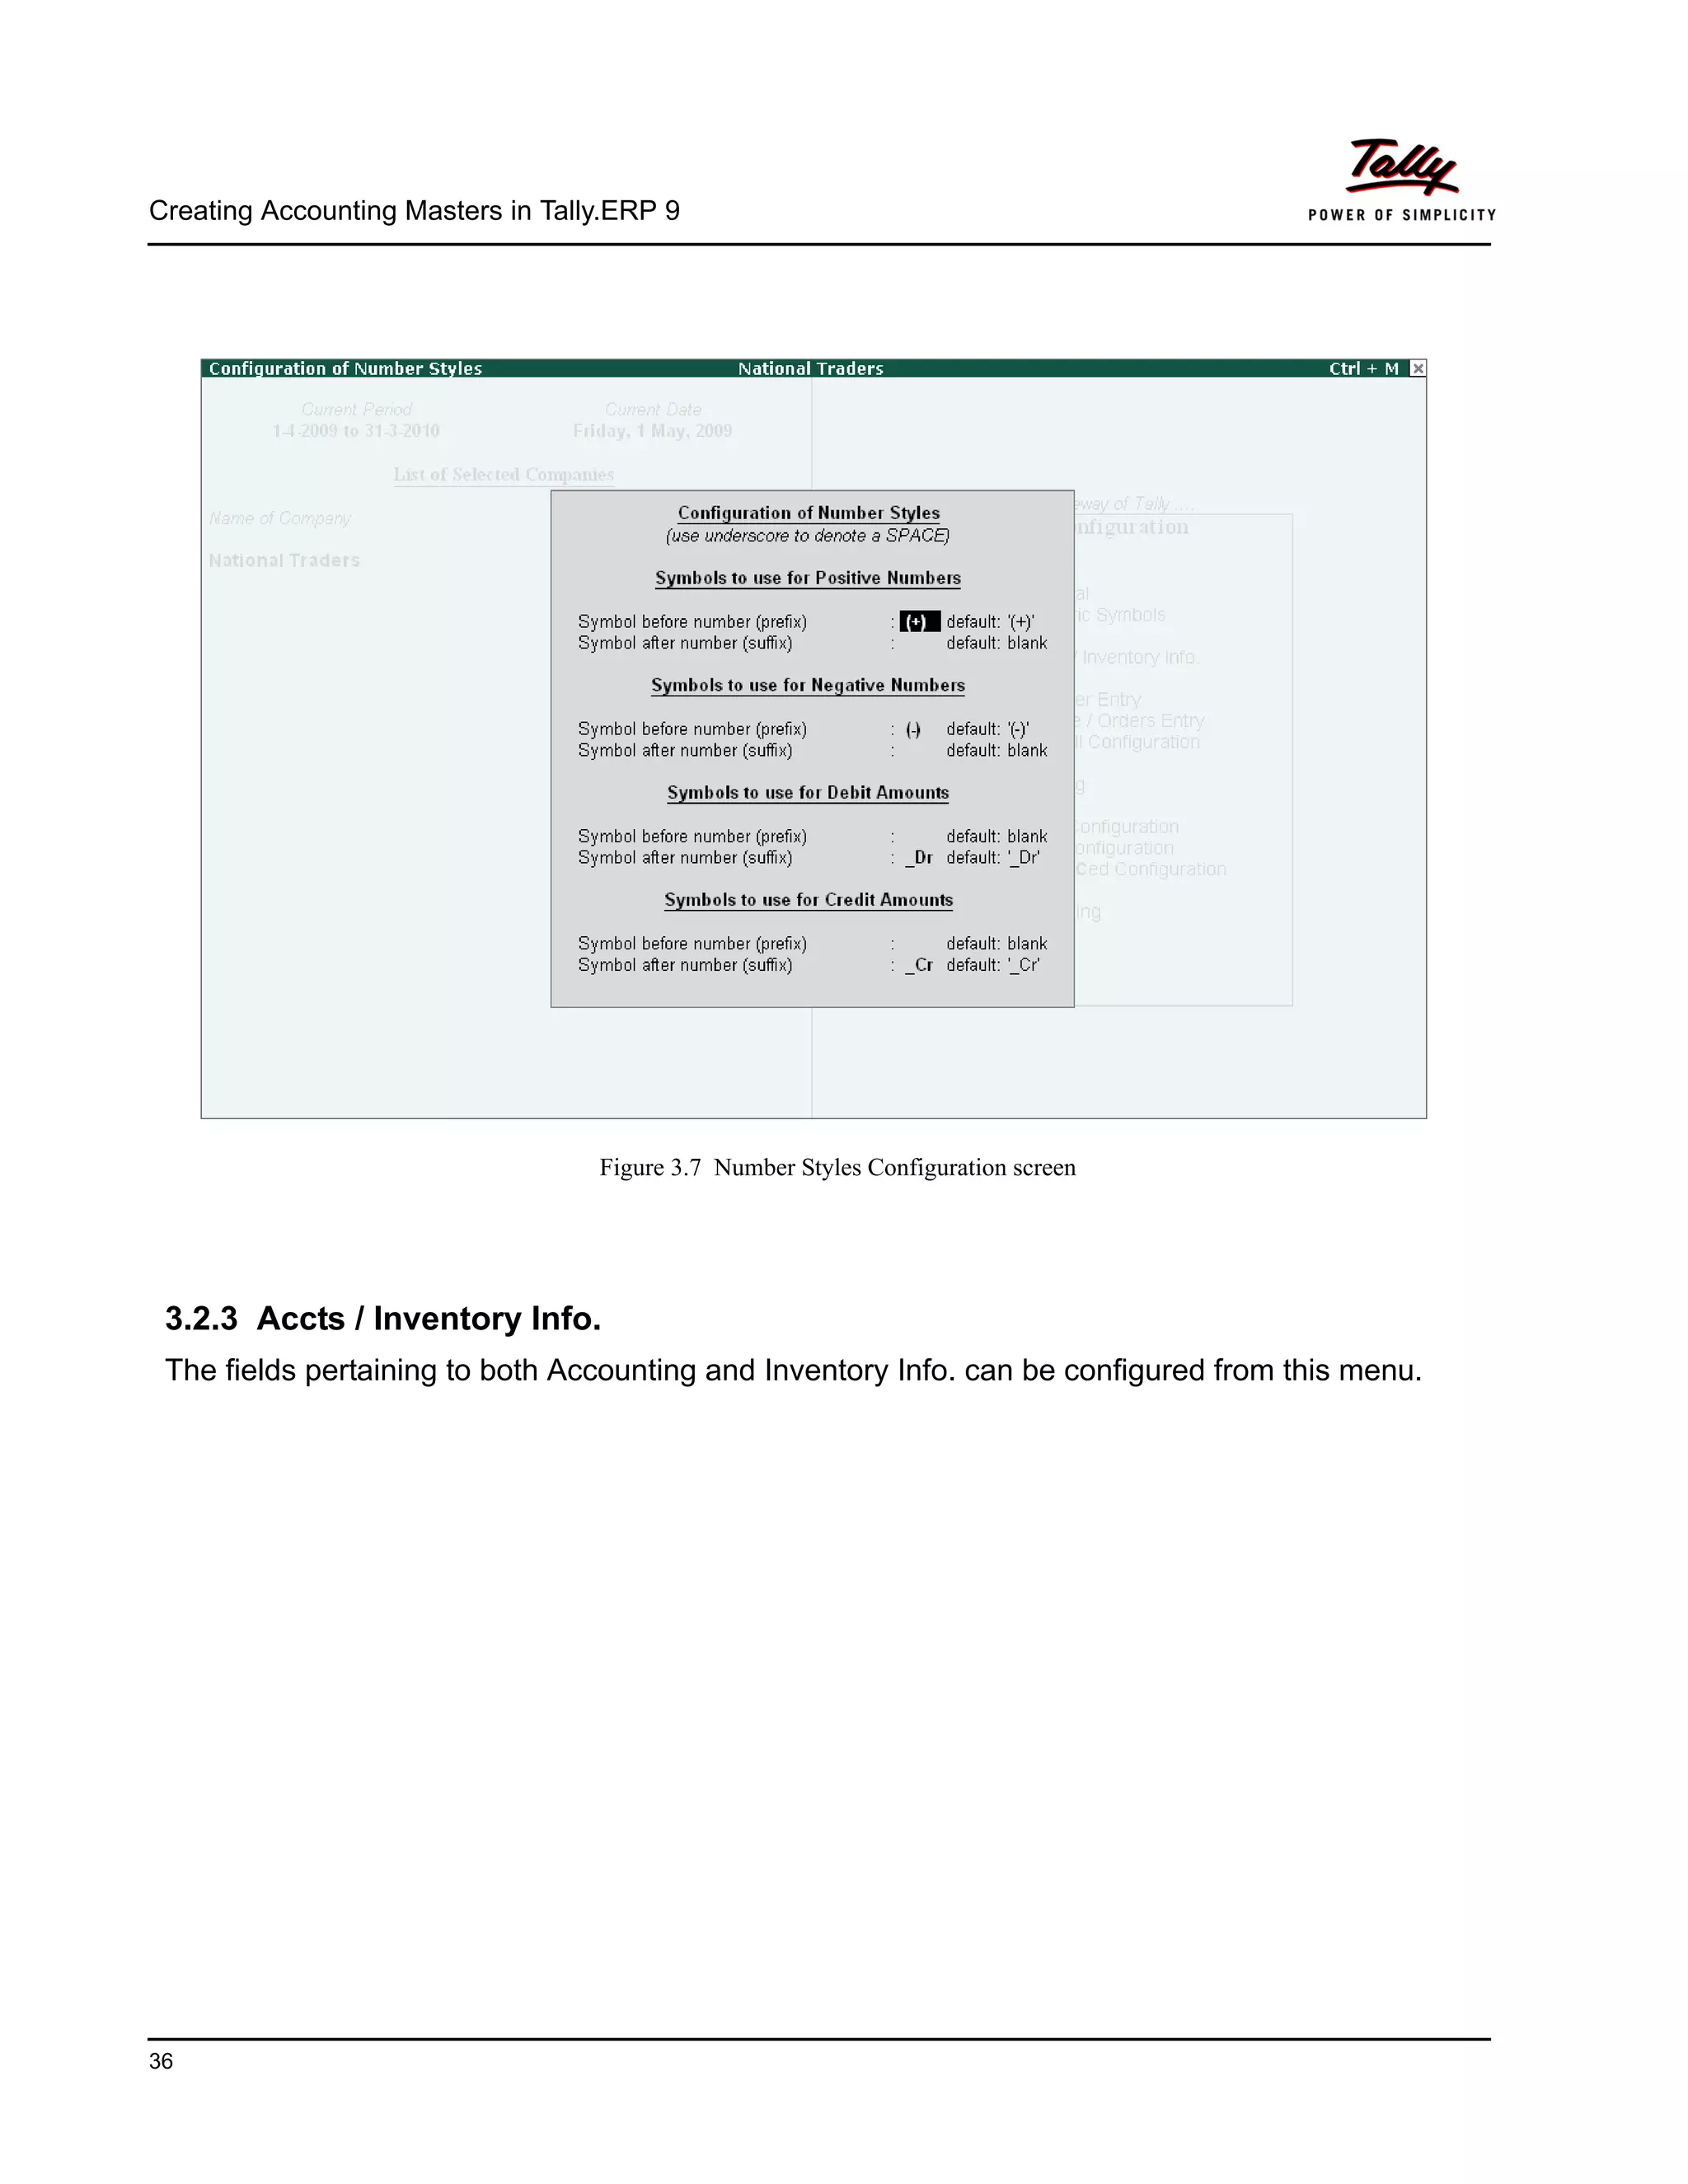
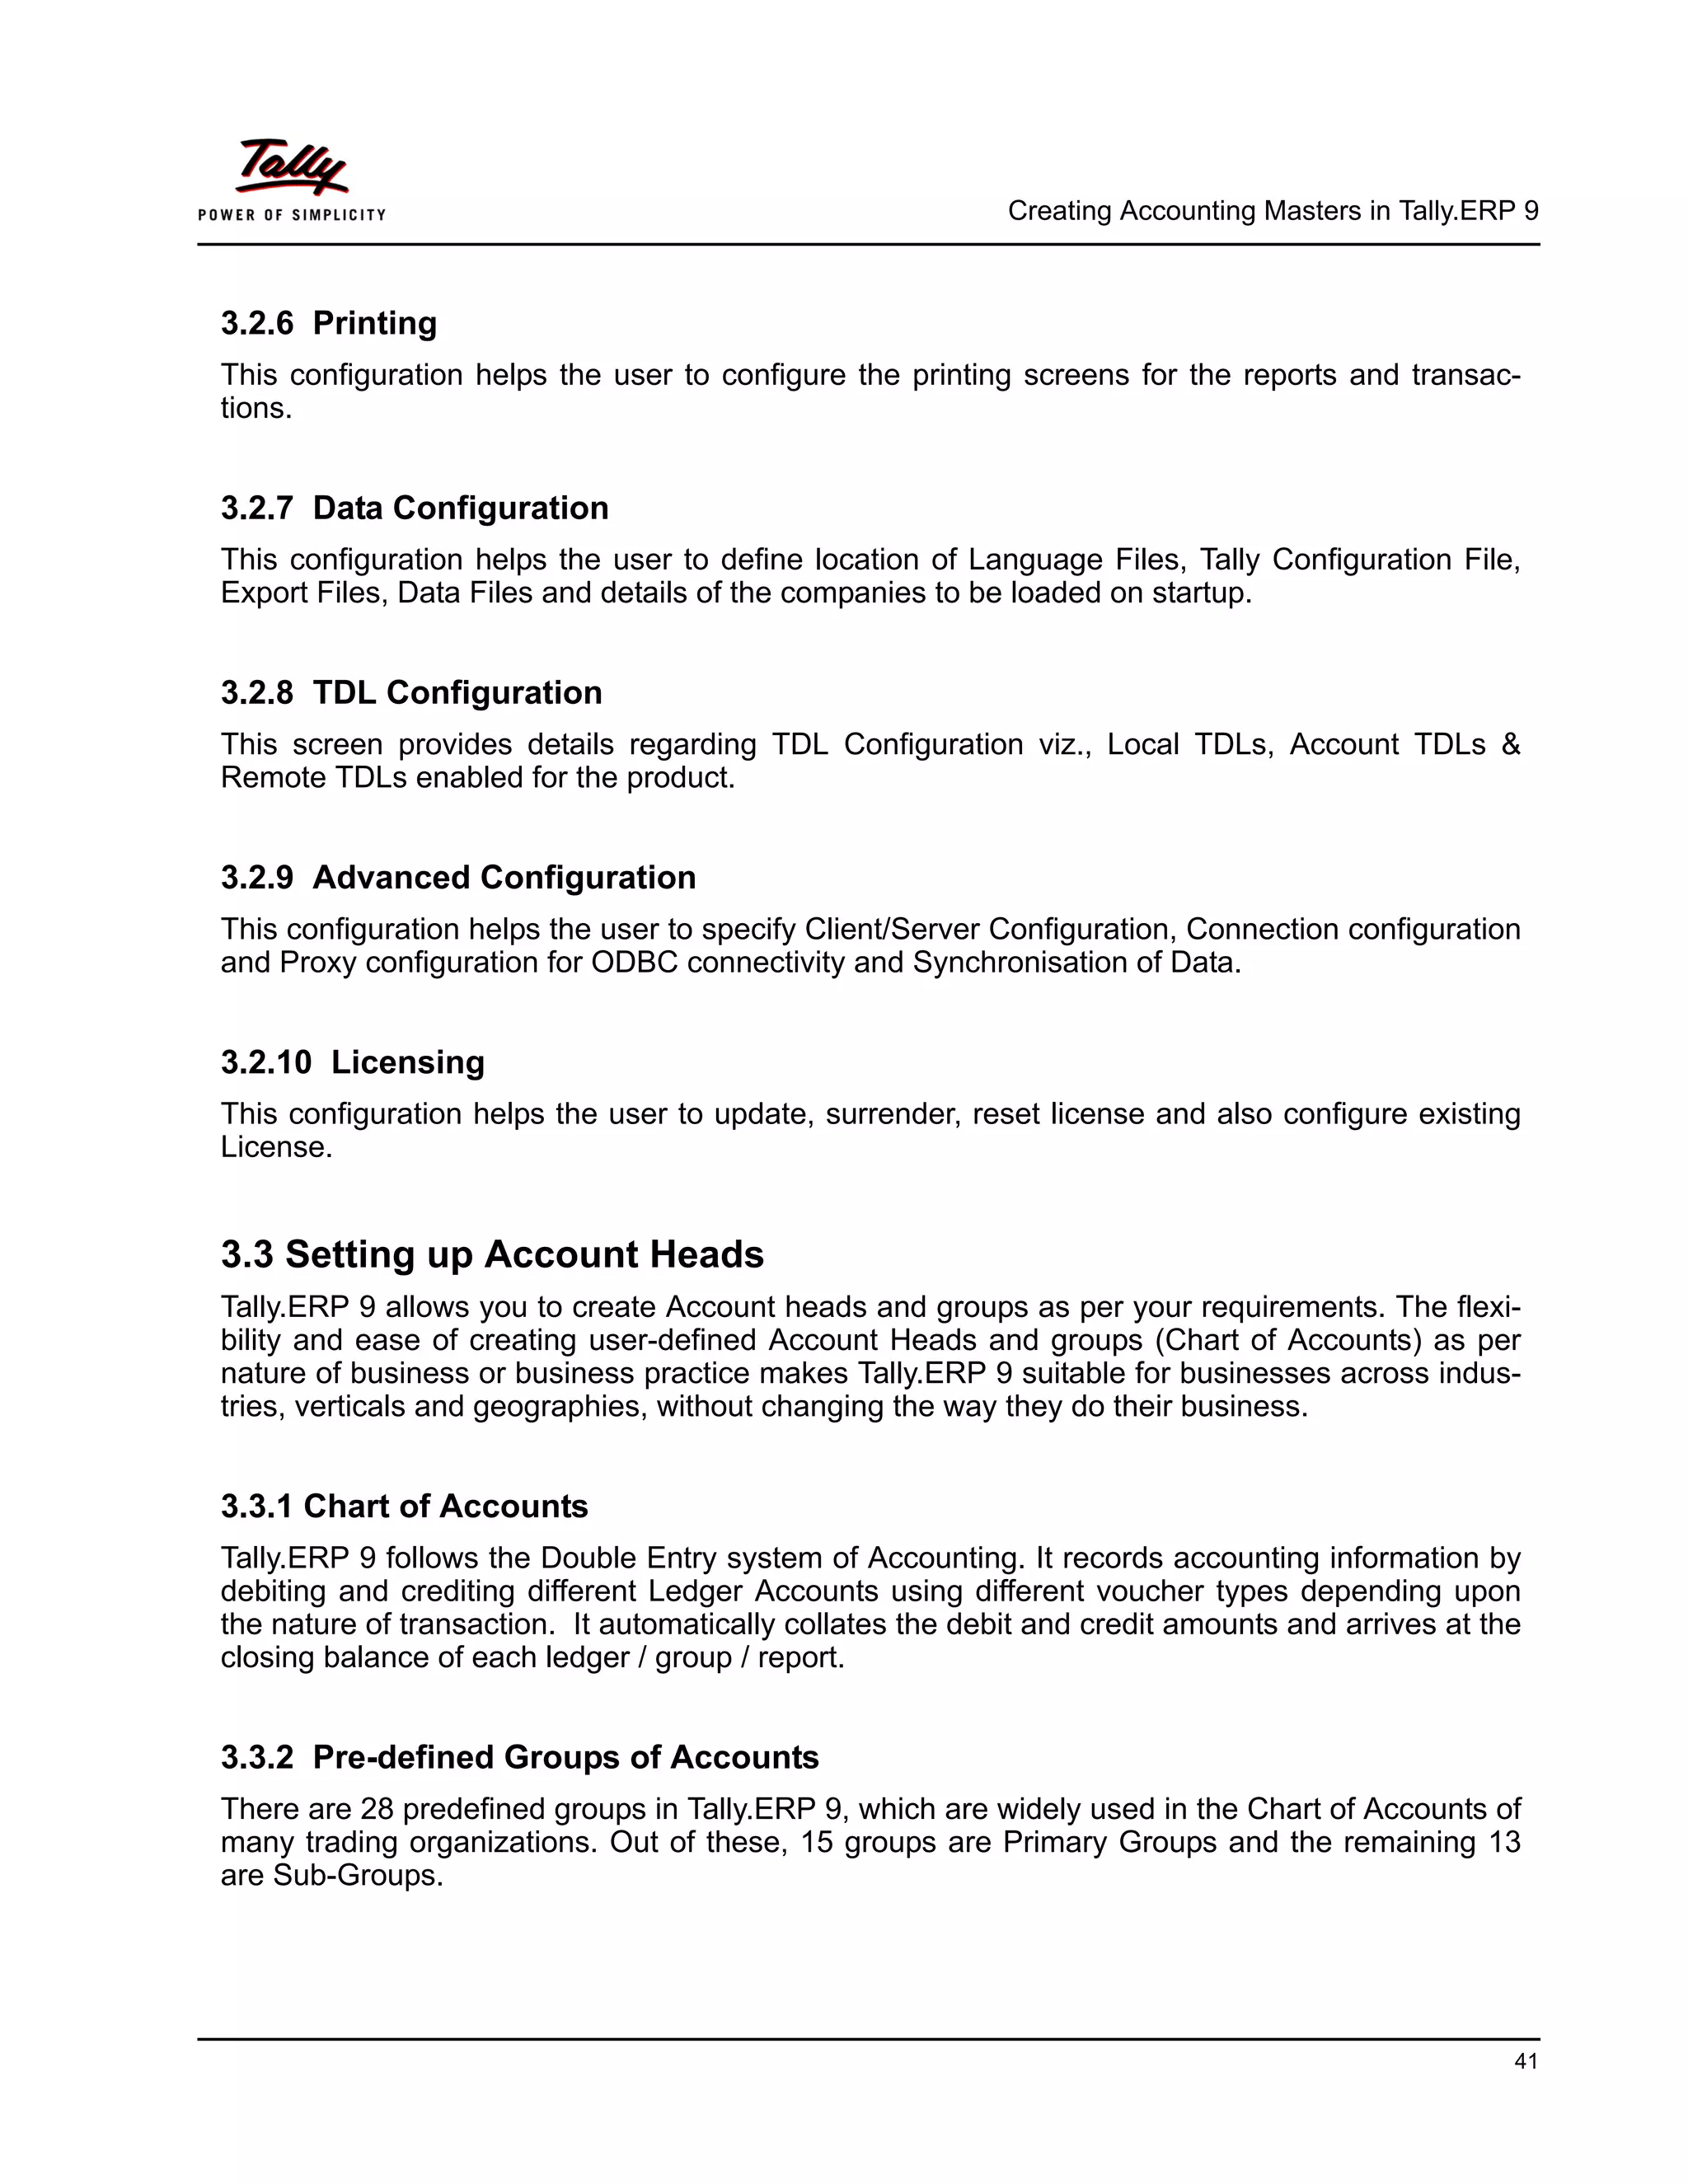
Among the 15 predefined groups, 9 Groups are Balance Sheet items and the remaining 6 groups
are Profit & Loss A/c items. However, you may also alter the nomenclature of these predefined 28
Groups
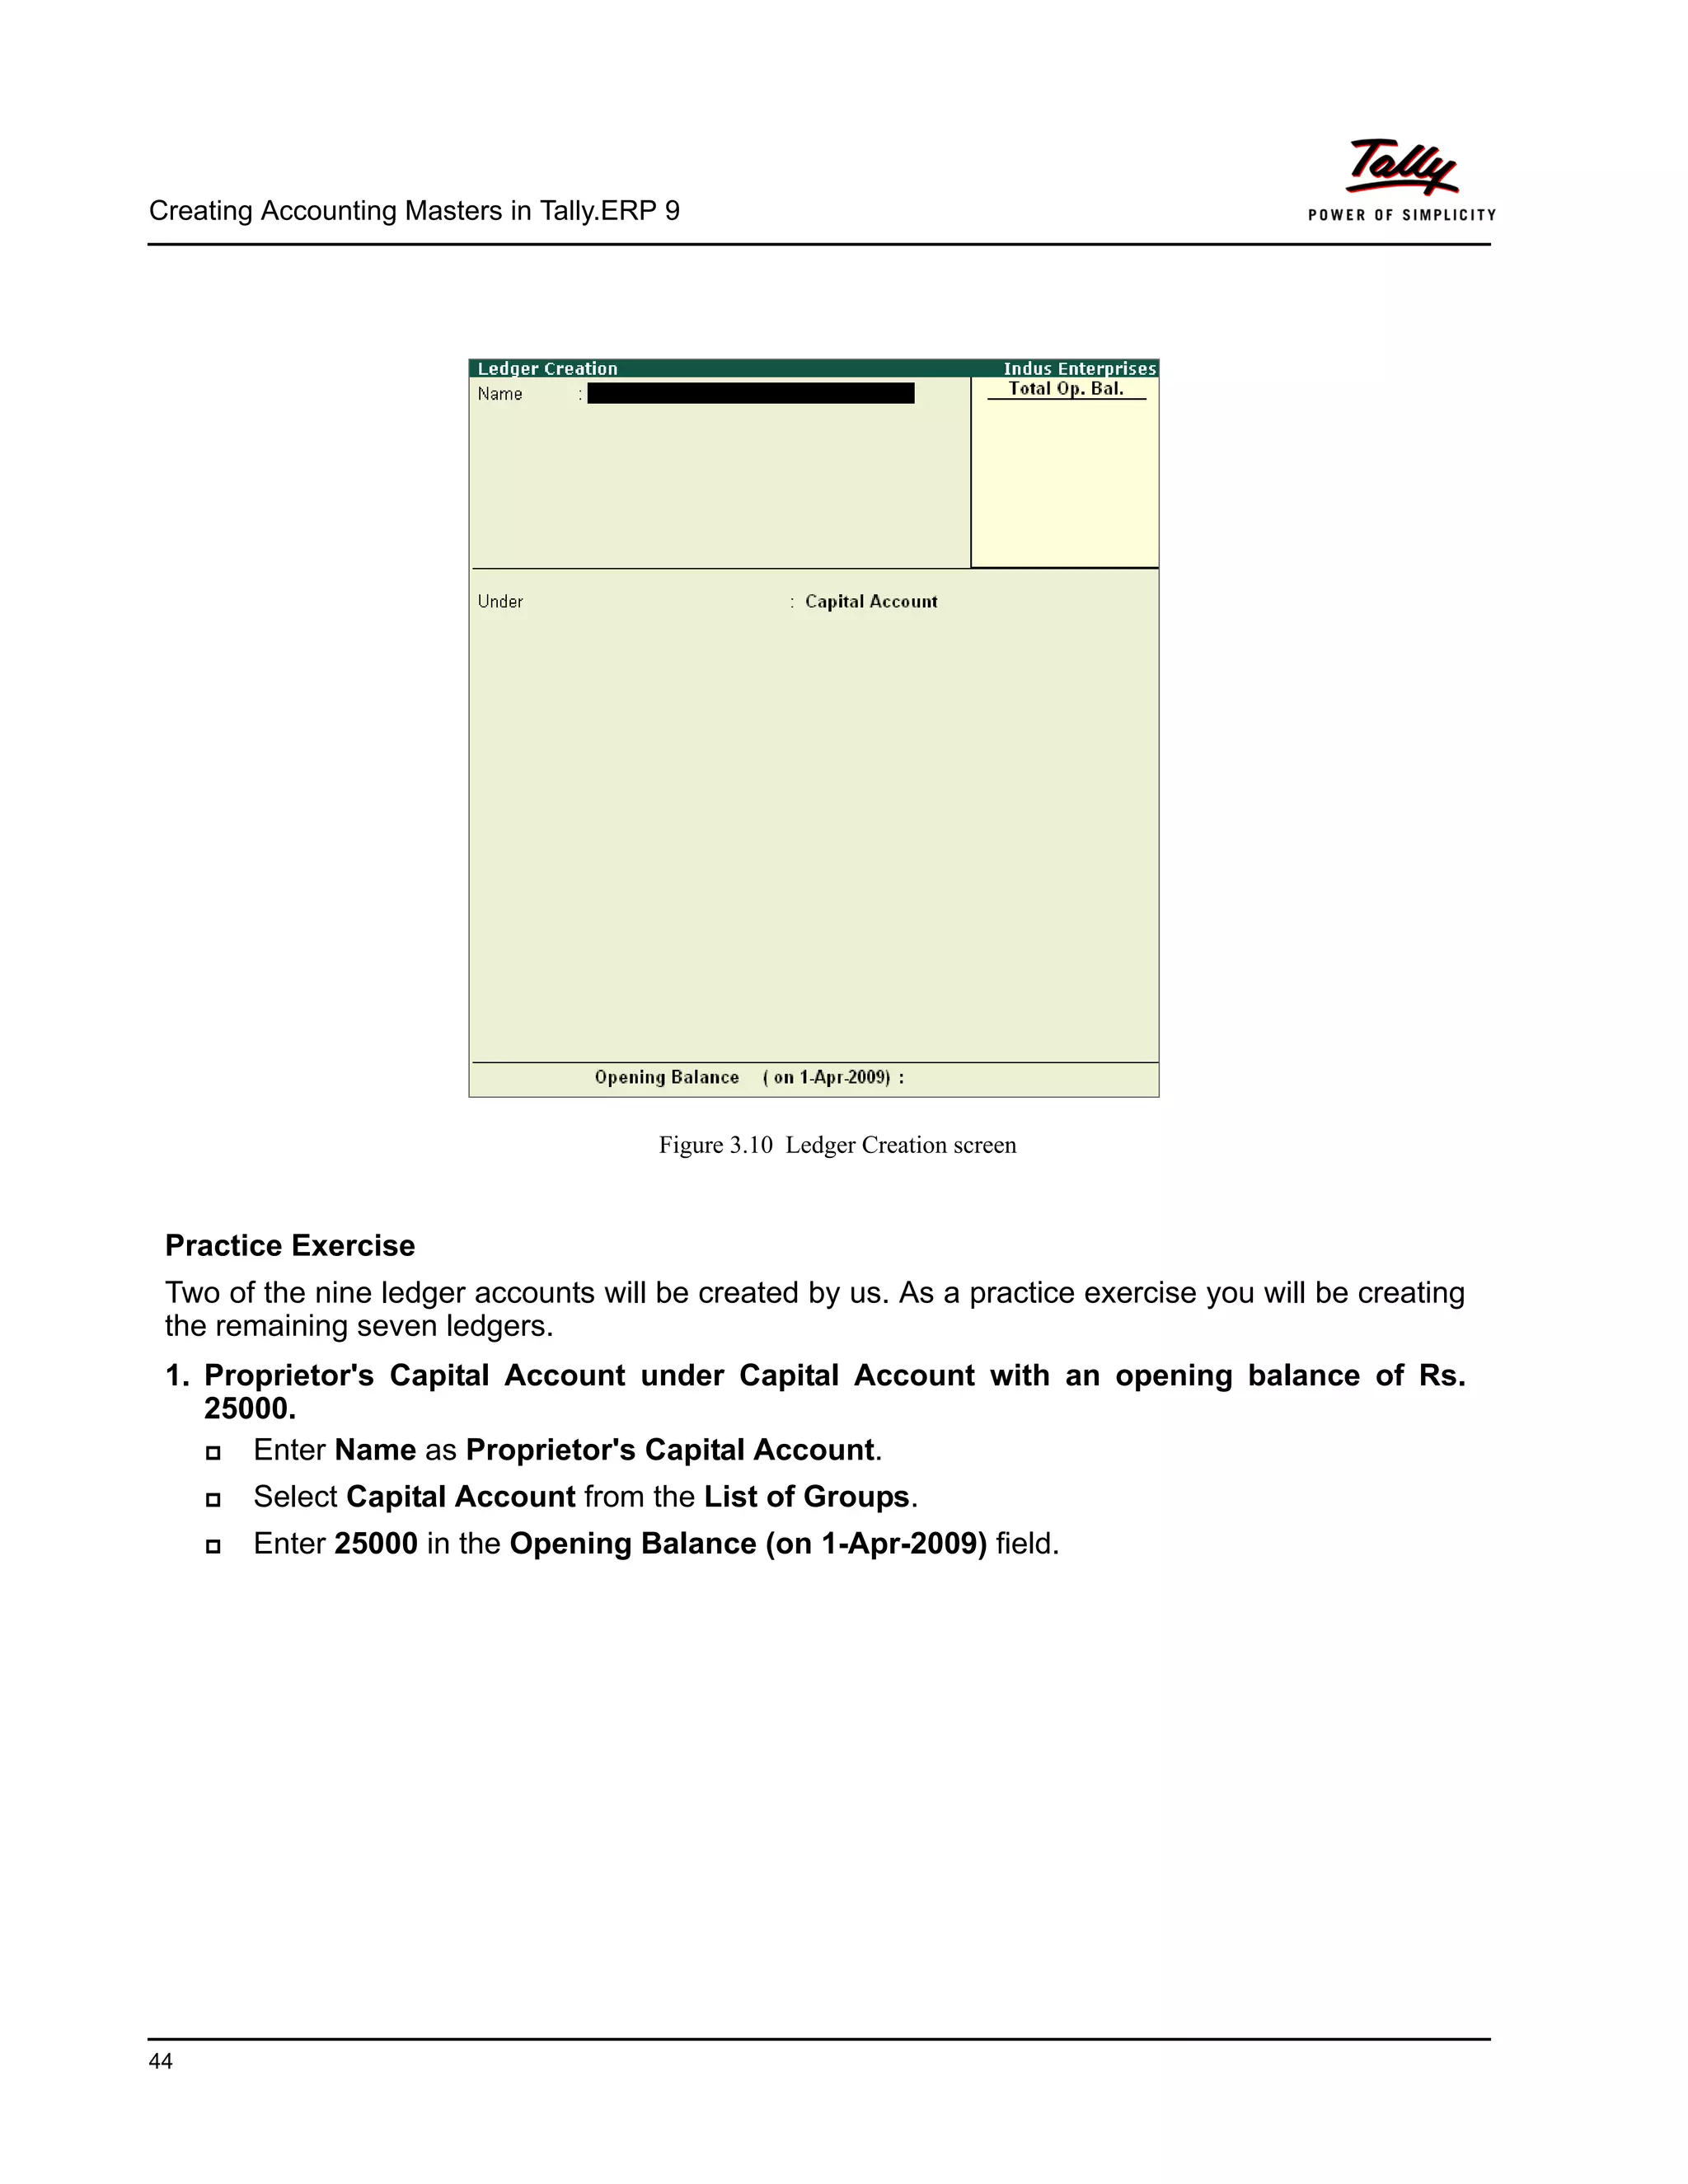
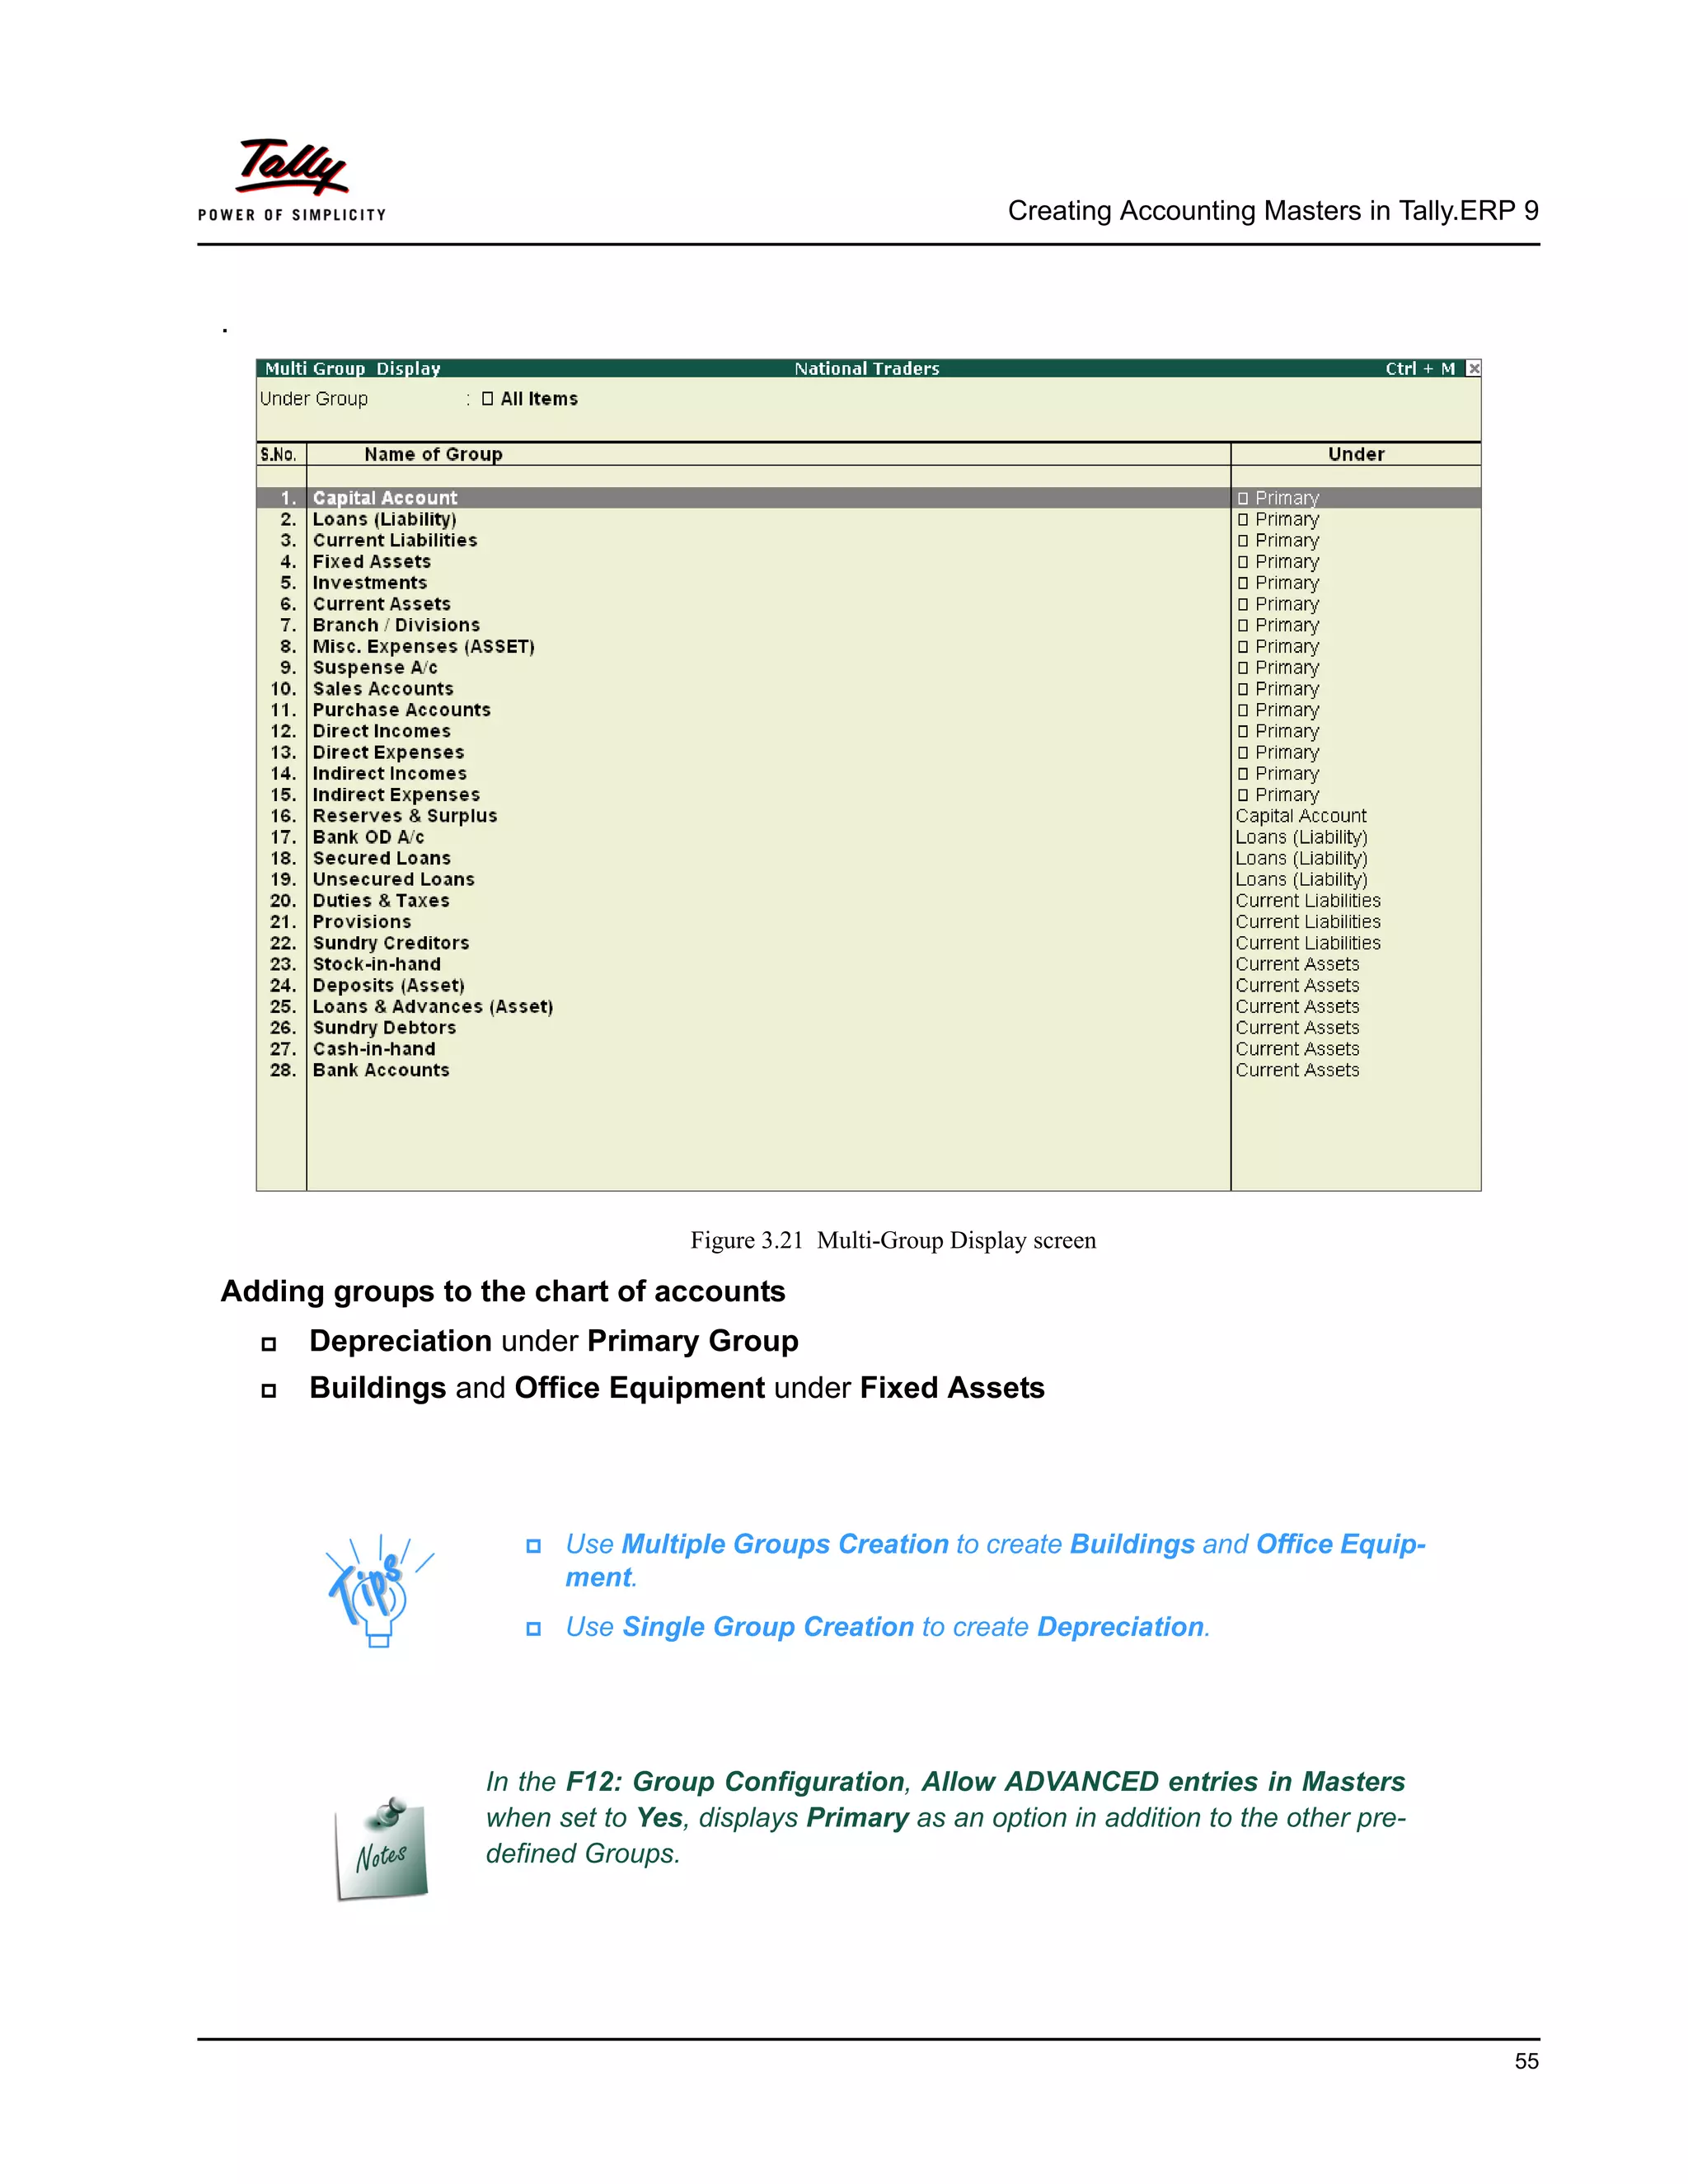
The List of Accounts screen is displayed as shown
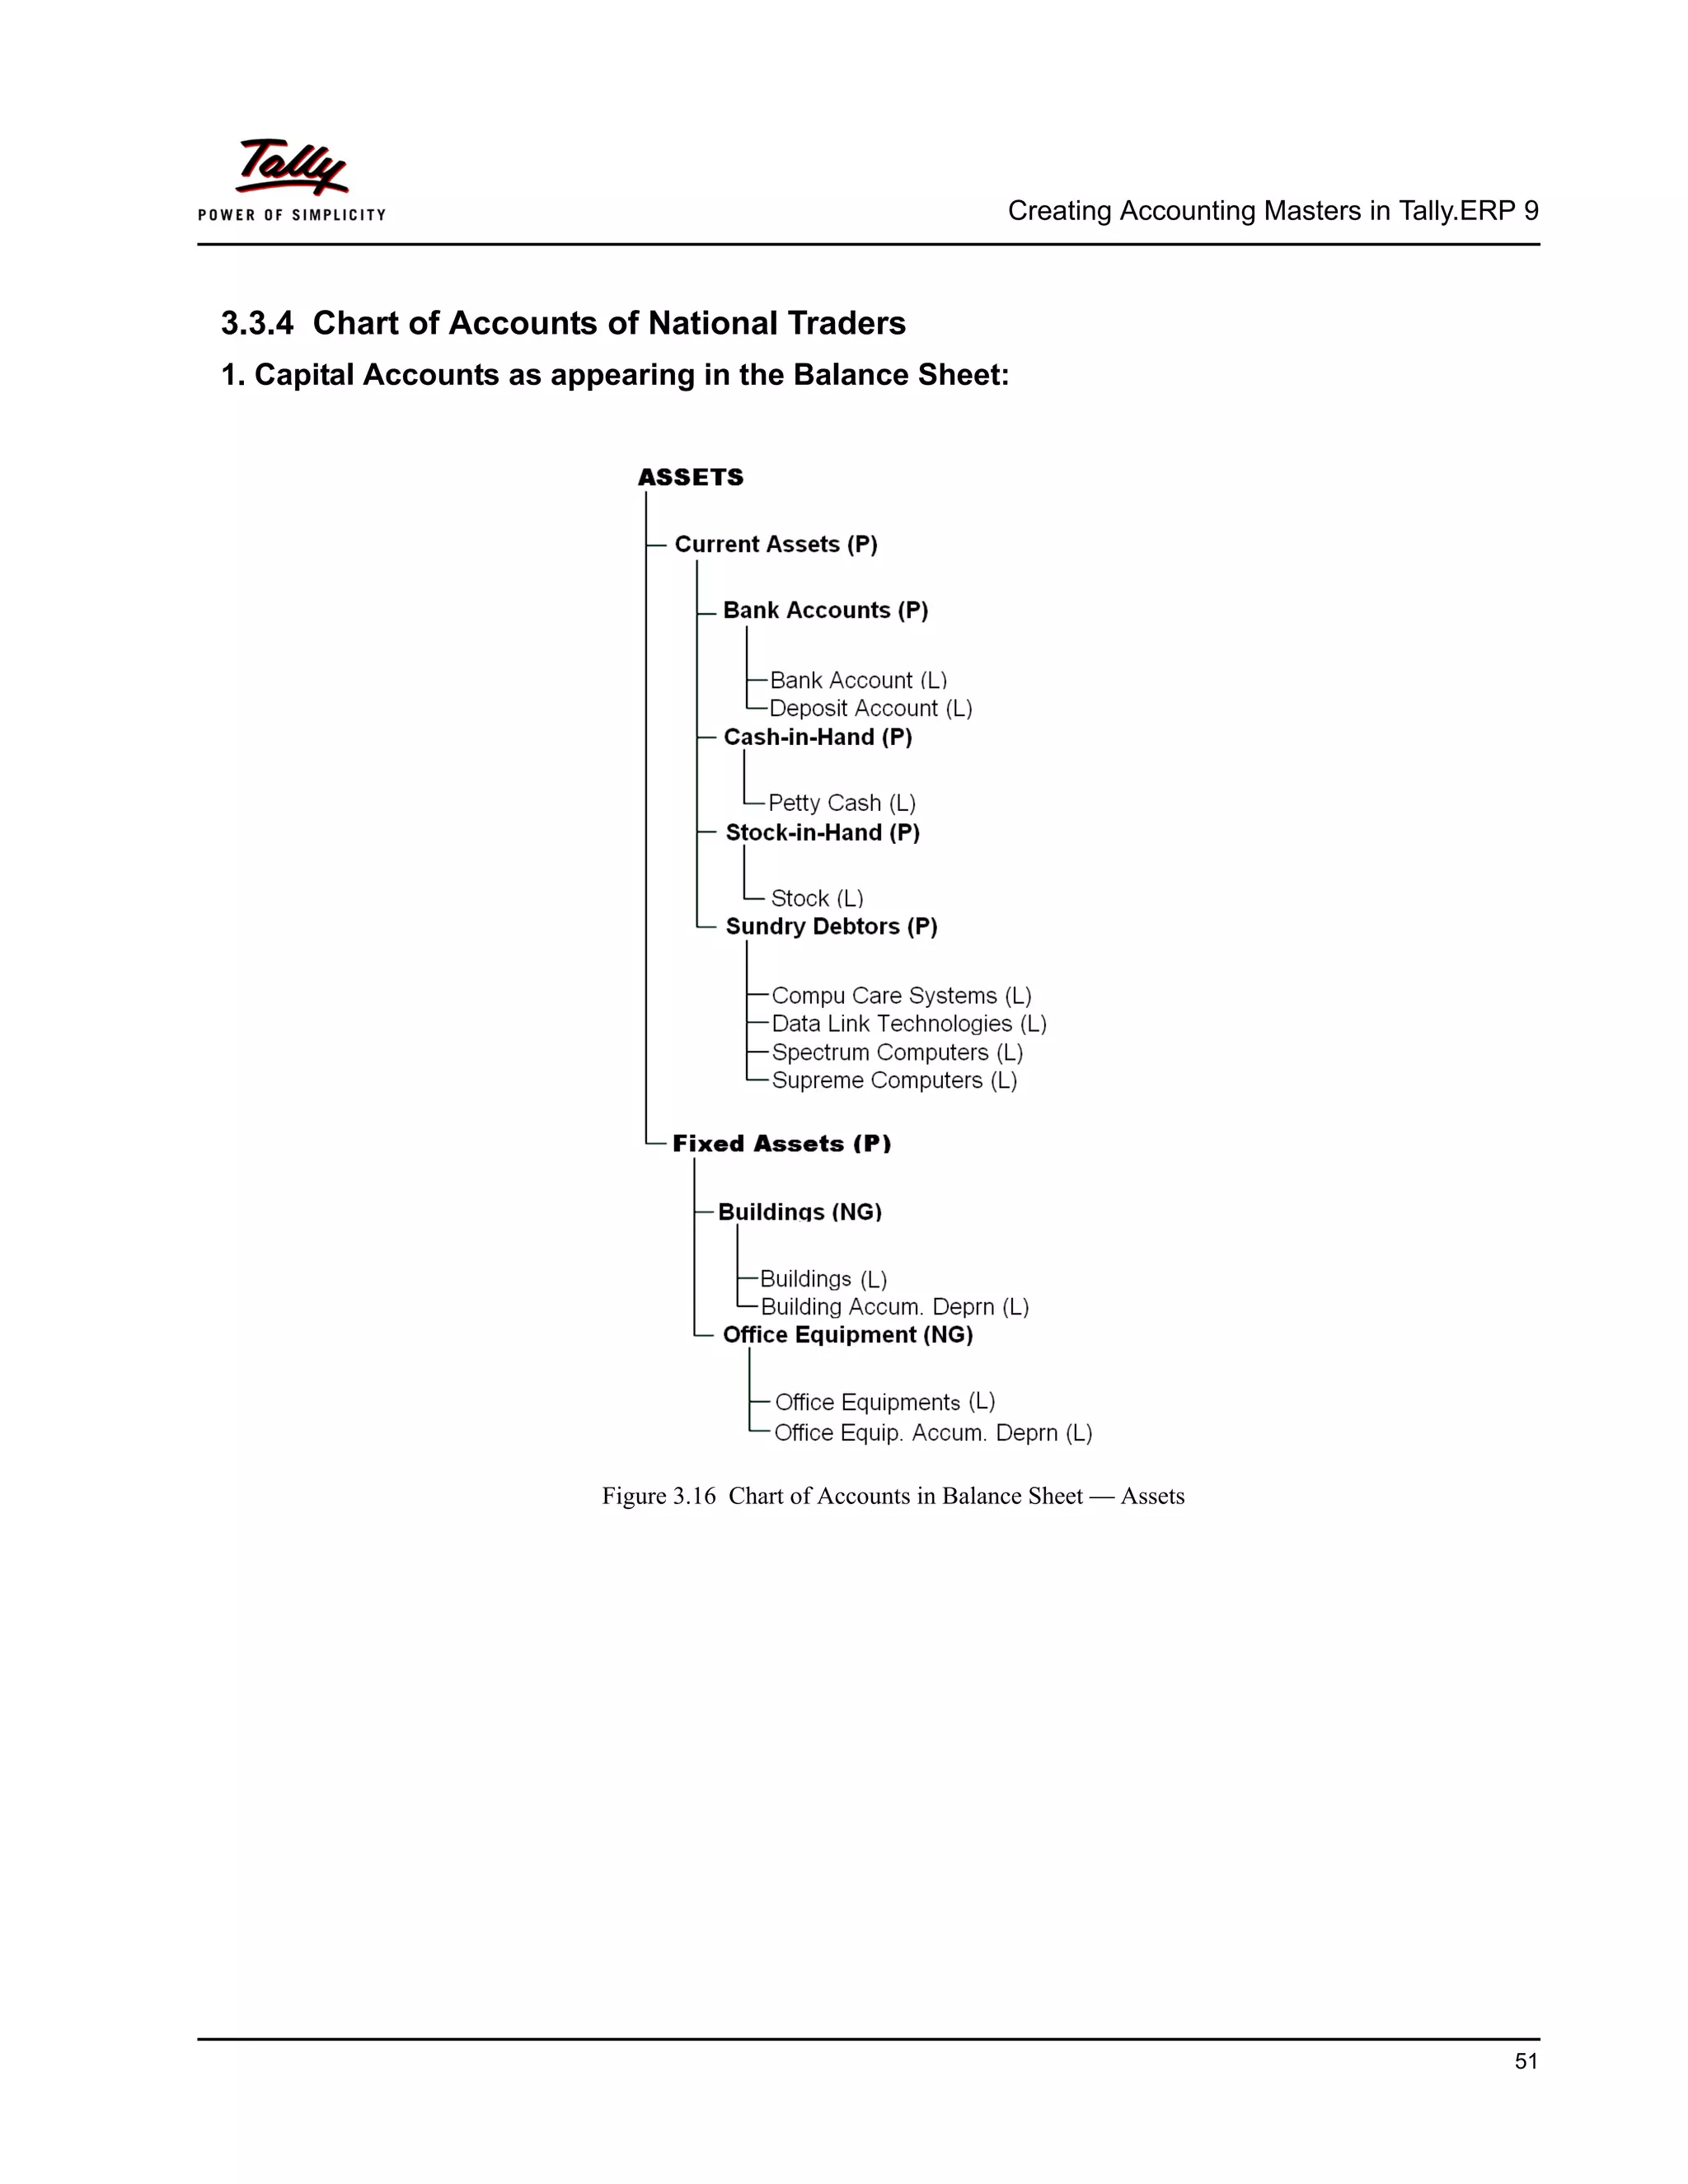
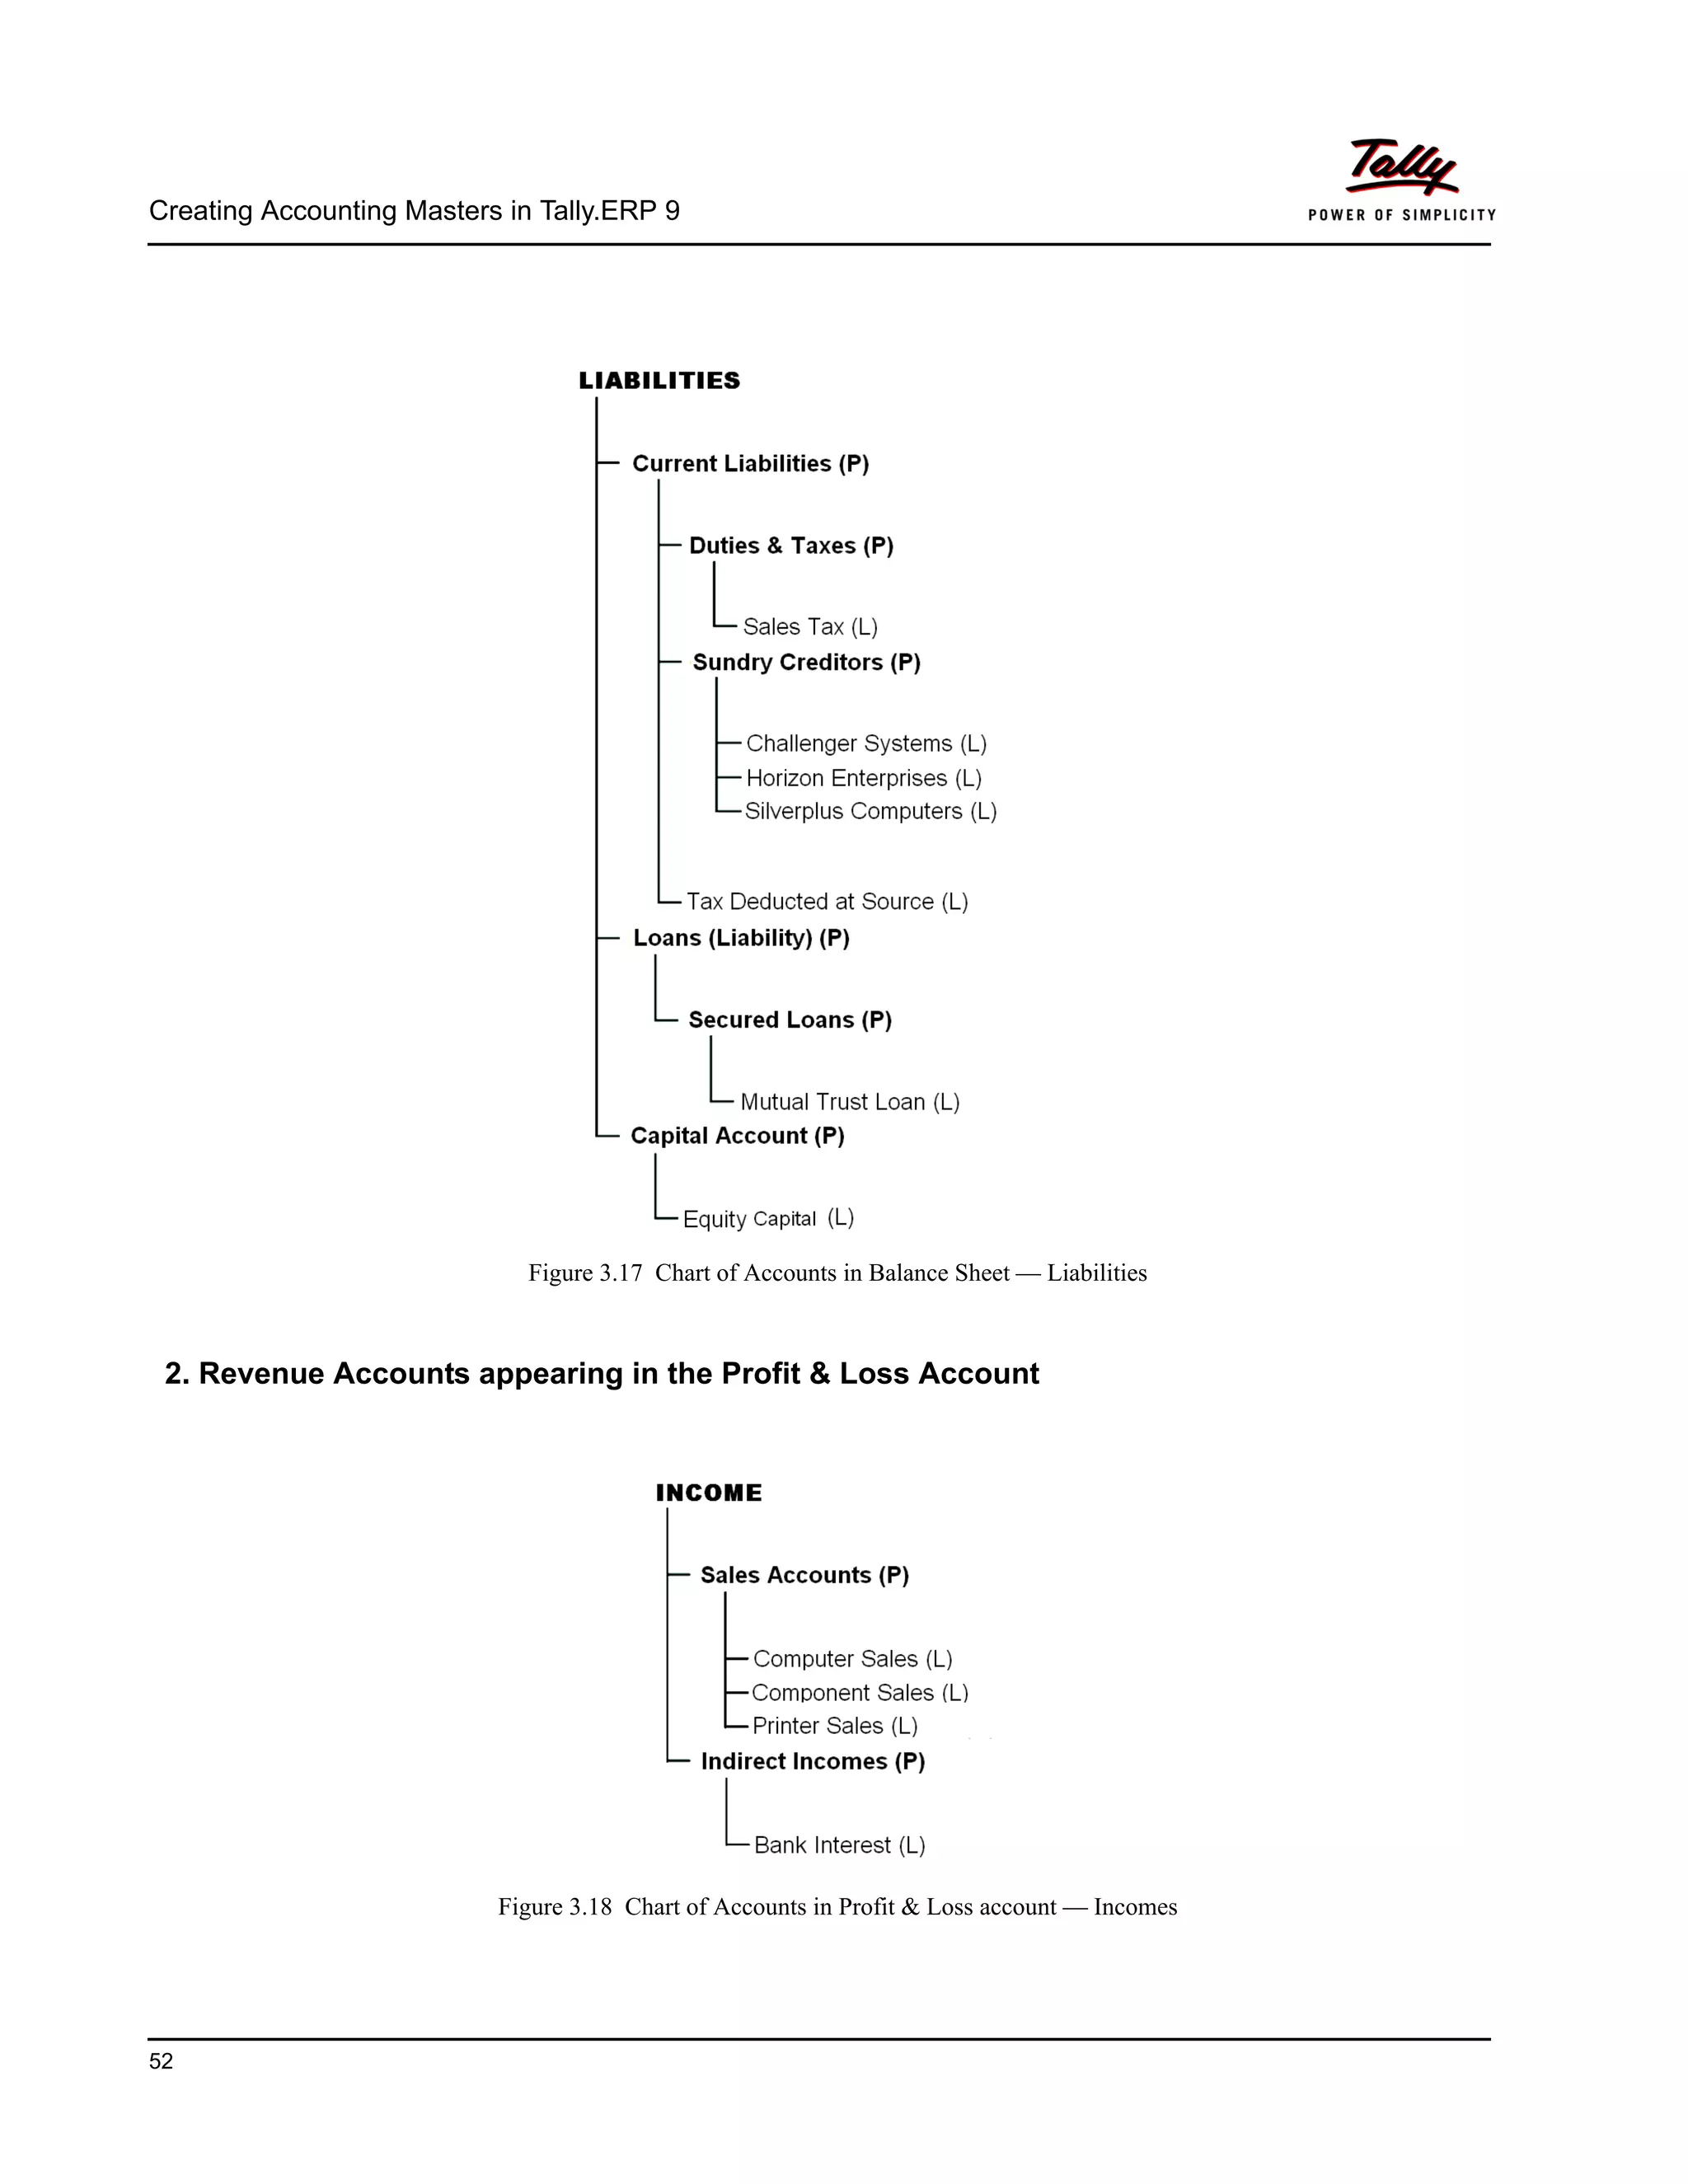
1. Capital Account
Reserves & Surplus [Retained Earnings]
2. Current Assets
Bank Accounts
Cash-in-hand
Deposits (Asset)
Loans & Advances (Asset)
Stock-in-hand
Sundry Debtors
3. Current Liabilities
Duties & Taxes
Provisions
Sundry Creditors
4. Fixed Assets
5. Investments
6. Loans (Liability)
Bank OD A/c [Bank OCC A/c]
Secured Loans
Unsecured Loans
7. Suspense A/c
8. Misc. Expenses (Asset)
9. Branch/Divisions
Out of the 15 pre-defined primary groups, the following are the six pre-defined groups that
appear in the Profit & Loss Account.
1. Sales Accounts
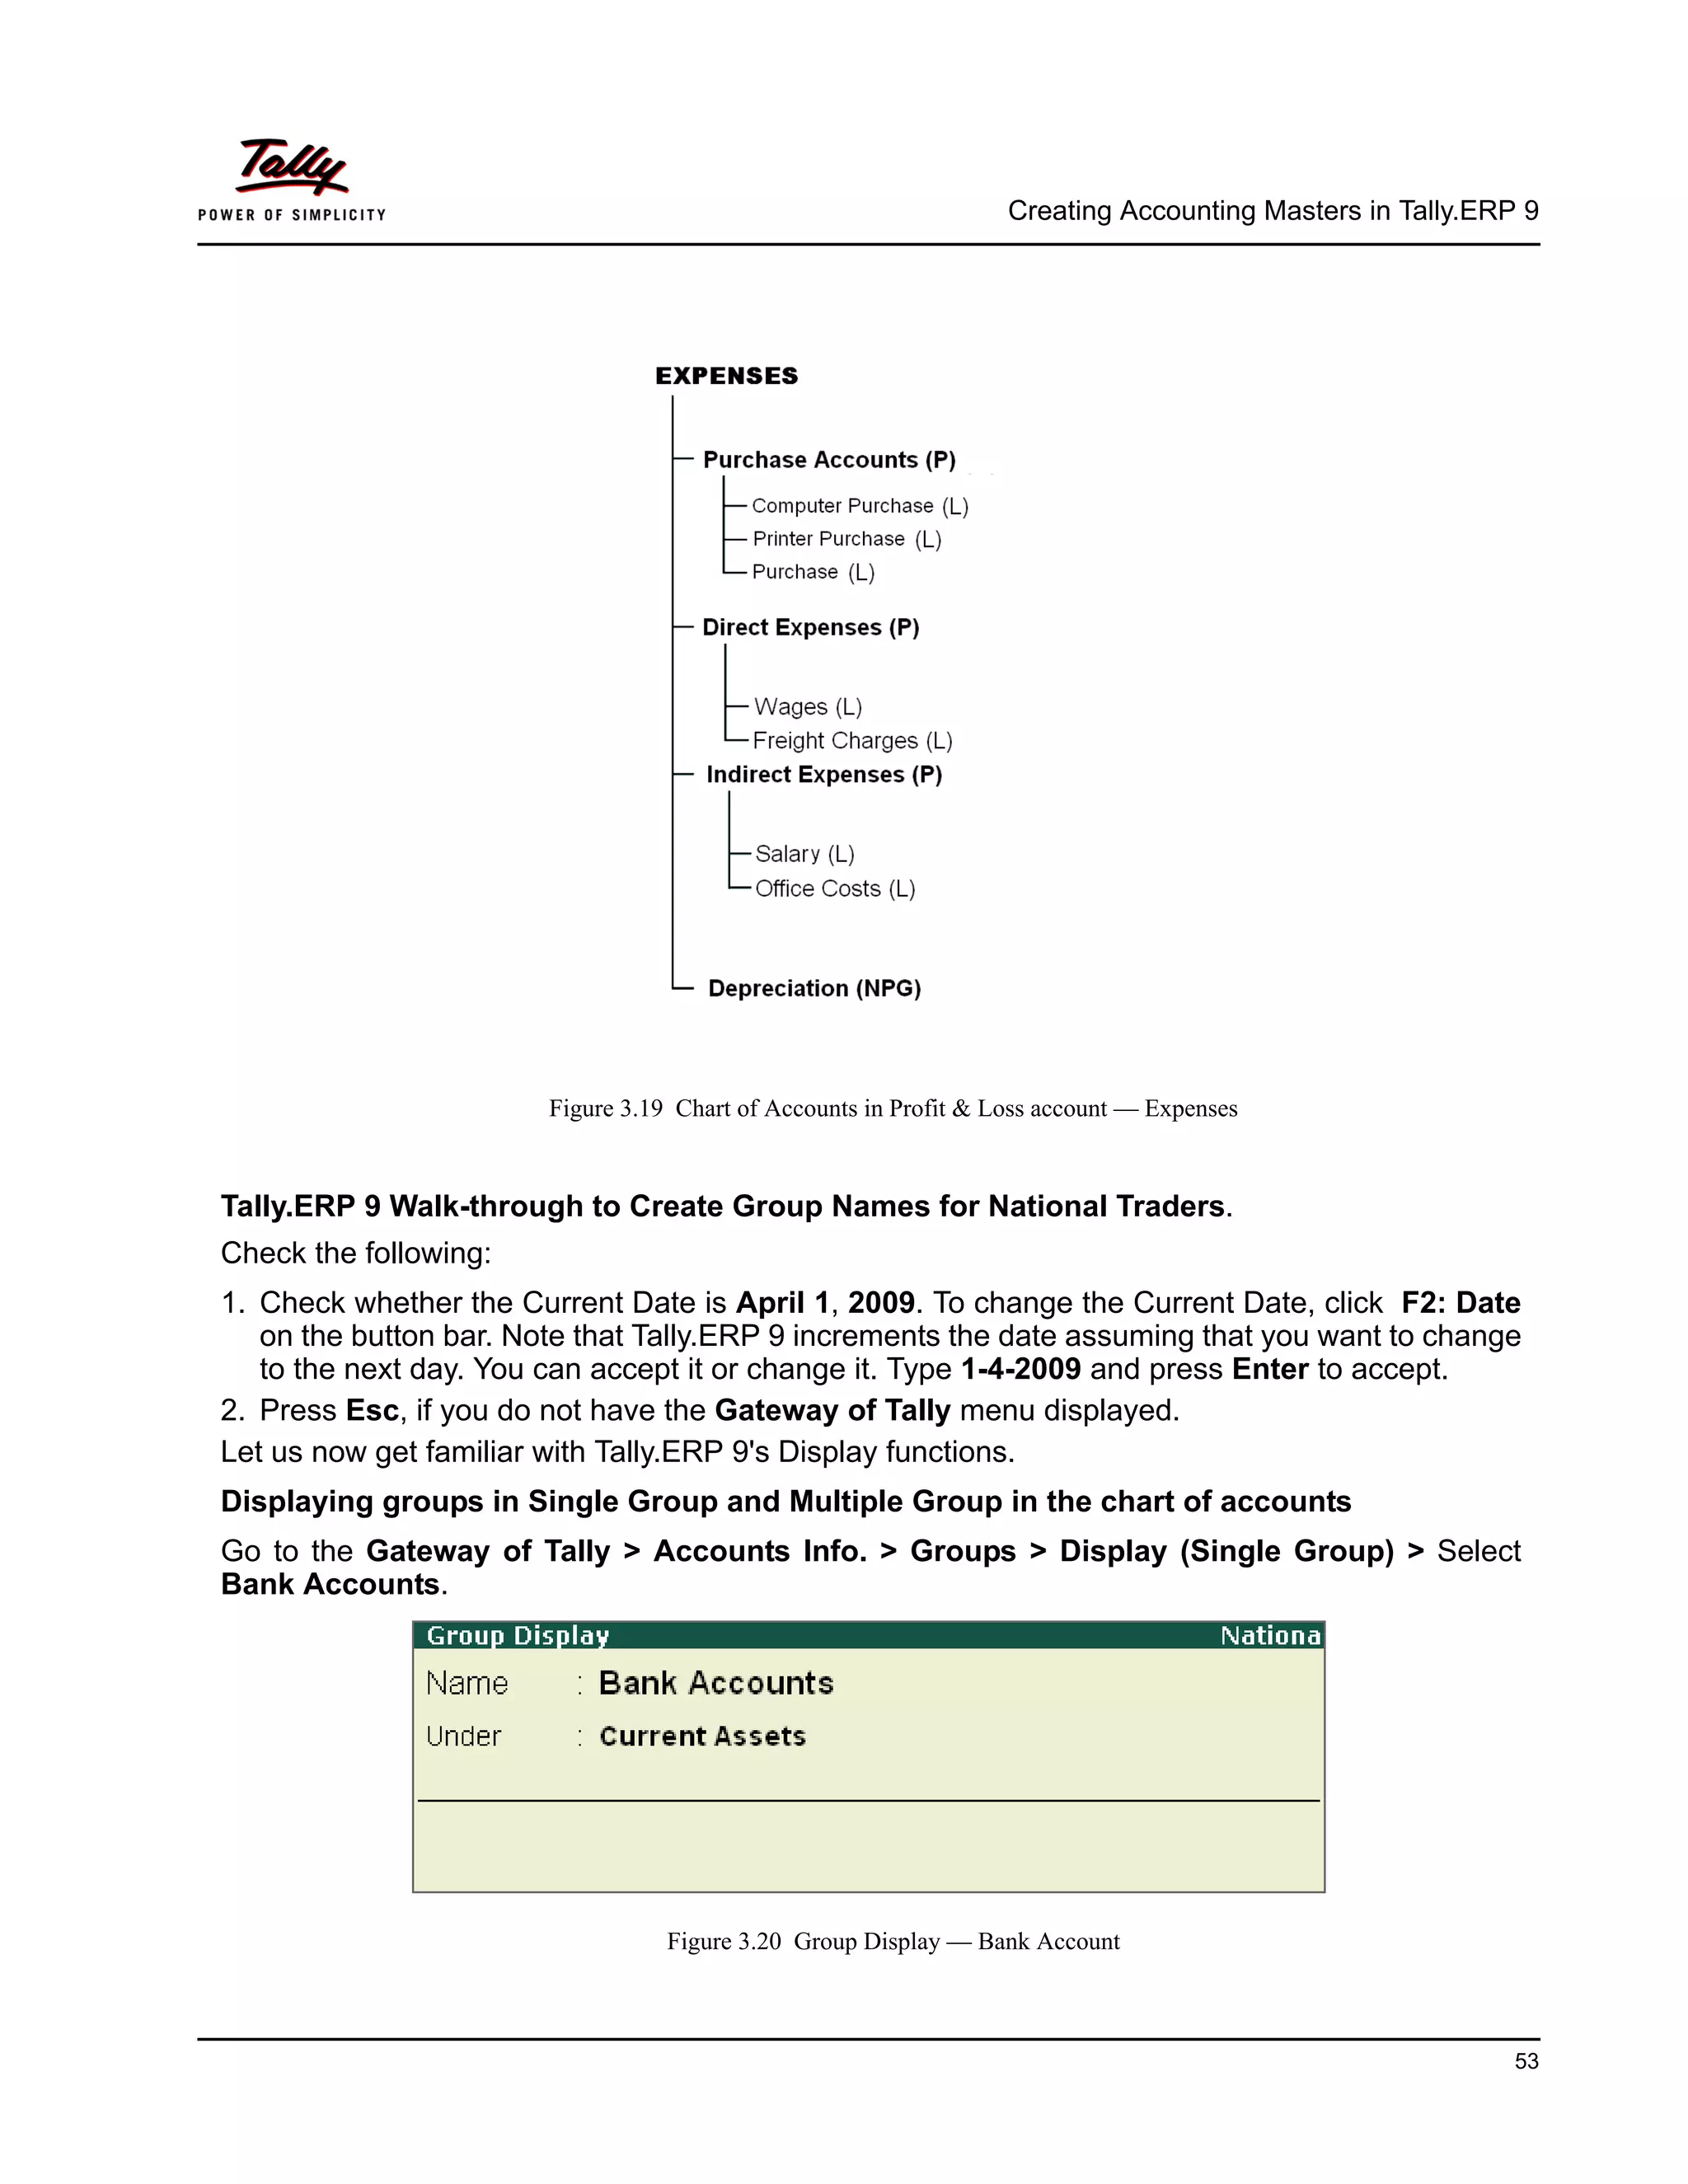
2. Purchase Accounts
3. Direct Incomes [Income (Direct)]
4. Indirect Incomes [Income (Indirect)]
5. Direct Expenses [Expenses (Direct)]
6. Indirect Expenses [Expenses (Indirect)]
15. Creating Accounting Masters in Tally.ERP 9
43
3.3.3 Groups and Ledgers
Group is a collection of Ledgers of the same nature. In a business, expenditures like telephone
expenses, electricity charges, conveyance etc., are commonly incurred. Ledgers based on these
expenditures are created to be used while accounting vouchers are entered. To know the total of
such expenses for any period (a week or a month), similar natured expense ledgers are grouped.
Ledger account heads are the actual account heads with which we identify the transactions. All
voucher entries have to be passed using ledgers. To Understand the concept of Groups and
Ledgers, let us create Ledgers and Groups in Indus Enterprises.
1. Proprietor's Capital Account – under Capital Account with an opening balance of
Rs.25000.
2. Land & Building – under Fixed Assets with an opening balance of Rs.60000.
3. Milton & Co – under Sundry Debtors because we have sold some goods to them – with an
opening balance of Rs.15000.
4. Kaltronic Ltd – under Sundry Creditors – because we have purchased some goods from
them with opening balance of Rs. 85000.
5. Local Sales – under Sales Account with no opening balance.
6. Local Purchases – under Purchase Account with no opening balance.
7. State Bank of India – under Bank Accounts with an opening balance of Rs. 35000.
8. Conveyance – under Indirect Expenses with no opening balance.
9. Bank Interest – under Indirect Income with no opening balance.
Notice that we have mentioned ledger names under groups i.e., under Capital Account, under
Sundry Debtor, etc. which are referred to as GROUP names.
Ledgers are created in the following manner:
Go to the Gateway of Tally > Accounts Info. > Ledgers > Create.
The Ledger Creation screen appears as shown below:
The Items in square brackets are aliases for the Group Names. This is
another powerful feature of Tally.ERP 9, which allows you to refer to the
same item under several different names.
Make sure all the options in the F12: Configure (Master configuration) are
set to No. The function of each option will be explained as and when the
topic is covered.
16. Creating Accounting Masters in Tally.ERP 9
44
Figure 3.10 Ledger Creation screen
Practice Exercise
Two of the nine ledger accounts will be created by us. As a practice exercise you will be creating
the remaining seven ledgers.
1. Proprietor's Capital Account under Capital Account with an opening balance of Rs.
25000.
Enter Name as Proprietor's Capital Account.
Select Capital Account from the List of Groups.
Enter 25000 in the Opening Balance (on 1-Apr-2009) field.
17. Creating Accounting Masters in Tally.ERP 9
45
Figure 3.11 Ledger Creation screen — Proprietor’s Capital Account
Press Y or Enter to accept the screen.
Notice that Tally.ERP 9 automatically capitalises the first letter for you.
2. Land & Building under Fixed Assets with an opening balance of Rs.60000.
Enter Name as Land & Building.
Select Fixed Assets from the List of Groups.
Enter 60,000 in the Opening Balance (on 1-Apr-2009) field.
18. Creating Accounting Masters in Tally.ERP 9
46
Figure 3.12 Ledger Creation — Land & Building
Press Y or Enter to accept the screen.
Tally.ERP 9 displays the total debit and credit opening balances while the ledgers are being
created in the Ledger Creation screen. This is to avoid differences in the opening balance.
So far, we have used the default groups provided in Tally.ERP 9, but Tally.ERP 9 does allow us to
create our own groups. To know how to do so, let us explore the options available under the
creation of Groups using Tally.ERP 9's pre-defined groups.
Groups can be created in the following manner:
Go to the Gateway of Tally > Accounts Info. > Groups.
The Groups menu appears as shown below:
19. Creating Accounting Masters in Tally.ERP 9
47
Figure 3.13 Groups Menu
Create the following Sundry Debtors Ledger accounts :
Groups - North Delhi Debtors and Bhopal Debtors under North India Debtors.
Mysore Debtors and Secundrabad Debtors under South India Debtors.
Renison & Co and Milton & Co grouped under North Delhi Debtors.
Solution
The solution is to first create two sub-groups North India Debtors and South India Debtors
under Sundry Debtors.
Go to the Gateway of Tally > Accounts Info. > Groups > Create.
Enter Name as North India Debtors
Against the field Under select Sundry Debtors from the List of Groups
The Group Creation screen appears as shown below :
You can create one group at a time by pressing Enter on Create under
Single Group menu. In case, you want to create multiple groups simultane-
ously, you can create them by pressing Enter on Create under Multiple
Groups.
20. Creating Accounting Masters in Tally.ERP 9
48
Figure 3.14 Group Creation — North India Debtors
Press Y or Enter to accept the screen.
Similarly create the following Groups:
South India Debtors under Sundry Debtors.
Mysore Debtors and Secundrabad Debtors under South India Debtors.
North Delhi Debtors and Bhopal Debtors under North India Debtors.
Tally.ERP 9 allows you to create any number of groups under all the default groups. We have now
created two sub-groups under Sundry Debtors viz. North India Debtors and South India Debtors.
Additionally, we have created two sub-groups each under North India Debtors and South India
Debtors as per the requirements.
Let us now create the ledgers for Renison & Co and Milton & Co under North Delhi Debtors.
Go to the Gateway of Tally > Accounts Info. >Ledgers > Create (Multiple Ledgers).
Create Renison & Co and Milton & Co under North Delhi Debtors.
Select North Delhi Debtors from List of Groups.
Enter Renison & Co in the Name of Ledger field.
21. Creating Accounting Masters in Tally.ERP 9
49
Enter Milton & Co in the Name of Ledger field.
Figure 3.15 Multi-Ledger Creation
North Delhi Debtors is automatically prefilled in the Under field, press Enter to accept
Press Enter to accept the screen.
We have learnt to create ledgers in both the single and multiple mode under Tally.ERP 9's default
pre-defined groups. We have also created our own sub-groups under Tally.ERP 9's predefined
groups.
Return to the Gateway of Tally and shut Indus Enterprises and select National Traders.
22. Creating Accounting Masters in Tally.ERP 9
50
Given below is the Trial Balance of National Traders extracted from the Books of Accounts at
the close of business on March 31, 2009.
The Chart of Accounts to be prepared is based on the above Trial Balance of National Traders.
This is to assist you in understanding the classification of ledgers. To help you, each account has
been marked as :
P - Pre-defined Tally.ERP 9 Group (no action)
L - Ledger account required
NG - New Group required
NPG - New Primary Group required
Trial Balance
Particulars Debit Credit
Bank account 35000
Deposit Account 40000
Petty Cash 500
Opening Stock 286150
Sundry Debtors (Total) 57300
Compu Care Systems 5400
Data Link Technologies 26000
Spectrum Computers 12400
Supreme Computers 13500
Buildings 75000
Buildings Accum Deprn 8000
Office Equipment 25000
Office Equip Accum Deprn 4500
Tax Deducted at Source 4780
Sales tax 13600
Sundry Creditors (Total) 156000
Challenger Systems 65650
Horizon Enterprises 44750
Silverplus Computers 45600
Mutual Trust Loan 50000
Equity Capital 250000
Profit & Loss A/c 32070
Total 518950 518950
23. Creating Accounting Masters in Tally.ERP 9
51
3.3.4 Chart of Accounts of National Traders
1. Capital Accounts as appearing in the Balance Sheet:
Figure 3.16 Chart of Accounts in Balance Sheet — Assets
24. Creating Accounting Masters in Tally.ERP 9
52
Figure 3.17 Chart of Accounts in Balance Sheet — Liabilities
2. Revenue Accounts appearing in the Profit & Loss Account
Figure 3.18 Chart of Accounts in Profit & Loss account — Incomes
25. Creating Accounting Masters in Tally.ERP 9
53
Figure 3.19 Chart of Accounts in Profit & Loss account — Expenses
Tally.ERP 9 Walk-through to Create Group Names for National Traders.
Check the following:
1. Check whether the Current Date is April 1, 2009. To change the Current Date, click F2: Date
on the button bar. Note that Tally.ERP 9 increments the date assuming that you want to change
to the next day. You can accept it or change it. Type 1-4-2009 and press Enter to accept.
2. Press Esc, if you do not have the Gateway of Tally menu displayed.
Let us now get familiar with Tally.ERP 9's Display functions.
Displaying groups in Single Group and Multiple Group in the chart of accounts
Go to the Gateway of Tally > Accounts Info. > Groups > Display (Single Group) > Select
Bank Accounts.
Figure 3.20 Group Display — Bank Account
26. Creating Accounting Masters in Tally.ERP 9
54
You can now use the Page Up and Page Down keys to view different groups.
Let us now view the List of Groups in the Multiple Display Mode.
Go to the Gateway of Tally > Accounts Info. > Groups > Display (Multiple Groups) > Select
All Items
The Groups in Tally.ERP 9, serve to both classify and identify account
heads (ledger accounts) according to their nature. This enables a pres-
entation of summarised information.
The Groups have a hierarchical organisation. At the top of the
hierarchy are Primary Groups where accounts are classified into
capital or revenue, more specifically into assets, liabilities, income and
expenditure to determine the entire accounting and their presentation,
i.e., whether a ledger affects Profit & Loss Account (as a revenue item)
or goes into the Balance Sheet.
Tally.ERP 9 provides a set of reserved groups, based on mercantile
accounting principles, and allows you to modify their names or create
sub-groups and primary groups.
27. Creating Accounting Masters in Tally.ERP 9
55
.
Figure 3.21 Multi-Group Display screen
Adding groups to the chart of accounts
Depreciation under Primary Group
Buildings and Office Equipment under Fixed Assets
Use Multiple Groups Creation to create Buildings and Office Equip-
ment.
Use Single Group Creation to create Depreciation.
In the F12: Group Configuration, Allow ADVANCED entries in Masters
when set to Yes, displays Primary as an option in addition to the other pre-
defined Groups.
28. Creating Accounting Masters in Tally.ERP 9
56
We can access all the configuration options for the Masters from the Gateway of Tally > F12:
Configure > Accts / Inventory Info.
Go to the Gateway of Tally > Accounts Info. > Groups > Create (Single Group).
Click on F12: Configure button and set Yes to:
Allow ALIASES along with Names
Allow Language ALIASES along with Names.
Allow ADVANCED entries in Masters.
Accept the configuration screen and Tally.ERP 9 displays the Group Creation Screen in which you
will notice additional information like:
1. Alias – This is a simple mechanism of identifying an account by another name.
2. Group behaves like a Sub-Ledger – The group behaves like a Control Account for the ledg-
ers it contains when set to Yes. Only the group balance will be displayed, not the individual
ledger balances. It is useful for groups such as Sundry Debtors and Sundry Creditors (which
are pre-set to Yes) where there can be numerous ledger items.
3. Nett Debit/Credit Balances for Reporting – By setting this to Yes, amounts will be displayed
as a net figure instead of separate debit and credit balances in reports.
Create Group
1. Name: Depreciation
2. (alias): Type Deprn and press Enter. This allows you to refer to the group by either name. You
will notice that there is a field to enter a second alias if required. If you enter a name here,
another alias field will be displayed, and so on. Tally uses the main name on all displays and
reports, but this multiple alias facility is extremely useful for data entry.
3. Under: Select Primary from the list of Groups
4. Nature of Group: Select Expenses
5. Does it affect Gross Profits?: No
Since these are Expenses (and the same is true for Income) which affect the Profit & Loss A/c,
Tally.ERP 9 needs to know if the group affects the gross profit. This field will not appear if you are
adding a group to an existing group.
Nature of Group is displayed when the new Group is created under a
Primary Group. It helps to distinguish whether the group is a part of
assets, liabilities, income or expenses, to identify the correct group for
the Balance Sheet or Profit & Loss A/c.
29. Creating Accounting Masters in Tally.ERP 9
57
6. Group behaves like a Sub-Ledger: No
7. Nett Debit/Credit Balances for Reporting: No.
8. Used for Calculation (eg. Taxes, Discounts): No
9. Method to Allocate when used in Purchase Invoice: Not Applicable
The Group Creation Screen appears as shown below :
Figure 3.22 Group Creation — Depreciation
10. Press Y or Enter to accept the screen.
Altering Groups
Once created, groups can be altered by selecting the Alter option for single or multiple groups.
The procedure is the same as used earlier to display groups, except that, here the data can be
altered.
For Primary Income and Expenses Groups, the field Does it affect
Gross Profit? tells Tally.ERP 9 whether the item is above or below the
line in the Profit & Loss A/c in terms of its effect on the gross or net
profit. Direct items are pre-set to Yes and indirect items to No.
30. Creating Accounting Masters in Tally.ERP 9
58
Deleting Groups
You can delete a group via the Group Alteration (Single Mode) screen by pressing Alt+D.
However, you cannot delete Tally.ERP 9’s pre-defined groups, or groups with sub-groups or
groups containing ledgers. The lowest level must be deleted first.
Tally.ERP 9 walkthrough to create National Traders ledgers with opening balances.
Go to the Gateway of Tally > Accounts Info. > Ledgers > Create.
Adding Single Ledgers
1. Name: Mutual Trust Loan
2. Alias: Skip this field
3. Under: Secured Loans
4. Inventory values are affected ?: No
5. Opening Balance (on 1-April-2009): 50000 Cr
Figure 3.23 Ledger Creation — Mutual Trust Loan
31. Creating Accounting Masters in Tally.ERP 9
59
6. Press Y or Enter to accept the screen.
Adding Multiple Ledgers
Under Group: Sundry Debtor
Name of Ledger: Data Link Technologies
Opening Balance: 26000 Dr
Name of Ledger: Spectrum Computers
Opening Balance: 12400 Dr
Name of Ledger: Supreme Computers
Opening Balance: 13500 Dr
Press Y or Enter to accept the screen.
Altering and Displaying Ledgers
The procedures for altering and displaying ledgers are similar to those of groups. Now try this out
on National Traders by altering the Tally.ERP 9 pre-defined ledger for Cash to Petty Cash and
entering the opening balance:
Select Alter from the Single Ledger option.
Select Cash from the List of Ledgers.
Change the Name from Cash to Petty Cash.
Enter the Opening Balance of 500 Dr.
Press Y or Enter to accept the screen.
If you use Display in Single Ledger now, you will see that the List of Ledgers shows Petty Cash
instead of Cash.
Deleting Ledgers
You can delete a ledger, by pressing Alt+D in the Ledger Alteration screen.
You will not be able to delete a ledger, once the financial transactions (vouchers) have been
entered (excluding the Opening Balance). If there is a need to delete a ledger with any financial
transactions the lowest level must be deleted first by pressing Alt+D.
Tally.ERP 9 automatically assumes this to be a credit balance (Cr)
however, you can change it to debit (Dr) if required. Also note that
Tally.ERP 9 currently displays a running total of the difference in the
Opening Balance. This difference should be zero when all the
balances have been entered.
32. Creating Accounting Masters in Tally.ERP 9
60
Create other Ledgers given in the Trial Balance
1. Remember, you have already input the ledger details for the two Sundry Debtors, the Mutual
Trust Loan and Petty Cash.
2. Work from the Trial Balance, referring to the Chart of Accounts for the group to select, and cre-
ate the ledgers using the single or multiple options, depending on the number of ledgers you
create.
3. For the ledgers under Sales Accounts and Purchase Accounts, set Inventory values are
affected? to No. Reset it to Yes when you start Inventory Vouchers.
4. Please enter on the ledger names as per the Trial Balance.
5. Sundry Creditors should be set up using the multiple options in the same way as the Sundry
Debtors, except that the opening balances will be credits.
6. Watch the debits and credits on the two accumulated depreciation ledgers as, Tally.ERP 9
assumes it to be a debit balance (Dr). You need to change this to Cr.
7. Create a ledger for Bank Interest even though its balance is zero.
Verify the Ledgers and Opening Balances
In practical situations, that is all you have, the Chart of Accounts and the Trial Balance.
You need to match the Trial Balance ledger accounts with the Chart of Accounts. You might put
the opening balance figures in the chart of accounts itself. Tally.ERP 9 needs to know the Group
under which each account falls at the time you are creating the ledger account.
To ease your walk-through, the following Multi Ledger Alteration screen is taken from Tally.ERP
9 after entering the data. You can use them to verify your ledger accounts:
Go to the Gateway of Tally > Accounts Info. > Ledgers > Multiple Alteration > Select All
Items.
33. Creating Accounting Masters in Tally.ERP 9
61
Figure 3.24 Multi-Ledger Alteration screen
Press Y or Enter to accept the screen.
34. Creating Accounting Masters in Tally.ERP 9
62
Points to Remember
F11: Features are company-specific. You are allowed to specify options
that are specific to the selected company only.
The Accounting Features helps the user to create Budgets & Scenarios,
Currencies, Cost Centres, Cost Categories etc. in addition to Groups
and Ledgers.
The Inventory Features helps the user to create Stock categories, Multi-
ple Godowns, Use Tracking Numbers, Order Processing, Price levels
etc. in addition to Stock Groups, Stock Items and Units of Measure.
The Statutory & Taxation Features helps the user to enable Value
Added Tax (VAT), Excise, Service Tax, Tax deducted at Source(TDS),
Tax Collected at Source (TCS), Excise Duty along with Tax information
such as Local Sales Tax Number, Inter-state Sales Tax Number, PAN/
Income - Tax Number.
F12: Configuration options are applicable to all the companies in the
same data directory.
All financial entries are performed using ledgers or account heads.
Group is a collection of Ledgers of the same nature.
You can delete a ledger by pressing Alt+D in the Ledger Alteration
screen.