Downloaded 13 times


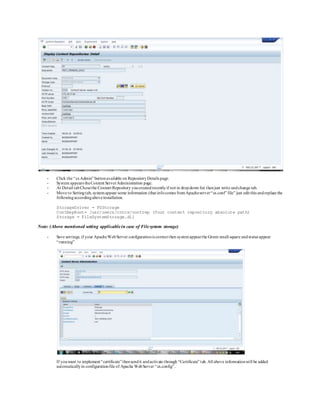
![When Content Repositoryis createdwith goodconfiguration settingsame time systemwill create “cs.conf” file in Apache server and
will make Directoryin content root as your content repository name.
If Content Repositoryis not runningor appearingwarningthencheck andcorrect your “cs.conf” file locatedin ApacheWebServer as
flows. Below informationplaced at bottom ofthe configurationfile.
Note: (Before edit Stop Apache Web Server. Ignore the linescommented with ;semicolon, only blueshaded linesare
important. Security is also optional)
[ContentServer]
TraceLevel=warning
;AdminSecurity=1
;AdminSecurityGroup=sapsys
;ContRepRoot=/usr/users/cntcs/contrep
;ContentStorageHost=@StorageHost@
;ContentStorageName=@StorageName@
;StorageDriver=FSStorage
;PSEDir=/usr/users/cntcs/security
;Storage=FileSystemStorage.dll
[contRep-ZP]
StorageDriver=FSStorage
ContRepRoot=/usr/users/cntcs/contrep
Storage=FileSystemStorage.dll
Security=1
ContRepDescription=TEST_PENSION_DOCS
DefaultDocProt=rucd
Defining Logical Path and FileNames:
1. Call transaction FILE .
Alternatively, fromthe initial screen for Archive Administration(transactionSARA ), choose: Customizing→ Basis-Customizing→
Cross-Client File
Name/Paths .
2. Mark an existingfile name,forexample, ARCHIVE_GLOBAL_PATH, orchoose newentries toenter a pathname. The name
shouldreflect its function.
3. Double click the dialogstructure Logical File Path Definitionin the substructure Assignment of Physical Paths to Logical Path.
Double click to select a syntax groupor create a newsyntaxgroup.
4. Assign a physical pathname to thelogical pathname.
Important whiledefining Logical Path and FileNames:
- When assigningpath names, the symbol <FILENAME> must appearat the end. This symbol is replacedat runtimeby the physical
file (or path) name.No part of the physical file name inthe pathname must be defined.
- If youwant to store your archive files, enter theplaceholder <F=ARCHIVELINK> in the logical path.With
<F=ARCHIVELINK><FILENAME> the files are createddirectlyin the basis path ofthe content repositorythat has been assignedto
the correspondingarchivingobject. This way you canavoidan internal copyprocess duringthe storephase.](https://image.slidesharecdn.com/contentserverinstallationguide-180407051845/85/Content-server-installation-guide-4-320.jpg)
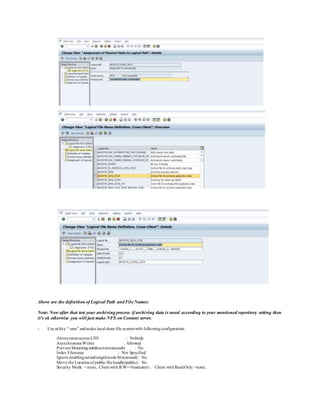
![- Use utility “ sam” andmake”AutomountedRemoteFile Systems” withfollowingconfiguration onthe Productions Server:
Local-Directory Name: /contrep
Remote-ServerName: upgqas.pfira.com
Remote-Server port: Not Specified
Remote-Directory Name: /usr/user/cntcs/contrep
View Multiple Server Configuration... ] Single Server Configured
Automounter MapType: AutoDirect
Permission: read/write
- Nowjust make mount point referringto content repositoryroot pathwhich was mentionedin NFSat Content Server.
NowContent Server must be workingfine.
The End…………..](https://image.slidesharecdn.com/contentserverinstallationguide-180407051845/85/Content-server-installation-guide-6-320.jpg)

The document provides installation instructions for an SAP Content Server on UNIX platforms using Apache Web Server. It outlines steps to create users and groups, set up filesystem storage with permissions, compile and install Apache from source, and configure the httpd.conf file. It also describes installing the Content Server, applying required patches, creating repositories and configuring settings in the Content Server Administration interface and cs.conf file. Finally it discusses defining logical paths and filenames and setting up NFS to share the content repository folder.
![[Aurora事例祭り]Amazon Aurora を使いこなすためのベストプラクティス](https://cdn.slidesharecdn.com/ss_thumbnails/amazonauroratips-170307140000-thumbnail.jpg?width=640&height=640&fit=bounds)


![[DockerCon 2019] Hardening Docker daemon with Rootless mode](https://cdn.slidesharecdn.com/ss_thumbnails/hardeningdockerdaemonwithrootlessmode-190501210234-thumbnail.jpg?width=640&height=640&fit=bounds)


![[D14] 【詳解】インメモリーデータベース SAP HANA:実際の仕組みと動きを理解しよう!by Toshiro Morisaki](https://cdn.slidesharecdn.com/ss_thumbnails/d14sapmorisaki-140623195128-phpapp01-thumbnail.jpg?width=640&height=640&fit=bounds)