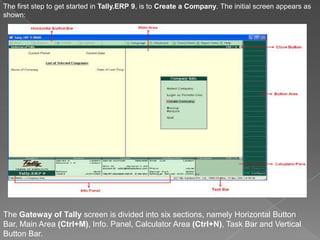
The first step to get started in Tally.ERP 9, is to Create a Company. The initial screen appears as
shown:


The Gateway of Tally screen is divided into six sections, namely Horizontal Button
Bar, Main Area (Ctrl+M), Info. Panel, Calculator Area (Ctrl+N), Task Bar and Vertical
Button Bar.
The elements of the Gateway of Tally screen are explained below:

                                 Horizontal Button Bar
The Buttons, Print (Alt+P), Export (Alt+E), E-mail (Alt+M), Upload (Alt+O), Language
(Ctrl+L), Keyboard (Ctrl+K), Control Centre (Ctrl+K), Support Centre (Ctrl+H) and Help
(Alt+H) can be seen in the Horizontal Button Bar.

Control Centre (Ctrl+K) – Login to the Control Centre for account management
Support Centre (Ctrl+H) – To access support incidents, queries and track the resolution
status
Help (Alt+H) – To access Tally.ERP's online context-sensitive help


                            Main Area (Gateway of Tally)
The Main Area is separated into two:
1. Left-hand side area
2. Right-hand side area

The left-hand side provides information on Current Period, Current Date and List of
Selected Companies (Name of the company and the date when last entry has been
made).

The right-hand side displays the Company Information menu such as Select a Company,
Create a Company, Backup a Company or Restore a Company and so on.
Hot Keys
Hot keys are capitalized and appear in red colour on all the menus. Using the Hot Keys in
Company Info menu will take you to the relevant screen or sub - menus within the selected
option.

                                         Info. Panel
The Information Panel or Info Panel as it is widely known appears at the bottom part of the
screen. It is divided into five blocks, the first four block give you vital information on the
various aspects of the product installed on your computer where as the last block contains
the calculator.

Calculator Pane
The Calculator Pane allows you to perform simple and complex mathematical operations
required by the user eliminating the need of an additional calculator at his desk. To
activate the calculator press Ctrl+N or click within the Calculator Pane where ever it is
displayed.
Task Bar
The menu path appears in the lower left corner of the Bottom pane.
The Current Date (system date). three letter day, date, month and year are displayed in
DDD, DD, MMM, YYYY format on the right-hand side.
System Time appears on the lower-right corner in Hour: Minutes: Seconds (HH/MM/SS)
format.
Calculator Pane
The Calculator Pane allows you to perform simple and complex mathematical operations
required by the user eliminating the need of an additional calculator at his desk. To
activate the calculator press Ctrl+N or click within the Calculator Pane where ever it is
displayed.


                                        Task Bar
The menu path appears in the lower left corner of the Bottom pane.
The Current Date (system date). three letter day, date, month and year are displayed in
DDD, DD, MMM, YYYY format on the right-hand side.
System Time appears on the lower-right corner in Hour: Minutes: Seconds (HH/MM/SS)
format.
Button Bar
The buttons are designed to make the work easier and faster, they vary from one screen to
another based on the screen functionality. They appear on the right hand side of the
Tally.ERP 9 screen and the inactive buttons are greyed out. You can either click these
buttons or press the shortcut keys to access the relevant screen.
The following are some of the buttons and their functions:

F1: Select Cmp – To select the company from the List of Companies and access data from
other data directories on the local system or through the network. You can also access the
Directory field by pressing [Backspace].

F12: Configure – To access the configuration settings to manage the information entered in
Tally.ERP 9. For example, you can access the General Configuration to set country specific
defaults, before creating a company.

Buttons where a character or function key is underlined indicates that you have to press
underlined character or the function key along with [ALT] key.
Buttons where a character or function key is double underlined indicates, you have to
press the character or the function key along with [CTRL] key.
F1: Press the shortcut function key [F1] to select a company
F1: Press [ALT+F1] to shut a company
F8: Press [CTRL+F8] to select the Credit Note voucher
Ctrl+M: Press Ctrl+M to access the Gateway of Tally
Ctrl+N: Press Ctrl+N to access the Calculator frame
Close Button


The Close Button in the upper right corner functions similar to the use of Esc in
Tally.ERP 9. It brings you to back to the Gateway of Tally.ERP 9 from any screen.


                                 Minimise Button

The Minimise button performs the standard Windows Operating System’s
function, allowing you to minimize Tally.ERP 9 and work on other applications. To
restore Tally.ERP 9, click on the Tally.ERP 9 icon on the taskbar.

Company information (tally)

  • 2.
    The first stepto get started in Tally.ERP 9, is to Create a Company. The initial screen appears as shown: The Gateway of Tally screen is divided into six sections, namely Horizontal Button Bar, Main Area (Ctrl+M), Info. Panel, Calculator Area (Ctrl+N), Task Bar and Vertical Button Bar.
  • 3.
    The elements ofthe Gateway of Tally screen are explained below: Horizontal Button Bar The Buttons, Print (Alt+P), Export (Alt+E), E-mail (Alt+M), Upload (Alt+O), Language (Ctrl+L), Keyboard (Ctrl+K), Control Centre (Ctrl+K), Support Centre (Ctrl+H) and Help (Alt+H) can be seen in the Horizontal Button Bar. Control Centre (Ctrl+K) – Login to the Control Centre for account management Support Centre (Ctrl+H) – To access support incidents, queries and track the resolution status Help (Alt+H) – To access Tally.ERP's online context-sensitive help Main Area (Gateway of Tally) The Main Area is separated into two: 1. Left-hand side area 2. Right-hand side area The left-hand side provides information on Current Period, Current Date and List of Selected Companies (Name of the company and the date when last entry has been made). The right-hand side displays the Company Information menu such as Select a Company, Create a Company, Backup a Company or Restore a Company and so on.
  • 4.
    Hot Keys Hot keysare capitalized and appear in red colour on all the menus. Using the Hot Keys in Company Info menu will take you to the relevant screen or sub - menus within the selected option. Info. Panel The Information Panel or Info Panel as it is widely known appears at the bottom part of the screen. It is divided into five blocks, the first four block give you vital information on the various aspects of the product installed on your computer where as the last block contains the calculator. Calculator Pane The Calculator Pane allows you to perform simple and complex mathematical operations required by the user eliminating the need of an additional calculator at his desk. To activate the calculator press Ctrl+N or click within the Calculator Pane where ever it is displayed. Task Bar The menu path appears in the lower left corner of the Bottom pane. The Current Date (system date). three letter day, date, month and year are displayed in DDD, DD, MMM, YYYY format on the right-hand side. System Time appears on the lower-right corner in Hour: Minutes: Seconds (HH/MM/SS) format.
  • 5.
    Calculator Pane The CalculatorPane allows you to perform simple and complex mathematical operations required by the user eliminating the need of an additional calculator at his desk. To activate the calculator press Ctrl+N or click within the Calculator Pane where ever it is displayed. Task Bar The menu path appears in the lower left corner of the Bottom pane. The Current Date (system date). three letter day, date, month and year are displayed in DDD, DD, MMM, YYYY format on the right-hand side. System Time appears on the lower-right corner in Hour: Minutes: Seconds (HH/MM/SS) format.
  • 6.
    Button Bar The buttonsare designed to make the work easier and faster, they vary from one screen to another based on the screen functionality. They appear on the right hand side of the Tally.ERP 9 screen and the inactive buttons are greyed out. You can either click these buttons or press the shortcut keys to access the relevant screen. The following are some of the buttons and their functions: F1: Select Cmp – To select the company from the List of Companies and access data from other data directories on the local system or through the network. You can also access the Directory field by pressing [Backspace]. F12: Configure – To access the configuration settings to manage the information entered in Tally.ERP 9. For example, you can access the General Configuration to set country specific defaults, before creating a company. Buttons where a character or function key is underlined indicates that you have to press underlined character or the function key along with [ALT] key. Buttons where a character or function key is double underlined indicates, you have to press the character or the function key along with [CTRL] key. F1: Press the shortcut function key [F1] to select a company F1: Press [ALT+F1] to shut a company F8: Press [CTRL+F8] to select the Credit Note voucher Ctrl+M: Press Ctrl+M to access the Gateway of Tally Ctrl+N: Press Ctrl+N to access the Calculator frame
  • 7.
    Close Button The CloseButton in the upper right corner functions similar to the use of Esc in Tally.ERP 9. It brings you to back to the Gateway of Tally.ERP 9 from any screen. Minimise Button The Minimise button performs the standard Windows Operating System’s function, allowing you to minimize Tally.ERP 9 and work on other applications. To restore Tally.ERP 9, click on the Tally.ERP 9 icon on the taskbar.