
Recommended
More Related Content
What's hot
What's hot (20)
Viewers also liked
Viewers also liked (20)
Similar to Children, Incorporated Presentation
Similar to Children, Incorporated Presentation (20)
Recently uploaded
Recently uploaded (20)
Children, Incorporated Presentation
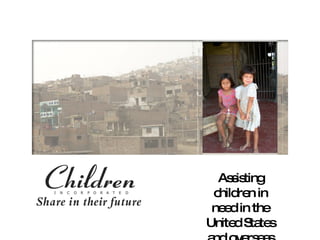
- 1. Assisting children in need in the United States and overseas since 1964
- 2. Our Mission Assisting impoverished children in the U.S. and abroad through already established schools, orphanages, and childcare centers. We facilitate sponsorships, maintain several special funds, and manage several projects on an as-needed basis. Our Vision To assist children in every country by collaborating with more schools, orphanages and childcare centers dedicated to the maintenance, support, education, and welfare of needy children everywhere.
- 3. HISTORY 1964 2009 After personally witnessing the deprivation of children in Guatemala, our founder, Mrs. Jeanne Clarke Wood, established Children, Incorporated in 1964 Over 40 years ago, we began our first project in Guatemala with 95 children We now assist over 17,000 children in 24 countries around the world, including the United States
- 5. Latin American Division Foreign Division American Indian Division Inner City Division Appalachian Division
- 6. Latin American Divison These are typical living conditions of the families we assist in Latin America. Many live as squatters in overcrowded neighborhoods with limited access to safe drinking water. Few, if any homes have indoor plumbing or electricity.
- 7. Political and social unrest, coupled with flooding and natural disasters, perpetuate the cycle of poverty
- 8. Foreign Division Lack of education, cultural infighting and government practices in countries like Kenya, India and Lebanon have given way to long term poverty with little hope in sight.
- 9. American Indian tribes have endured much turmoil through the years. Though isolated, their land represents their heritage and culture, and it is their home. Families find themselves struggling to make a living with the resources available. American Indian Division
- 10. Children are forced to cope with the daily influences of street gangs, random acts of violence, and drug abuse Homelessness is commonplace, many inner city families move frequently from one temporary dwelling to another Single parent homes are the majority, often headed by grandmothers, aunts, and non-related caregivers who barely scrape by financially Inner City Division
- 11. Appalachian Division Many Appalachian families continue to live in severely substandard rural housing. Many also lack the education needed to compete for a limited amount of well-paid jobs.
- 12. We don’t re-invent the wheel. Instead, we affiliate with already established orphanages, schools and childcare centers who have the staff to manage our program on a volunteer basis. This allows us to provide food, clothing, healthcare and education to children in need. How do we help?
- 13. Schools In the United States, Latin America, Asia, Africa and the Middle East How do we help?
- 14. Your Contributions Children benefit from a warm meal, school supplies, and other basic needs at our childcare centers
- 15. How can I help? sponsor a child give to the haven fund give to the warm clothing fund contribute to the annual fund
- 16. How Can I Help? Sponsor a child
- 17. How Can I Help? Give to the Haven Fund
- 18. How Can I Help? Give to the Warm Clothing Fund
- 19. How Can I Help? Contribute to the Annual Fund
- 21. Share in their future With your help, we can assist one more child today than we did yesterday. childrenincorporated.org 800-538-5381
Editor's Notes
- Custom animation effects: recolored picture with full-color section and motion path (Advanced) To reproduce the picture effects on this slide, do the following: On the Home tab, in the Slides group, click Layout and then click Blank . On the Insert tab, in the Illustrations group, click Picture . In the Insert Picture dialog box, select a picture, and then click Insert . Select the picture. Under Picture Tools , on the Format tab, in the bottom right corner of the Size group, click the Size and Position dialog box launcher. In the Size and Position dialog box, on the Size tab, resize or crop the picture as needed so that under Size and rotate , the Height box is set to 3.58” and the Width box is set to 8” . Resize the picture under Size and rotate by entering values into the Height and Width boxes. Crop the picture under Crop from by entering values into the Left , Right , Top , and Bottom boxes. Under Picture Tools , on the Format tab, in the Adjust group, click Recolor , and then under Dark Variations click Text color 2 Dark (first option from the left). Under Picture Tools , on the Format tab, in the Picture Styles group, click Picture Effects , point to Shadow , and then under Inner click Inside Diagonal Top Left (first row, first option from the left). Drag the picture so that it is positioned above the middle of the slide. On the Home tab, in the Clipboard group, click the arrow next to Paste , and then click Duplicate . Press and hold CTRL and select both pictures on the slide. On the Home tab, in the Drawing group, click Arrange , point to Align , and then do the following: Click Align to Slide . Click Align Center . Click Align Selected Objects . Click Align Middle . Click the slide background area to cancel the selection of both pictures. Select the duplicate (top) picture. Under Picture Tools , on the Format tab, in the bottom right corner of the Size group, click the Size and Position dialog box launcher. In the Size and Position dialog box, on the Size tab, under Crop from , enter values into the Left and Right boxes so that under Size and rotate , and the Width box is set to 2.33” . ( Note: For best results, crop the duplicate picture to tightly focus on a single element in the original picture.) Under Picture Tools , on the Format tab, in the Adjust group, click Recolor , and then under No Recolor click No Recolor . On the Home tab, in the Drawing group, click Shapes , and then under Rectangles click Rectangle (first option from the left). On the slide, drag to draw a rectangle. Select the rectangle. Under Drawing Tools , on the Format tab, in the Size group, do the following: In the Shape Height box, enter 7.5” . In the Shape Width box, enter 2.33” . Under Drawing Tools , on the Format tab, in the Shape Styles group, click the arrow next to Shape Fill , point to Gradient , and then click More Gradients . In the Format Shape dialog box, click Fill in the left pane, select Gradient fill in the Fill pane, and then do the following: In the Type list, select Linear . Click the button next to Direction , and then click Linear Down (first row, second option from the left). Under Gradient stops , click Add or Remove until two stops appear in the drop-down list. Also under Gradient stops , customize the gradient stops that you added as follows: Select Stop 1 from the list, and then do the following: In the Stop position box, enter 0% . Click the button next to Color , then under Theme Colors click White, Background 1 (first row, first option from the left). In the Transparency box, enter 55% . Select Stop 2 from the list, and then do the following: In the Stop position box, enter 100% . Click the button next to Color , and then under Theme Colors click White, Background 1 (first row, first option from the left). In the Transparency box, enter 100% . On the slide, drag the rectangle to cover the duplicate picture. Select the rectangle. On the Home tab, in the Drawing group, click Arrange , and then do the following: Point to Align , and then click Align to Slide . Point to Align , and then click Align Middle . Click Send Backward . On the Home tab, in the Drawing group, click Shapes , and then under Rectangles click Rectangle (first option from the left). On the slide, drag to draw another rectangle. Select the rectangle. Under Drawing Tools , on the Format tab, in the Size group, do the following: In the Shape Height box, enter 4” . In the Shape Width box, enter 2.67” . Under Drawing Tools , on the Format tab, in the Shape Styles group, click the arrow next to Shape Fill , point to Gradient , and then click More Gradients . In the Format Shape dialog box, click Fill in the left pane. In the Fill pane, select No fill . Also in the Format Shape dialog box, click Line Color in the left pane, select Solid line in the Line Color pane, and then do the following: Click the button next to Color , and then under Theme Colors click White, Background 1 (first row, first option from the left). In the Transparency box, enter 70% . Also in the Format Shape dialog box, click Line Style in the left pane, and then do the following in the Line Style pane: In the Width box, enter 0.75 pt . Click the button next to Dash type , and then click Square Dot (third option from the top). Drag the dotted rectangle on top of the small, full-color picture. Press and hold SHIFT and select the dotted rectangle, the small picture, and the large picture on the slide. On the Home tab, in the Drawing group, click Arrange , point to Align , and then do the following: Click Align Selected Objects . Click Align Middle . On the Insert tab, in the Text group, click Text Box , and then on the slide, drag to draw the text box. Enter text in the text box, select the text, and then on the Home tab, in the Font group, select Gill Sans MT Condensed from the Font list, select 24 from the Font Size list, click the button next to Font Color , and then under Theme Colors click White, Background 1 (first row, first option from the left). On the Home tab, in the Paragraph group, click Center to center the text within the text box. On the slide, drag the text box below the dotted rectangle. To reproduce the background effects on this slide, do the following: Right-click the slide background area, and then click Format Background . In the Format Background dialog box, click Fill in the left pane, and then select Solid fill in the Fill pane. Also in the Fill pane, click the button next to Color , and then under Theme Colors click Black, Text 1, Lighter 15% (fifth row, second option from the left). To reproduce the animation effects on this slide, do the following: To view the area beyond the slide, on the View tab, click Zoom , and then in the Zoom dialog box, in the Percent box, enter 70% . ( Note: Make sure that Fit is not selected in the Zoom dialog box.) On the Animations tab, in the Animations group, click Custom Animation . On the slide, select the dotted rectangle. In the Custom Animation task pane, click Add Effect , point to Motion Paths , point to Draw Custom Path , and then click Freeform . Press and hold SHIFT to conform the path to a straight, horizontal line, and then do the following on the slide: Click the center of the dotted rectangle to create the first motion-path point. Click approximately ½” beyond the right edge of the rectangle to create the second motion-path point. Double-click approximately 2” beyond the left edge of the slide to create the third and final motion-path point. On the slide, right-click the freeform motion path, and then click Reverse Path Direction . On the slide, select the freeform motion path. In the Custom Animation task pane, under Modify: Custom Path , in the Start list, select With Previous . On the slide, select the gradient-filled rectangle. In the Custom Animation task pane, do the following: Click Add Effect , point to Entrance , and then click More Effects . In the Add Entrance Effect dialog box, under Subtle , click Fade , and then click OK . Under Modify: Fade , in the Start list, select With Previous . Under Modify: Fade , in the Speed list, select Very Fast . Click Add Effect , point to Motion Paths , and then click Down . Under Modify: Down , in the Start list, select With Previous . Under Modify: Down , in the Speed list, select Medium . On the slide, right-click the down motion path and click Reverse Path Direction . On the slide, select the smaller, full-color picture. In the Custom Animation task pane, do the following: Click Add Effect , point to Entrance , and then click More Effects . In the Add Entrance Effect dialog box, under Subtle , click Fade , and then click OK . Under Modify: Fade , in the Start list, select With Previous . Under Modify: Fade , in the Speed list, select Very Fast . Right-click the picture fade effect in the pane, and then click Timing . In the Fade dialog box, on the Timing tab, in the Delay box, enter 1.5 . On the slide, select the text box. In the Custom Animation task pane, do the following: Click Add Effect , point to Entrance , and then click More Effects . In the Add Entrance Effect dialog box, under Moderate , click Descend , and then click OK . Under Modify: Descend , in the Start list, select With Previous . Under Modify: Descend , in the Speed list, select Fast .
- Custom animation effects: shrink transparent shapes (Intermediate) Tip: You will need to use drawing guides to reproduce the effects on this slide. To display and set the drawing guides, do the following: On the Home tab, in the Slides group, click Layout , and then click Blank . Right-click the slide background area, and then click Grid and Guides . In the Grid and Guides dialog box, do the following: Under Snap to , select Snap objects to grid . Under Grid settings , in the Spacing box, enter 0.25 . Under Guide settings , select Display drawing guides on screen . On the slide, press and hold CTRL, select the vertical guide, and then drag it left to the 2.00 position. ( Note: One horizontal and one vertical guide will display on the slide at 0.00, the default position. As you drag the guides, the cursor will display the new position.) Press and hold CTRL, select the vertical guide, and then drag it left to the 2.00 position. Press and hold CTRL, select the horizontal guide, and then drag it up to the 2.00 position. Press and hold CTRL, select the horizontal guide, and then drag it down to the 1.25 position. Right-click the slide background area, and then click Grid and Guides . In the Grid and Guides dialog box, under Snap to , clear Snap objects to grid . To reproduce the animated shape effects on this slide, do the following: On the Home tab, in the Drawing group, click Shapes , and then under Rectangle click Rounded Diagonal Corner Rectangle (ninth option from the left). On the slide, drag to draw a rectangle. Select the rectangle. Under Drawing Tools , on the Format tab, in the Size group, do the following: In the Shape Height box, enter 8.1” . In the Shape Width box, enter 10.5” . Under the Drawing Tools , on the Format tab, in the Shapes Styles group, click the arrow next to Shape Outline , and then click No Outline . On the Home tab, in the Drawing group, click Arrange , point to Align , and then do the following: Click Align to Slide . Click Align Center . Click Align Middle . On the Animations tab, in the Animations group, click Custom Animation . On the slide, select the rectangle. In the Custom Animation task pane, do the following: Click Add Effect , point to Emphasis , and then click More Effects . In the Add Emphasis Effect dialog box, under Basic , click Grow/Shrink . Select the animation effect (grow/shrink effect for the rectangle). Click the arrow next to the selected effect, and then click Effect Options . In the Grow/Shrink dialog box, do the following: On the Effect tab, in the Size list, in the Custom box, enter 37% , and then press ENTER. On the Timing tab, do the following: In the Start list, select With Previous . In the Speed box, enter 1.5 seconds . On the slide, select the rectangle. In the Custom Animation task pane, do the following: Click Add Effect , point to Motion Paths , and then click Left . Select the second animation effect (left motion path for the rectangle). Click the arrow next to the selected effect, and then click Timing . In the Left dialog box, on the Timing tab, do the following: In the Start list, select With Previous . In the Delay box, enter 0.7 . In the Speed box, enter 0.8 seconds . On the slide, select the motion path. Point to the endpoint (red arrow) until the cursor becomes a two-headed arrow, and then drag the endpoint to the intersection of the 2.00 top horizontal and the 2.00 left vertical drawing guides. Select the rectangle. On the Home tab, in the Clipboard group, click the arrow under Paste , and then click Duplicate . Select the duplicate rectangle. On the Home tab, in the Drawing group, click Arrange , point to Align , and then do the following: Click Align Center . Click Align Middle . With the second rectangle still selected, under Drawing Tools , on the Format tab, in the bottom right corner of the Shape Styles group, click the Format Shape dialog box launcher. In the Format Shape dialog box, click Fill in the left pane, select Solid fill in the Fill pane, and then do the following: Click the button next to Color , and then under Theme Colors click White, Background 1 (first row, first option from the left). In the Transparency box, enter 50% . In the Custom Animation task pane, select the fourth animation effect (motion path for the second rectangle). On the slide, point to the endpoint (red arrow) until the cursor becomes a two-headed arrow, and then drag the endpoint to the intersection of the 1.25 bottom horizontal and the 2.00 left vertical drawing guides. To reproduce the animated text effects on this slide, do the following: On the Insert tab, in the Text group, click Text Box , and then on the slide, drag to draw the text box. Enter text in the text box, and then select the text. On the Home tab, in the Font group, do the following: In the Font list, select Gill Sans MT . In the Font Size box, enter 26 . On the Home tab, in the Paragraph group, click Center to center the text in the text box. On the slide, drag the text box until it is centered at the intersection of the 2.00 top horizontal and the 2.00 left vertical drawing guides. On the Animations tab, in the Animations group, click Custom Animation . With the text box still selected, in the Custom Animation task pane, do the following: Click Add Effect , point to Entrance , and then click More Effects . In the Add Entrance Effect dialog box, under Subtle , click Fade . Select the fifth animation effect (fade effect for the first text box). Under Modify: Fade , do the following: In the Start list, select After Previous . In the Speed list, select Medium . On the slide, select the text box. On the Home tab, in the Clipboard group, click the arrow under Paste , and then click Duplicate . Click in the second, duplicate text box, and then edit the text. Select the text in the second text box. On the Home tab, in the Font group, click the arrow next to Font Color , and then click Black, Text 1 (first row, second option from the left). On the slide, drag the second text box until it is centered at the intersection of the 1.25 bottom horizontal and the 2.00 left vertical drawing guides. With the second text box still selected, in the Custom Animation task pane, select the sixth animation effect (fade effect for the second text box). Click the arrow next to the selected effect, and then click Timing . In the Fade dialog box, on the Timing tab, in the Delay box, enter 1 . Right-click off the slide, and then click Grid and Guides . In the Grid and Guides dialog box, under Guide settings , clear Display drawing guides on screen . To modify the color of the objects on the slide, do the following: In the Selection and Visibility pane, select the first rectangle you created on the slide. Under the Drawing Tools , on the Format tab, in the bottom right corner in the Shapes Styles group, click the Format Shape dialog box launcher. In the Format Shape dialog box, click Fill in the left pane, select Solid fill in the Fill pane, and then do the following: Click the button next to Colors , and then under Theme Colors click Black, Text 1 (first row, second option from the left). In the Transparency box, enter 50% . On the slide, select the text in the first text box. On the Home tab, in the Font group, click the arrow next to Font Color , and then under Theme Colors click White, Background 1 (first row, first option from the left). On the slide, select the text in the second text box. On the Home tab, in the Font group, click the arrow next to Font Color , and then under Theme Colors click Black, Text 1, Lighter 15% (fifth row, second option from the left). To reproduce the background effects on this slide, do the following: On the Design tab, in the bottom right corner of the Background group, click the Format Background dialog box launcher. In the Format Background dialog box, click Fill in the left pane, select Picture or texture fill in the Fill pane, and then under Insert from , click File . In the Insert Picture dialog box, select a picture, and then click Insert .
- Timeline graphic with pictures (Intermediate) To reproduce the picture effects on this slide, do the following: On the Home tab, in the Slides group, click Layout , and then click Blank . On the Insert tab, in the Illustrations group, click Picture . In the Insert Picture dialog box, select a picture and then click Insert . Select the picture. Under Picture Tools , on the Format tab, in the bottom right corner of the Size group, click the Size and Position dialog box launcher. In the Size and Position dialog box, on the Size tab, resize or crop the picture as needed so that under Size and rotate , the Height box is set to 2.65” and the Width box is set to 9” . Resize the picture under Size and rotate by entering values into the Height and Width boxes. Crop the picture under Crop from by entering values into the Left , Right , Top , and Bottom boxes. Under Picture Tools , in the Format tab, in the Picture Styles group, click Picture Shape , and then under Rectangles click Round Same Side Corner Rectangle (eighth option from the left). Drag the top yellow diamond adjustment handle slightly to the right to decrease the amount of rounding on the corners. Under Picture Tools , in the Format tab, in the Picture Styles group, click Picture Effects , point to Shadow , and then under Inner click Inside Center (second row, second option from the left). To reproduce the timeline effects on this slide, do the following: On the Home tab, in the Drawing group, click Shapes , and then under Rectangles click Rectangle (first option from the left). On the slide, drag to draw a rectangle. Select the rectangle. Under Drawing Tools , on the Format tab, in the Size group, do the following: In the Shape Height box, enter 0.73” . In the Shape Width box, enter 9” . On the Home tab, in the bottom right corner of the Drawing group, click the Format Shape dialog box launcher. In the Format Shape dialog box, click Fill in the left pane, select Solid fill in the Fill pane, and then do the following: Click the button next to Color , and then under Theme Colors click Black, Text 1, Lighter 35% (third row, second option from the left). In the Transparency box, enter 20% . Also in the Format Shape dialog box, click Line Color in the left pane, and then in the right pane, select No line . Also in the Format Shape dialog box, click Shadow in the left pane. In the right pane, click the button next to Presets , and then under Inner click Inside Center (second row, second option from the left). Drag the rectangle onto the bottom of the picture. Press and hold SHIFT and select the rectangle and the picture. On the Home tab, in the Drawing group, click Arrange , point to Align , and then do the following: Click Align Selected Objects . Click Align Center . Click Align Top . Click Align to Slide . Click Align Center . To reproduce the month labels for the timeline, do the following: On the Insert tab, in the Text group, click Text Box , and then on the slide, drag to draw the text box. Enter text in the text box (in this example the text is “JAN”), select the text, and then on the Home tab, in the Font group, select Gil Sans MT Condensed from the Font list, select 18 from the Font Size list, click the arrow next to Font Color , and then under Theme Colors click White, Background 1, Darker 35% (fifth row, first option from the left). On the Home tab, in the Paragraph group, click Center to center the text in the text box. Select the text box. On the Home tab, in the Clipboard group, click the arrow under Paste, and then click Duplicate . Repeat the process until there is a total of six text boxes. On the slide, drag the text boxes onto the rectangle to form a timeline. On the Home tab, in the Editing group, click Select , and then click Selection Pane . In the Selection and Visibility pane, press and hold CTRL and select all six text boxes and the rectangle. On the Home tab, in the Drawing group, click Arrange , point to Align , and then do the following: Click Align Selected Objects . Click Align Middle . In the Selection and Visibility pane, press and hold CTRL and cancel the selection of the rectangle, keeping the text boxes selected. On the Home tab, in the Drawing group, click Arrange , point to Align , and then do the following: Click Align to Slide . Click Distribute Horizontally . To change the text in the duplicate text boxes, click in each text box and edit the text. To change the color of the second text box from the left, select the text box, and then on the Home tab, in the Font group, click the arrow next to Font Color , and then under Theme Colors click White, Background 1 (first row, first option from the left). To reproduce the vertical line with text effects on this slide, do the following: On the Home tab, in the Drawing group, click Shapes , and then under Lines click Line (first option from the left). Press and hold SHIFT, and then drag on the slide to draw a straight, vertical line. Select the line. Under Drawing Tools , on the Format tab, in the Size group, in the Shape Width box, enter 1.2” . On the Home tab, in the bottom right corner of the Drawing group, click the Format Shape dialog box launcher. In the Format Shape dialog box, click Line Color in the left pane, and then do the following in the right pane: Select Solid line . Click the button next to Color , and then under Theme Colors click White, Background 1, Darker 25% (fourth row, first option from the left). Also in the Format Shape dialog box, click Line Style in the left pane, and then do the following in the right pane: In the Width box, enter 0.75 pt . Under Arrow Settings , click the button next to Begin type , and then click Oval Arrow (second row, third option from the left). Click the button next to Begin size , and then click Arrow L Size 1 (first row, first option from the left). Click the button next to End type , and then enter Oval Arrow (second row, third option from the left). Click the button next to End size , and then enter Arrow R Size 1 (first row, first option from the left). On the Home tab, in the Clipboard group, click the arrow under Paste , and then click Duplicate . Select the duplicate line. Under Drawing Tools , on the Format tab, in the Size group, in the Shape Width box, enter 2.6” . Press and hold SHIFT and select both lines. On the Home tab, in the Drawing group, click Arrange , and then do the following: Point to Align , and then click Align Selected Objects . Point to Align , and then click Align Center . Drag both lines together on the slide to position them under one of the timeline month labels. Press and hold SHIFT and select both lines and the text box they are under. On the Home tab, in the Drawing group, click Arrange , and then do the following: Click Align Selected Objects . Click Align Center . On the Insert tab, in the Text group, click Text Box , and then on the slide, drag to draw the text box. Enter text in the text box, select the text, and then on the Home tab, in the Font group, select Gill Sans MT from the Font list, select 20 from the Font Size list, and then click the arrow next to Font Color and click White, Background 1 (first row, first option from the left). On the Home tab, in the Paragraph group, click Align Text Left to align the text left in the text box. On the slide, drag the text box to position it to the right of the vertical line. To reproduce the background on this slide, do the following: Right-click the slide background area, and then click Format Background . In the Format Background dialog box, click Fill in the left pane, select Gradient fill in the Fill pane, and then do the following: In the Type list, select Linear . Click the button next to Direction , and then click Linear Down (first row, second option from the left). Under Gradient stops , click Add or Remove until two stops appear in the drop-down list. Also under Gradient stops , customize the gradient stops that you added as follows: Select Stop 1 from the list, and then do the following: In the Stop position box, enter 50% . Click the button next to Color , and then under Theme Colors click Black, Text 1 (first row, second option from the left). Select Stop 2 from the list, and then do the following: In the Stop position box, enter 99% . Click the button next to Color , and then under Theme Colors click Black, Text 1, Lighter 35% (third row, second option from the left).
- Custom animation effects: spinning clip art with text (Intermediate) To reproduce the clip art on this slide, do the following: On the Home tab, in the Slides group, click Layout , and then click Blank . On the Insert tab, in the Illustrations group, click Clip Art . In the Clip Art pane, in the Search for box, enter j0435540 . In the Search in list, select Everywhere , and then click Go . Select the clip art file in the pane to insert it into the slide. ( Note: If you choose another clip art file, the clip art must be in the Windows Metafile format [.wmf].) On the slide, select the clip art. Under Drawing Tools , on the Format tab, in the Size group, do the following: In the Shape Height box, enter 5.83” . In the Shape Width box, enter 8.12” . On the Home tab, in the Drawing group, click Arrange , and then click Ungroup . In the Microsoft Office PowerPoint dialog box, click Yes . On the slide, select the converted clip art. On the Home tab, in the Editing group, click Select , and then click Selection Pane . In the Selection and Visibility pane , select the top-level group. On the Home tab, in the Drawing group, click Arrange , and then click Ungroup . Also in the Selection and Visibility pane, select the Autoshape object, and then press DELETE. Press CTRL+A to select all of the objects on the slide. On the Home tab, in the Drawing group, click Arrange , and then click Group . Select the group. On the Home tab, in the Drawing group, click Shape Effects , point to Preset , and then under Presets click Preset 8 (second row, fourth option from the left). With the group still selected, under Drawing Tools , on the Format tab, in the bottom right corner of the Size group, click the Size and Position dialog box launcher, and do the following: On the Size tab, in the Height box, enter 6.27” . On the Size tab, in the Width box, enter 6.27” . On the Position tab, in the Horizontal box, enter 3.89 ”. On the Position tab, in the Vertical box, enter 1.55 ” To reproduce the text on this slide, do the following: On the Insert tab, in the Text group, click Text Box . Drag to draw a text box on the slide. In the text box, enter text and select it. On the Home tab, in the Font group do the following: In the Font list, select Candara . In the Font Size box, enter 32 pt . In the Font Color list, under Standard Colors select Orange (third option from the left). Click Italic . Select the text box on the slide, and then under Drawing Tools , on the Format tab, in the Size group, do the following: In the Shape Height box, enter 7.29” . In the Shape Width box, enter 7.29” . Under Drawing Tools , on the Format tab, in the WordArt Styles group, click Text Effects , point to Transform , and under Follow Path select Arch Up (first option from the left). To wrap the text upside down, at the bottom of the text box, drag the pink adjustment diamond from the center left position in the text box to the lower right corner of the text box. With the text box still selected, under Drawing Tools , on the Format tab, in the bottom right corner of the Size group, click the Size and Position dialog box launcher, and then on the Position tab do the following: In the Horizontal box, enter 3.38 ”. In the Vertical box, enter 1.04 ”. To reproduce the animation effects on this slide, do the following: On the Animation tab, in the Animations group, click Custom Animation . Select the circle clip art on the slide, and then in the Custom Animation task pane, do the following: Click Add Effect , point to Emphasis effect and select More Effects . In the Add Emphasis Effect dialog box, under Basic select Spin , and then click OK . Click the arrow to the right of the spin emphasis effect, select Effect Options , and do the following: On the Effect tab, under Settings , in the Amount list, select Quarter Spin . On the Effect tab, under Settings , in the Amount list, select Counterclockwise . On the Timing tab, in the Start list, select With Previous . On the Timing tab, in the Speed box enter 4.0 seconds . Click OK . On the slide, select the text box, and then in the Custom Animation task pane, do the following: Click the Add Effect , point to Entrance and select More Effects . In the Add Entrance Effect dialog box, under Subtle select Fade , and then click OK . Select the fade entrance effect (second effect), and under Modify: Fade do the following: In the Start list, select With Previous . In the Speed list, select Slow . With the text box still selected, click Add Effect , point to Emphasis and select More Effects . In the Add Emphasis Effect dialog box, under Basic select Spin , and then click OK . Select the spin emphasis effect (third effect), and under Modify: Spin do the following: In the Start list, select With Previous . In the Amount list, select Half Spin . In the Speed list select Slow . With the text box still selected, click Add Effect , point to Emphasis and select More Effects . In the Add Emphasis Effect dialog box, under Basic select Spin , and then click OK . Click the arrow to the right of the spin emphasis effect (fourth effect), select Effect Options , and do the following: On the Effect tab, under Settings , in the Amount list, in the Custom box enter 30° , and then press ENTER. On the Effect tab, under Settings , in the Amount list, select Counterclockwise . On the Timing tab, in the Start list, select With Previous . On the Timing tab, in the Delay box enter 3.0 seconds . On the Timing tab, in the Speed box enter 1 seconds (Fast) . Click OK . To reproduce the background on this slide, do the following: Right-click the slide background area, and then click Format Background . In the Format Background dialog box, click Fill in the left pane, select Gradient fill in the Fill pane, and then do the following: In the Type list, select Linear . In the Direction , list click Linear Down (first row, second option from the left) Under Gradient stops , click Add or Remove until two stops appear in the drop-down list. Also under Gradient stops , customize the gradient stops as follows: Select Stop 1 from the list, and then do the following: In the Stop position box, enter 0% . Click the button next to Color , and then under Theme Colors click Black, Text 1 (first row, second option from the left). Select Stop 2 from the list, and then do the following: In the Stop position box, enter 100% . Click the button next to Color , and then under Theme Colors click Black, Text 1, Lighter 50% (second row, second option from the left).
- Custom animation effects: buttons grow and turn on path (Advanced) To reproduce the curved shape on this slide, do the following: On the Home tab, in the Slides group, click Layout , and then click Blank . On the Home tab, in the Drawing group, click Shapes , and then under Lines click Freeform (11 th option from the left). On the slide, do the following to draw the freeform line: Click the first point on the upper left corner of the slide. Click the second point on the bottom edge of the slide, slightly to the left of the middle. Click the third point on the lower left corner of the slide. Double-click the fourth and final point on the first point, on the upper left corner of the slide. Right-click the freeform shape, and then click Edit Points . Right-click the diagonal line, and then click Curved Segment . ( Note: Your segment may not look as curved as in the example above.) Select the freeform shape. On the Home tab, in the Drawing group, click the arrow next to Shape Fill , and then under Theme Colors click White, Background 1 (first row, first option from the left). On the Home tab, in the Drawing group, click the arrow next to Shape Outline , and then click No Outline . To reproduce the background effects on this slide, do the following: Right-click the slide background area, and then click Format Background . In the Format Background dialog box, click Fill in the left pane, select Gradient fill in the Fill pane, and then do the following: In the Type list, select Linear . Click the button next to Direction , and then click Linear Diagonal (second row, third option from the left). Under Gradient stops , click Add or Remove until two stops appear in the drop-down list. Also under Gradient stops , customize the gradient stops that you added as follows: Select Stop 1 from the list, and then do the following: In the Stop position box, enter 0% . Click the button next to Color , and then under Theme Colors click White, Background 1 (first row, first option from the left). Select Stop 2 from the list, and then do the following: In the Stop position box, enter 100% . Click the button next to Color , click More Colors , and then in the Colors dialog box, on the Custom tab, enter values for Red: 230 , Green: 230 , Blue: 230 . To reproduce the picture and text effects on this slide, do the following: On the Insert tab, in the Illustrations group, click Picture . In the Insert Picture dialog box, select a picture, and then click Insert . On the slide, select the picture. Under Picture Tools , on the Format tab, in the Picture Styles group, click Picture Shape , and then under Basic Shapes click Oval (first option from the left). With the picture still selected, under Picture Tools , on the Format tab, in the bottom right corner of the Size group, click the Size and Position dialog box launcher. In the Size and Position dialog box, on the Size tab, resize or crop the picture as needed so that under Size and rotate , the Height box is set to 1.2” and the Width box is set to 1.2” . Resize the picture under Size and rotate by entering values into the Height and Width boxes. Crop the picture under Crop from by entering values into the Left , Right , Top , and Bottom boxes. Under Picture Tools , on the Format tab, in the Picture Styles group, click the arrow next to Picture Effects , point to Bevel , and then under Bevel click Circle (first row, first option from the left). Under Picture Tools , on the Format tab, in the Picture Styles group, click Picture Effects , point to Bevel , and then click 3-D Options . In the Format Picture dialog box, click 3-D Format in the left pane, and then do the following in the 3-D Format pane, under Surface : Click the button next to Material , and then under Standard click Metal (fourth option from the left). Click the button next to Lighting , and then under Neutral click Contrasting (second row, second option from the left). In the Angle box, enter 25 ° . Also in the Format Picture dialog box, click Shadow in the left pane. In the Shadow pane, click the button next to Presets , under Outer click Offset Diagonal Bottom Left (first row, third option from the left), and then do the following: In the Transparency box, enter 77% . In the Size box, enter 100% . In the Blur box, enter 10 pt . In the Angle box, enter 141 ° . In the Distance box, enter 10 pt . On the slide, drag the picture onto the curve, near the top. On the Insert tab, in the Text group, click Text Box . On the slide, drag to draw the text box. Enter text in the text box and select it. On the Home tab, in the Font group, do the following: In the Font list, select Corbel . In the Font Size box, enter 22 . Click the arrow next to Font Color , and then under Theme Colors click White, Background 1, Darker 50% (sixth row, first option from the left). On the Home tab, in the Paragraph group, click Align Text Left to align the text left in the text box. On the slide, drag the text box to the right of the picture. To reproduce the animation effects on this slide, do the following: It will help to zoom out in order to view the area off the slide. On the View tab, in the Zoom group, click Zoom . In the Zoom dialog box, select 33% . On the Animations tab, in the Animations group, click Custom Animation . On the slide, select the picture. In the Custom Animation task pane, do the following: Click Add Effect , point to Entrance , and then click More Effects . In the Add Entrance Effect dialog box, under Moderate , click Grow & Turn . Select the animation effect (grow & turn effect for the picture). Under Modify: Grow & Turn , do the following: In the Start list, select With Previous . In the Speed list, select Fast . On the slide, select the picture. In the Custom Animation task pane, click Add Effect , point to Motion Paths , point to Draw Custom Path , and then click Curve . On the slide, do the following to create the custom motion path: Click the first point in the center of the picture. Click the second point in the middle of the curve. Double-click the third point off the bottom edge of the slide. In the Custom Animation task pane, select the second animation effect (motion path for the picture), and then under Modify: Custom Path , do the following: In the Start list, select With Previous . In the Speed list, select Fast . On the slide, right-click the motion path and then click Reverse Path Direction . On the slide, select the text box. In the Custom Animation task pane, do the following: Click Add Effect , point to Entrance , and then click More Effects . In the Add Entrance Effect dialog box, under Subtle , click Fade . Select the third animation effect (fade effect for the text box). Under Modify: Fade , do the following: In the Start list, select After Previous . In the Speed list, select Fast . To reproduce the other animated pictures and text boxes on this slide, do the following: On the Home tab, in the Editing group, click Select , and then click Selection Pane . On the slide, press and hold CTRL and then select the picture and the text box. On the Home tab, in the Clipboard group, click the arrow under Paste , and then click Duplicate . In the Selection and Visibility pane, select the duplicate picture and text box. On the slide, drag them onto the curve below the first group. In the Custom Animation task pane, select the fifth animation effect (motion path for the second picture). On the slide, point to the starting point (green arrow) until the cursor becomes a two-headed arrow. Drag the starting point below the bottom edge of the slide, to the same position as the starting point for the first motion path. ( Note: The endpoint of the second motion path should still be in the middle of the second picture.) On the slide, right-click the second picture and then click Change Picture . In the Insert Picture dialog box, select a picture, and then click Insert . With the picture still selected, under Picture Tools , on the Format tab, in the bottom right corner of the Size group, click the Size and Position dialog box launcher. In the Size and Position dialog box, on the Size tab, resize or crop the picture as needed so that under Size and rotate , the Height box is set to 1.2” and the Width box is set to 1.2” . Resize the picture under Size and rotate by entering values into the Height and Width boxes. Crop the picture under Crop from by entering values into the Left , Right , Top , and Bottom boxes. Click in the text box and edit the text. Repeat steps 1-7 two more times to reproduce the third and fourth pictures and text boxes with animation effects.
- Custom animation effects: descending text levels (Basic) And even here, 9 out of 10 of my friends are To reproduce the rectangle on this slide, do the following: On the Home tab, in the Slides group, click Layout , and then click Blank . On the Home tab, in the Drawing group, click Shapes , and then under Rectangle click Rounded Rectangle (second option from the left). On the slide, drag to draw a rectangle. Select the rectangle. Under Drawing Tools , on the Format tab, in the Size group, do the following: In the Shape Height box, enter 3.08” . In the Shape Width box, enter 4.33” . Under Drawing Tools , on the Format tab, in the Shapes Styles group, click the arrow next to Shape Outline , and then click No Outline . Under Drawing Tools , on the Format tab, in the bottom right corner in the Shapes Styles group, click the Format Shape dialog box launcher. In the Format Shape dialog box, click Fill in the left pane, select Gradient fill in the Fill pane, and then do the following: In the Type list, select Linear . Click the button next to Direction , and then click Linear Down (first row, second option from the left). Under Gradient stops , click Add or Remove until two stops appear in the drop-down list. Also under Gradient stops , customize the gradient stops that you added as follows: Select Stop 1 from the list, and then do the following: In the Stop position box, enter 0% . Click the button next to Color , and then under Theme Colors click White, Background 1 (first row, first option from the left). In the Transparency box , enter 25% . Select Stop 2 from the list, and then do the following: In the Stop position box, enter 20% . Click the button next to Color , and then under Theme Colors click White, Background 1 (first row, first option from the left). In the Transparency box , enter 69% . Also in the Format Shape dialog box, click Shadow in the left pane. In the Shadow pane, click the button next to Presets , under Outer click Offset Diagonal Bottom Left (first row, third option from the left), and then do the following: In the Transparency box, enter 72% . In the Size box, enter 100% . In the Blur box, enter 11.81 pt . In the Angle box, enter 141° . In the Distance box, enter 19.7 pt . Also in the Format Shape dialog box, click 3-D Format in the left pane, and then do the following in the 3-D Format pane: Under Bevel , click the button next to Top , and then under Bevel click Circle (first row, first option from the left). Next to Top , in the Width box, enter 7 pt , in the Height box, enter 7 pt . Under Surface , click the button next to Material , and then under Standard click Metal (fourth option from the left). Click the button next to Lighting , and then under Neutral click Contrasting (second row, second option from the left). In the Angle box, enter 75° . On the slide, drag the rectangle into the bottom right corner. To reproduce the rectangle animation effects on this slide, do the following: On the Animations tab, in the Animations group, click Custom Animation . On the slide, select the rectangle. In the Custom Animation task pane, do the following: Click Add Effect , point to Entrance , and then click More Effects . In the Add Entrance Effect dialog box, under Moderate , click Ascend . Select the animation effect (ascend effect for the rectangle). Under Modify: Ascend , do the following: In the Start list, select With Previous . In the Speed list, select Medium . To reproduce the text effects on this slide, do the following: On the Insert tab, in the Text group, click Text Box , and then on the slide, drag to draw the text box. Enter three lines of text with paragraph breaks in the text box. Select the text, and then on the Home tab, in the Font group, do the following: In the Font list, select Candara . In the Font Size list, select 28 . Click the arrow next to Font Color , and then under Theme Colors click Aqua, Accent 5; Darker 50% (sixth row, ninth option from the left). On the Home tab, in the Paragraph group, click Align Text Left to position the text left in the text box. On the slide, drag the text box onto the rectangle. To reproduce the text animation effects on this slide, do the following: On the Animations tab, in the Animations group, click Custom Animation . On the slide, select the text box. In the Custom Animation task pane, do the following: Click Add Effect , point to Entrance , and then click More Effects . In the Add Entrance Effect dialog box, under Moderate , click Descend . Select the second animation effect (descend effect for the text box). Click the arrow to the right of the selected effect, and then click Effect Options . In the Descend dialog box, do the following: On the Timing tab, do the following: In the Start box, select With Previous . In the Speed box, select 1 seconds (Fast) . On the Text Animation tab, in the Group text list, select By 1 st Level Paragraphs . Also in the Custom Animation task pane, click the double arrow under the second animation effect to expand the list of effects, and then do the following: Select the new second animation effect in the list (descend effect for the first line of text). Click the arrow to the right of the selected effect, and then click Timing . In the Descend dialog box, on the Timing tab, in the Delay box, enter 1 . Select the third animation effect (descend effect for the second line of text). Click the arrow to the right of the selected effect, and then click Timing . In the Descend dialog box, on the Timing tab, do the following: In the Start list select With Previous . In the Delay box, enter 1.5 . Select the fourth animation effect (descend effect for the second line of text). Click the arrow to the right of the selected effect, and then click Timing . In the Descend dialog box, on the Timing tab, do the following: In the Start list select With Previous . In the Delay box, enter 2 . To reproduce the background effects on this slide, do the following: On the Design tab, in the bottom right corner of the Background group, click the Format Background dialog box launcher. In the Format Background dialog box, click Fill in the left pane, select Picture or texture fill in the Fill pane, and then under Insert from click File . In the Insert Picture dialog box, select a picture, and then click Insert .
- Political and social unrest, coupled with flooding and natural disasters, perpetuate the cycle of poverty here. Custom animation effects: horizontal scrolling text (Basic) To reproduce the text effects on this slide, do the following: On the Home tab, in the Slides group, click Layout , and then click Blank . On the Insert tab, in the Text group, click Text Box , and then on the slide, drag to draw the text box. Enter text in the text box. ( Note: You may want to add a bullet point at the end of your text, as in the example above. On the Insert tab, in the Text group, click Symbol . In the Symbol dialog box, in the Font list, select (normal text) . In the Subset list, select General Punctuation . In the Character Code box, enter 2022 to select BULLET , and then click Insert .) Select the text. On the Home tab, in the Font group, do the following: In the Font list, select Gill Sans MT . In the Font Size list, select 36 . Click Bold . Click the arrow next to Font Color , and then under Theme Colors click White, Background 1 (first row, first option from the left). On the Home tab, in the Paragraph group, click Align Text Left to align the text left in the text box. ( Note: If the text wraps to more than one line, drag the adjustment handles on the text box to widen it until the text fits on one line.) Drag the text box to the left of the lower left edge of the slide. ( Note: To see beyond the edges of the slide, on the View tab, click Zoom , and then in the Zoom dialog box, in the Percent box, enter 40% .) To reproduce the animation effects on this slide, do the following: On the Animations tab, in the Animations group, click Custom Animation . On the slide, select the text box. In the Custom Animation task pane, do the following: Click Add Effect , point to Entrance , and then click More Effects . In the Add Entrance Effect dialog box, under Basic , click Fly In . Select the animation effect (fly-in effect for the text box). Click the arrow to the right of the select effect, and then click Effect Options . In the Fly In dialog box, do the following: On the Effect tab, in the Direction list, select From Right . On the Timing tab, do the following: In the Start list, select With Previous . In the Speed box, enter 16 seconds . In the Repeat list, select Until End of Slide . On the slide, select the text box. On the Home tab, in the Clipboard group, click the arrow under Paste , and then click Duplicate . In the Custom Animation task pane, select the second animation effect (fly-in effect for the second text box). Click the arrow to the right of the selected effect, and then click Timing . In the Fly In dialog box, on the Timing tab, in the Delay box, enter 8 . ( Note: You may need to adjust the delay time if the length of your text is different than the example above.) On the slide, drag the second text box on top of the first text box. On the Home tab, in the Editing group, click Select , and then click Selection Pane . In the Selection and Visibility pane, press and hold CTRL, and then select both text boxes. On the Home tab, in the Drawing group, click Arrange , point to Align , and then do the following: Click Align Selected Objects . Click Align Middle . Click Align Center . To reproduce the background effects on this slide, do the following: Right-click the slide background area, and then click Format Background . In the Format Background dialog box, click Fill in the left pane, and then select Picture or texture fill in the Fill pane. Under Insert from , click File . In the Insert Picture dialog box, select a picture, and then click Insert . On the Home tab, in the Drawing group, click Shapes , and then under Rectangles click Rectangle (first option from the left). On the slide, drag to draw a rectangle. Select the rectangle. Under Drawing Tools , on the Format tab, in the Size group, do the following: In the Shape Height box, enter 7.5” . In the Shape Width box, enter 1” . Under Drawing Tools , on the Format tab, in the Shape Styles group, click the arrow next to Shape Outline , and then click No Outline . On the Home Tab, in the Drawing group, click the arrow next to Shape Fill , point to Gradient , and then click More Gradients . In the Format Shape dialog box, click Fill in the left pane, select Gradient fill in the Fill pane, and then do the following: In the Type list, select Linear . Click the button next to Direction , and then click Linear Right (first row, fourth option from the left). Under Gradient stops , click Add or Remove until two stops appear in the drop-down list. Also under Gradient stops , customize the gradient stops that you added as follows: Select Stop 1 from the list, and then do the following: In the Stop position box, enter 0% . Click the button next to Color , and then under Theme Colors click Black, Text 1 (first row, second option from the left). In the Transparency box, enter 0% . Select Stop 2 from the list, and then do the following: In the Stop position box, enter 100% . Click the button next to Color , and then under Theme Colors click Black, Text 1, (first row, second option from the left). In the Transparency box, enter 100% . On the slide, select the rectangle. On the Home tab, in the Drawing group, click Arrange , point to Align , and then do the following: Click Align to Slide . Click Align Left . Click Align Middle . Select the rectangle. On the Home tab, in the Clipboard group, click the arrow under Paste , and then click Duplicate . Select the duplicate rectangle. On the Home Tab, in the Drawing group, click the arrow next to Shape Fill , point to Gradient , and then click Linear Left (second row, third option from the left). With the duplicate rectangle still selected, on the Home tab, in the Drawing group, click Arrange , point to Align , and then do the following: Click Align to Slide . Click Align Right . Click Align Middle .
- Custom animation effects: descending text levels (Basic) And even here, 9 out of 10 of my friends are To reproduce the rectangle on this slide, do the following: On the Home tab, in the Slides group, click Layout , and then click Blank . On the Home tab, in the Drawing group, click Shapes , and then under Rectangle click Rounded Rectangle (second option from the left). On the slide, drag to draw a rectangle. Select the rectangle. Under Drawing Tools , on the Format tab, in the Size group, do the following: In the Shape Height box, enter 3.08” . In the Shape Width box, enter 4.33” . Under Drawing Tools , on the Format tab, in the Shapes Styles group, click the arrow next to Shape Outline , and then click No Outline . Under Drawing Tools , on the Format tab, in the bottom right corner in the Shapes Styles group, click the Format Shape dialog box launcher. In the Format Shape dialog box, click Fill in the left pane, select Gradient fill in the Fill pane, and then do the following: In the Type list, select Linear . Click the button next to Direction , and then click Linear Down (first row, second option from the left). Under Gradient stops , click Add or Remove until two stops appear in the drop-down list. Also under Gradient stops , customize the gradient stops that you added as follows: Select Stop 1 from the list, and then do the following: In the Stop position box, enter 0% . Click the button next to Color , and then under Theme Colors click White, Background 1 (first row, first option from the left). In the Transparency box , enter 25% . Select Stop 2 from the list, and then do the following: In the Stop position box, enter 20% . Click the button next to Color , and then under Theme Colors click White, Background 1 (first row, first option from the left). In the Transparency box , enter 69% . Also in the Format Shape dialog box, click Shadow in the left pane. In the Shadow pane, click the button next to Presets , under Outer click Offset Diagonal Bottom Left (first row, third option from the left), and then do the following: In the Transparency box, enter 72% . In the Size box, enter 100% . In the Blur box, enter 11.81 pt . In the Angle box, enter 141° . In the Distance box, enter 19.7 pt . Also in the Format Shape dialog box, click 3-D Format in the left pane, and then do the following in the 3-D Format pane: Under Bevel , click the button next to Top , and then under Bevel click Circle (first row, first option from the left). Next to Top , in the Width box, enter 7 pt , in the Height box, enter 7 pt . Under Surface , click the button next to Material , and then under Standard click Metal (fourth option from the left). Click the button next to Lighting , and then under Neutral click Contrasting (second row, second option from the left). In the Angle box, enter 75° . On the slide, drag the rectangle into the bottom right corner. To reproduce the rectangle animation effects on this slide, do the following: On the Animations tab, in the Animations group, click Custom Animation . On the slide, select the rectangle. In the Custom Animation task pane, do the following: Click Add Effect , point to Entrance , and then click More Effects . In the Add Entrance Effect dialog box, under Moderate , click Ascend . Select the animation effect (ascend effect for the rectangle). Under Modify: Ascend , do the following: In the Start list, select With Previous . In the Speed list, select Medium . To reproduce the text effects on this slide, do the following: On the Insert tab, in the Text group, click Text Box , and then on the slide, drag to draw the text box. Enter three lines of text with paragraph breaks in the text box. Select the text, and then on the Home tab, in the Font group, do the following: In the Font list, select Candara . In the Font Size list, select 28 . Click the arrow next to Font Color , and then under Theme Colors click Aqua, Accent 5; Darker 50% (sixth row, ninth option from the left). On the Home tab, in the Paragraph group, click Align Text Left to position the text left in the text box. On the slide, drag the text box onto the rectangle. To reproduce the text animation effects on this slide, do the following: On the Animations tab, in the Animations group, click Custom Animation . On the slide, select the text box. In the Custom Animation task pane, do the following: Click Add Effect , point to Entrance , and then click More Effects . In the Add Entrance Effect dialog box, under Moderate , click Descend . Select the second animation effect (descend effect for the text box). Click the arrow to the right of the selected effect, and then click Effect Options . In the Descend dialog box, do the following: On the Timing tab, do the following: In the Start box, select With Previous . In the Speed box, select 1 seconds (Fast) . On the Text Animation tab, in the Group text list, select By 1 st Level Paragraphs . Also in the Custom Animation task pane, click the double arrow under the second animation effect to expand the list of effects, and then do the following: Select the new second animation effect in the list (descend effect for the first line of text). Click the arrow to the right of the selected effect, and then click Timing . In the Descend dialog box, on the Timing tab, in the Delay box, enter 1 . Select the third animation effect (descend effect for the second line of text). Click the arrow to the right of the selected effect, and then click Timing . In the Descend dialog box, on the Timing tab, do the following: In the Start list select With Previous . In the Delay box, enter 1.5 . Select the fourth animation effect (descend effect for the second line of text). Click the arrow to the right of the selected effect, and then click Timing . In the Descend dialog box, on the Timing tab, do the following: In the Start list select With Previous . In the Delay box, enter 2 . To reproduce the background effects on this slide, do the following: On the Design tab, in the bottom right corner of the Background group, click the Format Background dialog box launcher. In the Format Background dialog box, click Fill in the left pane, select Picture or texture fill in the Fill pane, and then under Insert from click File . In the Insert Picture dialog box, select a picture, and then click Insert .
- Custom animation effects: motion path text and change color (Intermediate) To reproduce the picture on this slide, do the following: On the Home tab, in the Slides group, click Layout , and then click Blank . On the Insert tab, in the Illustrations group, click Picture . In the Insert Picture dialog box, select a picture, and then click Insert . On the slide, select the picture. Under Picture Tools , on the Format tab, in the bottom right corner of the Size group, click the Size and Position dialog box launcher. In the Size and Position dialog box, on the Size tab, resize or crop the picture as needed so that under Size and rotate , the Height box is set to 3” and the Width box is set to 10” . Resize the picture under Size and rotate by entering values into the Height and Width boxes. Crop the picture under Crop from by entering values into the Left , Right , Top , and Bottom boxes. Select the picture. On the Home tab, in the Drawing group, click the arrow under Arrange , point to Align , and do the following: Click Align to Slide . Click Align Center . Click Align Top . To reproduce the text effects on this slide, do the following: On the Insert tab, in the Text group, click Text Box , and then on the slide, drag to draw the text box. Enter text in the text box and select the text. On the Home tab, in the Font group, do the following: In the Font list, select Century Gothic . In the Font Size box, enter 30 . Click Bold . Click the arrow next to Font Color , click More Colors , and then in the Colors dialog box, on the Custom tab, enter values for Red: 80 , Green: 129 , Blue: 226 . On the Home tab, in the Paragraph group, click Align Text Left to align the text left in the text box. Drag the text box below the picture, in the middle of the left side of the slide. To reproduce the animation effects for the first text box on this slide, do the following: On the Animations tab, in the Animations group, click Custom Animation . On the slide, select the text box. In the Custom Animation task pane, do the following: Click Add Effect , point to Entrance , and then click More Effects . In the Add Entrance Effect dialog box, under Subtle , click Fade . Select the animation effect (fade effect for the first text box). Under Modify: Fade , do the following: In the Start list, select With Previous . In the Speed list, select Medium . On the slide, select the text box. In the Custom Animation task pane, do the following: Click Add Effect , point to Motion Paths , and then click Right . Select the second animation effect (right motion path for the first text box). Under Modify: Right , do the following: In the Start list, select With Previous . In the Speed list, select Medium . On the slide, select the text box. In the Custom Animation task pane, do the following: Click Add Effect , point to Emphasis , and then click More Effects . In the Add Emphasis Effect dialog box, under Basic , click Change Font Color . Select the third animation effect (change font color effect for the first text box). Under Modify: Change Font Color , do the following: In the Start list, select After Previous . In the Font Color list, select White (first option from the left). In the Speed list, select Fast . On the slide, select the motion path for the text box. Point to the endpoint (red arrow) until the cursor becomes a two-headed arrow, press and hold SHIFT, and then drag the endpoint to lengthen the motion path about 4”. ( Note: It will help to use the ruler to measure the path. On the View tab, in the Show/Hide group, select Ruler .) Right-click the motion path, and then click Reverse Path Direction . To reproduce the other animated text boxes on this slide, do the following: On the slide, select the text box. On the Home tab, in the Clipboard group, click the arrow under Paste , and then click Duplicate . Drag the second text box below and to the right of the first text box. Click in the second text box, and then edit the text. Select the text in the second text box. On the Home tab, in the Font group, do the following: In the Font Size list, select 24 . Click Bold to unbold the text. Click Italic . On the slide, select the motion path for the second text box. Point to the starting point (green arrow) until the cursor becomes a two-headed arrow. Press and hold SHIFT, and then drag the starting point to the left of the second text box, until the length of the path is about 4”. Select the first text box. On the Home tab, in the Clipboard group, click the arrow under Paste , and then click Duplicate . On the slide, Drag the third text box until it is below and to the left of the second text box, and to the right of the first text box. Click in the third text box, and then edit the text. Select the text in the third text box. On the Home tab, in the Font group, in the Font Size list, select 24 . In the Custom Animation task pane, select the sixth animation effect (change font color effect for the second text box). Under Modify: Change Font Color , in the Speed list, select Fast . On the slide, press and hold CTRL, and then select all three text boxes. In the Custom Animation task pane, do the following: Click Add Effect , point to Exit , and then click More Effects . In the Add Exit Effect dialog box, under Moderate , click Stretchy . Select the 10 th , 11 th , and 12 th animation effects (stretchy effects for the text boxes). Under Modify: Stretchy , do the following: In the Start list, select With Previous . In the Speed list, select Medium . Select the 10 th animation effect (stretchy effect for the first text box), and then drag it until it is ninth in the list of effects. Select the 12 th animation effect (stretchy effect for the third text box), and then under Modify: Exit , in the Start list, select After Previous . To reproduce the background effects on this slide, do the following: Right-click the slide background area, and then click Format Background . In the Format Background dialog box, click Fill in the left pane, select Gradient fill in the Fill pane, and then do the following: In the Type list, select Linear . Click the button next to Direction , and then click Linear Up (second row, second option from the left). Under Gradient stops , click Add or Remove until four stops appear in the drop-down list. Also under Gradient stops , customize the gradient stops that you added as follows: Select Stop 1 from the list, and then do the following: In the Stop position box, enter 0% . Click the button next to Color , and then under Theme Colors click Black, Text 1, Lighter 25% (fourth row, second option from the left). Select Stop 2 from the list, and then do the following: In the Stop position box, enter 20% . Click the button next to Color , and then under Theme Colors click Black, Text 1 (first row, second option from the left). Select Stop 3 from the list, and then do the following: In the Stop position box, enter 80% . Click the button next to Color , and then under Theme Colors click Black, Text 1 (first row, second option from the left). Select Stop 4 from the list, and then do the following: In the Stop position box, enter 100% . Click the button next to Color , and then under Theme Colors click Black, Text 1, Lighter 25% (fourth row, second option from the left).
- Custom animation effects: title fade-in on path and text fade by letter (Intermediate) Tip: For the effects on this slide, use a picture that measures 7.5” high (the height of the slide) and 2.61” wide. To reproduce the shape effects on this slide, do the following: On the Home tab, in the Drawing group, click Shapes , and then under Rectangles click Rectangle (first option from the left). On the slide, drag to draw a rectangle. Select the rectangle. Under Drawing Tools , on the Format tab, in the Size group, do the following: In the Shape Height box, enter 3.17” . In the Shape Width box, enter 9.5” . Drag the rectangle slightly above the middle of the slide. Select the rectangle. On the Home tab, in the Drawing group, click Arrange , point to Align , and then do the following: Click Align to Slide . Click Align Left . Under Drawing Tools , on the Format tab, in the Shape Styles group, click the next to Shape Outline , and then click No Outline . Under Drawing Tools , on the Format tab, in the bottom right corner of the Shape Styles group, click the Format Shape dialog box launcher. In the Format Shape dialog box, click Fill in the left pane, select Gradient fill in the Fill pane, and then do the following: In the Type list, select Linear . Click the button next to Direction , and then click Linear Right (first row, fourth option from the left). Under Gradient stops , click Add or Remove until two stops appear in the drop-down list. Also under Gradient stops , customize the gradient stops that you added as follows: Select Stop 1 from the list, and then do the following: In the Stop position box, enter 0% . Click the button next to Color , and then under Theme Colors click Orange, Accent 6, Darker 50% (fifth row, 10 th option from the left). Select Stop 2 from the list, and then do the following: In the Stop position box, enter 100% . Click the button next to Color , and then under Theme Colors click Orange, Accent 6, Darker 25% (fourth row, 10 th option from the left). To reproduce the “heading” text box on this slide, do the following: On the Insert tab, in the Text group, select Text Box . On the slide, drag to draw a text box. Enter the heading text, and then select text. On the Home tab, in the Font group, do the following: In the Font list, select Calibri . In the Font Size box, enter 38 . Click Bold . Click the arrow next to Font Color , and then under Theme Colors click Orange, Accent 6, Darker 25% (fourth row, 10 th option from the left). On the Home tab, in the Paragraph group, click Align Text Left . Drag the text box just above the rectangle, in the right half of the slide. To reproduce the second text box on this slide, do the following: On the Insert tab, in the Text group, click Text Box . On the slide, drag to draw a text box. Enter three lines of text with paragraph breaks, and then select the text. On the Home tab, in the Font group, do the following: In the Font list, select Calibri . In the Font Size list, select 28 . Click Bold . Click the arrow next to Font Color , and then under Theme Colors click White, Background 1 (first row, first option from the left). On the Home tab, in the Paragraph group, click Align Text Left . Drag the second text box onto the rectangle, below the “heading” text box. To reproduce the full-color picture on this slide, do the following: On the Home tab, in the Slides group, click Layout , and then click Blank . On the Insert tab, in the Illustrations group, click Picture . In the Insert Picture dialog box, select the 7.5” x 2.61” picture, and then click Insert . On the slide, select the picture. Under Picture Tools , on the Format tab, in the bottom right corner of the Size group, click the Size and Position dialog box launcher. In the Size and Position dialog box, on the Size tab, under Crop from , in the Bottom box, enter 2.43” . ( Note: Under Size and rotate , the Height should now be 5.08” .) On the slide, select the picture. Under Picture Tools , on the Format tab, in the Picture Styles group, click Picture Effects , point to Glow , and then under Glow Variations click Accent color 1, 5 pt glow (first row, first option from the left). Also under Picture Tools , on the Format tab, in the Picture Styles group, click Picture Effects , point to Glow , point to More Glow Colors , and then under Theme Colors click White, Background 1 (first row, first option from the left). Drag the full-color picture on top of the rectangle, to the left of the text boxes. On the Home tab, in the Drawing group, click Arrange , point to Align , and then do the following: Click Align to Slide . Click Align Top . To reproduce the second picture on this slide, do the following: On the Insert tab, in the Illustrations group, click Picture . In the Insert Picture dialog box, select the same 7.5” x 2.61” picture, and then click Insert . On the slide, select the picture. Under Picture Tools , on the Format tab, in the bottom right corner of the Size group, click the Size and Position dialog box launcher. In the Size and Position dialog box, on the Size tab, under Crop from , in the Top box, enter 5.08” . ( Note: Under Size and rotate , the Height should now be 2.43” .) On the slide, select the second, smaller picture. Under Picture Tools , on the Format tab, in the Picture Styles group, click the Format Shape dialog box launcher. In the Format Picture dialog box, click Picture in the left pane, and in the Picture pane do the following: In the Brightness box, enter 70% . In the Contrast box, enter -70% . On the slide, drag the smaller picture until it is directly underneath the larger full-color picture. Select the smaller picture. On the Home tab, in the Drawing group, click Arrange , point to Align , and then do the following: Click Align to Slide . Click Align Bottom . Press and hold CTRL, and then select both pictures. On the Home tab, in the Drawing group, click Arrange , point to Align , and then do the following: Click Align Selected Objects . Click Align Center . To reproduce the animation effects on this slide, do the following: On the Animations tab, in the Animations group, click Custom Animation . On the slide, select the “heading” text box. In the Custom Animation task pane, do the following: Click Add Effect , point to Entrance , and then click More Effects . In the Add Entrance Effect dialog box, under Subtle , click Fade . Select the animation effect (fade effect for the “heading” text box). Click the arrow to the right of the selected text box, and then click Timing . In the Fade dialog box, on the Timing tab, do the following: In the Start list, select With Previous . In the Delay box, enter 1.5 . In the Speed list, select 2 seconds ( Medium) . On the slide, select the “heading” text box. In the Custom Animation task pane, do the following: Click Add Effect , point to Motion Paths , and then click Left . Select the second animation effect (left motion path for the “heading” text box). Under Modify: Left , do the following: In the Start list, select With Previous . In the Speed list, select Medium . On the slide, right-click the left motion path and click Reverse Path Direction . With the motion path still selected, point to the starting point (green arrow) of the motion path until the cursor becomes a two-headed arrow. Press and hold SHIFT, and then drag the starting point about 1.5” off the left edge of the slide. ( Note: It may help to display the ruler. On the View tab, in the Show/Hide group, select Ruler . If your lines of text are longer than in the example above, you may need to further increase the length of the motion path. ) On the slide, select the second text box. In the Custom Animation task pane, do the following: Click Add Effect , point to Entrance , and then click More Effects . In the Add Entrance Effect dialog box, under Subtle , click Fade . Select the third animation effect (fade effect for the second text box). Click the arrow to the right of the selected effect, and then click Effect Options . In the Fade dialog box, do the following: On the Effect tab, do the following: In the Animate text list, select By Letter . In the % delay between letters box, enter 5 . On the Timing tab, do the following: In the Start list, select After Previous . In the Speed list, select 0.5 seconds ( Very Fast) . On the Text Animation tab, in the Group text list, select By 1 st Level Paragraphs . To reproduce the background on this slide, do the following: Right-click the slide background area, and then click Format Background . In the Format Background dialog box, click Fill in the left pane, select Gradient fill in the Fill pane, and then do the following: In the Type list, select Radial . Click the button next to Direction , and then click From Center (third option from the left). Under Gradient stops , click Add or Remove until three stops appear in the drop-down list. Also under Gradient stops , customize the gradient stops that you added as follows: Select Stop 1 from the list, and then do the following: In the Stop position box, enter 0% . Click the button next to Color , and then under Theme Colors click White, Background 1 (first row, first option from the left). Select Stop 2 from the list, and then do the following: In the Stop position box, enter 40% . Click the button next to Color , and then under Theme Colors click White, Background 1 (first row, first option from the left). Select Stop 3 from the list, and then do the following: In the Stop position box, enter 100% . Click the button next to Color , click More Colors , and then in the Colors dialog box, on the Custom tab, enter values for Red: 232 , Green: 227 , and Blue: 216 .
- Custom animation effects: line sweeps in picture and text (Basic) To reproduce the shape effects on this slide, do the following: On the Home tab, in the Slides group, click Layout , and then click Blank . On the Home tab, in the Drawing group, click Shapes , and then under Lines click Line (first option from the left). On the slide, press and hold SHIFT, and then drag to draw a straight, vertical line. Select the line. Under Drawing Tools , on the Format tab, in the Size group, in the Shape Width box, enter 7.5” . Under Drawing Tools , on the Format tab, in the Shape Styles group, click the Format Shape dialog box launcher. In the Format Shape dialog box, click Line Color in the left pane. In the Line Color pane, select Solid line , click the button next to Color , and then under Theme Colors click Black, Text 1 (first row, second option from the left). Also in the Format Shape dialog box, click Line Style in the left pane. In the Line Style pane, in the Weight box, enter 2 pt . Under Drawing Tools , on the Format tab, in the Shape Styles group, click Shape Effects , point to Glow , and then under Glow Variations click Accent color 1, 5 pt glow (first row, first option from the left). Under Drawing Tools , on the Format tab, in the Shape Styles group, click Shape Effects , point to Glow , point to More Glow Colors , and then under Theme Colors click White, Background 1 (first row, first option from the left). On the Home tab, in the Drawing group, click Arrange , point to Align , and then do the following: Click Align to Slide . Click Align Center . Click Align Middle . On the slide, select the line. On the Home tab, in the Clipboard group, click the arrow under Paste , and then click Duplicate . Drag the duplicate line slightly off the right edge of the slide. With the duplicate line still selected, on the Home tab, in the Drawing group, click Arrange , point to Align , and then do the following: Click Align to Slide . Click Align Middle . On the Insert tab, in the Illustrations group, click Picture . In the Insert Picture dialog box, select a picture, and then click Insert . On the slide, select the picture. Under Picture Tools , on the Format tab, in the bottom right corner of the Size group, click the Size and Position dialog box launcher. In the Size and Position dialog box, on the Size tab, resize or crop the picture as needed so that under Size and rotate , the Height box is set to 7.5” and the Width box is set to 5” . Resize the picture under Size and rotate by entering values into the Height and Width boxes. Crop the picture under Crop from by entering values into the Left , Right , Top , and Bottom boxes. On the Home tab, in the Drawing group, click Arrange , point to Align , and then do the following: Click Align to Slide . Click Align Right . Click Align Middle . To reproduce the text effects on this slide, do the following: On the Insert tab, in the Illustrations group, click Text Box . On the slide, drag to draw a text box. Enter text in the text box, and then select the text. On the Home tab, in the Font group, do the following: In the Font list, select Arial . In the Font Size list, select 28 . Click Bold . Click the button next to Font Color , and then under Theme Colors click White, Background 1 (first row, first option from the left). On the Home tab, in the Paragraph group, click Align Text Right to align the text right in the text box. Drag the text box onto the left half of the slide. To reproduce the background effects on this slide, do the following: Right-click the slide background area, and then click Format Background . In the Format Background dialog box, click Fill in the left pane, select Gradient fill in the Fill pane, and then do the following: In the Type list, select Linear . Click the button next to Direction , and then click Linear Down (first row, second option from the left). Under Gradient stops , click Add or Remove until two stops appear in the drop-down list. Also under Gradient stops , customize the gradient stops that you added as follows: Select Stop 1 from the list, and then do the following: In the Stop position box, enter 40% . Click the button next to Color , and then click Black, Text 1 (first row, second option from the left). Select Stop 2 from the list, and then do the following: In the Stop position box, enter 100% . Click the button next to Color , and then click Black, Text 1, Lighter 50% (second row, second option from the left). To reproduce the animation effects on this slide, do the following: On the Animations tab, in the Animations group, click Custom Animation . Select the line off the right edge of the slide. In the Custom Animation task pane, do the following: Click Add Effect , point to Entrance , and then click More Effects . In the Add Entrance Effect dialog box, under Basic , click Fly In . Select the animation effect (fly-in effect for the second line). Under Modify: Fly In , do the following: In the Start list, select After Previous . In the Direction list, select From Left . In the Speed list, select Fast . On the Home tab, in the Editing group, click Select , and then click Selection Pane . In the Selection and Visibility pane, select the first line you created (in the middle of the slide). In the Custom Animation task pane, do the following: Click Add Effect , point to Entrance , and then click More Effects . In the Add Entrance Effect dialog box, under Basic , click Fly In . Select the second animation effect (fly-in effect for the first line). Under Modify: Fly In , do the following: In the Start list, select After Previous . In the Direction list, select From Right . In the Speed list, select Fast . On the slide, select the picture. In the Custom Animation task pane, do the following: Click Add Effect , point to Entrance , and then click More Effects . In the Add Entrance Effect dialog box, under Basic , click Wipe . Select the third animation effect (wipe effect for the picture). Under Modify: Wipe , do the following: In the Start list, select With Previous . In the Direction list, select From Right . In the Speed list, select Fast . On the slide, select the text box. In the Custom Animation task pane, do the following: Click Add Effect , point to Entrance , and then click More Effects . In the Add Entrance Effect dialog box, under Basic , click Fly In . Select the fourth animation effect (fly-in effect for the text box). Under Modify: Fly In , do the following: In the Start list, select With Previous . In the Direction list, select From Right . In the Speed list, select Fast .
- Rounded corner rectangle tabs with inset pictures (Advanced) To reproduce the top rectangle (olive-green, “label one”) with text effects on this slide, do the following: On the Home tab, in the Slides group, click Layout , and then click Blank . On the Home tab, in the Drawing group, click Shapes , and then under Rectangles , click Rounded Diagonal Corner Rectangle (ninth option from the left). On the slide, drag to draw a rectangle. On the Home tab, in the bottom right corner of the Drawing group, click the Format Shape dialog box launcher. In the Format Shape dialog box, click Fill in the left pane, select Gradient fill in the right pane, and then do the following: In the Type list, select Linear . Click the button next to Direction , and then click Linear Down (first row, second option from the left). Under Gradient stops , click Add or Remove until two stops appear in the drop-down list. Also under Gradient stops , customize the gradient stops that you added as follows: Select Stop 1 from the list, and then do the following: In the Stop position box, enter 32% . Click the button next to Color , and then under Theme Colors click White, Background 1 (first row, first option from the left). Select Stop 2 from the list, and then do the following: In the Stop position box, enter 100% . Click the button next to Color , and then under Theme Colors click Olive Green, Accent 3, Lighter 60% (third row, seventh option from the left). Also in the Format Shape dialog box, click Line Color in the left pane, select Gradient line in the right pane, and then do the following: In the Type list, select Linear . Click the button next to Direction , and then click Linear Up (second row, second option from the left). Under Gradient stops , click Add or Remove until two stops appear in the drop-down list. Also under Gradient stops , customize the gradient stops that you added as follows: Select Stop 1 from the list, and then do the following: In the Stop position box, enter 0% . Click the button next to Color , and then under Theme Colors click White, Background 1 (first row, first option from the left). Select Stop 2 from the list, and then do the following: In the Stop position box, enter 100% . Click the button next to Color , and then under Theme Colors click White, Background 1, Darker 25% (fourth row, first option from the left). Also in the Format Shape dialog box, click Line Style in the left pane. In the Line Style pane, in the Width box, enter 1 pt . On the Home tab, in the Drawing group, click Shape Effects , point to Glow , and then do the following: Under Glow Variations , select any option in the first row (5 pt glow options). Point to More Glow Colors , and then under Theme Colors click White, Background 1, Darker 25% (fourth row, first option from the left). On the slide, right-click the rectangle and then click Edit Text . Enter text in the text box and select the text. On the Home tab, in the Font group, select Gill Sans MT from the Font list and then select 24 from the Font Size list. On the Home tab, in the Paragraph group, click Align Text Left to align the text left within the rectangle. Under Drawing Tools , on the Format tab, in the WordArt Styles group, click the arrow next to Text Fill , click More Fill Colors , and then in the Colors dialog box, on the Custom tab, enter values for Red: 127 , Green: 127 , and Blue: 127 . Select the rectangle. On the Home tab, in the bottom-right corner of the Drawing group, click the Format Shapes dialog box launcher. In the Format Shapes dialog box, click Text Box in the left pane. In the right pane, under Internal margin , enter 1” in the Left box to increase the left margin in the rectangle to accommodate the embossed picture. Under Drawing Tools , on the Format tab, in the Size group, do the following: In the Shape Height box, enter 0.92” . In the Shape Width box, enter 4.5” . To reproduce the olive-green embossed picture for the top rectangle on this slide, do the following: On the Home tab, in the Drawing group, click Shapes , and then under Rectangles , click Rounded Diagonal Corner Rectangle (ninth option from the left). On the slide, drag to draw a rectangle. On the Home tab, in the bottom right corner of the Drawing group, click the Format Shape dialog box launcher. In the Format Shape dialog box, click Fill in the left pane, select Picture or texture fill , and then under Insert from click File . In the Insert Picture dialog box, select a picture and then click Insert . Also in the Format Shape dialog box, click Line Color in the left pane. In the Line Color pane, select No line . Also in the Format Shape dialog box, click Picture in the left pane, click the button next to Recolor , and then under Light Variations click Accent color 3 Light (fourth option from the left). Also in the Format Shape dialog box, click Shadow in the left pane, and then do the following in the right pane: Click the button next to Preset , and then under Inner click Inside Diagonal Top Left (first row, first option from the left). In the Transparency box, enter 65% . Under Picture Tools , on the Format tab, in the bottom right corner of the Size group, click the Size and Position dialog box launcher. In the Size and Position dialog box, on the Size tab, do the following: Under Scale , select the Lock aspect ratio check box. Under Size and rotate , in the Height box, enter 0.75” . (Under Size and rotate , in the Width box, 0.75” will appear automatically.) Drag the picture onto the left side of the rectangle. Press and hold CTRL and select the picture and the rectangle. On the Home tab, in the Drawing group, click Arrange , point to Align , and then click Align Middle . To reproduce the other shapes on this slide, do the following: Press and hold CTRL and select the picture and the rectangle. On the Home tab, in the Drawing group, click Arrange , and then click Group . On the Home tab, in the Clipboard group, click the arrow under Paste, and then click Duplicate . Repeat the process until there is a total of four groups of shapes. Drag the groups so that they are distributed vertically on the slide. Press and hold CTRL and select all four groups. On the Home tab, in the Drawing group, click Arrange , and then do the following: Point to Align , and then click Align Center . Point to Align , and then click Distribute Vertically . Click Ungroup . To change the color and text for the duplicate rectangles (second, third, and fourth from the top), do the following: Select the rectangle that you would like to recolor. Under Drawing Tools , on the Format tab, in the Shape Styles group, click the arrow next to Shape Fill , point to Gradient , and then click More Gradients . In the Format Shape dialog box, click Fill in the left pane, select Gradient fill in the right pane, and then do the following: For the second rectangle from the top, under Gradient stops , select Stop 2 from the drop-down list, click the button next to Color , and then under Theme Colors click Orange, Accent 6, Lighter 60% (third row, tenth option from the left). For the third rectangle from the top, under Gradient stops , select Stop 2 from the drop-down list, click the button next to Color , and then under Theme Colors click Aqua, Accent 5, Lighter 60% (third row, ninth option from the left). For the fourth rectangle from the top, under Gradient stops , select Stop 2 from the drop-down list, click the button next to Color , and then under Theme Colors click Blue, Accent 1, Lighter 60% (third row, fifth option from the left). To change the text on the duplicate rectangles, click in each text box and edit the text. To change the picture on the duplicate rectangles (second, third, and fourth from the top), do the following: Right-click the second picture from the top, and then click Format Picture . In the Format Picture dialog box, click Fill in the left pane, and then under Insert from click File . In the Insert Picture dialog box, select a picture, and then click Insert . Repeat the process for the third and fourth rectangles from the top. To change the color for the duplicate pictures (second, third, and fourth from the top), do the following: Select the picture that you would like to recolor. Under Picture Tools , on the Format tab, in the Adjust group, click the arrow next to Recolor , and then do the following: For the second picture from the top, under Light Variations , click Accent color 6 Light (seventh option from the left). For the third picture from the top, under Light Variations , click Accent color 5 Light (sixth option from the left). For the fourth picture from the top, under Light Variations , click Accent color 1 Light (second option from the left). To reproduce the background on this slide, do the following: Right-click the slide background area, and then click Format Background . In the Format Background dialog box, click Fill in the left pane, select Gradient fill in the right pane, and then do the following: In the Type list, select Radial . Click the button next to Direction , and then click From Center (third option from the left). Under Gradient stops , click Add or Remove until two stops appear in the drop-down list. Also under Gradient stops , customize the gradient stops that you added as follows: Select Stop 1 from the list, and then do the following: In the Stop position box, enter 0% . Click the button next to Color , and then under Theme Colors click White, Background 1 (first row, first option from the left). Select Stop 2 from the list, and then do the following: In the Stop position box, enter 100% . Click the button next to Color , and then under Theme Colors click White, Background 1, Darker 15% (third row, first option from the left).
- Tinted pictures in shapes (Intermediate) To reproduce the first shape effect from the left on this slide, do the following: On the Home tab, in the Slides group, click Layout , and then click Blank . On the Insert tab, in the Illustrations group, click Picture . In the Insert Picture dialog box, select a picture and then click Insert . Select the picture. Under Picture Tools , on the Format tab, in the bottom right corner of the Size group, click the Size and Position dialog box launcher. In the Size and Position dialog box, on the Size tab, resize or crop the picture as needed so that under Size and rotate , the Height box is set to 2.75” and the Width box is set to 2.92” . Resize the picture under Size and rotate by entering values into the Height and Width boxes. Crop the picture under Crop from by entering values into the Left , Right , Top , and Bottom boxes. Under Picture Tools , on the Format tab, in the Picture Styles group, click Picture Shape , and then under Rectangles click Round Diagonal Corner Rectangle (ninth option from the left). Under Picture Tools , on the Format tab, in the Picture Styles group, click Picture Effects , point to Shadow , and then under Inner click Inside Diagonal Top Left (first row, first option from the left). Under Picture Tools , on the Format tab, in the Picture Styles group, click Picture Effects , point to Glow , and then under Glow Variations , click Accent color 1, 8 pt glow (second row, first option from the left). Under Picture Tools , on the Format tab, in the Picture Styles group, click Picture Effects , point to Glow , point to More Glow Colors , and then under Theme Colors click White, Background 1 (first row, first option from the left). Under Picture Tools , on the Format tab, in the Adjust group, click Recolor , and then under Light Variations select Accent color 5 Light (sixth option from the left). Select the rectangle. Drag the left yellow diamond adjustment handle to the top left corner, to remove the rounding on the top left and bottom right corners. Drag the right yellow diamond adjustment handle slightly to the left, to round the top right and bottom left corners. To reproduce the middle shape effect from the left on this slide, do the following: On the Insert tab, in the Illustrations group, click Picture . In the Insert Picture dialog box, select a picture and then click Insert . Select the picture. Under Picture Tools , on the Format tab, in the bottom right corner of the Size group, click the Size and Position dialog box launcher. In the Size and Position dialog box, on the Size tab, resize or crop the picture as needed so that under Size and rotate , the Height box is set to 2.75” and the Width box is set to 4.32” . Resize the picture under Size and rotate by entering values into the Height and Width boxes. Crop the picture under Crop from by entering values into the Left , Right , Top , and Bottom boxes. Under Picture Tools , on the Format tab, in the Picture Styles group, click Picture Shape , and then under Rectangles click Round Diagonal Corner Rectangle (ninth option from the left). Under Picture Tools , on the Format tab, in the Picture Styles group, click Picture Effects , point to Shadow , and then under Inner click Inside Diagonal Top Left (first row, first option from the left). Under Picture Tools , on the Format tab, in the Picture Styles group, click Picture Effects , point to Glow , and then under Glow Variations , click Accent color 1, 8pt glow (second row, first option from the left). Under Picture Tools , on the Format tab, in the Picture Styles group, click Picture Effects , point to Glow , point to More Glow Colors , and then under Theme Colors click White, Background 1 (first row, first option from the left). Under Picture Tools , on the Format tab, in the Adjust group, click Recolor , and then under Light Variations select Accent color 1 Light (second option from the left). Select the rectangle. Drag the left yellow diamond adjustment handle slightly to the left, to decrease rounding on the top left and bottom right corners. Drag the rectangle on the slide to position it to the right of the first rectangle. To reproduce the third shape effect from the left on this slide, do the following: On the Home tab, in the Drawing group, click Shapes , and then under Rectangles , click Rounded Diagonal Corner Rectangle (ninth option from the left). On the slide, drag to draw a rounded rectangle. Select the rectangle. Under Drawing Tools , on the Format tab, in the Size group, do the following: In the Shape Height box, enter 2.75” . In the Shape Width box, enter 2.25” . Drag the rectangle on the slide to position it to the right of the second picture-filled rectangle. On the Home tab, in the Drawing group, click the Format Shape dialog box launcher. In the Format Shape dialog box, click Fill in the left pane, click Solid fill in the right pane, and then do the following: Click the button next to Color , and then under Theme Colors click Olive Green, Accent 3, Darker 25% (fifth row, seventh option from the left). In the Transparency box, enter 55% . Also in the Format Shape dialog box, click Line Color in the left pane, and then select No line in the right pane. Also in the Format Shape dialog box, click Shadow in the left pane, and then do the following in the right pane: Click the button next to Presets , and then under Inner click Inside Diagonal Top Left (first row, first option from the left). Click the button next to Color , and then under Theme Colors click Black, Text 1 (first row, second option from the left). In the Transparency box, enter 65% . In the Blur box, enter 5 pt . In the Angle box, enter 225 ° . In the Distance box, enter 4 pt . On the Insert tab, in the Text group, click Text Box , and then on the slide, drag to draw the text box. Enter text in the text box, select the text, and then on the Home tab, in the Font group, select Trebuchet MS from the Font list, enter 22 in the Font Size box, click the arrow next to Font Color , and then under Theme Colors click White, Background 1 (first row, first option from the left). On the Home tab, in the Paragraph group, click Align Text Left to align the text left in the text box. Drag the text box onto the olive green rounded rectangle. Press and hold CTRL and select both objects. On the Home tab, in the Drawing group, click Arrange , and then click Group . Press and hold CTRL and select the two pictures and the new group. On the Home tab, in the Drawing group, click Arrange , point to Align , and then do the following: Click Align Selected Objects . Click Align Middle . Click Distribute Horizontally . To reproduce the text below the shapes, do the following: On the Insert tab, in the Text group, click Text Box , and then on the slide, drag to draw the text box. Enter text in the text box, select the text, and then on the Home tab, in the Font group, select Trebuchet MS from the Font list, select 18 from the Font Size list, and then click the arrow next to Font Color and click Black, Text 1, Lighter 50% (second row, second option from the left). On the Home tab, in the Paragraph group, click Align Text Left to align the text left in the text box. To reproduce the white vertical line on the left side of the text box, select the space to the left of the text. On the Insert tab, in the Text group, click Symbol . In the Symbol dialog box, do the following: In the Font list, select (normal text) . In the Subset list, select Latin-1 Supplement . In the Character Code box, enter 007C to select Vertical Line , and then click Insert . On the slide, select the vertical line. On the Home tab, in the Font group, click the button next to Font Color , and then under Theme Colors click White, Background 1 (first row, first option from the left). Select the text box. On the Home tab, in the Clipboard group, click the arrow under Paste , and click Duplicate . Drag the text boxes under each of the picture-filled rectangles. To reproduce the background on this slide, do the following: Right-click the slide background area, and then click Format Background . In the Format Background dialog box, click Fill in the left pane, select Gradient fill in the right pane, and then do the following: In the Type list, select Linear . Click the button next to Direction , and then click Linear Diagonal (first row, third option from the left). In the Angle box, enter 45 ° . Under Gradient stops , click Add or Remove until three stops appear in the drop-down list. Also under Gradient stops , customize the gradient stops that you added as follows: Select Stop 1 from the list, and then do the following: In the Stop position box, enter 0% . Click the button next to Color , and then click White, Background 1 (first row, first option from the left). Select Stop 2 from the list, and then do the following: In the Stop position box, enter 52% . Click the button next to Color , and then click Tan, Background 2 (first row, third option from the left). Select Stop 3 from the list, and then do the following: In the Stop position box, enter 100% . Click the button next to Color , click More Colors , and then in the Colors dialog box, on the Custom tab, enter values for Red: 170 , Green: 164 , Blue: 140 .
- Tinted pictures in shapes (Intermediate) To reproduce the first shape effect from the left on this slide, do the following: On the Home tab, in the Slides group, click Layout , and then click Blank . On the Insert tab, in the Illustrations group, click Picture . In the Insert Picture dialog box, select a picture and then click Insert . Select the picture. Under Picture Tools , on the Format tab, in the bottom right corner of the Size group, click the Size and Position dialog box launcher. In the Size and Position dialog box, on the Size tab, resize or crop the picture as needed so that under Size and rotate , the Height box is set to 2.75” and the Width box is set to 2.92” . Resize the picture under Size and rotate by entering values into the Height and Width boxes. Crop the picture under Crop from by entering values into the Left , Right , Top , and Bottom boxes. Under Picture Tools , on the Format tab, in the Picture Styles group, click Picture Shape , and then under Rectangles click Round Diagonal Corner Rectangle (ninth option from the left). Under Picture Tools , on the Format tab, in the Picture Styles group, click Picture Effects , point to Shadow , and then under Inner click Inside Diagonal Top Left (first row, first option from the left). Under Picture Tools , on the Format tab, in the Picture Styles group, click Picture Effects , point to Glow , and then under Glow Variations , click Accent color 1, 8 pt glow (second row, first option from the left). Under Picture Tools , on the Format tab, in the Picture Styles group, click Picture Effects , point to Glow , point to More Glow Colors , and then under Theme Colors click White, Background 1 (first row, first option from the left). Under Picture Tools , on the Format tab, in the Adjust group, click Recolor , and then under Light Variations select Accent color 5 Light (sixth option from the left). Select the rectangle. Drag the left yellow diamond adjustment handle to the top left corner, to remove the rounding on the top left and bottom right corners. Drag the right yellow diamond adjustment handle slightly to the left, to round the top right and bottom left corners. To reproduce the middle shape effect from the left on this slide, do the following: On the Insert tab, in the Illustrations group, click Picture . In the Insert Picture dialog box, select a picture and then click Insert . Select the picture. Under Picture Tools , on the Format tab, in the bottom right corner of the Size group, click the Size and Position dialog box launcher. In the Size and Position dialog box, on the Size tab, resize or crop the picture as needed so that under Size and rotate , the Height box is set to 2.75” and the Width box is set to 4.32” . Resize the picture under Size and rotate by entering values into the Height and Width boxes. Crop the picture under Crop from by entering values into the Left , Right , Top , and Bottom boxes. Under Picture Tools , on the Format tab, in the Picture Styles group, click Picture Shape , and then under Rectangles click Round Diagonal Corner Rectangle (ninth option from the left). Under Picture Tools , on the Format tab, in the Picture Styles group, click Picture Effects , point to Shadow , and then under Inner click Inside Diagonal Top Left (first row, first option from the left). Under Picture Tools , on the Format tab, in the Picture Styles group, click Picture Effects , point to Glow , and then under Glow Variations , click Accent color 1, 8pt glow (second row, first option from the left). Under Picture Tools , on the Format tab, in the Picture Styles group, click Picture Effects , point to Glow , point to More Glow Colors , and then under Theme Colors click White, Background 1 (first row, first option from the left). Under Picture Tools , on the Format tab, in the Adjust group, click Recolor , and then under Light Variations select Accent color 1 Light (second option from the left). Select the rectangle. Drag the left yellow diamond adjustment handle slightly to the left, to decrease rounding on the top left and bottom right corners. Drag the rectangle on the slide to position it to the right of the first rectangle. To reproduce the third shape effect from the left on this slide, do the following: On the Home tab, in the Drawing group, click Shapes , and then under Rectangles , click Rounded Diagonal Corner Rectangle (ninth option from the left). On the slide, drag to draw a rounded rectangle. Select the rectangle. Under Drawing Tools , on the Format tab, in the Size group, do the following: In the Shape Height box, enter 2.75” . In the Shape Width box, enter 2.25” . Drag the rectangle on the slide to position it to the right of the second picture-filled rectangle. On the Home tab, in the Drawing group, click the Format Shape dialog box launcher. In the Format Shape dialog box, click Fill in the left pane, click Solid fill in the right pane, and then do the following: Click the button next to Color , and then under Theme Colors click Olive Green, Accent 3, Darker 25% (fifth row, seventh option from the left). In the Transparency box, enter 55% . Also in the Format Shape dialog box, click Line Color in the left pane, and then select No line in the right pane. Also in the Format Shape dialog box, click Shadow in the left pane, and then do the following in the right pane: Click the button next to Presets , and then under Inner click Inside Diagonal Top Left (first row, first option from the left). Click the button next to Color , and then under Theme Colors click Black, Text 1 (first row, second option from the left). In the Transparency box, enter 65% . In the Blur box, enter 5 pt . In the Angle box, enter 225 ° . In the Distance box, enter 4 pt . On the Insert tab, in the Text group, click Text Box , and then on the slide, drag to draw the text box. Enter text in the text box, select the text, and then on the Home tab, in the Font group, select Trebuchet MS from the Font list, enter 22 in the Font Size box, click the arrow next to Font Color , and then under Theme Colors click White, Background 1 (first row, first option from the left). On the Home tab, in the Paragraph group, click Align Text Left to align the text left in the text box. Drag the text box onto the olive green rounded rectangle. Press and hold CTRL and select both objects. On the Home tab, in the Drawing group, click Arrange , and then click Group . Press and hold CTRL and select the two pictures and the new group. On the Home tab, in the Drawing group, click Arrange , point to Align , and then do the following: Click Align Selected Objects . Click Align Middle . Click Distribute Horizontally . To reproduce the text below the shapes, do the following: On the Insert tab, in the Text group, click Text Box , and then on the slide, drag to draw the text box. Enter text in the text box, select the text, and then on the Home tab, in the Font group, select Trebuchet MS from the Font list, select 18 from the Font Size list, and then click the arrow next to Font Color and click Black, Text 1, Lighter 50% (second row, second option from the left). On the Home tab, in the Paragraph group, click Align Text Left to align the text left in the text box. To reproduce the white vertical line on the left side of the text box, select the space to the left of the text. On the Insert tab, in the Text group, click Symbol . In the Symbol dialog box, do the following: In the Font list, select (normal text) . In the Subset list, select Latin-1 Supplement . In the Character Code box, enter 007C to select Vertical Line , and then click Insert . On the slide, select the vertical line. On the Home tab, in the Font group, click the button next to Font Color , and then under Theme Colors click White, Background 1 (first row, first option from the left). Select the text box. On the Home tab, in the Clipboard group, click the arrow under Paste , and click Duplicate . Drag the text boxes under each of the picture-filled rectangles. To reproduce the background on this slide, do the following: Right-click the slide background area, and then click Format Background . In the Format Background dialog box, click Fill in the left pane, select Gradient fill in the right pane, and then do the following: In the Type list, select Linear . Click the button next to Direction , and then click Linear Diagonal (first row, third option from the left). In the Angle box, enter 45 ° . Under Gradient stops , click Add or Remove until three stops appear in the drop-down list. Also under Gradient stops , customize the gradient stops that you added as follows: Select Stop 1 from the list, and then do the following: In the Stop position box, enter 0% . Click the button next to Color , and then click White, Background 1 (first row, first option from the left). Select Stop 2 from the list, and then do the following: In the Stop position box, enter 52% . Click the button next to Color , and then click Tan, Background 2 (first row, third option from the left). Select Stop 3 from the list, and then do the following: In the Stop position box, enter 100% . Click the button next to Color , click More Colors , and then in the Colors dialog box, on the Custom tab, enter values for Red: 170 , Green: 164 , Blue: 140 .
- Tinted pictures in shapes (Intermediate) To reproduce the first shape effect from the left on this slide, do the following: On the Home tab, in the Slides group, click Layout , and then click Blank . On the Insert tab, in the Illustrations group, click Picture . In the Insert Picture dialog box, select a picture and then click Insert . Select the picture. Under Picture Tools , on the Format tab, in the bottom right corner of the Size group, click the Size and Position dialog box launcher. In the Size and Position dialog box, on the Size tab, resize or crop the picture as needed so that under Size and rotate , the Height box is set to 2.75” and the Width box is set to 2.92” . Resize the picture under Size and rotate by entering values into the Height and Width boxes. Crop the picture under Crop from by entering values into the Left , Right , Top , and Bottom boxes. Under Picture Tools , on the Format tab, in the Picture Styles group, click Picture Shape , and then under Rectangles click Round Diagonal Corner Rectangle (ninth option from the left). Under Picture Tools , on the Format tab, in the Picture Styles group, click Picture Effects , point to Shadow , and then under Inner click Inside Diagonal Top Left (first row, first option from the left). Under Picture Tools , on the Format tab, in the Picture Styles group, click Picture Effects , point to Glow , and then under Glow Variations , click Accent color 1, 8 pt glow (second row, first option from the left). Under Picture Tools , on the Format tab, in the Picture Styles group, click Picture Effects , point to Glow , point to More Glow Colors , and then under Theme Colors click White, Background 1 (first row, first option from the left). Under Picture Tools , on the Format tab, in the Adjust group, click Recolor , and then under Light Variations select Accent color 5 Light (sixth option from the left). Select the rectangle. Drag the left yellow diamond adjustment handle to the top left corner, to remove the rounding on the top left and bottom right corners. Drag the right yellow diamond adjustment handle slightly to the left, to round the top right and bottom left corners. To reproduce the middle shape effect from the left on this slide, do the following: On the Insert tab, in the Illustrations group, click Picture . In the Insert Picture dialog box, select a picture and then click Insert . Select the picture. Under Picture Tools , on the Format tab, in the bottom right corner of the Size group, click the Size and Position dialog box launcher. In the Size and Position dialog box, on the Size tab, resize or crop the picture as needed so that under Size and rotate , the Height box is set to 2.75” and the Width box is set to 4.32” . Resize the picture under Size and rotate by entering values into the Height and Width boxes. Crop the picture under Crop from by entering values into the Left , Right , Top , and Bottom boxes. Under Picture Tools , on the Format tab, in the Picture Styles group, click Picture Shape , and then under Rectangles click Round Diagonal Corner Rectangle (ninth option from the left). Under Picture Tools , on the Format tab, in the Picture Styles group, click Picture Effects , point to Shadow , and then under Inner click Inside Diagonal Top Left (first row, first option from the left). Under Picture Tools , on the Format tab, in the Picture Styles group, click Picture Effects , point to Glow , and then under Glow Variations , click Accent color 1, 8pt glow (second row, first option from the left). Under Picture Tools , on the Format tab, in the Picture Styles group, click Picture Effects , point to Glow , point to More Glow Colors , and then under Theme Colors click White, Background 1 (first row, first option from the left). Under Picture Tools , on the Format tab, in the Adjust group, click Recolor , and then under Light Variations select Accent color 1 Light (second option from the left). Select the rectangle. Drag the left yellow diamond adjustment handle slightly to the left, to decrease rounding on the top left and bottom right corners. Drag the rectangle on the slide to position it to the right of the first rectangle. To reproduce the third shape effect from the left on this slide, do the following: On the Home tab, in the Drawing group, click Shapes , and then under Rectangles , click Rounded Diagonal Corner Rectangle (ninth option from the left). On the slide, drag to draw a rounded rectangle. Select the rectangle. Under Drawing Tools , on the Format tab, in the Size group, do the following: In the Shape Height box, enter 2.75” . In the Shape Width box, enter 2.25” . Drag the rectangle on the slide to position it to the right of the second picture-filled rectangle. On the Home tab, in the Drawing group, click the Format Shape dialog box launcher. In the Format Shape dialog box, click Fill in the left pane, click Solid fill in the right pane, and then do the following: Click the button next to Color , and then under Theme Colors click Olive Green, Accent 3, Darker 25% (fifth row, seventh option from the left). In the Transparency box, enter 55% . Also in the Format Shape dialog box, click Line Color in the left pane, and then select No line in the right pane. Also in the Format Shape dialog box, click Shadow in the left pane, and then do the following in the right pane: Click the button next to Presets , and then under Inner click Inside Diagonal Top Left (first row, first option from the left). Click the button next to Color , and then under Theme Colors click Black, Text 1 (first row, second option from the left). In the Transparency box, enter 65% . In the Blur box, enter 5 pt . In the Angle box, enter 225 ° . In the Distance box, enter 4 pt . On the Insert tab, in the Text group, click Text Box , and then on the slide, drag to draw the text box. Enter text in the text box, select the text, and then on the Home tab, in the Font group, select Trebuchet MS from the Font list, enter 22 in the Font Size box, click the arrow next to Font Color , and then under Theme Colors click White, Background 1 (first row, first option from the left). On the Home tab, in the Paragraph group, click Align Text Left to align the text left in the text box. Drag the text box onto the olive green rounded rectangle. Press and hold CTRL and select both objects. On the Home tab, in the Drawing group, click Arrange , and then click Group . Press and hold CTRL and select the two pictures and the new group. On the Home tab, in the Drawing group, click Arrange , point to Align , and then do the following: Click Align Selected Objects . Click Align Middle . Click Distribute Horizontally . To reproduce the text below the shapes, do the following: On the Insert tab, in the Text group, click Text Box , and then on the slide, drag to draw the text box. Enter text in the text box, select the text, and then on the Home tab, in the Font group, select Trebuchet MS from the Font list, select 18 from the Font Size list, and then click the arrow next to Font Color and click Black, Text 1, Lighter 50% (second row, second option from the left). On the Home tab, in the Paragraph group, click Align Text Left to align the text left in the text box. To reproduce the white vertical line on the left side of the text box, select the space to the left of the text. On the Insert tab, in the Text group, click Symbol . In the Symbol dialog box, do the following: In the Font list, select (normal text) . In the Subset list, select Latin-1 Supplement . In the Character Code box, enter 007C to select Vertical Line , and then click Insert . On the slide, select the vertical line. On the Home tab, in the Font group, click the button next to Font Color , and then under Theme Colors click White, Background 1 (first row, first option from the left). Select the text box. On the Home tab, in the Clipboard group, click the arrow under Paste , and click Duplicate . Drag the text boxes under each of the picture-filled rectangles. To reproduce the background on this slide, do the following: Right-click the slide background area, and then click Format Background . In the Format Background dialog box, click Fill in the left pane, select Gradient fill in the right pane, and then do the following: In the Type list, select Linear . Click the button next to Direction , and then click Linear Diagonal (first row, third option from the left). In the Angle box, enter 45 ° . Under Gradient stops , click Add or Remove until three stops appear in the drop-down list. Also under Gradient stops , customize the gradient stops that you added as follows: Select Stop 1 from the list, and then do the following: In the Stop position box, enter 0% . Click the button next to Color , and then click White, Background 1 (first row, first option from the left). Select Stop 2 from the list, and then do the following: In the Stop position box, enter 52% . Click the button next to Color , and then click Tan, Background 2 (first row, third option from the left). Select Stop 3 from the list, and then do the following: In the Stop position box, enter 100% . Click the button next to Color , click More Colors , and then in the Colors dialog box, on the Custom tab, enter values for Red: 170 , Green: 164 , Blue: 140 .
- Tinted pictures in shapes (Intermediate) To reproduce the first shape effect from the left on this slide, do the following: On the Home tab, in the Slides group, click Layout , and then click Blank . On the Insert tab, in the Illustrations group, click Picture . In the Insert Picture dialog box, select a picture and then click Insert . Select the picture. Under Picture Tools , on the Format tab, in the bottom right corner of the Size group, click the Size and Position dialog box launcher. In the Size and Position dialog box, on the Size tab, resize or crop the picture as needed so that under Size and rotate , the Height box is set to 2.75” and the Width box is set to 2.92” . Resize the picture under Size and rotate by entering values into the Height and Width boxes. Crop the picture under Crop from by entering values into the Left , Right , Top , and Bottom boxes. Under Picture Tools , on the Format tab, in the Picture Styles group, click Picture Shape , and then under Rectangles click Round Diagonal Corner Rectangle (ninth option from the left). Under Picture Tools , on the Format tab, in the Picture Styles group, click Picture Effects , point to Shadow , and then under Inner click Inside Diagonal Top Left (first row, first option from the left). Under Picture Tools , on the Format tab, in the Picture Styles group, click Picture Effects , point to Glow , and then under Glow Variations , click Accent color 1, 8 pt glow (second row, first option from the left). Under Picture Tools , on the Format tab, in the Picture Styles group, click Picture Effects , point to Glow , point to More Glow Colors , and then under Theme Colors click White, Background 1 (first row, first option from the left). Under Picture Tools , on the Format tab, in the Adjust group, click Recolor , and then under Light Variations select Accent color 5 Light (sixth option from the left). Select the rectangle. Drag the left yellow diamond adjustment handle to the top left corner, to remove the rounding on the top left and bottom right corners. Drag the right yellow diamond adjustment handle slightly to the left, to round the top right and bottom left corners. To reproduce the middle shape effect from the left on this slide, do the following: On the Insert tab, in the Illustrations group, click Picture . In the Insert Picture dialog box, select a picture and then click Insert . Select the picture. Under Picture Tools , on the Format tab, in the bottom right corner of the Size group, click the Size and Position dialog box launcher. In the Size and Position dialog box, on the Size tab, resize or crop the picture as needed so that under Size and rotate , the Height box is set to 2.75” and the Width box is set to 4.32” . Resize the picture under Size and rotate by entering values into the Height and Width boxes. Crop the picture under Crop from by entering values into the Left , Right , Top , and Bottom boxes. Under Picture Tools , on the Format tab, in the Picture Styles group, click Picture Shape , and then under Rectangles click Round Diagonal Corner Rectangle (ninth option from the left). Under Picture Tools , on the Format tab, in the Picture Styles group, click Picture Effects , point to Shadow , and then under Inner click Inside Diagonal Top Left (first row, first option from the left). Under Picture Tools , on the Format tab, in the Picture Styles group, click Picture Effects , point to Glow , and then under Glow Variations , click Accent color 1, 8pt glow (second row, first option from the left). Under Picture Tools , on the Format tab, in the Picture Styles group, click Picture Effects , point to Glow , point to More Glow Colors , and then under Theme Colors click White, Background 1 (first row, first option from the left). Under Picture Tools , on the Format tab, in the Adjust group, click Recolor , and then under Light Variations select Accent color 1 Light (second option from the left). Select the rectangle. Drag the left yellow diamond adjustment handle slightly to the left, to decrease rounding on the top left and bottom right corners. Drag the rectangle on the slide to position it to the right of the first rectangle. To reproduce the third shape effect from the left on this slide, do the following: On the Home tab, in the Drawing group, click Shapes , and then under Rectangles , click Rounded Diagonal Corner Rectangle (ninth option from the left). On the slide, drag to draw a rounded rectangle. Select the rectangle. Under Drawing Tools , on the Format tab, in the Size group, do the following: In the Shape Height box, enter 2.75” . In the Shape Width box, enter 2.25” . Drag the rectangle on the slide to position it to the right of the second picture-filled rectangle. On the Home tab, in the Drawing group, click the Format Shape dialog box launcher. In the Format Shape dialog box, click Fill in the left pane, click Solid fill in the right pane, and then do the following: Click the button next to Color , and then under Theme Colors click Olive Green, Accent 3, Darker 25% (fifth row, seventh option from the left). In the Transparency box, enter 55% . Also in the Format Shape dialog box, click Line Color in the left pane, and then select No line in the right pane. Also in the Format Shape dialog box, click Shadow in the left pane, and then do the following in the right pane: Click the button next to Presets , and then under Inner click Inside Diagonal Top Left (first row, first option from the left). Click the button next to Color , and then under Theme Colors click Black, Text 1 (first row, second option from the left). In the Transparency box, enter 65% . In the Blur box, enter 5 pt . In the Angle box, enter 225 ° . In the Distance box, enter 4 pt . On the Insert tab, in the Text group, click Text Box , and then on the slide, drag to draw the text box. Enter text in the text box, select the text, and then on the Home tab, in the Font group, select Trebuchet MS from the Font list, enter 22 in the Font Size box, click the arrow next to Font Color , and then under Theme Colors click White, Background 1 (first row, first option from the left). On the Home tab, in the Paragraph group, click Align Text Left to align the text left in the text box. Drag the text box onto the olive green rounded rectangle. Press and hold CTRL and select both objects. On the Home tab, in the Drawing group, click Arrange , and then click Group . Press and hold CTRL and select the two pictures and the new group. On the Home tab, in the Drawing group, click Arrange , point to Align , and then do the following: Click Align Selected Objects . Click Align Middle . Click Distribute Horizontally . To reproduce the text below the shapes, do the following: On the Insert tab, in the Text group, click Text Box , and then on the slide, drag to draw the text box. Enter text in the text box, select the text, and then on the Home tab, in the Font group, select Trebuchet MS from the Font list, select 18 from the Font Size list, and then click the arrow next to Font Color and click Black, Text 1, Lighter 50% (second row, second option from the left). On the Home tab, in the Paragraph group, click Align Text Left to align the text left in the text box. To reproduce the white vertical line on the left side of the text box, select the space to the left of the text. On the Insert tab, in the Text group, click Symbol . In the Symbol dialog box, do the following: In the Font list, select (normal text) . In the Subset list, select Latin-1 Supplement . In the Character Code box, enter 007C to select Vertical Line , and then click Insert . On the slide, select the vertical line. On the Home tab, in the Font group, click the button next to Font Color , and then under Theme Colors click White, Background 1 (first row, first option from the left). Select the text box. On the Home tab, in the Clipboard group, click the arrow under Paste , and click Duplicate . Drag the text boxes under each of the picture-filled rectangles. To reproduce the background on this slide, do the following: Right-click the slide background area, and then click Format Background . In the Format Background dialog box, click Fill in the left pane, select Gradient fill in the right pane, and then do the following: In the Type list, select Linear . Click the button next to Direction , and then click Linear Diagonal (first row, third option from the left). In the Angle box, enter 45 ° . Under Gradient stops , click Add or Remove until three stops appear in the drop-down list. Also under Gradient stops , customize the gradient stops that you added as follows: Select Stop 1 from the list, and then do the following: In the Stop position box, enter 0% . Click the button next to Color , and then click White, Background 1 (first row, first option from the left). Select Stop 2 from the list, and then do the following: In the Stop position box, enter 52% . Click the button next to Color , and then click Tan, Background 2 (first row, third option from the left). Select Stop 3 from the list, and then do the following: In the Stop position box, enter 100% . Click the button next to Color , click More Colors , and then in the Colors dialog box, on the Custom tab, enter values for Red: 170 , Green: 164 , Blue: 140 .