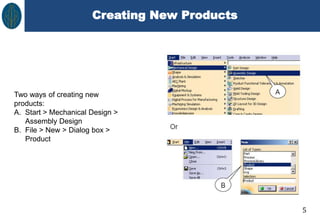
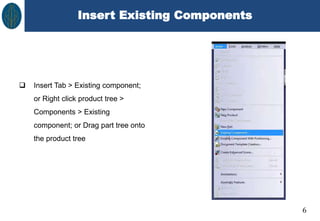
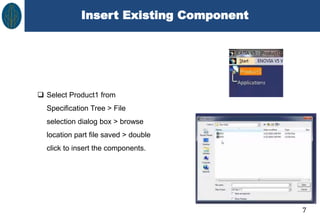
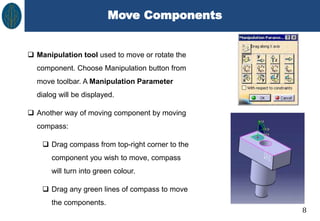
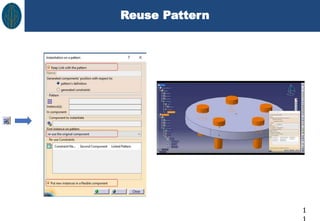
CATIA V5
Assembly
ASSEMBLY MODELING
2
 Process of creating designs that consist of two or more components
assembled together at their respective work position.
 Components brought together and assembled in Assembly Design.
 Assembly Design workbench allow you to apply suitable parametric
assembly constraints to the components and restrict the degree of
freedom.
Bottom-up Assembly
3
 Most preferred approach for creating assembly models.
 Components created in Part Design workbench and inserted in
Assembly Design workbench.
 Advantages for this approach:
• Users can focus on attention of the detail's components
• Easier to maintain a relationship between the feature of the
components
• Suitable for large assembles especially those having intricate
individual components.
Top-down Assembly
4
 Components created inside Assembly Design workbench.
 Different approach as Bottom-up approach. Require users to create all
components in product file.
 Advantages for this approach:
• No need to create separate files of the components.
• Gives user using the geometry of one component to define the
geometry of other.
• Construction and assembly take place simultaneously. User can view
development of product in real time.
• Highly preferred for conceptual design or tool design.
Creating New Products
5
Two ways of creating new
products:
A. Start > Mechanical Design >
Assembly Design
B. File > New > Dialog box >
Product
Insert Existing Components
6
 Insert Tab > Existing component;
or Right click product tree >
Components > Existing
component; or Drag part tree onto
the product tree
Insert Existing Component
7
 Select Product1 from
Specification Tree > File
selection dialog box > browse
location part file saved > double
click to insert the components.
Move Components
8
 Manipulation tool used to move or rotate the
component. Choose Manipulation button from
move toolbar. A Manipulation Parameter
dialog will be displayed.
 Another way of moving component by moving
compass:
 Drag compass from top-right corner to the
component you wish to move, compass
will turn into green colour.
 Drag any green lines of compass to move
the components.
Constraints
9
 The constraints used to fix the degree of freedom of the components.
 It helps to precisely place and position the components with respect to
other components and surroundings in the assembly.
 All degrees of freedom of all components are restricted, it is called fully
constrained assembly. Else, it called partially constrained assembly.
Constraints
1
A. Coincidence Constraint – Coincide the central axis of cylindrical
features
B. Contact Constraint – Make a surface-to-surface contact between
two selected elements from two different components.
C. Offset Constraint – Place selected elements at an offset distance
from each other.
D. Angle Constraint – Position two geometric elements at a
particular angle with respect to each other.
E. Fix Component – Fix the location of the selected component in
the 3D space.
Reuse Pattern
1
Drafting Steps
1
 Open the model for drafting is to be performed.
 Switch to drafting workbench
 New wizard opens up. Choose appropriate option.
Drafting – Title Block
1
 Title Block can be added using
the button Frame and Title
Block.
 New wizard opens up. Choose
appropriate option.
 Edit the information required.
THANK YOU

Catia Assembly drawing.pptx

  • 1.
  • 2.
    ASSEMBLY MODELING 2  Processof creating designs that consist of two or more components assembled together at their respective work position.  Components brought together and assembled in Assembly Design.  Assembly Design workbench allow you to apply suitable parametric assembly constraints to the components and restrict the degree of freedom.
  • 3.
    Bottom-up Assembly 3  Mostpreferred approach for creating assembly models.  Components created in Part Design workbench and inserted in Assembly Design workbench.  Advantages for this approach: • Users can focus on attention of the detail's components • Easier to maintain a relationship between the feature of the components • Suitable for large assembles especially those having intricate individual components.
  • 4.
    Top-down Assembly 4  Componentscreated inside Assembly Design workbench.  Different approach as Bottom-up approach. Require users to create all components in product file.  Advantages for this approach: • No need to create separate files of the components. • Gives user using the geometry of one component to define the geometry of other. • Construction and assembly take place simultaneously. User can view development of product in real time. • Highly preferred for conceptual design or tool design.
  • 5.
    Creating New Products 5 Twoways of creating new products: A. Start > Mechanical Design > Assembly Design B. File > New > Dialog box > Product
  • 6.
    Insert Existing Components 6 Insert Tab > Existing component; or Right click product tree > Components > Existing component; or Drag part tree onto the product tree
  • 7.
    Insert Existing Component 7 Select Product1 from Specification Tree > File selection dialog box > browse location part file saved > double click to insert the components.
  • 8.
    Move Components 8  Manipulationtool used to move or rotate the component. Choose Manipulation button from move toolbar. A Manipulation Parameter dialog will be displayed.  Another way of moving component by moving compass:  Drag compass from top-right corner to the component you wish to move, compass will turn into green colour.  Drag any green lines of compass to move the components.
  • 9.
    Constraints 9  The constraintsused to fix the degree of freedom of the components.  It helps to precisely place and position the components with respect to other components and surroundings in the assembly.  All degrees of freedom of all components are restricted, it is called fully constrained assembly. Else, it called partially constrained assembly.
  • 10.
    Constraints 1 A. Coincidence Constraint– Coincide the central axis of cylindrical features B. Contact Constraint – Make a surface-to-surface contact between two selected elements from two different components. C. Offset Constraint – Place selected elements at an offset distance from each other. D. Angle Constraint – Position two geometric elements at a particular angle with respect to each other. E. Fix Component – Fix the location of the selected component in the 3D space.
  • 11.
  • 12.
    Drafting Steps 1  Openthe model for drafting is to be performed.  Switch to drafting workbench  New wizard opens up. Choose appropriate option.
  • 13.
    Drafting – TitleBlock 1  Title Block can be added using the button Frame and Title Block.  New wizard opens up. Choose appropriate option.  Edit the information required.
  • 14.