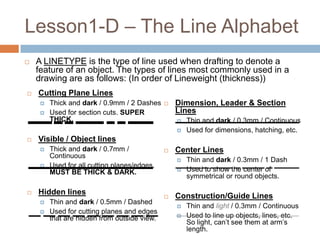
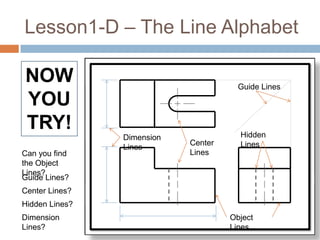
CADD 125
      BOARD DRAFTING
Lesson 1 – Intro & Drafting Basics
Lesson 1 - Drafting Basics
A. What is drafting? Introduction & Supplies

B. Lettering
C. Border & Title Block
D. Alphabet of Lines
E. Measurement Systems (Units)
F. Drawing Scale
G. Standard Sheet Sizes
Lesson 1 – Objectives &
Vocabulary
Lesson 1 Objectives                                   Lesson 1 Vocabulary
(We will focus on these objectives for this lesson)   (You may click the word to find it in the lesson)

                                                          Lettering                   Section Line
   Master Lettering                                                       

                                                         Border                     Guidelines
   Create a Border                                      Title Block                Scale
   Learn the Linetype                                   Alphabet of Lines          Units
                                                         Visible / Object           Imperial / Arch.
    Alphabet                                              Line                       Engineering
   Learn the                                            Hidden Line                Metric
                                                         Centerline
    Measurement System                                   Dimension /
                                                                                     Drawing Scale
                                                                                     A Size - Letter
   Practice Reading                                      Extension Line
                                                                                     B Size - Tabloid
                                                         Leader Line
    Scales                                               Phantom Line
   Learn the Standard                                   Cutting Plane
    Sheet Sizes
Introduction & Supplies
Greeting students!
In this class, you will learn the basics of Board
Drafting. This will teach you the basic concepts of
drafting and will prepare you for your future computer
based drafting courses.
When we draft, we are drawing representations of
objects clearly so that the object can be created or
modified and clearly understood. Because of this, our
drawings must be ACCURATE. There are certain
tools we use in drafting to help us with the
appearance and accuracy of our drawings. You will
need to purchase some of these tools for this class.
Introduction & Supplies
   You will need:
      Technical Drawing book (purchase either in the bookstore or used online for big
       discount!)
     1 Combination scale - Scale must have Architect 16 and (1/8, 1/4). Engineer 10
       and 50. Mechanical 1:100 and 1:500 measurements.
       (Will have a “D” on it if purchased at David Art Supplies)
     Two mid-size drafting Triangles - (30/60° and 45°)
     6”+ Bow Compass – Do NOT buy the cheapy ones with a golf pencil!!!!!
     .3 Pencil & .7 Pencil & HB lead for both
     Erasure shield & White Eraser
     Cream Art Tape OR Drafting Dots
     Binder or 3 Prong folder
     Clear sleeves for documents
     Circle Template
     Cleaning brush
     Dry Erase Pad
     Protractor
    ***ALL OF THIS IS ON YOUR SYLLABUS!
    ***You can expect to spend about $175 total on these supplies.
Notes about this Class:
   The object of this class is not only to teach you skills needed in your
    future career, but it will also help prepare you for the responsibilities
    that will come along with that career. There are certain rules and
    requirements that you must meet to succeed in this course. (All of
    this is on your syllabus!)
   Although you may not get a salary for these classes, you are given
    a grade. Therefore, your attendance & participation in class directly
    affects your grade.
       Attendance is a MUST. You will be docked 2 points from your FINAL
        GRADE for each unexcused absence, and one point for every excused
        absence. You will also be docked 1 point for every time you arrive late or
        leave early, so BE ON TIME!
       You MUST participate in class. We will have
        homework, quizzes, fieldtrips & class discussions through out the
        semester. You are expected to participate in these activities.
       ALL Assignments are REQUIRED. You will NOT pass this class if you
        do not complete all assignments timely and accurately. If you get all A’s
        on your assignments that you turned in, but only turned in 20 of 40
        assignments, you did not successfully complete this course!
       There are NO EXCUSES for missed deadlines. If it’s not on time, it’s
        not graded. You will be given ample time to complete assignments
Course Breakdown:
   You will be graded as follows:
     DWG    average             50%
     Final projects             10%
     Mid-term exam grade            10%
     Final exam grade           10%
     Quizzes                         5%
     Resume & cover letter           5%
     Syllabus test               5%
     Class participation & surveys   5%
                   Total     100%
Lesson1-A – Drafting is…
Imagine you’re just thought of a new
design for a tennis shoe. You try to
explain it to your friends, but the more
you say, the more confused they seem
to be.
Finally, you pick up a pencil and draw
it. Voila! You’ve just found out the
purpose of drafting! One of the best
ways to communicate one's ideas is
through some form of picture or
drawing, and drafting is the formal art
of drawing an object.
                                   As a drafter, it is your job to
                                   determine what information needs
                                   to be shown on the image and how
                                   to portray it.
Lesson1-A – Drafting FAQ
   Do I have to be an artist or be able to draw?
       No, drafting and “drawing” are two entirely different things. There are many highly
        trained drafters who can not “draw” much more than a stick figure. While it’s true
        that drafting is an art, it is not a requirement that you are able to “draw.”
        However, drafting takes a lot of time and dedication to master. The drafting
        program is designed to take you step by step in the drafting and design process.
   Why am I drafting on a board and not a computer?
       Drafting concepts are best taught on a board so that you can focus on learning
        the basics before you concentrate on learning the computer program. You can’t
        know what to tell the computer to do until you understand what it is you are
        doing.
   What does a drafter do?
       A drafter draws plans for everything man-made from floor plans, air
        planes, tools, highways, etc. When you graduate from the drafting program, you
        will be considered an entry level drafter. Your job mainly will be to make changes
        to drawings that have been already drawn, known as red lines or mark up
        drawings. Like any other profession, the pay varies, depending on location and
        the company you work for. Normally the pay ranges from $12.00 to $30.00 per
        hour depending on your experience, knowledge of programs and specialty.
Lesson1-B – Lettering
   It’s a fact: Many of us have horrible handwriting.   (I
                            do!)

    Why is handwriting important? Imagine you
    misread your doctor’s directions and you take 9
    pills a day, when you were supposed to take 4
    pills a day. Can you see where that would be a
    problem? What about if the engineer misreads a
    dimension and builds the pieces of a bridge too
    short? Would you drive over it? Handwriting /
    Lettering is important because not only does it
    make your drawing look professional, but it needs
    to be clear and easy to read to avoid costly
    mistakes.
Lesson1-B – Lettering
   As you can see on your
    handout, we need to use
    (mostly) straight lines and nice
    round letters.
   Take a few minutes and look
    over the Lettering guide.
    Then, practice using the given
    guides.
Lesson1-C – Creating a Border
   The border tells the reader necessary information about the drawing
    such as what the drawing title is, the drafter, when it was drawn, the
    revision number, the scale of the drawing, etc. ALL final drawings
    must have a border. Start by drawing a 10.5”x8” box (1/4” in from
    all sides)


                                                             8”


                                   10.5”
Lesson1-C – Creating a Border
   Looking at your border, you’ll see that there is another
    line along the bottom of your border that separates the
    text area from the drawing area. Let’s draw that
    one, next.


                                                  8”


    3/8”


                            10.5”
Lesson1-C – Creating a Border
   Now we need to fill in the remaining lines &
    text.


                                                          8”


              TITLE    NAME      SCALE   DATE   %   MOD


                         10.5”
Lesson1-D – The Line Alphabet
Question: What are all of    When drafting, it is necessary
these crazy lines I see?     to show all aspects of an
                             object.    Sometimes,      those
                             aspects are not immediately
                             apparent from the outside. For
                             example, although we can see
                             the hole in a tire from the front
                             view, we can not see it from
                             the side view. In drafting, we
                             use different linetypes to
                             denote features like this.

Answer: We use different
types of lines to denote
where a feature is located
and what the feature is.
Lesson1-D – The Line Alphabet
   A LINETYPE is the type of line used when drafting to denote a
    feature of an object. The types of lines most commonly used in a
    drawing are as follows: (In order of Lineweight (thickness))
   Cutting Plane Lines
        Thick and dark / 0.9mm / 2 Dashes       Dimension, Leader & Section
        Used for section cuts. SUPER             Lines
         THICK.                                      Thin and dark / 0.3mm / Continuous
                                                     Used for dimensions, hatching, etc.
   Visible / Object lines
        Thick and dark / 0.7mm /                Center Lines
         Continuous
                                                     Thin and dark / 0.3mm / 1 Dash
        Used for all cutting planes/edges.
         MUST BE THICK & DARK.                       Used to show the center of
                                                      symmetrical or round objects.

   Hidden lines                                 Construction/Guide Lines
        Thin and dark / 0.5mm / Dashed
                                                     Thin and light / 0.3mm / Continuous
        Used for cutting planes and edges
         that are hidden from outside view.          Used to line up objects, lines, etc.
                                                      So light, can’t see them at arm’s
                                                      length.
Lesson1-D – The Line Alphabet

NOW                                    Guide Lines

YOU
TRY!                                   Hidden
                Dimension
                            Center     Lines
                Lines
Can you find                Lines
the Object
Lines?
Guide Lines?
Center Lines?
Hidden Lines?
Dimension                            Object
Lines?                               Lines
Lesson1-E – Measurement
System
   Method of measuring an object
     US Units: (Based on units of 12 –
     inches, feet, etc.)
       Imperial   / Architectural – (Fractions of an inch –
        9½”)
       Engineering – (Decimal inches – 9.5”)

     International:     (Based on units of 10)
            – (Centimeters cm, Millimeters mm, etc. –
       Metric
       9.5mm)
Lesson1-F – Drawing Scale
   Visually: how close or how far you are from an
    object. Actually: the mathematical change in size of
    an object. For example, a 5” object drawn at half
    scale (1:2) would be 2.5” on a page. Used to fit
    large objects on page.
       Imperial / Architectural Scale – Example: ¼” means it’s 48
        times smaller than actual size. ( ¼” / 12” = 1/48)
       Engineering / Mechanical / Decimal Scale – Example: 50
        means it’s 50 times smaller than actual size. (1 / 50 = 1/50)
       Metric Scale – 1:10 means it’s 10 times smaller than actual size.
        (1 / 10 = 1/10)
Lesson1-G – Standard Sheet
Sizes:
   Because sheet sizes vary depending on what
    we use them for, it’s necessary to have standard
    sizes. (Just like with everything else!) All use ½”
    margins
     A Size – 8.5” x 11” “Letter size” (Closest Metric Size
      A4)
     B Size – 11” x 17” “Tabloid size” (Closest Metric Size
      A3)
     C Size – 17” x 22” (Closest Metric Size A2)

     D Size – 24” x 36” (Closest Metric Size A1)

     E Size – 34” x 44” (Closest Metric Size A0)
Lesson1 – Review Exercises
MOD 1: HANDOUT “Lettering Practice”
(No supplies - Done on handout)
MOD 2: HANDOUT “Borders and Linetypes”
(No supplies - Done on graph paper)
MOD 3: HANDOUT “Measuring Scales”
(No supplies - Done on handout)


                                   Lesson 1 – THE

Cadd 125 lesson 1 - intro & basics

  • 1.
    CADD 125 BOARD DRAFTING Lesson 1 – Intro & Drafting Basics
  • 2.
    Lesson 1 -Drafting Basics A. What is drafting? Introduction & Supplies B. Lettering C. Border & Title Block D. Alphabet of Lines E. Measurement Systems (Units) F. Drawing Scale G. Standard Sheet Sizes
  • 3.
    Lesson 1 –Objectives & Vocabulary Lesson 1 Objectives Lesson 1 Vocabulary (We will focus on these objectives for this lesson) (You may click the word to find it in the lesson) Lettering Section Line  Master Lettering    Border  Guidelines  Create a Border  Title Block  Scale  Learn the Linetype  Alphabet of Lines  Units  Visible / Object  Imperial / Arch. Alphabet Line  Engineering  Learn the  Hidden Line  Metric  Centerline Measurement System  Dimension /  Drawing Scale  A Size - Letter  Practice Reading Extension Line  B Size - Tabloid  Leader Line Scales  Phantom Line  Learn the Standard  Cutting Plane Sheet Sizes
  • 4.
    Introduction & Supplies Greetingstudents! In this class, you will learn the basics of Board Drafting. This will teach you the basic concepts of drafting and will prepare you for your future computer based drafting courses. When we draft, we are drawing representations of objects clearly so that the object can be created or modified and clearly understood. Because of this, our drawings must be ACCURATE. There are certain tools we use in drafting to help us with the appearance and accuracy of our drawings. You will need to purchase some of these tools for this class.
  • 5.
    Introduction & Supplies  You will need:  Technical Drawing book (purchase either in the bookstore or used online for big discount!)  1 Combination scale - Scale must have Architect 16 and (1/8, 1/4). Engineer 10 and 50. Mechanical 1:100 and 1:500 measurements. (Will have a “D” on it if purchased at David Art Supplies)  Two mid-size drafting Triangles - (30/60° and 45°)  6”+ Bow Compass – Do NOT buy the cheapy ones with a golf pencil!!!!!  .3 Pencil & .7 Pencil & HB lead for both  Erasure shield & White Eraser  Cream Art Tape OR Drafting Dots  Binder or 3 Prong folder  Clear sleeves for documents  Circle Template  Cleaning brush  Dry Erase Pad  Protractor ***ALL OF THIS IS ON YOUR SYLLABUS! ***You can expect to spend about $175 total on these supplies.
  • 6.
    Notes about thisClass:  The object of this class is not only to teach you skills needed in your future career, but it will also help prepare you for the responsibilities that will come along with that career. There are certain rules and requirements that you must meet to succeed in this course. (All of this is on your syllabus!)  Although you may not get a salary for these classes, you are given a grade. Therefore, your attendance & participation in class directly affects your grade.  Attendance is a MUST. You will be docked 2 points from your FINAL GRADE for each unexcused absence, and one point for every excused absence. You will also be docked 1 point for every time you arrive late or leave early, so BE ON TIME!  You MUST participate in class. We will have homework, quizzes, fieldtrips & class discussions through out the semester. You are expected to participate in these activities.  ALL Assignments are REQUIRED. You will NOT pass this class if you do not complete all assignments timely and accurately. If you get all A’s on your assignments that you turned in, but only turned in 20 of 40 assignments, you did not successfully complete this course!  There are NO EXCUSES for missed deadlines. If it’s not on time, it’s not graded. You will be given ample time to complete assignments
  • 7.
    Course Breakdown:  You will be graded as follows:  DWG average 50%  Final projects 10%  Mid-term exam grade 10%  Final exam grade 10%  Quizzes 5%  Resume & cover letter 5%  Syllabus test 5%  Class participation & surveys 5% Total 100%
  • 8.
    Lesson1-A – Draftingis… Imagine you’re just thought of a new design for a tennis shoe. You try to explain it to your friends, but the more you say, the more confused they seem to be. Finally, you pick up a pencil and draw it. Voila! You’ve just found out the purpose of drafting! One of the best ways to communicate one's ideas is through some form of picture or drawing, and drafting is the formal art of drawing an object. As a drafter, it is your job to determine what information needs to be shown on the image and how to portray it.
  • 9.
    Lesson1-A – DraftingFAQ  Do I have to be an artist or be able to draw?  No, drafting and “drawing” are two entirely different things. There are many highly trained drafters who can not “draw” much more than a stick figure. While it’s true that drafting is an art, it is not a requirement that you are able to “draw.” However, drafting takes a lot of time and dedication to master. The drafting program is designed to take you step by step in the drafting and design process.  Why am I drafting on a board and not a computer?  Drafting concepts are best taught on a board so that you can focus on learning the basics before you concentrate on learning the computer program. You can’t know what to tell the computer to do until you understand what it is you are doing.  What does a drafter do?  A drafter draws plans for everything man-made from floor plans, air planes, tools, highways, etc. When you graduate from the drafting program, you will be considered an entry level drafter. Your job mainly will be to make changes to drawings that have been already drawn, known as red lines or mark up drawings. Like any other profession, the pay varies, depending on location and the company you work for. Normally the pay ranges from $12.00 to $30.00 per hour depending on your experience, knowledge of programs and specialty.
  • 10.
    Lesson1-B – Lettering  It’s a fact: Many of us have horrible handwriting. (I do!) Why is handwriting important? Imagine you misread your doctor’s directions and you take 9 pills a day, when you were supposed to take 4 pills a day. Can you see where that would be a problem? What about if the engineer misreads a dimension and builds the pieces of a bridge too short? Would you drive over it? Handwriting / Lettering is important because not only does it make your drawing look professional, but it needs to be clear and easy to read to avoid costly mistakes.
  • 11.
    Lesson1-B – Lettering  As you can see on your handout, we need to use (mostly) straight lines and nice round letters.  Take a few minutes and look over the Lettering guide. Then, practice using the given guides.
  • 12.
    Lesson1-C – Creatinga Border  The border tells the reader necessary information about the drawing such as what the drawing title is, the drafter, when it was drawn, the revision number, the scale of the drawing, etc. ALL final drawings must have a border. Start by drawing a 10.5”x8” box (1/4” in from all sides) 8” 10.5”
  • 13.
    Lesson1-C – Creatinga Border  Looking at your border, you’ll see that there is another line along the bottom of your border that separates the text area from the drawing area. Let’s draw that one, next. 8” 3/8” 10.5”
  • 14.
    Lesson1-C – Creatinga Border  Now we need to fill in the remaining lines & text. 8” TITLE NAME SCALE DATE % MOD 10.5”
  • 15.
    Lesson1-D – TheLine Alphabet Question: What are all of When drafting, it is necessary these crazy lines I see? to show all aspects of an object. Sometimes, those aspects are not immediately apparent from the outside. For example, although we can see the hole in a tire from the front view, we can not see it from the side view. In drafting, we use different linetypes to denote features like this. Answer: We use different types of lines to denote where a feature is located and what the feature is.
  • 16.
    Lesson1-D – TheLine Alphabet  A LINETYPE is the type of line used when drafting to denote a feature of an object. The types of lines most commonly used in a drawing are as follows: (In order of Lineweight (thickness))  Cutting Plane Lines  Thick and dark / 0.9mm / 2 Dashes  Dimension, Leader & Section  Used for section cuts. SUPER Lines THICK.  Thin and dark / 0.3mm / Continuous  Used for dimensions, hatching, etc.  Visible / Object lines  Thick and dark / 0.7mm /  Center Lines Continuous  Thin and dark / 0.3mm / 1 Dash  Used for all cutting planes/edges. MUST BE THICK & DARK.  Used to show the center of symmetrical or round objects.  Hidden lines  Construction/Guide Lines  Thin and dark / 0.5mm / Dashed  Thin and light / 0.3mm / Continuous  Used for cutting planes and edges that are hidden from outside view.  Used to line up objects, lines, etc. So light, can’t see them at arm’s length.
  • 17.
    Lesson1-D – TheLine Alphabet NOW Guide Lines YOU TRY! Hidden Dimension Center Lines Lines Can you find Lines the Object Lines? Guide Lines? Center Lines? Hidden Lines? Dimension Object Lines? Lines
  • 18.
    Lesson1-E – Measurement System  Method of measuring an object  US Units: (Based on units of 12 – inches, feet, etc.)  Imperial / Architectural – (Fractions of an inch – 9½”)  Engineering – (Decimal inches – 9.5”)  International: (Based on units of 10) – (Centimeters cm, Millimeters mm, etc. –  Metric 9.5mm)
  • 19.
    Lesson1-F – DrawingScale  Visually: how close or how far you are from an object. Actually: the mathematical change in size of an object. For example, a 5” object drawn at half scale (1:2) would be 2.5” on a page. Used to fit large objects on page.  Imperial / Architectural Scale – Example: ¼” means it’s 48 times smaller than actual size. ( ¼” / 12” = 1/48)  Engineering / Mechanical / Decimal Scale – Example: 50 means it’s 50 times smaller than actual size. (1 / 50 = 1/50)  Metric Scale – 1:10 means it’s 10 times smaller than actual size. (1 / 10 = 1/10)
  • 20.
    Lesson1-G – StandardSheet Sizes:  Because sheet sizes vary depending on what we use them for, it’s necessary to have standard sizes. (Just like with everything else!) All use ½” margins  A Size – 8.5” x 11” “Letter size” (Closest Metric Size A4)  B Size – 11” x 17” “Tabloid size” (Closest Metric Size A3)  C Size – 17” x 22” (Closest Metric Size A2)  D Size – 24” x 36” (Closest Metric Size A1)  E Size – 34” x 44” (Closest Metric Size A0)
  • 21.
    Lesson1 – ReviewExercises MOD 1: HANDOUT “Lettering Practice” (No supplies - Done on handout) MOD 2: HANDOUT “Borders and Linetypes” (No supplies - Done on graph paper) MOD 3: HANDOUT “Measuring Scales” (No supplies - Done on handout) Lesson 1 – THE