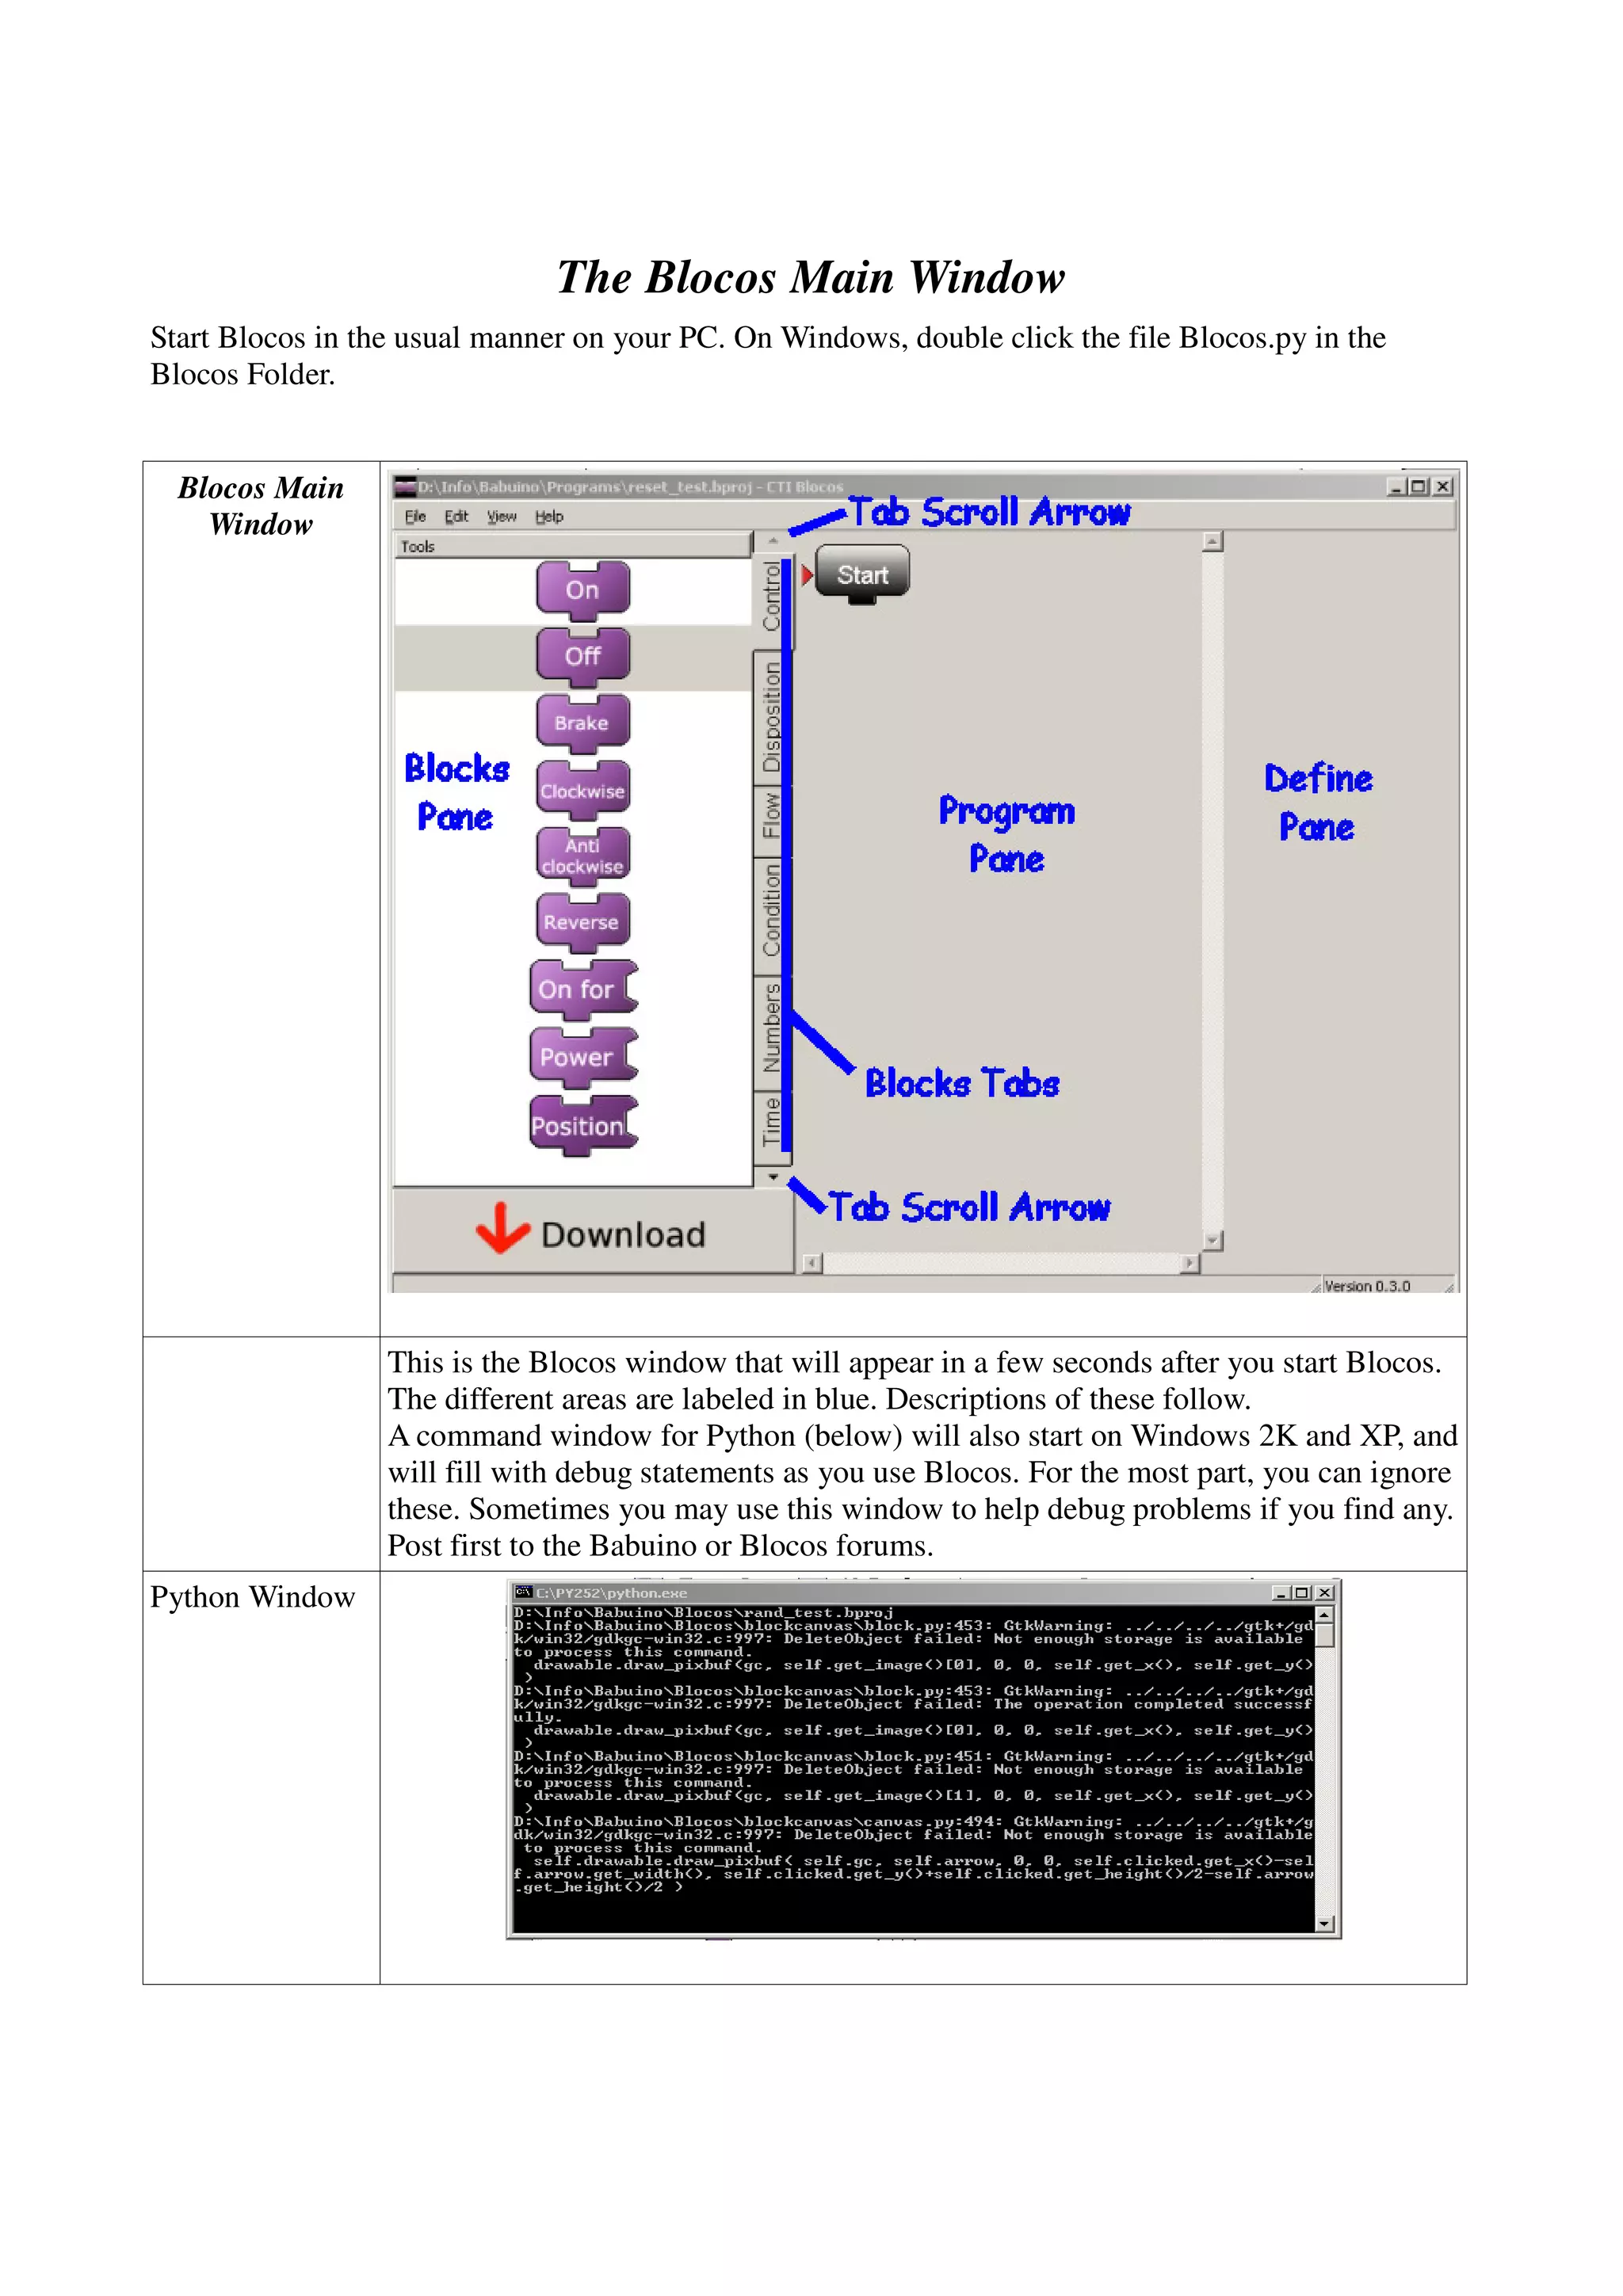
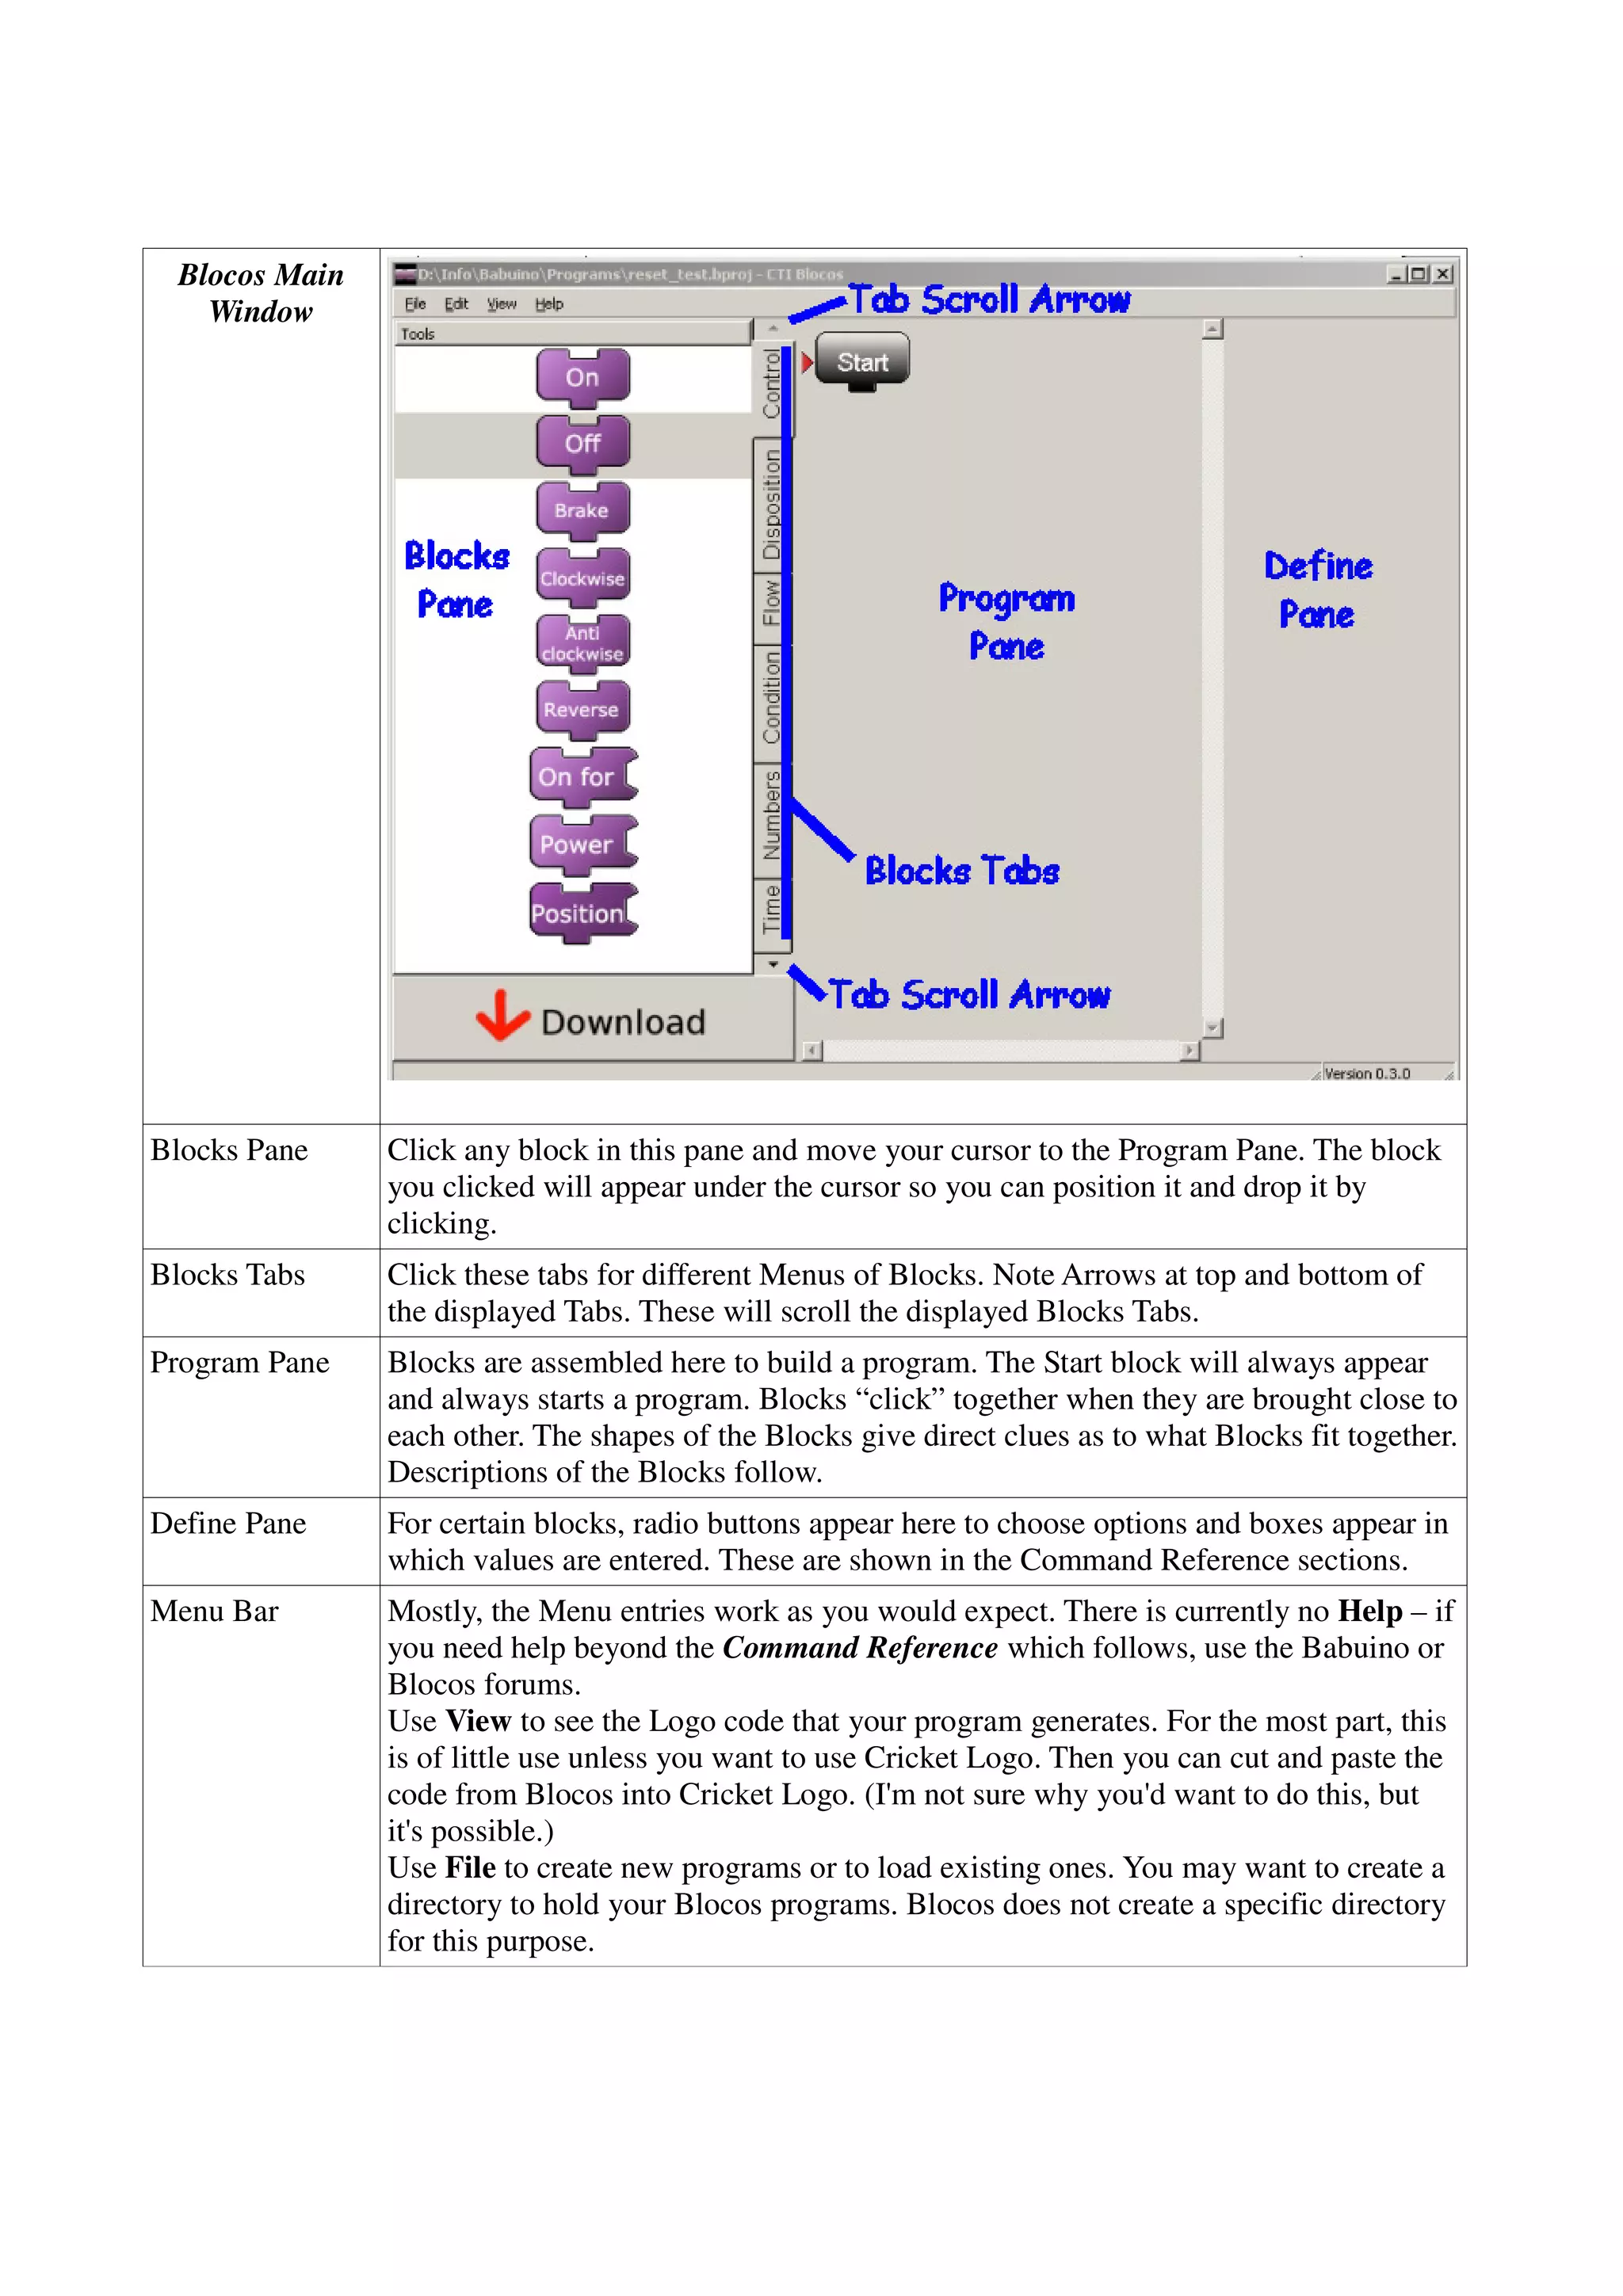
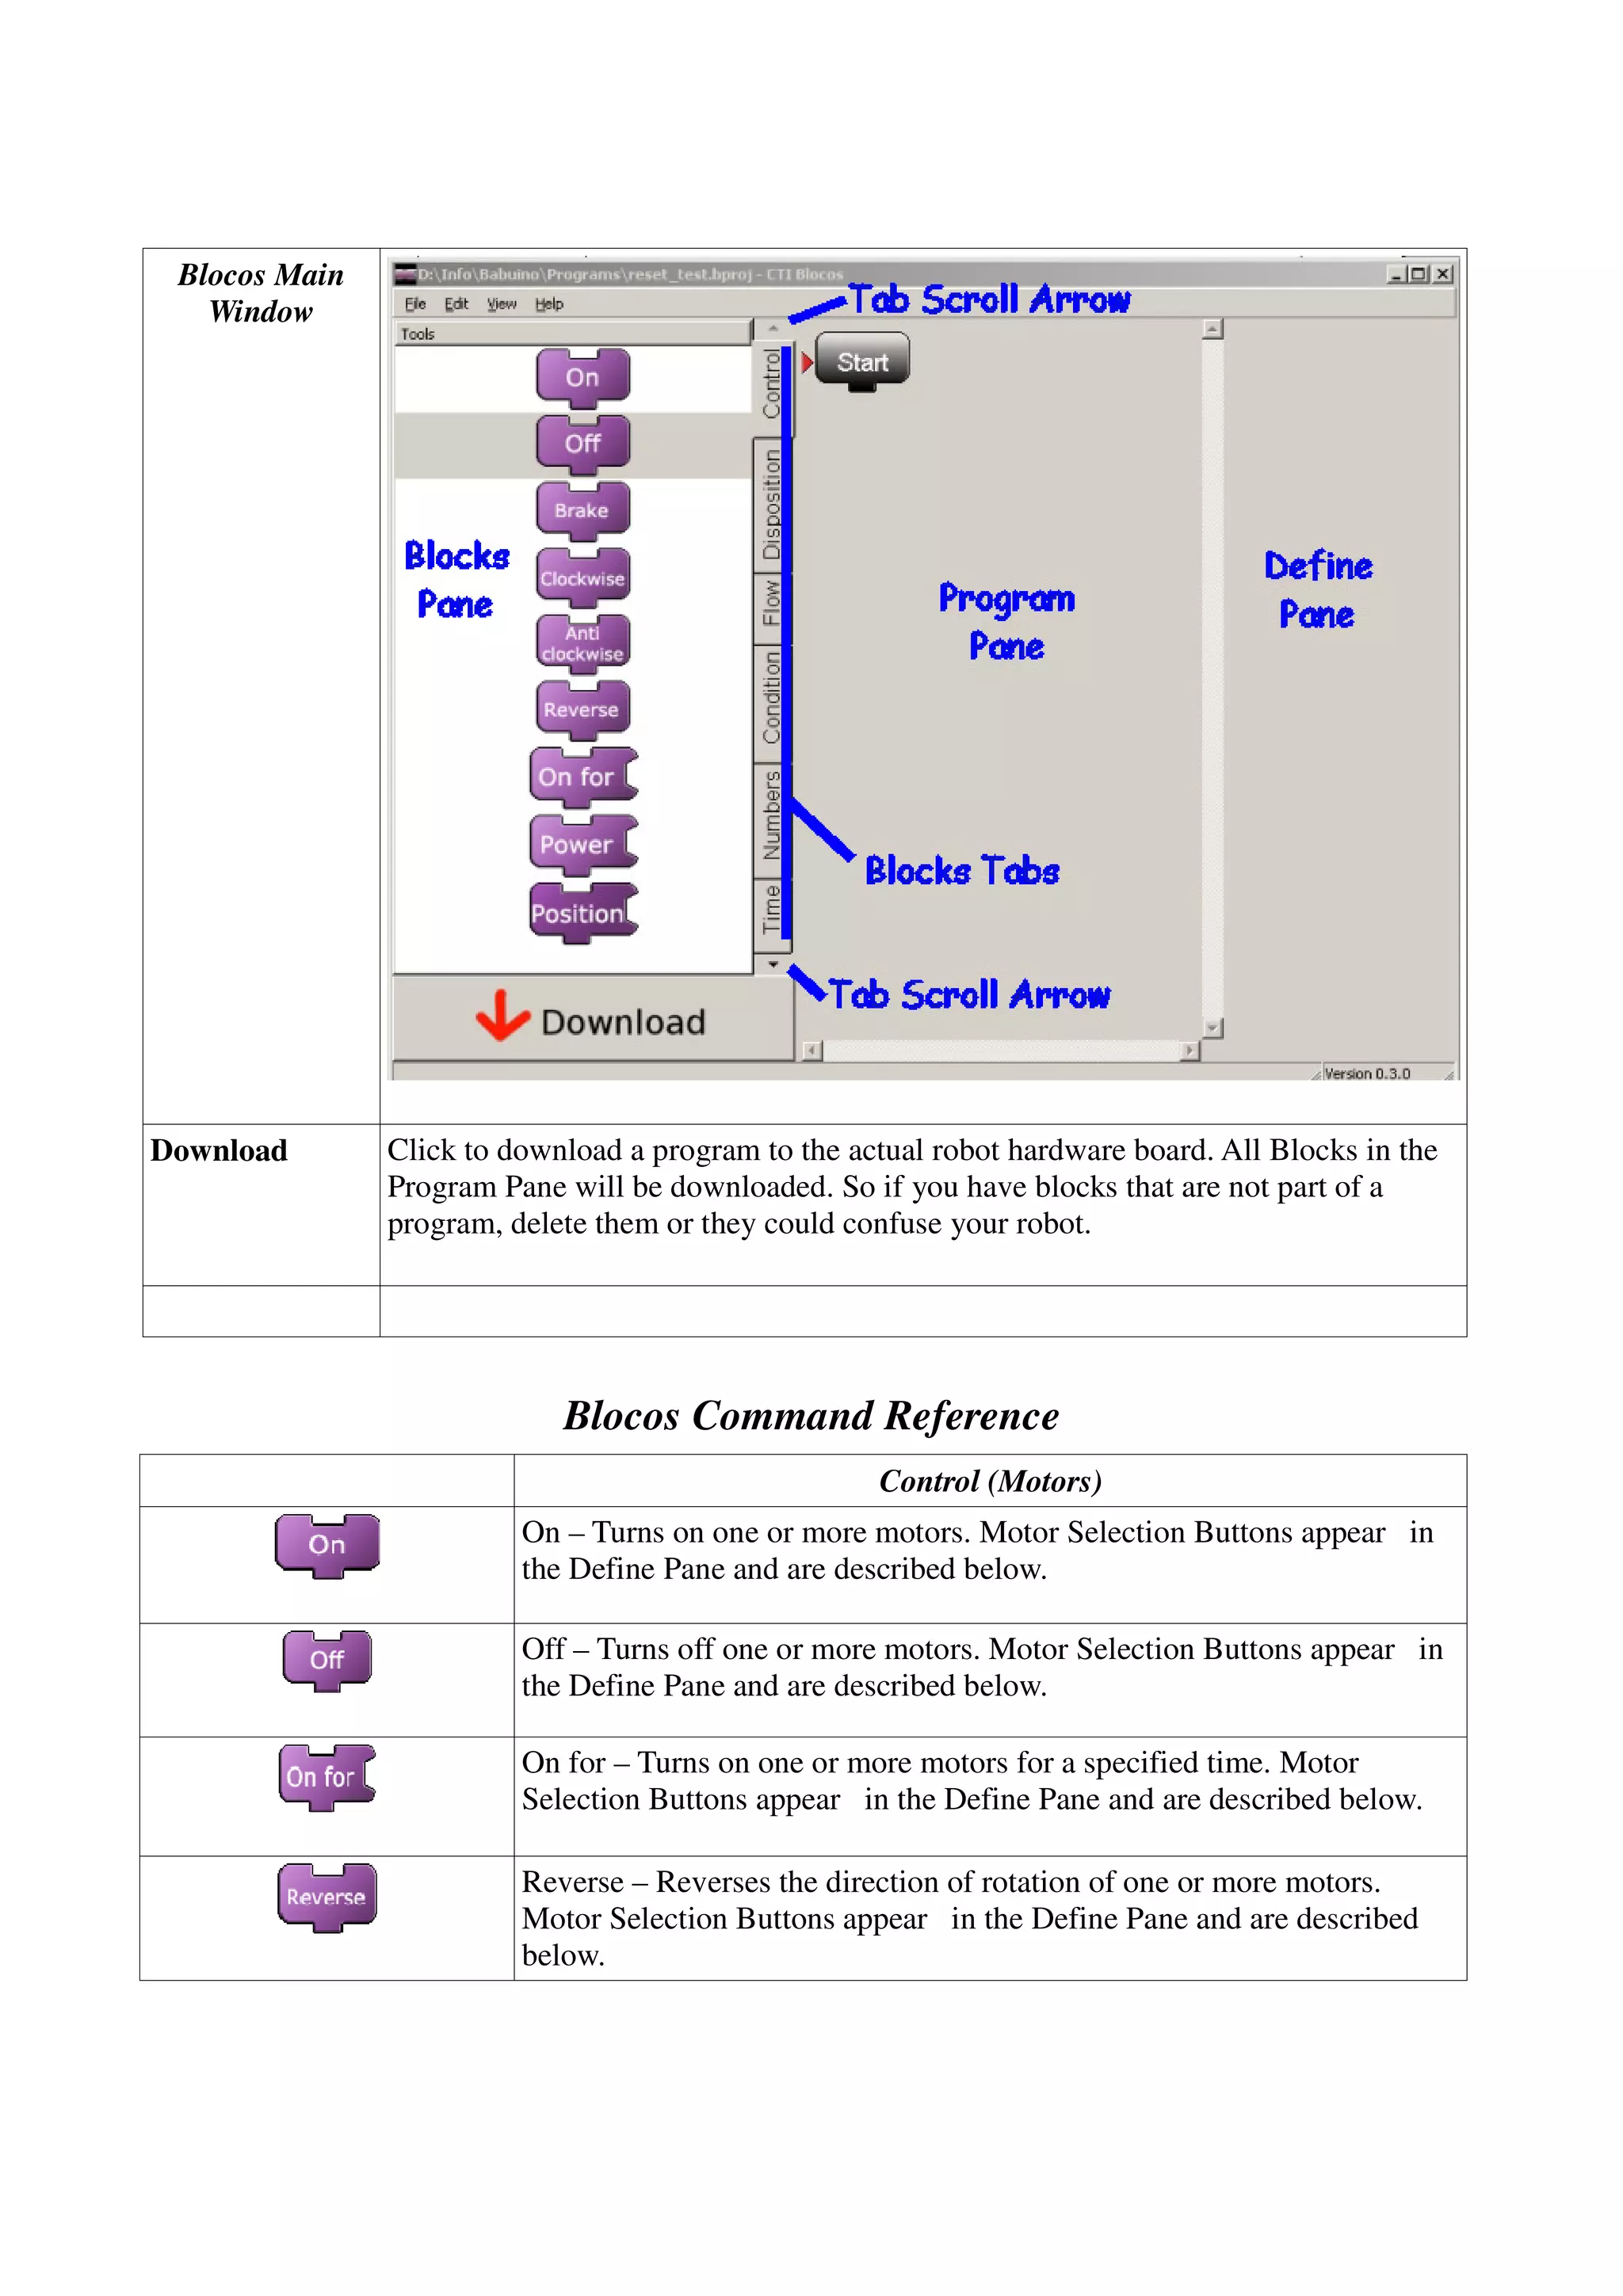
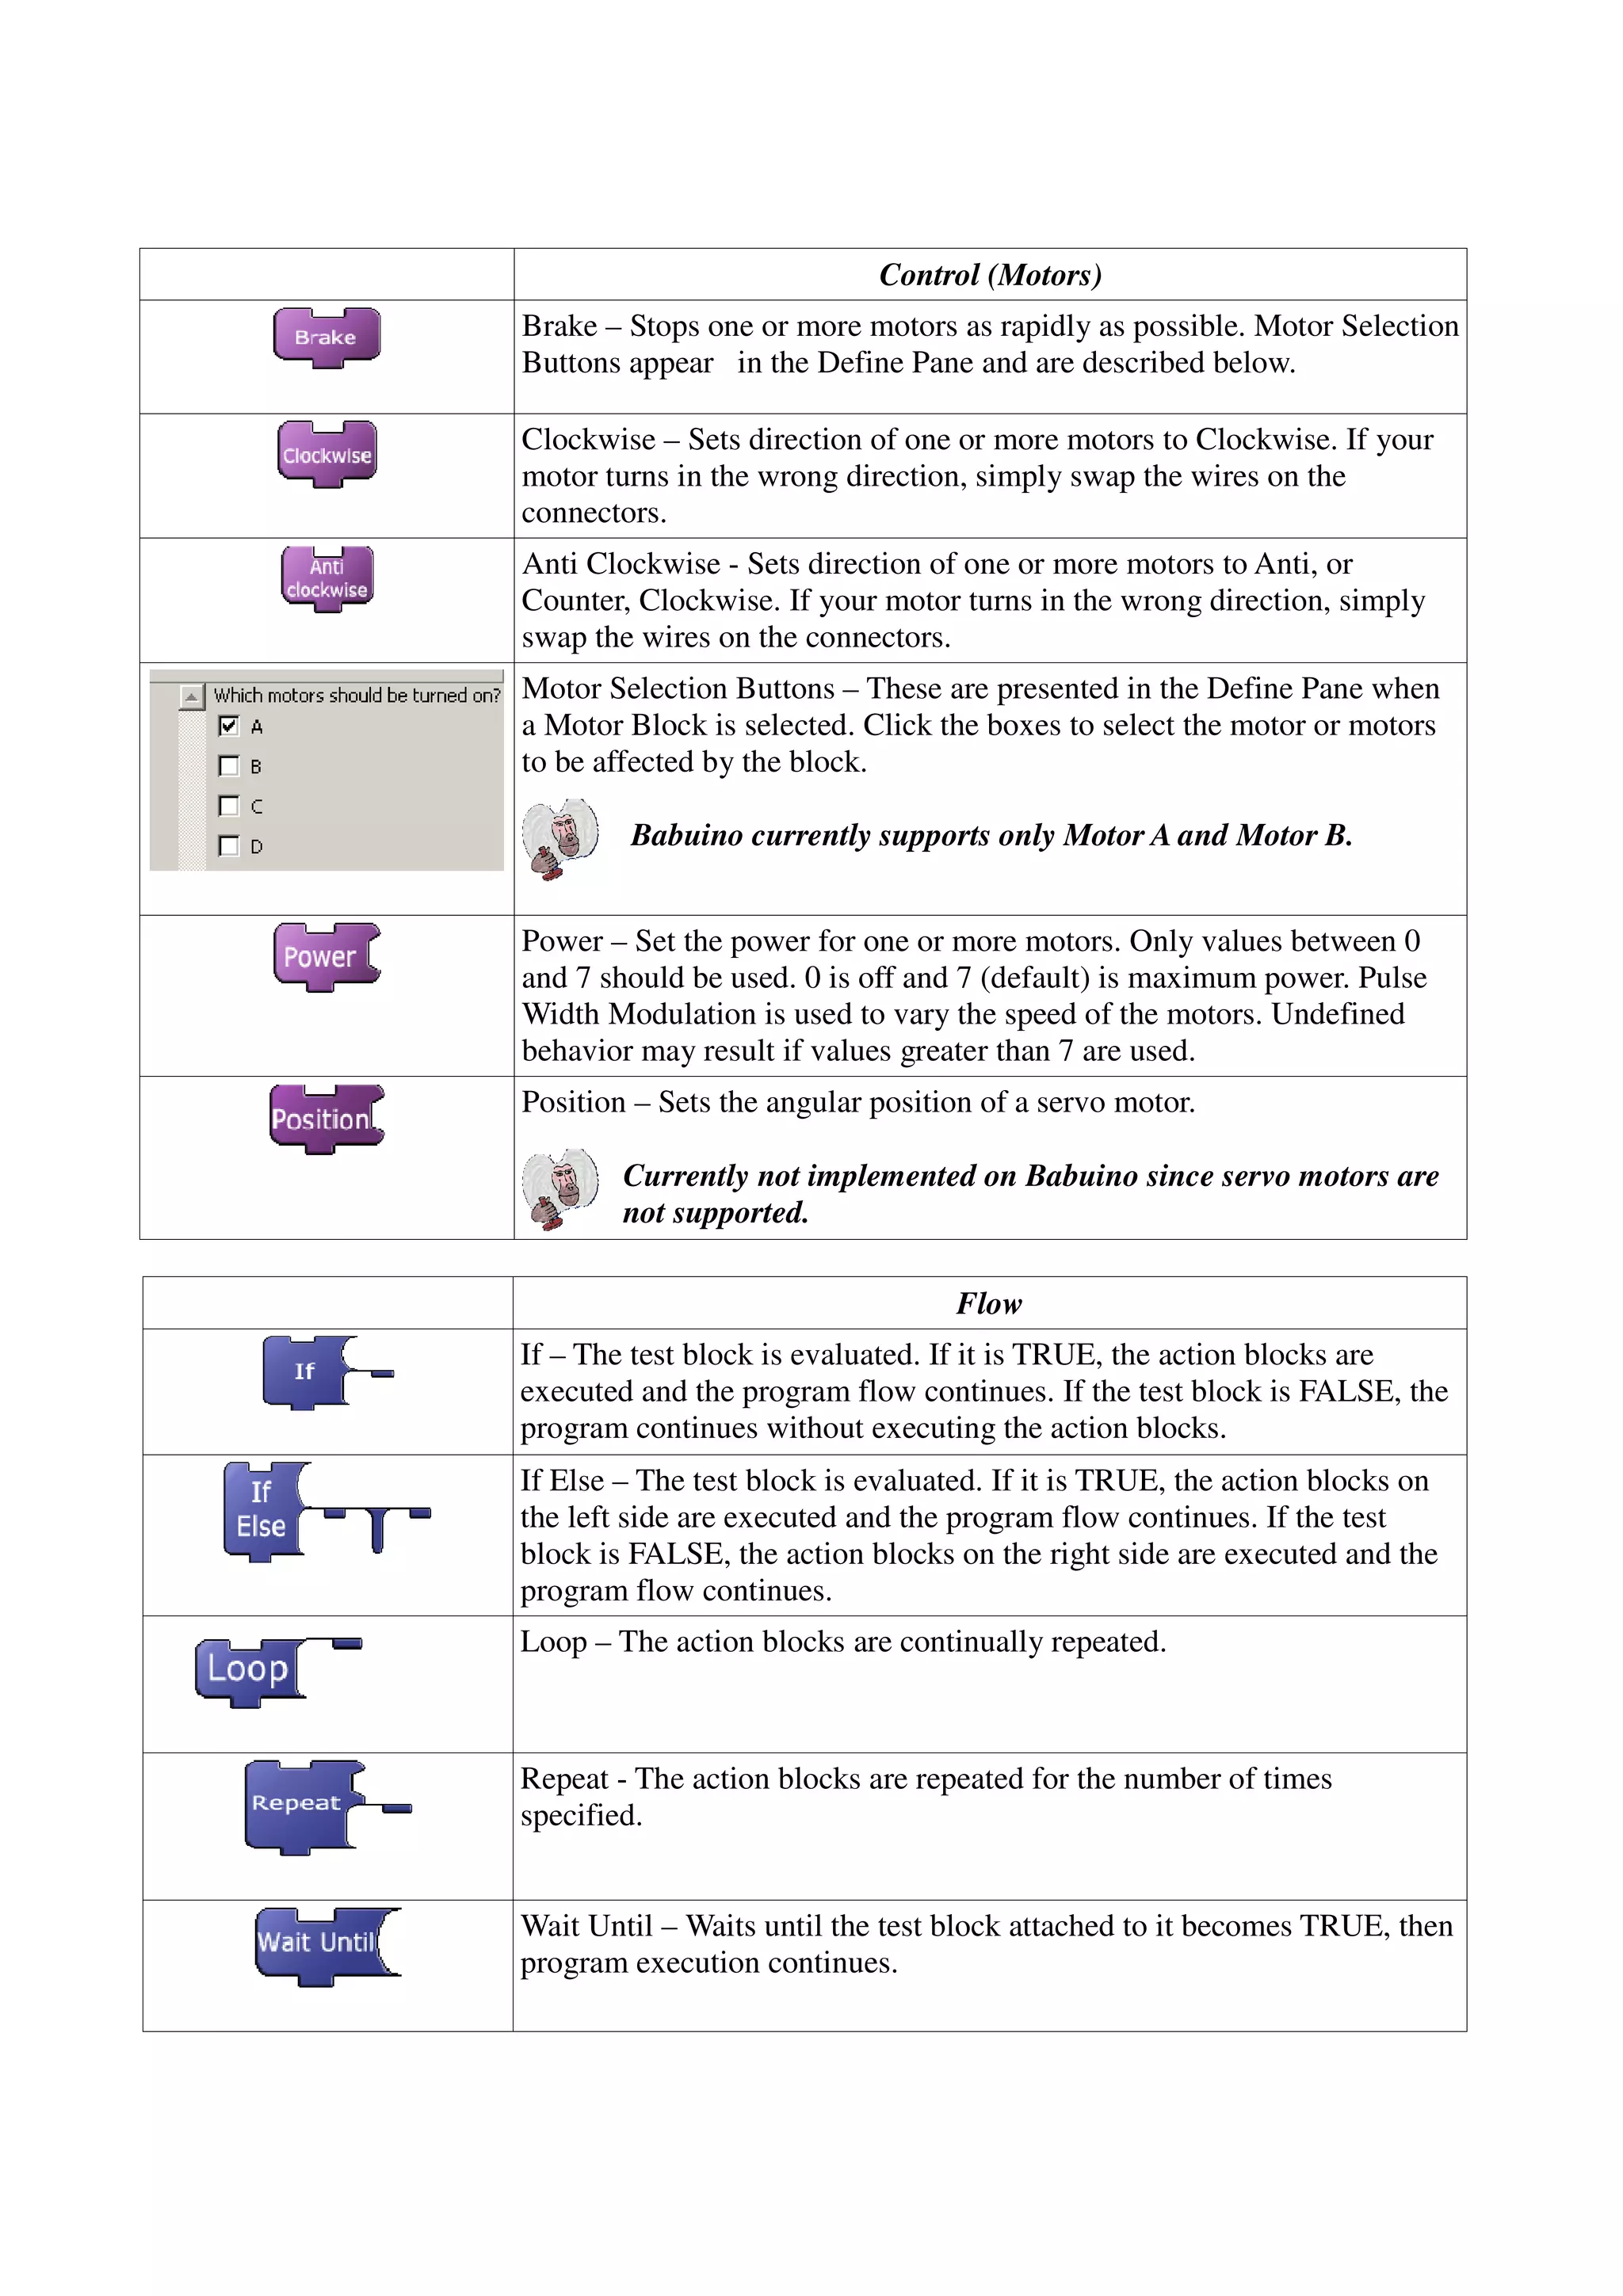
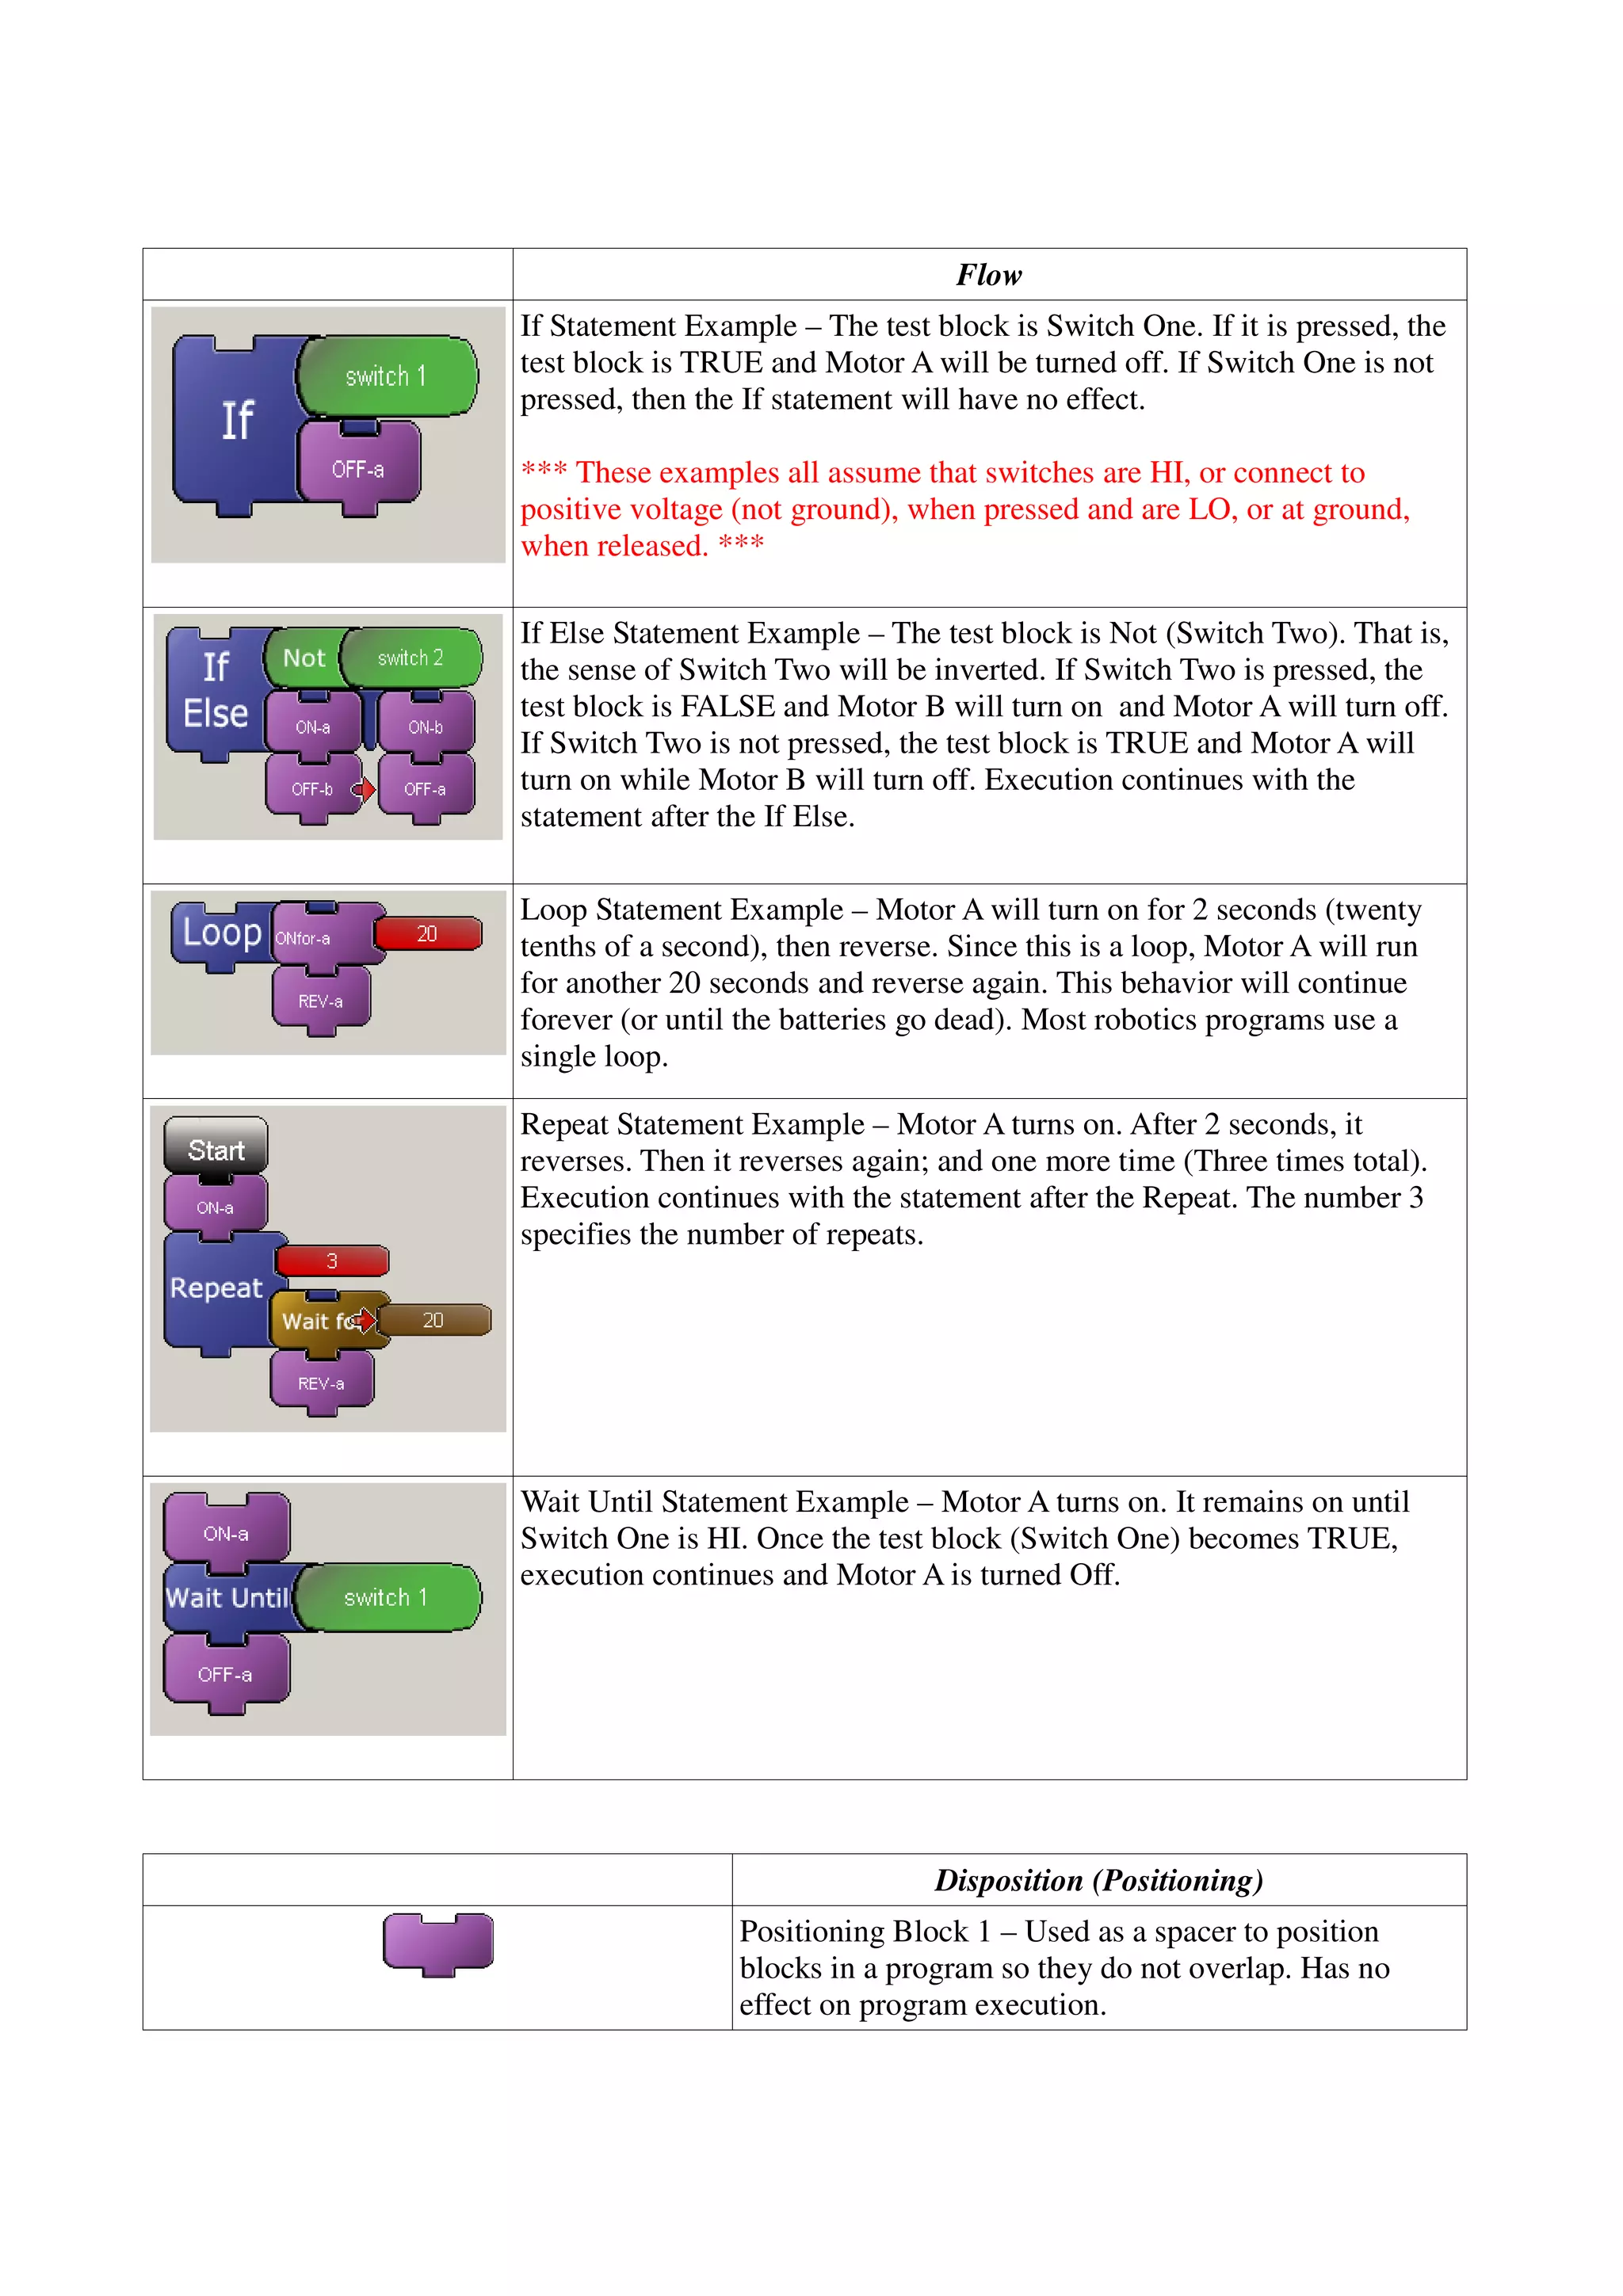
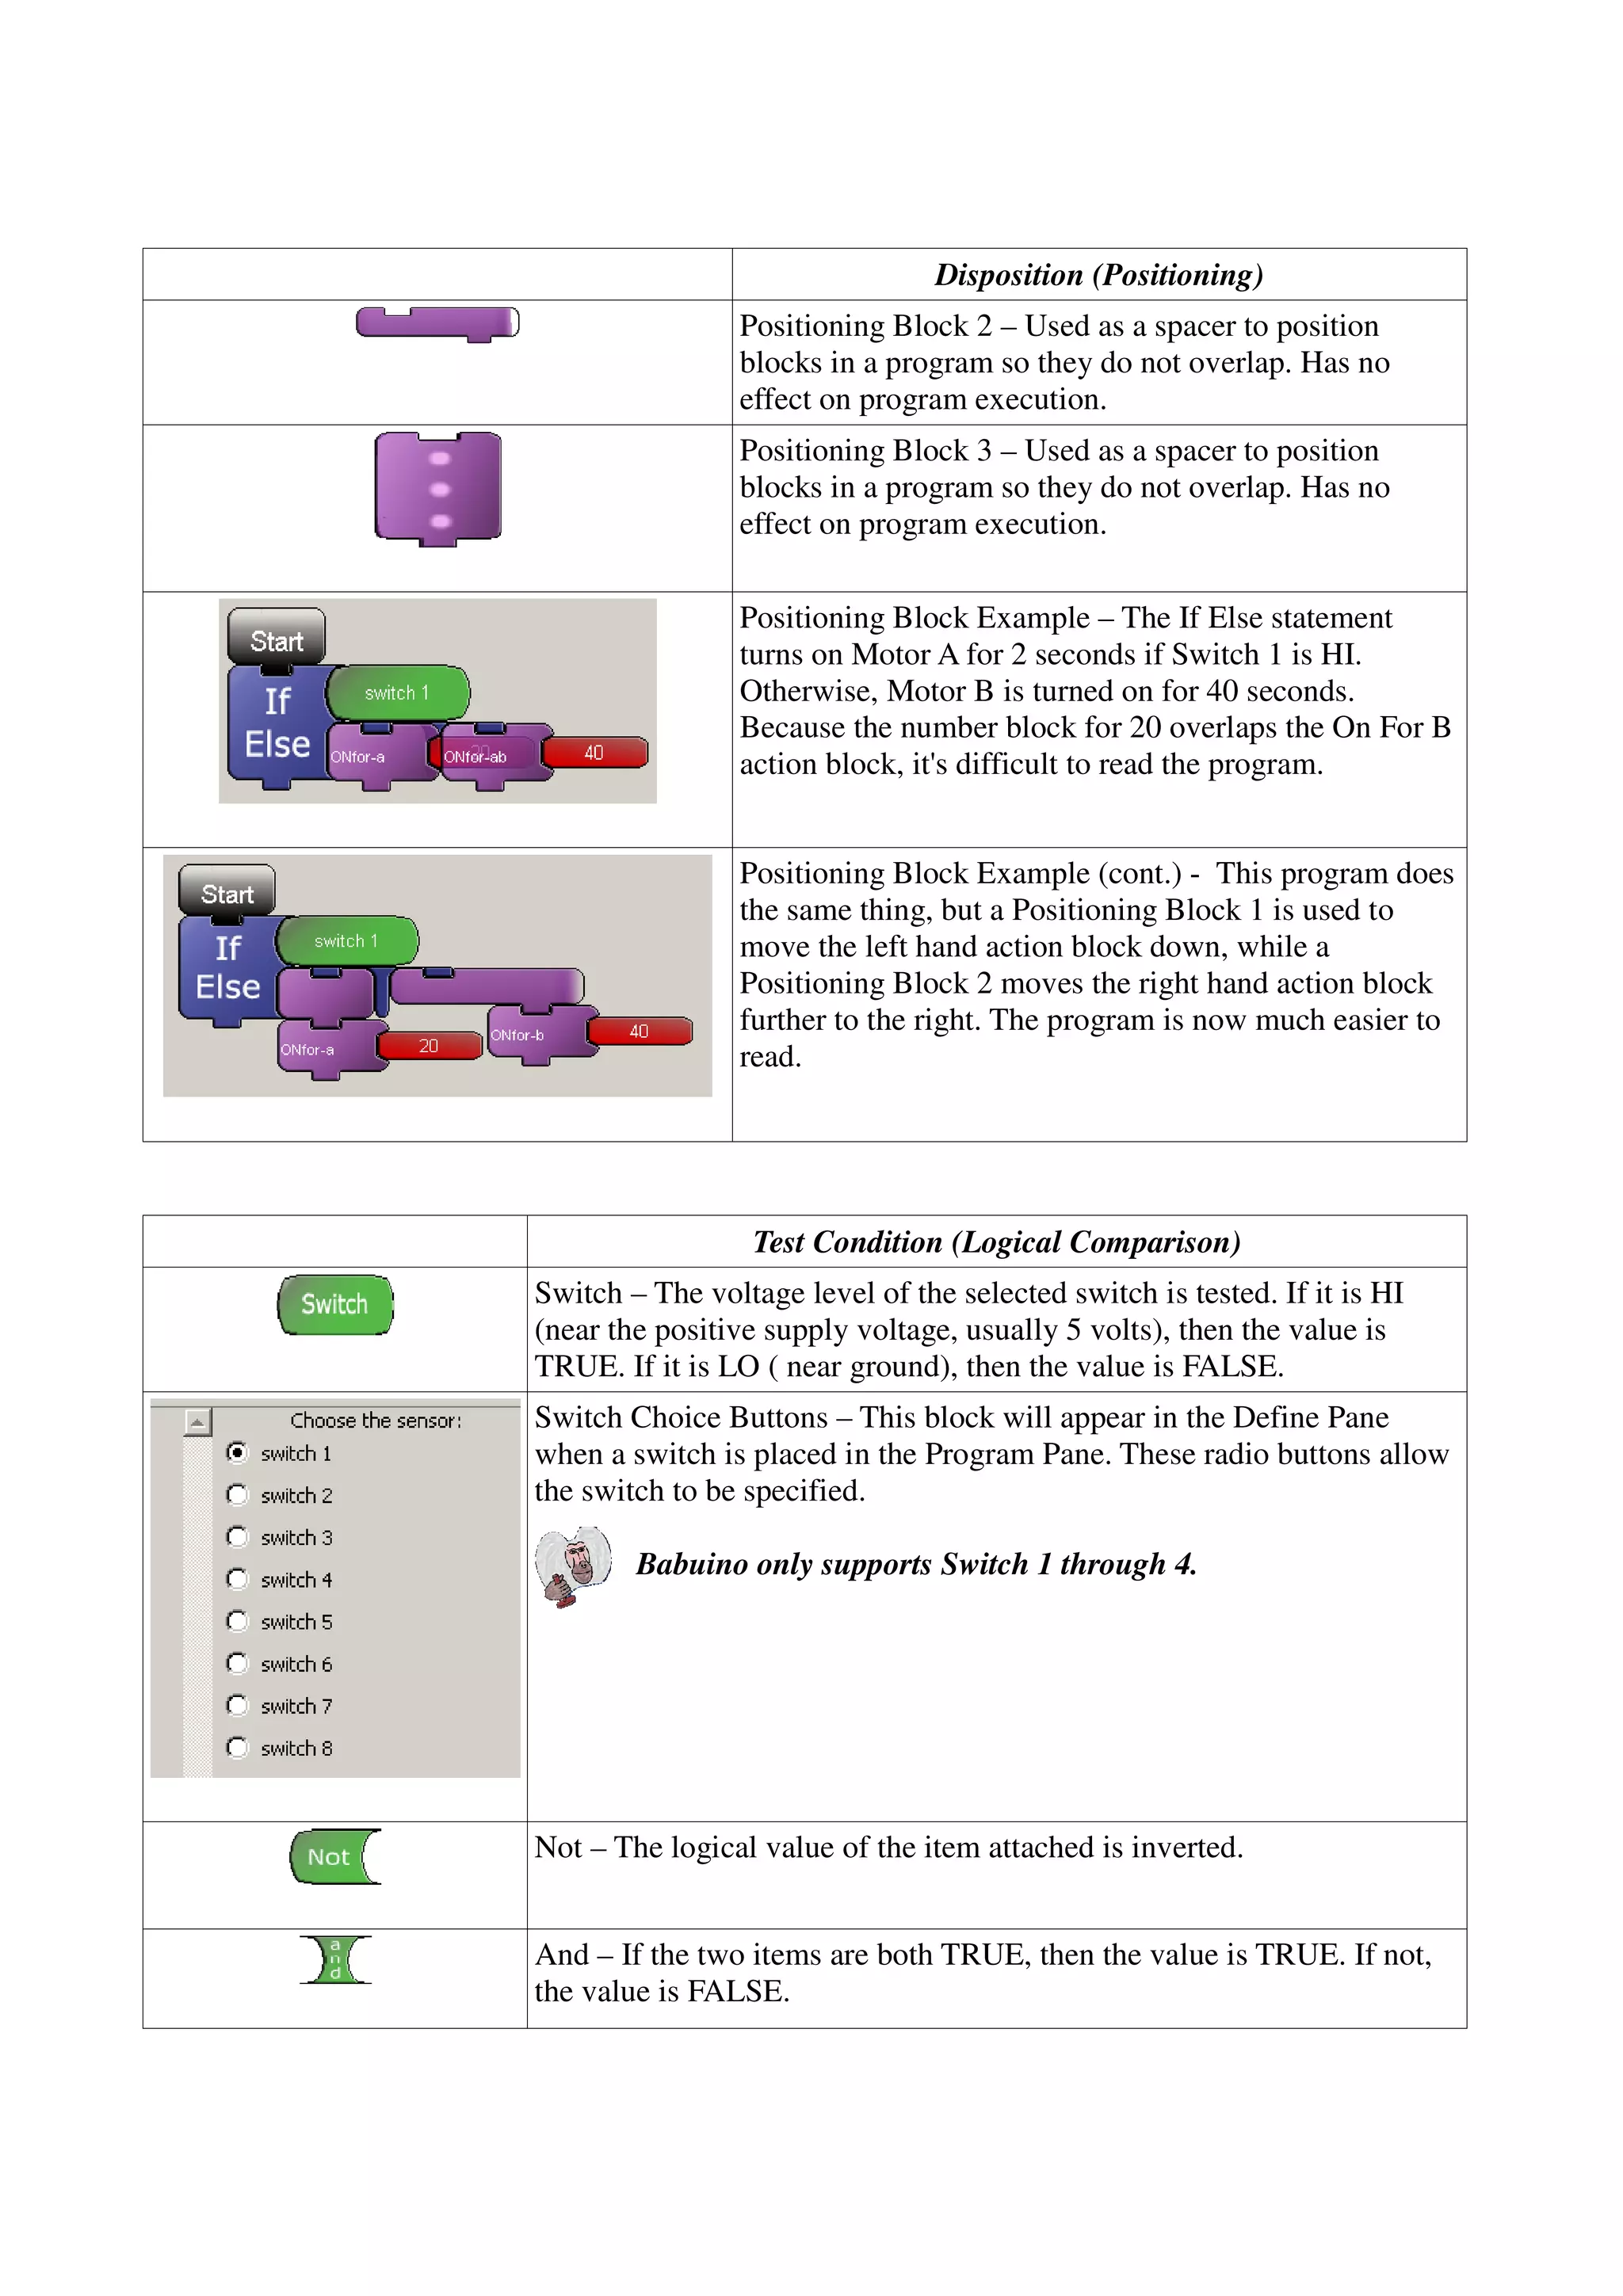
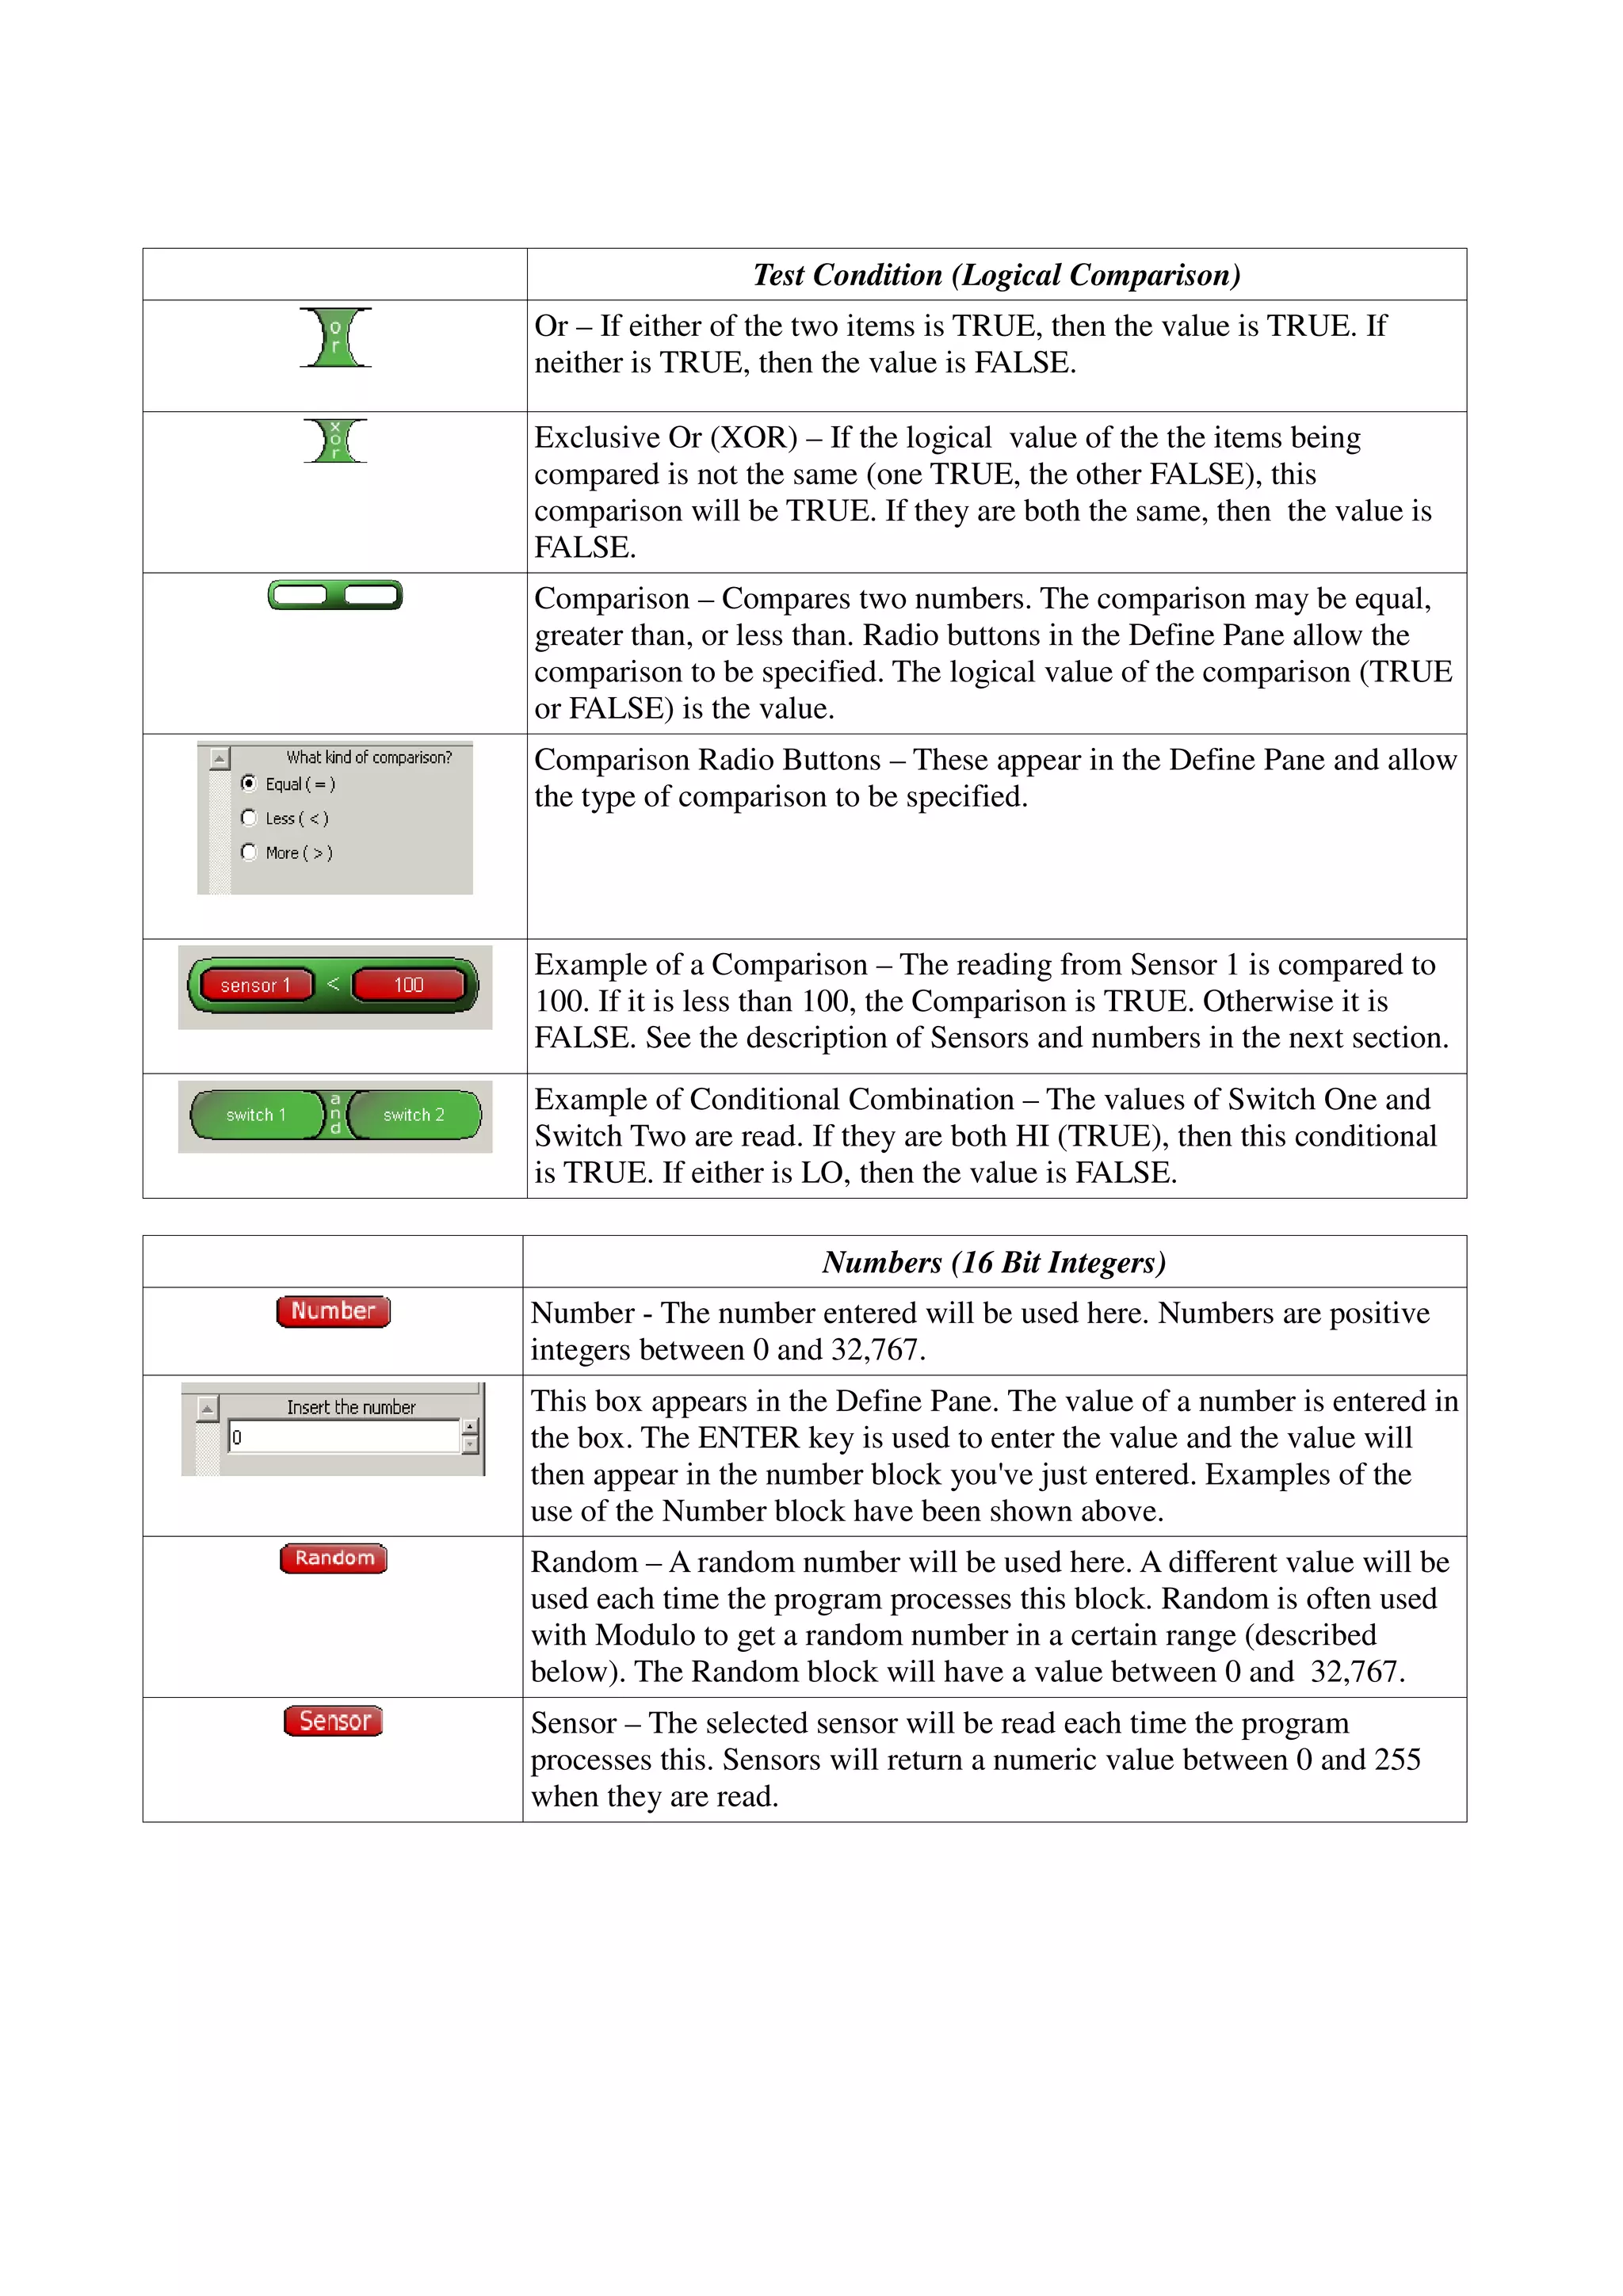
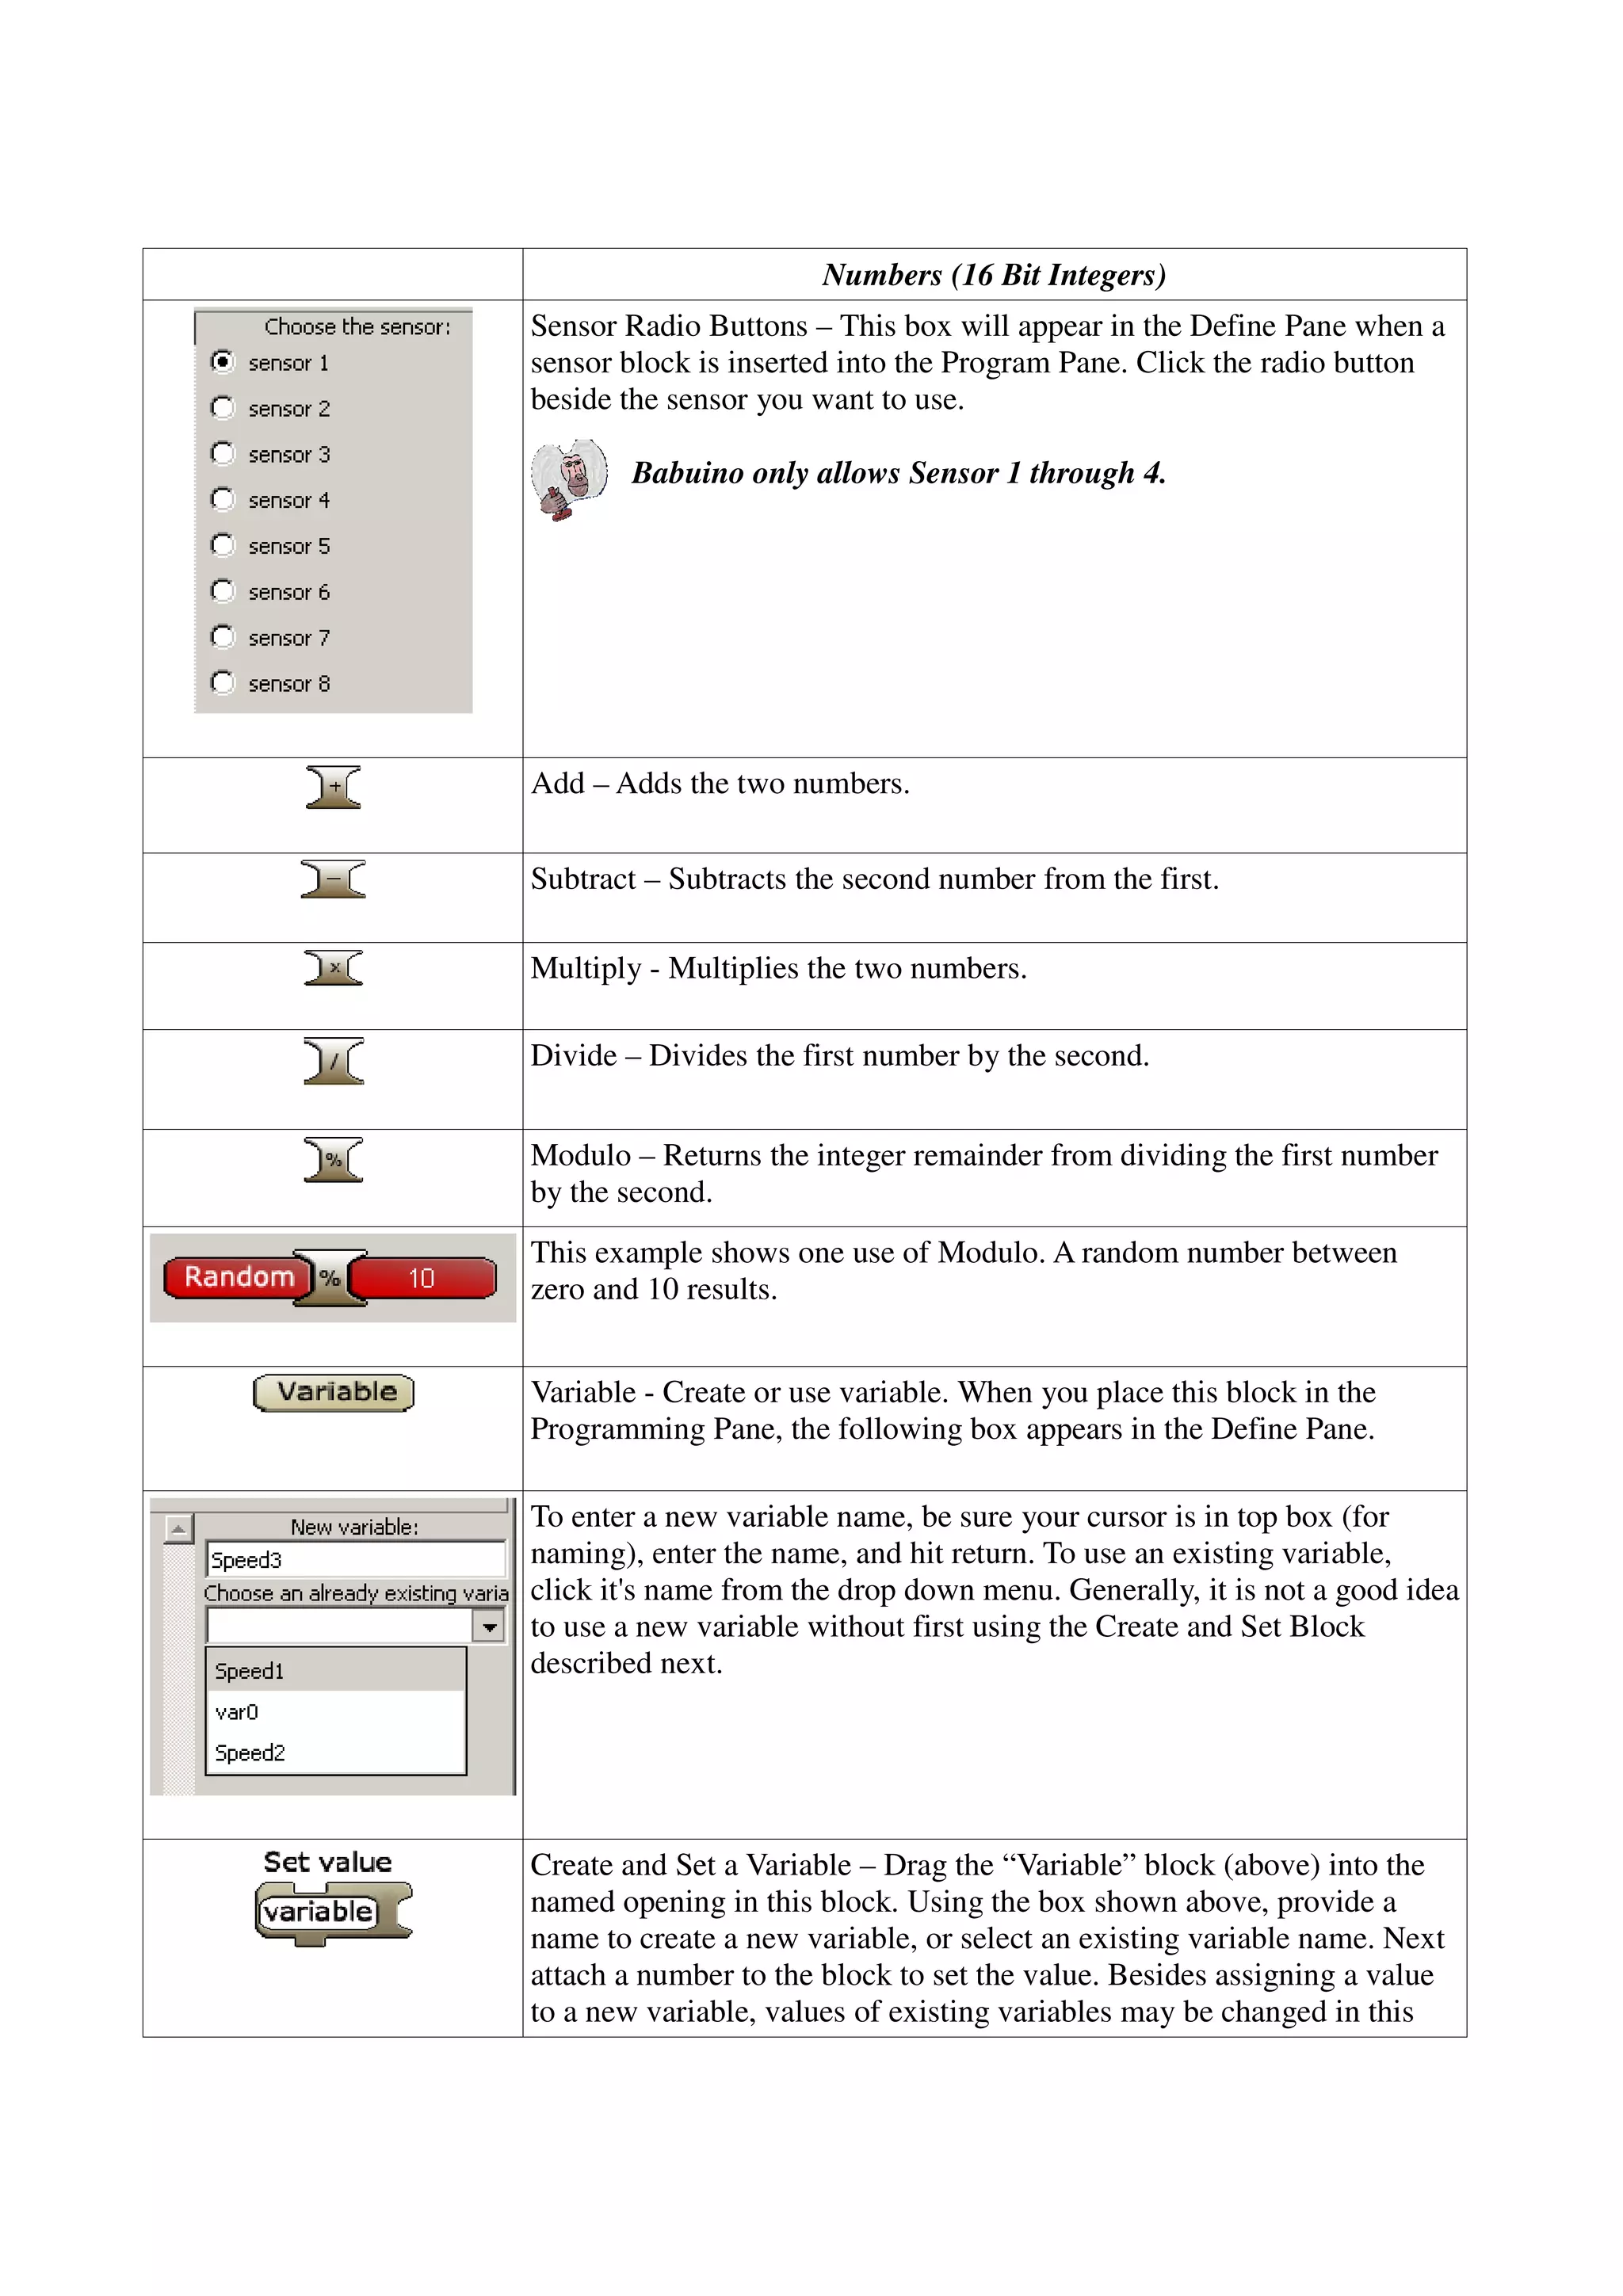
The document provides an overview of the Blocos programming environment, which allows users to program using visual blocks instead of text code. Blocos translates the blocks into Cricket Logo code, compiles it, and sends it to a controller board to execute. It supports various controller boards and can run on Windows, Linux, and Mac OS. The main window interface is described, including the blocks pane, program pane, and other areas. Command references are provided for various block types like control blocks, flow blocks, test condition blocks, and others.
GUI Programming in JAVA (Using Netbeans) - A ReviewFernando Torres
The powerpoint provides the user with a review of various concepts of GUI programming in JAVA. It covers various concepts like :
1. What is IDE ?
2. Various Methods and Properties of Components
3. Variable declaration
4. Data types
Etc
This presentation is a part of the COP2272C college level course taught at the Florida Polytechnic University located in Lakeland Florida. The purpose of this course is to introduce students to the C++ language and the fundamentals of object orientated programming..
The course is one semester in length and meets for 2 hours twice a week. The Instructor is Dr. Jim Anderson.
ACRRL
Applied Control & Robotics Research Laboratory of Shiraz University
Department of Power and Control Engineering, Shiraz University, Fars, Iran.
Instructor: Dr. Asemani
TA: Mohammad Sabouri
https://sites.google.com/view/acrrl/
I n this pdf having all the information about bottle line simulation and its ladder logic diagram and the procedure and necessary precauions taken while in designing.
User guide for iLumTech DALI USB Bridge - The DALI/USB Bridge is a control and configuration device that connects a DALI bus with any computer equipped with a USB port. The DALI/USB Bridge allows for the setting of the operating parameters defined by the DALI standard and the operating parameters of iLumTech control devices. The small form factor and wiring simplicity of the DALI/USB Bridge makes it ideal for DALI bus setup and commissioning.
Programming a UPB SW7 dimmer switch using the freely downloadable software program Upstart. Add the new dimmer switch to your UPB network to control your lighting manually, from a wall controller, or from an intelligent controller like the Web Mountain Remote Universal Controller (RUC-01). The SW7 can accept multiple styles of faceplates, from a simple single Decora style rocker, to a multi-button faceplate, which allows the SW7 to be used as a wall controller, and control multiple lights and scenes throughout the home.
10.USING THE ECLIPSE DEBUGGERupdated 8618This t.docxpaynetawnya
10.
USING THE ECLIPSE DEBUGGER
updated: 8/6/18
This tutorial assumes that you have previously completed the Getting Started with Eclipse tutorial. Since much of what you're going to do for this tutorial is identical to what you've done for that tutorial, I will refrain from providing all the details this time. If you don't remember the details of how to do something, look it up in the previous tutorial.
This tutorial uses x: to refer to the drive that you're saving your work to. In the lab, x: should be replaced by the USB drive (assuming that you're using a USB flash drive storage device). At home, x: should be replaced by the USB drive or the hard drive, whichever you prefer.
Whenever you are asked to perform an action (left column below) that you've already done before, I will refrain from providing the supplemental information (right column below). If you don't remember the details of how to do something, look for it earlier in the tutorial. I expect you to have to look up a lot of previously covered material. This is my attempt to force you to memorize how to do things.
Actions
Supplemental Information
Load Eclipse.
Create a project named tutorial2.
In creating a tutorial2 project, Eclipse will 1) create a tutorial2 folder and put it in your workspace folder, and 2) create a .project file and put it in your tutorial2 folder.
Within your tutorial2 project, create a source code file named MouseDriver.java and enter this text:
public class MouseDriver
{
public static void main(String[] args)
{
String temp = "stan";
Mouse mickey = new Mouse(temp + "dard", 100, 10);
Mouse fivel = new Mouse("standard", 100, 10);
mickey.printStatus();
mickey.simulateGrowth(4);
mickey.printStatus();
fivel.simulateGrowth(4);
if (mickey.equals(fivel))
{
System.out.println("They're equal");
}
} // end main
} // end class MouseDriver
Save the source file.
Within your tutorial2 project, create a source code file named Mouse.java and enter this text:
public class Mouse
{
private String variety; // standard, hairless, etc.
private int weight; // the mouse's weight in grams
private int growthRate; // % that mouse grows each day
private int days; // # of simulated days so far
public Mouse(String v, int w, int gR)
{
variety = v; weight = w; growthRate = gR;
} // end Mouse constructor
public void simulateGrowth(int d)
{
days += d;
while ((d > 0) || (weight > 0))
{
weight += growthRate/100 * weight;
d--;
}
} // end simulateGrowth
public void printStatus()
{
System.out.println("After " + days + " days, " +
" weight = " + weight + ".");
} // end printStatus
public boolean equals(Mouse otherMouse)
{
boolean varietyCheck, weightCheck;
varietyCheck = (variety == otherMouse.variety);
weightCheck = (weight == otherMouse.weight);
return varietyCheck && weightCheck;
} // end equals
} // end class Mouse
Save t ...
The main motive of industrial training institute is to educate desired students about the industry and the online trends in the world of IT. As we know, IT industry keeps on changing – and it always is a good idea to learn and grow in a great ambiance where you can learn better about the field regarding different prospects.
Why to Enroll for Industrial Training Courses?
Create & Develop a LIVE Project
Enhance your skills and become employable by hands-on training
Get Corporate Exposure & interact with industry experts
Get Technology Certification & Project Experience
Project based training is an important aspect of any training program and an integral part of the curriculum of all engineering and technical courses. Moreover, a student gets a chance to work on live project to sharpen his knowledge and skills. Many prestigious universities have included 6 months training program in their curriculum to help students learning and reaching their goals.
E2MATRIX Provide industrial training for all those students who want to learn software languages and methodology. We have all types of training programs as per the requirements of students. Our 6 Months Industrial Training Program is especially for last semester students of MCA, B. Tech., BE, M.sc, B.sc. Diploma etc. Students will work on LIVE PROJECTS during their 6 monthsindustrial training. So why just go to any institute for training if you have an opportunity to learn from it experts
Lab view pdf of front panel gives information about how to design design the front panel. its completely designed by National instruments and good for beginners.
Full-RAG: A modern architecture for hyper-personalizationZilliz
Mike Del Balso, CEO & Co-Founder at Tecton, presents "Full RAG," a novel approach to AI recommendation systems, aiming to push beyond the limitations of traditional models through a deep integration of contextual insights and real-time data, leveraging the Retrieval-Augmented Generation architecture. This talk will outline Full RAG's potential to significantly enhance personalization, address engineering challenges such as data management and model training, and introduce data enrichment with reranking as a key solution. Attendees will gain crucial insights into the importance of hyperpersonalization in AI, the capabilities of Full RAG for advanced personalization, and strategies for managing complex data integrations for deploying cutting-edge AI solutions.
Enchancing adoption of Open Source Libraries. A case study on Albumentations.AIVladimir Iglovikov, Ph.D.
Presented by Vladimir Iglovikov:
- https://www.linkedin.com/in/iglovikov/
- https://x.com/viglovikov
- https://www.instagram.com/ternaus/
This presentation delves into the journey of Albumentations.ai, a highly successful open-source library for data augmentation.
Created out of a necessity for superior performance in Kaggle competitions, Albumentations has grown to become a widely used tool among data scientists and machine learning practitioners.
This case study covers various aspects, including:
People: The contributors and community that have supported Albumentations.
Metrics: The success indicators such as downloads, daily active users, GitHub stars, and financial contributions.
Challenges: The hurdles in monetizing open-source projects and measuring user engagement.
Development Practices: Best practices for creating, maintaining, and scaling open-source libraries, including code hygiene, CI/CD, and fast iteration.
Community Building: Strategies for making adoption easy, iterating quickly, and fostering a vibrant, engaged community.
Marketing: Both online and offline marketing tactics, focusing on real, impactful interactions and collaborations.
Mental Health: Maintaining balance and not feeling pressured by user demands.
Key insights include the importance of automation, making the adoption process seamless, and leveraging offline interactions for marketing. The presentation also emphasizes the need for continuous small improvements and building a friendly, inclusive community that contributes to the project's growth.
Vladimir Iglovikov brings his extensive experience as a Kaggle Grandmaster, ex-Staff ML Engineer at Lyft, sharing valuable lessons and practical advice for anyone looking to enhance the adoption of their open-source projects.
Explore more about Albumentations and join the community at:
GitHub: https://github.com/albumentations-team/albumentations
Website: https://albumentations.ai/
LinkedIn: https://www.linkedin.com/company/100504475
Twitter: https://x.com/albumentations
Essentials of Automations: The Art of Triggers and Actions in FMESafe Software
In this second installment of our Essentials of Automations webinar series, we’ll explore the landscape of triggers and actions, guiding you through the nuances of authoring and adapting workspaces for seamless automations. Gain an understanding of the full spectrum of triggers and actions available in FME, empowering you to enhance your workspaces for efficient automation.
We’ll kick things off by showcasing the most commonly used event-based triggers, introducing you to various automation workflows like manual triggers, schedules, directory watchers, and more. Plus, see how these elements play out in real scenarios.
Whether you’re tweaking your current setup or building from the ground up, this session will arm you with the tools and insights needed to transform your FME usage into a powerhouse of productivity. Join us to discover effective strategies that simplify complex processes, enhancing your productivity and transforming your data management practices with FME. Let’s turn complexity into clarity and make your workspaces work wonders!
Dr. Sean Tan, Head of Data Science, Changi Airport Group
Discover how Changi Airport Group (CAG) leverages graph technologies and generative AI to revolutionize their search capabilities. This session delves into the unique search needs of CAG’s diverse passengers and customers, showcasing how graph data structures enhance the accuracy and relevance of AI-generated search results, mitigating the risk of “hallucinations” and improving the overall customer journey.
How to Get CNIC Information System with Paksim Ga.pptxdanishmna97
Pakdata Cf is a groundbreaking system designed to streamline and facilitate access to CNIC information. This innovative platform leverages advanced technology to provide users with efficient and secure access to their CNIC details.
DevOps and Testing slides at DASA ConnectKari Kakkonen
My and Rik Marselis slides at 30.5.2024 DASA Connect conference. We discuss about what is testing, then what is agile testing and finally what is Testing in DevOps. Finally we had lovely workshop with the participants trying to find out different ways to think about quality and testing in different parts of the DevOps infinity loop.
Goodbye Windows 11: Make Way for Nitrux Linux 3.5.0!SOFTTECHHUB
As the digital landscape continually evolves, operating systems play a critical role in shaping user experiences and productivity. The launch of Nitrux Linux 3.5.0 marks a significant milestone, offering a robust alternative to traditional systems such as Windows 11. This article delves into the essence of Nitrux Linux 3.5.0, exploring its unique features, advantages, and how it stands as a compelling choice for both casual users and tech enthusiasts.
Building RAG with self-deployed Milvus vector database and Snowpark Container...Zilliz
This talk will give hands-on advice on building RAG applications with an open-source Milvus database deployed as a docker container. We will also introduce the integration of Milvus with Snowpark Container Services.
Sudheer Mechineni, Head of Application Frameworks, Standard Chartered Bank
Discover how Standard Chartered Bank harnessed the power of Neo4j to transform complex data access challenges into a dynamic, scalable graph database solution. This keynote will cover their journey from initial adoption to deploying a fully automated, enterprise-grade causal cluster, highlighting key strategies for modelling organisational changes and ensuring robust disaster recovery. Learn how these innovations have not only enhanced Standard Chartered Bank’s data infrastructure but also positioned them as pioneers in the banking sector’s adoption of graph technology.
Unlocking Productivity: Leveraging the Potential of Copilot in Microsoft 365, a presentation by Christoforos Vlachos, Senior Solutions Manager – Modern Workplace, Uni Systems
Generative AI Deep Dive: Advancing from Proof of Concept to ProductionAggregage
Join Maher Hanafi, VP of Engineering at Betterworks, in this new session where he'll share a practical framework to transform Gen AI prototypes into impactful products! He'll delve into the complexities of data collection and management, model selection and optimization, and ensuring security, scalability, and responsible use.
Removing Uninteresting Bytes in Software FuzzingAftab Hussain
Imagine a world where software fuzzing, the process of mutating bytes in test seeds to uncover hidden and erroneous program behaviors, becomes faster and more effective. A lot depends on the initial seeds, which can significantly dictate the trajectory of a fuzzing campaign, particularly in terms of how long it takes to uncover interesting behaviour in your code. We introduce DIAR, a technique designed to speedup fuzzing campaigns by pinpointing and eliminating those uninteresting bytes in the seeds. Picture this: instead of wasting valuable resources on meaningless mutations in large, bloated seeds, DIAR removes the unnecessary bytes, streamlining the entire process.
In this work, we equipped AFL, a popular fuzzer, with DIAR and examined two critical Linux libraries -- Libxml's xmllint, a tool for parsing xml documents, and Binutil's readelf, an essential debugging and security analysis command-line tool used to display detailed information about ELF (Executable and Linkable Format). Our preliminary results show that AFL+DIAR does not only discover new paths more quickly but also achieves higher coverage overall. This work thus showcases how starting with lean and optimized seeds can lead to faster, more comprehensive fuzzing campaigns -- and DIAR helps you find such seeds.
- These are slides of the talk given at IEEE International Conference on Software Testing Verification and Validation Workshop, ICSTW 2022.
UiPath Test Automation using UiPath Test Suite series, part 5DianaGray10
Welcome to UiPath Test Automation using UiPath Test Suite series part 5. In this session, we will cover CI/CD with devops.
Topics covered:
CI/CD with in UiPath
End-to-end overview of CI/CD pipeline with Azure devops
Speaker:
Lyndsey Byblow, Test Suite Sales Engineer @ UiPath, Inc.
In the rapidly evolving landscape of technologies, XML continues to play a vital role in structuring, storing, and transporting data across diverse systems. The recent advancements in artificial intelligence (AI) present new methodologies for enhancing XML development workflows, introducing efficiency, automation, and intelligent capabilities. This presentation will outline the scope and perspective of utilizing AI in XML development. The potential benefits and the possible pitfalls will be highlighted, providing a balanced view of the subject.
We will explore the capabilities of AI in understanding XML markup languages and autonomously creating structured XML content. Additionally, we will examine the capacity of AI to enrich plain text with appropriate XML markup. Practical examples and methodological guidelines will be provided to elucidate how AI can be effectively prompted to interpret and generate accurate XML markup.
Further emphasis will be placed on the role of AI in developing XSLT, or schemas such as XSD and Schematron. We will address the techniques and strategies adopted to create prompts for generating code, explaining code, or refactoring the code, and the results achieved.
The discussion will extend to how AI can be used to transform XML content. In particular, the focus will be on the use of AI XPath extension functions in XSLT, Schematron, Schematron Quick Fixes, or for XML content refactoring.
The presentation aims to deliver a comprehensive overview of AI usage in XML development, providing attendees with the necessary knowledge to make informed decisions. Whether you’re at the early stages of adopting AI or considering integrating it in advanced XML development, this presentation will cover all levels of expertise.
By highlighting the potential advantages and challenges of integrating AI with XML development tools and languages, the presentation seeks to inspire thoughtful conversation around the future of XML development. We’ll not only delve into the technical aspects of AI-powered XML development but also discuss practical implications and possible future directions.
GridMate - End to end testing is a critical piece to ensure quality and avoid...ThomasParaiso2
End to end testing is a critical piece to ensure quality and avoid regressions. In this session, we share our journey building an E2E testing pipeline for GridMate components (LWC and Aura) using Cypress, JSForce, FakerJS…
Alt. GDG Cloud Southlake #33: Boule & Rebala: Effective AppSec in SDLC using ...James Anderson
Effective Application Security in Software Delivery lifecycle using Deployment Firewall and DBOM
The modern software delivery process (or the CI/CD process) includes many tools, distributed teams, open-source code, and cloud platforms. Constant focus on speed to release software to market, along with the traditional slow and manual security checks has caused gaps in continuous security as an important piece in the software supply chain. Today organizations feel more susceptible to external and internal cyber threats due to the vast attack surface in their applications supply chain and the lack of end-to-end governance and risk management.
The software team must secure its software delivery process to avoid vulnerability and security breaches. This needs to be achieved with existing tool chains and without extensive rework of the delivery processes. This talk will present strategies and techniques for providing visibility into the true risk of the existing vulnerabilities, preventing the introduction of security issues in the software, resolving vulnerabilities in production environments quickly, and capturing the deployment bill of materials (DBOM).
Speakers:
Bob Boule
Robert Boule is a technology enthusiast with PASSION for technology and making things work along with a knack for helping others understand how things work. He comes with around 20 years of solution engineering experience in application security, software continuous delivery, and SaaS platforms. He is known for his dynamic presentations in CI/CD and application security integrated in software delivery lifecycle.
Gopinath Rebala
Gopinath Rebala is the CTO of OpsMx, where he has overall responsibility for the machine learning and data processing architectures for Secure Software Delivery. Gopi also has a strong connection with our customers, leading design and architecture for strategic implementations. Gopi is a frequent speaker and well-known leader in continuous delivery and integrating security into software delivery.
Large Language Model (LLM) and it’s Geospatial Applications
Blocos command reference_pdf_78474
1. Blocos Programming Environment Manual
Last Modified in 02/19/11
What is the Blocos Programming Environment
Blocos is a iconic programing environment, where the user specifies a program with visual elements, or
blocks, instead of writing a text code (“Blocos” means “blocks” in Portuguese). The Blocos software
automatically translates each block into a statement in the Cricket Logo computer language.
The user may even see the generated text program if he wishes so, although it is not necessary – it is
expected that students when first introduced to Logo computer programming will find the visual
representation of a computer program easier to learn than its textual version.
Then, the Blocos software calls a Cricket Logo compiler which compiles the text program, generating a
byte-code sequence representing the program, and this byte-code sequence is sent to a controller board
to be executed. The Cricket Logo compiler is bundled together with the Blocos software.
Blocos has been used successfully with the following controller boards:
1. Br-Gogo Board ( http://sourceforge.net/projects/br-gogo/ )
2. Babuino Board ( http://babuinoproject.blogspot.com/ ).
3. Gogo Board (http://www.gogoboard.org)
Blocos is written in Python, therefore it may be executed in Windows, Linux, and Mac.
Through this document, this icon indicates that the following note is valid only when using a
Babuino board
2. The Blocos Main Window
Start Blocos in the usual manner on your PC. On Windows, double click the file Blocos.py in the
Blocos Folder.
Blocos Main
Window
This is the Blocos window that will appear in a few seconds after you start Blocos.
The different areas are labeled in blue. Descriptions of these follow.
A command window for Python (below) will also start on Windows 2K and XP, and
will fill with debug statements as you use Blocos. For the most part, you can ignore
these. Sometimes you may use this window to help debug problems if you find any.
Post first to the Babuino or Blocos forums.
Python Window
3. Blocos Main
Window
Blocks Pane Click any block in this pane and move your cursor to the Program Pane. The block
you clicked will appear under the cursor so you can position it and drop it by
clicking.
Blocks Tabs Click these tabs for different Menus of Blocks. Note Arrows at top and bottom of
the displayed Tabs. These will scroll the displayed Blocks Tabs.
Program Pane Blocks are assembled here to build a program. The Start block will always appear
and always starts a program. Blocks “click” together when they are brought close to
each other. The shapes of the Blocks give direct clues as to what Blocks fit together.
Descriptions of the Blocks follow.
Define Pane For certain blocks, radio buttons appear here to choose options and boxes appear in
which values are entered. These are shown in the Command Reference sections.
Menu Bar Mostly, the Menu entries work as you would expect. There is currently no Help – if
you need help beyond the Command Reference which follows, use the Babuino or
Blocos forums.
Use View to see the Logo code that your program generates. For the most part, this
is of little use unless you want to use Cricket Logo. Then you can cut and paste the
code from Blocos into Cricket Logo. (I'm not sure why you'd want to do this, but
it's possible.)
Use File to create new programs or to load existing ones. You may want to create a
directory to hold your Blocos programs. Blocos does not create a specific directory
for this purpose.
4. Blocos Main
Window
Download Click to download a program to the actual robot hardware board. All Blocks in the
Program Pane will be downloaded. So if you have blocks that are not part of a
program, delete them or they could confuse your robot.
Blocos Command Reference
Control (Motors)
On – Turns on one or more motors. Motor Selection Buttons appear in
the Define Pane and are described below.
Off – Turns off one or more motors. Motor Selection Buttons appear in
the Define Pane and are described below.
On for – Turns on one or more motors for a specified time. Motor
Selection Buttons appear in the Define Pane and are described below.
Reverse – Reverses the direction of rotation of one or more motors.
Motor Selection Buttons appear in the Define Pane and are described
below.
5. Control (Motors)
Brake – Stops one or more motors as rapidly as possible. Motor Selection
Buttons appear in the Define Pane and are described below.
Clockwise – Sets direction of one or more motors to Clockwise. If your
motor turns in the wrong direction, simply swap the wires on the
connectors.
Anti Clockwise - Sets direction of one or more motors to Anti, or
Counter, Clockwise. If your motor turns in the wrong direction, simply
swap the wires on the connectors.
Motor Selection Buttons – These are presented in the Define Pane when
a Motor Block is selected. Click the boxes to select the motor or motors
to be affected by the block.
Babuino currently supports only Motor A and Motor B.
Power – Set the power for one or more motors. Only values between 0
and 7 should be used. 0 is off and 7 (default) is maximum power. Pulse
Width Modulation is used to vary the speed of the motors. Undefined
behavior may result if values greater than 7 are used.
Position – Sets the angular position of a servo motor.
Currently not implemented on Babuino since servo motors are
not supported.
Flow
If – The test block is evaluated. If it is TRUE, the action blocks are
executed and the program flow continues. If the test block is FALSE, the
program continues without executing the action blocks.
If Else – The test block is evaluated. If it is TRUE, the action blocks on
the left side are executed and the program flow continues. If the test
block is FALSE, the action blocks on the right side are executed and the
program flow continues.
Loop – The action blocks are continually repeated.
Repeat - The action blocks are repeated for the number of times
specified.
Wait Until – Waits until the test block attached to it becomes TRUE, then
program execution continues.
6. Flow
If Statement Example – The test block is Switch One. If it is pressed, the
test block is TRUE and Motor A will be turned off. If Switch One is not
pressed, then the If statement will have no effect.
*** These examples all assume that switches are HI, or connect to
positive voltage (not ground), when pressed and are LO, or at ground,
when released. ***
If Else Statement Example – The test block is Not (Switch Two). That is,
the sense of Switch Two will be inverted. If Switch Two is pressed, the
test block is FALSE and Motor B will turn on and Motor A will turn off.
If Switch Two is not pressed, the test block is TRUE and Motor A will
turn on while Motor B will turn off. Execution continues with the
statement after the If Else.
Loop Statement Example – Motor A will turn on for 2 seconds (twenty
tenths of a second), then reverse. Since this is a loop, Motor A will run
for another 20 seconds and reverse again. This behavior will continue
forever (or until the batteries go dead). Most robotics programs use a
single loop.
Repeat Statement Example – Motor A turns on. After 2 seconds, it
reverses. Then it reverses again; and one more time (Three times total).
Execution continues with the statement after the Repeat. The number 3
specifies the number of repeats.
Wait Until Statement Example – Motor A turns on. It remains on until
Switch One is HI. Once the test block (Switch One) becomes TRUE,
execution continues and Motor A is turned Off.
Disposition (Positioning)
Positioning Block 1 – Used as a spacer to position
blocks in a program so they do not overlap. Has no
effect on program execution.
7. Disposition (Positioning)
Positioning Block 2 – Used as a spacer to position
blocks in a program so they do not overlap. Has no
effect on program execution.
Positioning Block 3 – Used as a spacer to position
blocks in a program so they do not overlap. Has no
effect on program execution.
Positioning Block Example – The If Else statement
turns on Motor A for 2 seconds if Switch 1 is HI.
Otherwise, Motor B is turned on for 40 seconds.
Because the number block for 20 overlaps the On For B
action block, it's difficult to read the program.
Positioning Block Example (cont.) - This program does
the same thing, but a Positioning Block 1 is used to
move the left hand action block down, while a
Positioning Block 2 moves the right hand action block
further to the right. The program is now much easier to
read.
Test Condition (Logical Comparison)
Switch – The voltage level of the selected switch is tested. If it is HI
(near the positive supply voltage, usually 5 volts), then the value is
TRUE. If it is LO ( near ground), then the value is FALSE.
Switch Choice Buttons – This block will appear in the Define Pane
when a switch is placed in the Program Pane. These radio buttons allow
the switch to be specified.
Babuino only supports Switch 1 through 4.
Not – The logical value of the item attached is inverted.
And – If the two items are both TRUE, then the value is TRUE. If not,
the value is FALSE.
8. Test Condition (Logical Comparison)
Or – If either of the two items is TRUE, then the value is TRUE. If
neither is TRUE, then the value is FALSE.
Exclusive Or (XOR) – If the logical value of the the items being
compared is not the same (one TRUE, the other FALSE), this
comparison will be TRUE. If they are both the same, then the value is
FALSE.
Comparison – Compares two numbers. The comparison may be equal,
greater than, or less than. Radio buttons in the Define Pane allow the
comparison to be specified. The logical value of the comparison (TRUE
or FALSE) is the value.
Comparison Radio Buttons – These appear in the Define Pane and allow
the type of comparison to be specified.
Example of a Comparison – The reading from Sensor 1 is compared to
100. If it is less than 100, the Comparison is TRUE. Otherwise it is
FALSE. See the description of Sensors and numbers in the next section.
Example of Conditional Combination – The values of Switch One and
Switch Two are read. If they are both HI (TRUE), then this conditional
is TRUE. If either is LO, then the value is FALSE.
Numbers (16 Bit Integers)
Number - The number entered will be used here. Numbers are positive
integers between 0 and 32,767.
This box appears in the Define Pane. The value of a number is entered in
the box. The ENTER key is used to enter the value and the value will
then appear in the number block you've just entered. Examples of the
use of the Number block have been shown above.
Random – A random number will be used here. A different value will be
used each time the program processes this block. Random is often used
with Modulo to get a random number in a certain range (described
below). The Random block will have a value between 0 and 32,767.
Sensor – The selected sensor will be read each time the program
processes this. Sensors will return a numeric value between 0 and 255
when they are read.
9. Numbers (16 Bit Integers)
Sensor Radio Buttons – This box will appear in the Define Pane when a
sensor block is inserted into the Program Pane. Click the radio button
beside the sensor you want to use.
Babuino only allows Sensor 1 through 4.
Add – Adds the two numbers.
Subtract – Subtracts the second number from the first.
Multiply - Multiplies the two numbers.
Divide – Divides the first number by the second.
Modulo – Returns the integer remainder from dividing the first number
by the second.
This example shows one use of Modulo. A random number between
zero and 10 results.
Variable - Create or use variable. When you place this block in the
Programming Pane, the following box appears in the Define Pane.
To enter a new variable name, be sure your cursor is in top box (for
naming), enter the name, and hit return. To use an existing variable,
click it's name from the drop down menu. Generally, it is not a good idea
to use a new variable without first using the Create and Set Block
described next.
Create and Set a Variable – Drag the “Variable” block (above) into the
named opening in this block. Using the box shown above, provide a
name to create a new variable, or select an existing variable name. Next
attach a number to the block to set the value. Besides assigning a value
to a new variable, values of existing variables may be changed in this
10. Numbers (16 Bit Integers)
manner. See the example below.
Example of setting and using variables – The variable named “Speed1”
is created and assigned a value of 3. The variable named “Speed2” is
created and assigned a value of 1. The Power of Motor A is set to the
value of variable Speed1 (in this case, 3).
Sixteen variables may be defined and used in a program.
Time
Time – Used to set a time delay in tenths of a second. The
following box will appear in the Define Pane.
This is the box that will appear in the Define Pane and allow a
Time value to be set.
Timer – This block represents the current value of the 16 bit timer.
The value rolls over at 65,535 or about every 65.535 seconds.
Time is in milliseconds with a four millisecond granularity.
Reset Timer – Causes the internal 16 bit timer to be reset to zero.
Allows more accurate time delays to be specified.
Wait For – Causes program execution to pause for the time
indicated. It should have a Time Block attached to it, although a
Number block can be used also.
Example of Timer Use – This example shows how Reset Timer
and Timer may be used for a time delay with more than 0.1 second
resolution. In this case, we turn on Motor A for 640 milliseconds,
then turn it off for 2 seconds, and repeat forever. Reset Timer starts
the timer at 0. When the timer reaches 640, the comparison is
TRUE and Motor A is turned off. Be sure the time delay you
specify is more than the time it takes to execute the blocks before
the comparison if you want it to be accurate. Avoid comparing for
“=” since there is some uncertainty in the Timer.
Others (Miscellaneous)
Beep – Causes the Beeper to sound for 50 milliseconds. There will be a
minimum pause of 50 milliseconds before another beep.
11. Others (Miscellaneous)
Comment – Used to insert comments into a program. Has no effect on
program execution.
Led ON – Turns on the User Led.
Led OFF – Turns off the User Led.
Show
Not implemented on Babuino.
Comment Example – This is an example of a comment block that can be
used in a program. It has no effect on a program and is not downloaded.
Procedures
New Procedure – Used to define a new procedure (also
called a function or subroutine).
End – Used to end a procedure definition
12. Procedures
When a new procedure is defined, a block with the
new name is created. Here is the Blocks Pane when the
Procedures Blocks Tab is chosen.
The purpose of defining a new procedure block is to
group a number of blocks that are used repetitively in
your program. This allows you to reuse the set of
blocks easily without having to re-enter them each
time. It also keeps your program shorter and clearer.
When the New Procedure block is selected and placed
into the Program Pane, this box will appear in the
Define Pane. Enter a name for your new procedure.
Here is how the Blocks Pane will appear after a new
procedure is named. A new block with the new name is
added. The new Procedure is defined in the Program
Pane.
There's very little room for names, so they're usually
very short. If many new procedures are defined, then
it's good to add comments with Comment Blocks to
explain what they each do.
Complete the definition of your new procedure by
adding blocks and ending with an End block.
Don't delete the new procedure from the program
window! It must remain.
Using a new Procedure – Once defined, the new
procedure may be used just like any other action block.
It may be used as often as you like in your main
program. Each time it is encountered, the blocks in
your procedure will be executed.
Programming with Blocos
This section is tutorial in nature and explains how to use Blocos to create and modify programs.
13. Programming with Blocos
Starting Out Start Blocos as described above. The Main Window will appear. You build
your program by choosing blocks from the Blocks Pane and assembling
them in the Program Pane. The Start Block will always be the first block
in your program. Once you have assembled your program, you can save it
using File from the Menu Bar.
Use the Blocks Tabs to find the blocks you want to use. To add a block to
your program, click the block and move your cursor to the Program Pane.
The block will appear under your cursor. Drag it where you want it and
click again to drop it in place.
Simple Example – Here is a very simple example program. This program
simply turns on Motor A for 3 seconds and reverses it. Starting with this,
we'll learn how to change, delete, and move blocks.
Changing a Block - Step 1 – We'll change the time block from 30 to 40.
To change a block, begin by clicking on it. The block will turn gray and a
red arrowhead will appear beside it. If there is a box or radio buttons
associated with the selected block, it will appear in the Define Pane and
changes may be made. In this case, we use the box (not shown – see
example in Command Reference above) to enter 40 for the time value.
Press the ENTER key and the new value will appear in the gray block.
Changing a Block - Step 2 – To complete the change, click any where in
the Program Pane except on the gray block. If we click on another block,
it will turn gray and the red arrowhead will appear beside it. Clicking
anywhere else in the Program Pane will return all blocks to their normal
colors, turn off the red arrowhead, and clear the Define Pane. The block
we changed will now appear in its original color with the change we
made.
14. Programming with Blocos
Moving and Adding blocks - Step 1 – We'll add a block to our program to
make the motor start turning in the Anticlockwise (counterclockwise)
direction. Since we want that block to be first, we have to move the other
blocks to make room for it.
To move a block, click and drag it a small distance from its original
position. Any blocks attached below or to the right of the selected block
will move with it. In this example, we've moved the blocks below Start
away so we can insert the Anticlockwise block. we click the OnFor block.
That block and all the others below it will turn gray. We then dragged
them away from Start.
Moving and Adding blocks - Step 2 – We now click the Anticlockwise
block in the Blocks Pane and move our cursor to the Program Pane. The
Anticlockwise block appears under our cursor. We drag it below the Start
block and click to drop it in place.
Moving and Adding blocks - Step 3 – Now we click the OnFor Block
again and drag it below the Anticlockwise block. Move the cursor
anywhere in the Program Pane, off the blocks, and click again and our
block addition is complete.
Taking blocks apart and Deleting Blocks- Step 1 – Suppose we decide we
really don't want the Anticlockwise block after all and want to delete it.
Step 1 is to click the Anticlockwise block and drag it away from the Start
block. Notice that all the other blocks turn gray and move along with it.
If you don't move the blocks far enough from Start, they'll snap back and
reconnect. If that happens, just try again and move the blocks a little
farther.
If we press the DELETE key, all the blocks are deleted and we're left with
only the Start block. We can use Edit Undo from the Menu Bar to recover
our work. Proceed as follows to delete only the desired block.
15. Programming with Blocos
Taking blocks apart and Deleting Blocks- Step 2 - To isolate the
Anticlockwise block, first click anywhere in the Program Pane (except on
a block) to de-select all the blocks. Then click on the OnFor block and
drag it and all the blocks below it away from the Anticlockwise block.
Taking blocks apart and Deleting Blocks- Step 3 – Now click on the
Anticlockwise block to select it.
Taking blocks apart and Deleting Blocks- Step 4 – To complete our
change, press DELETE to delete the Anticlockwise block, click and drag
the OnFor block below the Start block, and click anywhere in the Progarm
Pane.
Besides learning to delete blocks, we've also learned how to take blocks in
a program apart so we can move or reorder them. We'll do this lots as we
build our Blocos programs for Babuino.
Although this might seem like a lot of work and clumsy at first, a little
practice and this becomes easy and intuitive.
Copy and Paste – Select a block or group of blocks in the manner
described above. Then use [CTRL]C to copy the block and [CTRL]V to
paste a copy into the Program Pane. This can save a lot of time navigating
menus.
Created February 24, 2010 by Jim Larson (“doctek”)
Thanks to Brett Nelson for his helpful review and suggestions.
Most of all, thanks to the Blocos and Babuino an Gogo Board teams for their wonderful creations!
16. If you have comments or corrections, please post to the Blocos or Babuino or Gogo Board Forums