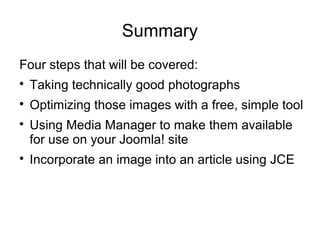
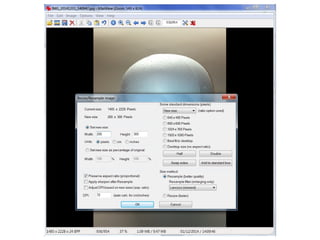
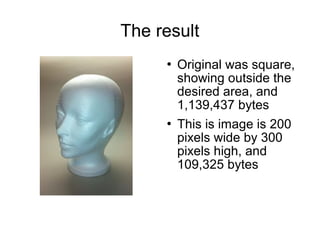
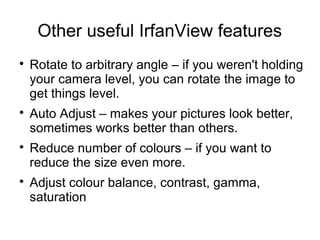
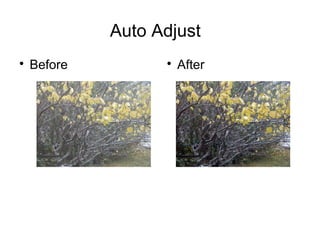
Photography for Joomla! 
Tips on how to take technically good photographs 
and use them on your Joomla! Web site. 
Presented by: 
Douglas Pickett 
9 December 2014, 
for 
Joomla! User Group Toronto
Summary 
Four steps that will be covered: 
 Taking technically good photographs 
 Optimizing those images with a free, simple tool 
 Using Media Manager to make them available 
for use on your Joomla! site 
 Incorporate an image into an article using JCE
Caveats 
 Some parts of this presentation will be my 
personal opinions. Others may disagree with 
my opinions. They're welcome to. 
 I'm not trying to teach you to be a great 
photographer – I've been trying for the better 
part of a lifetime and I don't think I'm there yet, 
so I'm not going to be able to do that for you in 
one short presentation. 
 I'll be quoting some generally accepted rules for 
photographers – but rules are made to be 
broken. 
 What I hope to do is help you create a well-exposed,
Blatant Personal Opinion 
 I see a lot of web sites where every single 
image is from a stock image site, and it makes 
me very suspicious. I look at that, and it makes 
me wonder if it is real or a scam. 
 If you want to do a little checking on this, look at 
reverse image search software like TinEye 
(https://www.tineye.com/) 
 Remember too that you only get what you pay 
for from sites like https://www.fiverr.com/ - one 
company I once did a search on shared its 
corporate logo (with minor variations) with half 
a dozen other sites, including a tattoo parlour. 
Did they get their logo from Fiverr? Well,
Types of images 
What you want to put on your site is wide and 
varied, but I'll touch on a small group of general 
categories, which I hope will cover a lot of 
them. 
 Portraits – add that personal touch by putting 
your own, or your clients, real people on the 
site 
 Architecture – your physical storefront or shop, 
if applicable, but outdoor photography in 
general. 
 Objects – things you sell. 
Shiny objects – a subset of Object, but with
What you need 
If you're a pro, you can spend a lot of money on 
this. I'm going to suggest some stuff that you 
may already have, or can purchase 
inexpensively, or improvise. 
 Camera 
 Lights and/or reflectors 
 Backgrounds 
 Tripod or equivalent
Camera 
 Most of us have a phone with a camera in it – a 
reasonable choice if you don't have an 
alternative. 
 If you have an actual digital camera, it would be 
nice if it has an “optical” zoom, not just a 
“digital” zoom, especially for portraiture. 
 Also cameras have the mount where you can 
screw them onto a tripod, which will be 
necessary under some circumstances.
Lighting 
 I'm going to offer a radical suggestion – under 
many situations don't use the built-in flash of 
your camera/phone. 
 Most digital cameras are sensitive enough that 
you can use ambient light, and the picture you 
take will look like what you're seeing. You won't 
end up making the objects in the foreground 
well lit, with a dark background, and you won't
Lighting, continued 
 One exception to using the in-camera flash is 
when you put your camera into the “always 
flash” mode, and your scene is well enough lit it 
doesn't actually need the flash. 
 This can help to highlight the central area of the 
image, especially for portraits. 
 But you'll want to review this to see if the 
balance between the main lighting and the flash 
is good, and you're not getting bad reflections.
Lighting, continued 
 As applicable, you may want up to four 
positionable light sources (key, fill, hair or 
kicker, background). But more or less can be 
used. 
 For shiny objects you'll want to use a 
translucent cone or box. 
 For outdoor photography, try to avoid putting 
the sun at the back of your subject. This may 
mean moving your position or that of your 
subjects where possible. You may need to do 
something to fill in the shadows. Shooting on 
an overcast day or near sunrise/sunset may be 
a choice.
Backgrounds 
 You may not have a choice, like with a building, 
but look behind what you're photographing. 
You may want to move your position or the 
subjects position to avoid busy backgrounds or 
objects growing out of peoples heads. 
 Under controlled circumstances, use a blank 
pale coloured wall, or a roll of paper, or a large 
sheet of paper, to create a background. Your 
choice will depend on the size of what you're 
photographing.
Tripod 
 You don't have to spend a lot on a tripod, but it 
will help you get the best image, especially in 
low light conditions where the exposure is 
longer. 
 Phones don't come with the threaded mount 
that allows you to put it on a standard tripod, 
but there are adapters that will do that. 
 You could take your phone, put it on top of 
some books, and then “sandbag” it (a couple of 
bags of dried beans?) to hold it in position.
Handheld images 
 Especially with a phone, you're likely to shake 
the camera as you press the shutter button, or 
touch the screen. 
 To reduce this, select the mode that introduces 
a delay after triggering the shutter before the 
picture is taken. 
 You can then leave the camera in its mount, or 
brace your arms, so it will be a still as possible 
when the picture is taken. 
 Exception – moving objects. Try to move your 
camera to track the moving object – it will blur 
the background but improve the moving object.
Why all this? 
 Start off with as good an image as possible – 
the less work you have to do after the fact the 
better. 
 Hold the camera level – this helps with the first 
point. 
 It probably has something to do with the fact 
that I started with a rangefinder camera, but I 
never count on getting exactly the image I see 
as the resulting image – leave a border that 
you'll edit out later.
Portraits 
 Lighting – Butterfly or Loop 
 Butterfly – main light shining straight on face, 
creating a symmetrical shadow under the nose, 
often considered best for women. 
 Loop (a variant on “Rembrandt” lighting) – main 
light at 45 degrees off axis, fill off to the other 
side (white card or foamboard may replace the 
fill light) 
 Both will have a hair or kicker light – above and 
behind shining on head 
 Background light on your background
Portrait, Continued 
 Torso at an angle to the camera. 
 Head turned partly or fully towards the camera. 
 Some suggest that men should look into the 
camera, and women off to the side. 
 Camera at eye level or above. 
 Ideally use a moderate telephoto setting, not 
wide angle. 
 Don't shoot up the nostrils! 
 Watch out for objects growing out of the head.
Background Light
Highlight
Fill
Key
Result
Architecture 
 Use a longer lens if possible 
 Consider taking a picture on a day with 
overcast, especially if the building is north 
facing – softens the shadows 
 If east facing, consider taking picture at dawn 
 If west facing, consider taking picture at sunset
Outdoor pictures of people 
 Try to avoid putting the sun behind them 
 Try to avoid facing directly into the sun 
 Using large sheets of white cardboard or 
foamboard to reflect light into the shadows may 
improve images taken in bright sunlight. 
 Depending on distance, and the power of a 
flash, turn on mandatory flash to help reduce 
shadows.
Small Objects 
 Lighting can be the same as for portraits 
 Use sheet of cardboard as “seamless” 
background, wrapping from under the object 
and up as the background 
 Keep a gap from the background, you may 
want to raise the object up if it can be done.
Shiny Objects 
 You are trying to avoid taking a picture of your 
own reflection. 
 Put the item on a plain background, or a light 
box to illuminate from underneath, then 
construct a cone or a box of translucent 
material. The object is inside the cone or box. 
Shine the lights in from the outside 
 Take the picture through a small opening 
through the apex of the cone, or through the 
side of the box. 
 This should eliminate most of the unwanted 
view of the environment around the item.
What Next? 
 You now have a good image that you can 
prepare for your web site. 
 We need to eliminate the extraneous part of our 
image (remember, I suggested you leave a 
margin around your images), and take into 
account that the shape of the image may not be 
what you need on your site. 
 You'll need to adjust the resolution down to 
something that works for your site, and doesn't 
take too long to load.
Editing Software 
 Options? 
 Photoshop is the choice for pro's – but it costs 
a lot of money, and has a significant learning 
curve. 
 GIMP – freely available, but still has a 
significant learning curve. 
 IrfanView – what I'll be talking about, free 
(although donations are appreciated), quick 
learning curve, but not nearly as powerful as 
Photoshop or GIMP. PC only.
IrfanView 
 Downloadable from http://www.irfanview.com/
Crop, Resize, Save 
 Most of the time, these are the steps I use. 
 Crop – select the part of the image I want, in 
the ratio that I need for the site 
 Resize – reduce the number of pixels while still 
keeping the desired vertical vs. horizontal ratio. 
 Save the result – usually as a JPEG or PNG
Rule of Thirds 
 Often useful rule for composing a picture 
 Draw imaginary lines horizontally and vertically 
dividing the image space in thirds 
 Usually the composition of the picture works 
best if you align key features of your subject 
along these lines.
The result 
 Original was square, 
showing outside the 
desired area, and 
1,139,437 bytes 
 This is image is 200 
pixels wide by 300 
pixels high, and 
109,325 bytes
Other useful IrfanView features 
 Rotate to arbitrary angle – if you weren't holding 
your camera level, you can rotate the image to 
get things level. 
 Auto Adjust – makes your pictures look better, 
sometimes works better than others. 
 Reduce number of colours – if you want to 
reduce the size even more. 
 Adjust colour balance, contrast, gamma, 
saturation
Auto Adjust 
 Before  After
Number of Colours 
 256 colours  Greyscale 16 colours
Media Manager 
 Used to load your images onto your website 
 Helps to organize the images 
 Create multiple sub-directories to help organize 
the images 
 This can be useful with some slideshow or 
image gallery software where you specify the 
contents of a directory to be displayed, rather 
than selecting individual images.
Insert image in article using JCE 
 Position cursor at insertion point 
 Select image 
 Set options, alignment, border, rollover action, 
styles, and more
Biography 
Douglas Pickett, Vogg Technology Limited. 
dpickett@voggtech.ca 
 As a photographer, started serious photography 
in high school with a hand-me-down 35mm 
rangefinder camera, mostly taking black&white 
photos because colour was so expensive. 
Studied film making, with Super 8 cameras, in 
his high school's Film Arts program, and 
received a couple of regional awards 
 Over 40 years studying and working in the IT 
field, both software development, system 
administration, and network design and 
administration. The last several years he's

Photography for Joomla!, presented at JUGT 9 December 2014

  • 1.
    Photography for Joomla! Tips on how to take technically good photographs and use them on your Joomla! Web site. Presented by: Douglas Pickett 9 December 2014, for Joomla! User Group Toronto
  • 2.
    Summary Four stepsthat will be covered:  Taking technically good photographs  Optimizing those images with a free, simple tool  Using Media Manager to make them available for use on your Joomla! site  Incorporate an image into an article using JCE
  • 3.
    Caveats  Someparts of this presentation will be my personal opinions. Others may disagree with my opinions. They're welcome to.  I'm not trying to teach you to be a great photographer – I've been trying for the better part of a lifetime and I don't think I'm there yet, so I'm not going to be able to do that for you in one short presentation.  I'll be quoting some generally accepted rules for photographers – but rules are made to be broken.  What I hope to do is help you create a well-exposed,
  • 4.
    Blatant Personal Opinion  I see a lot of web sites where every single image is from a stock image site, and it makes me very suspicious. I look at that, and it makes me wonder if it is real or a scam.  If you want to do a little checking on this, look at reverse image search software like TinEye (https://www.tineye.com/)  Remember too that you only get what you pay for from sites like https://www.fiverr.com/ - one company I once did a search on shared its corporate logo (with minor variations) with half a dozen other sites, including a tattoo parlour. Did they get their logo from Fiverr? Well,
  • 5.
    Types of images What you want to put on your site is wide and varied, but I'll touch on a small group of general categories, which I hope will cover a lot of them.  Portraits – add that personal touch by putting your own, or your clients, real people on the site  Architecture – your physical storefront or shop, if applicable, but outdoor photography in general.  Objects – things you sell. Shiny objects – a subset of Object, but with
  • 6.
    What you need If you're a pro, you can spend a lot of money on this. I'm going to suggest some stuff that you may already have, or can purchase inexpensively, or improvise.  Camera  Lights and/or reflectors  Backgrounds  Tripod or equivalent
  • 7.
    Camera  Mostof us have a phone with a camera in it – a reasonable choice if you don't have an alternative.  If you have an actual digital camera, it would be nice if it has an “optical” zoom, not just a “digital” zoom, especially for portraiture.  Also cameras have the mount where you can screw them onto a tripod, which will be necessary under some circumstances.
  • 8.
    Lighting  I'mgoing to offer a radical suggestion – under many situations don't use the built-in flash of your camera/phone.  Most digital cameras are sensitive enough that you can use ambient light, and the picture you take will look like what you're seeing. You won't end up making the objects in the foreground well lit, with a dark background, and you won't
  • 9.
    Lighting, continued One exception to using the in-camera flash is when you put your camera into the “always flash” mode, and your scene is well enough lit it doesn't actually need the flash.  This can help to highlight the central area of the image, especially for portraits.  But you'll want to review this to see if the balance between the main lighting and the flash is good, and you're not getting bad reflections.
  • 10.
    Lighting, continued As applicable, you may want up to four positionable light sources (key, fill, hair or kicker, background). But more or less can be used.  For shiny objects you'll want to use a translucent cone or box.  For outdoor photography, try to avoid putting the sun at the back of your subject. This may mean moving your position or that of your subjects where possible. You may need to do something to fill in the shadows. Shooting on an overcast day or near sunrise/sunset may be a choice.
  • 11.
    Backgrounds  Youmay not have a choice, like with a building, but look behind what you're photographing. You may want to move your position or the subjects position to avoid busy backgrounds or objects growing out of peoples heads.  Under controlled circumstances, use a blank pale coloured wall, or a roll of paper, or a large sheet of paper, to create a background. Your choice will depend on the size of what you're photographing.
  • 12.
    Tripod  Youdon't have to spend a lot on a tripod, but it will help you get the best image, especially in low light conditions where the exposure is longer.  Phones don't come with the threaded mount that allows you to put it on a standard tripod, but there are adapters that will do that.  You could take your phone, put it on top of some books, and then “sandbag” it (a couple of bags of dried beans?) to hold it in position.
  • 13.
    Handheld images Especially with a phone, you're likely to shake the camera as you press the shutter button, or touch the screen.  To reduce this, select the mode that introduces a delay after triggering the shutter before the picture is taken.  You can then leave the camera in its mount, or brace your arms, so it will be a still as possible when the picture is taken.  Exception – moving objects. Try to move your camera to track the moving object – it will blur the background but improve the moving object.
  • 14.
    Why all this?  Start off with as good an image as possible – the less work you have to do after the fact the better.  Hold the camera level – this helps with the first point.  It probably has something to do with the fact that I started with a rangefinder camera, but I never count on getting exactly the image I see as the resulting image – leave a border that you'll edit out later.
  • 15.
    Portraits  Lighting– Butterfly or Loop  Butterfly – main light shining straight on face, creating a symmetrical shadow under the nose, often considered best for women.  Loop (a variant on “Rembrandt” lighting) – main light at 45 degrees off axis, fill off to the other side (white card or foamboard may replace the fill light)  Both will have a hair or kicker light – above and behind shining on head  Background light on your background
  • 17.
    Portrait, Continued Torso at an angle to the camera.  Head turned partly or fully towards the camera.  Some suggest that men should look into the camera, and women off to the side.  Camera at eye level or above.  Ideally use a moderate telephoto setting, not wide angle.  Don't shoot up the nostrils!  Watch out for objects growing out of the head.
  • 18.
  • 19.
  • 20.
  • 21.
  • 22.
  • 23.
    Architecture  Usea longer lens if possible  Consider taking a picture on a day with overcast, especially if the building is north facing – softens the shadows  If east facing, consider taking picture at dawn  If west facing, consider taking picture at sunset
  • 25.
    Outdoor pictures ofpeople  Try to avoid putting the sun behind them  Try to avoid facing directly into the sun  Using large sheets of white cardboard or foamboard to reflect light into the shadows may improve images taken in bright sunlight.  Depending on distance, and the power of a flash, turn on mandatory flash to help reduce shadows.
  • 30.
    Small Objects Lighting can be the same as for portraits  Use sheet of cardboard as “seamless” background, wrapping from under the object and up as the background  Keep a gap from the background, you may want to raise the object up if it can be done.
  • 32.
    Shiny Objects You are trying to avoid taking a picture of your own reflection.  Put the item on a plain background, or a light box to illuminate from underneath, then construct a cone or a box of translucent material. The object is inside the cone or box. Shine the lights in from the outside  Take the picture through a small opening through the apex of the cone, or through the side of the box.  This should eliminate most of the unwanted view of the environment around the item.
  • 36.
    What Next? You now have a good image that you can prepare for your web site.  We need to eliminate the extraneous part of our image (remember, I suggested you leave a margin around your images), and take into account that the shape of the image may not be what you need on your site.  You'll need to adjust the resolution down to something that works for your site, and doesn't take too long to load.
  • 37.
    Editing Software Options?  Photoshop is the choice for pro's – but it costs a lot of money, and has a significant learning curve.  GIMP – freely available, but still has a significant learning curve.  IrfanView – what I'll be talking about, free (although donations are appreciated), quick learning curve, but not nearly as powerful as Photoshop or GIMP. PC only.
  • 38.
    IrfanView  Downloadablefrom http://www.irfanview.com/
  • 39.
    Crop, Resize, Save  Most of the time, these are the steps I use.  Crop – select the part of the image I want, in the ratio that I need for the site  Resize – reduce the number of pixels while still keeping the desired vertical vs. horizontal ratio.  Save the result – usually as a JPEG or PNG
  • 40.
    Rule of Thirds  Often useful rule for composing a picture  Draw imaginary lines horizontally and vertically dividing the image space in thirds  Usually the composition of the picture works best if you align key features of your subject along these lines.
  • 45.
    The result Original was square, showing outside the desired area, and 1,139,437 bytes  This is image is 200 pixels wide by 300 pixels high, and 109,325 bytes
  • 46.
    Other useful IrfanViewfeatures  Rotate to arbitrary angle – if you weren't holding your camera level, you can rotate the image to get things level.  Auto Adjust – makes your pictures look better, sometimes works better than others.  Reduce number of colours – if you want to reduce the size even more.  Adjust colour balance, contrast, gamma, saturation
  • 47.
    Auto Adjust Before  After
  • 48.
    Number of Colours  256 colours  Greyscale 16 colours
  • 49.
    Media Manager Used to load your images onto your website  Helps to organize the images  Create multiple sub-directories to help organize the images  This can be useful with some slideshow or image gallery software where you specify the contents of a directory to be displayed, rather than selecting individual images.
  • 54.
    Insert image inarticle using JCE  Position cursor at insertion point  Select image  Set options, alignment, border, rollover action, styles, and more
  • 61.
    Biography Douglas Pickett,Vogg Technology Limited. dpickett@voggtech.ca  As a photographer, started serious photography in high school with a hand-me-down 35mm rangefinder camera, mostly taking black&white photos because colour was so expensive. Studied film making, with Super 8 cameras, in his high school's Film Arts program, and received a couple of regional awards  Over 40 years studying and working in the IT field, both software development, system administration, and network design and administration. The last several years he's