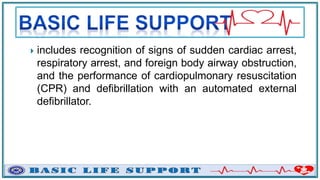
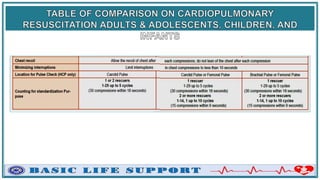
1. Explain the principles of emergency care and emergency action
principle.
2. Describe basic life support (BLS).
3. Explain the goals of cardiopulmonary resuscitation (CPR) and when it
should be performed on a patient.
4. Explain the components of CPR, the six links in the American Heart
Association (AHA) chain of survival, and how each one relates to
maximizing the survival of a patient.
5. Discuss guidelines for circumstances that require the use of an
automated external defibrillator (AED) on both adult and pediatric
patients experiencing cardiac arrest.
6. Describe the process of providing artificial ventilations to an adult
patient, ways to avoid gastric distention.
7. Explain the steps in providing single-rescuer adult CPR.
8. Explain the steps in providing two-rescuer adult CPR, including the
method for switching positions during the process.
9. Explain common causes of foreign body airway obstruction in both
children and adults and how to distinguish mild or partial airway
obstruction from complete airway obstruction.
10.Describe the different methods for removing a foreign body airway
obstruction in an infant, child, and adult, including the procedure for a
patient with an obstruction who becomes unresponsive.
1. Demonstrate how to perform one-rescuer adult, child and infant CPR.
2. Demonstrate how to perform two-rescuer adult and infant CPR.
3. Demonstrate how to perform rescue breathing on an adult, child and
infant.
4. Demonstrate how to remove a foreign body airway obstruction in a
responsive adult patient using abdominal thrusts (Heimlich
maneuver).
5. Demonstrate how to use the Automated External Defibrillator.
6. Demonstrate how to perform a team approach in CPR.
1. Planning
– Emergency plans should be established based on
anticipated needs and available resources.
2. Provision of Logistics
– The emergency response starts with the provision of
equipment and personnel before any emergency
occurs.
3. Remember the initial response as follows:
 Ask for help
 Intervene
 Do not do further harm
4. Instruction to bystanders
– Proper information and instruction to helpers would
provide organized first aid care.
1. Survey the Scene
2. Call Emergency Numbers/Assistance
3. Do a Primary Assessment of the Victim
4. Do a Secondary Assessment of the Victim
5. Referral of the Victim for Further Evaluation and
Management
1. Survey the Scene. Once you recognized that an emergency has
occurred and decide to act, you must make sure that the scene of
the emergency is safe for you, the victim/s, and the bystander/s.
• Elements of Survey the Scene
1. Scene Safety
2. Mechanism of Injury (MOI) or Nature of Illness (NOI)
3. Take standard precautions. Wear Personal Protective
Equipment.
4. Determine the number of patients
5. Consider additional/specialized resources.
1. Survey the Scene
• Take time to survey the scene and answer these
questions:
 Is the scene safe?
 What happened? Nature of incident?
 How many people are injured?
 Are there bystanders who can help?
 Then identify yourself as a trained first aider.
 Get consent to give care.
2. Call Emergency Numbers/Assistance. In some
emergencies, you will need to call for specific medical advise
before administering first aid. But in some situations, you will
need to attend to the victim first.
 Use of Social Media to Summon Rescuers.
 Use of Mobile Phone in Activation of Emergency Medical
Service (EMS).
• Call First and CPR First. Both trained and untrained
bystanders should be instructed to Activate Medical
Assistance as soon as they have determined that an adult
victim requires emergency care.
2. Call Emergency Numbers/Assistance.
• Information to be remembered in activating medical
assistance:
 What happened?
 Location?
 Number of persons injured?
 Extent of injury and first aid given?
 The telephone number from where you are calling?
 PERSON who activated Medical Assistance must
identify him/herself and drop the phone last.
3. Do a Primary Assessment of the Victim. In every
emergency situation, you must first find out if there are
conditions that are of immediate threat to the victim’s life.
3. Do a Primary Assessment of the Victim.
In Normal Times, below emergency care
procedure shall be followed:
3. Do a Primary Assessment of the Victim.
In COVID-19 Pandemic, below emergency care
procedure shall be followed:
4. Do a Secondary Assessment of the Victim. It is a
systematic method of gathering additional information about
the injuries or conditions that may need care.
 Interview the victim
S – signs and symptoms
A – allergies
M – medications
P – past medical history
L – last meal taken
E – events prior to injury
4. Do a Secondary Assessment of the Victim.
 Head-to-toe examination
– Rescuers should look for other signs of injuries in a
quick manner from the head to toe and apply
necessary first aid measures to the injury seen.
– D C A P B T L S
D – deformity C – contusion A – abrasion P – puncture
B – burn T – tenderness L – laceration S – swelling
4. Do a Secondary Assessment of the Victim.
• Check vital signs
– Every 15 minutes for stable condition and every 5
minutes if unstable.
5. Referral of the Victim for Further Evaluation and
Management. Refer patient for further evaluation and
management (if necessary, depending on patient’s condition)
to advance medical team / physician / health facility.
WHAT TO DO:
 Do remember to identify yourself to the victim.
 Do obtain consent, when possible.
 Do think the worst
 includes recognition of signs of sudden cardiac arrest,
respiratory arrest, and foreign body airway obstruction,
and the performance of cardiopulmonary resuscitation
(CPR) and defibrillation with an automated external
defibrillator.
1. Basic Life Support (BLS)
2. Advance Cardiac Life Support (ACLS)
3. Prolonged Life Support (PLS)
1. Basic Life Support (BLS). A set of emergency
procedures that consist of recognizing respiratory or cardiac
arrest and the proper application of Cardio-Pulmonary
Resuscitation (CPR) with or w/o Automated External
Defibrillation (AED) or Foreign Body Airway Obstruction
Management (FBAOM) and Rescue Breathing (RB) or to
maintain life until a victim recovers, or advanced life support is
available.
2. Advanced Cardiac Life Support (ACLS). A set of
clinical interventions for the urgent treatment of cardiac arrest
and other life-threatening emergencies, as well as the
knowledge and skills to deploy those interventions.
3. Prolonged Life Support (PLS). For post resuscitative
and long-term resuscitation with the use of adjunctive
equipment such as ventilator, cardiac monitor, pulse oximeter
etc.
The FIRST LINK: Recognition/Activation of EMS
– Lay rescuers must recognize the patient’s arrest and call for help.
If the victim is unresponsive with absent or abnormal breathing,
the rescuer should assume that the victim is in cardiac arrest.
Rescuers can activate an emergency response (ie, through use of
a mobile telephone) without leaving the victim’s side.
The SECOND LINK: Immediate High-Quality CPR
– If the lay rescuer finds an unresponsive victim is not breathing or
not breathing normally (e.g., gasping), high quality CPR shall be
started immediately. The probability of survival approximately
doubles when it is initiated before the arrival of EMS.
The THIRD LINK: Rapid Defibrillation
– It is recommended that public access defibrillation (PAD) programs
be implemented in communities with individuals at risk for OHCA.
This would enable bystanders to retrieve nearby AEDs and use it
when OHCA occurs.
The FOURTH LINK: Basic and Advanced EMS
– If provided by highly trained personnel like Emergency
Medical Technicians EMTs and paramedics, provision of
advanced care outside the hospital would be possible.
The FIFTH LINK: ALS and Post-arrest Care
– Post cardiac arrest care after return of spontaneous
circulation (ROSC) can improve the likelihood of patient
survival with good quality of life.
The SIXTH LINK: Recovery
– This highlights the need for treatment, surveillance and
rehabilitation for cardiac arrest survivors and their
caregivers. This includes comprehensive, multidisciplinary
dis-charge planning for cardiac arrest survivors and their
caregivers, including medical and rehabilitative treatment
recommendations and return to activity/work expectations.
The FIRST LINK: Prevention
– In children, the leading cause of death is injury, and vehicular
accidents are the most common causes of fatal childhood injuries
and child passenger’s safety seats can reduce the risk of death.
The SECOND LINK: Activation of Emergency Response
– It is the event initiated after the baby collapsed to recognize that
the victim has experienced a cardiac arrest until the arrival of
Emergency Medical Services personnel competent to provide care.
The THIRD LINK: High-Quality CPR
– It is most effective when started immediately after the victim’s
collapse. The probability of survival approximately double when it
is initiated before the arrival of EMS. It is associated with
successful return of spontaneous circulation and neurologically
intact survival in children.
The FOURTH LINK: Advanced Resuscitation
– Initial steps in stabilization provide warmth by placing baby under
a radiant heat source, position head in a “sniffing” position to
open the airway, clear airway with bulb syringe or suction
catheter, dry baby and stimulate breathing.
The FIFTH LINK: Post-Cardiac Arrest Care
– Post cardiac arrest after return of spontaneous circulation (ROSC)
can improve the likelihood of patient survival with good quality of life.
The SIXTH LINK: Recovery
– This highlights the need for treatment, surveillance and rehabilitation
for cardiac arrest survivors and their caregivers. It is recommended
that pediatric cardiac arrest survivors be evaluated for rehabilitation
services. It is reasonable to refer pediatric cardiac arrest survivors for
ongoing neurological evaluation for at least the first year after cardiac
arrest.
The Circulatory
System
– delivers oxygen and
nutrients to the body’s
tissues and removes
waste products. It
consists of the heart,
blood vessels, and
blood.
The Circulatory
System
The Respiratory System
– It delivers oxygen to the body,
as well as removes carbon
dioxide from the body.
Ventilation - passage of air
into and out of the lungs
Respiration - actual exchange
of oxygen and carbon dioxide
in the alveoli as well as the
tissues of the body
The Respiratory System
Inspiration - breathing in or
inhalation
Expiration - breathing out or
exhalation
Breathing and Circulation
1. Air that enters the lungs contains about 21% oxygen and only
a trace of carbon dioxide. Air that is exhaled from the lungs
contains about 16% oxygen and 4% carbon dioxide.
2. The right side of the heart pumps blood to the lungs, where
blood picks up oxy-gen and releases carbon dioxide.
3. The oxygenated blood then returns to the left side of the
heart, where it is pumped to the tissues of the body.
Breathing and Circulation
4. In the body tissues, blood releases oxygen and takes up
carbon dioxide after which it flows back to the right side of
the heart.
5. All body tissues require oxygen, but the brain requires more
than any other tissue.
The Nervous System
– composed of the brain, spinal cord and
nerves.
– two major functions:
Communication
Control
– let a person be aware of and react to the
environment.
– coordinates the body’s responses to stimuli
and keeps body systems working together.
The
Nervous
System
Clinical Death
• Within 1 min – cardiac irritability
• 1 - 4 min – brain damaged not likely
• 4 - 6 min – brain damage possible
Biological Death
• 6 - 10 min – brain damaged very
likely
• More than 10 min – irreversible
brain damaged
Brain cells die every second
they are deprived of oxygen.
CPR - a series of assessments and interventions using
techniques and maneuvers made to bring victims of
cardiac and respiratory arrest back to life.
CARDIAC ARREST - the condition in which circulation
ceases and vital organs are deprived of oxygen.
• THREE CONDITIONS OF CARDIAC ARREST
 Cardiovascular Collapse. The heart is still beating but its
action is so weak that blood is not being circulated through the
vascular system to the brain and body tissues.
 Ventricular Fibrillation. Occurs when the individual fascicles
of the heart beat independently rather than in coordinated,
synchronized manner that produces rhythmic heartbeat.
 Cardiac Standstill. It means that the heart has stopped
beating.
If you see a victim who is:
1. Unconscious/Unresponsive
2. Not breathing or has no normal breathing (only gasping)
3. No definite pulse
Note: Responders need to generally assume that all
victims have infectious diseases so that safety protocols
must be completely observed at all times.
1. Do not start CPR if the scene is
unsafe. The concept of ensuring scene
safety applies in cardiac arrest situations,
just as it does on any other call.
2. Do not start CPR if the patient has
obvious signs of death.
 Rigor mortis, or stiffening of the body after
death
 Dependent lividity (livor mortis), a
discoloration of the skin caused by pooling of
blood
2. Do not start CPR if the patient has
obvious signs of death.
 Putrefaction (decomposition of the body
tissues)
 Evidence of nonsurvivable injury, such as
decapitation, dismemberment, or being
burned beyond recognition.
3. Do not start CPR if the patient and the
patient’s physician have previously
agreed on a do not resuscitate (DNR)
order or no-CPR order
S - The patient Starts breathing and has a pulse.
T - The patient’s care is Transferred to another provider of
equal or higher-level training.
O - You are Out of Strength or too tired to continue CPR.
P - A Physician who is present or providing online medical
direction assumes responsibility for the patient and directs
you to discontinue CPR.
S - Scene becomes unsafe.
If a person cannot perform mouth-to-mouth ventilation for an
adult victim, chest compression only - CPR should be provided
rather than not attempting CPR. Chest compression only - CPR
is recommended only in the following circumstances:
1. When a rescuer is unwilling or unable to perform mouth-
to-mouth rescue breathing , or
2. For use in dispatcher-assisted CPR instructions where
the simplicity of this modified technique allow untrained
bystanders to rapidly intervene.
 Early CPR improves the likelihood of survival.
 Chest Compressions are the foundations of CPR.
 Compressions create blood flow by increasing intra-
thoracic pressure and directly compress the heart;
generate blood flow and oxygen delivery to the
myocardium and brain.
 CIRCULATION represents a heart that is actively pumping
blood, most often recognized by the presence of a pulse in
the neck
 Assume there is no CIRCULATION if the following exist:
1. Unresponsive
2. Not breathing
3. Not moving
4. Poor skin color
 Return of Spontaneous Circulation (ROSC) - sign of life
ADULT CPR
 Kneel facing the victim’s
chest
 Place the heel of one hand
on the center of the chest
 Place the heel of the second
hand on top of the first so that
the hands are over-lapped
and parallel
CHILD CPR
 Lower half of the sternum,
between the nipples
 One hand only/two hands for
big children
 30:2 for single rescuer, 15:2
for 2-man rescuer
INFANT CPR
 Just below the nipple line,
lower half of sternum
 Two fingers, flexing at the
wrist (lone rescuer)
 2 thumb-encircling hands
technique (two rescuers)
This must be done to ensure an open passage for spontaneous
breathing OR mouth to mouth during CPR.
 Head-Tilt/Chin-Lift Maneuver. Effective for opening the airway
in most patients when there is no indication of a spinal injury.
 Jaw-Thrust Maneuver. A technique that can be done by at least
two highly trained BLS providers (if suspected with cervical
trauma).
TO PERFORM THE HEAD TILT–CHIN LIFT
MANEUVER
1.Place one hand on the patient’s forehead
and apply firm backward pressure with
your palm to tilt the head back.
2.Next, place the tips of the index and middle
fingers of your other hand under the lower
jaw near the bony part of the chin. Lift the
chin upward, bringing the entire lower jaw
with it, helping to tilt the head back.
TO PERFORM THE JAW-THRUST
MANEUVER
1.Maintain the head in neutral
alignment and place your fingers
behind the angles of the lower jaw
and move the jaw upward.
 Maintain open airway
 Pinch nose shut (if mouth to mouth RB is
preferred)
 Open your mouth wide, take a normal breath,
and make a tight seal around out-side of
victim’s mouth
 Give 2 full breaths (1 sec each breath)
 Observe chest rise
 30:2 (Compression to Ventilation ratio)
 5 cycles or 2 minutes
In Pandemic (Single Rescuer)
• Avoid direct mouth to mouth ventilation. Use a pocket mask if
there is a need for rescue breathing specially for a child/infant
with an arrest most likely respiratory in nature. If unwilling and
unable, Hands-only CPR is a MUST.
• Perform Hands-Only CPR until Advanced Medical Help
arrives while assessing victim every after 2 minutes of
continuous compressions.
In Pandemic (Two rescuers)
• Perform chest compressions with ventilations via BVM with a
ratio of 30:2 for 5 cycles or 2 minutes (30 Chest compressions
delivered within 15-18 seconds).
• Give 2 ventilations via tight sealed Bag-Valve-Mask (BVM)
with a High-Efficiency Particulate Air (HEPA) filter with 1
second each ventilation.
1. Verify Scene Safety
• Survey for scene safety first
• Make sure the environment is safe for rescuers and victim
• Observe standard precautions (PPE)
2. Introduce Yourself
• Make sure to introduce yourself first before engaging with the
victim.
• “I’m _________. I know BLS/CPR. I can help.”
3. Check for Responsiveness
• Check for responsiveness by tapping the victim and ask loudly,
“Are you OK?”
• ADULT, ADOLESCENTS and CHILD BLS – Tap the shoulders
• INFANT BLS – Tap the sole of the feet
4. Activate Emergency Response System (EMS)
• Shout for nearby help.
• Activate EMS via mobile phone or phone patch (if available).
• Send someone to do so.
• If you are alone with no mobile phone, leave the victim to
activate the EMS, and get the AED (if readily available) before
beginning CPR.
5. Recognition of Cardiac Arrest
• Unresponsive.
• No breathing or only gasping.
• No pulse.
Check for breathing and pulse simultaneously
for no more than 10 seconds.
5. Recognition of Cardiac Arrest
HOW TO CHECK FOR BREATHING
• Observe for chest rise.
• Distinguish between normal breathing from no normal
breathing (only gasping).
WHERE TO CHECK FOR PULSE
• Adult & Adolescents – Check for Carotid Pulse
• Child BLS – Check for Carotid pulse
• Infant BLS – Check for Brachial or Femoral Pulse
6. Perform High Quality CPR
a. Correct Compression Site
b. Adequate Compression Rate (100-120/minute)
c. Adequate Compression Depth
ADULT: at least 2 inches (5cm) but should not exceed 2.4
inches (6cm)
CHILDREN: about 2 inches (5cm)
INFANTS: about 1.5 inches (4cm)
6. Perform High Quality CPR
d. Chest Recoil completed after
each compression
e. Minimize interruptions to less
than 10 seconds in between
chest compressions.
f. Avoidance of Excessive
Ventilation
S – Start CPR (within 10 seconds)
P – Push hard, Push Fast (2 to 2.4
inches/5 to 6cm at 100 to 120
compressions/min)
A – Allow full Chest Recoil (to
maximize blood return to the
heart)
M – Minimize Interruption (not
more than 10 seconds)
A – Avoid excessive ventilation
6. Perform High Quality CPR
PRIMARY CPR PROCEDURES
• Continue CPR until
› AED arrives and starts to analyze
› EMS providers take over the care of the victim
 Reassess victim every after 2 minutes
 Rescuers may switch roles (for Two-Man Rescuers)
 If patient becomes conscious, place patient in
RECOVERY POSITION.
6. Perform High Quality CPR
DONT's in External Chest Compression:
• Massager
• Bender
• Rocker
• Bouncer
• Double Crosser
6. Perform High Quality CPR
CPR with Advanced Airway (HCP ONLY)
• Cycles of 30 compressions : 2 ventilations should be
continued until an advanced airway is placed
• If an advanced airway is already in place:
› Continuous chest compressions at a rate of 100-120 per
minute, without pauses for ventilation.
› Ventilation rate of 1 breath every 6 sec. (10 breaths per
minute)
7. Recovery Position
• If the patient is breathing adequately on his or her own and has
no signs of injury to the spine, hip, or pelvis, then place the
patient in the recovery position.
• This position helps to maintain a clear airway in a patient with a
decreased level of consciousness who has not sustained
traumatic injuries and is breathing adequately on his or her own
7. Recovery Position
• It allows vomitus to drain from the mouth.
• Avoid placing a patient who has a suspected head or spinal
injury in the recovery position because in this position, the spine
is not aligned, spinal stabilization is not possible, and further
spinal injury could result.
7. Recovery Position
AEDs – are sophisticated computerized devices
that can analyze a heart rhythm and
prompts the user to deliver a shock when
necessary. These devices only require the
user to turn the AED on and follow the
audio instructions when prompted.
AED is used to:
• Apply controlled electrical shock
• Restore an organized rhythm
• Enable the heart to contract and pump blood
AED:
• Placed in areas of public access
• Also called as PAD: Public Access Defibrillator Area
– Railway stations, Airports, Shopping centers
• Stored in:
– Secured display units
– Accessible to all trained rescuers
– Clearly marked
• Should always be stored ready to use with a fully charged battery
• Razors to shave the casualty’s chest should be stored with the
defibrillator, along with gloves in various sizes
Defibrillation
– A process in which an electronic device (such as AED), gives an
electrical shock to the heart. Defibrillation stops Ventricular
Fibrillation (VF) by using an electrical shock and allows the
return of a normal heart rhythm.
 Shock success – Termination of VF for at least 5 seconds
following the shock
 VF frequently recurs after successful shocks & these
recurrence should not be equated to shock failure
Defibrillation
Indications and Importance
Early defibrillation is critical for victims of sudden cardiac arrest
because:
• The most frequent rhythm in sudden cardiac arrest is
Ventricular Fibrillation (VF)
• The most effective treatment for VF is defibrillation
• Also indicated for Pulseless Ventricular Tachycardia
Defibrillation
Indications and Importance
• Defibrillation is most likely to be successful if it occurs within
minutes of collapse (sudden cardiac arrest)
• Defibrillation may be ineffective if it is delayed
• VF deteriorates to asystole if not treated
Defibrillation
Shockable Rhythms
• Ventricular Fibrillation (VF)
• Pulseless Ventricular Tachycardia – a rapid contraction of the
ventricles that does not allow for normal filling of the heart.
• Torsade de Pointes – the heart’s two lower chambers, called
the ventricles, beat faster than and out of sync with the upper
chambers, called the atria.
Defibrillation
Non-Shockable Rhythms
• Asystole (Flatline) – indicates that no electrical activity
remains and therefore defibrillation will not help.
• Pulseless Electrical Activity (PEA) – refers to a state of
cardiac arrest that exists despite an organized electrical
complex; defibrillation could possibly make this situation
worse.
Ventricular Fibrillation (VF)
• VF is a common and treatable initial rhythm in adults with witnessed
cardiac
• Survival rates are highest when immediate bystander CPR is
provided, and defibrillation occurs within 3 to 5 minutes of collapse
• Rapid defibrillation is the treatment of choice
• Rhythm causing ‘all’ sudden cardiac arrest
• Useless quivering of the heart no blood flow
• Myocardium is depleted of oxygen & metabolic substrates
Pulseless Ventricular Tachycardia
The pulseless ventricular tachycardia rhythm is primarily identified by
several criteria:
• The rate is usually greater than 180 beats per minute and the
rhythm generally has a very wide QRS complex in ECG tracings.
• The patient will be pulseless
• The rhythm originates in the ventricles.
Causes of VF and Cardiac Arrest
1. Hypoxia
• Near drowning
• Burst lung
• Decompression illness
2. Bleeding
3. Heart attack
4. Drug overdose
Monitor!
• Rebreather malfunction
• Choking
• Carbon monoxide poisoning
Different Types of AED
1. AED Trainer
 Not capable of delivering a shock.
 Does not allow to be confused with real units.
2. Semi-Automated Defibrillator
 Requires the user to press the button for analysis and shock.
3. Fully Automated Defibrillator
• No intervention required for analysis and shock.
• They are programmed to run self-test and they will indicate
when maintenance is needed.
Several Factors That Can Affect AED Analysis
• Patient movement (eg. agonal gasp)
• Repositioning the patient
Use AED Only When Victims Have the Following 3 Clinical
Findings
 No Response
 No Breathing
 No Pulse
Note: Defibrillation is also indicated for pulseless ventricular
tachycardia (VT)
Special Conditions that Affect the Use of AED
• The victim is 1 month old or less.
• The victims has a hairy chest.
• The victim is lying in water, immersed in water, or water is
covering the victim’s chest.
• The victim has implanted defibrillator or pacemaker.
• The victim has a transdermal medication patch or other object on
the surface of the skin where the AED electrode pads are
placed.
CRITICAL CONCEPTS:
The four (4) Universal Steps of AED Operation
P – POWER ON the AED.
A – ATTACH the electrodes pads to the victim’s chest.
A – Clear the victim and ANALYZE the heart rhythm.
S – Clear the victim and deliver a SHOCK (if indicated)
AED PROCEDURES
1. Continue CPR until an AED is available.
2. Once the AED is available, Power on the AED and follow
the voice prompts.
3. Expose chest. Dry the skin or shave, if necessary.
4. Attach pads in victim’s bare chest.
5. Keep following voice prompts
AED PROCEDURES
6. Once the voice prompt tells “Analyzing heart rhythm, do
not touch the patient”, make sure:
•No one touches the victim!
•Remind co-rescuers/bystanders to avoid touching the
victim
NOTE: For Semi-automated AED, clear the victim and
manually press analyze button.
AED PROCEDURES
7. Deliver a Shock (if indicated)
•If the AED prompt tells “SHOCK ADVISED” make sure:
 No one touches the victim!
 Verbal warning to co-rescuers/ bystanders:
› “Clear”
› Physical and hand gestures
› Press the Shock button and immediately resume CPR
AED PROCEDURES
7. Deliver a Shock (if indicated)
•If the AED prompt initially tells “NO SHOCK ADVISED”:
 Continue CPR for 2 minutes
 Follow voice prompt
•If the AED prompt tells “NO SHOCK ADVISED” for the
second time:
 Check for pulse (HCP)
 Check for responsiveness (Lay rescuer)
Shock First vs. CPR First
• For witnessed adult cardiac arrest when an AED is
immediately available, it is reasonable that the defibrillator
be used as soon as possible.
• For adults with unmonitored cardiac arrest or for whom an
AED is not immediately available, it is reasonable that
CPR be initiated while the defibrillator equipment is being
retrieved and applied and that defibrillation, if indicated,
be attempted as soon as the device is ready for use.
AED Maintenance
1. Become familiar with your AED and how it operates.
2. Check the AED for visible problems such as signs of damage.
3. Check the “ready-for-use” indicator on your AED (if so equipped)
daily.
4. Perform all user-based maintenance according to the
manufacturer’s recommendations.
5. Ideally, the case carrying the AED should contain the following
supplies at all times:
•2 sets of extra electrode pads (3 sets total)
•2 pocket face masks
AED Maintenance
5. Ideally, the case carrying the AED should contain the following
supplies at all times:
•1 extra battery (if appropriate for your AED); some AEDs have
batteries that last for years
•2 disposable razors
•5 to 10 alcohol wipes
•5 sterile gauze pads (4X4 inches), individually wrapped
•1 absorbent cloth towel
•1 power scissor
Remember:
AED malfunctions are rare. Most AED
“problems” are caused by operator error or
failure to perform recommended user-based
maintenance.
– the condition in which breathing stops or inadequate.
– can result from a number of causes, including
submersion/near-drowning, stroke, FBAO, smoke
inhalation, epiglottis, drug over-dose, electrocution,
suffocation, injuries, myocardial infarction, lightning
strike, and coma from any cause.
– the heart and lungs can continue to oxygenate when
primary respiratory arrest occurs.
CAUSES OF RESPIRATORY ARREST
1. Obstruction
a. Anatomical Obstruction
b. Mechanical Obstruction
2. Diseases
a. Bronchitis
b. Pneumonia
c. Chronic Obstructive Pulmonary Disease (COPD) and other
respiratory illnesses.
CAUSES OF RESPIRATORY ARREST
3. Other Causes of Respiratory Arrest
a. Chest compression (by physical forces).
b. Circulatory collapse.
c. Drowning
d. Electrocution
e. External strangulation.
f. Poisoning
g. Suffocation
– a technique of breathing air into
person lungs to supply him or her
oxygen needed to survive.
– Given to victims who are not
breathing or inadequate but still have
pulse.
– Crucial tool to revive the individual or
keep him or her until the help comes.
WAYS TO VENTILATE THE LUNGS
1.Mouth-to-Mouth. Is a quick, effective way to provide oxygen and ventilation
to the victim.
2.Mouth-to-Nose. Is recommended when it is impossible to ventilate through
the victim’s mouth, the mouth cannot be opened (trismus), the mouth is
seriously injured, or a tight mouth-to-mouth seal is difficult to achieve.
3.Mouth-to-Mouth and Nose. If the victim is an infant (1-year-old), this is
the best way in delivering ventilation by placing your mouth over the infant’s
mouth and nose to create a seal.
4.Mouth to Stoma. It is used if the patient has a stoma; a permanent opening
that connects the trachea directly to the front of the neck. These patients
breathe only through the stoma.
WAYS TO VENTILATE THE LUNGS
5.Mouth-to-Faceshield. It could provide very low resistance ventilations to a
patient by using a thin and flexible plastic.
6.Mouth-to-Mask. It could deliver ventilation to a patient by using a pocket
facemask with a one-way valve to form a seal around the patient’s nose and
mouth.
7. Bag Valve Mask Device. It could deliver ventilation to a patient by using a
hand– operated device consisting of a self-inflating bag, one-way valve,
facemask, and oxygen reservoir.
SPECIAL CONSIDERATIONS
• Rescuer should avoid pressing soft tissue under the chin this might
obstruct the airway.
• Rescuer should not use the thumb to lift the chin.
• Rescuer should not close the victim’s mouth completely (unless
mouth to nose is the technique).
SPECIAL CONSIDERATIONS
• Each rescue breath should give enough air to make the chest rise
and be given at 1 second.
• Rescuer should avoid delivering more breaths (more than the
number recommended) or breaths that are too large or too forceful.
• Rescuers should take a normal breath (not a deep breath) mouth to
mouth or mouth-to-barrier device rescue breaths.
CAUTION: If you give breaths too quickly or with too much force, air
is likely to enter the stomach rather than the lungs. This can cause
gastric inflation. Gastric inflation frequently develops during mouth-
to-mouth, mouth-to-mask, or bag-mask ventilation. Gastric inflation
can result in serious complications, such as vomiting, aspiration, or
pneumonia. Rescuers can reduce the risk of gastric inflation by
avoiding giving breaths too rapidly or too forcefully.
– a condition when solid material like chunked foods, coins, vomitus,
small toys, etc. are blocking the airway.
CAUSES OF OBSTRUCTION
1. Improper chewing of large pieces of food.
2. Excessive intake of alcohol.
a. Relaxation of tongue back into the throat
b. Aspirated vomitus (stomach content)
3. The presence of loose upper and lower dentures.
4. Children who are running while eating.
5. For smaller children of “hand-to-mouth” stage left unattended.
TWO TYPES OF OBSTRUCTION
1. ANATOMICAL. When tongue drops back and obstruct the
throat. Other causes are acute asthma, croup, diphtheria,
swelling, and cough (whooping).
2. MECHANICAL. When foreign objects lodge in the pharynx or
airways; fluids accumulate in the back of the throat.
CLASSIFICATION OF OBSTRUCTION
1. MILD OBSTRUCTION
A. Signs:
a. Good air exchange
b. Responsive and can cough forcefully
c. May wheeze between coughs.
CLASSIFICATION OF OBSTRUCTION
1. MILD OBSTRUCTION
B. Rescuer Actions:
As long as good air exchange continues,
a. Encourage the victim to continue spontaneous coughing and
breathing efforts.
b. Do not interfere with the victim’s own attempts to expel the
foreign body but stay with the victim and monitor his or her
condition.
c. If patient becomes unconscious/unresponsive, activate the
emergency response system.
CLASSIFICATION OF OBSTRUCTION
2. SEVERE OBSTRUCTION
A. Signs:
a. Poor or no air exchange,
b. Weak or ineffective cough or no cough at all,
c. High-pitched noise while inhaling or no noise at all
d. Increased respiratory difficulty,
e. Cyanotic (turning blue)
f. Unable to speak
CLASSIFICATION OF OBSTRUCTION
2. SEVERE OBSTRUCTION
A. Signs:
g. Clutching the neck with the thumb and fingers making the
universal sign of choking.
h. Movement of air is absent.
CLASSIFICATION OF OBSTRUCTION
2. SEVERE OBSTRUCTION
B. Rescuer Actions:
a. Ask the victim if he or she is choking. If the victim nods and
cannot talk, severe airway obstruction is present.
b. The rescuer must initially perform five (5) back slaps between
victim’s shoulder blades/scapula using the heel of the hand. If
unsuccessful, perform abdominal thrust repeatedly and once
the victim becomes unconscious, slowly lay down the victim.
c. Activate the emergency response system and perform chest
compressions.
The universal sign for choking is hands clutched to the throat.
FBAO MANAGEMENT FOR ADULT AND CHILDREN
(HEIMLICH MANEUVER)
Recommended for removing severe airway obstructions in
responsive adults and children older than 1 year
Creates an artificial cough by causing a sudden increase in
intrathoracic pressure when thrusts are applied to the
subdiaphragmatic region
Goal is to compress the lungs upward and force residual air from
the lungs to flow upward and expel the object
FBAO MANAGEMENT FOR ADULT AND CHILDREN
(HEIMLICH MANEUVER)
CHEST THRUST
 Used for women in advanced
stages of pregnancy and
patients who have obesity
FBAO MANAGEMENT FOR INFANT
Do not use abdominal thrusts on a responsive infant with an airway
obstruction because of the risk of injury to the immature organs of
the abdomen.
Perform 5 back slaps and 5 chest thrusts to try to clear a severe
airway obstruction in a responsive infant
FINGER SWEEP - a technique recommended for relieving
foreign body airway obstruction after chest compression/thrust
when foreign body is visible in an unconscious victim.
Conscious Adult (Part I)
Unconscious Adult (Part II)
Conscious Infant (Part I)
Unconscious Infant (Part II)
1. Explain the principles of emergency care and emergency action
principle.
2. Describe basic life support (BLS).
3. Explain the goals of cardiopulmonary resuscitation (CPR) and when it
should be performed on a patient.
4. Explain the components of CPR, the six links in the American Heart
Association (AHA) chain of survival, and how each one relates to
maximizing the survival of a patient.
5. Discuss guidelines for circumstances that require the use of an
automated external defibrillator (AED) on both adult and pediatric
patients experiencing cardiac arrest.
6. Describe the process of providing artificial ventilations to an adult
patient, ways to avoid gastric distention.
7. Explain the steps in providing single-rescuer adult CPR.
8. Explain the steps in providing two-rescuer adult CPR, including the
method for switching positions during the process.
9. Explain common causes of foreign body airway obstruction in both
children and adults and how to distinguish mild or partial airway
obstruction from complete airway obstruction.
10.Describe the different methods for removing a foreign body airway
obstruction in an infant, child, and adult, including the procedure for a
patient with an obstruction who becomes unresponsive.

BASIC LIFE SUPPORT POWERPOINT PRESENTATION.pptx

  • 2.
    1. Explain theprinciples of emergency care and emergency action principle. 2. Describe basic life support (BLS). 3. Explain the goals of cardiopulmonary resuscitation (CPR) and when it should be performed on a patient. 4. Explain the components of CPR, the six links in the American Heart Association (AHA) chain of survival, and how each one relates to maximizing the survival of a patient. 5. Discuss guidelines for circumstances that require the use of an automated external defibrillator (AED) on both adult and pediatric patients experiencing cardiac arrest.
  • 3.
    6. Describe theprocess of providing artificial ventilations to an adult patient, ways to avoid gastric distention. 7. Explain the steps in providing single-rescuer adult CPR. 8. Explain the steps in providing two-rescuer adult CPR, including the method for switching positions during the process. 9. Explain common causes of foreign body airway obstruction in both children and adults and how to distinguish mild or partial airway obstruction from complete airway obstruction. 10.Describe the different methods for removing a foreign body airway obstruction in an infant, child, and adult, including the procedure for a patient with an obstruction who becomes unresponsive.
  • 4.
    1. Demonstrate howto perform one-rescuer adult, child and infant CPR. 2. Demonstrate how to perform two-rescuer adult and infant CPR. 3. Demonstrate how to perform rescue breathing on an adult, child and infant. 4. Demonstrate how to remove a foreign body airway obstruction in a responsive adult patient using abdominal thrusts (Heimlich maneuver). 5. Demonstrate how to use the Automated External Defibrillator. 6. Demonstrate how to perform a team approach in CPR.
  • 6.
    1. Planning – Emergencyplans should be established based on anticipated needs and available resources. 2. Provision of Logistics – The emergency response starts with the provision of equipment and personnel before any emergency occurs.
  • 7.
    3. Remember theinitial response as follows:  Ask for help  Intervene  Do not do further harm 4. Instruction to bystanders – Proper information and instruction to helpers would provide organized first aid care.
  • 8.
    1. Survey theScene 2. Call Emergency Numbers/Assistance 3. Do a Primary Assessment of the Victim 4. Do a Secondary Assessment of the Victim 5. Referral of the Victim for Further Evaluation and Management
  • 9.
    1. Survey theScene. Once you recognized that an emergency has occurred and decide to act, you must make sure that the scene of the emergency is safe for you, the victim/s, and the bystander/s. • Elements of Survey the Scene 1. Scene Safety 2. Mechanism of Injury (MOI) or Nature of Illness (NOI) 3. Take standard precautions. Wear Personal Protective Equipment. 4. Determine the number of patients 5. Consider additional/specialized resources.
  • 10.
    1. Survey theScene • Take time to survey the scene and answer these questions:  Is the scene safe?  What happened? Nature of incident?  How many people are injured?  Are there bystanders who can help?  Then identify yourself as a trained first aider.  Get consent to give care.
  • 11.
    2. Call EmergencyNumbers/Assistance. In some emergencies, you will need to call for specific medical advise before administering first aid. But in some situations, you will need to attend to the victim first.  Use of Social Media to Summon Rescuers.  Use of Mobile Phone in Activation of Emergency Medical Service (EMS). • Call First and CPR First. Both trained and untrained bystanders should be instructed to Activate Medical Assistance as soon as they have determined that an adult victim requires emergency care.
  • 12.
    2. Call EmergencyNumbers/Assistance. • Information to be remembered in activating medical assistance:  What happened?  Location?  Number of persons injured?  Extent of injury and first aid given?  The telephone number from where you are calling?  PERSON who activated Medical Assistance must identify him/herself and drop the phone last.
  • 13.
    3. Do aPrimary Assessment of the Victim. In every emergency situation, you must first find out if there are conditions that are of immediate threat to the victim’s life.
  • 14.
    3. Do aPrimary Assessment of the Victim. In Normal Times, below emergency care procedure shall be followed:
  • 15.
    3. Do aPrimary Assessment of the Victim. In COVID-19 Pandemic, below emergency care procedure shall be followed:
  • 16.
    4. Do aSecondary Assessment of the Victim. It is a systematic method of gathering additional information about the injuries or conditions that may need care.  Interview the victim S – signs and symptoms A – allergies M – medications P – past medical history L – last meal taken E – events prior to injury
  • 17.
    4. Do aSecondary Assessment of the Victim.  Head-to-toe examination – Rescuers should look for other signs of injuries in a quick manner from the head to toe and apply necessary first aid measures to the injury seen. – D C A P B T L S D – deformity C – contusion A – abrasion P – puncture B – burn T – tenderness L – laceration S – swelling
  • 18.
    4. Do aSecondary Assessment of the Victim. • Check vital signs – Every 15 minutes for stable condition and every 5 minutes if unstable.
  • 19.
    5. Referral ofthe Victim for Further Evaluation and Management. Refer patient for further evaluation and management (if necessary, depending on patient’s condition) to advance medical team / physician / health facility.
  • 20.
    WHAT TO DO: Do remember to identify yourself to the victim.  Do obtain consent, when possible.  Do think the worst
  • 22.
     includes recognitionof signs of sudden cardiac arrest, respiratory arrest, and foreign body airway obstruction, and the performance of cardiopulmonary resuscitation (CPR) and defibrillation with an automated external defibrillator.
  • 23.
    1. Basic LifeSupport (BLS) 2. Advance Cardiac Life Support (ACLS) 3. Prolonged Life Support (PLS)
  • 24.
    1. Basic LifeSupport (BLS). A set of emergency procedures that consist of recognizing respiratory or cardiac arrest and the proper application of Cardio-Pulmonary Resuscitation (CPR) with or w/o Automated External Defibrillation (AED) or Foreign Body Airway Obstruction Management (FBAOM) and Rescue Breathing (RB) or to maintain life until a victim recovers, or advanced life support is available.
  • 25.
    2. Advanced CardiacLife Support (ACLS). A set of clinical interventions for the urgent treatment of cardiac arrest and other life-threatening emergencies, as well as the knowledge and skills to deploy those interventions. 3. Prolonged Life Support (PLS). For post resuscitative and long-term resuscitation with the use of adjunctive equipment such as ventilator, cardiac monitor, pulse oximeter etc.
  • 27.
    The FIRST LINK:Recognition/Activation of EMS – Lay rescuers must recognize the patient’s arrest and call for help. If the victim is unresponsive with absent or abnormal breathing, the rescuer should assume that the victim is in cardiac arrest. Rescuers can activate an emergency response (ie, through use of a mobile telephone) without leaving the victim’s side.
  • 28.
    The SECOND LINK:Immediate High-Quality CPR – If the lay rescuer finds an unresponsive victim is not breathing or not breathing normally (e.g., gasping), high quality CPR shall be started immediately. The probability of survival approximately doubles when it is initiated before the arrival of EMS. The THIRD LINK: Rapid Defibrillation – It is recommended that public access defibrillation (PAD) programs be implemented in communities with individuals at risk for OHCA. This would enable bystanders to retrieve nearby AEDs and use it when OHCA occurs.
  • 29.
    The FOURTH LINK:Basic and Advanced EMS – If provided by highly trained personnel like Emergency Medical Technicians EMTs and paramedics, provision of advanced care outside the hospital would be possible. The FIFTH LINK: ALS and Post-arrest Care – Post cardiac arrest care after return of spontaneous circulation (ROSC) can improve the likelihood of patient survival with good quality of life.
  • 30.
    The SIXTH LINK:Recovery – This highlights the need for treatment, surveillance and rehabilitation for cardiac arrest survivors and their caregivers. This includes comprehensive, multidisciplinary dis-charge planning for cardiac arrest survivors and their caregivers, including medical and rehabilitative treatment recommendations and return to activity/work expectations.
  • 32.
    The FIRST LINK:Prevention – In children, the leading cause of death is injury, and vehicular accidents are the most common causes of fatal childhood injuries and child passenger’s safety seats can reduce the risk of death. The SECOND LINK: Activation of Emergency Response – It is the event initiated after the baby collapsed to recognize that the victim has experienced a cardiac arrest until the arrival of Emergency Medical Services personnel competent to provide care.
  • 33.
    The THIRD LINK:High-Quality CPR – It is most effective when started immediately after the victim’s collapse. The probability of survival approximately double when it is initiated before the arrival of EMS. It is associated with successful return of spontaneous circulation and neurologically intact survival in children. The FOURTH LINK: Advanced Resuscitation – Initial steps in stabilization provide warmth by placing baby under a radiant heat source, position head in a “sniffing” position to open the airway, clear airway with bulb syringe or suction catheter, dry baby and stimulate breathing.
  • 34.
    The FIFTH LINK:Post-Cardiac Arrest Care – Post cardiac arrest after return of spontaneous circulation (ROSC) can improve the likelihood of patient survival with good quality of life. The SIXTH LINK: Recovery – This highlights the need for treatment, surveillance and rehabilitation for cardiac arrest survivors and their caregivers. It is recommended that pediatric cardiac arrest survivors be evaluated for rehabilitation services. It is reasonable to refer pediatric cardiac arrest survivors for ongoing neurological evaluation for at least the first year after cardiac arrest.
  • 35.
    The Circulatory System – deliversoxygen and nutrients to the body’s tissues and removes waste products. It consists of the heart, blood vessels, and blood.
  • 36.
  • 37.
    The Respiratory System –It delivers oxygen to the body, as well as removes carbon dioxide from the body. Ventilation - passage of air into and out of the lungs Respiration - actual exchange of oxygen and carbon dioxide in the alveoli as well as the tissues of the body
  • 38.
    The Respiratory System Inspiration- breathing in or inhalation Expiration - breathing out or exhalation
  • 39.
    Breathing and Circulation 1.Air that enters the lungs contains about 21% oxygen and only a trace of carbon dioxide. Air that is exhaled from the lungs contains about 16% oxygen and 4% carbon dioxide. 2. The right side of the heart pumps blood to the lungs, where blood picks up oxy-gen and releases carbon dioxide. 3. The oxygenated blood then returns to the left side of the heart, where it is pumped to the tissues of the body.
  • 40.
    Breathing and Circulation 4.In the body tissues, blood releases oxygen and takes up carbon dioxide after which it flows back to the right side of the heart. 5. All body tissues require oxygen, but the brain requires more than any other tissue.
  • 41.
    The Nervous System –composed of the brain, spinal cord and nerves. – two major functions: Communication Control – let a person be aware of and react to the environment. – coordinates the body’s responses to stimuli and keeps body systems working together.
  • 42.
  • 43.
    Clinical Death • Within1 min – cardiac irritability • 1 - 4 min – brain damaged not likely • 4 - 6 min – brain damage possible Biological Death • 6 - 10 min – brain damaged very likely • More than 10 min – irreversible brain damaged Brain cells die every second they are deprived of oxygen.
  • 45.
    CPR - aseries of assessments and interventions using techniques and maneuvers made to bring victims of cardiac and respiratory arrest back to life. CARDIAC ARREST - the condition in which circulation ceases and vital organs are deprived of oxygen.
  • 46.
    • THREE CONDITIONSOF CARDIAC ARREST  Cardiovascular Collapse. The heart is still beating but its action is so weak that blood is not being circulated through the vascular system to the brain and body tissues.  Ventricular Fibrillation. Occurs when the individual fascicles of the heart beat independently rather than in coordinated, synchronized manner that produces rhythmic heartbeat.  Cardiac Standstill. It means that the heart has stopped beating.
  • 47.
    If you seea victim who is: 1. Unconscious/Unresponsive 2. Not breathing or has no normal breathing (only gasping) 3. No definite pulse Note: Responders need to generally assume that all victims have infectious diseases so that safety protocols must be completely observed at all times.
  • 48.
    1. Do notstart CPR if the scene is unsafe. The concept of ensuring scene safety applies in cardiac arrest situations, just as it does on any other call. 2. Do not start CPR if the patient has obvious signs of death.  Rigor mortis, or stiffening of the body after death  Dependent lividity (livor mortis), a discoloration of the skin caused by pooling of blood
  • 49.
    2. Do notstart CPR if the patient has obvious signs of death.  Putrefaction (decomposition of the body tissues)  Evidence of nonsurvivable injury, such as decapitation, dismemberment, or being burned beyond recognition. 3. Do not start CPR if the patient and the patient’s physician have previously agreed on a do not resuscitate (DNR) order or no-CPR order
  • 50.
    S - Thepatient Starts breathing and has a pulse. T - The patient’s care is Transferred to another provider of equal or higher-level training. O - You are Out of Strength or too tired to continue CPR. P - A Physician who is present or providing online medical direction assumes responsibility for the patient and directs you to discontinue CPR. S - Scene becomes unsafe.
  • 51.
    If a personcannot perform mouth-to-mouth ventilation for an adult victim, chest compression only - CPR should be provided rather than not attempting CPR. Chest compression only - CPR is recommended only in the following circumstances: 1. When a rescuer is unwilling or unable to perform mouth- to-mouth rescue breathing , or 2. For use in dispatcher-assisted CPR instructions where the simplicity of this modified technique allow untrained bystanders to rapidly intervene.
  • 52.
     Early CPRimproves the likelihood of survival.  Chest Compressions are the foundations of CPR.  Compressions create blood flow by increasing intra- thoracic pressure and directly compress the heart; generate blood flow and oxygen delivery to the myocardium and brain.
  • 53.
     CIRCULATION representsa heart that is actively pumping blood, most often recognized by the presence of a pulse in the neck  Assume there is no CIRCULATION if the following exist: 1. Unresponsive 2. Not breathing 3. Not moving 4. Poor skin color  Return of Spontaneous Circulation (ROSC) - sign of life
  • 54.
    ADULT CPR  Kneelfacing the victim’s chest  Place the heel of one hand on the center of the chest  Place the heel of the second hand on top of the first so that the hands are over-lapped and parallel
  • 55.
    CHILD CPR  Lowerhalf of the sternum, between the nipples  One hand only/two hands for big children  30:2 for single rescuer, 15:2 for 2-man rescuer
  • 56.
    INFANT CPR  Justbelow the nipple line, lower half of sternum  Two fingers, flexing at the wrist (lone rescuer)  2 thumb-encircling hands technique (two rescuers)
  • 58.
    This must bedone to ensure an open passage for spontaneous breathing OR mouth to mouth during CPR.  Head-Tilt/Chin-Lift Maneuver. Effective for opening the airway in most patients when there is no indication of a spinal injury.  Jaw-Thrust Maneuver. A technique that can be done by at least two highly trained BLS providers (if suspected with cervical trauma).
  • 59.
    TO PERFORM THEHEAD TILT–CHIN LIFT MANEUVER 1.Place one hand on the patient’s forehead and apply firm backward pressure with your palm to tilt the head back. 2.Next, place the tips of the index and middle fingers of your other hand under the lower jaw near the bony part of the chin. Lift the chin upward, bringing the entire lower jaw with it, helping to tilt the head back.
  • 60.
    TO PERFORM THEJAW-THRUST MANEUVER 1.Maintain the head in neutral alignment and place your fingers behind the angles of the lower jaw and move the jaw upward.
  • 62.
     Maintain openairway  Pinch nose shut (if mouth to mouth RB is preferred)  Open your mouth wide, take a normal breath, and make a tight seal around out-side of victim’s mouth  Give 2 full breaths (1 sec each breath)  Observe chest rise  30:2 (Compression to Ventilation ratio)  5 cycles or 2 minutes
  • 63.
    In Pandemic (SingleRescuer) • Avoid direct mouth to mouth ventilation. Use a pocket mask if there is a need for rescue breathing specially for a child/infant with an arrest most likely respiratory in nature. If unwilling and unable, Hands-only CPR is a MUST. • Perform Hands-Only CPR until Advanced Medical Help arrives while assessing victim every after 2 minutes of continuous compressions.
  • 64.
    In Pandemic (Tworescuers) • Perform chest compressions with ventilations via BVM with a ratio of 30:2 for 5 cycles or 2 minutes (30 Chest compressions delivered within 15-18 seconds). • Give 2 ventilations via tight sealed Bag-Valve-Mask (BVM) with a High-Efficiency Particulate Air (HEPA) filter with 1 second each ventilation.
  • 65.
    1. Verify SceneSafety • Survey for scene safety first • Make sure the environment is safe for rescuers and victim • Observe standard precautions (PPE) 2. Introduce Yourself • Make sure to introduce yourself first before engaging with the victim. • “I’m _________. I know BLS/CPR. I can help.”
  • 66.
    3. Check forResponsiveness • Check for responsiveness by tapping the victim and ask loudly, “Are you OK?” • ADULT, ADOLESCENTS and CHILD BLS – Tap the shoulders • INFANT BLS – Tap the sole of the feet
  • 67.
    4. Activate EmergencyResponse System (EMS) • Shout for nearby help. • Activate EMS via mobile phone or phone patch (if available). • Send someone to do so. • If you are alone with no mobile phone, leave the victim to activate the EMS, and get the AED (if readily available) before beginning CPR.
  • 68.
    5. Recognition ofCardiac Arrest • Unresponsive. • No breathing or only gasping. • No pulse. Check for breathing and pulse simultaneously for no more than 10 seconds.
  • 69.
    5. Recognition ofCardiac Arrest HOW TO CHECK FOR BREATHING • Observe for chest rise. • Distinguish between normal breathing from no normal breathing (only gasping). WHERE TO CHECK FOR PULSE • Adult & Adolescents – Check for Carotid Pulse • Child BLS – Check for Carotid pulse • Infant BLS – Check for Brachial or Femoral Pulse
  • 70.
    6. Perform HighQuality CPR a. Correct Compression Site b. Adequate Compression Rate (100-120/minute) c. Adequate Compression Depth ADULT: at least 2 inches (5cm) but should not exceed 2.4 inches (6cm) CHILDREN: about 2 inches (5cm) INFANTS: about 1.5 inches (4cm)
  • 71.
    6. Perform HighQuality CPR d. Chest Recoil completed after each compression e. Minimize interruptions to less than 10 seconds in between chest compressions. f. Avoidance of Excessive Ventilation S – Start CPR (within 10 seconds) P – Push hard, Push Fast (2 to 2.4 inches/5 to 6cm at 100 to 120 compressions/min) A – Allow full Chest Recoil (to maximize blood return to the heart) M – Minimize Interruption (not more than 10 seconds) A – Avoid excessive ventilation
  • 77.
    6. Perform HighQuality CPR PRIMARY CPR PROCEDURES • Continue CPR until › AED arrives and starts to analyze › EMS providers take over the care of the victim  Reassess victim every after 2 minutes  Rescuers may switch roles (for Two-Man Rescuers)  If patient becomes conscious, place patient in RECOVERY POSITION.
  • 78.
    6. Perform HighQuality CPR DONT's in External Chest Compression: • Massager • Bender • Rocker • Bouncer • Double Crosser
  • 79.
    6. Perform HighQuality CPR CPR with Advanced Airway (HCP ONLY) • Cycles of 30 compressions : 2 ventilations should be continued until an advanced airway is placed • If an advanced airway is already in place: › Continuous chest compressions at a rate of 100-120 per minute, without pauses for ventilation. › Ventilation rate of 1 breath every 6 sec. (10 breaths per minute)
  • 80.
    7. Recovery Position •If the patient is breathing adequately on his or her own and has no signs of injury to the spine, hip, or pelvis, then place the patient in the recovery position. • This position helps to maintain a clear airway in a patient with a decreased level of consciousness who has not sustained traumatic injuries and is breathing adequately on his or her own
  • 81.
    7. Recovery Position •It allows vomitus to drain from the mouth. • Avoid placing a patient who has a suspected head or spinal injury in the recovery position because in this position, the spine is not aligned, spinal stabilization is not possible, and further spinal injury could result.
  • 82.
  • 84.
    AEDs – aresophisticated computerized devices that can analyze a heart rhythm and prompts the user to deliver a shock when necessary. These devices only require the user to turn the AED on and follow the audio instructions when prompted. AED is used to: • Apply controlled electrical shock • Restore an organized rhythm • Enable the heart to contract and pump blood
  • 85.
    AED: • Placed inareas of public access • Also called as PAD: Public Access Defibrillator Area – Railway stations, Airports, Shopping centers • Stored in: – Secured display units – Accessible to all trained rescuers – Clearly marked • Should always be stored ready to use with a fully charged battery • Razors to shave the casualty’s chest should be stored with the defibrillator, along with gloves in various sizes
  • 86.
    Defibrillation – A processin which an electronic device (such as AED), gives an electrical shock to the heart. Defibrillation stops Ventricular Fibrillation (VF) by using an electrical shock and allows the return of a normal heart rhythm.  Shock success – Termination of VF for at least 5 seconds following the shock  VF frequently recurs after successful shocks & these recurrence should not be equated to shock failure
  • 87.
    Defibrillation Indications and Importance Earlydefibrillation is critical for victims of sudden cardiac arrest because: • The most frequent rhythm in sudden cardiac arrest is Ventricular Fibrillation (VF) • The most effective treatment for VF is defibrillation • Also indicated for Pulseless Ventricular Tachycardia
  • 88.
    Defibrillation Indications and Importance •Defibrillation is most likely to be successful if it occurs within minutes of collapse (sudden cardiac arrest) • Defibrillation may be ineffective if it is delayed • VF deteriorates to asystole if not treated
  • 89.
    Defibrillation Shockable Rhythms • VentricularFibrillation (VF) • Pulseless Ventricular Tachycardia – a rapid contraction of the ventricles that does not allow for normal filling of the heart. • Torsade de Pointes – the heart’s two lower chambers, called the ventricles, beat faster than and out of sync with the upper chambers, called the atria.
  • 90.
    Defibrillation Non-Shockable Rhythms • Asystole(Flatline) – indicates that no electrical activity remains and therefore defibrillation will not help. • Pulseless Electrical Activity (PEA) – refers to a state of cardiac arrest that exists despite an organized electrical complex; defibrillation could possibly make this situation worse.
  • 91.
    Ventricular Fibrillation (VF) •VF is a common and treatable initial rhythm in adults with witnessed cardiac • Survival rates are highest when immediate bystander CPR is provided, and defibrillation occurs within 3 to 5 minutes of collapse • Rapid defibrillation is the treatment of choice • Rhythm causing ‘all’ sudden cardiac arrest • Useless quivering of the heart no blood flow • Myocardium is depleted of oxygen & metabolic substrates
  • 92.
    Pulseless Ventricular Tachycardia Thepulseless ventricular tachycardia rhythm is primarily identified by several criteria: • The rate is usually greater than 180 beats per minute and the rhythm generally has a very wide QRS complex in ECG tracings. • The patient will be pulseless • The rhythm originates in the ventricles.
  • 93.
    Causes of VFand Cardiac Arrest 1. Hypoxia • Near drowning • Burst lung • Decompression illness 2. Bleeding 3. Heart attack 4. Drug overdose Monitor! • Rebreather malfunction • Choking • Carbon monoxide poisoning
  • 94.
    Different Types ofAED 1. AED Trainer  Not capable of delivering a shock.  Does not allow to be confused with real units. 2. Semi-Automated Defibrillator  Requires the user to press the button for analysis and shock. 3. Fully Automated Defibrillator • No intervention required for analysis and shock. • They are programmed to run self-test and they will indicate when maintenance is needed.
  • 95.
    Several Factors ThatCan Affect AED Analysis • Patient movement (eg. agonal gasp) • Repositioning the patient Use AED Only When Victims Have the Following 3 Clinical Findings  No Response  No Breathing  No Pulse Note: Defibrillation is also indicated for pulseless ventricular tachycardia (VT)
  • 96.
    Special Conditions thatAffect the Use of AED • The victim is 1 month old or less. • The victims has a hairy chest. • The victim is lying in water, immersed in water, or water is covering the victim’s chest. • The victim has implanted defibrillator or pacemaker. • The victim has a transdermal medication patch or other object on the surface of the skin where the AED electrode pads are placed.
  • 97.
    CRITICAL CONCEPTS: The four(4) Universal Steps of AED Operation P – POWER ON the AED. A – ATTACH the electrodes pads to the victim’s chest. A – Clear the victim and ANALYZE the heart rhythm. S – Clear the victim and deliver a SHOCK (if indicated)
  • 98.
    AED PROCEDURES 1. ContinueCPR until an AED is available. 2. Once the AED is available, Power on the AED and follow the voice prompts. 3. Expose chest. Dry the skin or shave, if necessary. 4. Attach pads in victim’s bare chest. 5. Keep following voice prompts
  • 99.
    AED PROCEDURES 6. Oncethe voice prompt tells “Analyzing heart rhythm, do not touch the patient”, make sure: •No one touches the victim! •Remind co-rescuers/bystanders to avoid touching the victim NOTE: For Semi-automated AED, clear the victim and manually press analyze button.
  • 100.
    AED PROCEDURES 7. Delivera Shock (if indicated) •If the AED prompt tells “SHOCK ADVISED” make sure:  No one touches the victim!  Verbal warning to co-rescuers/ bystanders: › “Clear” › Physical and hand gestures › Press the Shock button and immediately resume CPR
  • 101.
    AED PROCEDURES 7. Delivera Shock (if indicated) •If the AED prompt initially tells “NO SHOCK ADVISED”:  Continue CPR for 2 minutes  Follow voice prompt •If the AED prompt tells “NO SHOCK ADVISED” for the second time:  Check for pulse (HCP)  Check for responsiveness (Lay rescuer)
  • 104.
    Shock First vs.CPR First • For witnessed adult cardiac arrest when an AED is immediately available, it is reasonable that the defibrillator be used as soon as possible. • For adults with unmonitored cardiac arrest or for whom an AED is not immediately available, it is reasonable that CPR be initiated while the defibrillator equipment is being retrieved and applied and that defibrillation, if indicated, be attempted as soon as the device is ready for use.
  • 105.
    AED Maintenance 1. Becomefamiliar with your AED and how it operates. 2. Check the AED for visible problems such as signs of damage. 3. Check the “ready-for-use” indicator on your AED (if so equipped) daily. 4. Perform all user-based maintenance according to the manufacturer’s recommendations. 5. Ideally, the case carrying the AED should contain the following supplies at all times: •2 sets of extra electrode pads (3 sets total) •2 pocket face masks
  • 106.
    AED Maintenance 5. Ideally,the case carrying the AED should contain the following supplies at all times: •1 extra battery (if appropriate for your AED); some AEDs have batteries that last for years •2 disposable razors •5 to 10 alcohol wipes •5 sterile gauze pads (4X4 inches), individually wrapped •1 absorbent cloth towel •1 power scissor
  • 107.
    Remember: AED malfunctions arerare. Most AED “problems” are caused by operator error or failure to perform recommended user-based maintenance.
  • 109.
    – the conditionin which breathing stops or inadequate. – can result from a number of causes, including submersion/near-drowning, stroke, FBAO, smoke inhalation, epiglottis, drug over-dose, electrocution, suffocation, injuries, myocardial infarction, lightning strike, and coma from any cause. – the heart and lungs can continue to oxygenate when primary respiratory arrest occurs.
  • 110.
    CAUSES OF RESPIRATORYARREST 1. Obstruction a. Anatomical Obstruction b. Mechanical Obstruction 2. Diseases a. Bronchitis b. Pneumonia c. Chronic Obstructive Pulmonary Disease (COPD) and other respiratory illnesses.
  • 111.
    CAUSES OF RESPIRATORYARREST 3. Other Causes of Respiratory Arrest a. Chest compression (by physical forces). b. Circulatory collapse. c. Drowning d. Electrocution e. External strangulation. f. Poisoning g. Suffocation
  • 112.
    – a techniqueof breathing air into person lungs to supply him or her oxygen needed to survive. – Given to victims who are not breathing or inadequate but still have pulse. – Crucial tool to revive the individual or keep him or her until the help comes.
  • 113.
    WAYS TO VENTILATETHE LUNGS 1.Mouth-to-Mouth. Is a quick, effective way to provide oxygen and ventilation to the victim. 2.Mouth-to-Nose. Is recommended when it is impossible to ventilate through the victim’s mouth, the mouth cannot be opened (trismus), the mouth is seriously injured, or a tight mouth-to-mouth seal is difficult to achieve. 3.Mouth-to-Mouth and Nose. If the victim is an infant (1-year-old), this is the best way in delivering ventilation by placing your mouth over the infant’s mouth and nose to create a seal. 4.Mouth to Stoma. It is used if the patient has a stoma; a permanent opening that connects the trachea directly to the front of the neck. These patients breathe only through the stoma.
  • 114.
    WAYS TO VENTILATETHE LUNGS 5.Mouth-to-Faceshield. It could provide very low resistance ventilations to a patient by using a thin and flexible plastic. 6.Mouth-to-Mask. It could deliver ventilation to a patient by using a pocket facemask with a one-way valve to form a seal around the patient’s nose and mouth. 7. Bag Valve Mask Device. It could deliver ventilation to a patient by using a hand– operated device consisting of a self-inflating bag, one-way valve, facemask, and oxygen reservoir.
  • 115.
    SPECIAL CONSIDERATIONS • Rescuershould avoid pressing soft tissue under the chin this might obstruct the airway. • Rescuer should not use the thumb to lift the chin. • Rescuer should not close the victim’s mouth completely (unless mouth to nose is the technique).
  • 116.
    SPECIAL CONSIDERATIONS • Eachrescue breath should give enough air to make the chest rise and be given at 1 second. • Rescuer should avoid delivering more breaths (more than the number recommended) or breaths that are too large or too forceful. • Rescuers should take a normal breath (not a deep breath) mouth to mouth or mouth-to-barrier device rescue breaths.
  • 118.
    CAUTION: If yougive breaths too quickly or with too much force, air is likely to enter the stomach rather than the lungs. This can cause gastric inflation. Gastric inflation frequently develops during mouth- to-mouth, mouth-to-mask, or bag-mask ventilation. Gastric inflation can result in serious complications, such as vomiting, aspiration, or pneumonia. Rescuers can reduce the risk of gastric inflation by avoiding giving breaths too rapidly or too forcefully.
  • 120.
    – a conditionwhen solid material like chunked foods, coins, vomitus, small toys, etc. are blocking the airway. CAUSES OF OBSTRUCTION 1. Improper chewing of large pieces of food. 2. Excessive intake of alcohol. a. Relaxation of tongue back into the throat b. Aspirated vomitus (stomach content) 3. The presence of loose upper and lower dentures. 4. Children who are running while eating. 5. For smaller children of “hand-to-mouth” stage left unattended.
  • 121.
    TWO TYPES OFOBSTRUCTION 1. ANATOMICAL. When tongue drops back and obstruct the throat. Other causes are acute asthma, croup, diphtheria, swelling, and cough (whooping). 2. MECHANICAL. When foreign objects lodge in the pharynx or airways; fluids accumulate in the back of the throat.
  • 122.
    CLASSIFICATION OF OBSTRUCTION 1.MILD OBSTRUCTION A. Signs: a. Good air exchange b. Responsive and can cough forcefully c. May wheeze between coughs.
  • 123.
    CLASSIFICATION OF OBSTRUCTION 1.MILD OBSTRUCTION B. Rescuer Actions: As long as good air exchange continues, a. Encourage the victim to continue spontaneous coughing and breathing efforts. b. Do not interfere with the victim’s own attempts to expel the foreign body but stay with the victim and monitor his or her condition. c. If patient becomes unconscious/unresponsive, activate the emergency response system.
  • 124.
    CLASSIFICATION OF OBSTRUCTION 2.SEVERE OBSTRUCTION A. Signs: a. Poor or no air exchange, b. Weak or ineffective cough or no cough at all, c. High-pitched noise while inhaling or no noise at all d. Increased respiratory difficulty, e. Cyanotic (turning blue) f. Unable to speak
  • 125.
    CLASSIFICATION OF OBSTRUCTION 2.SEVERE OBSTRUCTION A. Signs: g. Clutching the neck with the thumb and fingers making the universal sign of choking. h. Movement of air is absent.
  • 126.
    CLASSIFICATION OF OBSTRUCTION 2.SEVERE OBSTRUCTION B. Rescuer Actions: a. Ask the victim if he or she is choking. If the victim nods and cannot talk, severe airway obstruction is present. b. The rescuer must initially perform five (5) back slaps between victim’s shoulder blades/scapula using the heel of the hand. If unsuccessful, perform abdominal thrust repeatedly and once the victim becomes unconscious, slowly lay down the victim. c. Activate the emergency response system and perform chest compressions.
  • 127.
    The universal signfor choking is hands clutched to the throat.
  • 128.
    FBAO MANAGEMENT FORADULT AND CHILDREN (HEIMLICH MANEUVER) Recommended for removing severe airway obstructions in responsive adults and children older than 1 year Creates an artificial cough by causing a sudden increase in intrathoracic pressure when thrusts are applied to the subdiaphragmatic region Goal is to compress the lungs upward and force residual air from the lungs to flow upward and expel the object
  • 129.
    FBAO MANAGEMENT FORADULT AND CHILDREN (HEIMLICH MANEUVER)
  • 130.
    CHEST THRUST  Usedfor women in advanced stages of pregnancy and patients who have obesity
  • 131.
    FBAO MANAGEMENT FORINFANT Do not use abdominal thrusts on a responsive infant with an airway obstruction because of the risk of injury to the immature organs of the abdomen. Perform 5 back slaps and 5 chest thrusts to try to clear a severe airway obstruction in a responsive infant
  • 132.
    FINGER SWEEP -a technique recommended for relieving foreign body airway obstruction after chest compression/thrust when foreign body is visible in an unconscious victim.
  • 133.
    Conscious Adult (PartI) Unconscious Adult (Part II)
  • 134.
    Conscious Infant (PartI) Unconscious Infant (Part II)
  • 135.
    1. Explain theprinciples of emergency care and emergency action principle. 2. Describe basic life support (BLS). 3. Explain the goals of cardiopulmonary resuscitation (CPR) and when it should be performed on a patient. 4. Explain the components of CPR, the six links in the American Heart Association (AHA) chain of survival, and how each one relates to maximizing the survival of a patient. 5. Discuss guidelines for circumstances that require the use of an automated external defibrillator (AED) on both adult and pediatric patients experiencing cardiac arrest.
  • 136.
    6. Describe theprocess of providing artificial ventilations to an adult patient, ways to avoid gastric distention. 7. Explain the steps in providing single-rescuer adult CPR. 8. Explain the steps in providing two-rescuer adult CPR, including the method for switching positions during the process. 9. Explain common causes of foreign body airway obstruction in both children and adults and how to distinguish mild or partial airway obstruction from complete airway obstruction. 10.Describe the different methods for removing a foreign body airway obstruction in an infant, child, and adult, including the procedure for a patient with an obstruction who becomes unresponsive.