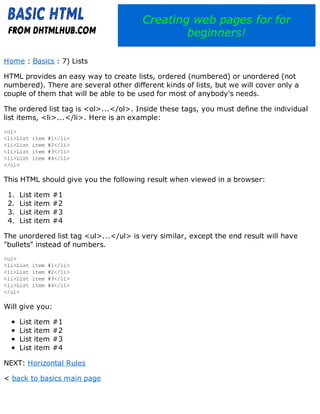
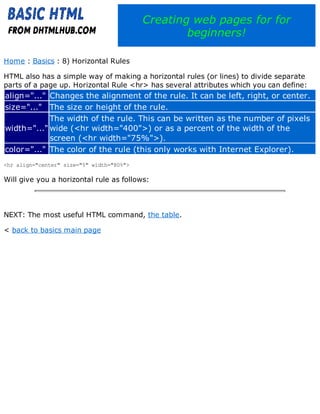
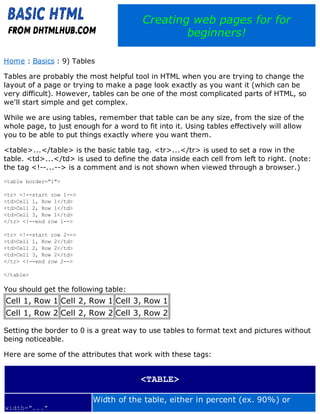
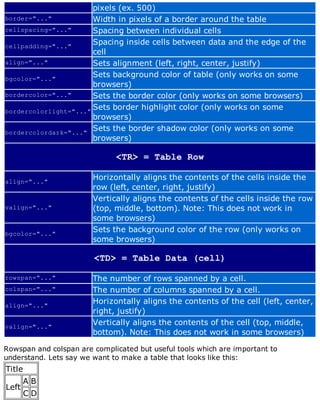
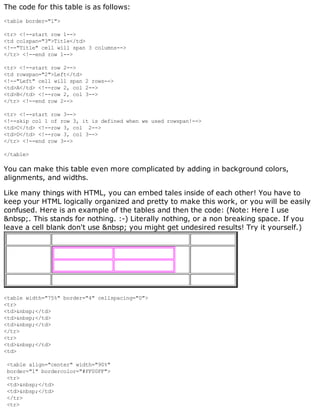
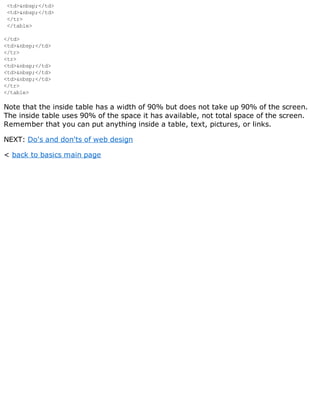
The Internet is growing at an incredible pace, and we want everybody to be a part of this growth. Basic HTML was created for the beginner to learn about designing web pages from the ground up and for the advanced web designers that want to revise a few HTML tricks.This downloadable tutorial is designed to help you learn about HTML and web page design.
This is simple slider for web designer. If you know advance html then you can ignore this otherwise you can read. You can also knock me to get more information...
There are four tasks to complete in this workshop. They are listed below and can be accessed from the JohnAllanSandbox course on Desire2Learn, in the Table of Content. Please complete these in this order.
1. HTML Review Activity
2. Creating an image link
3. Attributes
4. Lists
HTML Basics
Welcome to HTML Basics. This workshop leads you through the basics of Hyper Text Markup Language (HTML). HTML is the building block for web pages. You will learn to use HTML to author an HTML page to display in a web browser.
HTML Basics
Welcome to HTML Basics. This workshop leads you through the basics of Hyper Text Markup Language (HTML). HTML is the building block for web pages. You will learn to use HTML to author an HTML page to display in a web browser.
Web Designing Training in Ambala ! BATRA COMPUTER CENTREjatin batra
Are you in search of Web Designing training in Ambala?
Now your search ends here... Batra Computer Centre provides you the best training in Ambala Cantt. We provide training in Basics of Computers, training in Programming Languages C, C++, HTML, PHP,Web Designing,WebDevelopment,Seo,Smo and training many other courses also provided here.
Learn HTML and CSS_ Learn to build a website with HTML and CSS simodafire
Understanding
Web 2.0
For many people the term Web 2.0 is complicated. They fail truly to
understand what this is and how it works. Many so-called experts have tried
to give their long drawn out technical explanation of this type of web site.
The problem is though is that use so much jargon and hard to understand
technical mumbo jumbo that an average person will need a Rosetta stone to
decipher what these experts are saying.
Following are the some notes regarding HTML.It will provide you a basic insight in HTML and web designing.
For further, contact us -http://nextgenr.com/
This guide was designed to teach beginner web designers and programmers how to use HTML.:D This guide is aimed to give newbies a little experience in writing HTML code, saving their files correctly, and viewing the completed works in a web browser. HTML may seem confusing or boring at first, but we will help you understand how it works and by the end of the book you would be told about how to make your first web home page for your website.
Dev Dives: Train smarter, not harder – active learning and UiPath LLMs for do...UiPathCommunity
💥 Speed, accuracy, and scaling – discover the superpowers of GenAI in action with UiPath Document Understanding and Communications Mining™:
See how to accelerate model training and optimize model performance with active learning
Learn about the latest enhancements to out-of-the-box document processing – with little to no training required
Get an exclusive demo of the new family of UiPath LLMs – GenAI models specialized for processing different types of documents and messages
This is a hands-on session specifically designed for automation developers and AI enthusiasts seeking to enhance their knowledge in leveraging the latest intelligent document processing capabilities offered by UiPath.
Speakers:
👨🏫 Andras Palfi, Senior Product Manager, UiPath
👩🏫 Lenka Dulovicova, Product Program Manager, UiPath
Encryption in Microsoft 365 - ExpertsLive Netherlands 2024Albert Hoitingh
In this session I delve into the encryption technology used in Microsoft 365 and Microsoft Purview. Including the concepts of Customer Key and Double Key Encryption.
State of ICS and IoT Cyber Threat Landscape Report 2024 previewPrayukth K V
The IoT and OT threat landscape report has been prepared by the Threat Research Team at Sectrio using data from Sectrio, cyber threat intelligence farming facilities spread across over 85 cities around the world. In addition, Sectrio also runs AI-based advanced threat and payload engagement facilities that serve as sinks to attract and engage sophisticated threat actors, and newer malware including new variants and latent threats that are at an earlier stage of development.
The latest edition of the OT/ICS and IoT security Threat Landscape Report 2024 also covers:
State of global ICS asset and network exposure
Sectoral targets and attacks as well as the cost of ransom
Global APT activity, AI usage, actor and tactic profiles, and implications
Rise in volumes of AI-powered cyberattacks
Major cyber events in 2024
Malware and malicious payload trends
Cyberattack types and targets
Vulnerability exploit attempts on CVEs
Attacks on counties – USA
Expansion of bot farms – how, where, and why
In-depth analysis of the cyber threat landscape across North America, South America, Europe, APAC, and the Middle East
Why are attacks on smart factories rising?
Cyber risk predictions
Axis of attacks – Europe
Systemic attacks in the Middle East
Download the full report from here:
https://sectrio.com/resources/ot-threat-landscape-reports/sectrio-releases-ot-ics-and-iot-security-threat-landscape-report-2024/
LF Energy Webinar: Electrical Grid Modelling and Simulation Through PowSyBl -...DanBrown980551
Do you want to learn how to model and simulate an electrical network from scratch in under an hour?
Then welcome to this PowSyBl workshop, hosted by Rte, the French Transmission System Operator (TSO)!
During the webinar, you will discover the PowSyBl ecosystem as well as handle and study an electrical network through an interactive Python notebook.
PowSyBl is an open source project hosted by LF Energy, which offers a comprehensive set of features for electrical grid modelling and simulation. Among other advanced features, PowSyBl provides:
- A fully editable and extendable library for grid component modelling;
- Visualization tools to display your network;
- Grid simulation tools, such as power flows, security analyses (with or without remedial actions) and sensitivity analyses;
The framework is mostly written in Java, with a Python binding so that Python developers can access PowSyBl functionalities as well.
What you will learn during the webinar:
- For beginners: discover PowSyBl's functionalities through a quick general presentation and the notebook, without needing any expert coding skills;
- For advanced developers: master the skills to efficiently apply PowSyBl functionalities to your real-world scenarios.
Accelerate your Kubernetes clusters with Varnish CachingThijs Feryn
A presentation about the usage and availability of Varnish on Kubernetes. This talk explores the capabilities of Varnish caching and shows how to use the Varnish Helm chart to deploy it to Kubernetes.
This presentation was delivered at K8SUG Singapore. See https://feryn.eu/presentations/accelerate-your-kubernetes-clusters-with-varnish-caching-k8sug-singapore-28-2024 for more details.
Neuro-symbolic is not enough, we need neuro-*semantic*Frank van Harmelen
Neuro-symbolic (NeSy) AI is on the rise. However, simply machine learning on just any symbolic structure is not sufficient to really harvest the gains of NeSy. These will only be gained when the symbolic structures have an actual semantics. I give an operational definition of semantics as “predictable inference”.
All of this illustrated with link prediction over knowledge graphs, but the argument is general.
GDG Cloud Southlake #33: Boule & Rebala: Effective AppSec in SDLC using Deplo...James Anderson
Effective Application Security in Software Delivery lifecycle using Deployment Firewall and DBOM
The modern software delivery process (or the CI/CD process) includes many tools, distributed teams, open-source code, and cloud platforms. Constant focus on speed to release software to market, along with the traditional slow and manual security checks has caused gaps in continuous security as an important piece in the software supply chain. Today organizations feel more susceptible to external and internal cyber threats due to the vast attack surface in their applications supply chain and the lack of end-to-end governance and risk management.
The software team must secure its software delivery process to avoid vulnerability and security breaches. This needs to be achieved with existing tool chains and without extensive rework of the delivery processes. This talk will present strategies and techniques for providing visibility into the true risk of the existing vulnerabilities, preventing the introduction of security issues in the software, resolving vulnerabilities in production environments quickly, and capturing the deployment bill of materials (DBOM).
Speakers:
Bob Boule
Robert Boule is a technology enthusiast with PASSION for technology and making things work along with a knack for helping others understand how things work. He comes with around 20 years of solution engineering experience in application security, software continuous delivery, and SaaS platforms. He is known for his dynamic presentations in CI/CD and application security integrated in software delivery lifecycle.
Gopinath Rebala
Gopinath Rebala is the CTO of OpsMx, where he has overall responsibility for the machine learning and data processing architectures for Secure Software Delivery. Gopi also has a strong connection with our customers, leading design and architecture for strategic implementations. Gopi is a frequent speaker and well-known leader in continuous delivery and integrating security into software delivery.
UiPath Test Automation using UiPath Test Suite series, part 3DianaGray10
Welcome to UiPath Test Automation using UiPath Test Suite series part 3. In this session, we will cover desktop automation along with UI automation.
Topics covered:
UI automation Introduction,
UI automation Sample
Desktop automation flow
Pradeep Chinnala, Senior Consultant Automation Developer @WonderBotz and UiPath MVP
Deepak Rai, Automation Practice Lead, Boundaryless Group and UiPath MVP
Epistemic Interaction - tuning interfaces to provide information for AI supportAlan Dix
Paper presented at SYNERGY workshop at AVI 2024, Genoa, Italy. 3rd June 2024
https://alandix.com/academic/papers/synergy2024-epistemic/
As machine learning integrates deeper into human-computer interactions, the concept of epistemic interaction emerges, aiming to refine these interactions to enhance system adaptability. This approach encourages minor, intentional adjustments in user behaviour to enrich the data available for system learning. This paper introduces epistemic interaction within the context of human-system communication, illustrating how deliberate interaction design can improve system understanding and adaptation. Through concrete examples, we demonstrate the potential of epistemic interaction to significantly advance human-computer interaction by leveraging intuitive human communication strategies to inform system design and functionality, offering a novel pathway for enriching user-system engagements.
Securing your Kubernetes cluster_ a step-by-step guide to success !KatiaHIMEUR1
Today, after several years of existence, an extremely active community and an ultra-dynamic ecosystem, Kubernetes has established itself as the de facto standard in container orchestration. Thanks to a wide range of managed services, it has never been so easy to set up a ready-to-use Kubernetes cluster.
However, this ease of use means that the subject of security in Kubernetes is often left for later, or even neglected. This exposes companies to significant risks.
In this talk, I'll show you step-by-step how to secure your Kubernetes cluster for greater peace of mind and reliability.
Kubernetes & AI - Beauty and the Beast !?! @KCD Istanbul 2024Tobias Schneck
As AI technology is pushing into IT I was wondering myself, as an “infrastructure container kubernetes guy”, how get this fancy AI technology get managed from an infrastructure operational view? Is it possible to apply our lovely cloud native principals as well? What benefit’s both technologies could bring to each other?
Let me take this questions and provide you a short journey through existing deployment models and use cases for AI software. On practical examples, we discuss what cloud/on-premise strategy we may need for applying it to our own infrastructure to get it to work from an enterprise perspective. I want to give an overview about infrastructure requirements and technologies, what could be beneficial or limiting your AI use cases in an enterprise environment. An interactive Demo will give you some insides, what approaches I got already working for real.
Essentials of Automations: Optimizing FME Workflows with ParametersSafe Software
Are you looking to streamline your workflows and boost your projects’ efficiency? Do you find yourself searching for ways to add flexibility and control over your FME workflows? If so, you’re in the right place.
Join us for an insightful dive into the world of FME parameters, a critical element in optimizing workflow efficiency. This webinar marks the beginning of our three-part “Essentials of Automation” series. This first webinar is designed to equip you with the knowledge and skills to utilize parameters effectively: enhancing the flexibility, maintainability, and user control of your FME projects.
Here’s what you’ll gain:
- Essentials of FME Parameters: Understand the pivotal role of parameters, including Reader/Writer, Transformer, User, and FME Flow categories. Discover how they are the key to unlocking automation and optimization within your workflows.
- Practical Applications in FME Form: Delve into key user parameter types including choice, connections, and file URLs. Allow users to control how a workflow runs, making your workflows more reusable. Learn to import values and deliver the best user experience for your workflows while enhancing accuracy.
- Optimization Strategies in FME Flow: Explore the creation and strategic deployment of parameters in FME Flow, including the use of deployment and geometry parameters, to maximize workflow efficiency.
- Pro Tips for Success: Gain insights on parameterizing connections and leveraging new features like Conditional Visibility for clarity and simplicity.
We’ll wrap up with a glimpse into future webinars, followed by a Q&A session to address your specific questions surrounding this topic.
Don’t miss this opportunity to elevate your FME expertise and drive your projects to new heights of efficiency.
To Graph or Not to Graph Knowledge Graph Architectures and LLMs
Basic HTML Tutorial For Beginners
1. Creating web pages for the new
millennium.
The Internet is growing at an incredible pace, and we want everybody to be a part of
this growth. Basic HTML was created for the beginner to learn about designing web
pages from the ground up and for the advanced web designers that want to revise a
few HTML tricks.
This downloadable tutorial is designed to help you learn about HTML and web page
design. If you want to have more information about HTML, the DHTMLHub blog is
updated more often than this tutorial. I hope this free resource will help you satisfy
your basic web page needs.
Because these resources are free, I would appreciate any feedback (both good and bad)
you have about Basic HTML. With this feedback I will continue to be motivated to
provide with the opportunity to learn HTML and web development for free. Feel free to
email me at support@dhtmlhub.com or visit the web site to send feedback from there.
My main home website remains www.dhtmlextreme.net
I encourage everybody to tell people about this free web page design help that Basic
HTML offers. However, no part of this file may be reproduced, decompiled, or edited,
in any form or by any means, without permission.
2. Creating web pages for for
beginners!
Home : Basics : 1) Your first HTML file
HTML stands for Hypertext Markup Language, the bare bones of the Internet. If you
truly want to understand web pages well, a basic understanding of HTML is a necessity.
You can purchase programs like Microsoft Front Page or Netscape Composer to help you
in designing web pages, but if you want to get the most out of HTML, basic knowledge
of it is required.
To make a web page, all you need is a text editor (like Notepad) and a little knowledge.
HTML is a text file made up of 'Tags.' A tag is a command inside of less than and
greater than symbols (ex <html> ). Most tags also have a closing tag that tells the
computer when to stop doing the command. Closing tags are written with a / in them.
(ex </html> ).
Here are explanations of a few of the most basic HTML tags:
<html>
</html>
Defines the text file as being in HTML format. This is found on the
beginning and end of each web page.
<head>
</html>
The heading area of a the page. The space between these two tags
is used for special commands that does not have any connection to
the actual formatting of the page.
<title>
</title>
Defines the title displayed at the title bar of the browser window.
<body>
</body>
Found after the <head> tag and is used to define the area of the file
which formats the way the web page is seen.
<b>
</b>
Makes text Bold
To make your first web page, open up Notepad and type in the following:
<html>
<head>
<title>My First Page</title>
</head>
<body>
Regular Text <b>Bold Text</b>
</body>
</html>
Save this file as something.html (not something.txt). Next, open up the file by double
clicking on it or typing the location into the location bar on your web browser (ex c:my
documentssomething.html). Note the "My First Page" in the title bar of the screen.
3. You should see something like the following:
Regular Text Bold Text
Every web page has a HTML file like the one you just made that goes with it. To see the
actual HTML of a web page, open up a page in your browser and select VIEW | SOURCE
in Internet Explorer or VIEW | PAGE SOURCE in Netscape. Try it right now! Anything
you see on a site, you can "steal" to put on your own site, with a small amount of
knowledge.
NEXT: Learn more about editing HTML files.
< back to basics main page
4. Creating web pages for for
beginners!
Home : Basics : 2) Editing HTML
Now, open your first HTML file in Notepad again. This time, add a couple returns after
"Regular Text" so it looks like this:
<html>
<head>
<title>My First Page</title>
</head>
<body>
Regular Text
<b>Bold Text</b>
</body>
</html>
To a first time user, it would seem like now there should be a space between "Regular
Text" and "Bold Text" when you view this file in your browser. But this is not the case.
Web browsers do not care how many spaces are in your HTML file, you must use
commands to change the text in any way.
To put these two phrases on different lines, we need to use the <p> (paragraph
command).
<html>
<head>
<title>My First Page</title>
</head>
<body>
<p>Regular Text</p>
<p><b>Bold Text</b></p>
</body>
</html>
Now your web page will look as follows:
Regular Text
Bold Text
You can also make the paragraph be centered in the window by using <p
align="center"> instead of <p>. Or you can right justify a paragraph by using <p
align="right">.
What if you do not want a space between the two lines, like using <p> does, you must
use the <br> (break) tag. Example:
5. <html>
<head>
<title>My First Page</title>
</head>
<body>
<p align="center">Regular Text<br>
<b>Bold Text</b></p>
</body>
</html>
This will give you a page that look like the following:
Regular Text
Bold Text
These are just a few of the many tags used in HTML.
NEXT: Learn about adding color to your web pages.
< back to basics main page
6. Creating web pages for for
beginners!
Home : Basics : 3) Adding Color
Adding colors to web pages is relatively simple. Each color has a six digit code assigned
to it with a number sign in front of it. This code is the Hexadecimal (Hex) Triplet value.
Instead of using a number system that goes from 0 to 9, Hex uses a system that starts
with 0 goes to 9 and then from A-F. This allows one digit to stand for 16 values instead
of just ten.
The first two numbers of the code is the amount of red. #FF0000 is red. The second two
numbers is the amount of green. #00FF00 is green. The last two numbers represents
the amount of blue. #0000FF is blue. Any combination of these codes can be used to
create any color. A list colors and their codes is found on the colors page in the
reference area.
To change the default colors on the whole page, you need to change an attribute to the
<body> tag. The following are some attributes you can have inside the body tag:
bgcolor="..." Sets the background color of the page.
text="..." Sets the color of the text.
link="..." Color of links.
vlink="..." Visited link color.
alink="..." Active link color.
Note that you do not have to define all of these attributes. If you do not set a color for a
visited link, for example, the color of visited links will be set by the browser looking at
the file.
An example of a page with blue background, white text and with red links. (we'll learn
more about link tags next)
<html>
<head>
<title>My Colorful Page</title>
</head>
<body bgcolor="#0000FF" text="#FFFFFF" link="#FF0000">
<p>Regular Text<br>
<a href="link.html">Link</a></p>
</body>
</html>
Try it yourself!
8. Creating web pages for for
beginners!
Home : Basics : 4) Creating Links
Making a link requires have two HTML pages. So make two and name them
"page1.html" and "page2.html" (make sure you save them in the same folder). The link
tag, <a> is often called an anchor tag, we'll talk more about anchors later.
In "page1.html" put the following someplace between your <body> and </body> tags.
Link to <a href="page2.html">page 2</a>.
The <a href="page2.html"> means to make a link to page2.html when you click on the
information following it. The </a> part of the link tells the browser to stop the link
continue with regular text. The link you just made should look something like the
following:
Link to page 2.
Try it and see if the link goes to the other HTML file.
There are a couple different kinds of links, relative and absolute. Most of the links you
make, like the one we just made, will be relative. Relative pathnames point to files
based on their locations relative to the current file, while absolute pathnames point to
files based on their absolute location on the file system. We could make our link
absolute by changing it to
Link to <a href="c:my docspage2.html">page 2</a>.
This link will work on your computer but when you put it up on a site or try it on
another computer and the files are no longer on the c: in the "my docs" folder, it will
not work. Here are a few examples of relative links:
href="file.html" file.html is in the current directory or folder.
href="folder/file.html"
file.html is located in the directory called
folder (and the folder directory is located in
the current directory)
href="folder/morefiles/file.html"
file.html is located in the more files
directory, which is located in the current
directory.
href="../file.html"
file.html is located in the directory one level
up from the current directory (a.k.a. the
"parent" directory)
file.html is located two directory levels up, in
9. href="../../files/file.html the directory files.
To link to another page on the web, not one on your site, you simply need to put the
address for the site inside href="...".
A link to <a href="http://www.yahoo.com/">Yahoo!</a>
Or to make a link for someone to send you an email:
Click <a href="mailto:name@domain.com">here</a> to email me!
You can also use the <a> tag to create an anchor on a page. You can use an anchor link
to let a person click on your link to take you to a different place on the page, like the
top for example. The next example will have a link up on bottom of the page that will
move you to the top of the page when you click on it. (to make this work, you need
enough information on your page to fill up at least one screen).
<html>
<head>
<title>Anchors</title>
</head>
<body>
<a name="top">
<p>Paragraph 1</p>
<p>Paragraph 2</p>
<p>Paragraph 3</p>
<p>Paragraph 4</p>
<p>Paragraph 5</p>
<p>Paragraph 6</p>
<p>Paragraph 7</p>
<a href="#top">To top</a>
</body>
</html>
I put an anchor on the top of this page so when you click on this link, it will take you to
the top of the page. You can put as many anchors on a page as you want, but you
should remember that your actual link should have # symbol in it (example: <a
href="#something">). But you do not need the # symbol in your actual anchor
(example <a name="something">).
NEXT: Using images
< back to basics main page
10. Creating web pages for for
beginners!
Home : Basics : 5) Images
Images are probably the most fun part of web pages. You can put pictures of anything
on your web site, from photographs to animations. To have make good graphics for
your website, a good graphics program is a must. I recommend JASC Software's Paint
Shop Pro. You can "steal" pictures from other people's web sites, but without a good
graphics program, you can not customize the graphics to make your site personalized.
Window's Paint will get you nowhere and Microsoft Photo Editor isn't much better.
When considering what images you should put up on your site, you must think about
the size of the graphic. Keep your graphics as small as possible. I do not recommend
having any graphics on a page that are more than 30KB unless the user chooses to see
it.
There are two main types of images on the web: JPG and GIF. These types of formats
are highly compressed, if you take a JPG file and save it as a BMP file, the size of the
file increases tremendously. JPG compresses photographs or large pictures best, while
GIF is good for small pictures with a few colors, transparency or animations.
When you work with GIF files, make sure you have the least number of colors in the
picture as possible. You can do this by decreasing the size of the palette or decreasing
the number of colors from 256 to 16, for example. You can make these changes with a
good graphics editor.
Lastly, weather your image is a JPG or GIF, make sure the physical size (length and
hieght) of it is reasonable. You can change this by using a crop tool or resize tool in a
graphics program.
Now to the HTML side of images. Putting a image onto a page is relatively easy. <img
src="person.jpg" width="50" height="50" border="0" alt="Person" align="left">
Will give you this:
Note that when you use align left, the text "wraps" around the picture. Remember that
you do not have to define all of the attribute I have just defined. The code above will
give you the picture, person.jpg (in the same directory...remember relative/absolute
paths?). The picture will be 50 pixels tall and wide. While the picture is loading the word
"Person" will show up. The word "Person" will also show up if rest your mouse over the
picture (on most browsers). You can also have the browser put a border around the
picture, this is usually done when you use the picture as a link. To make this picture
into a link, just put the picture inside the link code:
<a href="somefile.html"><img src="person.jpg" width="50" height="50" border="1" alt="Person"></a>
11. Here is an example of a transparent GIF image:
You can tell the center of the circle is transparent because when you put it into a table
with a background color (we'll talk about making tables later), the center of the circle is
clear.
Remember, this is just a crash course on HTML, to find out more about images, search
for some help on the web, or just practice. HTML just takes a little practice everyday.
There are countless "quirks" in HTML that just take time and experience to learn about.
NEXT: Text attributes.
< back to basics main page
12. Creating web pages for for
beginners!
Home : Basics : 6) Text Appearance
There are many tags that have to do with changing the appearance of text. Here is a
list of the tags, a example of what they look like, and an explanation of what it does.
<FONT size="2"
color="#FFFF00"
face="arial">...
</font>
Example
Changes the size, color, and face
(font). Size can be a number from 1 -
7 or a relative number like +1 (one
size bigger than what is already set).
Color sets the color of the font using
color codes. Face is the font used. The
font should be a standard font found
on most computers like Arial, Times
New Roman, Helvetica, Tahoma, or
Courier. You can list different fonts
for the computer to try until it finds
one that works. Example: <font
face="verdana, arial black, arial">
<BASEFONT size="2"
color="#FFFF00"
face="arial">
-
Sets the base (default font size, color,
and face for a page). However, often
this does not work for all text on a
page, for example, text in a table
(which we'll cover later).
<BIG>...</BIG> Example Makes text big
<SMALL>...</SMALL> Example Makes text small
<B>...</b> Example Bold text
<I>...</I> Example Italicized text
<S>...</S> Example Strikethrough text
<STRIKE>...
</STRIKE> Example Strikethrough text
<U>...</U> Example
Underlined text. Warning: Underlined
text is easily confused with a link!
<TT>...</TT> Example Teletype (or monospaced) text
<H1>...</H1> Heading #1
14. Example
<H3>...</H3> Example Heading #3
<H4>...</H4> Example Heading #4
<H5>...</H5> Example Heading #5
<H6>...</H6> Example Heading #6
Try some of these text attributes for yourself!
NEXT: Making a List and checking it twice.
< back to basics main page
15. Creating web pages for for
beginners!
Home : Basics : 7) Lists
HTML provides an easy way to create lists, ordered (numbered) or unordered (not
numbered). There are several other different kinds of lists, but we will cover only a
couple of them that will be able to be used for most of anybody's needs.
The ordered list tag is <ol>...</ol>. Inside these tags, you must define the individual
list items, <li>...</li>. Here is an example:
<ol>
<li>List item #1</li>
<li>List item #2</li>
<li>List item #3</li>
<li>List item #4</li>
</ol>
This HTML should give you the following result when viewed in a browser:
1. List item #1
2. List item #2
3. List item #3
4. List item #4
The unordered list tag <ul>...</ul> is very similar, except the end result will have
"bullets" instead of numbers.
<ul>
<li>List item #1</li>
<li>List item #2</li>
<li>List item #3</li>
<li>List item #4</li>
</ul>
Will give you:
List item #1
List item #2
List item #3
List item #4
NEXT: Horizontal Rules
< back to basics main page
16. Creating web pages for for
beginners!
Home : Basics : 8) Horizontal Rules
HTML also has a simple way of making a horizontal rules (or lines) to divide separate
parts of a page up. Horizontal Rule <hr> has several attributes which you can define:
align="..." Changes the alignment of the rule. It can be left, right, or center.
size="..." The size or height of the rule.
width="..."
The width of the rule. This can be written as the number of pixels
wide (<hr width="400">) or as a percent of the width of the
screen (<hr width="75%">).
color="..." The color of the rule (this only works with Internet Explorer).
<hr align="center" size="5" width="80%">
Will give you a horizontal rule as follows:
NEXT: The most useful HTML command, the table.
< back to basics main page
17. Creating web pages for for
beginners!
Home : Basics : 9) Tables
Tables are probably the most helpful tool in HTML when you are trying to change the
layout of a page or trying to make a page look exactly as you want it (which can be
very difficult). However, tables can be one of the most complicated parts of HTML, so
we'll start simple and get complex.
While we are using tables, remember that table can be any size, from the size of the
whole page, to just enough for a word to fit into it. Using tables effectively will allow
you to be able to put things exactly where you want them.
<table>...</table> is the basic table tag. <tr>...</tr> is used to set a row in the
table. <td>...</td> is used to define the data inside each cell from left to right. (note:
the tag <!--...--> is a comment and is not shown when viewed through a browser.)
<table border="1">
<tr> <!--start row 1-->
<td>Cell 1, Row 1</td>
<td>Cell 2, Row 1</td>
<td>Cell 3, Row 1</td>
</tr> <!--end row 1-->
<tr> <!--start row 2-->
<td>Cell 1, Row 2</td>
<td>Cell 2, Row 2</td>
<td>Cell 3, Row 2</td>
</tr> <!--end row 2-->
</table>
You should get the following table:
Cell 1, Row 1 Cell 2, Row 1 Cell 3, Row 1
Cell 1, Row 2 Cell 2, Row 2 Cell 3, Row 2
Setting the border to 0 is a great way to use tables to format text and pictures without
being noticeable.
Here are some of the attributes that work with these tags:
<TABLE>
width="..."
Width of the table, either in percent (ex. 90%) or
18. pixels (ex. 500)
border="..." Width in pixels of a border around the table
cellspacing="..." Spacing between individual cells
cellpadding="..."
Spacing inside cells between data and the edge of the
cell
align="..." Sets alignment (left, right, center, justify)
bgcolor="..."
Sets background color of table (only works on some
browsers)
bordercolor="..." Sets the border color (only works on some browsers)
bordercolorlight="..."
Sets border highlight color (only works on some
browsers)
bordercolordark="..."
Sets the border shadow color (only works on some
browsers)
<TR> = Table Row
align="..."
Horizontally aligns the contents of the cells inside the
row (left, center, right, justify)
valign="..."
Vertically aligns the contents of the cells inside the row
(top, middle, bottom). Note: This does not work in
some browsers)
bgcolor="..."
Sets the background color of the row (only works on
some browsers)
<TD> = Table Data (cell)
rowspan="..." The number of rows spanned by a cell.
colspan="..." The number of columns spanned by a cell.
align="..."
Horizontally aligns the contents of the cell (left, center,
right, justify)
valign="..."
Vertically aligns the contents of the cell (top, middle,
bottom). Note: This does not work in some browsers)
Rowspan and colspan are complicated but useful tools which are important to
understand. Lets say we want to make a table that looks like this:
Title
Left
A B
C D
19. The code for this table is as follows:
<table border="1">
<tr> <!--start row 1-->
<td colspan="3">Title</td>
<!--"Title" cell will span 3 columns-->
</tr> <!--end row 1-->
<tr> <!--start row 2-->
<td rowspan="2">Left</td>
<!--"Left" cell will span 2 rows-->
<td>A</td> <!--row 2, col 2-->
<td>B</td> <!--row 2, col 3-->
</tr> <!--end row 2-->
<tr> <!--start row 3-->
<!--skip col 1 of row 3, it is defined when we used rowspan!-->
<td>C</td> <!--row 3, col 2-->
<td>D</td> <!--row 3, col 3-->
</tr> <!--end row 3-->
</table>
You can make this table even more complicated by adding in background colors,
alignments, and widths.
Like many things with HTML, you can embed tales inside of each other! You have to
keep your HTML logically organized and pretty to make this work, or you will be easily
confused. Here is an example of the tables and then the code: (Note: Here I use
. This stands for nothing. :-) Literally nothing, or a non breaking space. If you
leave a cell blank don't use you might get undesired results! Try it yourself.)
<table width="75%" border="4" cellspacing="0">
<tr>
<td> </td>
<td> </td>
<td> </td>
</tr>
<tr>
<td> </td>
<td>
<table align="center" width="90%"
border="1" bordercolor="#FF00FF">
<tr>
<td> </td>
<td> </td>
</tr>
<tr>
21. Creating web pages for for
beginners!
Home : Basics : 10) Do's and Dont's
1. Think about tags before you use them, some tags only work in some browsers.
2. Look at your pages on different computers with different browsers. You might be
surprised at the differences browsers, operating systems, and screen sizes effect
your pages!
3. Organize you pages for quick scanning
1. Use headings
2. Use lists
3. Make a menu with all the links on one place
4. Important information should stand out!
5. But don't use too much emphasis, people won't know where to look
4. Make each page be independent. People might jump to a specific page while
missing information on the pages between.
5. Check your spelling and grammar. Some free HTML editors have spell check built
in! If you use Notepad, make sure you double check your spelling.
6. Group related information. Use tables, graphics, or horizontal rules to split up
separate areas on a page.
7. Be consistent. This will create a general "feel" for your site.
8. Describe links when possible.
9. Don't use too many links in your text, it gets distracting.
10. Think about your links before you make them. Is it useful?
11. Avoid using phrases like: click this link or click here.
12. Don't use too many images, these pages take a long time to load. Also, keep
images as small as possible.
13. Use the same image twice when possible, the computer doesn't have to download
it each time you use it, it keeps recent images close by.
14. Always use the ALT attribute of <img> in case someone has pictures turned off, or
doesn't have time to wait for the page to load.
15. Be cautious with backgrounds and colored text. Everything should be easily
readable.
16. Each page should have a link back to your home page in case someone gets "lost."
17. Each page should also have a standard signature on the bottom of each page. This
can provide contact or copyright information
18. Don't say "Under Construction." Every web page is always under construction.
< back to basics main page
22. Creating web pages for for
beginners!
Home : Basics
This course of pages will teach you the basics of web design. No previous knowledge of
HTML or web design is required. Remember that HTML is really learned by practice,
always try to practice everything you learn. There are only a few basic examples here,
but with practice, you should be able to combine all of these skills to create a good web
page.
1) Your first HTML file - Learn the foundation of HTML and make your first web page.
2) Editing HTML - More information about how HTML works.
3) Adding Color - Add some color to your page.
4) Creating Links - Make a link to another page.
5) Images - Add graphics to your page.
6) Text Appearance - Using fonts, bold, italics, etc.
7) Lists - Make lists easily.
8) Horizontal Rules - Learn to make dividers between different sections.
9) Tables - The most useful HTML command.
10) Do's and Don'ts - Learn good habits when designing pages.