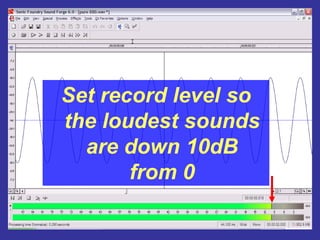
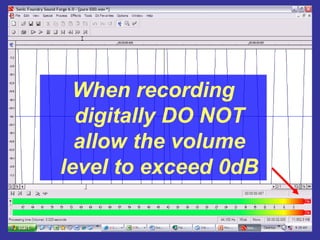
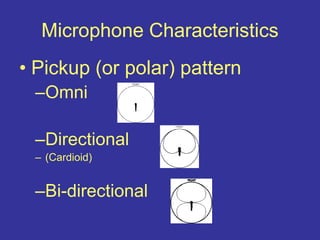
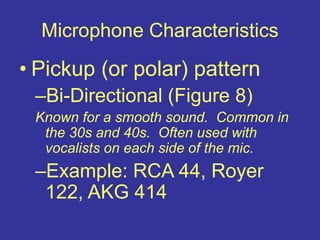
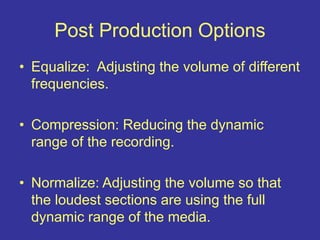
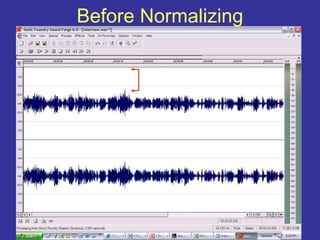
Audio Production
This PowerPoint presentation was prepared by David Christensen, Technical Director for
Centrum. www.david-christensen.com for use class presentations during Centrum’s Blues and
Chamber Music workshops in 2007.
There are two files…the MHTML file made from PowerPoint, which you of course have found.
(Note: Click “slide show” in the lower right for full screen viewing.) There is limited audio in the
presentation, so turn up your volume. There is also a file called samples of A.wav If you load
this file into any audio editing program (including Audacity a free program you can download)
you will see the wave forms for a pure 440 Hz tone (A) and the wave form for the note A from a
human voice, a flute, a guitar and a piano. This helps in understanding harmonics/overtones.
The program will suggest when you want to look at this file.
I hope you find the program of interest. I’d love to hear your comments.
David Christensen dave@david-christensen.com
Audio Production
Basics
&
Techniques for Demo
Recording
David Christensen, Technical Director for Centrum
www.david-christensen.com
Prepared for the 2007 Port Townsend Jazz and Chamber
Music Festival
Audio Production
Basics
Goal: Make someone's ear drum move.
Side view of an ear drum
Creating a wave form
Time
Frequency
V
o
l
u
m
e
Creating a wave form
Time
Frequency
V
o
l
u
m
e
Simple wave form – A 440
Time
Frequency
V
o
l
u
m
e
(click the speaker icon to hear tone)
Audio Production
Basics
Just what do we hear
and
how loud is too loud
What can we hear?
• Frequency Range:
• From Approximately 20 cycles (Hz)
(click the speaker icon to hear tone)
(You probably won’t hear much from these two
samples…chances are your speakers can’t
reproduce 20 Hz and you can’t hear 20,000 Hz!)
What can we hear?
• Frequency Range:
• From Approximately 20 cycles (Hz)
• To Approximately 20,000 cycles (Hz)
(click the speaker icon to hear tone)
(You probably didn’t hear much from these two
samples…chances are your speakers can’t
reproduce 20 Hz and you can’t hear 20,000 Hz!)
What can we hear?
• Frequency Range:
• From Approximately 20 cycles (Hz)
• To Approximately 20,000 cycles (Hz)
• Volume Range
• From 0dB
• To Approximately 120dB (considered threshold of
pain!)
Audio Production
Basics
How does this relate to what we
want to record?
So…
What is it that creates the
Timbre or Uniqueness of a
Sound
• The attack or how the sound is created
So…
What is it that creates the
Timbre or Uniqueness of a
Sound
• The attack or how the sound is created
• The release or how the sound is
terminated.
So…
What is it that creates the
Timbre or Uniqueness of a
Sound
• The attack or how the sound is created
• The release or how the sound is
terminated.
• The overtones or harmonics
Overtone Progression
• 440hz Fundamental
• 880hz First Overtone
• 1320hz Second Overtone
• 1760hz Third Overtone
• 2200hz Fourth Overtone
• 26 40hzFifth Overtone
• Etc.
(click the speaker icon to hear tone)
Overtone Progression
• 440hz Fundamental
• 880hz First Overtone
• 1320hz Second Overtone
• 1760hz Third Overtone
• 2200hz Fourth Overtone
• 26 40hzFifth Overtone
• Etc.
(click the speaker icon to hear tone)
Overtone Progression
• 440hz Fundamental
• 880hz First Overtone
• 1320hz Second Overtone
• 1760hz Third Overtone
• 2200hz Fourth Overtone
• 26 40hzFifth Overtone
• Etc.
(click the speaker icon to hear tone)
Overtone Progression
• 440hz Fundamental
• 880hz First Overtone
• 1320hz Second Overtone
• 1760hz Third Overtone
• 2200hz Fourth Overtone
• 26 40hzFifth Overtone
• Etc.
(click the speaker icon to hear tone)
Overtone Progression
• 440hz Fundamental
• 880hz First Overtone
• 1320hz Second Overtone
• 1760hz Third Overtone
• 2200hz Fourth Overtone
• 26 40hzFifth Overtone
• Etc.
(click the speaker icon to hear tone)
Overtone Progression
• 440hz Fundamental
• 880hz First Overtone
• 1320hz Second Overtone
• 1760hz Third Overtone
• 2200hz Fourth Overtone
• 26 40hzFifth Overtone
• Etc.
(click the speaker icon to hear tone)
• For a given note, the overtones are always
the same (for most sounds)…voice and
instruments.
• For a given note, the overtones are always
the same (for most sounds)…voice and
instruments.
• What gives the note timbre (what make it a
violin or a clarinet etc.) is
• For a given note, the overtones are always
the same (for most sounds)…voice and
instruments.
• What gives the note timbre (what make it a
violin or a clarinet etc.) is
•
The relative volume
of those overtones
Audio Production
Basics
What does sound look like?
• Let’s look at the wave forms of different
sounds in Sony Media’s Sound Forge.
Audio Production
Basics
Analog
vs.
Digital
No…we are not going to discuss which is better!
Analog vs. Digital Audio
• Analog audio is all the audio we listen to…
(You can’t hear digital audio)
Analog vs. Digital Audio
• Analog audio is all the audio we listen to…
(You can’t hear digital audio)
• Digital Audio
– To create digital audio you first must convert analog
audio to digital.
Analog vs. Digital Audio
• Analog audio is all the audio we listen to…
(You can’t hear digital audio)
• Digital Audio
– To create digital audio you first must convert analog
audio to digital.
–To listen to digital audio you must first convert digital
audio to analog.
• To Record Digital Audio
– You must first must convert analog audio to digital.
• To Playback Digital Audio
– You must first convert digital audio to analog.
Analog vs. Digital Audio
• To Record Digital Audio
– You must first must convert analog audio to digital.
• To Playback Digital Audio
– You must first convert digital audio to analog.
• Not all analog to digital (A to D) and digital
to analog (D to A) converters are created
equal.
Analog vs. Digital Audio
Digital File Formats
• Wav or aiff file. CD quality is 44,100
samples per second with 16 bit words.
These files are the product of most professional
digital recorders and computers. Files can be
created in CD quality or even higher resolution
files.
Digital File Formats
• Wav or aiff file. CD quality is 44,100
samples per second with 16 bit words.
Let’s go back to Sound Forge to actually see
the samples!
Digital File Formats
• Wav or aiff file. CD quality is 44,100
samples per second with 16 bit words.
• CD format: wav or aiff files written to a
music cd.
Digital File Formats
• Wav or aiff file. CD quality is 44,100
samples per second with 16 bit words.
• CD format: wav or aiff files written to a
music cd.
• MP3 format
– Most MP3 files are 128kbps
– High almost CD quality are aprox 360kbps
Digital File Formats
• Wav or aiff file. CD quality is 44,100
samples per second with 16 bit words.
• CD format: wav or aiff files written to a
music cd.
• MP3 format
– Most MP3 files are 128kbps
– High almost CD quality are aprox 360kbps
• Other formats (for streaming etc.) *.rm
(Real Media) *.wma (Windows Media) *.mov
(Quicktime)
Audio Production
Basics
What do you need to know
about
recording digitally?
Ideally
• When recording digitally you should be
creating *.wav or *.aiff files.
Ideally
• When recording digitally you should be
creating *.wav or *.aiff files.
• You should (at least) be recording at a
sample rate of 44,100/sec and with word
length of 16 bits (not bytes)
Ideally
• When recording digitally you should be
creating *.wav or *.aiff files.
• You should (at least) be recording at a
sample rate of 44,100/sec and with word
length of 16 bits (not bytes)
This will give you files that can be made into
any format, and can be easily edited and
mastered.
Audio Production
Basics
Best ways to record
Record to what?
For this discussion we will only talk about
recording two channel in real time…which
is stereo.
Most classical music is recorded in stereo
using two mics.
Multi-track recording much more complex
and beyond what we can talk about here.
Record to what?
To a Computer:
For a usable recording you will need software and
an interface between your recording gear and
the computer.
Software:
ProTools
Sony Media Vegas/Sound Forge
Audacity (free)
Many others too.
Record to what?
To a Computer:
Digital Recorder: Many available
– Hard disk recorders – Masterlink by Alisis
– Memory chip recorders – M-Audio Microtrack,
Sony PCM
Audio Production
Basics
Recording volume
level
Set record level so
the loudest sounds
are down 10dB
from 0
When recording
digitally DO NOT
allow the volume
level to exceed 0dB
Audio Production
Basics
Once you arrive at a recording
level for a piece, do not change it
for different movements!
Audio Production
Basics
Microphones
Audio Production
Basics
Microphones
The Microphone Book
John Eargle
Microphones
Without a good mic, you can’t
have a good recording.
Microphones
• 2 types of mics:
– Dynamic/moving coil mics.
Most common and least
expensive of good mics.
Microphones
• 2 types of mics:
– Dynamic/moving coil mics.
– Condenser mic
More expensive and all things being
equal, better. But they require
some sort of a power supply.
Microphone Characteristics
• Pickup (or polar) pattern
–Omni
–Directional
– (Cardioid)
–Bi-directional
Microphone Characteristics
• Pickup (or polar) pattern
–Omni – good for recording groups in
a good room. Also great when put in the
middle of a drum kit. Can be used as
excellent vox mic.
–Example: Earthworks QTC1
Microphone Characteristics
• Pickup (or polar) pattern
–Omni
–Directional
– (Cardioid)
–Bi-directional
Microphone Characteristics
• Pickup (or polar) pattern
–Directional (Cardioid) – pickup
pattern helps isolate the sound and
avoid “bleeding” Usually used for VOX
and close micing instruments
–Example: Shure SM58
Microphone Characteristics
• Pickup (or polar) pattern
–Omni
–Directional
– (Cardioid)
–Bi-directional
Microphone Characteristics
• Pickup (or polar) pattern
–Bi-Directional (Figure 8)
Known for a smooth sound. Common in
the 30s and 40s. Often used with
vocalists on each side of the mic.
–Example: RCA 44, Royer
122, AKG 414
Audio Production
Basics
Mic placement
(a good mic in the wrong place
sounds like _ _ _ _!)
Mic Placement
• Voice
Mic Placement
• Voice
• Guitar
Mic Placement
• Voice
• Guitar
• Piano
Mic Placement
• Voice
• Guitar
• Piano
• Chamber ensemble
Mic Placement
• Voice
• Guitar
• Piano
• Chamber ensemble
• Orchestra
Audio Production
Basics
Is Stereo Important?
Audio Production
Basics
Is Stereo Important?
Yes!
Stereo Preception
• How we perceive stereo
–Volume difference: It’s louder in the
right ear than the left ear.
Stereo Preception
• How we perceive stereo
–Volume difference: It’s louder in the
right ear than the left ear.
–Time arrival: It gets to the right ear
before the left ear.
Stereo Preception
• How we perceive stereo
–Volume difference: It’s louder in the
right ear than the left ear.
–Time arrival: It gets to the right ear
before the left ear.
Stereo perception for frequencies below
700hz is primarily through time arrival.
Stereo micing for groups
• X-Y (note: must use directional mics)
Stereo micing for groups
• X-Y (note: must use directional mics)
• Spaced Pair 15” to 36”
Stereo micing for groups
• X-Y (note: must use directional mics)
• Spaced Pair 15” to 36”
• NOS/ORTF (note: must use directional mics)
Audio Production
Basics
Post Production
(or OK, it’s recorded…now what?)
Post Production Options
• Equalize: Adjusting the volume of different
frequencies.
Post Production Options
• Equalize: Adjusting the volume of different
frequencies.
Post Production Options
• Equalize: Adjusting the volume of different
frequencies.
• Compression: Reducing the dynamic
range of the recording.
Post Production Options
• Equalize: Adjusting the volume of different
frequencies.
• Compression: Reducing the dynamic
range of the recording.
Post Production Options
• Equalize: Adjusting the volume of different
frequencies.
• Compression: Reducing the dynamic
range of the recording.
Post Production Options
• Equalize: Adjusting the volume of different
frequencies.
• Compression: Reducing the dynamic
range of the recording.
• Normalize: Adjusting the volume so that
the loudest sections are using the full
dynamic range of the media.
Before Normalizing
Normalized
IMPORTANT
Adjust volume equally for all cuts
of a classical recording.
Normalizing
Track 1 - 6 dB
Track 2 - 12 dB
Track 3 - 5 dB
Track 4 - 4.5 dB
Raise volume of each track 4 dB
leaving .5 dB headroom.
Normalizing
Audio Production
Basics
Ways to get your demo
where you want it.
What format for your demo
• Standard CD
The usual form for audition and demos.
What format for your demo
• Standard CD
• Streaming on your web site
You will need to prepare the files in *.wma,
*.rm or *.mov format. You may also need
help in creating the streaming format using
meta files.
What format for your demo
• Standard CD
• Streaming on your web site
• Downloadable from your web site
You’ll need MP3 files (128bps) for this
What format for your demo
• Standard CD
• Streaming on your web site
• Downloadable from your web site
• uTunes, MySpace etc.
Your files have to be compiled for these
sites.
Preparing your demo disk
• No more than 3 or 4 selections
Select carefully and put your best cut first!
Preparing your demo disk
• No more than 3 or 4 selections
• No longer than 30 sec. each
Note: You don’t have to start at the
beginning. If you have a hot 30 seconds
embedded in the cut, use it!
Preparing your demo disk
• No more than 3 or 4 selections
• No longer than 30 sec. each
• If you want to include full cuts put them
after all the 30 sec. cuts.
(Be sure to note that on the label)
Preparing your demo disk
• No more than 3 or 4 selections
• No longer than 30 sec. each
• If you want to include full cuts put them
after all the 30 sec. cuts.
• Prepare a good looking disk label with:
– The group name
– The contact name and address, phone numbers and email address
– Web address
– Musicians name(s) and instrument(s)
• Put in jewel box. Label inserts are optional and
can include bios of the musicians and group activity.
Audio Production
Basics
Questions – Discussion –
Experiment?

audio-production-1231352387673755-2.ppt

  • 1.
    Audio Production This PowerPointpresentation was prepared by David Christensen, Technical Director for Centrum. www.david-christensen.com for use class presentations during Centrum’s Blues and Chamber Music workshops in 2007. There are two files…the MHTML file made from PowerPoint, which you of course have found. (Note: Click “slide show” in the lower right for full screen viewing.) There is limited audio in the presentation, so turn up your volume. There is also a file called samples of A.wav If you load this file into any audio editing program (including Audacity a free program you can download) you will see the wave forms for a pure 440 Hz tone (A) and the wave form for the note A from a human voice, a flute, a guitar and a piano. This helps in understanding harmonics/overtones. The program will suggest when you want to look at this file. I hope you find the program of interest. I’d love to hear your comments. David Christensen dave@david-christensen.com
  • 2.
    Audio Production Basics & Techniques forDemo Recording David Christensen, Technical Director for Centrum www.david-christensen.com Prepared for the 2007 Port Townsend Jazz and Chamber Music Festival
  • 3.
    Audio Production Basics Goal: Makesomeone's ear drum move.
  • 4.
    Side view ofan ear drum
  • 5.
    Side view ofan ear drum
  • 6.
    Side view ofan ear drum
  • 7.
    Creating a waveform Time Frequency V o l u m e
  • 8.
    Creating a waveform Time Frequency V o l u m e
  • 9.
    Simple wave form– A 440 Time Frequency V o l u m e (click the speaker icon to hear tone)
  • 10.
    Audio Production Basics Just whatdo we hear and how loud is too loud
  • 11.
    What can wehear? • Frequency Range: • From Approximately 20 cycles (Hz) (click the speaker icon to hear tone) (You probably won’t hear much from these two samples…chances are your speakers can’t reproduce 20 Hz and you can’t hear 20,000 Hz!)
  • 12.
    What can wehear? • Frequency Range: • From Approximately 20 cycles (Hz) • To Approximately 20,000 cycles (Hz) (click the speaker icon to hear tone) (You probably didn’t hear much from these two samples…chances are your speakers can’t reproduce 20 Hz and you can’t hear 20,000 Hz!)
  • 13.
    What can wehear? • Frequency Range: • From Approximately 20 cycles (Hz) • To Approximately 20,000 cycles (Hz) • Volume Range • From 0dB • To Approximately 120dB (considered threshold of pain!)
  • 14.
    Audio Production Basics How doesthis relate to what we want to record?
  • 16.
    So… What is itthat creates the Timbre or Uniqueness of a Sound • The attack or how the sound is created
  • 17.
    So… What is itthat creates the Timbre or Uniqueness of a Sound • The attack or how the sound is created • The release or how the sound is terminated.
  • 18.
    So… What is itthat creates the Timbre or Uniqueness of a Sound • The attack or how the sound is created • The release or how the sound is terminated. • The overtones or harmonics
  • 19.
    Overtone Progression • 440hzFundamental • 880hz First Overtone • 1320hz Second Overtone • 1760hz Third Overtone • 2200hz Fourth Overtone • 26 40hzFifth Overtone • Etc. (click the speaker icon to hear tone)
  • 20.
    Overtone Progression • 440hzFundamental • 880hz First Overtone • 1320hz Second Overtone • 1760hz Third Overtone • 2200hz Fourth Overtone • 26 40hzFifth Overtone • Etc. (click the speaker icon to hear tone)
  • 21.
    Overtone Progression • 440hzFundamental • 880hz First Overtone • 1320hz Second Overtone • 1760hz Third Overtone • 2200hz Fourth Overtone • 26 40hzFifth Overtone • Etc. (click the speaker icon to hear tone)
  • 22.
    Overtone Progression • 440hzFundamental • 880hz First Overtone • 1320hz Second Overtone • 1760hz Third Overtone • 2200hz Fourth Overtone • 26 40hzFifth Overtone • Etc. (click the speaker icon to hear tone)
  • 23.
    Overtone Progression • 440hzFundamental • 880hz First Overtone • 1320hz Second Overtone • 1760hz Third Overtone • 2200hz Fourth Overtone • 26 40hzFifth Overtone • Etc. (click the speaker icon to hear tone)
  • 24.
    Overtone Progression • 440hzFundamental • 880hz First Overtone • 1320hz Second Overtone • 1760hz Third Overtone • 2200hz Fourth Overtone • 26 40hzFifth Overtone • Etc. (click the speaker icon to hear tone)
  • 25.
    • For agiven note, the overtones are always the same (for most sounds)…voice and instruments.
  • 26.
    • For agiven note, the overtones are always the same (for most sounds)…voice and instruments. • What gives the note timbre (what make it a violin or a clarinet etc.) is
  • 27.
    • For agiven note, the overtones are always the same (for most sounds)…voice and instruments. • What gives the note timbre (what make it a violin or a clarinet etc.) is • The relative volume of those overtones
  • 28.
  • 29.
    • Let’s lookat the wave forms of different sounds in Sony Media’s Sound Forge.
  • 30.
    Audio Production Basics Analog vs. Digital No…we arenot going to discuss which is better!
  • 31.
    Analog vs. DigitalAudio • Analog audio is all the audio we listen to… (You can’t hear digital audio)
  • 32.
    Analog vs. DigitalAudio • Analog audio is all the audio we listen to… (You can’t hear digital audio) • Digital Audio – To create digital audio you first must convert analog audio to digital.
  • 33.
    Analog vs. DigitalAudio • Analog audio is all the audio we listen to… (You can’t hear digital audio) • Digital Audio – To create digital audio you first must convert analog audio to digital. –To listen to digital audio you must first convert digital audio to analog.
  • 34.
    • To RecordDigital Audio – You must first must convert analog audio to digital. • To Playback Digital Audio – You must first convert digital audio to analog. Analog vs. Digital Audio
  • 35.
    • To RecordDigital Audio – You must first must convert analog audio to digital. • To Playback Digital Audio – You must first convert digital audio to analog. • Not all analog to digital (A to D) and digital to analog (D to A) converters are created equal. Analog vs. Digital Audio
  • 36.
    Digital File Formats •Wav or aiff file. CD quality is 44,100 samples per second with 16 bit words. These files are the product of most professional digital recorders and computers. Files can be created in CD quality or even higher resolution files.
  • 37.
    Digital File Formats •Wav or aiff file. CD quality is 44,100 samples per second with 16 bit words. Let’s go back to Sound Forge to actually see the samples!
  • 38.
    Digital File Formats •Wav or aiff file. CD quality is 44,100 samples per second with 16 bit words. • CD format: wav or aiff files written to a music cd.
  • 39.
    Digital File Formats •Wav or aiff file. CD quality is 44,100 samples per second with 16 bit words. • CD format: wav or aiff files written to a music cd. • MP3 format – Most MP3 files are 128kbps – High almost CD quality are aprox 360kbps
  • 40.
    Digital File Formats •Wav or aiff file. CD quality is 44,100 samples per second with 16 bit words. • CD format: wav or aiff files written to a music cd. • MP3 format – Most MP3 files are 128kbps – High almost CD quality are aprox 360kbps • Other formats (for streaming etc.) *.rm (Real Media) *.wma (Windows Media) *.mov (Quicktime)
  • 41.
    Audio Production Basics What doyou need to know about recording digitally?
  • 42.
    Ideally • When recordingdigitally you should be creating *.wav or *.aiff files.
  • 43.
    Ideally • When recordingdigitally you should be creating *.wav or *.aiff files. • You should (at least) be recording at a sample rate of 44,100/sec and with word length of 16 bits (not bytes)
  • 44.
    Ideally • When recordingdigitally you should be creating *.wav or *.aiff files. • You should (at least) be recording at a sample rate of 44,100/sec and with word length of 16 bits (not bytes) This will give you files that can be made into any format, and can be easily edited and mastered.
  • 45.
  • 46.
    Record to what? Forthis discussion we will only talk about recording two channel in real time…which is stereo. Most classical music is recorded in stereo using two mics. Multi-track recording much more complex and beyond what we can talk about here.
  • 47.
    Record to what? Toa Computer: For a usable recording you will need software and an interface between your recording gear and the computer. Software: ProTools Sony Media Vegas/Sound Forge Audacity (free) Many others too.
  • 48.
    Record to what? Toa Computer: Digital Recorder: Many available – Hard disk recorders – Masterlink by Alisis – Memory chip recorders – M-Audio Microtrack, Sony PCM
  • 49.
  • 50.
    Set record levelso the loudest sounds are down 10dB from 0
  • 51.
    When recording digitally DONOT allow the volume level to exceed 0dB
  • 52.
    Audio Production Basics Once youarrive at a recording level for a piece, do not change it for different movements!
  • 53.
  • 54.
  • 55.
    Microphones Without a goodmic, you can’t have a good recording.
  • 56.
    Microphones • 2 typesof mics: – Dynamic/moving coil mics. Most common and least expensive of good mics.
  • 57.
    Microphones • 2 typesof mics: – Dynamic/moving coil mics. – Condenser mic More expensive and all things being equal, better. But they require some sort of a power supply.
  • 58.
    Microphone Characteristics • Pickup(or polar) pattern –Omni –Directional – (Cardioid) –Bi-directional
  • 59.
    Microphone Characteristics • Pickup(or polar) pattern –Omni – good for recording groups in a good room. Also great when put in the middle of a drum kit. Can be used as excellent vox mic. –Example: Earthworks QTC1
  • 60.
    Microphone Characteristics • Pickup(or polar) pattern –Omni –Directional – (Cardioid) –Bi-directional
  • 61.
    Microphone Characteristics • Pickup(or polar) pattern –Directional (Cardioid) – pickup pattern helps isolate the sound and avoid “bleeding” Usually used for VOX and close micing instruments –Example: Shure SM58
  • 62.
    Microphone Characteristics • Pickup(or polar) pattern –Omni –Directional – (Cardioid) –Bi-directional
  • 63.
    Microphone Characteristics • Pickup(or polar) pattern –Bi-Directional (Figure 8) Known for a smooth sound. Common in the 30s and 40s. Often used with vocalists on each side of the mic. –Example: RCA 44, Royer 122, AKG 414
  • 64.
    Audio Production Basics Mic placement (agood mic in the wrong place sounds like _ _ _ _!)
  • 65.
  • 66.
  • 67.
  • 68.
    Mic Placement • Voice •Guitar • Piano • Chamber ensemble
  • 69.
    Mic Placement • Voice •Guitar • Piano • Chamber ensemble • Orchestra
  • 70.
  • 71.
  • 72.
    Stereo Preception • Howwe perceive stereo –Volume difference: It’s louder in the right ear than the left ear.
  • 73.
    Stereo Preception • Howwe perceive stereo –Volume difference: It’s louder in the right ear than the left ear. –Time arrival: It gets to the right ear before the left ear.
  • 74.
    Stereo Preception • Howwe perceive stereo –Volume difference: It’s louder in the right ear than the left ear. –Time arrival: It gets to the right ear before the left ear. Stereo perception for frequencies below 700hz is primarily through time arrival.
  • 75.
    Stereo micing forgroups • X-Y (note: must use directional mics)
  • 76.
    Stereo micing forgroups • X-Y (note: must use directional mics) • Spaced Pair 15” to 36”
  • 77.
    Stereo micing forgroups • X-Y (note: must use directional mics) • Spaced Pair 15” to 36” • NOS/ORTF (note: must use directional mics)
  • 78.
    Audio Production Basics Post Production (orOK, it’s recorded…now what?)
  • 79.
    Post Production Options •Equalize: Adjusting the volume of different frequencies.
  • 80.
    Post Production Options •Equalize: Adjusting the volume of different frequencies.
  • 81.
    Post Production Options •Equalize: Adjusting the volume of different frequencies. • Compression: Reducing the dynamic range of the recording.
  • 82.
    Post Production Options •Equalize: Adjusting the volume of different frequencies. • Compression: Reducing the dynamic range of the recording.
  • 83.
    Post Production Options •Equalize: Adjusting the volume of different frequencies. • Compression: Reducing the dynamic range of the recording.
  • 84.
    Post Production Options •Equalize: Adjusting the volume of different frequencies. • Compression: Reducing the dynamic range of the recording. • Normalize: Adjusting the volume so that the loudest sections are using the full dynamic range of the media.
  • 85.
  • 86.
  • 87.
    IMPORTANT Adjust volume equallyfor all cuts of a classical recording. Normalizing
  • 88.
    Track 1 -6 dB Track 2 - 12 dB Track 3 - 5 dB Track 4 - 4.5 dB Raise volume of each track 4 dB leaving .5 dB headroom. Normalizing
  • 89.
    Audio Production Basics Ways toget your demo where you want it.
  • 90.
    What format foryour demo • Standard CD The usual form for audition and demos.
  • 91.
    What format foryour demo • Standard CD • Streaming on your web site You will need to prepare the files in *.wma, *.rm or *.mov format. You may also need help in creating the streaming format using meta files.
  • 92.
    What format foryour demo • Standard CD • Streaming on your web site • Downloadable from your web site You’ll need MP3 files (128bps) for this
  • 93.
    What format foryour demo • Standard CD • Streaming on your web site • Downloadable from your web site • uTunes, MySpace etc. Your files have to be compiled for these sites.
  • 94.
    Preparing your demodisk • No more than 3 or 4 selections Select carefully and put your best cut first!
  • 95.
    Preparing your demodisk • No more than 3 or 4 selections • No longer than 30 sec. each Note: You don’t have to start at the beginning. If you have a hot 30 seconds embedded in the cut, use it!
  • 96.
    Preparing your demodisk • No more than 3 or 4 selections • No longer than 30 sec. each • If you want to include full cuts put them after all the 30 sec. cuts. (Be sure to note that on the label)
  • 97.
    Preparing your demodisk • No more than 3 or 4 selections • No longer than 30 sec. each • If you want to include full cuts put them after all the 30 sec. cuts. • Prepare a good looking disk label with: – The group name – The contact name and address, phone numbers and email address – Web address – Musicians name(s) and instrument(s)
  • 98.
    Preparing your demodisk • No more than 3 or 4 selections • No longer than 30 sec. each • If you want to include full cuts put them after all the 30 sec. cuts. • Prepare a good looking disk label with: – The group name – The contact name and address, phone numbers and email address – Web address – Musicians name(s) and instrument(s) • Put in jewel box. Label inserts are optional and can include bios of the musicians and group activity.
  • 99.
    Audio Production Basics Questions –Discussion – Experiment?