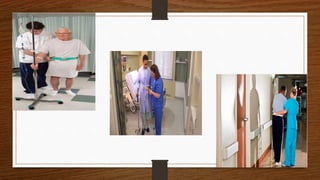
Assisting clients with ambulation
ABIRAMI. K, B.SC(N)
TUTOR
SRMTCON
TRICHY
introduction
• Patients who are immobile for even a short
time may require assistance with
ambulation
definition
• Assistance means walking along the side of a patient
while ambulating (or) providing an assistive device to
aid in ambulation.
purposes
• To promote mobilization
• To improve the activity level of the patient
• To prevent complications such as secondary to surgery
• To prevent pressure sores
• To enhance the patient’s level of independence.
articles
• Sphygmomanometer
• Assistive devices such as gait belt if needed.
procedure
• Pre procedure:
• Explain the reason for ambulation
• Check blood pressure
• Confirm that the patient does not feel light – headed
• Assist the patient to sit in the cot for few minutes and dangle the
foot
• Check the BP once again and if it is normal, apply the gait belt and
help the patient to assume a standing position observe the balance.
intra procedure
• Assisted ambulation by one nurse:
• Stand on the patient’s stronger side &grasp the gait belt. If gait
belt is not there, grasp the patient’s back. Take few steps &
walk forward with the patient. If the patient becomes weak (or)
dizzy, ask the patient to sit; if not, continue to walk for few
minutes as the patient tolerates.
• Assisted ambulation by two nurses:
• The nurse should stand on either side of the patient; grasp the gait belt in the
middle of the patient’s back.
• Step forward in unison with the patient, maintaining the same pace as the patient
gradually increase the distance of the walk. If the patient becomes weak (or)
dizzy, ask the patient to sit; if not, continue to walk for few minutes as the patient
tolerates.
• After ambulation, encourage the patient to sit; provide fluids to drink if needed.
• Position the patient comfortably.
• Wash hands and document the procedure.
https://youtu.be/1HWdMttzGPE
Using mechanical aids for walking
canes
• Canes are light weight, easily movable devices that are made of wood (or)
metal.
• TYPES OF CANES:
• Single ended canes with half circle handle
• Single ended canes with straight handle
• Canes with 3 (or) 4 prongs (quad canes)
procedure
• Instruct patient to stand with weight evenly distributed between the feet & the cane.
• The cane is held on the patient’s stronger side.
• Instruct patient to position cane 6 inches (15 cm) anterior of the foot.
• Move the affected leg forward to the cane while the weight is borne by the cane and
stronger leg.
• Next move the unaffected leg forward ahead of the cane and weak leg while the weight is
borne by the cane & weak leg.
• Repeat the steps.
walkers
• A walker is a light weight metal frame with four legs.
• Patient’s requirements to use walkers
• Partial strength in both hands & wrist.
• Strong elbow extensors such as triceps brachi
• Strong shoulder depressors such as the pectoralis minor.
• Ability to bear at least partial weight on both legs.
• Explain the method of using walker
• Instruct patient to wear non – skid shoe (or) slipper.
• Have patient stand in center of walker and grasp handgrips on upper bars
• Lift walker and move it 6 – 8 inches forward, making sure all 4 feet of the walker
stays on the floor.
• Take a step forward with one foot. Then follow through with other leg.
• If one leg is weaker than the other
• Move the walker and weak leg ahead together about 15 cm while your weight is
borne by the affected leg and both.
https://youtu.be/4RB7OZ5KVyk
Assisting with crutch walking
• Assisting patient to walk using crutches while providing support & balance
and as a convenient method of getting from one place to another.
• TYPES OF CRUTCHES:
• Axillary crutch
• Lofstrand crutch
• Platform crutch
• Four point gait:
• This is the most stable of crutch gaits because it provides atleast 3 points of support
at all times.
• Tripod position:
• Crutches are placed 6 inches in front & 6 inches to side of each foot.
• Move right crutch forward 10 – 15 cm (4 – 6 inches)
• Move the left front foot forward, preferably to the level of crutch. Move the left
crutch forward.
• Move the right foot forward.
• Three point gait:
• The client must be able to bear the entire body weight on affected leg. The nurse asks the client to:
• Move both crutches and the weaker leg forward.
• Move the stronger leg forward.
• Two point gait:
• It requires at least partial weight bearing on each foot. It requires more balance.
• Begin in tripod position
• Move left crutch & right foot forward
• Move right crutch & left foot forward.
• Repeat sequences.
• Swing – through gait:
• Requires that patient have the ability to sustain partial weight bearing on both feet. Move both crutches
forward lift & swing legs through & beyond crutches.
https://youtu.be/k2-w3LZlCVk
Assisting_clients_with_ambulation.pptx

Assisting_clients_with_ambulation.pptx

  • 1.
    Assisting clients withambulation ABIRAMI. K, B.SC(N) TUTOR SRMTCON TRICHY
  • 2.
    introduction • Patients whoare immobile for even a short time may require assistance with ambulation
  • 3.
    definition • Assistance meanswalking along the side of a patient while ambulating (or) providing an assistive device to aid in ambulation.
  • 4.
    purposes • To promotemobilization • To improve the activity level of the patient • To prevent complications such as secondary to surgery • To prevent pressure sores • To enhance the patient’s level of independence.
  • 5.
    articles • Sphygmomanometer • Assistivedevices such as gait belt if needed.
  • 6.
    procedure • Pre procedure: •Explain the reason for ambulation • Check blood pressure • Confirm that the patient does not feel light – headed • Assist the patient to sit in the cot for few minutes and dangle the foot • Check the BP once again and if it is normal, apply the gait belt and help the patient to assume a standing position observe the balance.
  • 7.
    intra procedure • Assistedambulation by one nurse: • Stand on the patient’s stronger side &grasp the gait belt. If gait belt is not there, grasp the patient’s back. Take few steps & walk forward with the patient. If the patient becomes weak (or) dizzy, ask the patient to sit; if not, continue to walk for few minutes as the patient tolerates.
  • 9.
    • Assisted ambulationby two nurses: • The nurse should stand on either side of the patient; grasp the gait belt in the middle of the patient’s back. • Step forward in unison with the patient, maintaining the same pace as the patient gradually increase the distance of the walk. If the patient becomes weak (or) dizzy, ask the patient to sit; if not, continue to walk for few minutes as the patient tolerates. • After ambulation, encourage the patient to sit; provide fluids to drink if needed. • Position the patient comfortably. • Wash hands and document the procedure.
  • 11.
  • 12.
  • 13.
    canes • Canes arelight weight, easily movable devices that are made of wood (or) metal. • TYPES OF CANES: • Single ended canes with half circle handle
  • 14.
    • Single endedcanes with straight handle • Canes with 3 (or) 4 prongs (quad canes)
  • 15.
    procedure • Instruct patientto stand with weight evenly distributed between the feet & the cane. • The cane is held on the patient’s stronger side. • Instruct patient to position cane 6 inches (15 cm) anterior of the foot. • Move the affected leg forward to the cane while the weight is borne by the cane and stronger leg. • Next move the unaffected leg forward ahead of the cane and weak leg while the weight is borne by the cane & weak leg. • Repeat the steps.
  • 16.
    walkers • A walkeris a light weight metal frame with four legs.
  • 17.
    • Patient’s requirementsto use walkers • Partial strength in both hands & wrist. • Strong elbow extensors such as triceps brachi • Strong shoulder depressors such as the pectoralis minor. • Ability to bear at least partial weight on both legs. • Explain the method of using walker • Instruct patient to wear non – skid shoe (or) slipper. • Have patient stand in center of walker and grasp handgrips on upper bars
  • 18.
    • Lift walkerand move it 6 – 8 inches forward, making sure all 4 feet of the walker stays on the floor. • Take a step forward with one foot. Then follow through with other leg. • If one leg is weaker than the other • Move the walker and weak leg ahead together about 15 cm while your weight is borne by the affected leg and both.
  • 19.
  • 20.
    Assisting with crutchwalking • Assisting patient to walk using crutches while providing support & balance and as a convenient method of getting from one place to another. • TYPES OF CRUTCHES: • Axillary crutch
  • 21.
    • Lofstrand crutch •Platform crutch
  • 22.
    • Four pointgait: • This is the most stable of crutch gaits because it provides atleast 3 points of support at all times. • Tripod position: • Crutches are placed 6 inches in front & 6 inches to side of each foot. • Move right crutch forward 10 – 15 cm (4 – 6 inches) • Move the left front foot forward, preferably to the level of crutch. Move the left crutch forward. • Move the right foot forward.
  • 23.
    • Three pointgait: • The client must be able to bear the entire body weight on affected leg. The nurse asks the client to: • Move both crutches and the weaker leg forward. • Move the stronger leg forward. • Two point gait: • It requires at least partial weight bearing on each foot. It requires more balance. • Begin in tripod position • Move left crutch & right foot forward • Move right crutch & left foot forward. • Repeat sequences. • Swing – through gait: • Requires that patient have the ability to sustain partial weight bearing on both feet. Move both crutches forward lift & swing legs through & beyond crutches.
  • 24.