ASSIGNMENT #3
EXAMPLES
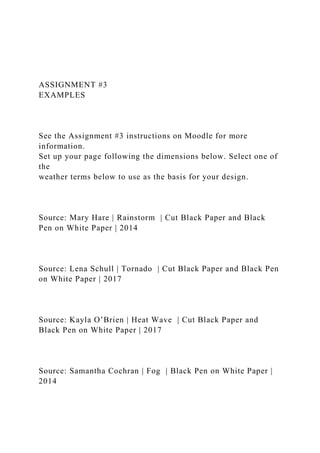
See the Assignment #3 instructions on Moodle for more information.
Set up your page following the dimensions below. Select one of the
weather terms below to use as the basis for your design.
Source: Mary Hare | Rainstorm | Cut Black Paper and Black Pen on White Paper | 2014
Source: Lena Schull | Tornado | Cut Black Paper and Black Pen on White Paper | 2017
Source: Kayla O’Brien | Heat Wave | Cut Black Paper and Black Pen on White Paper | 2017
Source: Samantha Cochran | Fog | Black Pen on White Paper | 2014
DESIGN ELEMENTS
& PRINCIPLES
design elements: the building blocks used by
artists to create designs; artists apply design
elements to produce the design principles
design principles: describe the ways artists
use design elements to achieve desired visual
effects
Design Elements:
Point
Line
Shape
Forms
Space
Color
Value
Texture
Design Principles:
Pattern
Balance
Emphasis
Movement
Repetition Unity
Proportion
Scale
Rhythm
Variety
DESIGN
PROCESS
design process: the process through which
an artist seeks visual solutions to a design
problem
• There’s no right answer to a design problem,
although some solutions are more or less
successful.
• There are multiple, possible solutions. Your
job as a designer is try to find the strongest
solution.
• Design process is iterative. This means that it
is repetitive - you try one thing and then
circle back to evaluate, revise, and refine.
Source: The Chicago Architecture Center | The Design Process
• Thumbnail sketches are small, quick, rough
sketches for testing compositions.
• Allow you to place major elements to see
if the composition is pleasing and balanced.
• Can complete several in a short amount of
time and pick the composition that works
best.
Source: Hannah Assebe | Brainstorming Sketches | Pen on Paper | 2014
Source: explore-drawing-and-painting.com
Source: Thomas Kegler | Thumbnails | Pencil on Paper | Date Unknown
Source: Thomas Kegler | Thunderstorm in Catskills, Psalm 9:9-10” | Oil on Linen | Date Unknown
RULE OF
THIRDS
• Think about the page as a whole.
• Imagine a series of grid lines running across
your paper that divides the page into thirds
both horizontally and vertically.
• For balanced and dynamic compositions,
place major elements along these lines or at
their points of intersection.
Source: DesignMantic | Rule of Thirds
Uses Rule of Thirds Does Not Use
Rule of Thirds
LINE
“A line is a point set in motion.”
- Paul Klee
Source: Gjon Mili | Pablo Picasso’s Light Drawings | Photography | 1949
Lines convey mood, feeling, and information.
We can describe them as nervous, angry,
happy, graceful, or quiet.
Source: Saul Steinberg | Untitled | Pencil on Paper | 1959
Source: Jasper Johns | Flag | Pencil & Graphite Wash on Paper | 1958
Sometimes a hand drawn line may better
express t.
Role Of Transgenic Animal In Target Validation-1.pptx
ASSIGNMENT #3EXAMPLESSee the Assignment #3 instructi.docx
1. ASSIGNMENT #3
EXAMPLES
See the Assignment #3 instructions on Moodle for more
information.
Set up your page following the dimensions below. Select one of
the
weather terms below to use as the basis for your design.
Source: Mary Hare | Rainstorm | Cut Black Paper and Black
Pen on White Paper | 2014
Source: Lena Schull | Tornado | Cut Black Paper and Black Pen
on White Paper | 2017
Source: Kayla O’Brien | Heat Wave | Cut Black Paper and
Black Pen on White Paper | 2017
Source: Samantha Cochran | Fog | Black Pen on White Paper |
2014
2. DESIGN ELEMENTS
& PRINCIPLES
design elements: the building blocks used by
artists to create designs; artists apply design
elements to produce the design principles
design principles: describe the ways artists
use design elements to achieve desired visual
effects
Design Elements:
Point
Line
Shape
Forms
Space
Color
Value
Texture
4. successful.
• There are multiple, possible solutions. Your
job as a designer is try to find the strongest
solution.
• Design process is iterative. This means that it
is repetitive - you try one thing and then
circle back to evaluate, revise, and refine.
Source: The Chicago Architecture Center | The Design Process
• Thumbnail sketches are small, quick, rough
sketches for testing compositions.
• Allow you to place major elements to see
if the composition is pleasing and balanced.
• Can complete several in a short amount of
time and pick the composition that works
best.
Source: Hannah Assebe | Brainstorming Sketches | Pen on Paper
| 2014
Source: explore-drawing-and-painting.com
5. Source: Thomas Kegler | Thumbnails | Pencil on Paper | Date
Unknown
Source: Thomas Kegler | Thunderstorm in Catskills, Psalm 9:9-
10” | Oil on Linen | Date Unknown
RULE OF
THIRDS
• Think about the page as a whole.
• Imagine a series of grid lines running across
your paper that divides the page into thirds
both horizontally and vertically.
• For balanced and dynamic compositions,
place major elements along these lines or at
their points of intersection.
Source: DesignMantic | Rule of Thirds
Uses Rule of Thirds Does Not Use
Rule of Thirds
6. LINE
“A line is a point set in motion.”
- Paul Klee
Source: Gjon Mili | Pablo Picasso’s Light Drawings |
Photography | 1949
Lines convey mood, feeling, and information.
We can describe them as nervous, angry,
happy, graceful, or quiet.
Source: Saul Steinberg | Untitled | Pencil on Paper | 1959
Source: Jasper Johns | Flag | Pencil & Graphite Wash on Paper |
1958
Sometimes a hand drawn line may better
express the values or feel of a brand.
7. Source: LOVE Creative UK | Johnnie Walker 1910
Commemorative Special Edition Bottles | 2012
• Variation in line weights creates depth and
visual interest.
• Consider including a range of line weights in
your design.
• Thick lines advance towards the viewer. Thin
lines recede.
Source: Rico Lebrun | Detail of Seated Clown | Ink & Wash on
Paper | 1941
Source: Judy Pfaff | Half a Dozen of the Other-Che (Del) Cosa e
Acqua | Color drypoint with spit bite and sugar lift aquatints
and etching | 1992
Types of Line:
actual line: any drawn line or contour
implied line: a line created by positioning
a series of points so that the eye tends to
automatically connect them
8. psychic line: a mental connection between two
points or elements; there is no real line, not
even intermittent points, yet we feel a line
Source: Francis Ching | Iris Contour Drawing | Pen on Paper |
Date Unknown
Source: Facing Web Design | Implied Line | Photograph | Date
Unknown
Source: Georges de La Tour | The Fortune Teller | Oil on
Canvas | 1630s
Source: Georges de La Tour | The Fortune Teller | Oil on
Canvas | 1630s
ART 115 Assignment 3 – page 1
ART 115 BASIC DESIGN: FUNDAMENTALS
SPRING 2020
ASSIGNMENT #3 – POINT, LINE, PLANE
9. Due Dates & Points
Assignment #3 is due by 12:00pm on Monday, April 20th. This
assignment is worth 35 points and a grading rubric
is provided at the end of this handout. Please submit your
assignment via the link on Moodle. Late exercises are
graded according to the late policy in the course syllabus.
Materials
White Paper; Black Paper; Cutting Mat; Cutting Knife; Ruler;
Rubber Cement; Rubber Cement Eraser;
Black Pens (optional)
Assignment
This assignment builds on your knowledge of point, line, and
plane, which are the building blocks of design. From
these elements, designers create typography, animations,
textures, patterns, garments, floorplans, buildings and
more.
Design Problem
• Using only points and/or lines, represent a weather-related
phenomenon.
• You may use small dots, points, and marks.
• You may use straight, diagonal, or curved lines.
• Lines can cross but should not close to create shapes.
• Lines can be the same thickness or vary in thickness. The line
thickness can change over the line (taper).
• Your final solution should be an abstract representation of the
phenomenon rather than a recognizable
object or realistic interpretation of the event within a landscape.
Design Process
10. • Look at the completed Assignment #3 examples on Moodle.
They’re under the Week 3 Resources.
• Watch the videos on cutting knife safety and cutting straight
or curved lines. They’re on Moodle under
the Tutorial Videos in Course Resources at the top of the page,
and under the Week 3 Resources.
• Choose a weather phenomenon from the list below.
• In pencil, roughly sketch at least ten ideas at one-fourth scale
(2 x 2 in.) on a blank piece of paper. Your
finished solution will be 8 x 8 in. square so it would be helpful
to generate ideas that will work with that
format. You may use inexpensive printer paper for this step.
Consider the whole of the picture plane in
your design.
• Choose your favorite solution.
• On a piece of white paper from your pad, draw an 8 x 8 in.
box, lightly in pencil. Follow the layout
shown below for where to place your square on the page.
• Using black paper, execute your favorite solution at actual
size within the 8 x 8 in square. You may also
add black pen to your design in addition to the cut paper if it
adds to your design.
11. • When finished, please erase the light pencil box around your
design so it appears to be floating in the
page.
• Take a photograph of your initial process sketches and
finished design. Make sure your photographs are
well lit and in focus, and that your design is clearly visible.
Upload the photographs to Moodle under the
Assignment #3 link.
ART 115 Assignment 3 – page 2
ART 115 Assignment 3 – page 3
Assignment #3 Grading Rubric
This assignment is graded on four categories:
• Concept: Have you considered the design problem and
solution thoughtfully?
• Creativity: Is it interesting and original?
• Process: How did you arrive at your solution and did you
follow directions?
• Craft: Have you taken care in the execution?
12. Concept (10 points)
q Are you using only points and/or lines (no closed shapes)?
q Is it an abstract representation (not representational?)
q Can we guess which weather phenomenon you are
representing?
q Have you created visual interest through use of design
elements or principles?
q Does the design convey a mood or feeling (hot, cold, wet,
dry, craggy, smooth, stable, turbulent…)?
q Does the composition sit balanced within the square? Or is it
purposefully off-balance?
Creativity (10 points)
q Is it a solution we’ve never seen before?
q Have you surprised us? Are you thinking outside of the box?
q Has the detail and execution of the design taken extra time
to complete?
q Is it aesthetically beautiful?
Process (10 points)
q Did you complete ten brainstorming sketches to start
(remember to upload a photo of your sketches)?
q Do your sketches demonstrate thought and iteration (design
process)?
q Does your design fit within the 8 x 8 in. square?
q Are you using only black paper and/or pen to create your
marks?
q Have you erased the outline around your 8 x 8 in square so
13. your design appears to be floating?
q Did you place your square according to the coordinates on
the previous page?
Craft (5 points)
q Is your design the first thing we notice (and the craft is
secondary)?
q Have you taken care in the execution?
q Are your points and/or lines neat and clear?
q Are your points and/or lines consistently executed across the
design?
q Is your paper clean and free of blemishes?
q Is there minimal glue residue visible?
ART 115 Basic 2D Design
LCC, Art and Applied Design JS Bird [email protected]
Project One:
GOAL:
Create one design using only horizontal and vertical lines. In
14. this design you are
trying to create unity of the picture-plane, a clear and integrated
focal point, a
variety of spacing, and areas of rest and areas of activity. When
I say spacing I mean
both variety of black lines, and a variety of white spaces.
Please review the PDF introduction to the project carefully. You
goal is to
understand the basic design principles, see and identify them in
other art work and
then create these principles in your own design. Review it and
send questions if you
have any Wednesday, April 8 noon-1:30.
PROCESS:
use in the
composition. You will cut these lines out of black construction
paper using your
utility knife. Make sure to cut on the cutting matt to save your
table and to help
cut straight. Use a straight edge to help if you want. DO NOT
use scissors. It is
important to become comfortable and confident using the utility
knife. Do not
cut yourself either. Cut the lines before you start. We are
cutting lines so that
you can move them around quickly and easily in your
composition.
a. If you don’t have black construction paper yet, use any kind
of dark paper.
You WILL need black and grey construction paper this term.
15. angles). Cut a wide
variety of lines. From thin to wide, and long to short. Do not
make them more
than 3/8 inch wide. If they get too wide they function as
rectangle shapes, not
lines. Cut all the lines before you start working.
your pad. Place the
black lines in a variety of positions, but only use horizontal and
vertical lines.
Refer to the students examples in the introductory PDF. Try
many combinations.
Make sure your lines move across the picture plane and touch
the outside edges
of the paper. Do not only work in the middle. Try to work from
the outside in. If
you want to start with a basic shape like a Tor a cross, try it.
EXPERIMENT. Take
pictures of your line sketches to compare them. You goal is to
create a focal
point and unity, AND do it in a way that is visually interesting.
tion first with a
pencil, just play with
the lines.
shapes. These
16. shapes can be completely outlined or they can be created with
implied lines.
Consult your vocabulary sheet to assist in understanding the
principles.
rubber cement. You can
get excess glue on the paper to make sure the lines stay adhered
to the paper.
When the excess rubber cement is dry, you can rub it off using
the rubber
cement eraser.
with horizontal and
vertical lines –
a. Unity,
b. Variety of Spacing
c. Focal point.
d. Area of rest and area of activity.
e. Use black lines on a white ground.
f. Experiment with multiple designs before gluing.
Review the PDF introduction at Noon Wednesday, April 8 or
earlier. Submit the
writing by email by the listed due date on the PDF
The first Composition will be due Noon, Monday, April 13.
Submit a photo of the completed design by the date above. Also
submit a
17. photo of one other design you created before you glued it.
All compositions will be evaluated on the objectives as listed
below including
workmanship. Workmanship means clean straight lines and no
messy glue smears.
Line Composition One
Name____________________________________
Unity _______________
Focal Point _______________
Variety of spacing/size _______________
Area of rest / activity _______________
Workmanship/Presentation _______________
Persistence/experimentation _______________
Overall Score _______________