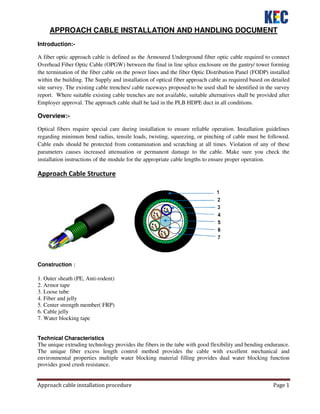
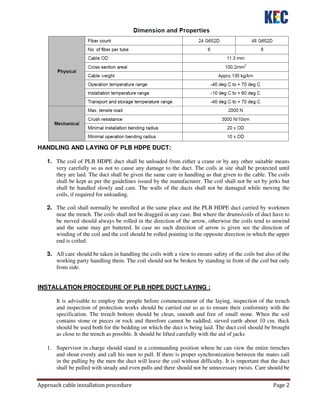
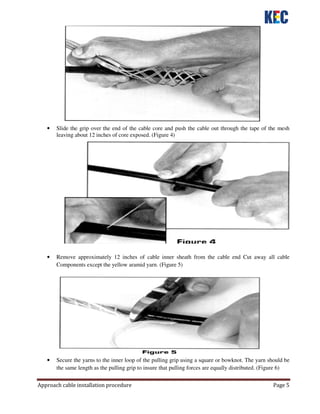
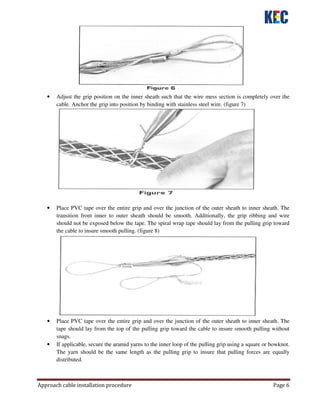
Approach cable installation procedure Page 1
APPROACH CABLE INSTALLATION AND HANDLING DOCUMENT
Introduction:-
A fiber optic approach cable is defined as the Armoured Underground fiber optic cable required to connect
Overhead Fiber Optic Cable (OPGW) between the final in line splice enclosure on the gantry/ tower forming
the termination of the fiber cable on the power lines and the fiber Optic Distribution Panel (FODP) installed
within the building. The Supply and installation of optical fiber approach cable as required based on detailed
site survey. The existing cable trenches/ cable raceways proposed to be used shall be identified in the survey
report. Where suitable existing cable trenches are not available, suitable alternatives shall be provided after
Employer approval. The approach cable shall be laid in the PLB HDPE duct in all conditions.
Overview:-
Optical fibers require special care during installation to ensure reliable operation. Installation guidelines
regarding minimum bend radius, tensile loads, twisting, squeezing, or pinching of cable must be followed.
Cable ends should be protected from contamination and scratching at all times. Violation of any of these
parameters causes increased attenuation or permanent damage to the cable. Make sure you check the
installation instructions of the module for the appropriate cable lengths to ensure proper operation.
Approach Cable Structure
Construction:
:
:
:
1. Outer sheath (PE, Anti-rodent)
2. Armor tape
3. Loose tube
4. Fiber and jelly
5. Center strength member( FRP)
6. Cable jelly
7. Water blocking tape
Technical Characteristics
The unique extruding technology provides the fibers in the tube with good flexibility and bending endurance.
The unique fiber excess length control method provides the cable with excellent mechanical and
environmental properties multiple water blocking material filling provides dual water blocking function
provides good crush resistance.
Approach cable installation procedure Page 2
HANDLING AND LAYING OF PLB HDPE DUCT:
1. The coil of PLB HDPE duct shall be unloaded from either a crane or by any other suitable means
very carefully so as not to cause any damage to the duct. The coils at site shall be protected until
they are laid. The duct shall be given the same care in handling as that given to the cable. The coils
shall be kept as per the guidelines issued by the manufacturer. The coil shall not be set by jerks but
shall be handled slowly and care. The walls of the ducts shall not be damaged while moving the
coils, if required for unloading.
2. The coil shall normally be unrolled at the same place and the PLB HDPE duct carried by workmen
near the trench. The coils shall not be dragged in any case. But where the drums/coils of duct have to
be moved should always be rolled in the direction of the arrow, otherwise the coils tend to unwind
and the same may get battered. In case no such direction of arrow is given see the direction of
winding of the coil and the coil should be rolled pointing in the opposite direction in which the upper
end is coiled.
3. All care should be taken in handling the coils with a view to ensure safety of the coils but also of the
working party handling them. The coil should not be broken by standing in front of the coil but only
from side.
INSTALLATION PROCEDURE OF PLB HDPE DUCT LAYING :
It is advisable to employ the people before commencement of the laying, inspection of the trench
and inspection of protection works should be carried out so as to ensure their conformity with the
specification. The trench bottom should be clean, smooth and free of small stone. When the soil
contains stone or pieces or rock and therefore cannot be raddled, sieved earth about 10 cm. thick
should be used both for the bedding on which the duct is being laid. The duct coil should be brought
as close to the trench as possible. It should be lifted carefully with the aid of jacks
1. Supervisor in charge should stand in a commanding position where he can view the entire trenches
and shout evenly and call his men to pull. If there is proper synchronization between the mates call
in the pulling by the men the duct will leave the coil without difficulty. It is important that the duct
shall be pulled with steady and even pulls and there should not be unnecessary twists. Care should be
Approach cable installation procedure Page 3
taken to avoid twist as this is likely to damage the PLB HDPE duct. When pulling around bends one
or two men should be stationed to give the duct the correct bent when it passes.
2. While laying the duct employ adequate number of men so that the duct can be conveniently carried
by them in both hands without stretched arms. The distance between any two persons carrying the
duct shall be two to ten meters depending upon the weight such that the maximum sag of the PLB
HDPE duct between any two persons is not more than 0.5 meters.
3. While laying work is in progress one man has to continuously observe the PLB HDPE duct along its
line in order to determine indentations poles or other damaged parts are apparent. Such damaged
parts have to be protected immediately.
4. The conditions of the PLB HDPE duct shall be visually inspected throughout its line and in case
damage or defect is noticed, the trench shall be filled up only after ensuring that the damage is not
likely to affect the cable.
5. The end of the duct should be sealed with flex to prevent entry of soil before filling back. Adjoining
ducts shall be joined by couplers. Duct integrity testing shall be carried out when laying is completed
in a block section (1 kms). In case the continuity is not achieved the fault shall be localized and
rectified by providing PLB HDPE DUCT couplers/Compression couplers.
6. Tools necessary for laying PLB HDPE Duct is to be checked as physically available before starting
the Duct laying. For efficient and safe laying, communication may be provided between following
points using portable VHF Walkie talkie sets.
7. The Supervisor In charge of the duct laying. During PLB HDPE duct laying care must be taken not
to twist duct in any direction. For this purpose, the survival (rotating hook) shall be attached between
pulling line and pulling eye at the end of duct so as to avoid any possible twist during pulling and
laying of the cable.
8. During duct laying care must be taken not to twist duct in any direction. For this purpose, the
rotating hook shall be attached between pulling line and pulling eye at the end of duct so as to avoid
any possible twist during pulling and laying of the cable. In case it is planned to lay the cable in duct
by pulling the cable by using a winch; the duct should be provided with a nylon rope for pulling
PREPARATION FOR CABLE PULLING GRIP
1. Methods used for placing fiber optic cables in ducts are essentially. However, fiber optic cable is a
high capacity transmission medium which can have its transmission characteristics degraded when
subjected to excessive pulling force, sharp bends, and crushing forces. These losses may not be
revealed until long after installation is complete. For these reasons extra care must be taken during
the entire installation procedure.
2. Cable manufacturers install special strength members, usually aramid yarn, to absorb the stress of
pulling the cable. Fiber optic cable should only be pulled by these strength members unless the cable
design allows pulling by a grip on the jacket. Any other method may put stress on the fibers and
harm them. Swivel pulling eyes should be used to attach the pulling rope or tape to the cable to
prevent cable twisting during the pull.
Approach cable installation procedure Page 4
3. A Cable pulling grip is installed on fiber optic cable to provide optimum load distribution during
cable pulling. When correctly installed, the cable-pulling grip distributes the pulling force equally
along the cable strength members. To prevent dangerous cable twisting during the pulling operation.
4. Tools and Materials Required
• Scissors
• Utility Knife/Hook Blade
• Diagonal Pliers/Wire Cutters
• Vinyl Tape
• Stainless Steel Wire
• Cable Cleaner or Approved Solvent
• Tape Measure
• Needle Nose Pliers
5. Prior to installation, the proper size grip must be choose for the cable to be pulled. Grip selection is
based on cable inner-outer jacket diameter. Generally, use the smallest grip that will fit over the
inner jacket without excessive difficulty. Measure the cable inner jacket diameter and determine the
proper grip.
• Remove 1.25 meters (48 inches) or outer sheath exposing the polyethylene jacketed cable core. The
length removed depends on pulling grip and should be roughly the length of the grip plus 12-16
inches.
• Mark the outer sheath 48 inches from the cable end with a piece of PVC tape or marking pen.
• Ring cut the outer jacket and armor at the tape mark with utility knife or hook blade.
• Flex the cable to completely server the jacket and armor sheath. Remove the cable sheath using
Recommended Procedure “Armored Loose Tube Cable Preparation”.
Approach cable installation procedure Page 5
• Slide the grip over the end of the cable core and push the cable out through the tape of the mesh
leaving about 12 inches of core exposed. (Figure 4)
• Remove approximately 12 inches of cable inner sheath from the cable end Cut away all cable
Components except the yellow aramid yarn. (Figure 5)
• Secure the yarns to the inner loop of the pulling grip using a square or bowknot. The yarn should be
the same length as the pulling grip to insure that pulling forces are equally distributed. (Figure 6)
Approach cable installation procedure Page 6
• Adjust the grip position on the inner sheath such that the wire mess section is completely over the
cable. Anchor the grip into position by binding with stainless steel wire. (figure 7)
• Place PVC tape over the entire grip and over the junction of the outer sheath to inner sheath. The
transition from inner to outer sheath should be smooth. Additionally, the grip ribbing and wire
should not be exposed below the tape. The spiral wrap tape should lay from the pulling grip toward
the cable to insure smooth pulling. (figure 8)
• Place PVC tape over the entire grip and over the junction of the outer sheath to inner sheath. The
tape should lay from the top of the pulling grip toward the cable to insure smooth pulling without
snags.
• If applicable, secure the aramid yarns to the inner loop of the pulling grip using a square or bowknot.
The yarn should be the same length as the pulling grip to insure that pulling forces are equally
distributed.
Approach cable installation procedure Page 7
6. Cables should not be pulled by the jacket unless it is specifically approved by the cable
manufacturers. These grips are usually tied to the strength members also. Tight buffer cable can be
pulled by the jacket in premises applications if a large (~40 cm, 8 in.) spool is used as a pulling
mandrel. Wrap the cable around the spool 5 times and hold gently when pulling.
Do not exceed the maximum pulling tension rating. Consult the cable manufacturer and suppliers of
conduit, innerduct, and cable lubricants for guidelines on tension ratings and lubricant use. If
possible, use an automated puller with tension control and/or a breakaway pulling eye. When laying
loops of fiber on a surface during a pull, use “figure-8” loops to prevent twisting the cable.
7. Twisting Cable :- Do not twist the cable. Twisting the cable can stress the fibers. Tension on the
cable and pulling ropes can cause twisting. Use a swivel pulling eye to connect the pull rope to the
cable to prevent pulling tension causing twisting forces on the cable.
Roll the cable off the spool instead of spinning it off the spool end to prevent putting a twist in the
cable for every turn on the spool. When laying cable out for a long pull, use a "figure-8" on the
ground to prevent twisting. The figure 8 puts a half twist in on one side of the 8 and takes it out on
the other, preventing twists.
PROCEDURE FOR PULLING OF OPTICAL FIBER CABLE:
1. Use pulling grip designed for pre-connected fiber optic cables. Grips with a fixed pull ring should
use a swivel to attach the pulling rope.
2. Monitor pulling tension. Do not exceed the maximum pulling load rating. On long runs, use proper
lubricants and make sure they are compatible with the cable jacket. On really long runs pull from the
middle out to both ends. If possible, use an automated puller with tension control or at least a
breakaway-pulling eye.
Approach cable installation procedure Page 8
3. Always use a straight pull. Use cable guides to maintain the recommended bend radius. Do not
exceed the cable bending radius otherwise it will harm the optical fibers. It may not be immediate
but it may even take a few years but eventually by exceeding the recommended bending radius of
the cable you reduce life of the cable.
4. Do not twist the cable; putting a twist in the cable can stress the fibers.
5. Roll the cable off the spool. Use the device to aid in uncoiling long cables. Do not spin it off the
spool end. This puts a twist in the cable for very turn on the spool. Figure 8 for a long pull. If you are
laying cable for a long pull, use a figure 8 on the ground to prevent twisting.
6. Bend Radius: - Do not exceed the cable bend radius. Fiber optic cable can be broken when kinked
or bent too tightly, especially during pulling. If no specific recommendations are available from the
cable manufacturer, the cable should not be pulled over a bend radius smaller than twenty (20) times
the cable diameter. After completion of the pull, the cable should not have any bend radius smaller
than ten (10) times the cable diameter.
7. Vertical Cable Runs: - Drop vertical cables down rather than pulling them up whenever possible.
Support cables at frequent intervals to prevent excess stress on the jacket. Support can be provided
by cable ties (tightened snugly, not tightly enough to deform the cable jacket) grips. Use service
loops can to assist in gripping the cable for support and provide cable for future repairs or rerouting.
The route for the fiber optic cable and FODP Lay out in control room. Planned route for approach cable
at switchyard of sub-station
Approach cable installation procedure Page 9
Approach cable in PLB HDPE Duct
Gantry Tower in Sub-station
FODP (Fiber Optic Distribution Panel in Control Room
Approach cable installation procedure Page 10
Protect cables from excessive or frequent bending. Routing on a cabinet door should be used as a resort and
special care must be taken to protect the cable and avoid exceeding the bending radius of the cable.
When routing the cable proper pulling techniques should be used earlier in this manual. When attaching
cables with clamps use plastic clamps with large surface areas and avoid pinching or squeezing cable. Cable
should be installed manually with gentle pressure.
Cleaning Fiber Optic Connections
We recommend always keep dust caps on connectors, bulkhead splices, patch panels or anything else that is
going to have a connection made with it. Not only will it prevent additional dust buildup, but it will prevent
contamination from being touched or damaged from dropping.
When testing, we recommend that connectors on both the reference and tested cables be cleaned before
every test, as every time the connector is exposed to air, it can accumulate dust.

Approach cable installation

  • 1.
    Approach cable installationprocedure Page 1 APPROACH CABLE INSTALLATION AND HANDLING DOCUMENT Introduction:- A fiber optic approach cable is defined as the Armoured Underground fiber optic cable required to connect Overhead Fiber Optic Cable (OPGW) between the final in line splice enclosure on the gantry/ tower forming the termination of the fiber cable on the power lines and the fiber Optic Distribution Panel (FODP) installed within the building. The Supply and installation of optical fiber approach cable as required based on detailed site survey. The existing cable trenches/ cable raceways proposed to be used shall be identified in the survey report. Where suitable existing cable trenches are not available, suitable alternatives shall be provided after Employer approval. The approach cable shall be laid in the PLB HDPE duct in all conditions. Overview:- Optical fibers require special care during installation to ensure reliable operation. Installation guidelines regarding minimum bend radius, tensile loads, twisting, squeezing, or pinching of cable must be followed. Cable ends should be protected from contamination and scratching at all times. Violation of any of these parameters causes increased attenuation or permanent damage to the cable. Make sure you check the installation instructions of the module for the appropriate cable lengths to ensure proper operation. Approach Cable Structure Construction: : : : 1. Outer sheath (PE, Anti-rodent) 2. Armor tape 3. Loose tube 4. Fiber and jelly 5. Center strength member( FRP) 6. Cable jelly 7. Water blocking tape Technical Characteristics The unique extruding technology provides the fibers in the tube with good flexibility and bending endurance. The unique fiber excess length control method provides the cable with excellent mechanical and environmental properties multiple water blocking material filling provides dual water blocking function provides good crush resistance.
  • 2.
    Approach cable installationprocedure Page 2 HANDLING AND LAYING OF PLB HDPE DUCT: 1. The coil of PLB HDPE duct shall be unloaded from either a crane or by any other suitable means very carefully so as not to cause any damage to the duct. The coils at site shall be protected until they are laid. The duct shall be given the same care in handling as that given to the cable. The coils shall be kept as per the guidelines issued by the manufacturer. The coil shall not be set by jerks but shall be handled slowly and care. The walls of the ducts shall not be damaged while moving the coils, if required for unloading. 2. The coil shall normally be unrolled at the same place and the PLB HDPE duct carried by workmen near the trench. The coils shall not be dragged in any case. But where the drums/coils of duct have to be moved should always be rolled in the direction of the arrow, otherwise the coils tend to unwind and the same may get battered. In case no such direction of arrow is given see the direction of winding of the coil and the coil should be rolled pointing in the opposite direction in which the upper end is coiled. 3. All care should be taken in handling the coils with a view to ensure safety of the coils but also of the working party handling them. The coil should not be broken by standing in front of the coil but only from side. INSTALLATION PROCEDURE OF PLB HDPE DUCT LAYING : It is advisable to employ the people before commencement of the laying, inspection of the trench and inspection of protection works should be carried out so as to ensure their conformity with the specification. The trench bottom should be clean, smooth and free of small stone. When the soil contains stone or pieces or rock and therefore cannot be raddled, sieved earth about 10 cm. thick should be used both for the bedding on which the duct is being laid. The duct coil should be brought as close to the trench as possible. It should be lifted carefully with the aid of jacks 1. Supervisor in charge should stand in a commanding position where he can view the entire trenches and shout evenly and call his men to pull. If there is proper synchronization between the mates call in the pulling by the men the duct will leave the coil without difficulty. It is important that the duct shall be pulled with steady and even pulls and there should not be unnecessary twists. Care should be
  • 3.
    Approach cable installationprocedure Page 3 taken to avoid twist as this is likely to damage the PLB HDPE duct. When pulling around bends one or two men should be stationed to give the duct the correct bent when it passes. 2. While laying the duct employ adequate number of men so that the duct can be conveniently carried by them in both hands without stretched arms. The distance between any two persons carrying the duct shall be two to ten meters depending upon the weight such that the maximum sag of the PLB HDPE duct between any two persons is not more than 0.5 meters. 3. While laying work is in progress one man has to continuously observe the PLB HDPE duct along its line in order to determine indentations poles or other damaged parts are apparent. Such damaged parts have to be protected immediately. 4. The conditions of the PLB HDPE duct shall be visually inspected throughout its line and in case damage or defect is noticed, the trench shall be filled up only after ensuring that the damage is not likely to affect the cable. 5. The end of the duct should be sealed with flex to prevent entry of soil before filling back. Adjoining ducts shall be joined by couplers. Duct integrity testing shall be carried out when laying is completed in a block section (1 kms). In case the continuity is not achieved the fault shall be localized and rectified by providing PLB HDPE DUCT couplers/Compression couplers. 6. Tools necessary for laying PLB HDPE Duct is to be checked as physically available before starting the Duct laying. For efficient and safe laying, communication may be provided between following points using portable VHF Walkie talkie sets. 7. The Supervisor In charge of the duct laying. During PLB HDPE duct laying care must be taken not to twist duct in any direction. For this purpose, the survival (rotating hook) shall be attached between pulling line and pulling eye at the end of duct so as to avoid any possible twist during pulling and laying of the cable. 8. During duct laying care must be taken not to twist duct in any direction. For this purpose, the rotating hook shall be attached between pulling line and pulling eye at the end of duct so as to avoid any possible twist during pulling and laying of the cable. In case it is planned to lay the cable in duct by pulling the cable by using a winch; the duct should be provided with a nylon rope for pulling PREPARATION FOR CABLE PULLING GRIP 1. Methods used for placing fiber optic cables in ducts are essentially. However, fiber optic cable is a high capacity transmission medium which can have its transmission characteristics degraded when subjected to excessive pulling force, sharp bends, and crushing forces. These losses may not be revealed until long after installation is complete. For these reasons extra care must be taken during the entire installation procedure. 2. Cable manufacturers install special strength members, usually aramid yarn, to absorb the stress of pulling the cable. Fiber optic cable should only be pulled by these strength members unless the cable design allows pulling by a grip on the jacket. Any other method may put stress on the fibers and harm them. Swivel pulling eyes should be used to attach the pulling rope or tape to the cable to prevent cable twisting during the pull.
  • 4.
    Approach cable installationprocedure Page 4 3. A Cable pulling grip is installed on fiber optic cable to provide optimum load distribution during cable pulling. When correctly installed, the cable-pulling grip distributes the pulling force equally along the cable strength members. To prevent dangerous cable twisting during the pulling operation. 4. Tools and Materials Required • Scissors • Utility Knife/Hook Blade • Diagonal Pliers/Wire Cutters • Vinyl Tape • Stainless Steel Wire • Cable Cleaner or Approved Solvent • Tape Measure • Needle Nose Pliers 5. Prior to installation, the proper size grip must be choose for the cable to be pulled. Grip selection is based on cable inner-outer jacket diameter. Generally, use the smallest grip that will fit over the inner jacket without excessive difficulty. Measure the cable inner jacket diameter and determine the proper grip. • Remove 1.25 meters (48 inches) or outer sheath exposing the polyethylene jacketed cable core. The length removed depends on pulling grip and should be roughly the length of the grip plus 12-16 inches. • Mark the outer sheath 48 inches from the cable end with a piece of PVC tape or marking pen. • Ring cut the outer jacket and armor at the tape mark with utility knife or hook blade. • Flex the cable to completely server the jacket and armor sheath. Remove the cable sheath using Recommended Procedure “Armored Loose Tube Cable Preparation”.
  • 5.
    Approach cable installationprocedure Page 5 • Slide the grip over the end of the cable core and push the cable out through the tape of the mesh leaving about 12 inches of core exposed. (Figure 4) • Remove approximately 12 inches of cable inner sheath from the cable end Cut away all cable Components except the yellow aramid yarn. (Figure 5) • Secure the yarns to the inner loop of the pulling grip using a square or bowknot. The yarn should be the same length as the pulling grip to insure that pulling forces are equally distributed. (Figure 6)
  • 6.
    Approach cable installationprocedure Page 6 • Adjust the grip position on the inner sheath such that the wire mess section is completely over the cable. Anchor the grip into position by binding with stainless steel wire. (figure 7) • Place PVC tape over the entire grip and over the junction of the outer sheath to inner sheath. The transition from inner to outer sheath should be smooth. Additionally, the grip ribbing and wire should not be exposed below the tape. The spiral wrap tape should lay from the pulling grip toward the cable to insure smooth pulling. (figure 8) • Place PVC tape over the entire grip and over the junction of the outer sheath to inner sheath. The tape should lay from the top of the pulling grip toward the cable to insure smooth pulling without snags. • If applicable, secure the aramid yarns to the inner loop of the pulling grip using a square or bowknot. The yarn should be the same length as the pulling grip to insure that pulling forces are equally distributed.
  • 7.
    Approach cable installationprocedure Page 7 6. Cables should not be pulled by the jacket unless it is specifically approved by the cable manufacturers. These grips are usually tied to the strength members also. Tight buffer cable can be pulled by the jacket in premises applications if a large (~40 cm, 8 in.) spool is used as a pulling mandrel. Wrap the cable around the spool 5 times and hold gently when pulling. Do not exceed the maximum pulling tension rating. Consult the cable manufacturer and suppliers of conduit, innerduct, and cable lubricants for guidelines on tension ratings and lubricant use. If possible, use an automated puller with tension control and/or a breakaway pulling eye. When laying loops of fiber on a surface during a pull, use “figure-8” loops to prevent twisting the cable. 7. Twisting Cable :- Do not twist the cable. Twisting the cable can stress the fibers. Tension on the cable and pulling ropes can cause twisting. Use a swivel pulling eye to connect the pull rope to the cable to prevent pulling tension causing twisting forces on the cable. Roll the cable off the spool instead of spinning it off the spool end to prevent putting a twist in the cable for every turn on the spool. When laying cable out for a long pull, use a "figure-8" on the ground to prevent twisting. The figure 8 puts a half twist in on one side of the 8 and takes it out on the other, preventing twists. PROCEDURE FOR PULLING OF OPTICAL FIBER CABLE: 1. Use pulling grip designed for pre-connected fiber optic cables. Grips with a fixed pull ring should use a swivel to attach the pulling rope. 2. Monitor pulling tension. Do not exceed the maximum pulling load rating. On long runs, use proper lubricants and make sure they are compatible with the cable jacket. On really long runs pull from the middle out to both ends. If possible, use an automated puller with tension control or at least a breakaway-pulling eye.
  • 8.
    Approach cable installationprocedure Page 8 3. Always use a straight pull. Use cable guides to maintain the recommended bend radius. Do not exceed the cable bending radius otherwise it will harm the optical fibers. It may not be immediate but it may even take a few years but eventually by exceeding the recommended bending radius of the cable you reduce life of the cable. 4. Do not twist the cable; putting a twist in the cable can stress the fibers. 5. Roll the cable off the spool. Use the device to aid in uncoiling long cables. Do not spin it off the spool end. This puts a twist in the cable for very turn on the spool. Figure 8 for a long pull. If you are laying cable for a long pull, use a figure 8 on the ground to prevent twisting. 6. Bend Radius: - Do not exceed the cable bend radius. Fiber optic cable can be broken when kinked or bent too tightly, especially during pulling. If no specific recommendations are available from the cable manufacturer, the cable should not be pulled over a bend radius smaller than twenty (20) times the cable diameter. After completion of the pull, the cable should not have any bend radius smaller than ten (10) times the cable diameter. 7. Vertical Cable Runs: - Drop vertical cables down rather than pulling them up whenever possible. Support cables at frequent intervals to prevent excess stress on the jacket. Support can be provided by cable ties (tightened snugly, not tightly enough to deform the cable jacket) grips. Use service loops can to assist in gripping the cable for support and provide cable for future repairs or rerouting. The route for the fiber optic cable and FODP Lay out in control room. Planned route for approach cable at switchyard of sub-station
  • 9.
    Approach cable installationprocedure Page 9 Approach cable in PLB HDPE Duct Gantry Tower in Sub-station FODP (Fiber Optic Distribution Panel in Control Room
  • 10.
    Approach cable installationprocedure Page 10 Protect cables from excessive or frequent bending. Routing on a cabinet door should be used as a resort and special care must be taken to protect the cable and avoid exceeding the bending radius of the cable. When routing the cable proper pulling techniques should be used earlier in this manual. When attaching cables with clamps use plastic clamps with large surface areas and avoid pinching or squeezing cable. Cable should be installed manually with gentle pressure. Cleaning Fiber Optic Connections We recommend always keep dust caps on connectors, bulkhead splices, patch panels or anything else that is going to have a connection made with it. Not only will it prevent additional dust buildup, but it will prevent contamination from being touched or damaged from dropping. When testing, we recommend that connectors on both the reference and tested cables be cleaned before every test, as every time the connector is exposed to air, it can accumulate dust.