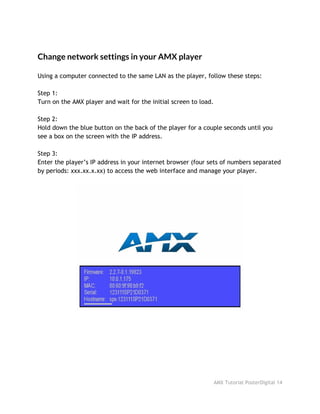
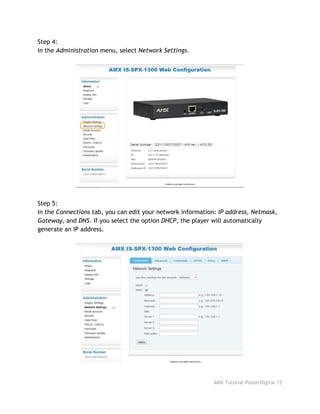
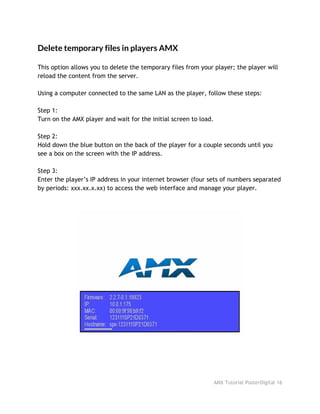
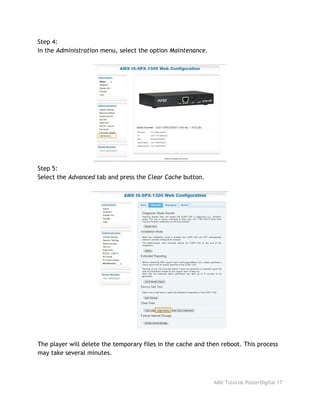
AMX Tutorial


Web:  
posterdigital.com/soporte 
 
Contact: 
contact@posterdigital.com 
11 June 2015
AMX Tutorial PosterDigital 1
 
AMX (supported models)  3 
AMX player installation  4 
Open ports in your AMX player  7 
Change screen orientation with AMX  9 
Change network settings in your AMX player  14 
Delete temporary files in players AMX  16 
Synchronizing two or more AMX players  18 
 
 
AMX Tutorial PosterDigital 2
AMX (supported models)
 
ISP-SPX-1000  ISP-SPX-1300 


AMX Tutorial PosterDigital 3
AMX player installation
• Connection:
Connect the AC power cable.
Connect the player to a screen with a VGA or HDMI video cable.
Connect the player to your network with an RJ45 network cable.
• First launch:
To configure your AMX player, use a computer connected to the same LAN as the
player.
Turn on the AMX player and wait for the initial screen to load.
Hold down the blue button on the back of the player for a couple seconds until you
see a box on the screen with the IP address.
AMX Tutorial PosterDigital 4
There are two ways to access the web interface for managing your player:
1) Enter the player’s IP address in your internet browser (four sets of
numbers separated by periods: xxx.xx.x.xx), or
2) Enter the following URL, substituting “SERIAL_NUMBER” for the
serial number specified on your player:
“​http://spx-hmp-NUMERO_DE_SERIE.local”
• Configuration:
In the ​Administration​menu, select the option ​Content Settings​.
Select the tab ​Pull Mode​.
Select the option ​From remote iCalendar file (ICS)​.
Enter the following URL in the field titled ​Schedule URL​, substituting
“PROJECT_NAME” with the name of your project:
“http://PROJECT_NAME.posterdigitalhq.com/autoconf/project.ics”
Choose an interval in the field titled ​Check calendar every:​(example: 5 min). This
will define how often the player checks the server to determine if there are any
changes in the content programming.
AMX Tutorial PosterDigital 5
• Screen configuration:
In the ​Administration​menu, select ​Display Settings​.
Select the ​Display​tab.
Choose the screen resolution.
Select the screen orientation (vertical/horizontal).
Finally, press the ​Apply​button to add the screen to the system.
AMX Tutorial PosterDigital 6
Open ports in your AMX player
 
If you’ve installed your AMX player, we recommend that you set ports 80, 81, and
1234 as open ports.
With these ports open, the system administrator can do a variety of things to improve
the control of your player:
● Web interface (direct access to player).
● View log (registry that lets you see possible errors).
AMX Tutorial PosterDigital 7
● Reboot (turns the player off and back on).
● Reload (loads programmed content and starts it from the beginning).
 
AMX Tutorial PosterDigital 8
Change screen orientation with AMX
 
You can change the orientation of the player to use either a vertical or horizontal
screen. Just follow these steps:
Step 1:
Hold down the blue button on the back of the player for a couple seconds until you
see a box on the screen with the IP address.
Step 2:
Using a computer connected to the same LAN as the player, enter the AMX IP address
in your internet browser to access the screen configuration.
AMX Tutorial PosterDigital 9
Step 3:
A menu will appear on the left side of the screen. In the ​Administration​section,
select ​Display Settings​.
Step 4:
In the section titled ​Screen orientation​, you’ll see a dropdown menu where you can
select the appropriate option for your screen and content.
Step 5:
Once you’ve selected the orientation, press the ​Apply​button. The player is now
configured to the option you selected.
AMX Tutorial PosterDigital 10
Remember: the orientation has to be same in the configuration of your player and of
your PosterDigital project. After setting the orientation in your player, follow these
steps to set the orientation in your PosterDigital project:
Step 1:
Go to the main page of your project with this URL, substituting “PROJECT_NAME”
with the actual name of your project:
http://TU_PROYECTO.posterdigitalhq.com/main.php
Step 2:
Select ​Screens​from the menu on the left.
You will see a new page with the screens included in your project.
AMX Tutorial PosterDigital 11
Step 3:
Click the name of the screen that you want to check. You’ll see the current
orientation in the screen details. To change the orientation, click ​Edit​at the top of
the screen.
Step 4:
To make changes, enter the serial number of the player in the field titled ​Serial
Number​.
AMX Tutorial PosterDigital 12
Step 5:
In the section titled ​Type​, open the dropdown menu and select the orientation.
Step 6:
Once you’ve selected the orientation, press ​Save​. The screen orientation in your
PosterDigital project is now changed.
AMX Tutorial PosterDigital 13
Change network settings in your AMX player
Using a computer connected to the same LAN as the player, follow these steps:
Step 1:
Turn on the AMX player and wait for the initial screen to load.
Step 2:
Hold down the blue button on the back of the player for a couple seconds until you
see a box on the screen with the IP address.
Step 3:
Enter the player’s IP address in your internet browser (four sets of numbers separated
by periods: xxx.xx.x.xx) to access the web interface and manage your player.
AMX Tutorial PosterDigital 14
Step 4:
In the ​Administration​menu, select ​Network Settings​.
Step 5:
In the ​Connections​tab, you can edit your network information: ​IP address, Netmask,
Gateway​, and ​DNS​. If you select the option ​DHCP​, the player will automatically
generate an IP address.
AMX Tutorial PosterDigital 15
Delete temporary files in players AMX
This option allows you to delete the temporary files from your player; the player will
reload the content from the server.
Using a computer connected to the same LAN as the player, follow these steps:
Step 1:
Turn on the AMX player and wait for the initial screen to load.
Step 2:
Hold down the blue button on the back of the player for a couple seconds until you
see a box on the screen with the IP address.
Step 3:
Enter the player’s IP address in your internet browser (four sets of numbers separated
by periods: xxx.xx.x.xx) to access the web interface and manage your player.
AMX Tutorial PosterDigital 16
Step 4:
In the ​Administration​menu, select the option ​Maintenance​.
Step 5:
Select the ​Advanced​tab and press the ​Clear Cache​button.
The player will delete the temporary files in the cache and then reboot. This process
may take several minutes.
AMX Tutorial PosterDigital 17
Synchronizing two or more AMX players
Follow these steps to sync two or more AMX players:
Step 1:
First, set one of your AMX players as an NTP server. The player you set as server is the
“​Master​” and all the rest are “​Slaves​”.
Step 2:
Configure a AMX as the ​Master​player:
a. Hold down the blue button on the back of the player for a couple
seconds until you see a box on the screen with the IP address.
b. Enter the player’s IP address in your internet browser (four sets of
numbers separated by periods: xxx.xx.x.xx) to access the web
interface and manage your player.
c. In the ​Administration​menu, select the option ​Date/Time​.
AMX Tutorial PosterDigital 18
d. Go to the ​Time Source​tab.
e. Erase the content that appears by default (“pool.ntp.org”) in all
the ​Server​fields.
AMX Tutorial PosterDigital 19
f. Enter the IP address of the AMX players that you want to
synchronize, and select the option ​Monitor only​next to each one.
g. Next to ​Pause device at startup…​, select 0 s in the dropdown
menu as shown in the image.
AMX Tutorial PosterDigital 20
h. Finally, press the ​Apply​button and wait a few minutes while the
settings are saved. The player will then automatically restart.
Step 3:
Configuring AMX players as ​Slaves​:
a. Access the web interface of the player you want to use as ​Master​.
b. Hold down the blue button on the back of the player for a couple
seconds until you see a box on the screen with the IP address.
c. Enter the player’s IP address in your internet browser (four sets of
numbers separated by periods: xxx.xx.x.xx) to access the web interface
and manage your player.
AMX Tutorial PosterDigital 21
d. In the ​Administration​menu, select the option ​Date/Time​.
e. Go to the ​Time Source​tab.
AMX Tutorial PosterDigital 22
f. Erase the content that appears by default (“pool.ntp.org”) in all the
Server​fields.
g. Enter the IP address of the AMX players that you want to synchronize,
and unselect the option ​Monitor only​.
AMX Tutorial PosterDigital 23
h. Next to ​Pause device at startup…​, select 90 s in the dropdown menu as
shown in the image.
Finally, press the ​Apply​button and wait a few minutes while the settings are saved.
The player will then automatically restart.
Once the players have restarted, they will all be synchonized. 
AMX Tutorial PosterDigital 24

PosterDigital AMX Tutorial: How to connect your AMX player

  • 1.
  • 2.
      AMX (supported models)  3  AMX player installation  4  Open ports in your AMX player 7  Change screen orientation with AMX  9  Change network settings in your AMX player  14  Delete temporary files in players AMX  16  Synchronizing two or more AMX players  18      AMX Tutorial PosterDigital 2
  • 3.
    AMX (supported models)   ISP-SPX-1000 ISP-SPX-1300                                              AMX Tutorial PosterDigital 3
  • 4.
    AMX player installation •Connection: Connect the AC power cable. Connect the player to a screen with a VGA or HDMI video cable. Connect the player to your network with an RJ45 network cable. • First launch: To configure your AMX player, use a computer connected to the same LAN as the player. Turn on the AMX player and wait for the initial screen to load. Hold down the blue button on the back of the player for a couple seconds until you see a box on the screen with the IP address. AMX Tutorial PosterDigital 4
  • 5.
    There are twoways to access the web interface for managing your player: 1) Enter the player’s IP address in your internet browser (four sets of numbers separated by periods: xxx.xx.x.xx), or 2) Enter the following URL, substituting “SERIAL_NUMBER” for the serial number specified on your player: “​http://spx-hmp-NUMERO_DE_SERIE.local” • Configuration: In the ​Administration​menu, select the option ​Content Settings​. Select the tab ​Pull Mode​. Select the option ​From remote iCalendar file (ICS)​. Enter the following URL in the field titled ​Schedule URL​, substituting “PROJECT_NAME” with the name of your project: “http://PROJECT_NAME.posterdigitalhq.com/autoconf/project.ics” Choose an interval in the field titled ​Check calendar every:​(example: 5 min). This will define how often the player checks the server to determine if there are any changes in the content programming. AMX Tutorial PosterDigital 5
  • 6.
    • Screen configuration: Inthe ​Administration​menu, select ​Display Settings​. Select the ​Display​tab. Choose the screen resolution. Select the screen orientation (vertical/horizontal). Finally, press the ​Apply​button to add the screen to the system. AMX Tutorial PosterDigital 6
  • 7.
    Open ports inyour AMX player   If you’ve installed your AMX player, we recommend that you set ports 80, 81, and 1234 as open ports. With these ports open, the system administrator can do a variety of things to improve the control of your player: ● Web interface (direct access to player). ● View log (registry that lets you see possible errors). AMX Tutorial PosterDigital 7
  • 8.
    ● Reboot (turnsthe player off and back on). ● Reload (loads programmed content and starts it from the beginning).   AMX Tutorial PosterDigital 8
  • 9.
    Change screen orientationwith AMX   You can change the orientation of the player to use either a vertical or horizontal screen. Just follow these steps: Step 1: Hold down the blue button on the back of the player for a couple seconds until you see a box on the screen with the IP address. Step 2: Using a computer connected to the same LAN as the player, enter the AMX IP address in your internet browser to access the screen configuration. AMX Tutorial PosterDigital 9
  • 10.
    Step 3: A menuwill appear on the left side of the screen. In the ​Administration​section, select ​Display Settings​. Step 4: In the section titled ​Screen orientation​, you’ll see a dropdown menu where you can select the appropriate option for your screen and content. Step 5: Once you’ve selected the orientation, press the ​Apply​button. The player is now configured to the option you selected. AMX Tutorial PosterDigital 10
  • 11.
    Remember: the orientationhas to be same in the configuration of your player and of your PosterDigital project. After setting the orientation in your player, follow these steps to set the orientation in your PosterDigital project: Step 1: Go to the main page of your project with this URL, substituting “PROJECT_NAME” with the actual name of your project: http://TU_PROYECTO.posterdigitalhq.com/main.php Step 2: Select ​Screens​from the menu on the left. You will see a new page with the screens included in your project. AMX Tutorial PosterDigital 11
  • 12.
    Step 3: Click thename of the screen that you want to check. You’ll see the current orientation in the screen details. To change the orientation, click ​Edit​at the top of the screen. Step 4: To make changes, enter the serial number of the player in the field titled ​Serial Number​. AMX Tutorial PosterDigital 12
  • 13.
    Step 5: In thesection titled ​Type​, open the dropdown menu and select the orientation. Step 6: Once you’ve selected the orientation, press ​Save​. The screen orientation in your PosterDigital project is now changed. AMX Tutorial PosterDigital 13
  • 14.
    Change network settingsin your AMX player Using a computer connected to the same LAN as the player, follow these steps: Step 1: Turn on the AMX player and wait for the initial screen to load. Step 2: Hold down the blue button on the back of the player for a couple seconds until you see a box on the screen with the IP address. Step 3: Enter the player’s IP address in your internet browser (four sets of numbers separated by periods: xxx.xx.x.xx) to access the web interface and manage your player. AMX Tutorial PosterDigital 14
  • 15.
    Step 4: In the​Administration​menu, select ​Network Settings​. Step 5: In the ​Connections​tab, you can edit your network information: ​IP address, Netmask, Gateway​, and ​DNS​. If you select the option ​DHCP​, the player will automatically generate an IP address. AMX Tutorial PosterDigital 15
  • 16.
    Delete temporary filesin players AMX This option allows you to delete the temporary files from your player; the player will reload the content from the server. Using a computer connected to the same LAN as the player, follow these steps: Step 1: Turn on the AMX player and wait for the initial screen to load. Step 2: Hold down the blue button on the back of the player for a couple seconds until you see a box on the screen with the IP address. Step 3: Enter the player’s IP address in your internet browser (four sets of numbers separated by periods: xxx.xx.x.xx) to access the web interface and manage your player. AMX Tutorial PosterDigital 16
  • 17.
    Step 4: In the​Administration​menu, select the option ​Maintenance​. Step 5: Select the ​Advanced​tab and press the ​Clear Cache​button. The player will delete the temporary files in the cache and then reboot. This process may take several minutes. AMX Tutorial PosterDigital 17
  • 18.
    Synchronizing two ormore AMX players Follow these steps to sync two or more AMX players: Step 1: First, set one of your AMX players as an NTP server. The player you set as server is the “​Master​” and all the rest are “​Slaves​”. Step 2: Configure a AMX as the ​Master​player: a. Hold down the blue button on the back of the player for a couple seconds until you see a box on the screen with the IP address. b. Enter the player’s IP address in your internet browser (four sets of numbers separated by periods: xxx.xx.x.xx) to access the web interface and manage your player. c. In the ​Administration​menu, select the option ​Date/Time​. AMX Tutorial PosterDigital 18
  • 19.
    d. Go tothe ​Time Source​tab. e. Erase the content that appears by default (“pool.ntp.org”) in all the ​Server​fields. AMX Tutorial PosterDigital 19
  • 20.
    f. Enter theIP address of the AMX players that you want to synchronize, and select the option ​Monitor only​next to each one. g. Next to ​Pause device at startup…​, select 0 s in the dropdown menu as shown in the image. AMX Tutorial PosterDigital 20
  • 21.
    h. Finally, pressthe ​Apply​button and wait a few minutes while the settings are saved. The player will then automatically restart. Step 3: Configuring AMX players as ​Slaves​: a. Access the web interface of the player you want to use as ​Master​. b. Hold down the blue button on the back of the player for a couple seconds until you see a box on the screen with the IP address. c. Enter the player’s IP address in your internet browser (four sets of numbers separated by periods: xxx.xx.x.xx) to access the web interface and manage your player. AMX Tutorial PosterDigital 21
  • 22.
    d. In the​Administration​menu, select the option ​Date/Time​. e. Go to the ​Time Source​tab. AMX Tutorial PosterDigital 22
  • 23.
    f. Erase thecontent that appears by default (“pool.ntp.org”) in all the Server​fields. g. Enter the IP address of the AMX players that you want to synchronize, and unselect the option ​Monitor only​. AMX Tutorial PosterDigital 23
  • 24.
    h. Next to​Pause device at startup…​, select 90 s in the dropdown menu as shown in the image. Finally, press the ​Apply​button and wait a few minutes while the settings are saved. The player will then automatically restart. Once the players have restarted, they will all be synchonized.  AMX Tutorial PosterDigital 24