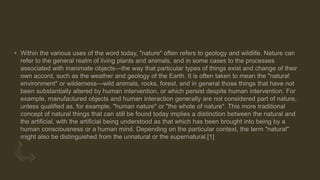
This presentation you can know more about nature and use this for school reasons this was made by joseph benny arakkal i think this is a perfect presentation for nature childrens can use this teachers can use this contact me thru my mail jbaluva@gmail.com to get more power points i had made more i can make you a custom for free hope you liked my power point
4. 30 things in Nature
1. Animal Tracks
2. Berries on bushes or trees
3. Fruit from trees
4. Nuts from trees
5. Fallen leaves to determine types of trees in the area
6. Moss on logs, rocks and in shady areas
7. Local common snakes (wear long pants, boots and never disturb)
8. Insects
9. Arachnids (spiders)
10.Animal homes, holes in the ground or obvious dens (don’t disturb,just observe)
5. 1.Natural or man-made caves or dwellings
2.Creek beds and rivers
3.Different types of rocks and minerals
4.Rock formations
5.Wildflower species
6.Trails from humans or animals
7.Carcass or remains of animals
8.Animal droppings
9.Antlers from deer
10.Various types of spiderwebs
6. 1.Wild turkeys
2.Wild hogs
3.Different species of birds
4.Lizards
5.Markings on trees from deer or bears
6.Evidence of fire (from wildfire or humans building campfires)
7.Cocoons from moths
8.Naturally growing mushrooms
9.Butterfly chrysalis
10.Ant hills
7. Which way can people destroy Nature
• Land-use change: Humans may destroy natural landscapes as they mine resources and
urbanize areas. This is detrimental, as it displaces residing species, reducing available habitats
and food sources.
• Pollution: Pollution can occur from the runoff or disposal of chemical substances, or from
energy sources (noise and light pollution).
•
Introduced species: Humans may unintentionally, or intentionally, introduce a non-native
species into an ecosystem. This can negatively affect an ecosystem because the introduced
species may outcompete native organisms and displace them.
• Resource exploitation: Humans consume large amounts of resources for their own needs.
Some examples include the mining of natural resources like coal, the hunting and fishing of
animals for food, and the clearing of forests for urbanization and wood use.
8. 10 simple ways to save Nature
• Reduce, reuse, and recycle. Cut down on what you throw away. Follow the three "R's" to conserve
natural resources and landfill space.
• Volunteer. Volunteer for cleanups in your community. You can get involved in protecting your
watershed, too.
• Educate. When you further your own education, you can help others understand the importance and
value of our natural resources.
• Conserve water. The less water you use, the less runoff and wastewater that eventually end up in the
ocean.
• Choose sustainable. Shop wisely. Buy less plastic and bring a reusable shopping bag.
• Use long-lasting light bulbs. Energy efficient light bulbs reduce greenhouse gas emissions. Also flip
the light switch off when you leave the room!
• Plant a tree. Trees provide food and oxygen. They help save energy, clean the air, and help combat
climate change.
• Don't send chemicals into our waterways. Choose non-toxic chemicals in the home and office.
9. How to plant a tree Step-1
• 1. Prepare the proper planting hole. When preparing any hole for planting, make it three times
wider than the current root mass but never deeper than the plant was growing in its previous
environment.
• An even better guide with trees is to look for the flare of the trunk near the soil level. Don’t place
the tree in the planting hole so deep that any part of that flare is covered with soil. The truth is,
even nurseries sometimes put plants in containers too deeply. There have been many times
where I’ve actually had to pull away soil to find the base of the trunk flare and true surface roots.
Make a habit of checking this.
10. Step 2
• 2. Plant high. I go even one step further by placing trees and shrubs
in their new environment with up to 25% of the root ball higher than
the surrounding soil level. I then taper soil up to cover all the roots
and add a generous layer of mulch above that. Newly disturbed soil
tends to settle and shrubs and trees planted at grade can quickly
settle below grade and succumb to root rot or disease.
• In my book, it’s always better to plant a tree or shrub slightly high
and allow the area to drain away rather than for a plant to sit in a
bowl and collect excess water.
11. Step 3
• 3. Inspect the roots and disturb when necessary. Once the plant is out of its container, look at
the roots. If they are densely bound in a circular pattern or have started growing in the shape of
the container (even slightly), break up the pattern.
• It’s vitally important to stop this pattern now. The biggest mistake you can make at this point is to
place a rootbound plant into the ground as is. Unless you break up the pattern, you’ve likely
sentenced the plant to a slow death. At a minimum, it will likely never establish or reach a
fraction of its potential.
• Don’t worry about hurting the roots or losing soil as you break the roots apart or even cut some
away. Better to give them a fresh start than allow the constrictive pattern to only get worse below
ground. While you don’t want to be any rougher than necessary, do what you must to arrest the
pattern.
• I often scratch my fingers across the sides and bottom of the root mass in mild cases. In more
severe situations, I’ll slice up the roots vertically with a pruning saw, hack off the bottom inch or
so, and or pull apart the root mass to clearly create new opportunities for non-circular new root
12. Step 4
• 4. Don’t amend the soil. Contrary to traditional planting methods, contemporary
research indicates that you should not amend the hole with additional organic
material (unless you intend to amend the entire area where roots will eventually
grow). Roots growing in amended soil rarely venture into harder native soil. The
long-term affect is a smaller root system, reduced growth and a less hardy plant.
• Instead, simply break up the clumps in existing soil, remove the rocks and
backfill. Studies show plant roots growing in only the native soil actually did a
better job at establishing and expanding beyond the original hole.
13. Step 5
• 5. Eliminate air pockets. While you could lightly tamp or
hand-pack the soil around the plant roots to ensure good
soil-to-root contact, I prefer to add a stiff spray of water to
the hole after backfilling halfway. Not only does it provide
needed moisture, but the water also helps eliminate air
pockets that could otherwise result in dead roots or worse
(without compacting the soil too much). Finally, water again
gently but thoroughly once all the soil is in place.
14. Step 6
• 6. Add mulch. Starting about two inches from the trunk
(leave this area exposed), place roughly two inches of
organic matter such as shredded leaves, or ground bark or
nuggets around the plant, at least out to the drip line.
Further is better. Mulch helps retain much-needed moisture
and helps keep roots cooler near the surface—a very
important requirement for newly installed plants.
15. Step 7
• Water Properly Until Established. The most important job you will have after planting is to
keep plants and trees well watered until established. This can take weeks to months, to even a
year or more in some cases. But don’t worry. You can put this part of the process on auto-pilot.
(I’ll tell you how below.)
• The key to proper watering and establishment is slow and deep irrigation. It’s not practical to do
that by hand. The only way to establish trees properly through irrigation is with soaker hoses or
drip irrigation.
• The slow and deep irrigation allows the soil around the roots to saturate, so the roots have time
to absorb the moisture, while avoiding excess runoff. Short, manual blasts of water from an
overhead hose or sprinkler system simply don’t come close to providing the same effectiveness
for water delivery.