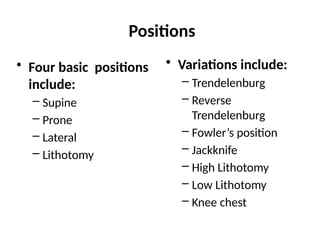
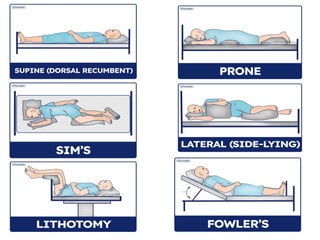
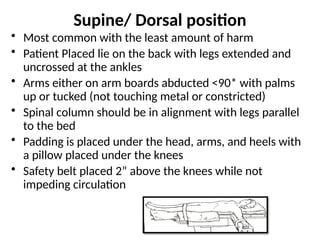
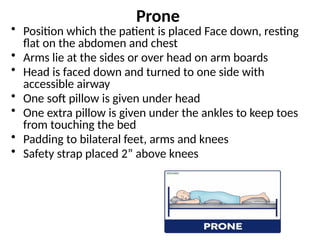
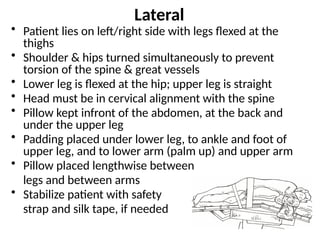
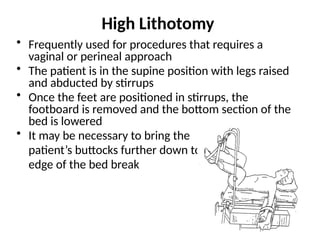
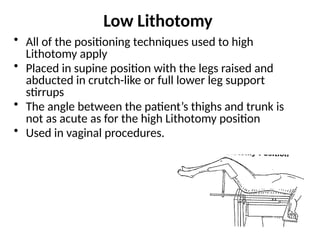
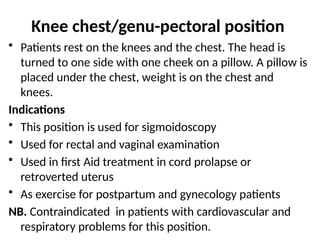
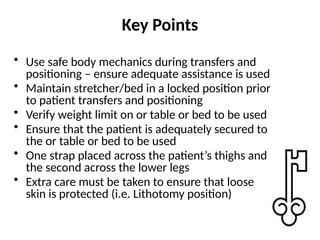
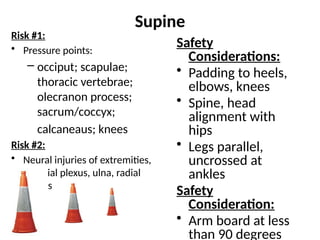
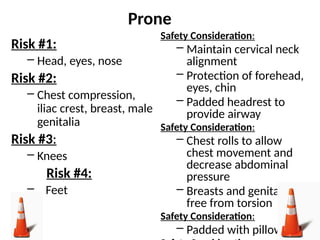
PATIENT
POSITIONING
Definition
• Positioning is defined as placing the patient in such a
way to perform therapeutic interventions to promote
the health of an individual.
• Positioning is also defined as placing the person in a
proper body alignment for the purpose of preventive,
promotive, curative and rehabilitative aspect of
health.
Purpose of positioning
• To promote comfort to the patient
• To relieve pressure on various parts
• To improve circulation
• To prevent formation of deformity
• To carryout investigations
• To perform surgical and medical investigations
• To prevent pressure sores
• To provide proper body alignment
• To conduct delivery/labor
• To carryout nursing interventions
Principles of positioning
• Systematic and orderly way of doing
• Cooperation between the two
• Follow safety measures to prevent accidents
• Active participation
• Using a right technique at the right time
• Ensure patients’ comfort
Factors involved in positioning
• Need of an individual
• Self care ability
• Extend of disability
• Nature of disease condition
• Level of consciousness
• Protocol of the hospital
Positions
• Four basic positions
include:
– Supine
– Prone
– Lateral
– Lithotomy
• Variations include:
– Trendelenburg
– Reverse
Trendelenburg
– Fowler’s position
– Jackknife
– High Lithotomy
– Low Lithotomy
– Knee chest
Type of patients who need special care
• Unconscious patient
• Infant and children
• Hemiplegic and paraplegic patients
• Immediate postoperative patients
• Orthopedic patients
• Cardiac patients
General instructions
• Maintain good body alignment of the patient at all
times
• Support body parts in good alignment by using the
supportive devices to promote comfort and prevent
muscle strain
• Avoid prolonged flexion of any one body segment by
changing the position at every two hours
• Reduce pressure caused by body weight of his or her
body or object by changing the position and using
protective devices
Preliminary Assessment
• Check the patient’s general condition
• Check the physicians order for any limited movements
• Assess the self care ability of an individual
• Arrange the comfort devices near the bedside
• Identify the deformed extremity
• Support and immobilize area during positioning
Equipment
• Extra man power if needed
• Extra pillows
• Sheets and sheet rolls
• Comfort devices such as backrest, cardiac table,
sandbags
Procedure
• Explain the procedure to the patient
• Provide privacy
• Arrange the articles and man power
• Untie the bed sheets
• Turn / lift / ambulate gently
• Place and support with extra pillows under pressure
points
• Special care taken at the pressure areas
• Cover the patient with top sheet
• Hand wash
• Record the time, position and condition of the skin
Supine/ Dorsal position
• Most common with the least amount of harm
• Patient Placed lie on the back with legs extended and
uncrossed at the ankles
• Arms either on arm boards abducted <90* with palms
up or tucked (not touching metal or constricted)
• Spinal column should be in alignment with legs parallel
to the bed
• Padding is placed under the head, arms, and heels with
a pillow placed under the knees
• Safety belt placed 2” above the knees while not
impeding circulation
Indications & contraindications for
supine position
Indications
• The usual positions used by the patient
• Used for examination of the chest and abdomen
• Patients with operations on the abdomen, chest and
thorax
Contraindications
Elderly patients
Prone hypostatic pneumonia
Patients with long standing illness and neurological
conditions
Dorsal Recumbent
• Patient lies on his back, knees fully flexed, thighs flexed
and externally rotated feet flat on the bed
Indications
• Used for catheterization,vaginal douche,vulval, vaginal
and rectal examination
• For vaginal operations and insertion of tampons
• Patients with chest conditions
• Patients with abdominal or pelvic operations unless
erect sitting position is indicated
• Patients with gastric conditions
• Patients who are in convalescent period
Procedure
• Place the patient on the back with two or more
pillows under the head and one pillow under the
knees or maintain his position by elevating the top of
bed with blocks.
• Place the air ring under the hips and cotton rings or
form pads under the heels to reduce the pressure
• Align the patients body in good position
• Support the body parts in good alignment when the
patient is paralyzed
Prone
• Position which the patient is placed Face down, resting
flat on the abdomen and chest
• Arms lie at the sides or over head on arm boards
• Head is faced down and turned to one side with
accessible airway
• One soft pillow is given under head
• One extra pillow is given under the ankles to keep toes
from touching the bed
• Padding to bilateral feet, arms and knees
• Safety strap placed 2” above knees
Indication for prone position
• This position is used postoperatively to prevent
aspiration of saliva and mucus
• Used in postoperative cases, tonsils, vesicovaginal
fistula and spinal cases
• To prevent bedsores
• To release abdominal distension
• Used for patients having injuries and burns on the back
Contraindication
Position is Not well tolerated by the elderly or patients
with cardiovascular or respiratory problems
Procedure
• Explain the procedure to the patient
• Provide privacy
• Place the patient flat on abdomen with one pillow
under the head
• Turn patients head to one side and align the patient
in good position
• Support the body parts in good alignment for
comfort
• Place both arms lies at the sides of the heads
Lateral
• Patient lies on left/right side with legs flexed at the
thighs
• Shoulder & hips turned simultaneously to prevent
torsion of the spine & great vessels
• Lower leg is flexed at the hip; upper leg is straight
• Head must be in cervical alignment with the spine
• Pillow kept infront of the abdomen, at the back and
under the upper leg
• Padding placed under lower leg, to ankle and foot of
upper leg, and to lower arm (palm up) and upper arm
• Pillow placed lengthwise between
legs and between arms
• Stabilize patient with safety
strap and silk tape, if needed
Indications
• Lateral position is used for giving back the enemas
and colonic irrigation
• Used for examination of perineum or rectum
inserting suppositories
• For taking rectal temperature
• For change of position
• Lateral position is a relaxing position
• Giving back care
Sims' position/semi-prone/Recovery
• Sims position is similar to the lateral position except that
the patients weight is on the anterior aspect of the
patient’s shoulder girdle and hip.
• The patients lower arm is behind him and the upper arm
is flexed at the shoulder and Elbow.
Indications
• Used for unconscious patients
• Used for rectal examination
• Used for vaginal examination
• Used for relaxation in antenatal exercises
Contraindications. Contraindicated in pts with deformities
of the hip or knee maybe unable to assume this position
Procedure
• Explain the procedure to the patient
• Collect articles needed at the bedside
• Provide privacy
• Place the patient on the sides
• One pillow is placed under the head with the left cheek
resting on it
• The left arm is drawn behind the body and the right arm
may be in any position comfortable for the position
• The right thigh is flexed against the abdomen
• The left leg is extended well
• Cover the patient with the top sheet neatly
Advantages of the left side position
• Left side positioning is referred to by several
terms: recovery positioning, left side positioning
• Keeps the airway open in unresponsive
breathing victim without spinal cord injury
• It protects the lungs from aspiration should
vomiting occur
• It delays vomiting by placing the oesophagus
above the stomach
• It delays poison effects by retaining the poison in
the stomach(the pyloric sphincter is kept straight
up). A poison can be better dealt within the
stomach than in the small intestines
• It relieves pressure on a pregnant woman’s vena
cava(the body’s largest vein. Many women will
pass out or at least feel dizzy if they lie supine( on
their backs) because of reduced blood flow
Trendelenburg
• The patient is placed in the supine position while the
bed is modified to a head-down tilt of 35 to 45 degrees,
the head being lower than the pelvis
• In addition to a safety strap, strips of 3” tape may be
used to assist with holding the patient in the position
• Used for procedures in the lower abdomen or pelvis
Reverse Trendelenburg
• The bed is tilted so the head is higher than the feet
• Used for head and neck procedures
• Facilitates exposure, aids in breathing and decreases
blood supply to the area
• A padded footboard is used to prevent the patient
from sliding toward the foot
Fowler’s Position
(Sitting/Lawnchair/Beachchair)
• Foot of the bed is lowered, flexing the knees, while the
body section is raised to 35 – 45 degree. Backrest and
two pillows are used for the back and head
• Feet rest against a padded footboard
• Arms are crossed loosely over
the abdomen and placed on
a pillow on the patient’s lap
• A pillow is placed under the knees.
• For cranial procedures, the head is
supported in a head rest and/or
with sterile tongs
Indications
Flowler’s position the main weight bearing areas of the
head are the heels, sacrum and posterior aspects of the
ileum.
• To relieve dyspnea
• To improve circulation
• To prevent thrombosis
• Postoperatively to assist drainage from abdominal or
pelvic cavity
• To relax muscles of the abdomen, back and thighs
• To promote comfort
• To relieve edema of the chest and abdomen
• To localize infection
Procedure
• Explain the procedure to the patient
• Arrange the articles as needed at the bed side
• Provide privacy
• Place the patient in a sitting up position with arms at
the sides and knees raised with pillow
• Maintain the position; elevate the head of the bed to
an angle of 45-60 degree angle(semi-fowler) or 60-90
degree angle (High–fowler)
• Elevate the knee rest to an angle of 15 degree or
place a small pillow under the knees
Jackknife
• Modification of the prone position
• The patient is placed in the prone position on the bed
and then inverted in a V position
• Chest rolls are placed to raise the chest
• Arms are extended on angled arm boards with the
elbows flexed and the palms down
• A pillow is placed under the ankles to free the feet and
toes of pressure
• The bed leg section is
lowered, and the bed is
flexed at a 90 degree angle
• Used in gluteal and anorectal
procedures
Lithotomy
• With the patient in the supine position, the legs are
raised and abducted to expose the perineal region
• The legs and feet are placed in stirrups or straps that
support the lower extremities
• Stirrups should be placed at an even height
• Adequate padding and support for the legs/feet
should eliminate pressure on joints and nervus plexus
• The position must be symmetrical
High Lithotomy
• Frequently used for procedures that requires a
vaginal or perineal approach
• The patient is in the supine position with legs raised
and abducted by stirrups
• Once the feet are positioned in stirrups, the
footboard is removed and the bottom section of the
bed is lowered
• It may be necessary to bring the
patient’s buttocks further down to the
edge of the bed break
Low Lithotomy
• All of the positioning techniques used to high
Lithotomy apply
• Placed in supine position with the legs raised and
abducted in crutch-like or full lower leg support
stirrups
• The angle between the patient’s thighs and trunk is
not as acute as for the high Lithotomy position
• Used in vaginal procedures.
Knee chest/genu-pectoral position
• Patients rest on the knees and the chest. The head is
turned to one side with one cheek on a pillow. A pillow is
placed under the chest, weight is on the chest and
knees.
Indications
• This position is used for sigmoidoscopy
• Used for rectal and vaginal examination
• Used in first Aid treatment in cord prolapse or
retroverted uterus
• As exercise for postpartum and gynecology patients
NB. Contraindicated in patients with cardiovascular and
respiratory problems for this position.
Procedure
• Explain the procedure to the patient
• Collect the needed articles at the bedside
• Provide privacy
• Make the patient rest on the knees and chest
• The head is turned to one side with the cheek on the
pillow
• The arms should be extended on the bed and flexed at
the elbows to support the patient partially.
• The weight should rest on the chest and knees which
are flexed so that the thighs are at right angles to the
legs.
Safety Considerations
Key Points
• Use safe body mechanics during transfers and
positioning – ensure adequate assistance is used
• Maintain stretcher/bed in a locked position prior
to patient transfers and positioning
• Verify weight limit on or table or bed to be used
• Ensure that the patient is adequately secured to
the or table or bed to be used
• One strap placed across the patient’s thighs and
the second across the lower legs
• Extra care must be taken to ensure that loose
skin is protected (i.e. Lithotomy position)
Supine
Risk #1:
• Pressure points:
– occiput; scapulae;
thoracic vertebrae;
olecranon process;
sacrum/coccyx;
calcaneaus; knees
Risk #2:
• Neural injuries of extremities,
brachial plexus, ulna, radial
nerves
Safety
Considerations:
• Padding to heels,
elbows, knees
• Spine, head
alignment with
hips
• Legs parallel,
uncrossed at
ankles
Safety
Consideration:
• Arm board at less
than 90 degrees
Prone
Risk #1:
– Head, eyes, nose
Risk #2:
– Chest compression,
iliac crest, breast, male
genitalia
Risk #3:
– Knees
Risk #4:
– Feet
Safety Consideration:
– Maintain cervical neck
alignment
– Protection of forehead,
eyes, chin
– Padded headrest to
provide airway
Safety Consideration:
– Chest rolls to allow
chest movement and
decrease abdominal
pressure
– Breasts and genitalia
free from torsion
Safety Consideration:
– Padded with pillows
Lateral
Risk #1:
– Bony prominences
and pressure points
on dependent side
Risk #2:
– Spinal alignment
Safety Consideration:
– Axillary roll for
dependent axilla
– Lower leg flexed at hip
– Upper leg straight with
pillow between legs
– Padding between
knees, ankles and feet
Safety Consideration:
– Maintain spinal
alignment during
turning
– Padded support to
prevent lateral neck
flexion
Lithotomy
Risk #1:
– Hip/knee joint injury
– Lumbar/sacral
pressure
– Vascular congestion
Risk #2:
– Neuropathy of
obturator nerves,
femoral nerves,
common peroneal
nerves/ulnar nerves
Risk #3:
– Restricted
diaphragmatic
movement
Safety Consideration:
– Place stirrups at even
height
– Elevate lower legs slowly
and simultaneously
from stirrups
Safety Consideration:
– Maintain minimal
external hip rotation
– Pad lateral or posterior
knees/ankles to prevent
pressure and contact
with metal surface
Safety Consideration:
– Keep arms away from
chest to facilitate
Conclusion
• Positions used for the comfort are one of the important
aspects in nursing intervention. Nurses caring for client in
many setting and situations can adapt various
comfortable positions, to provide them a comfortable
stay. Different positions are used for physical
examinations so that the body parts are accessible and
clients stay is comfortable .
• Patient’s ability to assume positions depends upon their
physical strength and degrees of wellness. Their privacy
should be kept as the top priority while doing physical
examination as it will keep them at ease and provide
greater accessibility and accuracy in accessing body parts.
Documentation
• Documentation should include:
– Preoperative assessments
– Type and location of positioning and/or padding
devices
– Names and titles of persons positioning the patient
– Intra-operative positioning changes
– Postoperative outcome evaluation
• Documentation includes nursing assessments and
interventions
• Documenting nursing activities provides an accurate
picture of the nursing care provided as well as the
outcomes of the care delivered
• Document all of your findings
Don’t Forget:
• Good positioning starts with an assessment
• Prevent team members from leaning against patients
• Cushioning of all pressure points is a priority - the correct use of
padding can protect the patient
• Procedures longer than 2 ½ to 3 hours significantly increase the
risk of pressure ulcer formation
• During a longer procedure, you should assist with shifting the
patient, adjusting the table, or adding/removing a positioning
device
• The nurse must assess extremities at regular intervals for signs of
circulatory compromise
• Documentation of the positioning process should be performed
accurately and completely
One last note…
Positioning problems can result
in significant injuries and
successful lawsuits.

7. Patient Positioning_043334.pptx. f

  • 1.
  • 2.
    Definition • Positioning isdefined as placing the patient in such a way to perform therapeutic interventions to promote the health of an individual. • Positioning is also defined as placing the person in a proper body alignment for the purpose of preventive, promotive, curative and rehabilitative aspect of health.
  • 3.
    Purpose of positioning •To promote comfort to the patient • To relieve pressure on various parts • To improve circulation • To prevent formation of deformity • To carryout investigations • To perform surgical and medical investigations • To prevent pressure sores • To provide proper body alignment • To conduct delivery/labor • To carryout nursing interventions
  • 4.
    Principles of positioning •Systematic and orderly way of doing • Cooperation between the two • Follow safety measures to prevent accidents • Active participation • Using a right technique at the right time • Ensure patients’ comfort
  • 5.
    Factors involved inpositioning • Need of an individual • Self care ability • Extend of disability • Nature of disease condition • Level of consciousness • Protocol of the hospital
  • 6.
    Positions • Four basicpositions include: – Supine – Prone – Lateral – Lithotomy • Variations include: – Trendelenburg – Reverse Trendelenburg – Fowler’s position – Jackknife – High Lithotomy – Low Lithotomy – Knee chest
  • 8.
    Type of patientswho need special care • Unconscious patient • Infant and children • Hemiplegic and paraplegic patients • Immediate postoperative patients • Orthopedic patients • Cardiac patients
  • 9.
    General instructions • Maintaingood body alignment of the patient at all times • Support body parts in good alignment by using the supportive devices to promote comfort and prevent muscle strain • Avoid prolonged flexion of any one body segment by changing the position at every two hours • Reduce pressure caused by body weight of his or her body or object by changing the position and using protective devices
  • 10.
    Preliminary Assessment • Checkthe patient’s general condition • Check the physicians order for any limited movements • Assess the self care ability of an individual • Arrange the comfort devices near the bedside • Identify the deformed extremity • Support and immobilize area during positioning
  • 11.
    Equipment • Extra manpower if needed • Extra pillows • Sheets and sheet rolls • Comfort devices such as backrest, cardiac table, sandbags
  • 12.
    Procedure • Explain theprocedure to the patient • Provide privacy • Arrange the articles and man power • Untie the bed sheets • Turn / lift / ambulate gently • Place and support with extra pillows under pressure points • Special care taken at the pressure areas • Cover the patient with top sheet • Hand wash • Record the time, position and condition of the skin
  • 13.
    Supine/ Dorsal position •Most common with the least amount of harm • Patient Placed lie on the back with legs extended and uncrossed at the ankles • Arms either on arm boards abducted <90* with palms up or tucked (not touching metal or constricted) • Spinal column should be in alignment with legs parallel to the bed • Padding is placed under the head, arms, and heels with a pillow placed under the knees • Safety belt placed 2” above the knees while not impeding circulation
  • 14.
    Indications & contraindicationsfor supine position Indications • The usual positions used by the patient • Used for examination of the chest and abdomen • Patients with operations on the abdomen, chest and thorax Contraindications Elderly patients Prone hypostatic pneumonia Patients with long standing illness and neurological conditions
  • 15.
    Dorsal Recumbent • Patientlies on his back, knees fully flexed, thighs flexed and externally rotated feet flat on the bed Indications • Used for catheterization,vaginal douche,vulval, vaginal and rectal examination • For vaginal operations and insertion of tampons • Patients with chest conditions • Patients with abdominal or pelvic operations unless erect sitting position is indicated • Patients with gastric conditions • Patients who are in convalescent period
  • 16.
    Procedure • Place thepatient on the back with two or more pillows under the head and one pillow under the knees or maintain his position by elevating the top of bed with blocks. • Place the air ring under the hips and cotton rings or form pads under the heels to reduce the pressure • Align the patients body in good position • Support the body parts in good alignment when the patient is paralyzed
  • 17.
    Prone • Position whichthe patient is placed Face down, resting flat on the abdomen and chest • Arms lie at the sides or over head on arm boards • Head is faced down and turned to one side with accessible airway • One soft pillow is given under head • One extra pillow is given under the ankles to keep toes from touching the bed • Padding to bilateral feet, arms and knees • Safety strap placed 2” above knees
  • 18.
    Indication for proneposition • This position is used postoperatively to prevent aspiration of saliva and mucus • Used in postoperative cases, tonsils, vesicovaginal fistula and spinal cases • To prevent bedsores • To release abdominal distension • Used for patients having injuries and burns on the back Contraindication Position is Not well tolerated by the elderly or patients with cardiovascular or respiratory problems
  • 19.
    Procedure • Explain theprocedure to the patient • Provide privacy • Place the patient flat on abdomen with one pillow under the head • Turn patients head to one side and align the patient in good position • Support the body parts in good alignment for comfort • Place both arms lies at the sides of the heads
  • 20.
    Lateral • Patient lieson left/right side with legs flexed at the thighs • Shoulder & hips turned simultaneously to prevent torsion of the spine & great vessels • Lower leg is flexed at the hip; upper leg is straight • Head must be in cervical alignment with the spine • Pillow kept infront of the abdomen, at the back and under the upper leg • Padding placed under lower leg, to ankle and foot of upper leg, and to lower arm (palm up) and upper arm • Pillow placed lengthwise between legs and between arms • Stabilize patient with safety strap and silk tape, if needed
  • 21.
    Indications • Lateral positionis used for giving back the enemas and colonic irrigation • Used for examination of perineum or rectum inserting suppositories • For taking rectal temperature • For change of position • Lateral position is a relaxing position • Giving back care
  • 22.
    Sims' position/semi-prone/Recovery • Simsposition is similar to the lateral position except that the patients weight is on the anterior aspect of the patient’s shoulder girdle and hip. • The patients lower arm is behind him and the upper arm is flexed at the shoulder and Elbow. Indications • Used for unconscious patients • Used for rectal examination • Used for vaginal examination • Used for relaxation in antenatal exercises Contraindications. Contraindicated in pts with deformities of the hip or knee maybe unable to assume this position
  • 23.
    Procedure • Explain theprocedure to the patient • Collect articles needed at the bedside • Provide privacy • Place the patient on the sides • One pillow is placed under the head with the left cheek resting on it • The left arm is drawn behind the body and the right arm may be in any position comfortable for the position • The right thigh is flexed against the abdomen • The left leg is extended well • Cover the patient with the top sheet neatly
  • 25.
    Advantages of theleft side position • Left side positioning is referred to by several terms: recovery positioning, left side positioning • Keeps the airway open in unresponsive breathing victim without spinal cord injury • It protects the lungs from aspiration should vomiting occur • It delays vomiting by placing the oesophagus above the stomach
  • 26.
    • It delayspoison effects by retaining the poison in the stomach(the pyloric sphincter is kept straight up). A poison can be better dealt within the stomach than in the small intestines • It relieves pressure on a pregnant woman’s vena cava(the body’s largest vein. Many women will pass out or at least feel dizzy if they lie supine( on their backs) because of reduced blood flow
  • 27.
    Trendelenburg • The patientis placed in the supine position while the bed is modified to a head-down tilt of 35 to 45 degrees, the head being lower than the pelvis • In addition to a safety strap, strips of 3” tape may be used to assist with holding the patient in the position • Used for procedures in the lower abdomen or pelvis
  • 28.
    Reverse Trendelenburg • Thebed is tilted so the head is higher than the feet • Used for head and neck procedures • Facilitates exposure, aids in breathing and decreases blood supply to the area • A padded footboard is used to prevent the patient from sliding toward the foot
  • 29.
    Fowler’s Position (Sitting/Lawnchair/Beachchair) • Footof the bed is lowered, flexing the knees, while the body section is raised to 35 – 45 degree. Backrest and two pillows are used for the back and head • Feet rest against a padded footboard • Arms are crossed loosely over the abdomen and placed on a pillow on the patient’s lap • A pillow is placed under the knees. • For cranial procedures, the head is supported in a head rest and/or with sterile tongs
  • 30.
    Indications Flowler’s position themain weight bearing areas of the head are the heels, sacrum and posterior aspects of the ileum. • To relieve dyspnea • To improve circulation • To prevent thrombosis • Postoperatively to assist drainage from abdominal or pelvic cavity • To relax muscles of the abdomen, back and thighs • To promote comfort • To relieve edema of the chest and abdomen • To localize infection
  • 31.
    Procedure • Explain theprocedure to the patient • Arrange the articles as needed at the bed side • Provide privacy • Place the patient in a sitting up position with arms at the sides and knees raised with pillow • Maintain the position; elevate the head of the bed to an angle of 45-60 degree angle(semi-fowler) or 60-90 degree angle (High–fowler) • Elevate the knee rest to an angle of 15 degree or place a small pillow under the knees
  • 32.
    Jackknife • Modification ofthe prone position • The patient is placed in the prone position on the bed and then inverted in a V position • Chest rolls are placed to raise the chest • Arms are extended on angled arm boards with the elbows flexed and the palms down • A pillow is placed under the ankles to free the feet and toes of pressure • The bed leg section is lowered, and the bed is flexed at a 90 degree angle • Used in gluteal and anorectal procedures
  • 33.
    Lithotomy • With thepatient in the supine position, the legs are raised and abducted to expose the perineal region • The legs and feet are placed in stirrups or straps that support the lower extremities • Stirrups should be placed at an even height • Adequate padding and support for the legs/feet should eliminate pressure on joints and nervus plexus • The position must be symmetrical
  • 34.
    High Lithotomy • Frequentlyused for procedures that requires a vaginal or perineal approach • The patient is in the supine position with legs raised and abducted by stirrups • Once the feet are positioned in stirrups, the footboard is removed and the bottom section of the bed is lowered • It may be necessary to bring the patient’s buttocks further down to the edge of the bed break
  • 35.
    Low Lithotomy • Allof the positioning techniques used to high Lithotomy apply • Placed in supine position with the legs raised and abducted in crutch-like or full lower leg support stirrups • The angle between the patient’s thighs and trunk is not as acute as for the high Lithotomy position • Used in vaginal procedures.
  • 36.
    Knee chest/genu-pectoral position •Patients rest on the knees and the chest. The head is turned to one side with one cheek on a pillow. A pillow is placed under the chest, weight is on the chest and knees. Indications • This position is used for sigmoidoscopy • Used for rectal and vaginal examination • Used in first Aid treatment in cord prolapse or retroverted uterus • As exercise for postpartum and gynecology patients NB. Contraindicated in patients with cardiovascular and respiratory problems for this position.
  • 37.
    Procedure • Explain theprocedure to the patient • Collect the needed articles at the bedside • Provide privacy • Make the patient rest on the knees and chest • The head is turned to one side with the cheek on the pillow • The arms should be extended on the bed and flexed at the elbows to support the patient partially. • The weight should rest on the chest and knees which are flexed so that the thighs are at right angles to the legs.
  • 38.
  • 39.
    Key Points • Usesafe body mechanics during transfers and positioning – ensure adequate assistance is used • Maintain stretcher/bed in a locked position prior to patient transfers and positioning • Verify weight limit on or table or bed to be used • Ensure that the patient is adequately secured to the or table or bed to be used • One strap placed across the patient’s thighs and the second across the lower legs • Extra care must be taken to ensure that loose skin is protected (i.e. Lithotomy position)
  • 40.
    Supine Risk #1: • Pressurepoints: – occiput; scapulae; thoracic vertebrae; olecranon process; sacrum/coccyx; calcaneaus; knees Risk #2: • Neural injuries of extremities, brachial plexus, ulna, radial nerves Safety Considerations: • Padding to heels, elbows, knees • Spine, head alignment with hips • Legs parallel, uncrossed at ankles Safety Consideration: • Arm board at less than 90 degrees
  • 41.
    Prone Risk #1: – Head,eyes, nose Risk #2: – Chest compression, iliac crest, breast, male genitalia Risk #3: – Knees Risk #4: – Feet Safety Consideration: – Maintain cervical neck alignment – Protection of forehead, eyes, chin – Padded headrest to provide airway Safety Consideration: – Chest rolls to allow chest movement and decrease abdominal pressure – Breasts and genitalia free from torsion Safety Consideration: – Padded with pillows
  • 42.
    Lateral Risk #1: – Bonyprominences and pressure points on dependent side Risk #2: – Spinal alignment Safety Consideration: – Axillary roll for dependent axilla – Lower leg flexed at hip – Upper leg straight with pillow between legs – Padding between knees, ankles and feet Safety Consideration: – Maintain spinal alignment during turning – Padded support to prevent lateral neck flexion
  • 43.
    Lithotomy Risk #1: – Hip/kneejoint injury – Lumbar/sacral pressure – Vascular congestion Risk #2: – Neuropathy of obturator nerves, femoral nerves, common peroneal nerves/ulnar nerves Risk #3: – Restricted diaphragmatic movement Safety Consideration: – Place stirrups at even height – Elevate lower legs slowly and simultaneously from stirrups Safety Consideration: – Maintain minimal external hip rotation – Pad lateral or posterior knees/ankles to prevent pressure and contact with metal surface Safety Consideration: – Keep arms away from chest to facilitate
  • 44.
    Conclusion • Positions usedfor the comfort are one of the important aspects in nursing intervention. Nurses caring for client in many setting and situations can adapt various comfortable positions, to provide them a comfortable stay. Different positions are used for physical examinations so that the body parts are accessible and clients stay is comfortable . • Patient’s ability to assume positions depends upon their physical strength and degrees of wellness. Their privacy should be kept as the top priority while doing physical examination as it will keep them at ease and provide greater accessibility and accuracy in accessing body parts.
  • 45.
  • 46.
    • Documentation shouldinclude: – Preoperative assessments – Type and location of positioning and/or padding devices – Names and titles of persons positioning the patient – Intra-operative positioning changes – Postoperative outcome evaluation • Documentation includes nursing assessments and interventions • Documenting nursing activities provides an accurate picture of the nursing care provided as well as the outcomes of the care delivered • Document all of your findings
  • 47.
    Don’t Forget: • Goodpositioning starts with an assessment • Prevent team members from leaning against patients • Cushioning of all pressure points is a priority - the correct use of padding can protect the patient • Procedures longer than 2 ½ to 3 hours significantly increase the risk of pressure ulcer formation • During a longer procedure, you should assist with shifting the patient, adjusting the table, or adding/removing a positioning device • The nurse must assess extremities at regular intervals for signs of circulatory compromise • Documentation of the positioning process should be performed accurately and completely
  • 48.
    One last note… Positioningproblems can result in significant injuries and successful lawsuits.