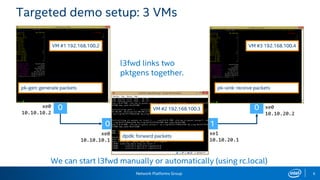
The document provides instructions for running an Intel DPDK hands-on session to demonstrate packet forwarding using the l3fwd example. It describes downloading and compiling DPDK, getting and applying patches to l3fwd, configuring three VMs with pktgen to generate and receive packets and l3fwd to forward between them, and running l3fwd and pktgen manually or automatically on system startup.

![Network Platforms Group
Legal Disclaimer
General Disclaimer:
© Copyright 2015 Intel Corporation. All rights reserved. Intel, the Intel logo, Intel Inside, the Intel Inside logo, Intel.
Experience What’s Inside are trademarks of Intel. Corporation in the U.S. and/or other countries. *Other names and
brands may be claimed as the property of others.
FTC Disclaimer:
Intel technologies’ features and benefits depend on system configuration and may require enabled hardware, software
or service activation. Performance varies depending on system configuration. No computer system can be absolutely
secure. Check with your system manufacturer or retailer or learn more at [intel.com].
Software and workloads used in performance tests may have been optimized for performance only on Intel
microprocessors. Performance tests, such as SYSmark and MobileMark, are measured using specific computer systems,
components, software, operations and functions. Any change to any of those factors may cause the results to vary. You
should consult other information and performance tests to assist you in fully evaluating your contemplated purchases,
including the performance of that product when combined with other products. For more complete information visit
http://www.intel.com/performance.](https://image.slidesharecdn.com/7handson-150616084137-lva1-app6892/85/7-hands-on-2-320.jpg)


![Network Platforms Group 12
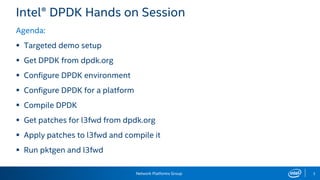
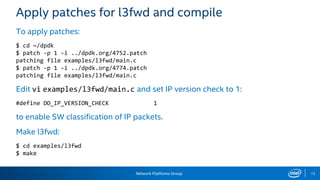
Get patches for l3fwd from dpdk.org
DPDK patches submitted to dpdk.org but not yet applied can be downloaded
from Patchwork http://dpdk.org/dev/patchwork/project/dpdk/list/
We already have two l3fwd patches preloaded:
Patch 4752 [dpdk-dev] examples: add ip version check for l3fwd app
$ wget http://dpdk.org/dev/patchwork/patch/4752/raw/ -O dpdk.org/4752.patch
Patch 4774 [dpdk-dev,v2] l3fwd: make destination mac address configurable
$ wget http://dpdk.org/dev/patchwork/patch/4774/raw/ -O dpdk.org/4774.patch
First patch enables IP classification on emulated network devices, second adds
ability to configure l3fwd destination Ethernet address for forwarding ports](https://image.slidesharecdn.com/7handson-150616084137-lva1-app6892/85/7-hands-on-12-320.jpg)
![Network Platforms Group 14
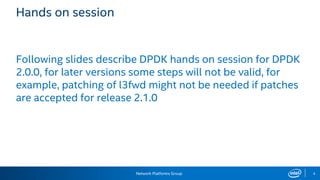
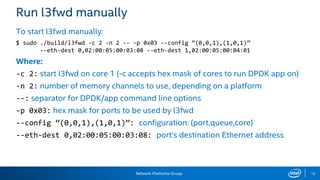
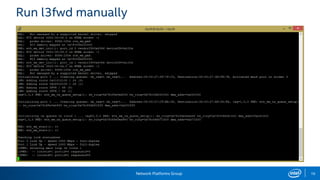
Run l3fwd manually (cont)
To find MAC addresses for destination ports:
$ ping –c 1 10.10.10.2
$ ping –c 1 10.10.20.2
$ arp -a
? (10.10.10.2) at 02:00:05:00:03:08 [ether] on xe0
? (10.10.20.2) at 02:00:05:00:04:01 [ether] on xe1
Now we can use these MAC addresses to start l3fwd manually, but first we need
to bind ports to DPDK:
$ sudo ~/dpdk/tools/dpdk_nic_bind.py --force --bind=igb_uio 00:10.0 00:11.0
(we can use aliases dpstat, dpbind, dpunbind we created in bash_aliases files)](https://image.slidesharecdn.com/7handson-150616084137-lva1-app6892/85/7-hands-on-14-320.jpg)
![Network Platforms Group 17
Run our demo scenario
We are using 3 VMs setup:
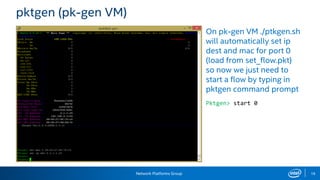
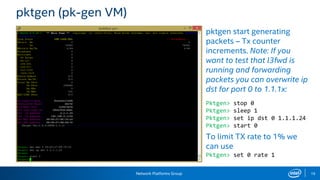
VM#1 pk-gen – pktgen generating packets on port #0
VM#2 dpdk – l3fwd forwarding packets between two pktgens
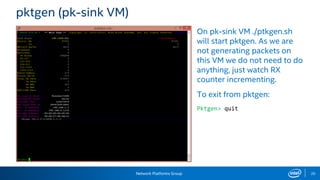
VM#3 pk-sink – pktgen receiving packets
VMs are configured to automatically allocate hugepages and load DPDK igb_uio
driver automatically at reboot. VM#1 and VM#3 have pktgen preinstalled, so no
need to compile, we can just run pktgen. There is a script in home folder which
can be used for start pktgen on pk-gen and pk-sink VMs:
[dpdk@pk-gen ~]$ ./pktgen.sh
This script binds port to igb_uio and starts pktgen.](https://image.slidesharecdn.com/7handson-150616084137-lva1-app6892/85/7-hands-on-17-320.jpg)
![Network Platforms Group 22
For deployment on pool of resources
Need to update start.sh script as follows:
• On [dpdk] host download new start.sh as follows:
$ cd ~
$ wget https://github.com/gerardo-garcia/movilforum2015/raw/master/start.sh -O
start.sh
$ chmod +x start.sh](https://image.slidesharecdn.com/7handson-150616084137-lva1-app6892/85/7-hands-on-22-320.jpg)


![[Draft] Fast Prototyping with DPDK and eBPF in Containernet](https://cdn.slidesharecdn.com/ss_thumbnails/draftfastprototypingwithdpdkandebpfincontainernet-180720185101-thumbnail.jpg?width=640&height=640&fit=bounds)


