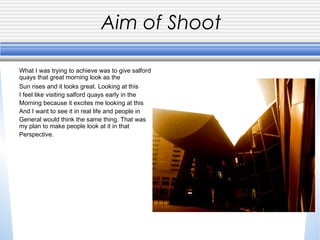
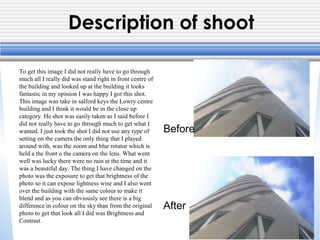
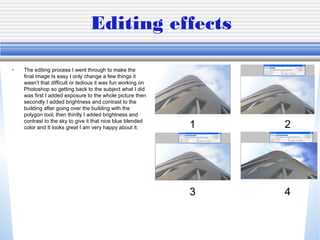
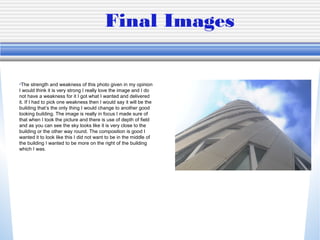
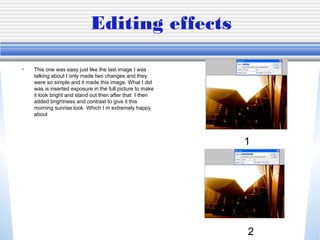
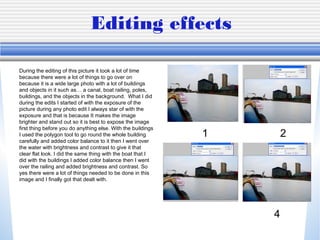
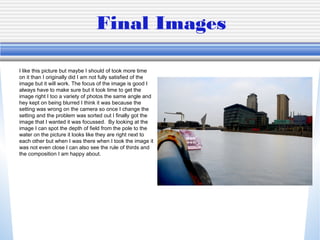
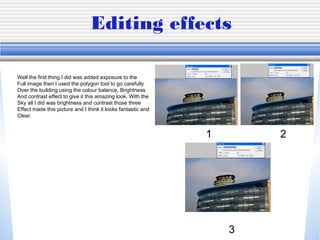
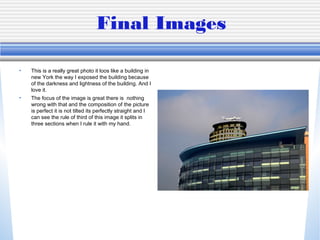
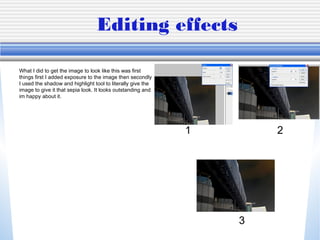
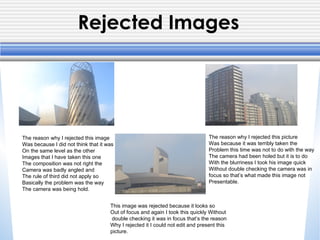
Photo Shoot Review
(you are creative visual people…
make this power point look more
interesting!
Unit 57: Photography and
Photographic Practice
Task 4 Selection of final images &
review
Aim of Shoot
What I was trying to achieve was to give salford
quays that great morning look as the
Sun rises and it looks great. Looking at this
I feel like visiting salford quays early in the
Morning because it excites me looking at this
And I want to see it in real life and people in
General would think the same thing. That was
my plan to make people look at it in that
Perspective.
Description of shoot
To get this image I did not really have to go through
much all I really did was stand right in front centre of
the building and looked up at the building it looks
fantastic in my opinion I was happy I got this shot.
This image was take in salford keys the Lowry centre
building and I think it would be in the close up
category. He shot was easily taken as I said before I
did not really have to go through much to get what I
wanted. I just took the shot I did not use any type of
setting on the camera the only thing that I played
around with, was the zoom and blur rotator which is
held a the front o the camera on the lens. What went
well was lucky there were no rain at the time and it
was a beautiful day. The thing I have changed on the
photo was the exposure to get that brightness of the
photo so it can expose lightness wise and I also went
over the building with the same colour to make it
blend and as you can obviously see there is a big
difference in colour on the sky than from the original
photo to get that look all I did was Brightness and
Contrast
Before
After
Contact Sheet
Selection of unedited images
Editing effects
• The editing process I went through to make the
final image Is easy I only change a few things it
wasn’t that difficult or tedious it was fun working on
Photoshop so getting back to the subject what I did
was first I added exposure to the whole picture then
secondly I added brightness and contrast to the
building after going over the building with the
polygon tool, then thirdly I added brightness and
contrast to the sky to give it that nice blue blended
color and It looks great I am very happy about it. 1 2
3 4
Final Images
•The strength and weakness of this photo given in my opinion
I would think it is very strong I really love the image and I do
not have a weakness for it I got what I wanted and delivered
it. If I had to pick one weakness then I would say it will be the
building that’s the only thing I would change to another good
looking building. The image is really in focus I made sure of
that when I took the picture and there is use of depth of field
and as you can see the sky looks like it is very close to the
building or the other way round. The composition is good I
wanted it to look like this I did not want to be in the middle of
the building I wanted to be more on the right of the building
which I was.
Editing effects
• This one was easy just like the last image I was
talking about I only made two changes and they
were so simple and it made this image. What I did
was is inserted exposure in the full picture to make
it look bright and stand out then after that I then
added brightness and contrast to give it this
morning sunrise look. Which I m extremely happy
about
1
2
Final Images
• The reason why I chosen to talk about this picture is
because I actually like it, it stands out from the other
images I have talked about I was happy that this was
the final outcome of the picture during the editing
because it looks great it reminds me of summertime
early in the morning during sunrise and the birds are
singing that’s why this image appeals to me. The image
I will have to say is well in focus and I did not worry as
much on the depth of field because it looks fine I did not
think about the depth on this shot I just took it like that
play with the focus. The composition of the image is fine
and straight and this is how I wanted to take it from this
angle. And I can see the rule of thirds by looking at the
image it splits into three sections.
Editing effects
During the editing of this picture it took a lot of time
because there were a lot of things to go over on
because it is a wide large photo with a lot of buildings
and objects in it such as… a canal, boat railing, poles,
buildings, and the objects in the background. What I did
during the edits I started of with the exposure of the
picture during any photo edit I always star of with the
exposure and that is because It makes the image
brighter and stand out so it is best to expose the image
first thing before you do anything else. With the buildings
I used the polygon tool to go round the whole building
carefully and added color balance to it then I went over
the water with brightness and contrast to give it that
clear flat look. I did the same thing with the boat that I
did with the buildings I added color balance then I went
over the railing and added brightness and contrast. So
yes there were a lot of things needed to be done in this
image and I finally got that dealt with.
1 2
4
Final Images
I like this picture but maybe I should of took more time
on it than I originally did I am not fully satisfied of the
image but it will work. The focus of the image is good I
always have to make sure but it took time to get the
image right I too a variety of photos the same angle and
hey kept on being blurred I think it was because the
setting was wrong on the camera so once I change the
setting and the problem was sorted out I finally got the
image that I wanted it was focussed. By looking at the
image I can spot the depth of field from the pole to the
water on the picture it looks like they are right next to
each other but when I was there when I took the image it
was not even close I can also see the rule of thirds and
the composition I am happy about.
Editing effects
1 2
3
Well the first thing I did was added exposure to the
Full image then I used the polygon tool to go carefully
Over the building using the colour balance, Brightness
And contrast effect to give it this amazing look. With the
Sky all I did was brightness and contrast those three
Effect made this picture and I think it looks fantastic and
Clear.
Final Images
• This is a really great photo it loos like a building in
new York the way I exposed the building because
of the darkness and lightness of the building. And I
love it.
• The focus of the image is great there is nothing
wrong with that and the composition of the picture
is perfect it is not tilted its perfectly straight and I
can see the rule of third of this image it splits in
three sections when I rule it with my hand.
Capture log
• Setting
• Shutter Speed
• Aperture
• ISO
Editing effects
What I did to get the image to look like this was first
things first I added exposure to the image then secondly
I used the shadow and highlight tool to literally give the
image to give it that sepia look. It looks outstanding and
im happy about it.
1 2
3
Final Images
I really love this picture there is nothing wrong with it and
I would not do anything to change this picture it is fine
the way it is. There are no weaknesses. The image is
deeply in focus the rule of third applies in the image I
can see it as I measure it and the composition is looking
great so on top of all that I think it is a fantastic image.
Capture log
• Setting
• Shutter Speed
• Aperture
• ISO
Rejected Images
The reason why I rejected this image
Was because I did not think that it was
On the same level as the other
Images that I have taken this one
The composition was not right the
Camera was badly angled and
The rule of third did not apply so
Basically the problem was the way
The camera was being hold.
The reason why I rejected this picture
Was because it was terribly taken the
Problem this time was not to do with the way
The camera had been holed but it is to do
With the blurriness I took his image quick
Without double checking the camera was in
focus so that’s what made this image not
Presentable.
This image was rejected because it looks so
Out of focus and again I took this quickly Without
double checking it was in focus that’s the reason
Why I rejected it I could not edit and present this
picture.
Aims for next project
What I have learnt during this shoot was to pre-organise what I want from this shoot
and to take my time and always to double check every manoeuvre.
The thing I would change when I do my next shoot to improve my images is again I
would take a lot of time on what shot and keep it steady and focused then repeat
againg the same shot several times for each different shot I do.

57review

  • 1.
    Photo Shoot Review (youare creative visual people… make this power point look more interesting! Unit 57: Photography and Photographic Practice Task 4 Selection of final images & review
  • 2.
    Aim of Shoot WhatI was trying to achieve was to give salford quays that great morning look as the Sun rises and it looks great. Looking at this I feel like visiting salford quays early in the Morning because it excites me looking at this And I want to see it in real life and people in General would think the same thing. That was my plan to make people look at it in that Perspective.
  • 3.
    Description of shoot Toget this image I did not really have to go through much all I really did was stand right in front centre of the building and looked up at the building it looks fantastic in my opinion I was happy I got this shot. This image was take in salford keys the Lowry centre building and I think it would be in the close up category. He shot was easily taken as I said before I did not really have to go through much to get what I wanted. I just took the shot I did not use any type of setting on the camera the only thing that I played around with, was the zoom and blur rotator which is held a the front o the camera on the lens. What went well was lucky there were no rain at the time and it was a beautiful day. The thing I have changed on the photo was the exposure to get that brightness of the photo so it can expose lightness wise and I also went over the building with the same colour to make it blend and as you can obviously see there is a big difference in colour on the sky than from the original photo to get that look all I did was Brightness and Contrast Before After
  • 4.
  • 5.
  • 6.
    Editing effects • Theediting process I went through to make the final image Is easy I only change a few things it wasn’t that difficult or tedious it was fun working on Photoshop so getting back to the subject what I did was first I added exposure to the whole picture then secondly I added brightness and contrast to the building after going over the building with the polygon tool, then thirdly I added brightness and contrast to the sky to give it that nice blue blended color and It looks great I am very happy about it. 1 2 3 4
  • 7.
    Final Images •The strengthand weakness of this photo given in my opinion I would think it is very strong I really love the image and I do not have a weakness for it I got what I wanted and delivered it. If I had to pick one weakness then I would say it will be the building that’s the only thing I would change to another good looking building. The image is really in focus I made sure of that when I took the picture and there is use of depth of field and as you can see the sky looks like it is very close to the building or the other way round. The composition is good I wanted it to look like this I did not want to be in the middle of the building I wanted to be more on the right of the building which I was.
  • 8.
    Editing effects • Thisone was easy just like the last image I was talking about I only made two changes and they were so simple and it made this image. What I did was is inserted exposure in the full picture to make it look bright and stand out then after that I then added brightness and contrast to give it this morning sunrise look. Which I m extremely happy about 1 2
  • 9.
    Final Images • Thereason why I chosen to talk about this picture is because I actually like it, it stands out from the other images I have talked about I was happy that this was the final outcome of the picture during the editing because it looks great it reminds me of summertime early in the morning during sunrise and the birds are singing that’s why this image appeals to me. The image I will have to say is well in focus and I did not worry as much on the depth of field because it looks fine I did not think about the depth on this shot I just took it like that play with the focus. The composition of the image is fine and straight and this is how I wanted to take it from this angle. And I can see the rule of thirds by looking at the image it splits into three sections.
  • 10.
    Editing effects During theediting of this picture it took a lot of time because there were a lot of things to go over on because it is a wide large photo with a lot of buildings and objects in it such as… a canal, boat railing, poles, buildings, and the objects in the background. What I did during the edits I started of with the exposure of the picture during any photo edit I always star of with the exposure and that is because It makes the image brighter and stand out so it is best to expose the image first thing before you do anything else. With the buildings I used the polygon tool to go round the whole building carefully and added color balance to it then I went over the water with brightness and contrast to give it that clear flat look. I did the same thing with the boat that I did with the buildings I added color balance then I went over the railing and added brightness and contrast. So yes there were a lot of things needed to be done in this image and I finally got that dealt with. 1 2 4
  • 11.
    Final Images I likethis picture but maybe I should of took more time on it than I originally did I am not fully satisfied of the image but it will work. The focus of the image is good I always have to make sure but it took time to get the image right I too a variety of photos the same angle and hey kept on being blurred I think it was because the setting was wrong on the camera so once I change the setting and the problem was sorted out I finally got the image that I wanted it was focussed. By looking at the image I can spot the depth of field from the pole to the water on the picture it looks like they are right next to each other but when I was there when I took the image it was not even close I can also see the rule of thirds and the composition I am happy about.
  • 12.
    Editing effects 1 2 3 Wellthe first thing I did was added exposure to the Full image then I used the polygon tool to go carefully Over the building using the colour balance, Brightness And contrast effect to give it this amazing look. With the Sky all I did was brightness and contrast those three Effect made this picture and I think it looks fantastic and Clear.
  • 13.
    Final Images • Thisis a really great photo it loos like a building in new York the way I exposed the building because of the darkness and lightness of the building. And I love it. • The focus of the image is great there is nothing wrong with that and the composition of the picture is perfect it is not tilted its perfectly straight and I can see the rule of third of this image it splits in three sections when I rule it with my hand.
  • 14.
    Capture log • Setting •Shutter Speed • Aperture • ISO
  • 15.
    Editing effects What Idid to get the image to look like this was first things first I added exposure to the image then secondly I used the shadow and highlight tool to literally give the image to give it that sepia look. It looks outstanding and im happy about it. 1 2 3
  • 16.
    Final Images I reallylove this picture there is nothing wrong with it and I would not do anything to change this picture it is fine the way it is. There are no weaknesses. The image is deeply in focus the rule of third applies in the image I can see it as I measure it and the composition is looking great so on top of all that I think it is a fantastic image.
  • 17.
    Capture log • Setting •Shutter Speed • Aperture • ISO
  • 18.
    Rejected Images The reasonwhy I rejected this image Was because I did not think that it was On the same level as the other Images that I have taken this one The composition was not right the Camera was badly angled and The rule of third did not apply so Basically the problem was the way The camera was being hold. The reason why I rejected this picture Was because it was terribly taken the Problem this time was not to do with the way The camera had been holed but it is to do With the blurriness I took his image quick Without double checking the camera was in focus so that’s what made this image not Presentable. This image was rejected because it looks so Out of focus and again I took this quickly Without double checking it was in focus that’s the reason Why I rejected it I could not edit and present this picture.
  • 19.
    Aims for nextproject What I have learnt during this shoot was to pre-organise what I want from this shoot and to take my time and always to double check every manoeuvre. The thing I would change when I do my next shoot to improve my images is again I would take a lot of time on what shot and keep it steady and focused then repeat againg the same shot several times for each different shot I do.