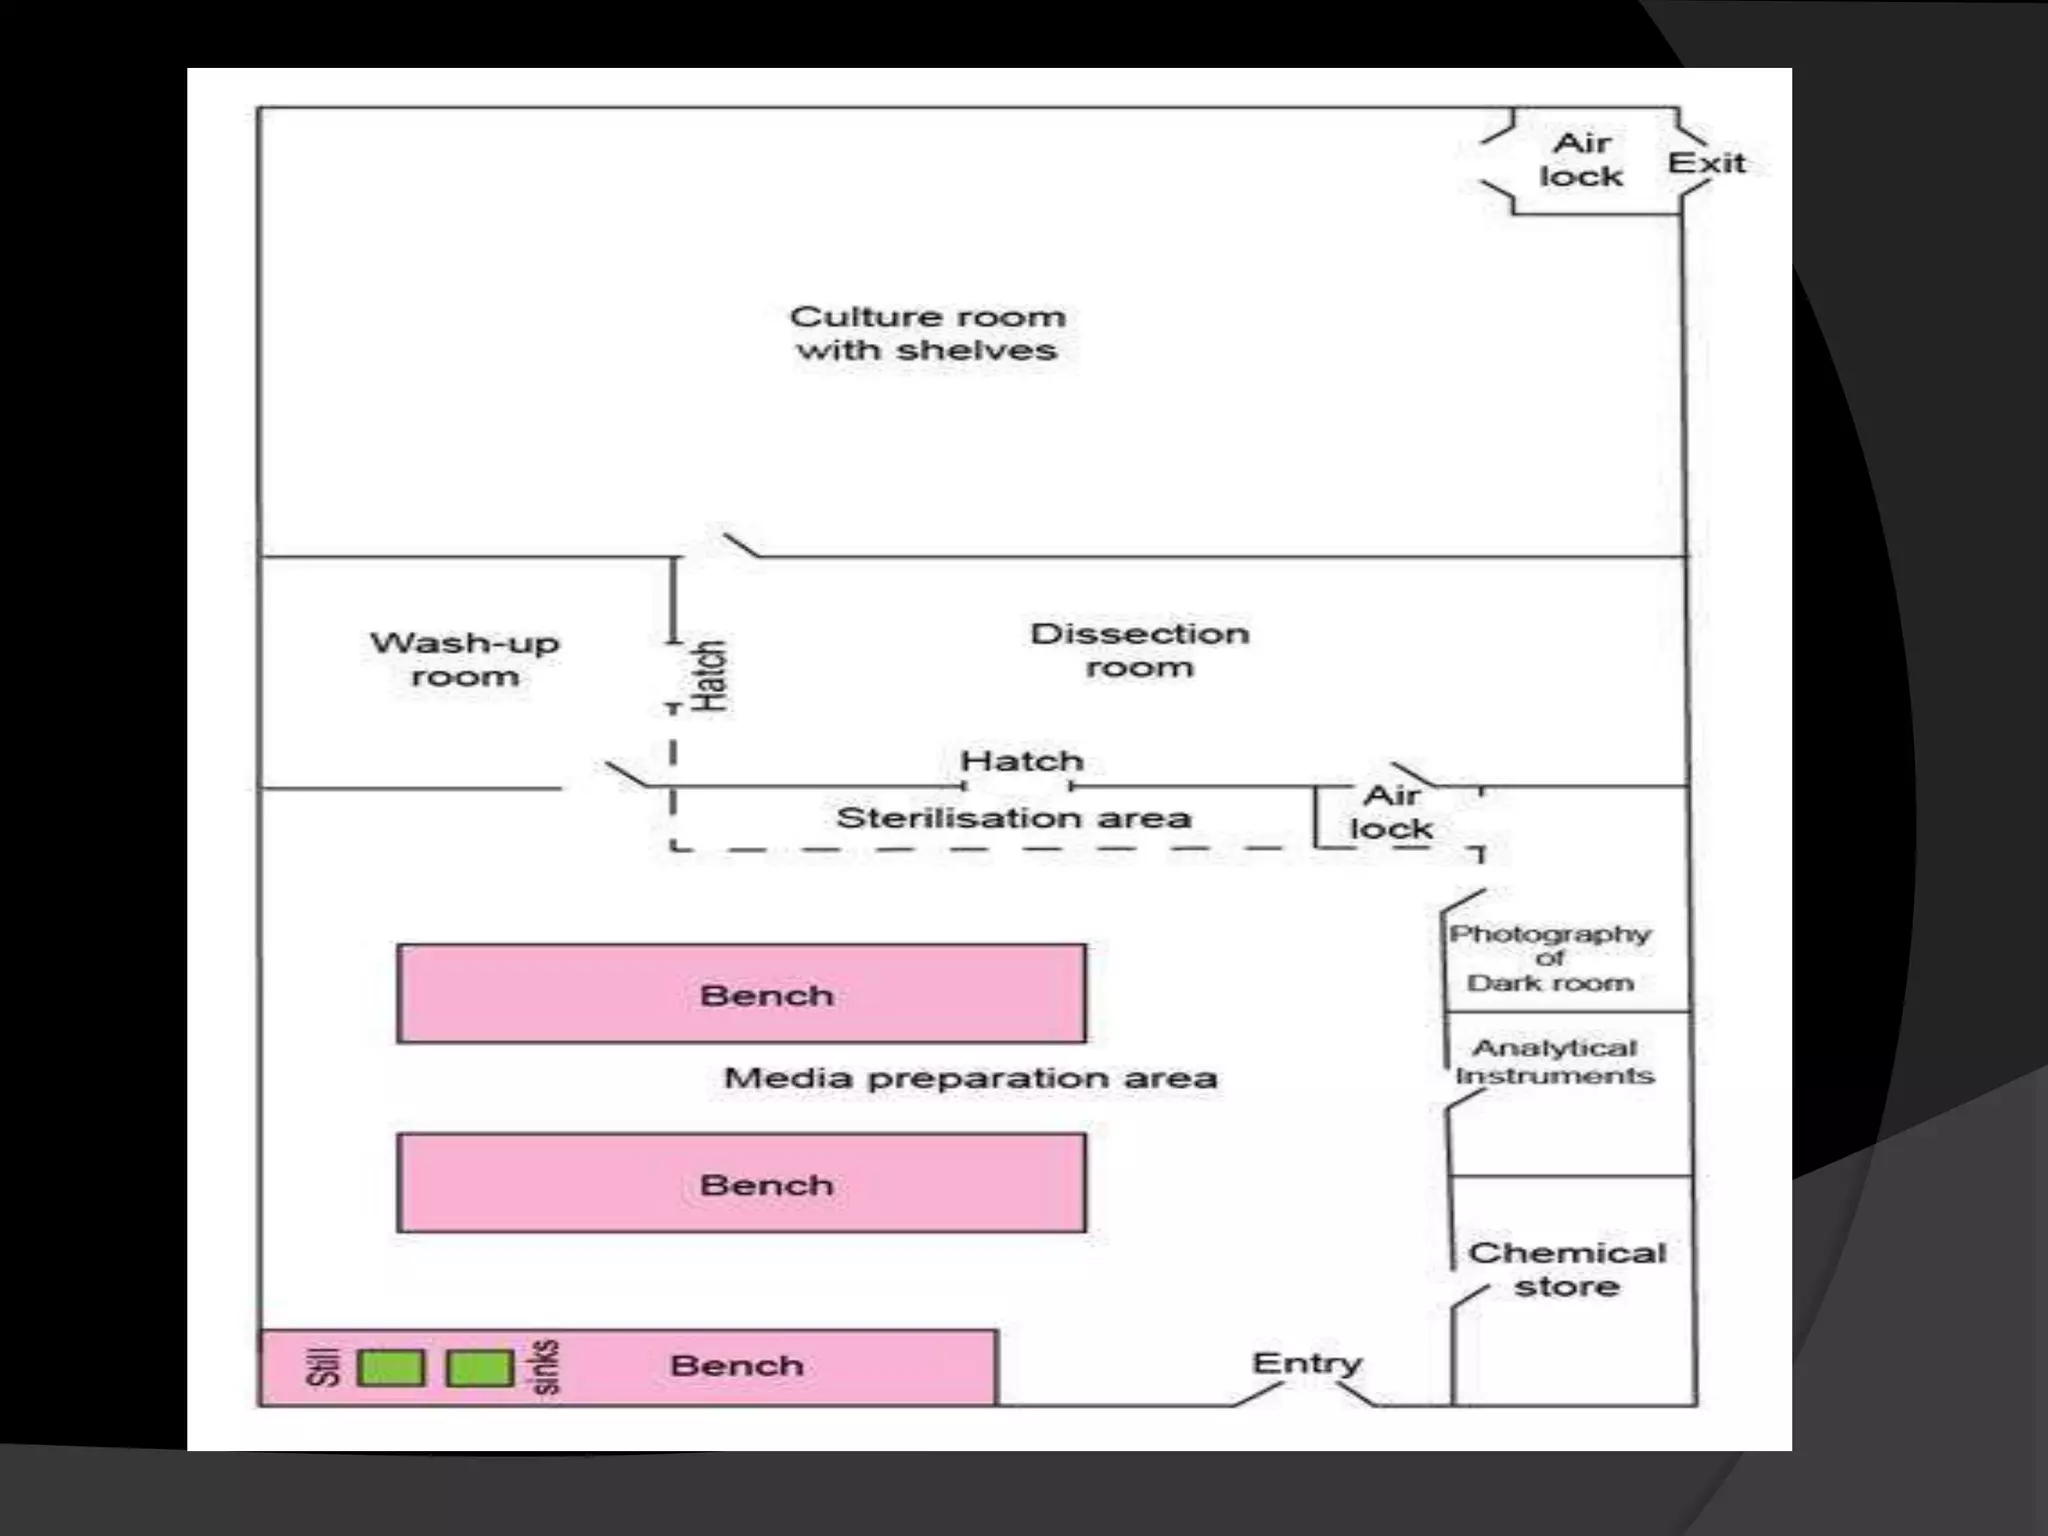
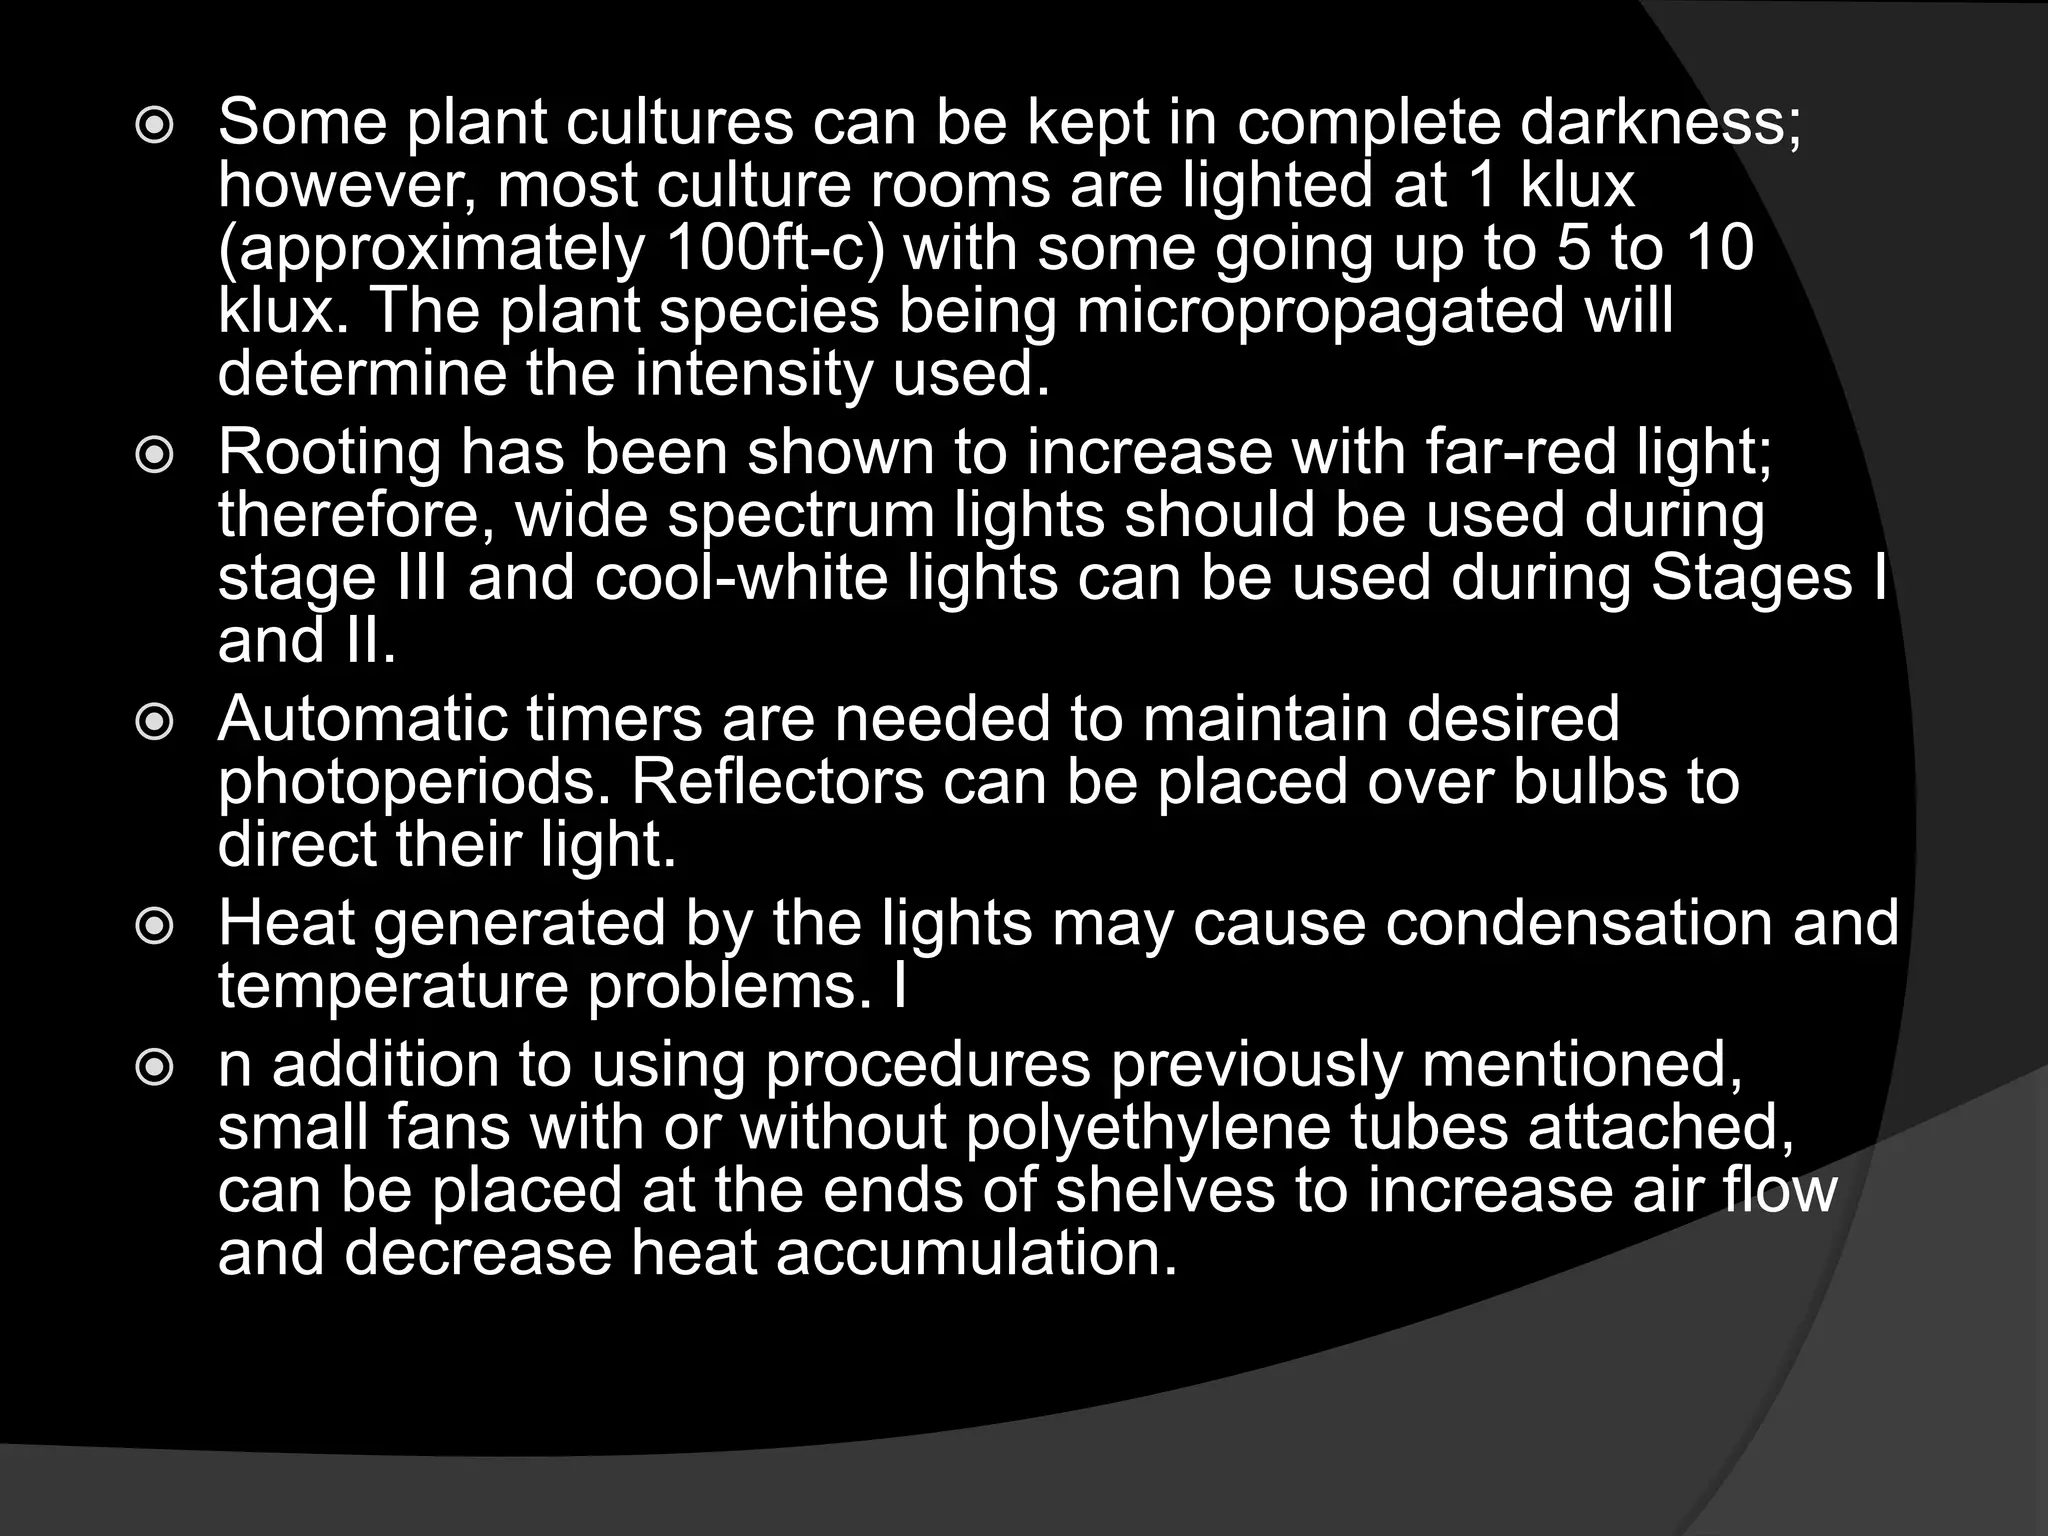
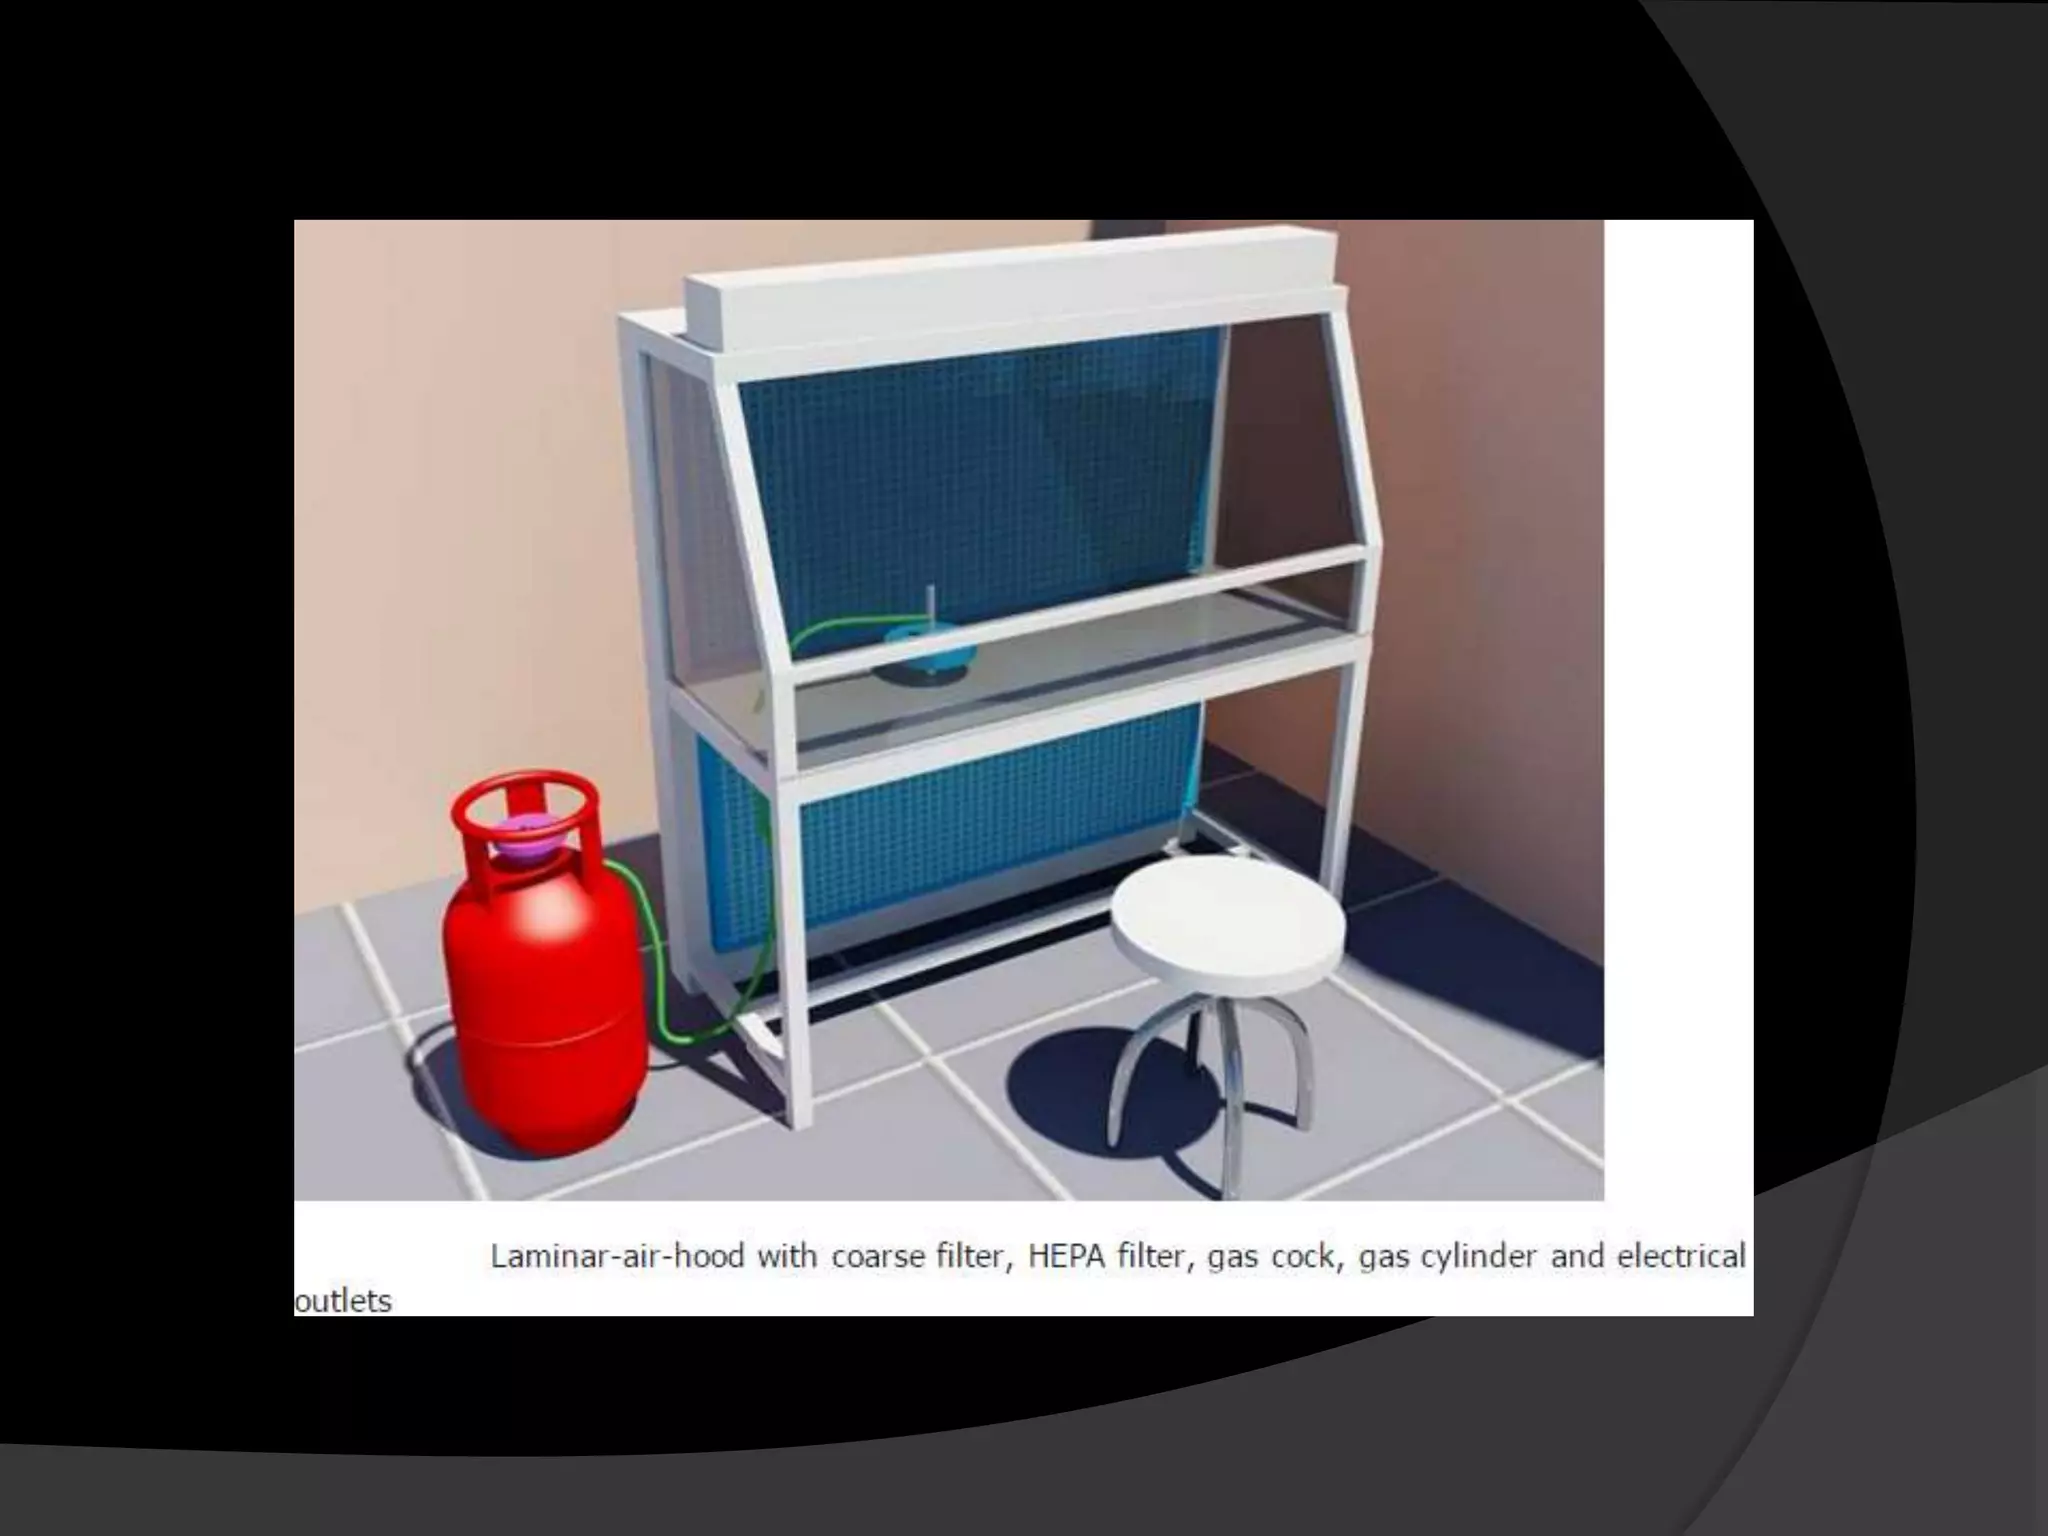
PLANT TISSUE
CULTURE
LABORATORY DESIGN
INTRODUCTION:
 In designing any laboratory, big or small,
certain elements are essential for a
successful operation.
 The correct design of a laboratory will
not only help maintain asepsis, but it will
also achieve a high standard of work.
 A convenient location is necessary for a
proper functional laboratory.
STRATEGIC PLANNING:
 Careful planning is required while
remodeling old structure or building a
new laboratory facility.
 The size of tissue culture lab and the
amount and type of equipment used
depend upon the nature of the work to
be undertaken.
 A standard tissue culture laboratory should provide
facilities for:
 Washing and storage of glassware and plastic-ware
 Preparation, sterilization and storage of nutrient
media
 Aseptic manipulation of plant material
 Maintenance of cultures under controlled
temperature, light and humidity
 Observation of cultures, data collection and
photographic facility
 Acclimatization of in vitro developed plants. The
overall design must focus on maintaining aseptic
conditions.
LOCATION:
 A good location includes the following:
1.Isolation from foot traffic.
2. No contamination from adjacent rooms.
3. Thermostatically controlled heat.
4. Water and drains for a sink.
5. Adequate electrical service.
6. Provisions for a fan and intake blower for
ventilation.
7. Good lighting.
 Labs are frequently built as free-standing
buildings. Although more expensive to build,
the added isolation form adjacent activities
will keep the laboratory cleaner.
 Prefabricated buildings make convenient low
cost laboratories. They are readily available
9 in many sizes in most parts of the country.
Built-in-place frame buildings can also be
used. Consideration should be given to the
following:
1) Check with local authorities about zoning and building permits.
2) Locate the building away from sources of contamination such
as a gravel driveway or parking lot, soil mixing area, shipping
dock, pesticide storage, or dust and chemicals from fields.
3) A clear span building allows for a flexible arrangement of walls.
4) The floor should be concrete or capable of carrying 50 pounds
per square foot.
5) Walls and ceiling should be insulated to at least R-15 and be
covered inside with a water-resistant material.
6) Windows, if desired, may be placed wherever convenient in the
media preparation and glassware washing rooms.
7) The heating system should be capable of maintaining a room
temperature at 70 F in the coldest part of winter.
8) A minimum 3/4 in. water service is needed.
9) Connection to a septic system or sanitary sewer should be
provided.
10) Air conditioning for summer cooling may be necessary.
11) Electric service capacity for equipment, lights and future
expansion should be calculated. A minimum 100 amp service is
recommended.
GENERAL LABORATORY
DESIGN
 Laboratories should have easy to wash
walls and floors. Acrylic or urethane
epoxy wall paints can be used; cement
floors can be painted with an epoxy or
urethane floor enamel or have an inlaid
linoleum installed.
 The traffic pattern and work flow in a
laboratory must be considered in order
to maximize cleanliness.
 The cleanest rooms or areas are the culture
room, i.e. primary growth room, and the
aseptic transfer area. It is best to design
these rooms so they are not entered directly
from the outside of a building.
 The media preparation area, glassware
washing area, or storage area should be
located outside these rooms.
 The primary growth room and aseptic
transfer room should be enclosed with
doors leading to each. Traffic through these
areas can be minimized by installing pass-
through windows
 Ideally, the media preparation area would
lead to the sterilization area, which would
lead to the aseptic transfer room and
eventually the primary growth room.
 Unusual requirements for electricity and fire
safety dictate that power installation be done
by professional electricians. Most wiring will
require 110 volts.
 Temperature and fire 10 alarms are to be
connected directly to telephone lines to give
fast warnings of problems. An emergency
generator should be available to operate
essential equipment during power outages.
GLASSWARE WASHING AND
STORAGE AREA :
 The glassware washing area should be
located near the sterilization and media
preparation areas. When culture vessels
are removed from the growth area, they
are often autoclaved to kill contaminants
or to soften semi-solid media.
 Locate the glassware storage area close
to the wash area to expedite storage;
these areas also need to be accessible
to the media preparation area.
 The glassware area should be equipped with
at least one large sink; two sinks are
preferable. Adequate work space is required
on both sides of the sink; this space will be
used for glassware soaking tubs and
drainage trays.
 Plastic netting can be placed on surfaces
near the sink to reduce glassware breakage
and enhance water drainage.
 The pipes leading from the sink can be PVC
to resist damage from acids and alkalis.
 Both hot and cold water should be available
with water distillation and/or deionization
devices nearby.
 Mobile drying racks can be stored nearby
and lined with cheesecloth to prevent water
dripping and loss of small objects.
 Locate ovens or hot air cabinets (75 C)
close to the glassware washing and storage
area.
 Dust-proof cabinets, low enough to allow
easy access, can be used in the storage
area.
MEDIA PREPARATION AND
STERILIZATION AREA
 The water source and glassware
storage area should be convenient to
the media preparation area.
 Benches, suitable for comfortable
working while standing (34 to 36in.) and
deep enough (24 in.) to hold equipment
listed below are essential.
 Their tops should be made with molded
plastic laminate surfaces that can
tolerate frequent cleanings.
 There is a variety of equipment available for
micropropagation laboratories; this
equipment is generally located in the media
preparation area.
 All laboratories need the following basics:
1. Refrigerator/freezer
2. High quality water
3. Balances
4. Hot plate/stirrer
5. pH meter
6. Aspirator or vacuum pump
7. Autoclave
Optional equipment:
 Microwave ovens are convenient for
defrosting frozen stocks and heating agar
media.
 Dissecting microscopes are useful to have
in the laboratory for meristeming,
dissecting floral and shoot apices, and
observing plant culture growth.
 Labwashers, or regular dishwashers, can
be useful.
 Automatic media dispensers are helpful
when pipetting large volumes of media.
PRIMARY GROWTH
ROOM
 Temperature, relative humidity, lighting units, and
shelves need to be considered in the culture room.
All of these environmental considerations will vary
depending on the size of the growth room, its
location, and the type of plants grown within it.
 Generally, temperatures are kept 76 +/-2 F. Heating
can be accomplished by traditional heating systems
supplemented with heat from light ballasts or space
heaters. Cooling the room is usually a greater
problem than heating; cooler temperatures can be
obtained by installing heat pumps, air conditioners,
or exhaust fans.
 Using outside windows to cool culture rooms invites
contamination problems in the summer and humidity
problems in the winter.
 Some plant cultures can be kept in complete darkness;
however, most culture rooms are lighted at 1 klux
(approximately 100ft-c) with some going up to 5 to 10
klux. The plant species being micropropagated will
determine the intensity used.
 Rooting has been shown to increase with far-red light;
therefore, wide spectrum lights should be used during
stage III and cool-white lights can be used during Stages I
and II.
 Automatic timers are needed to maintain desired
photoperiods. Reflectors can be placed over bulbs to
direct their light.
 Heat generated by the lights may cause condensation and
temperature problems. I
 n addition to using procedures previously mentioned,
small fans with or without polyethylene tubes attached,
can be placed at the ends of shelves to increase air flow
and decrease heat accumulation.
 Relative humidity (RH) is difficult to control
inside growing vessels, but fluctuations in the
culture room may have a deleterious effect;
humidifiers can be used to correct this problem.
 If the RH becomes too high, a dehumidifier is
recommended.
 Shelving within primary growth rooms can vary
depending upon the situation and the plants
grown. Wood is recommended for inexpensive,
easy-to-build shelves.
 The wood for shelves should be exterior
particleboard or plywood and should be painted
white to reflect the room's light.
 Expanded metal is more expensive than wood,
but provides better air circulation; wire mesh of
1/4 or 1/2 in.
 Hardware cloth can be used but tends to sag
under load.
 Tempered glass is sometimes used for shelves
to increase light penetration, but it is more
prone to breaking.
 Air spaces, 2 to 4 in., between the lights and
shelves will decrease bottom heat on upper
shelves and condensation in culture vessels.
 A room that is 8 ft high will accommodate 5
shelves, each 18 in. apart, when the bottom
shelf is 4 in. off the floor. The top and bottom
shelves may be difficult to work.
ASEPTIC TRANSFER
AREA
 The aseptic transfer area needs to be as
clean as possible.
 It is preferable to have a separate room for
aseptic transfer; this decreases spore
circulation and allows personnel to leave
shoes outside the room.
 Special laboratory shoes and coats should
be worn in this area.
 Laminar flow hoods or still-air boxes can be
placed in this room and used for all aseptic
work.
 Ultraviolet (UV) lights are sometimes installed
in transfer areas to disinfect the room; these
lights should only be used when people and
plant material are not in the room.
 Safety switches can be installed to shut off the
UV lights when regular room lights are turned
on.
 Surfaces inside the aseptic transfer area
should be smooth to minimize the amount of
dust that settles.
 Several electric outlets are to be installed to
accommodate balances, flow hoods, bacti-
cinerators, and microscopes.
REFERENCES
 Designing a Plant Micropropagation
Laboratory Mark P. Bridgen and John W.
Bartok, Jr. Departments of Plant Science and
Agricultural Engineering University of
Connecticut Storrs, Connecticut 06268
Originally published in the Proceedings of the
International Plant Propagators Society, Vol.
37 (1987), pp. 462-467.
Reprinted here and distributed by permission of
the senior author. March 4, 1996. http://aggie-
horticulture.tamu.edu/tisscult/microprop/faciliti
es/microlab.html
 https://www.slideshare.net/RioneDrevale/w2-
lab-designnew2?qid=5f888e8b-1339-4778-
b8f2-b64c9861516b&v=&b=&from_search=8
 NPTEL BIOTECHNOLOGY COURSE:
http://nptel.ac.in/courses/102103016/2
 S.S. Bhojwani and P.K. Dantu. Plant Tissue
culture : an Introductory text, Springer India.

4068 plant tissue culture lab design

  • 1.
  • 2.
    INTRODUCTION:  In designingany laboratory, big or small, certain elements are essential for a successful operation.  The correct design of a laboratory will not only help maintain asepsis, but it will also achieve a high standard of work.  A convenient location is necessary for a proper functional laboratory.
  • 3.
    STRATEGIC PLANNING:  Carefulplanning is required while remodeling old structure or building a new laboratory facility.  The size of tissue culture lab and the amount and type of equipment used depend upon the nature of the work to be undertaken.
  • 4.
     A standardtissue culture laboratory should provide facilities for:  Washing and storage of glassware and plastic-ware  Preparation, sterilization and storage of nutrient media  Aseptic manipulation of plant material  Maintenance of cultures under controlled temperature, light and humidity  Observation of cultures, data collection and photographic facility  Acclimatization of in vitro developed plants. The overall design must focus on maintaining aseptic conditions.
  • 6.
    LOCATION:  A goodlocation includes the following: 1.Isolation from foot traffic. 2. No contamination from adjacent rooms. 3. Thermostatically controlled heat. 4. Water and drains for a sink. 5. Adequate electrical service. 6. Provisions for a fan and intake blower for ventilation. 7. Good lighting.
  • 7.
     Labs arefrequently built as free-standing buildings. Although more expensive to build, the added isolation form adjacent activities will keep the laboratory cleaner.  Prefabricated buildings make convenient low cost laboratories. They are readily available 9 in many sizes in most parts of the country. Built-in-place frame buildings can also be used. Consideration should be given to the following:
  • 8.
    1) Check withlocal authorities about zoning and building permits. 2) Locate the building away from sources of contamination such as a gravel driveway or parking lot, soil mixing area, shipping dock, pesticide storage, or dust and chemicals from fields. 3) A clear span building allows for a flexible arrangement of walls. 4) The floor should be concrete or capable of carrying 50 pounds per square foot. 5) Walls and ceiling should be insulated to at least R-15 and be covered inside with a water-resistant material. 6) Windows, if desired, may be placed wherever convenient in the media preparation and glassware washing rooms. 7) The heating system should be capable of maintaining a room temperature at 70 F in the coldest part of winter. 8) A minimum 3/4 in. water service is needed. 9) Connection to a septic system or sanitary sewer should be provided. 10) Air conditioning for summer cooling may be necessary. 11) Electric service capacity for equipment, lights and future expansion should be calculated. A minimum 100 amp service is recommended.
  • 9.
    GENERAL LABORATORY DESIGN  Laboratoriesshould have easy to wash walls and floors. Acrylic or urethane epoxy wall paints can be used; cement floors can be painted with an epoxy or urethane floor enamel or have an inlaid linoleum installed.  The traffic pattern and work flow in a laboratory must be considered in order to maximize cleanliness.
  • 10.
     The cleanestrooms or areas are the culture room, i.e. primary growth room, and the aseptic transfer area. It is best to design these rooms so they are not entered directly from the outside of a building.  The media preparation area, glassware washing area, or storage area should be located outside these rooms.  The primary growth room and aseptic transfer room should be enclosed with doors leading to each. Traffic through these areas can be minimized by installing pass- through windows
  • 11.
     Ideally, themedia preparation area would lead to the sterilization area, which would lead to the aseptic transfer room and eventually the primary growth room.  Unusual requirements for electricity and fire safety dictate that power installation be done by professional electricians. Most wiring will require 110 volts.  Temperature and fire 10 alarms are to be connected directly to telephone lines to give fast warnings of problems. An emergency generator should be available to operate essential equipment during power outages.
  • 12.
    GLASSWARE WASHING AND STORAGEAREA :  The glassware washing area should be located near the sterilization and media preparation areas. When culture vessels are removed from the growth area, they are often autoclaved to kill contaminants or to soften semi-solid media.  Locate the glassware storage area close to the wash area to expedite storage; these areas also need to be accessible to the media preparation area.
  • 13.
     The glasswarearea should be equipped with at least one large sink; two sinks are preferable. Adequate work space is required on both sides of the sink; this space will be used for glassware soaking tubs and drainage trays.  Plastic netting can be placed on surfaces near the sink to reduce glassware breakage and enhance water drainage.  The pipes leading from the sink can be PVC to resist damage from acids and alkalis.
  • 14.
     Both hotand cold water should be available with water distillation and/or deionization devices nearby.  Mobile drying racks can be stored nearby and lined with cheesecloth to prevent water dripping and loss of small objects.  Locate ovens or hot air cabinets (75 C) close to the glassware washing and storage area.  Dust-proof cabinets, low enough to allow easy access, can be used in the storage area.
  • 15.
    MEDIA PREPARATION AND STERILIZATIONAREA  The water source and glassware storage area should be convenient to the media preparation area.  Benches, suitable for comfortable working while standing (34 to 36in.) and deep enough (24 in.) to hold equipment listed below are essential.  Their tops should be made with molded plastic laminate surfaces that can tolerate frequent cleanings.
  • 17.
     There isa variety of equipment available for micropropagation laboratories; this equipment is generally located in the media preparation area.  All laboratories need the following basics: 1. Refrigerator/freezer 2. High quality water 3. Balances 4. Hot plate/stirrer 5. pH meter 6. Aspirator or vacuum pump 7. Autoclave
  • 19.
    Optional equipment:  Microwaveovens are convenient for defrosting frozen stocks and heating agar media.  Dissecting microscopes are useful to have in the laboratory for meristeming, dissecting floral and shoot apices, and observing plant culture growth.  Labwashers, or regular dishwashers, can be useful.  Automatic media dispensers are helpful when pipetting large volumes of media.
  • 20.
    PRIMARY GROWTH ROOM  Temperature,relative humidity, lighting units, and shelves need to be considered in the culture room. All of these environmental considerations will vary depending on the size of the growth room, its location, and the type of plants grown within it.  Generally, temperatures are kept 76 +/-2 F. Heating can be accomplished by traditional heating systems supplemented with heat from light ballasts or space heaters. Cooling the room is usually a greater problem than heating; cooler temperatures can be obtained by installing heat pumps, air conditioners, or exhaust fans.  Using outside windows to cool culture rooms invites contamination problems in the summer and humidity problems in the winter.
  • 21.
     Some plantcultures can be kept in complete darkness; however, most culture rooms are lighted at 1 klux (approximately 100ft-c) with some going up to 5 to 10 klux. The plant species being micropropagated will determine the intensity used.  Rooting has been shown to increase with far-red light; therefore, wide spectrum lights should be used during stage III and cool-white lights can be used during Stages I and II.  Automatic timers are needed to maintain desired photoperiods. Reflectors can be placed over bulbs to direct their light.  Heat generated by the lights may cause condensation and temperature problems. I  n addition to using procedures previously mentioned, small fans with or without polyethylene tubes attached, can be placed at the ends of shelves to increase air flow and decrease heat accumulation.
  • 22.
     Relative humidity(RH) is difficult to control inside growing vessels, but fluctuations in the culture room may have a deleterious effect; humidifiers can be used to correct this problem.  If the RH becomes too high, a dehumidifier is recommended.  Shelving within primary growth rooms can vary depending upon the situation and the plants grown. Wood is recommended for inexpensive, easy-to-build shelves.  The wood for shelves should be exterior particleboard or plywood and should be painted white to reflect the room's light.
  • 24.
     Expanded metalis more expensive than wood, but provides better air circulation; wire mesh of 1/4 or 1/2 in.  Hardware cloth can be used but tends to sag under load.  Tempered glass is sometimes used for shelves to increase light penetration, but it is more prone to breaking.  Air spaces, 2 to 4 in., between the lights and shelves will decrease bottom heat on upper shelves and condensation in culture vessels.  A room that is 8 ft high will accommodate 5 shelves, each 18 in. apart, when the bottom shelf is 4 in. off the floor. The top and bottom shelves may be difficult to work.
  • 25.
    ASEPTIC TRANSFER AREA  Theaseptic transfer area needs to be as clean as possible.  It is preferable to have a separate room for aseptic transfer; this decreases spore circulation and allows personnel to leave shoes outside the room.  Special laboratory shoes and coats should be worn in this area.  Laminar flow hoods or still-air boxes can be placed in this room and used for all aseptic work.
  • 27.
     Ultraviolet (UV)lights are sometimes installed in transfer areas to disinfect the room; these lights should only be used when people and plant material are not in the room.  Safety switches can be installed to shut off the UV lights when regular room lights are turned on.  Surfaces inside the aseptic transfer area should be smooth to minimize the amount of dust that settles.  Several electric outlets are to be installed to accommodate balances, flow hoods, bacti- cinerators, and microscopes.
  • 28.
    REFERENCES  Designing aPlant Micropropagation Laboratory Mark P. Bridgen and John W. Bartok, Jr. Departments of Plant Science and Agricultural Engineering University of Connecticut Storrs, Connecticut 06268 Originally published in the Proceedings of the International Plant Propagators Society, Vol. 37 (1987), pp. 462-467. Reprinted here and distributed by permission of the senior author. March 4, 1996. http://aggie- horticulture.tamu.edu/tisscult/microprop/faciliti es/microlab.html
  • 29.
     https://www.slideshare.net/RioneDrevale/w2- lab-designnew2?qid=5f888e8b-1339-4778- b8f2-b64c9861516b&v=&b=&from_search=8  NPTELBIOTECHNOLOGY COURSE: http://nptel.ac.in/courses/102103016/2  S.S. Bhojwani and P.K. Dantu. Plant Tissue culture : an Introductory text, Springer India.