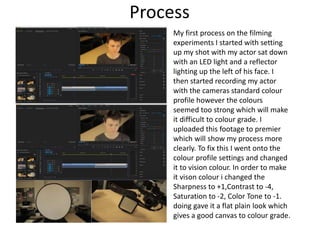
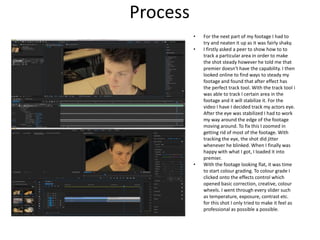
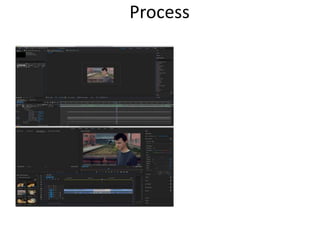
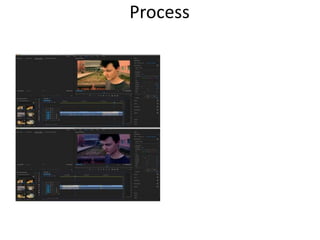
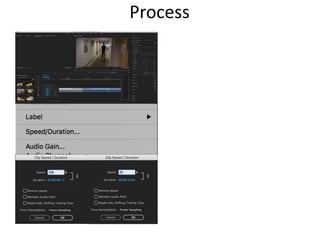
Experiments
Your Name
Process
My first process on the filming
experiments I started with setting
up my shot with my actor sat down
with an LED light and a reflector
lighting up the left of his face. I
then started recording my actor
with the cameras standard colour
profile however the colours
seemed too strong which will make
it difficult to colour grade. I
uploaded this footage to premier
which will show my process more
clearly. To fix this I went onto the
colour profile settings and changed
it to vision colour. In order to make
it vison colour i changed the
Sharpness to +1,Contrast to -4,
Saturation to -2, Color Tone to -1.
doing gave it a flat plain look which
gives a good canvas to colour grade.
Reflection
• What elements of your experiments will you
include in your final product?
– I definitely will be using the LED light for the interior shots as
sometimes the home lights can be terrible and badly composed. The
LED light would help me be more flexible with the style and colour
grading.
– I will also be setting the camera to vision colour as it will help me
colour grade more easier allowing me to make the scenes more
cinematic.
– I may not be able to use the reflector as its very large and hard to
handle. I doubt it would be that effective especially with just a small
LED light
Process
• For the next part of my footage I had to
try and neaten it up as it was fairly shaky.
• I firstly asked a peer to show how to to
track a particular area in order to make
the shot steady however he told me that
premier doesn't have the capability. I then
looked online to find ways to steady my
footage and found that after effect has
the perfect track tool. With the track tool i
was able to track I certain area in the
footage and it will stabilize it. For the
video I have I decided track my actors eye.
After the eye was stabilized I had to work
my way around the edge of the footage
moving around. To fix this I zoomed in
getting rid of most of the footage. With
tracking the eye, the shot did jitter
whenever he blinked. When I finally was
happy with what I got, I loaded it into
premier.
• With the footage looking flat, it was time
to start colour grading. To colour grade I
clicked onto the effects control which
opened basic correction, creative, colour
wheels. I went through every slider such
as temperature, exposure, contrast etc.
for this shot I only tried to make it feel as
professional as possible a possible.
Reflection
• What elements of your experiments will you
include in your final product?
– The after effect tracking can be very useful if I
ever have a rough shot which I will try my best not
to have. I will mostly stray away from using the
tracking as it forces me to get rid of useful areas of
the footage, ruining my composition. To get a
steady shot I would rather use a steady cam
making it look more natural.
Process
Reflection
• What elements of your experiments will you
include in your final product?
Process
Reflection
• What elements of your experiments will you
include in your final product?
Process
Reflection
• What elements of your experiments will you
include in your final product?

4. production experiments

  • 1.
  • 2.
    Process My first processon the filming experiments I started with setting up my shot with my actor sat down with an LED light and a reflector lighting up the left of his face. I then started recording my actor with the cameras standard colour profile however the colours seemed too strong which will make it difficult to colour grade. I uploaded this footage to premier which will show my process more clearly. To fix this I went onto the colour profile settings and changed it to vision colour. In order to make it vison colour i changed the Sharpness to +1,Contrast to -4, Saturation to -2, Color Tone to -1. doing gave it a flat plain look which gives a good canvas to colour grade.
  • 3.
    Reflection • What elementsof your experiments will you include in your final product? – I definitely will be using the LED light for the interior shots as sometimes the home lights can be terrible and badly composed. The LED light would help me be more flexible with the style and colour grading. – I will also be setting the camera to vision colour as it will help me colour grade more easier allowing me to make the scenes more cinematic. – I may not be able to use the reflector as its very large and hard to handle. I doubt it would be that effective especially with just a small LED light
  • 4.
    Process • For thenext part of my footage I had to try and neaten it up as it was fairly shaky. • I firstly asked a peer to show how to to track a particular area in order to make the shot steady however he told me that premier doesn't have the capability. I then looked online to find ways to steady my footage and found that after effect has the perfect track tool. With the track tool i was able to track I certain area in the footage and it will stabilize it. For the video I have I decided track my actors eye. After the eye was stabilized I had to work my way around the edge of the footage moving around. To fix this I zoomed in getting rid of most of the footage. With tracking the eye, the shot did jitter whenever he blinked. When I finally was happy with what I got, I loaded it into premier. • With the footage looking flat, it was time to start colour grading. To colour grade I clicked onto the effects control which opened basic correction, creative, colour wheels. I went through every slider such as temperature, exposure, contrast etc. for this shot I only tried to make it feel as professional as possible a possible.
  • 5.
    Reflection • What elementsof your experiments will you include in your final product? – The after effect tracking can be very useful if I ever have a rough shot which I will try my best not to have. I will mostly stray away from using the tracking as it forces me to get rid of useful areas of the footage, ruining my composition. To get a steady shot I would rather use a steady cam making it look more natural.
  • 6.
  • 7.
    Reflection • What elementsof your experiments will you include in your final product?
  • 8.
  • 9.
    Reflection • What elementsof your experiments will you include in your final product?
  • 10.
  • 11.
    Reflection • What elementsof your experiments will you include in your final product?

Editor's Notes

  • #3 Discuss the tools and processes used in your experiments
  • #5 Discuss the tools and processes used in your experiments
  • #7 Discuss the tools and processes used in your experiments
  • #9 Discuss the tools and processes used in your experiments
  • #11 Discuss the tools and processes used in your experiments