Professional Motion Control : Adobe After Effects Tutorial                                                                                             09/28/2007 04:21 PM


                                                                                                                 LOG IN/OUT :: SPONSORS :: ABOUT US :: CONTACT US


  FORUMS         LIBRARY          PODCASTS            BLOGS         MAGAZINE           TRAINING     NEWSLETTERS                  NEWS          STORE   EVENTS     RSS

  LIBRARY:      Tutorials    Video Tutorials    Reviews      Interviews   Editorials   Features   Business     Authors      RSS Feed


     Professional Motion Control
     COW Library > Richard Harrington > Professional Motion Control
                                                                                                  Adobe After Effects Tutorials : (print friendly)


                      Richard Harrington
                      Washington DC USA


       Article Focus:
       In this article, Richard Harrington demonstrates a quick tip on how to combine Photoshop and After Effects to achieve
       high-quality motion control in those documentary-style pan and zooms. Copyright © 2003 by CMP Books, excerpted with
       permission from "Photoshop for Nonlinear Editors" by Richard Harrington, ISBN 1-57820-209-4 No part of this material
       may be reproduced or distributed in any form.


      Project files (includes source files and final file): .sit                                          Project files: .zip


       Documentary-style motion control photography is becoming increasingly popular for use in all styles of video production.
       Why just show the pictures, static and full-screen? Most editors have traditionally had two options. The first is setting up a
       camera and card stand, and then shooting the photos with a digital video camera. This method is prone to keystoning
       (due to the tilting to avoid light reflections) and does not allow for photo restoration or precise movement. The second
       method involved importing the photos into the edit system and enlarging (zooming) them. This method produced softening
       and had very limited results. Many plug-ins have recently been developed that work within edit systems that improve upon
       this technique, but there is still a better way.
       By combining Photoshop with Adobe After Effects, extremely high-
       quality motion control is possible. In fact, I have produced results that
       outperform those done on expensive motion control rigs. Everyone
       knows that Photoshop is the perfect tool for restoring damaged photos
       (see Chapter 9, “Repairing Damaged Photos”). When combined with
       Adobe After Effects, complex motion is possible. I’ve included a


http://library.creativecow.net/articles/harrington_richard/doc_style.php                                                                                        Page 1 of 4
Professional Motion Control : Adobe After Effects Tutorial                                                                             09/28/2007 04:21 PM


       project in this chapter’s folder that contains a few motion control
       examples. You will find a movie on the disc as well that demonstrates
       this technique.

       Step 1
       Scan and prep all of your photos in Photoshop. If you want to do a
       zoom or a pan, you will need extra pixels. For example, an image that
       is 2160 pixels wide will allow you to perform a threescreen pan. Do
       not worry about cropping or sizing for the screen, but make sure that
       you have enough pixels for additional movement. The goal is to have
       extra pixels when you shrink the image. In other words, you scale the
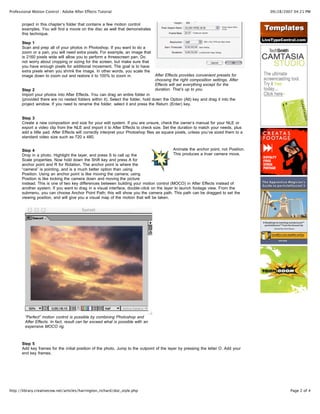
       image down to zoom out and restore it to 100% to zoom in.                  After Effects provides convenient presets for
                                                                                  choosing the right composition settings. After
                                                                                  Effects will set everything except for the
       Step 2                                                                     duration. That’s up to you.
       Import your photos into After Effects. You can drag an entire folder in
       (provided there are no nested folders within it). Select the folder, hold down the Option (Alt) key and drag it into the
       project window. If you need to rename the folder, select it and press the Return (Enter) key.


       Step 3
       Create a new composition and size for your edit system. If you are unsure, check the owner’s manual for your NLE or
       export a video clip from the NLE and import it to After Effects to check size. Set the duration to match your needs, plus
       add a little pad. After Effects will correctly interpret your Photoshop files as square pixels, unless you’ve sized them to a
       standard video size such as 720 x 480.


       Step 4                                                                              Animate the anchor point, not Position.
       Drop in a photo. Highlight the layer, and press S to call up the                    This produces a truer camera move.
       Scale properties. Now hold down the Shift key and press A for
       anchor point and R for Rotation. The anchor point is where the
       “camera” is pointing, and is a much better option than using
       Position. Using an anchor point is like moving the camera; using
       Position is like locking the camera down and moving the picture
       instead. This is one of two key differences between building your motion control (MOCO) in After Effects instead of
       another system. If you want to drag in a visual interface, double-click on the layer to launch footage view. From the
       submenu, you can choose Anchor Point Path; this will show you the camera path. This path can be dragged to set the
       viewing position, and will give you a visual map of the motion that will be taken.


        “Perfect” motion control is possible by combining Photoshop and
        After Effects. In fact, result can far exceed what is possible with an
        expensive MOCO rig.


       Step 5
       Add key frames for the initial position of the photo. Jump to the outpoint of the layer by pressing the letter O. Add your
       end key frames.


http://library.creativecow.net/articles/harrington_richard/doc_style.php                                                                        Page 2 of 4
Professional Motion Control : Adobe After Effects Tutorial                                                                            09/28/2007 04:21 PM


       Step 6
       If you will want to simulate a zoom, press S for Scale to access the scaling controls. Do not enlarge your image beyond
       100% for best results. You can also add Rotation keyframes (R), if that is desired.


       Step 7
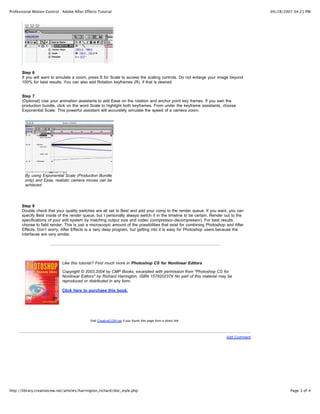
       (Optional) Use your animation assistants to add Ease on the rotation and anchor point key frames. If you own the
       production bundle, click on the word Scale to highlight both keyframes. From under the keyframe assistants, choose
       Exponential Scale. This powerful assistant will accurately simulate the speed of a camera zoom.


        By using Exponential Scale (Production Bundle
        only) and Ease, realistic camera moves can be
        achieved.


       Step 8
       Double check that your quality switches are all set to Best and add your comp to the render queue. If you want, you can
       specify Best inside of the render queue, but I personally always switch it in the timeline to be certain. Render out to the
       specifications of your edit system by matching output size and codec (compressor-decompressor). For best results,
       choose to field render. This is just a microscopic amount of the possibilities that exist for combining Photoshop and After
       Effects. Don’t worry, After Effects is a very deep program, but getting into it is easy for Photoshop users because the
       interfaces are very similar.


                             Like this tutorial? Find much more in Photoshop CS for Nonlinear Editors.

                             Copyright © 2003,2004 by CMP Books, excerpted with permission from "Photoshop CS for
                             Nonlinear Editors" by Richard Harrington, ISBN 157820237X No part of this material may be
                             reproduced or distributed in any form.

                             Click here to purchase this book.


                                             Visit CreativeCOW.net if you found this page from a direct link.


                                                                                                                        Add Comment


http://library.creativecow.net/articles/harrington_richard/doc_style.php                                                                       Page 3 of 4
Professional Motion Control : Adobe After Effects Tutorial                                                                      09/28/2007 04:21 PM


                        FORUMS • LIBRARY • PODCASTS • BLOGS • MAGAZINE • TRAINING • NEWSLETTERS • NEWS • STORE • EVENTS • RSS

                                                               © CreativeCOW.net All rights are reserved.

                                                                                 [Top]


http://library.creativecow.net/articles/harrington_richard/doc_style.php                                                                 Page 4 of 4

prod75_019870

  • 1.
    Professional Motion Control: Adobe After Effects Tutorial 09/28/2007 04:21 PM LOG IN/OUT :: SPONSORS :: ABOUT US :: CONTACT US FORUMS LIBRARY PODCASTS BLOGS MAGAZINE TRAINING NEWSLETTERS NEWS STORE EVENTS RSS LIBRARY: Tutorials Video Tutorials Reviews Interviews Editorials Features Business Authors RSS Feed Professional Motion Control COW Library > Richard Harrington > Professional Motion Control Adobe After Effects Tutorials : (print friendly) Richard Harrington Washington DC USA Article Focus: In this article, Richard Harrington demonstrates a quick tip on how to combine Photoshop and After Effects to achieve high-quality motion control in those documentary-style pan and zooms. Copyright © 2003 by CMP Books, excerpted with permission from "Photoshop for Nonlinear Editors" by Richard Harrington, ISBN 1-57820-209-4 No part of this material may be reproduced or distributed in any form. Project files (includes source files and final file): .sit Project files: .zip Documentary-style motion control photography is becoming increasingly popular for use in all styles of video production. Why just show the pictures, static and full-screen? Most editors have traditionally had two options. The first is setting up a camera and card stand, and then shooting the photos with a digital video camera. This method is prone to keystoning (due to the tilting to avoid light reflections) and does not allow for photo restoration or precise movement. The second method involved importing the photos into the edit system and enlarging (zooming) them. This method produced softening and had very limited results. Many plug-ins have recently been developed that work within edit systems that improve upon this technique, but there is still a better way. By combining Photoshop with Adobe After Effects, extremely high- quality motion control is possible. In fact, I have produced results that outperform those done on expensive motion control rigs. Everyone knows that Photoshop is the perfect tool for restoring damaged photos (see Chapter 9, “Repairing Damaged Photos”). When combined with Adobe After Effects, complex motion is possible. I’ve included a http://library.creativecow.net/articles/harrington_richard/doc_style.php Page 1 of 4
  • 2.
    Professional Motion Control: Adobe After Effects Tutorial 09/28/2007 04:21 PM project in this chapter’s folder that contains a few motion control examples. You will find a movie on the disc as well that demonstrates this technique. Step 1 Scan and prep all of your photos in Photoshop. If you want to do a zoom or a pan, you will need extra pixels. For example, an image that is 2160 pixels wide will allow you to perform a threescreen pan. Do not worry about cropping or sizing for the screen, but make sure that you have enough pixels for additional movement. The goal is to have extra pixels when you shrink the image. In other words, you scale the image down to zoom out and restore it to 100% to zoom in. After Effects provides convenient presets for choosing the right composition settings. After Effects will set everything except for the Step 2 duration. That’s up to you. Import your photos into After Effects. You can drag an entire folder in (provided there are no nested folders within it). Select the folder, hold down the Option (Alt) key and drag it into the project window. If you need to rename the folder, select it and press the Return (Enter) key. Step 3 Create a new composition and size for your edit system. If you are unsure, check the owner’s manual for your NLE or export a video clip from the NLE and import it to After Effects to check size. Set the duration to match your needs, plus add a little pad. After Effects will correctly interpret your Photoshop files as square pixels, unless you’ve sized them to a standard video size such as 720 x 480. Step 4 Animate the anchor point, not Position. Drop in a photo. Highlight the layer, and press S to call up the This produces a truer camera move. Scale properties. Now hold down the Shift key and press A for anchor point and R for Rotation. The anchor point is where the “camera” is pointing, and is a much better option than using Position. Using an anchor point is like moving the camera; using Position is like locking the camera down and moving the picture instead. This is one of two key differences between building your motion control (MOCO) in After Effects instead of another system. If you want to drag in a visual interface, double-click on the layer to launch footage view. From the submenu, you can choose Anchor Point Path; this will show you the camera path. This path can be dragged to set the viewing position, and will give you a visual map of the motion that will be taken. “Perfect” motion control is possible by combining Photoshop and After Effects. In fact, result can far exceed what is possible with an expensive MOCO rig. Step 5 Add key frames for the initial position of the photo. Jump to the outpoint of the layer by pressing the letter O. Add your end key frames. http://library.creativecow.net/articles/harrington_richard/doc_style.php Page 2 of 4
  • 3.
    Professional Motion Control: Adobe After Effects Tutorial 09/28/2007 04:21 PM Step 6 If you will want to simulate a zoom, press S for Scale to access the scaling controls. Do not enlarge your image beyond 100% for best results. You can also add Rotation keyframes (R), if that is desired. Step 7 (Optional) Use your animation assistants to add Ease on the rotation and anchor point key frames. If you own the production bundle, click on the word Scale to highlight both keyframes. From under the keyframe assistants, choose Exponential Scale. This powerful assistant will accurately simulate the speed of a camera zoom. By using Exponential Scale (Production Bundle only) and Ease, realistic camera moves can be achieved. Step 8 Double check that your quality switches are all set to Best and add your comp to the render queue. If you want, you can specify Best inside of the render queue, but I personally always switch it in the timeline to be certain. Render out to the specifications of your edit system by matching output size and codec (compressor-decompressor). For best results, choose to field render. This is just a microscopic amount of the possibilities that exist for combining Photoshop and After Effects. Don’t worry, After Effects is a very deep program, but getting into it is easy for Photoshop users because the interfaces are very similar. Like this tutorial? Find much more in Photoshop CS for Nonlinear Editors. Copyright © 2003,2004 by CMP Books, excerpted with permission from "Photoshop CS for Nonlinear Editors" by Richard Harrington, ISBN 157820237X No part of this material may be reproduced or distributed in any form. Click here to purchase this book. Visit CreativeCOW.net if you found this page from a direct link. Add Comment http://library.creativecow.net/articles/harrington_richard/doc_style.php Page 3 of 4
  • 4.
    Professional Motion Control: Adobe After Effects Tutorial 09/28/2007 04:21 PM FORUMS • LIBRARY • PODCASTS • BLOGS • MAGAZINE • TRAINING • NEWSLETTERS • NEWS • STORE • EVENTS • RSS © CreativeCOW.net All rights are reserved. [Top] http://library.creativecow.net/articles/harrington_richard/doc_style.php Page 4 of 4