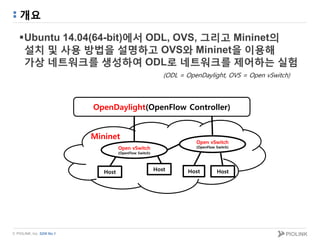
Ubuntu 14.04(64-bit)에서 ODL, OVS, 그리고 Mininet의 설치 및 사용 방법을 설명하고 OVS와 Mininet을 이용해 가상 네트워크를 생성하여 ODL로 네트워크를 제어하는 실험


![© PIOLINK, Inc. SDN No.1
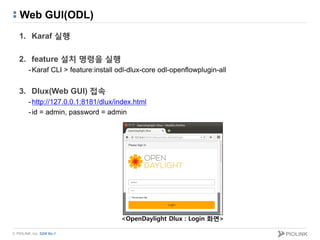
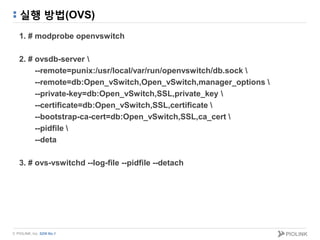
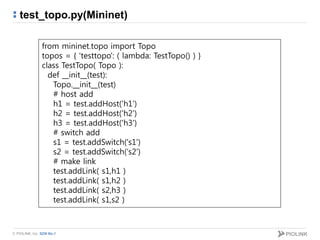
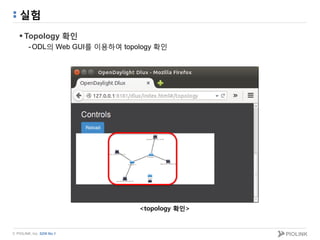
Topology 구성(Mininet)
Command option
-$ sudo mn --topo [topology][,depth=][,fanout=]
-기본으로 지원되는 topology = linear, single, tree
•Ex) sudo mn --topo tree,depth=2,fanout=2
S1
S2 S3
1
Depth
2
1 2
fanout
1 2 1 2
H1 H2 H3 H4](https://image.slidesharecdn.com/opendaylightpiolink-150315204412-conversion-gate01/85/Open-vSwitch-Mininet-OpenDaylight-25-320.jpg)


![[MeetUp][1st] 오리뎅이의_쿠버네티스_네트워킹](https://cdn.slidesharecdn.com/ss_thumbnails/3-191024235922-thumbnail.jpg?width=640&height=640&fit=bounds)


![MPLS L3 VPN Tutorial, by Nurul Islam Roman [APNIC 38]](https://cdn.slidesharecdn.com/ss_thumbnails/mplsl3vpnapnic381410820509-140915192004-phpapp02-thumbnail.jpg?width=640&height=640&fit=bounds)


![[OpenStack Days Korea 2016] Track3 - VDI on OpenStack with LeoStream Connecti...](https://cdn.slidesharecdn.com/ss_thumbnails/36gotocloud-160226174146-thumbnail.jpg?width=640&height=640&fit=bounds)

![[242]open stack neutron dataplane 구현](https://cdn.slidesharecdn.com/ss_thumbnails/242openstackneutron-dataplane-171017004554-thumbnail.jpg?width=640&height=640&fit=bounds)
![[OpenInfra Days Korea 2018] (Track 4) - Grafana를 이용한 OpenStack 클라우드 성능 모니터링](https://cdn.slidesharecdn.com/ss_thumbnails/42openinfraday201820180626grafana-180704055533-thumbnail.jpg?width=640&height=640&fit=bounds)
![[OpenStack Days Korea 2016] Innovating OpenStack Network with SDN solution](https://cdn.slidesharecdn.com/ss_thumbnails/05kulcloud-160226170318-thumbnail.jpg?width=640&height=640&fit=bounds)


