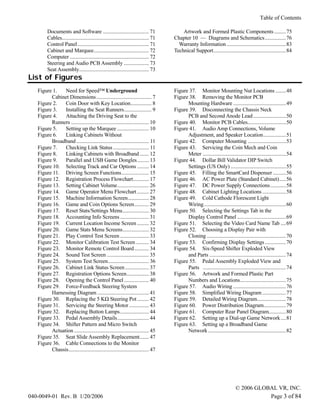
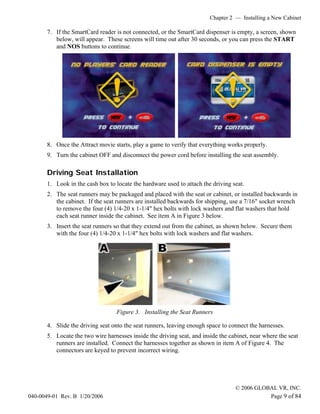
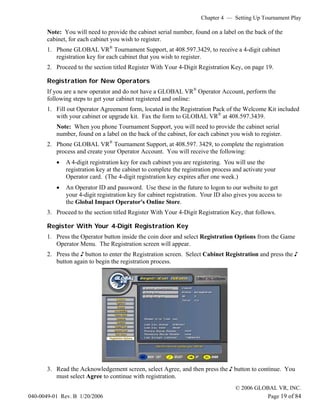
SlideShare a Scribd company logo
Need for Speed™ Underground
                                                     System Manual
                                                   040-0049-01 Rev. B


                                        ! Read this manual before installing the Game.
                                        ! Keep this manual with the machine at all times.


                                                                         www.globalvr.com
                                                                         http://service.globalvr.com
                                                                         techsupport@globalvr.com
                                                                         tournament@globalvr.com
                                                                         Phone: 408.597.3435
                                                                         Fax: 408.597.3437

© 2006 Electronic Arts Inc. Electronic Arts, Need for Speed, EA GAMES and the EA GAMES logo are trademarks or registered trademarks of Electronic Arts Inc. in the
U.S. and/or other countries. All rights reserved. EA GAMES™ is an Electronic Arts™ brand. Dodge is a trademark of DaimlerChrysler Corporation. Dodge Neon and its
trade dress are used under license by Electronic Arts Inc. ©:DaimlerChrysler Corporation 2004. Honda®, the 'H' logo®, Acura®, the stylized 'A' logo®, Civic®, Si™ ,
Integra Type-R®, S2000™, RSX®, Type-R™ and Type-S™ names, emblems and body design elements are trademarks and/or intellectual property rights of Honda Motor
Co., Ltd., used under license. Tiburon (Tuscani) is a registered trademark owned and licensed by Hyundai Motor Company. Mazda MX-5 Miata and Mazda RX-7 are used
under the approval of Mazda Motor Corporation. Mitsubishi, Eclipse, and Lancer names, emblems and body designs are trademarks and/or intellectual property rights of
Mitsubishi Motors Corporation and used under license to Electronic Arts Inc. NISSAN, SKYLINE, 350Z, SENTRA and 240SX are trademarks and/or intellectual property
rights of NISSAN MOTOR CO.,LTD. And are used under license to Electronic Arts Inc. PEUGEOT 206 GTI S16 2003 is used under license from AUTOMOBILES PEUGEOT
by Electronic Arts. SUBARU, IMPREZA and WRX names, emblems and body designs are properties of Fuji Heavy Industries Ltd. Toyota, Supra, and Celica are
trademarks of Toyota Motor Corporation, and used with permission. Trademarks, design patents and copyrights are used with the permission of the owner
VOLKSWAGEN AG. The names and logos of all after market car part companies are trademarks of their respective owners and are used by permission. All rights
reserved. EA GAMES™ is an Electronic Arts brand. GLOBAL VR and the GLOBAL VR logo are registered trademarks of Global VR, Inc. All other trademarks are the
property of their respective owners. U.S. Patent Nos. 5,269,687; 5,354,202; and 5,577,913 used under license from Midway Games West Inc

Tournaments are not sponsored or administered by Electronic Arts or their Licensors.

GLOBAL VR IS AN AUTHORIZED ELECTRONIC ARTS DISTRIBUTOR.
Table of Contents

Table of Contents
   Preface.......................................................................... 4    Using the System Recovery CD.............................39
     Safety........................................................................ 4     Using the Game Install CDs...................................39
       Warnings ............................................................... 5        Chapter 7 — Service and Repair .............................40
       Environmental Conditions.................................... 5                     Opening the Control Panel .....................................40
     FCC Notices (United States).................................... 5                    Force-Feedback Steering System Service..............41
   Chapter 1 — Introduction.......................................... 6                     5 KΩ Steering Pot (Potentiometer)
     Need for Speed™ Underground Description........... 6                                      Replacement ....................................................42
       Need for Speed™ Underground Upgrade ............ 6                                   Force-Feedback Belt or Steering Motor
     Cabinet Specifications.............................................. 7                    Replacement ....................................................42
       Power Requirements............................................. 7                    Force-Feedback PCB Replacement....................43
       Hardware Features................................................ 7                Driving Control Panel Button Service ...................43
   Chapter 2 — Installing a New Cabinet ..................... 8                           Pedal Assembly Service .........................................44
     Driving Seat Installation .......................................... 9                 5 KΩ Gas and Brake Pot (Potentiometer)
     Marquee Setup........................................................ 10                  Replacement ....................................................44
     Linking Cabinets .................................................... 10             Six-Speed Shifter and E-Brake Service .................45
       Linking Cabinets Without Broadband................ 11                                Six-Speed Shifter Replacement ..........................45
       Linking Cabinets that use a Broadband Internet                                       Six-Speed Shifter Micro Switch Service............45
          Connection ...................................................... 12              Shifter Bottom Plate Replacement .....................46
     Checking the Game Dongle................................... 13                         E-Brake Button Service ......................................46
     Connecting an External Monitor............................ 13                        Driving Seat Slide Assembly Replacement ...........46
   Chapter 3 — Playing a Game.................................. 14                        Wells-Gardner® Monitor Replacement ..................47
     Starting the Game................................................... 14              Wells-Gardner® Monitor Chassis PCB Removal ..49
     Game Play .............................................................. 15          Audio Amp and Speakers Service..........................51
       Modes of Play ..................................................... 16               Audio Amp PCB Replacement...........................51
       Operator-Run Local Tournaments...................... 16                              Front (Marquee) Speaker Replacement..............52
   Chapter 4 — Setting Up Tournament Play.............. 17                                  Center Speaker Replacement..............................52
     Getting Started........................................................ 17             Rear (Seat) Speaker or Subwoofer Replacement52
     Cabinet Registration............................................... 17               Computer Replacement ..........................................53
       Navigating the Registration Screens .................. 18                          Coin Mech Replacement ........................................54
       Web Registration for Existing Operators ........... 18                             Coin Meter Replacement........................................54
       Registration for Existing Operators without                                        Dollar Bill Validator Replacement .........................54
          Web Access ..................................................... 18             SmartCard Reader Replacement ............................55
       Registration for New Operators ......................... 18                        SmartCard Dispenser Service.................................55
       Register With Your 4-Digit Registration Key .... 19                                  SmartCard Dispenser Replacement....................55
       Register with an Active Operator Card .............. 22                            Power Distribution Service ....................................56
   Chapter 5 — Operator Menu and Game                                                       AC Power Plate...................................................56
     Setup ....................................................................... 26       AC Power Strip Replacement.............................57
     Navigating Through the Game Operator Menu                                              DC Power Supplies (+24 and +5/+12 VDC)......57
          Screens............................................................. 26         Cabinet Lighting Service........................................58
     Machine Information Menu ................................... 28                        Marquee Florescent Light Service......................58
     Game and Coin Options Menu .............................. 29                           Leader Light Service...........................................59
     Reset Stats/Settings Screen .................................... 30                    Brake Light Replacement ...................................59
     Accounting Screens................................................ 31                  Cold-Cathode Light Service ...............................60
     Current Location Income Screen ........................... 32                        Setting the Computer BIOS (CMOS) ....................61
     Game Statistics Screens ......................................... 32                Chapter 8 — Troubleshooting..................................63
     Play Control Test Screen........................................ 33                    Video Troubleshooting........................................63
     Monitor Calibration Screen.................................... 34                      Audio Troubleshooting .......................................64
     Sound Test .............................................................. 35           Control Troubleshooting .....................................64
     System Test............................................................. 36            Cabinet Linking Troubleshooting.......................66
     Link Status.............................................................. 37           Miscellaneous Troubleshooting..........................67
     Registration Options............................................... 38                 Connection Troubleshooting...............................68
   Chapter 6 — System Recovery and Game                                                     External Monitor Troubleshooting .....................69
     Install CDs.............................................................. 39        Chapter 9 — Replacement Parts ..............................71

Need for Speed™ Underground System Manual
Page 2 of 84                                                                                                            040-0049-01 Rev. B 1/20/2006
Table of Contents

         Documents and Software ................................... 71                     Artwork and Formed Plastic Components .........75
         Cables.................................................................. 71   Chapter 10 — Diagrams and Schematics................76
         Control Panel ...................................................... 71         Warranty Information .............................................83
         Cabinet and Marquee.......................................... 72              Technical Support.......................................................84
         Computer ............................................................ 72
         Steering and Audio PCB Assembly ................... 73
         Seat Assembly..................................................... 73
List of Figures
   Figure 1.   Need for Speed™ Underground                                             Figure 37. Monitor Mounting Nut Locations ........48
         Cabinet Dimensions.......................................... 7                Figure 38. Removing the Monitor PCB
   Figure 2.   Coin Door with Key Location................ 8                                 Mounting Hardware ........................................49
   Figure 3.   Installing the Seat Runners..................... 9                      Figure 39. Disconnecting the Chassis Neck
   Figure 4.   Attaching the Driving Seat to the                                             PCB and Second Anode Lead .........................50
         Runners ........................................................... 10        Figure 40. Monitor PCB Cables.............................50
   Figure 5.   Setting up the Marquee ........................ 10                      Figure 41. Audio Amp Connections, Volume
   Figure 6.   Linking Cabinets Without                                                      Adjustment, and Speaker Location.................51
         Broadband ....................................................... 11          Figure 42. Computer Mounting .............................53
   Figure 7.   Checking Link Status ........................... 11                     Figure 43. Servicing the Coin Mech and Coin
   Figure 8.   Linking Cabinets with Broadband ....... 12                                    Meter ...............................................................54
   Figure 9.   Parallel and USB Game Dongles......... 13                               Figure 44. Dollar Bill Validator DIP Switch
   Figure 10. Selecting Track and Car Options ......... 14                                   Settings (US Only) ..........................................55
   Figure 11. Driving Screen Functions..................... 15                         Figure 45. Filling the SmartCard Dispenser ..........56
   Figure 12. Registration Process Flowchart............ 17                            Figure 46. AC Power Plate (Standard Cabinet).....56
   Figure 13. Setting Cabinet Volume........................ 26                        Figure 47. DC Power Supply Connections............58
   Figure 14. Game Operator Menu Flowchart ......... 27                                Figure 48. Cabinet Lighting Locations ..................58
   Figure 15. Machine Information Screen................ 28                            Figure 49. Cold Cathode Florescent Light
   Figure 16. Game and Coin Options Screen........... 29                                     Wiring ..............................................................60
   Figure 17. Reset Stats/Settings Menu.................... 30                         Figure 50. Selecting the Settings Tab in the
   Figure 18. Accounting Info Screens ...................... 31                              Display Control Panel .....................................69
   Figure 19. Current Location Income Screen ......... 32                              Figure 51. Selecting the Video Card Name Tab ....69
   Figure 20. Game Stats Menu Screens.................... 32                           Figure 52. Choosing a Display Pair with
   Figure 21. Play Control Test Screen ...................... 33                             Cloning ............................................................70
   Figure 22. Monitor Calibration Test Screen .......... 34                            Figure 53. Confirming Display Settings ................70
   Figure 23. Monitor Remote Control Board ........... 34                              Figure 54. Six-Speed Shifter Exploded View
   Figure 24. Sound Test Screen ................................ 35                          and Parts ..........................................................74
   Figure 25. System Test Screen............................... 36                     Figure 55. Pedal Assembly Exploded View and
   Figure 26. Cabinet Link Status Screen .................. 37                               Parts ...............................................................74
   Figure 27. Registration Options Screen................. 38                          Figure 56. Artwork and Formed Plastic Part
   Figure 28. Opening the Control Panel................... 40                                Numbers and Locations...................................75
   Figure 29. Force-Feedback Steering System                                           Figure 57. Audio Wiring ........................................76
         Harnessing Diagram ....................................... 41                 Figure 58. Simplified Wiring Diagram ..................77
   Figure 30. Replacing the 5 KΩ Steering Pot ......... 42                             Figure 59. Detailed Wiring Diagram......................78
   Figure 31. Servicing the Steering Motor ............... 43                          Figure 60. Power Distribution Diagram.................79
   Figure 32. Replacing Button Lamps...................... 44                          Figure 61. Computer Rear Panel Diagram.............80
   Figure 33. Pedal Assembly Details........................ 44                        Figure 62. Setting up a Dial-up Game Network ....81
   Figure 34. Shifter Pattern and Micro Switch                                         Figure 63. Setting up a Broadband Game
         Actuation ......................................................... 45              Network ...........................................................82
   Figure 35. Seat Slide Assembly Replacement....... 47
   Figure 36. Cable Connections to the Monitor
         Chassis............................................................. 47


                                                                                                                               © 2006 GLOBAL VR, INC.
040-0049-01 Rev. B 1/20/2006                                                                                                              Page 3 of 84
Preface

Preface

          Safety
                        Please read this page before preparing your arcade cabinet for game play.
          The following safety instructions apply to all game operators and service personnel. Specific warnings and cautions will
          be included throughout this manual.
          Use the following safety guidelines to help protect the system from potential damage and to ensure your personal safety:
          •   Make sure that the switch on the back of the computer is set to match the AC power in use at your location:
              −   115 volts / 60Hz in most of North and South America and some Far Eastern countries such as Japan, South
                  Korea and Taiwan
              −   230 volts / 50Hz in most of Europe, the Middle East and the Far East
          •   To help prevent electric shock, plug the system into a properly grounded power source. These cables are equipped
              with 3-prong plugs to help ensure proper grounding. Do not use adapter plugs or remove the grounding prong from
              a cable. If you must use an extension cable, use a 3-wire cable with properly grounded plugs.
          •   To help protect your system from sudden increases and decreases in electrical power, use a surge suppressor, line
              conditioner or Uninterruptible Power Supply (UPS).
          •   Be sure nothing rests on the system's cables and that the cables are not located where they can be stepped on or
              tripped over.
          •   Keep your system far away from radiators and other heat sources.
          •   Do not block cooling vents.

          Precautions for Game Operation
          •   The avoid injury and accidents, people who fall under the following categories should not play the game:
              −   Those who need assistance when walking.
              −   Those who have high blood pressure or a heart problem.
              −   Those who have experienced muscle convulsions or loss of consciousness when playing a video game or similar
                  activities.
              −   Those who have trouble in the neck or spinal cord.
              −   Intoxicated persons.
              −   Pregnant women.
              −   Persons susceptible to motion sickness.
              −   Persons who do not abide by the warning labels on the game.
          •   A player who has never been adversely affected by light stimulus might experience dizziness or headache when
              playing the game. Small children can be especially susceptible to these conditions. Caution guardians of small
              children to keep watch over their children during play.
          •   Instruct those who feel sick during play to see a doctor.
          •   To avoid injury from falling objects, and electric shock due to spilled drinks, instruct players not to place heavy
              items, food, or drinks on the product.
          •   To avoid electric shock or short circuit, do not allow customers to put hands and fingers or extraneous matter in the
              openings of the product.
          •   To avoid risk of injury from falling, immediately stop customers from leaning against or climbing on the product.


Need for Speed™ Underground System Manual
Page 4 of 84                                                                                     040-0049-01 Rev. B 1/20/2006
Preface

       Warnings


                                  To avoid electrical shock, unplug the cabinet before performing installation or
                                  service procedures.


                                  GLOBAL VR® assumes no liability for any damages or injuries incurred while
                                  setting up or servicing the cabinet. Only qualified service personnel should
                                  perform installation or service procedures!


       Environmental Conditions
       Cabinet is intended for indoor use only. Be sure to keep the cabinet dry and maintain operating temperatures of 10°-
       40°C (50°-104°F).


       FCC Notices (United States)
       Electromagnetic Interference (EMI) is any signal or emission radiated in free space or conducted along power or signal
       leads, that endangers the functioning of radio navigation or other safety service, or that seriously degrades, obstructs, or
       repeatedly interrupts a licensed radio communications service. Radio communications services include, but are not
       limited to, AM/FM commercial broadcast, television, cellular services, radar, air-traffic control, pager, and Personal
       Communication Services (PCS). These licensed services, along with unintentional radiators such as digital devices
       (including computer systems) contribute to the electromagnetic environment.
       Electromagnetic Compatibility (EMC) is the ability of items of electronic equipment to function properly together in the
       electronic environment. While this computer system has been designed and determined to be compliant with regulatory
       agency limits for EMI, there is no guarantee that interference will not occur in a particular installation. If this equipment
       does cause interference with radio communications services, which can be determined by turning the equipment off and
       on, you are encouraged to try to correct the interference by one or more of the following measures:
       •   Re-orient the receiving antenna.
       •   Relocate the cabinet relative to the receiver.
       •   Plug the game into a different outlet so that the computer and the receiver are on different branch circuits.
       If necessary, consult a Regulatory EMC representative of GLOBAL VR® or an experienced radio/television technician
       for additional suggestions. You may find the FCC Interference Handbook, to be helpful. It is available from the U.S.
       Government Print Office, Washington, DC 20402.
       This device has been tested and complies with the limits for a Class A digital device pursuant to Part 15 of the FCC
       Rules. These limits are designed to provide reasonable protection against harmful interference when the equipment is
       operated in a commercial environment. This equipment generates, uses, and can radiate radio frequency energy. If not
       installed and used in accordance with the instruction manual, it may cause harmful interference with radio
       communications. Operation of this equipment in a residential area is likely to cause harmful interference, in which case
       you will be required to correct the interference at your own expense.
       Operation is subject to the following conditions:
       •   This device may not cause harmful interference.
       •   This device must accept any interference received, including interference that may cause undesired operation.


                                                                                                    © 2006 GLOBAL VR, INC.
040-0049-01 Rev. B 1/20/2006                                                                                   Page 5 of 84
Chapter 1 — Introduction

Chapter 1 — Introduction

       Need for Speed™ Underground Description
       Build and race the ultimate urban exotic with Need for Speed™ Underground.
       Take control of top import street tuners like Toyota Celica, Nissan 350Z, Mitsubishi Eclipse and
       the exclusive Nissan Skyline GT-R. Play Career and customize your car with licensed
       aftermarket parts to build your own unique ride.
       Force-feedback steering, surround sound and a 6-speed shifter make Need for Speed™
       Underground a truly engaging driving experience.

       Own the Streets
       •   Linkable – allowing up to 4 players to compete in blistering head-to-head competition.
       •   Tournament Play – with National Tournaments and Wednesday Tournament events
           throughout the US.
       •   Career Mode – allows players to choose their car and compete in a series of 81 races,
           earning custom performance parts and upgrades along the way. Players can store 4
           Careers on one Players’ Card!
       •   GLOBAL VR® Players’ Card Compatible – thousands of registered players are ready
           to drive, and new players can purchase a SmartCard format Players’ Card to store their
           data.

       Need for Speed™ Underground Upgrade
       The Need for Speed™ Underground Upgrade Kit is available for existing Need for Speed™
       cabinets. The upgrade kit includes the new Need for Speed™ Underground software, 6-speed
       shifter, Players’ Card reader (for Tournament and Career Mode play), NOS button, and new
       artwork.


Need for Speed™ Underground System Manual
Page 6 of 84                                                                  040-0049-01 Rev. B 1/20/2006
Chapter 1 — Introduction


       Cabinet Specifications
       The standard and deluxe cabinet styles are pictured below. Upgrade kits are available to convert
       cabinets released with earlier Need for Speed™ versions to run Need for Speed™ Underground.


                     Figure 1. Need for Speed™ Underground Cabinet Dimensions

       Power Requirements

                   Voltage             Nominal Inrush               Nominal Operating
                                      AC Current (Amps)             AC Current (Amps)

                     115                      6.5                            4

                     230                         3                           2


       Hardware Features
          •   Pentium 4 Computer                            •   Force-Feedback Steering
          •   Nvidia GeForce Graphics Card                  •   Six-Speed Shifter
          •   Six-Channel Surround Sound                    •   SmartCard Reader
          •   800x600, Super VGA Monitor                    •   SmartCard Dispenser
              - 27-Inch Flat-Screen (Standard)
              - 39-Inch (Deluxe)


                                                                                 © 2006 GLOBAL VR, INC.
040-0049-01 Rev. B 1/20/2006                                                                Page 7 of 84
Chapter 2 — Installing a New Cabinet

Chapter 2 — Installing a New Cabinet

       Use the following procedure to set up your game:
       1. Carefully remove the cabinet from the shipping container, giving yourself plenty of space.
          Inspect the exterior of the cabinet for any damage.
       2. Remove the keys from the coin return slot. Open the coin door to locate the second set of keys.


                                 Figure 2. Coin Door with Key Location

       3. Open the cash-box door and remove the loose parts inside the cash box. You will find the
          following items (may vary with cabinet style):
           •   10/100 Base-T Network Cable                •   System Manual (This Document)
           •   10/100 Base-T Crossover Coupler            •   Software Restore Guide
           •   Phone Cord                                 •   System Recovery Disk (1 CD)
           •   AC Power Cord                              •   Game Install Disks (2 CDs)
           •   Hardware for Attaching Driving Seat        •   T-25 Torx Security Bit
               Assembly
       4. Remove the back door from the cabinet. Verify that all cables and wires are securely connected
          to the computer and other components. See Chapter 10 — Diagrams and Schematics for wiring
          and connection diagrams.
       5. Connect the AC power cord from the cabinet to a grounded (3-terminal) AC wall outlet.
       6. Power ON the cabinet using the ON/OFF switch located on the lower rear of the cabinet. Verify
          that the game boots properly.


Need for Speed™ Underground System Manual
Page 8 of 84                                                                  040-0049-01 Rev. B 1/20/2006
Chapter 2 — Installing a New Cabinet

       7. If the SmartCard reader is not connected, or the SmartCard dispenser is empty, a screen, shown
          below, will appear. These screens will time out after 30 seconds, or you can press the START
          and NOS buttons to continue.


       8. Once the Attract movie starts, play a game to verify that everything works properly.
       9. Turn the cabinet OFF and disconnect the power cord before installing the seat assembly.

       Driving Seat Installation
       1. Look in the cash box to locate the hardware used to attach the driving seat.
       2. The seat runners may be packaged and placed with the seat or cabinet, or installed backwards in
          the cabinet. If the seat runners are installed backwards for shipping, use a 7/16" socket wrench
          to remove the four (4) 1/4-20 x 1-1/4" hex bolts with lock washers and flat washers that hold
          each seat runner inside the cabinet. See item A in Figure 3 below.
       3. Insert the seat runners so that they extend out from the cabinet, as shown below. Secure them
          with the four (4) 1/4-20 x 1-1/4" hex bolts with lock washers and flat washers.


                                  Figure 3. Installing the Seat Runners

       4. Slide the driving seat onto the seat runners, leaving enough space to connect the harnesses.
       5. Locate the two wire harnesses inside the driving seat, and inside the cabinet, near where the seat
          runners are installed. Connect the harnesses together as shown in item A of Figure 4. The
          connectors are keyed to prevent incorrect wiring.


                                                                                  © 2006 GLOBAL VR, INC.
040-0049-01 Rev. B 1/20/2006                                                                 Page 9 of 84
Chapter 2 — Installing a New Cabinet

       6. Slide the driving seat towards the cabinet while guiding the wire harnesses inside. Attach each
          driving seat to the seat runners using four (4) 2-1/4" T-27 Torx screws with 1/4" lock washers
          and fender washers. See item B of Figure 4.


                                                 B


                           Figure 4. Attaching the Driving Seat to the Runners

       Marquee Setup
       1. Rotate the marquee forward towards the front of the cabinet as shown in the figure below.
       2. Install three (3) 1/4-20 x 1-1/2" T-27 Torx bolts through the holes in the metal bracket at the
          edge of the marquee support brace into the T-nuts in the top of the cabinet to secure the
                          support brace.
              Warning: Until the bolts are in place, the marquee can slide back and could
              cause injury.


                                       Figure 5. Setting up the Marquee

       The cabinet is now ready for game play.

       Linking Cabinets
       You can link up to four cabinets together for head-to-head competition. Once the cabinets are
       linked in hardware and software, the Attract Mode movies will synchronize, and players can
       choose to play individually or race against other players.
       Each cabinet ships with an Ethernet cable and a cross-over coupler. The cross-over coupler is
       used to link two cabinets. An Ethernet hub is required to link more than two cabinets. If you use
       broadband instead of dial-up for connecting the cabinets to the Internet to sync with the


Need for Speed™ Underground System Manual
Page 10 of 84                                                                  040-0049-01 Rev. B 1/20/2006
Chapter 2 — Installing a New Cabinet

       GLOBAL VR® server, you must use a router to link your cabinets. The table below shows
       required equipment by type of Internet connection and number of cabinets.
        Number of    Internet           Linking Equipment Required
        Cabinets     Connection
        2            Dial-up or None    Cross-over coupler (Included with cabinet)
        3 or 4       Dial-up or None    Ethernet hub (10/100 Mbps)
        2, 3, or 4   Broadband          Ethernet router (Netgear® RP614v2 router recommended)

       Linking Cabinets Without Broadband


                               Figure 6. Linking Cabinets Without Broadband

       1. Before connecting the Ethernet cables, go into the Operator Menu on each cabinet, and set the
          Cabinet Link ID number, as shown by the arrow in Figure 7. Each cabinet must have a unique
          number: 1, 2, 3, or 4. Cabinets should be numbered from left to right. Exit the Operator Menu
          to reset the number in the software. All linked cabinets must run the same software version.
       2. Locate the 10' Ethernet cable and Ethernet crossover coupler in the cash box of each cabinet.
       3. Connect the Ethernet cable to the Ethernet connector on the power plate of each cabinet.
          •   To link two cabinets: Connect the two Ethernet cables to one cross-over coupler. Do not
              use two couplers.
          •   To link three or four cabinets: Connect the Ethernet cables to an Ethernet hub or switch
              (not included). Connect the hub or switch to AC power and make sure it is powered ON.
              Do not use cross-over couplers with a hub or switch.
       4. If more than one cabinet has the same Cabinet Link ID number, each cabinet with a duplicate ID
          number will display an error message, as shown below. Repeat Step 1 to correct the duplicate
          Cabinet Link ID numbers.


                                       Figure 7. Checking Link Status
                                                                                  © 2006 GLOBAL VR, INC.
040-0049-01 Rev. B 1/20/2006                                                                Page 11 of 84
Chapter 2 — Installing a New Cabinet

       Linking Cabinets that use a Broadband Internet Connection


                               Figure 8. Linking Cabinets with Broadband
       This procedure was tested using a Netgear® RP614v2 router. GLOBAL VR® does not offer
       support for other router brands or models. See Figure 63 on page 82 for an example of how to
       set up your broadband game network.
       Important: Your Need for Speed™ Underground cabinets must be connected to a separate
       router from any other games or devices.
       1. Before connecting the Ethernet cables, go into the Operator Menu on each cabinet, and set the
          Cabinet Link ID number, as shown by the arrow in Figure 7. Each cabinet must have a unique
          number: 1, 2, 3, or 4. Cabinets should be numbered from left to right. Exit the Operator Menu
          to reset the number in the software. All linked cabinets must run the same software version.
       2. Connect your Cable/DSL router to AC power.
       3. The router must be configured to Factory Default Settings. If you have used the Router before,
          or changed its settings, press and hold the reset pushbutton (shown in Figure 8) until the Test
          LED turns on (about 10 seconds).
       4. Connect the Internet port of the router to your network. (Note: The router replaces the hub for
          systems using broadband.)
       5. Connect an Ethernet cable to the Ethernet connector on the power plate of each cabinet, and to
          router ports 1—4 as shown in Figure 8. Do not use crossover couplers.
       6. If more than one cabinet has the same Cabinet Link ID number, each cabinet with a duplicate ID
          number will display an error message, as shown in Figure 7. Repeat Step 1 to correct the
          duplicate Cabinet Link ID numbers.
       7. Attempt to force a call from the System Test screen of the Game Operator menu of each cabinet,
          to verify that the connection is working properly.
       If the cabinets are able to sync with GLOBAL VR®, you have successfully set up your
       connections. If a cabinet cannot sync, an error message will be displayed.
Need for Speed™ Underground System Manual
Page 12 of 84                                                                040-0049-01 Rev. B 1/20/2006
Chapter 2 — Installing a New Cabinet


       Checking the Game Dongle
       The cabinet uses a game dongle to activate the game software. Depending on the type of dongle
       shipped with the game, it connects to either the parallel port or the USB port on the back of the
       computer. If the dongle is missing, the game will not run.
       When a USB Dongle is installed and working properly, a red LED will illuminate inside the
       dongle. A Parallel Dongle does not light up.
       For a Game Dongle to be recognized correctly, it should be connected before the cabinet is
       powered ON. If the software does not recognize the Game Dongle, make sure the Dongle is
       connected properly, and then power cycle the cabinet to see if this resolves the problem.
       If the dongle should come out while the game is running, a NO DONGLE screen will appear. If
       this happens, the dongle can be re-installed without rebooting the game.
       Note: The dongle supplied with the cabinet is specific to the game and software version. Future
       software upgrades may require you to also upgrade the dongle.
       Important: Some of your registration information is stored in the dongle, so if you replace your
       computer, remove the dongle and keep it with the cabinet.


                  Parallel Game Dongle          USB Game Dongle

                               Figure 9. Parallel and USB Game Dongles

       Connecting an External Monitor
       If you wish, you can use the S-video connector on the computer video card to connect an
       external TV monitor and display the game action outside of the cabinet.
       Important: If you install the operating system with the System Restore Disk while a second
       monitor is connected, an NVIDIA dialog box will appear onscreen after the large GLOBAL VR®
       logo appears at the end of the installation process. When you see this screen, power-cycle the
       cabinet and then proceed with the game software installation.
       If your cabinet has an FX 5700 video card, you cannot use the S-video and VGA ports at the
       same time. In this case, you must purchase a DVI-to-VGA adapter and use this adapter to
       connect the cabinet monitor to the DVI port.
       Important: Turn the cabinet OFF before making any video connections.
       In most cases, the external monitor should not require any special setup. In some cases the
       Attract Movie may not show up on the screen. If this happens, refer to External Monitor
       Troubleshooting on page 69.


                                                                                  © 2006 GLOBAL VR, INC.
040-0049-01 Rev. B 1/20/2006                                                                Page 13 of 84
Chapter 3 — Playing a Game

Chapter 3 — Playing a Game

      Starting the Game
      With the proper number of coins inserted, press the red Start button to begin the game. First
      select your mode of play, Race, Career, or Tournament (see page 16). Next a series of screens
      will appear, as shown below, allowing you to select options for the game.


                              Figure 10. Selecting Track and Car Options
      1. Track Select: Turn the steering wheel to highlight each track displayed at the top of the screen.
         The track map and difficulty (Easy, Medium, or Hard) are displayed as you highlight each track.
         Press the gas pedal to select a track.
      2. Car Select: Turn the steering wheel to highlight each car displayed at the top of the screen, and
         press the gas pedal to select your car.
      3. Customize: Turn the steering wheel to highlight each customization shown at the top of the
         screen. Your car is displayed in each highlighted color. Press the gas pedal to make a selection.
      4. Transmission: Select either automatic or manual transmission. Manual transmission (using the
         6-speed shifter) may result in better speed control and faster race times for experienced drivers.
         No clutch is used, only the shifter.
      5. Other Options: At any time during the car, customization, or transmission selection screens,
         you can press a control panel button for other options. These options are set through pop-up
         menus that display for five seconds.
         • Press NOS to turn AI on or off. In a linked race, any player can turn AI off for all cabinets.
            Turning AI off removes computer-controlled cars from the track. For a driver racing solo,
            this also activates Shadow Attack Mode, in which the driver races against a shadow of the
            track leader.
         • Press Look Back to turn Handicap (catch-up) on or off (default is on) for one driver only.
            Handicap helps a driver catch up with other cars.
         • Press ♪ to toggle the Force-Feedback level through Light, Medium, or Heavy.
      Once you have selected your options, the game will begin to load.

Need for Speed™ Underground System Manual
Page 14 of 84                                                                040-0049-01 Rev. B 1/20/2006
Chapter 3 — Playing a Game

       Game Play
       As in any driving game, use the Steering Wheel, Gas, Brake and Shifter to control the car.
       The Look Back button lets you look behind the car. The View button toggles the view between
       inside and outside the car. Tap the ♪ button to turn the music off; tap it again to change songs.
       Press the NOS button for an extra burst of speed—but quantities are limited! Tap the E-Brake
       button to start a drift.


                                   Figure 11. Driving Screen Functions

       During the race, useful information is displayed onscreen:
       1. Shows the number of the lap you are currently driving, and the total laps to complete the race.
       2. Shows your current time for the lap and the best recorded lap time.
       3. Shows your position (green triangle) relative to the other cars (red triangles) on a track map.
       4. Shows your car's turbo level.
       5. Shows the number of seconds you have to cross the next checkpoint. A Shadow Attack icon is
          displayed above this number if you are in Shadow Attack mode.
       6. Shows your position in the race out of the total number of cars.
       7. Shows the time gap between you and the leader, or the car behind you if you are in the lead.
       8. Shows style points earned for advanced driving techniques.
       9. Tachometer, shows your engine RPM in thousands.
       10. Shows your current gear. In manual, the gear position in the shift pattern is also displayed.
       11. Shows your speed in either km/h or MPH (set in Game Operator menu).
       Additional information will appear onscreen depending on the race mode and options selected.
       At the end of the race, the time and position for each driver is displayed.


                                                                                   © 2006 GLOBAL VR, INC.
040-0049-01 Rev. B 1/20/2006                                                                 Page 15 of 84
Chapter 3 — Playing a Game

      Modes of Play
      Race Mode (amusement): This is normal racing, requiring no Players' Card or online services.
      If cabinets are linked, players can race against each other head-to-head.
      Using a Players' Card in Race Mode makes another car available for the player to drive. Also, a
      player can track miles on a Players' Card, and after 300 miles, another car becomes available.
      Career Mode: In this mode, players drive a series of races. For each race they finish within a
      specified time, they win a customization or performance upgrade for their car. Players save their
      car and points on their Players' SmartCards. Players who complete a career (81 different races)
      can re-race any Career Mode race. Players can also use their customized Career Mode car in
      Race Mode.
      Tournament Mode: If a cabinet is registered and online, players can compete in tournaments to
      win cash and prizes. To participate, players need a Players' SmartCard. Check the
      GLOBAL VR® website (www.globalvr.com) for the latest Tournament information.

      Operator-Run Local Tournaments
      If a cabinet is registered and online, operators can create their own Local Tournaments through
      the GLOBAL VR® website (www.globalvr.com). Operators can set up a local tournament on
      one cabinet, or on a number of cabinets at any of their locations. They can list the tournaments
      on the GLOBAL VR® website to attract players.
      Note: Certain regions have local restrictions on tournament play.


Need for Speed™ Underground System Manual
Page 16 of 84                                                                 040-0049-01 Rev. B 1/20/2006
Chapter 4 — Setting Up Tournament Play

Chapter 4 — Setting Up Tournament Play

       Go Online With GLOBAL VR®
               and Get More From Your Equipment Investment
       More Players – Top players find your games through our online Game Locator.
       More Free Time – Online equipment management lets you adjust and account without
                        leaving your desk.
       More Play Modes – Players at all levels have more ways to enjoy their favorite games.
       More Cash – Increased earnings with Tournament Play and other online-only features.

       Getting Started
       Register with the GLOBAL VR® Tournament System to connect your game cabinets to our
       online servers. Being online opens Tournament Play and other new play modes for your players
       and time-saving services for you. Getting started is easy:
       1. If you do not have an account with GLOBAL VR®, fax in the Operator Agreement form located
          in the Registration Pack of the Welcome Kit included with your cabinet or upgrade kit.
       2. Connect your cabinet to a phone line or broadband network. See the diagrams on pages 81 and
          82 for examples of how to set up your game network. Also see page 12 for important
          information about using broadband with linked cabinets.
       3. Register your cabinet as described below.

       Cabinet Registration
       You have four options for registering your cabinet:
       •   New Operators: Go to page 18.
       •   Existing Operators:
           − Register through our website: Go to page 18.
           − Obtain a 4-digit registration key if you do not have web access: Go to page 18.
           − Register with your Active Operator Plus™ SmartCard: Go to page 22.
              Note: For existing operators setting up a cabinet in a new location, it is probably easiest to
              register through the website.


                                                                                   © 2006 GLOBAL VR, INC.
040-0049-01 Rev. B 1/20/2006                                                                 Page 17 of 84
Chapter 4 — Setting Up Tournament Play

                                                                                           Select from your
                                                Register with your active                 Existing Locations
                                                Operator Plus SmartCard
                                                                                          Enter New Location
                                               Logon to www.globalvr.com
                                                                                              Information
               Existing Operators             and fill out the form to get your
                                                 4-digit Registration Key

                                              If you don't have web access,
                New Operators                   phone GLOBAL VR® to get                   Register using your
                                               your 4-digit Registration Key           4-Digit Registration Code.

               Fill out the Operator
                                               Phone GLOBAL VR® to get
              Agreement Form and
                                               your 4-digit Registration Key
              fax it to GLOBAL VR®

                                       Figure 12. Registration Process Flowchart

       Navigating the Registration Screens
       Use the driving control panel buttons to navigate the registration screens, as shown below. Also
       look for onscreen instructions and hints near the bottom of each screen.
               Button                    Function                      Button               Function
                              Up                                                  Back or Exit
                                                                                  Left (In Some Screens)
                              Down                                                Select
                                                                                  Right (In Some Screens)
                              Select                                  Steering    Right & Left
                              (In Some Screens)                        Wheel      (In Some Screens)


       Web Registration for Existing Operators
       Perform the following steps to register online if you have an account with GLOBAL VR®.
       Note: You will need to provide the cabinet serial number, found on a label on the back of the
       cabinet, for each cabinet you wish to register.
       1. Go to the GLOBAL VR® website, www.globalvr.com.
       2. Click the Operator tab and login using your Operator ID and password.
       3. Click the MY CABINETS tab near the top of the page.
       4. From the menu on the left side of the Cabinets screen, under Racing, select Registration.
       5. Fill out the Registration Form. In the Select Existing Location field, you can select New
          Location, or one of your existing locations. When you finish the form, click the Create button.
       6. A Cabinet Registration Confirmation screen will appear. Find your 4-digit Registration Key
          near the top of the page, and write it down. Use this number at the cabinet to complete the
          registration process and activate your Operator card. (The Registration Key expires after one
          week.)
       7. Repeat the steps above for each cabinet that you wish to register.
       8. Proceed to the section titled Register With Your 4-Digit Registration Key, on page 19.

       Registration for Existing Operators without Web Access
       Perform the following steps if you have an account with GLOBAL VR® but no Web access.
Need for Speed™ Underground System Manual
Page 18 of 84                                                                               040-0049-01 Rev. B 1/20/2006
Chapter 4 — Setting Up Tournament Play

       Note: You will need to provide the cabinet serial number, found on a label on the back of the
       cabinet, for each cabinet you wish to register.
       1. Phone GLOBAL VR® Tournament Support, at 408.597.3429, to receive a 4-digit cabinet
          registration key for each cabinet that you wish to register.
       2. Proceed to the section titled Register With Your 4-Digit Registration Key, on page 19.

       Registration for New Operators
       If you are a new operator and do not have a GLOBAL VR® Operator Account, perform the
       following steps to get your cabinet registered and online:
       1. Fill out Operator Agreement form, located in the Registration Pack of the Welcome Kit included
          with your cabinet or upgrade kit. Fax the form to GLOBAL VR® at 408.597.3439.
          Note: When you phone Tournament Support, you will need to provide the cabinet serial
          number, found on a label on the back of the cabinet, for each cabinet you wish to register.
       2. Phone GLOBAL VR® Tournament Support, at 408.597. 3429, to complete the registration
          process and create your Operator Account. You will receive the following:
          •   A 4-digit registration key for each cabinet you are registering. You will use the
              registration key at the cabinet to complete the registration process and activate your
              Operator card. (The 4-digit registration key expires after one week.)
          •   An Operator ID and password. Use these in the future to logon to our website to get
              your 4-digit registration key for cabinet registration. Your ID also gives you access to
              the Global Impact Operator's Online Store.
       3. Proceed to the section titled Register With Your 4-Digit Registration Key, that follows.

       Register With Your 4-Digit Registration Key
       1. Press the Operator button inside the coin door and select Registration Options from the Game
          Operator Menu. The Registration screen will appear.
       2. Press the ♪ button to enter the Registration screen. Select Cabinet Registration and press the ♪
          button again to begin the registration process.


       3. Read the Acknowledgement screen, select Agree, and then press the ♪ button to continue. You
          must select Agree to continue with registration.
                                                                                   © 2006 GLOBAL VR, INC.
040-0049-01 Rev. B 1/20/2006                                                                 Page 19 of 84
Chapter 4 — Setting Up Tournament Play

       4. The Dial-up Phone settings screen will appear next. Phone Option is set to Dial-up as default.
          To use a broadband connection, press ♪ with Phone Option selected, and then press VIEW
          and LOOK BACK to toggle between Broadband and Dial-up. Press ♪ to select. If using
          Broadband, skip to step 6.


       5. To use a dial-up phone line, keep Dial-up as the Phone Option, and use the buttons to set the
          dial-up properties as described below:
          a. Use VIEW and LOOK BACK to select State and press ♪. Use VIEW and LOOK
             BACK to scroll through the list of states. Press ♪ to select your state from the list.
          b. Use VIEW and LOOK BACK to select Primary City and press ♪. Use VIEW and
             LOOK BACK to scroll through the list of cities. Press ♪ to select your city or the city
             closest to the cabinet location.
              Hint: Press the gas pedal while scrolling the list of cities to jump to the next letter.
          c. Use VIEW and LOOK BACK to select Primary Number and press ♪. Use VIEW and
             LOOK BACK to scroll through the list of phone numbers for your city. Press ♪ to select
             a local phone number.
          d. Select Yes for Skip Area Code unless the area code for the selected number is different
             from the line the cabinet will be using. (If the cabinet needs to dial an area code, you will
             also need to enter a “1” as a dialing prefix in the next step.)
          e. If you need to dial a number (such as “9”) to call outside of your location, or if your
             modem will be dialing an area code and needs to dial a “1” first, select Dialing Prefix
             and press ♪. This will select the onscreen keypad.
              Use VIEW, LOOK BACK, ♪, and NOS, to select each number from the onscreen
              keypad, and press START to enter it. Select the comma (,) to insert a pause in the
              dialing. To make a correction, select DELETE on the onscreen number pad and press
              START. When you are finished, select ENTER on the number pad and press START.
          f. Repeat Steps b—e for the Secondary City. (If your Primary City has more than one dial-
             up number, select the same city and a different number.) The computer will use this dial-
             up number as a backup if it cannot reach the primary number.


Need for Speed™ Underground System Manual
Page 20 of 84                                                                    040-0049-01 Rev. B 1/20/2006
Chapter 4 — Setting Up Tournament Play

          g. When you finish, the Primary and Secondary numbers will be displayed onscreen, with
             the dialing prefix and area code, if entered. Check the entries, and use the buttons to
             return to any entry that you wish to change. When you are finished, Use VIEW and
             LOOK BACK to select Continue, and press ♪.
       6. The Time Zone screen will appear next. Use VIEW and LOOK BACK to select your time zone
          and press ♪.
       7. The Select Registration Method screen will appear next. Select Register with a 4-Digit Code
          and press ♪.


       8. On the Enter your 4-digit code screen, use VIEW, LOOK BACK, ♪, and NOS, and/or steering
          wheel, to select each number from the onscreen keypad, and press START to enter it. If you
          make a mistake, select Delete and press START.
       9. When you are finished, select Enter and press START.
          You will see "Connecting…" followed by "In progress…".
          When the process finishes, you will see "Registration Successful." Your cabinet is now
          registered.
          Important: If you never see the Registration Successful screen, this can indicate a problem
          with registration, possibly an interrupted modem connection. Select Force Call from the
          Registration Options screen to make sure that your cabinet is able to sync with
          GLOBAL VR®, and to finalize registration.
       10. After registration, you will be prompted to insert your Operator card to activate it. When the
           Card Activation Successful screen appears, your SmartCard will be active and can be used to
           register other cabinets. You can skip this step if you do not wish to activate a card at this time.
           You can activate an Operator Card at any time from the Registration Options screen.
          Note: Inserting your active Operator card in a registered cabinet will automatically open the
          Operator menu.
       Your cabinet is now registered. It is a good idea to set the sync time on the Registration Options
       screen so that your cabinets call in to GLOBAL VR® at different times. Also make sure the
       cabinet will be powered on at the selected sync time.


                                                                                     © 2006 GLOBAL VR, INC.
040-0049-01 Rev. B 1/20/2006                                                                   Page 21 of 84
Chapter 4 — Setting Up Tournament Play


       Register with an Active Operator Card
       If you already have an account with GLOBAL VR®, you can use your Operator Card to register
       immediately.
       1. Press the Operator button inside the coin door and select Registration Options from the Game
          Operator Menu. The Registration screen will appear.
       2. Press the ♪ button to enter the Registration screen. Select Cabinet Registration and press the ♪
          button again to begin the registration process.


       3. Read the Acknowledgement screen, select Agree, and then press the ♪ button to continue. You
          must select Agree to continue with registration.
       4. The Dial-up Phone settings screen will appear next. Phone Option is set to Dial-up as default.
          To use a broadband connection, press ♪ with Phone Option selected, and then press VIEW
          and LOOK BACK to toggle between Broadband and Dial-up. Press ♪ to select. If using
          Broadband, skip to step 6.


       5. To use a dial-up phone line, keep Dial-up as the Phone Option, and use the buttons to set the
          dial-up properties as described below:
          a. Use VIEW and LOOK BACK to select State and press ♪. Use VIEW and LOOK
             BACK to scroll through the list of states. Press ♪ to select your state from the list.

Need for Speed™ Underground System Manual
Page 22 of 84                                                                 040-0049-01 Rev. B 1/20/2006
Chapter 4 — Setting Up Tournament Play

          b. Use VIEW and LOOK BACK to select Primary City and press ♪. Use VIEW and
             LOOK BACK to scroll through the list of cities. Press ♪ to select your city or the city
             closest to the cabinet location.
              Hint: Press the gas pedal while scrolling the list of cities to jump to the next letter.
          c. Use VIEW and LOOK BACK to select Primary Number and press ♪. Use VIEW and
             LOOK BACK to scroll through the list of phone numbers for your city. Press ♪ to select
             a local phone number.
          d. Select Yes for Skip Area Code unless the area code for the selected number is different
             from the line the cabinet will be using. (If the cabinet needs to dial an area code, you will
             also need to enter a “1” as a dialing prefix in the next step.)
          e. If you need to dial a number (such as “9”) to call outside of your location, or if your
             modem will be dialing an area code and needs to dial a “1” first, select Dialing Prefix
             and press ♪. This will select the onscreen keypad.
              Use VIEW, LOOK BACK, ♪, and NOS, to select each number from the onscreen
              keypad, and press START to enter it. Select the comma (,) to insert a pause in the
              dialing. To make a correction, select DELETE on the onscreen number pad and press
              START. When you are finished, select ENTER on the number pad and press START.
          f. Repeat Steps b—e for the Secondary City. (If your Primary City has more than one dial-
             up number, select the same city and a different number.) The computer will use this dial-
             up number as a backup if it cannot reach the primary number.
          g. When you finish, the Primary and Secondary numbers will be displayed onscreen, with
             the dialing prefix and area code, if entered. Check the entries, and use the buttons to
             return to any entry that you wish to change. When you are finished, Use VIEW and
             LOOK BACK to select Continue, and press ♪.
       6. The Time Zone screen will appear next. Use VIEW and LOOK BACK to select your time zone
          and press ♪.
       7. The Select Registration Method screen will appear next. Select Register with Operator Card
          and press ♪.


       8. When you are prompted, insert your Operator Card. The SmartCard reader will read the card
          automatically. You will see "Connecting…" onscreen for a about a minute, followed by
          "Disconnecting… 100% Complete" when the process has finished.


                                                                                     © 2006 GLOBAL VR, INC.
040-0049-01 Rev. B 1/20/2006                                                                   Page 23 of 84
Chapter 4 — Setting Up Tournament Play

          If the call fails to connect, you will see a modem error message (see Connection
          Troubleshooting on page 68 for information on modem error messages). Press any button to
          start over from the initial screen. (You will not have to re-enter your settings, and you can
          leave your Operator Card in the SmartCard reader.) If you have repeated connect failures,
          select a different dial-up number.
       9. The Select Cabinet Location screen will appear next. Your existing locations should appear in
          the list. If you are setting up the cabinet at a new location, proceed to Manually Entering your
          Location, on page 25. Otherwise continue with Step 10.


       10. Use VIEW and LOOK BACK to scroll through the list, and press ♪ to select your location.
       11. The next screen will prompt you to enter your cabinet serial number (find this number, starting
           with "GVR" on a sticker on the back of the cabinet). Use the buttons and/or steering wheel to
           navigate the onscreen keyboard to select each character. Press Start to enter each character.
           Select Done and press Start when finished.
          You will see "Connecting…" onscreen, followed by "In Progress…". When the process
          finishes, you will see "Registration Successful." Press any button to return to the Operator
          Menu.
          Important: If you never see the Registration Successful screen, this can indicate a problem
          with registration, possibly an interrupted modem connection. Select Force Call from the
          Registration Options screen to make sure that your cabinet is able to sync with GLOBAL VR®.
       Your cabinet is now registered. It is a good idea to set the sync time on the Registration Options
       screen so that your cabinets call in to GLOBAL VR® at different times. Also make sure the
       cabinet will be powered on at the selected sync time.
       Once your cabinet is registered, the Operator menu will open automatically when you insert your
       active Operator card.


Need for Speed™ Underground System Manual
Page 24 of 84                                                                  040-0049-01 Rev. B 1/20/2006
Chapter 4 — Setting Up Tournament Play


Manually Entering your Location
       1. If your location is not in the list on the Select Cabinet Location screen, select New Location and
          press ♪. The next screen will show a list of fields requesting information about your location.
          When you enter this screen, the first field will be pre-selected.


       2. Use the VIEW, LOOK BACK, ♪, and NOS buttons and/or steering wheel to navigate the
          onscreen keyboard, and press START to enter each selected character. To make a correction,
          select the Backspace key on the onscreen keyboard and press START. When you are finished,
          select ENTER on the onscreen keyboard and press START.
       3. For Location Type and State, use VIEW and LOOK BACK to scroll through a list of options
          and press START to select.
       4. When you have filled in all of the fields, select DONE from the onscreen keyboard and press
          Start. (If you press Done before filling out all required fields, the next field that needs
          information will become selected.)
          You will see "Connecting…" onscreen, followed by "In Progress…". When the process
          finishes, you will see "Registration Successful." Press any key to return to the Operator
          Menu.
          Important: If you never see the Registration Successful screen, this can indicate a problem
          with registration, possibly an interrupted modem connection. Select Force Call from the
          Registration Options screen to make sure that your cabinet is able to sync with GLOBAL VR®.
       Your cabinet is now registered. It is a good idea to set the sync time on the Registration Options
       screen so that your cabinets call in to GLOBAL VR® at different times. Also make sure the
       cabinet will be powered on at the selected sync time.


                                                                                   © 2006 GLOBAL VR, INC.
040-0049-01 Rev. B 1/20/2006                                                                 Page 25 of 84
Chapter 5 — Operator Menu and Game Setup

Chapter 5 — Operator Menu and Game Setup
      This chapter describes how to use the Game Operator menu to set up the game or diagnose
      problems. All game audits, settings, registration, and control diagnostics are accessed from the
      Game Operator Menu.
      Version 1.1 of the software added an Accounting menu with several useful new accounting
      features. Also, certain Game Operator menu functions were moved to different screens than in
      earlier software. The Operator Menu screens are described in detail on the following pages.
      Refer to Game Operator Menu Flowchart, on the following page, for a list of the Game Operator
      menu screens and available settings.
      Press the red operator button behind the coin mech door to enter the Game Operator menu.

      Navigating Through the Game Operator Menu Screens
      Use the buttons on the driving control panel to navigate, select, and change options, as described
      in the table below. Onscreen instructions will provide additional information on using each
      menu.
                     Button           Function                       Comments
                                 Up                 Scroll through lists or settings.

                                 Down

                                 Select             Confirm a setting.

                                 Back or Exit       Navigate back to the menu list or exit the
                                                    menu.

      The following is an example of how to change a menu option:


                                      Figure 13. Setting Cabinet Volume

      1. Use the           and            buttons to navigate and highlight a menu option.

      2. Press the            button to select the highlighted option. The game option will turn to red when
         it is selected.

      3. Use the         and         buttons to rotate through the available settings for the selected
         option, as shown by the arrows in steps 2 and 3 of the picture above.

      4. When you reach the setting you want, press the           button again. The game option will now
         turn back to yellow, and will display the new setting, as shown in step 4 of the picture above.

      5. Press the            button to go back to the main menu.
Need for Speed™ Underground System Manual
Page 26 of 84                                                                           040-0049-01 Rev. B 1/20/2006
Chapter 5 — Operator Menu and Game Setup

       The flowchart below shows the function of each menu in the Game Operator Menu.
           Main Menu

                                    Displays International Setting, Software Version, Cabinet Type,
                                    and GLOBAL VR® contact info. Lets you set Volume and Link ID #.
             Machine
                                    Lets you set Play Type, Credit Display, Free Play on or off, MPH
                                    or km/h, Players Card Sales enabled or disabled, and Skill Level.
              Options
                                    Lets you Restore Default Settings, Reset Game Stats, and Reset
                                    Amusement Play Track Records and Shadows.
              Resets

                                     Lets you set the number of coins           Product Pricing
            Accounting               per unit of money, view or clear           Location Splits
                                     credits, open other menus to set           Current Collection Stats
                                     pricing and location splits, and           Current Location Income
                                     view or reset collection statistics.
            Game Stats                                                          Previous Collection Stats

                                    Displays statistics about settings selected by players.
             Controls
                                    Lets you test and calibrate the driving controls.

              Monitor               Lets you test and calibrate the monitor.

                                    Lets you test cabinet audio.
            Sound Test
                                    Lets you test SmartCard reader, Players' Card dispenser, and
                                    modem, and set monitor gamma.
                                    Test Watchdog (new in version 1.1) uses the Watchdog function to
           System Test
                                    reboot the shell. This test is primarily used by GLOBAL VR®
                                    software QA testers.
            Link Status
                                    Displays status of each cabinet in a linked set.

                                    Lets you register the cabinet for Tournaments and online features,
        Registration Options
                                    and force a call to sync with the GLOBAL VR® servers.


                               Figure 14. Game Operator Menu Flowchart


                                                                                        © 2006 GLOBAL VR, INC.
040-0049-01 Rev. B 1/20/2006                                                                      Page 27 of 84
Chapter 5 — Operator Menu and Game Setup

      Machine Information Menu


                                Figure 15. Machine Information Screen

      The Machine Information menu is the default screen displayed when you press the Operator
      Button. It displays important information about the cabinet.
          Menu Item          Description                                                 Default Value
                                                                                         (as applicable)
          International      Displays international location (e.g. USA or UK) as read    (Set by Dongle)
          Setting            from the game dongle.
          Game Version       Displays the game software version installed.
          OS Version         Displays the operating system software version installed.
          Cabinet Type       Displays cabinet type (Sit-Down or Up-Right).               (Set by Dongle)
          Cabinet Volume     Sets the game audio volume form 0—100% in increments        55%
          Setting            of 5.
          Attract Volume     Sets the Attract mode audio volume as a percentage of       95%
                             cabinet volume.
          Attract Sound      Sets Attract mode sound to Always, Sometimes, or Never.     Always
          Mode               The Sometimes setting will play sound in attract mode one
                             third of the time.
          Cabinet Link ID#   Sets the ID number used for linking cabinets. Each linked   1
                             cabinet must have a unique Cabinet Link ID number (1, 2,
                             3, or 4).
          Contact Info       Displays GLOBAL VR® contact information.


Need for Speed™ Underground System Manual
Page 28 of 84                                                                    040-0049-01 Rev. B 1/20/2006
Chapter 5 — Operator Menu and Game Setup


       Game and Coin Options Menu


                                 Figure 16. Game and Coin Options Screen

       The Game and Coin Options menu is used to set up the type of money or credits used at your
       location, game pricing, and game-play difficulty.
         Menu Item                                     Description                             Default Value
                                                                                              (as applicable)
  Play Type                    Sets Play Type to Player's Choice or Race Only.               Player's Choice
                               (Race Only disables Tournament and Career modes.)
  Credit Display               Sets whether Money or Credits are used to play the cabinet.   Money
                               (This setting affects the display of other items.)
  Free Play                    Sets free play ON or OFF.                                     OFF
  Display Speed in             Sets the speedometer to MPH or km/h.                          MPH
  Players' Card Sales          Sets Players' Card sales to Enabled or Disabled. This gives   Enabled
                               Operators the option of allowing card sales only from
                               cabinets with dispensers.
  Skill Level                  Lets you set the Skill Level, by track, from A (easiest)      C (Medium)
  (Checkpoint Difficulty)      through E (hardest). Easier settings mean players have more
                               time to reach each checkpoint; harder settings mean less
                               time.                                                         # Laps/Drags
                               # Laps/Drags lets you set how many laps or drags players      varies by track
                               get for each racetrack. Options are 1–5.


                                                                                       © 2006 GLOBAL VR, INC.
040-0049-01 Rev. B 1/20/2006                                                                     Page 29 of 84
Chapter 5 — Operator Menu and Game Setup


      Reset Stats/Settings Screen


                                   Figure 17. Reset Stats/Settings Menu

               Menu Item                                        Description
        Restore Default Settings   Sets the cabinet to the factory default settings. Settings that are
                                   reset include Credit Display, Coins per $, Cost Per Play, Game
                                   Volume, Attract Volume, and Skill Level.
        Reset Collection Stats     Resets the Coin Statistics for the cabinet.
        Reset Game Stats           Resets the Game Statistics for the cabinet.
        Reset Amusement Track      Resets the amusement (Race mode) track records and shadows.
        Records & Shadows          Tournament records are not affected. You can select Reset All
                                   Tracks, or reset tracks individually.


Need for Speed™ Underground System Manual
Page 30 of 84                                                                      040-0049-01 Rev. B 1/20/2006
Chapter 5 — Operator Menu and Game Setup


       Accounting Screens


                                          Figure 18. Accounting Info Screens

         Menu Item                                                      Description
  Coins Per $                       Sets how many coin drops it takes to reach a unit of money, typically 4 in the
  (Symbol varies internationally)   US (4 quarters per $) or 1 in the UK and Europe.
  Available Credits                 Displays the number of credits inserted.
  Reset Credits                     Highlight and select this button to reset the Available Credits to 0.
  Product Pricing                   Brings up the Product Pricing screen where you can set the price for each
                                    mode of play and Players' Cards (either dispensed or fulfilled by GLOBAL VR®
                                    via mail). Also displays applicable fees paid to GLOBAL VR®.
  Location Splits                   Brings up the Location Splits screen that displays the location's share of income
                                    for each mode of play, Players' Card sales, and unspent money, plus the
                                    location's share of fees paid to GLOBAL VR®.
                                    Note that in the example above, all items are set to 50% (50/50 split) except
                                    Local Operator Tournament, which is set to pay the location 25%.
  Current Collection Stats          Brings up the Current Collection Stats screen, which displays income,
                                    expenses, fees, and net earnings for each mode of play. It also displays the
                                    start date for the current stats.
  Current Location Income           Brings up the Current Location Income screen, which displays all of the
                                    information in Current Collection Stats, plus the Location Split calculations.
                                    Note that in the example above, the location gets 50% of income and pays 50%
                                    of fees in all categories except Local Tourney. For this item, the Operator has
                                    set the Location Share at 25% on the Location Split screen.
  Previous Collection               Brings up the Previous Collection Stats screen, which was saved last time Do
  Stats                             Collection Now was selected. It also displays the start and end dates for the
                                    displayed stats. Operators can view past Collection Stats for their online
                                    cabinets running software version 1.1 or later by logging in to
                                    www.globalvr.com.
  Do Collection Now                 Deletes the Previous Collection Stats and replaces them with the current
                                    collection stats. Resets all Current Collection Stats to 0.00.

                                                                                             © 2006 GLOBAL VR, INC.
040-0049-01 Rev. B 1/20/2006                                                                           Page 31 of 84
Chapter 5 — Operator Menu and Game Setup

      Current Location Income Screen


                               Figure 19. Current Location Income Screen

      The Current Location Income screen, accessed via the Accounting menu, is a useful tool for
      operators who split the cabinet income with a location. The Operator sets the location's share of
      each income and expense item in the Location Splits screen, and the software calculates the
      location's split based on these settings. The example above shows 50/50 splits for everything
      except Local Tourney, which is set to give the location 25%.

      Game Statistics Screens


                                  Figure 20. Game Stats Menu Screens

      The Game Statistics menu lets you cycle through three screens with statistics about the options
      players have selected in Race mode, and their average times for each track. The screens are: Car
      and Track, Average Times, and Game Features Usage. Press View or Look Back to move
      through the pages. You can reset the Game Statistics through the Resets menu.


Need for Speed™ Underground System Manual
Page 32 of 84                                                                 040-0049-01 Rev. B 1/20/2006
Chapter 5 — Operator Menu and Game Setup

       Play Control Test Screen


                                       Figure 21. Play Control Test Screen
       The Play Control Test screen displays pictures of each driving control, and allows you to test each
       control, as described below. To exit from this menu, press the Start and View buttons together. If a
       component is not detected, a ! symbol will be displayed over it, as shown above.
       • Buttons: When you press a control panel button, it will light up on the screen.
       • SmartCard Reader: Indicates whether a SmartCard reader is installed and working.
       • SmartCard Dispenser: Indicates whether a dispenser is installed and working.
       • Steering Wheel: When you turn the steering wheel to the left or right, the numbers above
          the graphic should change to indicate the steering wheel position. Full left position should be
          about "–127" and full right position should be about "127". As you turn the wheel, the
          number change should be smooth and linear. A sudden jump in the numbers, or a different
          range of numbers, can indicate a bad pot.
       • Gas & Brake Pedal: When you step on the pedals you will see the same action on-screen.
          The numbers displayed near the pedals show the value when the pedal is full up, full down,
          and the current value. The difference between the full up and full down values should be
          about 80 (±5). As you press and release the pedals, the number change should be smooth and
          linear. A sudden jump in the numbers can indicate a bad pot.
       • Calibration: To calibrate the steering wheel and pedals, press the Start and NOS buttons
          together. The steering wheel will turn by itself during calibration; do not touch it during this
          process. When prompted, step on the gas and brake pedals to calibrate them.
       • Shifter: When you shift through the gears, the current gear number appears on the screen.
          The screen also displays which shifter micro switches are actuated for each gear. For
          example, "2 LT DN" means the left and down micro switches are actuated in gear 2. "3
          UP" means that only the up micro switch is actuated in gear 3. For more information, refer to
          Six-Speed Shifter Micro Switch Service on page 45.
       • E-Brake: If you press the E-Brake button, it will light up on the screen.
       • Credits: When you insert money into the coin mech or bill validator, the word “CREDITS”
          will flash, and “OK” will highlight on the screen.
       • Nytric Card Version: Indicates version of Nytric USBI/O card installed in the computer.
       • Start Button, Leader Light and Brake Light: When you enter the Controls Menu, the Start
          button, Leader Light and Brake Lights on the cabinet will blink for several seconds. If any of
          these lights fails to blink, check the bulb and wiring for the light.
                                                                                     © 2006 GLOBAL VR, INC.
040-0049-01 Rev. B 1/20/2006                                                                   Page 33 of 84
Chapter 5 — Operator Menu and Game Setup


      Monitor Calibration Screen


                               Figure 22. Monitor Calibration Test Screen

      Press the ♪ button to start the monitor calibration test, and the View or Look Back button to
      scroll through the screens. To exit the Monitor Calibration Test, press the NOS button or the
      Operator button.
      The monitor calibration test cycles through a series of monitor calibration screens. Various
      screens are designed to help you align the horizontal or vertical sync, or adjust the white balance
      and color hues.
      Use the monitor remote control board buttons to adjust the monitor. The board is located next to
      the Operator button. Use the buttons on the monitor control panel to access a series of menus
      allowing you to adjust the display size, color, and quality.


                                Figure 23. Monitor Remote Control Board


Need for Speed™ Underground System Manual
Page 34 of 84                                                                  040-0049-01 Rev. B 1/20/2006
Chapter 5 — Operator Menu and Game Setup

       Sound Test


                                       Figure 24. Sound Test Screen

       The Sound Test menu tests the speakers. Once you press the ♪ button to enter the sound test,
       each speaker will call out its name, one at a time. You should hear the words “Front Left
       Channel” from the left front speaker, followed by “Center Channel” from the center, and so on.
       The subwoofer will emit a thumping sound. The Sound Test will continue to automatically
       rotate through each speaker until you press the NOS button to exit the test. While the sound test
       is running, the picture on the screen shows the location of each speaker as it is tested.
       Press the View or Look Back button to stop the sound rotation and test one speaker at a time.
       Press View to rotate to the next speaker, or Look Back to rotate to the previous speaker. Press
       the NOS button to exit the test.
       If any sound comes from the wrong speaker, or any speakers are not working, check the
       connections to the speakers, audio amp, and PC (see Audio Amp and Speakers Service on
       page 51).
       Refer to Audio Troubleshooting on page 64 for more information on fixing audio problems.


                                                                                  © 2006 GLOBAL VR, INC.
040-0049-01 Rev. B 1/20/2006                                                                Page 35 of 84
Chapter 5 — Operator Menu and Game Setup


      System Test


                                      Figure 25. System Test Screen
      •   Set Video Gamma: Adjusts the overall brightness of the video. Default is 1.00.
      •   Test Card Reader: Insert an Operator or Players' SmartCard, and then select this option.
          If the SmartCard reader is working properly, the screen will indicate the type of card
          inserted and the card number. For Players' Cards, the name of the owner will also be
          shown. This can be useful for finding the owners of lost cards.
      •   Test Card Dispenser: If a card dispenser is installed, select this option to dispense a
          card and confirm the dispenser is working.
      •   Test Modem: Forces a call to verify modem function. The screen will indicate whether
          the modem connected successfully. (For online cabinets only.)
      •   Test Watchdog: Uses the Watchdog function to reboot the shell. This test is primarily
          used by GLOBAL VR® software QA testers.


Need for Speed™ Underground System Manual
Page 36 of 84                                                                  040-0049-01 Rev. B 1/20/2006
Chapter 5 — Operator Menu and Game Setup

       Link Status


                                    Figure 26. Cabinet Link Status Screen

       This screen shows the link status of each cabinet in a linked set. The cabinet you are using to
       view the Link Status screen will be shown as BUSY, while the other cabinets will be shown as
       either AVAILABLE or BUSY if they are linked properly, or UNCONNECTED if they are not
       linked.
       For example, in the picture above:
       •   Cabinet 1 is not linked properly, or Link ID 1 is not being used.
       •   Cabinet 2 is linked properly, and is busy because the Operator is viewing the menu.
       •   Cabinet 3 is linked properly, and is busy because a player is driving a race.
       •   Cabinet 4 is linked properly, and is available for play.


                                                                                     © 2006 GLOBAL VR, INC.
040-0049-01 Rev. B 1/20/2006                                                                   Page 37 of 84
Chapter 5 — Operator Menu and Game Setup

      Registration Options
      The Registration Options screen allows you to register, unregister, or change the settings the
      cabinet uses for syncing with GLOBAL VR. This screen also provides valuable information
      about a registered cabinet. Refer to Chapter 4, starting on page 17, for registration instructions.


                                  Figure 27. Registration Options Screen
      Buttons
      •   Cabinet Registration or Unregister Cabinet: This button will change depending on
          whether your cabinet is registered. If you restore the software using the System
          Recovery disk, this button will change to Cabinet Restore. Selecting the Cabinet
          Restore button will cause the cabinet to call in to GLOBAL VR® and use information
          stored in your game dongle to retrieve your registration settings.
      •   Force Call: This button causes the cabinet to call in to GLOBAL VR®. Use this if the
          cabinet fails to sync at the normal time, or to test your connection.
      •   Edit Dial-In Numbers: Use this button to change the phone number the cabinet uses to
          connect to the Internet, or to switch between dial-up and broadband. If you have repeated
          connection problems, try a different local number.
      •   Activate Operator Card: Use this button to activate an inactive Operator Card.
      •   Call Sync Log: Select this to view the list of calls the cabinet has made to
          GLOBAL VR®, and confirm call success or get information about modem errors.
      •   Sync Time: Select this button to change the time the cabinet syncs with GLOBAL VR®.
          Select a time when the cabinet is powered ON, but not used heavily, and stagger the time
          so that all of your cabinets do not try to dial in at the same time.
      •   Time Zone: Displays the selected time zone and allows you to change it.
      Informational Text
      •   The upper right side of the screen shows the Cabinet Registration Status, Cabinet ID
          Number used for your account, and Cabinet Serial Number.
      •   The lower part of the window shows information about the last call made by the cabinet
          to GLOBAL VR®. If there was a problem syncing, the Modem Error Code may help you
          solve the problem. Refer to Connection Troubleshooting on page 68 for more
          information.
Need for Speed™ Underground System Manual
Page 38 of 84                                                                   040-0049-01 Rev. B 1/20/2006
040 0049-01 b-nfsu-system_manual-web

More Related Content

What's hot

Faronics Core User Guide
Faronics Core User GuideFaronics Core User Guide
Faronics Core User Guide
Faronics
 
stratix 8000 8300
 stratix 8000 8300 stratix 8000 8300
stratix 8000 8300
volverin9977
 
ESTACION DE TRABAJO ALLEN-BRADLEY
ESTACION DE TRABAJO ALLEN-BRADLEYESTACION DE TRABAJO ALLEN-BRADLEY
ESTACION DE TRABAJO ALLEN-BRADLEY
Hard Rock Cafe
 
Aspire 2930
Aspire 2930Aspire 2930
Aspire 2930Yan Bali
 
IBM Power 750 and 755 Technical Overview and Introduction
IBM Power 750 and 755 Technical Overview and IntroductionIBM Power 750 and 755 Technical Overview and Introduction
IBM Power 750 and 755 Technical Overview and Introduction
IBM India Smarter Computing
 
Motherboard manual ga-ma790x-ds4_e
Motherboard manual ga-ma790x-ds4_eMotherboard manual ga-ma790x-ds4_e
Motherboard manual ga-ma790x-ds4_e
Cord_Dj
 
IBM Power 710 and 730 Technical Overview and Introduction
IBM Power 710 and 730 Technical Overview and IntroductionIBM Power 710 and 730 Technical Overview and Introduction
IBM Power 710 and 730 Technical Overview and Introduction
IBM India Smarter Computing
 
IBM Power 770 and 780 Technical Overview and Introduction
IBM Power 770 and 780 Technical Overview and IntroductionIBM Power 770 and 780 Technical Overview and Introduction
IBM Power 770 and 780 Technical Overview and Introduction
IBM India Smarter Computing
 
Redbook overview and introduction 8670-61x
Redbook overview and introduction 8670-61xRedbook overview and introduction 8670-61x
Redbook overview and introduction 8670-61x
Thaninnada Samart
 
Jdsu mts 2000_manual
Jdsu mts 2000_manualJdsu mts 2000_manual
Jdsu mts 2000_manual
WELLINGTON MARTINS
 
Smart otdr JDSU
Smart otdr JDSUSmart otdr JDSU
Smart otdr JDSU
WELLINGTON MARTINS
 
13f250 350-450-550superduty
13f250 350-450-550superduty13f250 350-450-550superduty
13f250 350-450-550superdutyrukford1
 
Manual CV41
Manual  CV41Manual  CV41
Faronics Anti-executable Enterprise User guide
Faronics Anti-executable Enterprise User guideFaronics Anti-executable Enterprise User guide
Faronics Anti-executable Enterprise User guide
Faronics
 
Eaton 9135 ups_users_guide
Eaton 9135 ups_users_guideEaton 9135 ups_users_guide
Eaton 9135 ups_users_guide
David Reyes
 
Ap 51xx access point product reference guide (part no. 72 e-113664-01 rev. b)
Ap 51xx access point product reference guide (part no. 72 e-113664-01 rev. b)Ap 51xx access point product reference guide (part no. 72 e-113664-01 rev. b)
Ap 51xx access point product reference guide (part no. 72 e-113664-01 rev. b)Advantec Distribution
 

What's hot (19)

Faronics Core User Guide
Faronics Core User GuideFaronics Core User Guide
Faronics Core User Guide
 
Omron CS1D
Omron CS1DOmron CS1D
Omron CS1D
 
stratix 8000 8300
 stratix 8000 8300 stratix 8000 8300
stratix 8000 8300
 
ESTACION DE TRABAJO ALLEN-BRADLEY
ESTACION DE TRABAJO ALLEN-BRADLEYESTACION DE TRABAJO ALLEN-BRADLEY
ESTACION DE TRABAJO ALLEN-BRADLEY
 
Aspire 2930
Aspire 2930Aspire 2930
Aspire 2930
 
IBM Power 750 and 755 Technical Overview and Introduction
IBM Power 750 and 755 Technical Overview and IntroductionIBM Power 750 and 755 Technical Overview and Introduction
IBM Power 750 and 755 Technical Overview and Introduction
 
Motherboard manual ga-ma790x-ds4_e
Motherboard manual ga-ma790x-ds4_eMotherboard manual ga-ma790x-ds4_e
Motherboard manual ga-ma790x-ds4_e
 
IBM Power 710 and 730 Technical Overview and Introduction
IBM Power 710 and 730 Technical Overview and IntroductionIBM Power 710 and 730 Technical Overview and Introduction
IBM Power 710 and 730 Technical Overview and Introduction
 
IBM Power 770 and 780 Technical Overview and Introduction
IBM Power 770 and 780 Technical Overview and IntroductionIBM Power 770 and 780 Technical Overview and Introduction
IBM Power 770 and 780 Technical Overview and Introduction
 
Redbook overview and introduction 8670-61x
Redbook overview and introduction 8670-61xRedbook overview and introduction 8670-61x
Redbook overview and introduction 8670-61x
 
Jdsu mts 2000_manual
Jdsu mts 2000_manualJdsu mts 2000_manual
Jdsu mts 2000_manual
 
Smart otdr JDSU
Smart otdr JDSUSmart otdr JDSU
Smart otdr JDSU
 
13f250 350-450-550superduty
13f250 350-450-550superduty13f250 350-450-550superduty
13f250 350-450-550superduty
 
Manual CV41
Manual  CV41Manual  CV41
Manual CV41
 
Faronics Anti-executable Enterprise User guide
Faronics Anti-executable Enterprise User guideFaronics Anti-executable Enterprise User guide
Faronics Anti-executable Enterprise User guide
 
MK-99DF8208-03
MK-99DF8208-03MK-99DF8208-03
MK-99DF8208-03
 
Man hinh otd
Man hinh otdMan hinh otd
Man hinh otd
 
Eaton 9135 ups_users_guide
Eaton 9135 ups_users_guideEaton 9135 ups_users_guide
Eaton 9135 ups_users_guide
 
Ap 51xx access point product reference guide (part no. 72 e-113664-01 rev. b)
Ap 51xx access point product reference guide (part no. 72 e-113664-01 rev. b)Ap 51xx access point product reference guide (part no. 72 e-113664-01 rev. b)
Ap 51xx access point product reference guide (part no. 72 e-113664-01 rev. b)
 

Viewers also liked

How to post a Citizen Report (EN)
How to post a Citizen Report (EN)How to post a Citizen Report (EN)
How to post a Citizen Report (EN)Tom Trewinnard
 
2007 annual audited financial statements
2007 annual audited financial statements2007 annual audited financial statements
2007 annual audited financial statementsProphecy Corp
 
Cafeblog.hu webdesign workshop
Cafeblog.hu webdesign workshop Cafeblog.hu webdesign workshop
Cafeblog.hu webdesign workshop
Zsuzsanna Tóth
 
Modern Latin America
Modern Latin AmericaModern Latin America
Modern Latin America03ram
 
Senior Health Insurance_DVU_September 12 2013
Senior Health Insurance_DVU_September 12 2013Senior Health Insurance_DVU_September 12 2013
Senior Health Insurance_DVU_September 12 2013Mary Howrey
 
8. Comparative History: Article Readings
8. Comparative History: Article Readings8. Comparative History: Article Readings
8. Comparative History: Article Readings03ram
 
Day ın the Life - Militant Optimist
Day ın the Life - Militant OptimistDay ın the Life - Militant Optimist
Day ın the Life - Militant OptimistNoel Hatch
 
地域社会におけるgisの利用
地域社会におけるgisの利用地域社会におけるgisの利用
地域社会におけるgisの利用naka9181
 
Smart and the City -
Smart and the City - Smart and the City -
Smart and the City -
Chandra Vikash
 
American Urbanization and New York City
American Urbanization and New York CityAmerican Urbanization and New York City
American Urbanization and New York City03ram
 
Brainstorming Session - July 6, 2011
Brainstorming Session - July 6, 2011Brainstorming Session - July 6, 2011
Brainstorming Session - July 6, 2011
ladieslearningcode
 
Transformed by You - Process
Transformed by You - ProcessTransformed by You - Process
Transformed by You - ProcessNoel Hatch
 
2011 annual audited financial statements
2011 annual audited financial statements2011 annual audited financial statements
2011 annual audited financial statementsProphecy Corp
 
Transformed by You - Communities
Transformed by You - CommunitiesTransformed by You - Communities
Transformed by You - CommunitiesNoel Hatch
 
Americas 19th Century
Americas 19th CenturyAmericas 19th Century
Americas 19th Centurymeggss24
 
Day ın the Lıfe Template
Day ın the Lıfe TemplateDay ın the Lıfe Template
Day ın the Lıfe TemplateNoel Hatch
 
تْشِك دِسْك - الإعلام الاجتماعي إلى غرف الأخبار
تْشِك دِسْك - الإعلام الاجتماعي إلى غرف الأخبارتْشِك دِسْك - الإعلام الاجتماعي إلى غرف الأخبار
تْشِك دِسْك - الإعلام الاجتماعي إلى غرف الأخبار
Tom Trewinnard
 

Viewers also liked (20)

How to post a Citizen Report (EN)
How to post a Citizen Report (EN)How to post a Citizen Report (EN)
How to post a Citizen Report (EN)
 
1403903271
14039032711403903271
1403903271
 
2007 annual audited financial statements
2007 annual audited financial statements2007 annual audited financial statements
2007 annual audited financial statements
 
Cafeblog.hu webdesign workshop
Cafeblog.hu webdesign workshop Cafeblog.hu webdesign workshop
Cafeblog.hu webdesign workshop
 
Modern Latin America
Modern Latin AmericaModern Latin America
Modern Latin America
 
Senior Health Insurance_DVU_September 12 2013
Senior Health Insurance_DVU_September 12 2013Senior Health Insurance_DVU_September 12 2013
Senior Health Insurance_DVU_September 12 2013
 
Survey
SurveySurvey
Survey
 
8. Comparative History: Article Readings
8. Comparative History: Article Readings8. Comparative History: Article Readings
8. Comparative History: Article Readings
 
Day ın the Life - Militant Optimist
Day ın the Life - Militant OptimistDay ın the Life - Militant Optimist
Day ın the Life - Militant Optimist
 
地域社会におけるgisの利用
地域社会におけるgisの利用地域社会におけるgisの利用
地域社会におけるgisの利用
 
Smart and the City -
Smart and the City - Smart and the City -
Smart and the City -
 
American Urbanization and New York City
American Urbanization and New York CityAmerican Urbanization and New York City
American Urbanization and New York City
 
Brainstorming Session - July 6, 2011
Brainstorming Session - July 6, 2011Brainstorming Session - July 6, 2011
Brainstorming Session - July 6, 2011
 
Transformed by You - Process
Transformed by You - ProcessTransformed by You - Process
Transformed by You - Process
 
Hadoop
HadoopHadoop
Hadoop
 
2011 annual audited financial statements
2011 annual audited financial statements2011 annual audited financial statements
2011 annual audited financial statements
 
Transformed by You - Communities
Transformed by You - CommunitiesTransformed by You - Communities
Transformed by You - Communities
 
Americas 19th Century
Americas 19th CenturyAmericas 19th Century
Americas 19th Century
 
Day ın the Lıfe Template
Day ın the Lıfe TemplateDay ın the Lıfe Template
Day ın the Lıfe Template
 
تْشِك دِسْك - الإعلام الاجتماعي إلى غرف الأخبار
تْشِك دِسْك - الإعلام الاجتماعي إلى غرف الأخبارتْشِك دِسْك - الإعلام الاجتماعي إلى غرف الأخبار
تْشِك دِسْك - الإعلام الاجتماعي إلى غرف الأخبار
 

Similar to 040 0049-01 b-nfsu-system_manual-web

Aspire one series service guide
Aspire one series service guideAspire one series service guide
Aspire one series service guideSetyo Prasadja
 
Manual aspire 1810t 1410
Manual aspire 1810t 1410Manual aspire 1810t 1410
Manual aspire 1810t 1410
Jose Silva
 
475 manual
475 manual475 manual
Smart classethernet user_manual_en
Smart classethernet user_manual_enSmart classethernet user_manual_en
Smart classethernet user_manual_en
Ikundu Gatambia
 
Smart classethernet user_manual_en
Smart classethernet user_manual_enSmart classethernet user_manual_en
Smart classethernet user_manual_en
Juan Milton Garduno Rubio
 
Windows Internals Part 2_6th Edition.pdf
Windows Internals Part 2_6th Edition.pdfWindows Internals Part 2_6th Edition.pdf
Windows Internals Part 2_6th Edition.pdf
LokeshSainathGudivad
 
cl3108.pdf
cl3108.pdfcl3108.pdf
cl3108.pdf
angelopalaming
 
Netgear Aircard 785S Mobile Broadband Hotspot User Guide
Netgear Aircard 785S Mobile Broadband Hotspot User GuideNetgear Aircard 785S Mobile Broadband Hotspot User Guide
Netgear Aircard 785S Mobile Broadband Hotspot User Guide
Telephones Online
 
600 M Owners Manual
600 M Owners Manual600 M Owners Manual
600 M Owners Manualjuchiman23
 
Nsr Userguide
Nsr UserguideNsr Userguide
Nsr Userguidekerklaanm
 
Manual Ck3 honeywell - www.codeprint.com.br
Manual Ck3 honeywell - www.codeprint.com.brManual Ck3 honeywell - www.codeprint.com.br
Manual Ck3 honeywell - www.codeprint.com.br
Codeprint Soluçoes em Identificaçao e Captura de Ddos
 
catalogo ck3
catalogo ck3catalogo ck3
Acer espire es1 523 service guide manual tricera czl
Acer espire es1 523 service guide manual tricera czlAcer espire es1 523 service guide manual tricera czl
Acer espire es1 523 service guide manual tricera czl
Aditya Trivedi
 
Manual Cn51, catalogo Cn51
Manual Cn51, catalogo Cn51Manual Cn51, catalogo Cn51
S6_Guide_80752
S6_Guide_80752S6_Guide_80752
S6_Guide_80752Rob Wenig
 
Smart dsp os_user_guide
Smart dsp os_user_guideSmart dsp os_user_guide
Smart dsp os_user_guide
eng_basemm
 
Hp laser jet 1150 1300 service manual
Hp laser jet 1150 1300 service manualHp laser jet 1150 1300 service manual
Hp laser jet 1150 1300 service manuallayyah2013
 
User Guide En 7435
User Guide En 7435User Guide En 7435
User Guide En 7435
jkuehner
 
MetaFabric™ Architecture Virtualized Data Center: Design and Implementation G...
MetaFabric™ Architecture Virtualized Data Center: Design and Implementation G...MetaFabric™ Architecture Virtualized Data Center: Design and Implementation G...
MetaFabric™ Architecture Virtualized Data Center: Design and Implementation G...
Juniper Networks
 
Magelis xbt gt, xbt gk 2016
Magelis xbt gt, xbt gk 2016Magelis xbt gt, xbt gk 2016
Magelis xbt gt, xbt gk 2016
Hoàng Phương JSC
 

Similar to 040 0049-01 b-nfsu-system_manual-web (20)

Aspire one series service guide
Aspire one series service guideAspire one series service guide
Aspire one series service guide
 
Manual aspire 1810t 1410
Manual aspire 1810t 1410Manual aspire 1810t 1410
Manual aspire 1810t 1410
 
475 manual
475 manual475 manual
475 manual
 
Smart classethernet user_manual_en
Smart classethernet user_manual_enSmart classethernet user_manual_en
Smart classethernet user_manual_en
 
Smart classethernet user_manual_en
Smart classethernet user_manual_enSmart classethernet user_manual_en
Smart classethernet user_manual_en
 
Windows Internals Part 2_6th Edition.pdf
Windows Internals Part 2_6th Edition.pdfWindows Internals Part 2_6th Edition.pdf
Windows Internals Part 2_6th Edition.pdf
 
cl3108.pdf
cl3108.pdfcl3108.pdf
cl3108.pdf
 
Netgear Aircard 785S Mobile Broadband Hotspot User Guide
Netgear Aircard 785S Mobile Broadband Hotspot User GuideNetgear Aircard 785S Mobile Broadband Hotspot User Guide
Netgear Aircard 785S Mobile Broadband Hotspot User Guide
 
600 M Owners Manual
600 M Owners Manual600 M Owners Manual
600 M Owners Manual
 
Nsr Userguide
Nsr UserguideNsr Userguide
Nsr Userguide
 
Manual Ck3 honeywell - www.codeprint.com.br
Manual Ck3 honeywell - www.codeprint.com.brManual Ck3 honeywell - www.codeprint.com.br
Manual Ck3 honeywell - www.codeprint.com.br
 
catalogo ck3
catalogo ck3catalogo ck3
catalogo ck3
 
Acer espire es1 523 service guide manual tricera czl
Acer espire es1 523 service guide manual tricera czlAcer espire es1 523 service guide manual tricera czl
Acer espire es1 523 service guide manual tricera czl
 
Manual Cn51, catalogo Cn51
Manual Cn51, catalogo Cn51Manual Cn51, catalogo Cn51
Manual Cn51, catalogo Cn51
 
S6_Guide_80752
S6_Guide_80752S6_Guide_80752
S6_Guide_80752
 
Smart dsp os_user_guide
Smart dsp os_user_guideSmart dsp os_user_guide
Smart dsp os_user_guide
 
Hp laser jet 1150 1300 service manual
Hp laser jet 1150 1300 service manualHp laser jet 1150 1300 service manual
Hp laser jet 1150 1300 service manual
 
User Guide En 7435
User Guide En 7435User Guide En 7435
User Guide En 7435
 
MetaFabric™ Architecture Virtualized Data Center: Design and Implementation G...
MetaFabric™ Architecture Virtualized Data Center: Design and Implementation G...MetaFabric™ Architecture Virtualized Data Center: Design and Implementation G...
MetaFabric™ Architecture Virtualized Data Center: Design and Implementation G...
 
Magelis xbt gt, xbt gk 2016
Magelis xbt gt, xbt gk 2016Magelis xbt gt, xbt gk 2016
Magelis xbt gt, xbt gk 2016
 

040 0049-01 b-nfsu-system_manual-web

  • 1. Need for Speed™ Underground System Manual 040-0049-01 Rev. B ! Read this manual before installing the Game. ! Keep this manual with the machine at all times. www.globalvr.com http://service.globalvr.com techsupport@globalvr.com tournament@globalvr.com Phone: 408.597.3435 Fax: 408.597.3437 © 2006 Electronic Arts Inc. Electronic Arts, Need for Speed, EA GAMES and the EA GAMES logo are trademarks or registered trademarks of Electronic Arts Inc. in the U.S. and/or other countries. All rights reserved. EA GAMES™ is an Electronic Arts™ brand. Dodge is a trademark of DaimlerChrysler Corporation. Dodge Neon and its trade dress are used under license by Electronic Arts Inc. ©:DaimlerChrysler Corporation 2004. Honda®, the 'H' logo®, Acura®, the stylized 'A' logo®, Civic®, Si™ , Integra Type-R®, S2000™, RSX®, Type-R™ and Type-S™ names, emblems and body design elements are trademarks and/or intellectual property rights of Honda Motor Co., Ltd., used under license. Tiburon (Tuscani) is a registered trademark owned and licensed by Hyundai Motor Company. Mazda MX-5 Miata and Mazda RX-7 are used under the approval of Mazda Motor Corporation. Mitsubishi, Eclipse, and Lancer names, emblems and body designs are trademarks and/or intellectual property rights of Mitsubishi Motors Corporation and used under license to Electronic Arts Inc. NISSAN, SKYLINE, 350Z, SENTRA and 240SX are trademarks and/or intellectual property rights of NISSAN MOTOR CO.,LTD. And are used under license to Electronic Arts Inc. PEUGEOT 206 GTI S16 2003 is used under license from AUTOMOBILES PEUGEOT by Electronic Arts. SUBARU, IMPREZA and WRX names, emblems and body designs are properties of Fuji Heavy Industries Ltd. Toyota, Supra, and Celica are trademarks of Toyota Motor Corporation, and used with permission. Trademarks, design patents and copyrights are used with the permission of the owner VOLKSWAGEN AG. The names and logos of all after market car part companies are trademarks of their respective owners and are used by permission. All rights reserved. EA GAMES™ is an Electronic Arts brand. GLOBAL VR and the GLOBAL VR logo are registered trademarks of Global VR, Inc. All other trademarks are the property of their respective owners. U.S. Patent Nos. 5,269,687; 5,354,202; and 5,577,913 used under license from Midway Games West Inc Tournaments are not sponsored or administered by Electronic Arts or their Licensors. GLOBAL VR IS AN AUTHORIZED ELECTRONIC ARTS DISTRIBUTOR.
  • 2. Table of Contents Table of Contents Preface.......................................................................... 4 Using the System Recovery CD.............................39 Safety........................................................................ 4 Using the Game Install CDs...................................39 Warnings ............................................................... 5 Chapter 7 — Service and Repair .............................40 Environmental Conditions.................................... 5 Opening the Control Panel .....................................40 FCC Notices (United States).................................... 5 Force-Feedback Steering System Service..............41 Chapter 1 — Introduction.......................................... 6 5 KΩ Steering Pot (Potentiometer) Need for Speed™ Underground Description........... 6 Replacement ....................................................42 Need for Speed™ Underground Upgrade ............ 6 Force-Feedback Belt or Steering Motor Cabinet Specifications.............................................. 7 Replacement ....................................................42 Power Requirements............................................. 7 Force-Feedback PCB Replacement....................43 Hardware Features................................................ 7 Driving Control Panel Button Service ...................43 Chapter 2 — Installing a New Cabinet ..................... 8 Pedal Assembly Service .........................................44 Driving Seat Installation .......................................... 9 5 KΩ Gas and Brake Pot (Potentiometer) Marquee Setup........................................................ 10 Replacement ....................................................44 Linking Cabinets .................................................... 10 Six-Speed Shifter and E-Brake Service .................45 Linking Cabinets Without Broadband................ 11 Six-Speed Shifter Replacement ..........................45 Linking Cabinets that use a Broadband Internet Six-Speed Shifter Micro Switch Service............45 Connection ...................................................... 12 Shifter Bottom Plate Replacement .....................46 Checking the Game Dongle................................... 13 E-Brake Button Service ......................................46 Connecting an External Monitor............................ 13 Driving Seat Slide Assembly Replacement ...........46 Chapter 3 — Playing a Game.................................. 14 Wells-Gardner® Monitor Replacement ..................47 Starting the Game................................................... 14 Wells-Gardner® Monitor Chassis PCB Removal ..49 Game Play .............................................................. 15 Audio Amp and Speakers Service..........................51 Modes of Play ..................................................... 16 Audio Amp PCB Replacement...........................51 Operator-Run Local Tournaments...................... 16 Front (Marquee) Speaker Replacement..............52 Chapter 4 — Setting Up Tournament Play.............. 17 Center Speaker Replacement..............................52 Getting Started........................................................ 17 Rear (Seat) Speaker or Subwoofer Replacement52 Cabinet Registration............................................... 17 Computer Replacement ..........................................53 Navigating the Registration Screens .................. 18 Coin Mech Replacement ........................................54 Web Registration for Existing Operators ........... 18 Coin Meter Replacement........................................54 Registration for Existing Operators without Dollar Bill Validator Replacement .........................54 Web Access ..................................................... 18 SmartCard Reader Replacement ............................55 Registration for New Operators ......................... 18 SmartCard Dispenser Service.................................55 Register With Your 4-Digit Registration Key .... 19 SmartCard Dispenser Replacement....................55 Register with an Active Operator Card .............. 22 Power Distribution Service ....................................56 Chapter 5 — Operator Menu and Game AC Power Plate...................................................56 Setup ....................................................................... 26 AC Power Strip Replacement.............................57 Navigating Through the Game Operator Menu DC Power Supplies (+24 and +5/+12 VDC)......57 Screens............................................................. 26 Cabinet Lighting Service........................................58 Machine Information Menu ................................... 28 Marquee Florescent Light Service......................58 Game and Coin Options Menu .............................. 29 Leader Light Service...........................................59 Reset Stats/Settings Screen .................................... 30 Brake Light Replacement ...................................59 Accounting Screens................................................ 31 Cold-Cathode Light Service ...............................60 Current Location Income Screen ........................... 32 Setting the Computer BIOS (CMOS) ....................61 Game Statistics Screens ......................................... 32 Chapter 8 — Troubleshooting..................................63 Play Control Test Screen........................................ 33 Video Troubleshooting........................................63 Monitor Calibration Screen.................................... 34 Audio Troubleshooting .......................................64 Sound Test .............................................................. 35 Control Troubleshooting .....................................64 System Test............................................................. 36 Cabinet Linking Troubleshooting.......................66 Link Status.............................................................. 37 Miscellaneous Troubleshooting..........................67 Registration Options............................................... 38 Connection Troubleshooting...............................68 Chapter 6 — System Recovery and Game External Monitor Troubleshooting .....................69 Install CDs.............................................................. 39 Chapter 9 — Replacement Parts ..............................71 Need for Speed™ Underground System Manual Page 2 of 84 040-0049-01 Rev. B 1/20/2006
  • 3. Table of Contents Documents and Software ................................... 71 Artwork and Formed Plastic Components .........75 Cables.................................................................. 71 Chapter 10 — Diagrams and Schematics................76 Control Panel ...................................................... 71 Warranty Information .............................................83 Cabinet and Marquee.......................................... 72 Technical Support.......................................................84 Computer ............................................................ 72 Steering and Audio PCB Assembly ................... 73 Seat Assembly..................................................... 73 List of Figures Figure 1. Need for Speed™ Underground Figure 37. Monitor Mounting Nut Locations ........48 Cabinet Dimensions.......................................... 7 Figure 38. Removing the Monitor PCB Figure 2. Coin Door with Key Location................ 8 Mounting Hardware ........................................49 Figure 3. Installing the Seat Runners..................... 9 Figure 39. Disconnecting the Chassis Neck Figure 4. Attaching the Driving Seat to the PCB and Second Anode Lead .........................50 Runners ........................................................... 10 Figure 40. Monitor PCB Cables.............................50 Figure 5. Setting up the Marquee ........................ 10 Figure 41. Audio Amp Connections, Volume Figure 6. Linking Cabinets Without Adjustment, and Speaker Location.................51 Broadband ....................................................... 11 Figure 42. Computer Mounting .............................53 Figure 7. Checking Link Status ........................... 11 Figure 43. Servicing the Coin Mech and Coin Figure 8. Linking Cabinets with Broadband ....... 12 Meter ...............................................................54 Figure 9. Parallel and USB Game Dongles......... 13 Figure 44. Dollar Bill Validator DIP Switch Figure 10. Selecting Track and Car Options ......... 14 Settings (US Only) ..........................................55 Figure 11. Driving Screen Functions..................... 15 Figure 45. Filling the SmartCard Dispenser ..........56 Figure 12. Registration Process Flowchart............ 17 Figure 46. AC Power Plate (Standard Cabinet).....56 Figure 13. Setting Cabinet Volume........................ 26 Figure 47. DC Power Supply Connections............58 Figure 14. Game Operator Menu Flowchart ......... 27 Figure 48. Cabinet Lighting Locations ..................58 Figure 15. Machine Information Screen................ 28 Figure 49. Cold Cathode Florescent Light Figure 16. Game and Coin Options Screen........... 29 Wiring ..............................................................60 Figure 17. Reset Stats/Settings Menu.................... 30 Figure 50. Selecting the Settings Tab in the Figure 18. Accounting Info Screens ...................... 31 Display Control Panel .....................................69 Figure 19. Current Location Income Screen ......... 32 Figure 51. Selecting the Video Card Name Tab ....69 Figure 20. Game Stats Menu Screens.................... 32 Figure 52. Choosing a Display Pair with Figure 21. Play Control Test Screen ...................... 33 Cloning ............................................................70 Figure 22. Monitor Calibration Test Screen .......... 34 Figure 53. Confirming Display Settings ................70 Figure 23. Monitor Remote Control Board ........... 34 Figure 54. Six-Speed Shifter Exploded View Figure 24. Sound Test Screen ................................ 35 and Parts ..........................................................74 Figure 25. System Test Screen............................... 36 Figure 55. Pedal Assembly Exploded View and Figure 26. Cabinet Link Status Screen .................. 37 Parts ...............................................................74 Figure 27. Registration Options Screen................. 38 Figure 56. Artwork and Formed Plastic Part Figure 28. Opening the Control Panel................... 40 Numbers and Locations...................................75 Figure 29. Force-Feedback Steering System Figure 57. Audio Wiring ........................................76 Harnessing Diagram ....................................... 41 Figure 58. Simplified Wiring Diagram ..................77 Figure 30. Replacing the 5 KΩ Steering Pot ......... 42 Figure 59. Detailed Wiring Diagram......................78 Figure 31. Servicing the Steering Motor ............... 43 Figure 60. Power Distribution Diagram.................79 Figure 32. Replacing Button Lamps...................... 44 Figure 61. Computer Rear Panel Diagram.............80 Figure 33. Pedal Assembly Details........................ 44 Figure 62. Setting up a Dial-up Game Network ....81 Figure 34. Shifter Pattern and Micro Switch Figure 63. Setting up a Broadband Game Actuation ......................................................... 45 Network ...........................................................82 Figure 35. Seat Slide Assembly Replacement....... 47 Figure 36. Cable Connections to the Monitor Chassis............................................................. 47 © 2006 GLOBAL VR, INC. 040-0049-01 Rev. B 1/20/2006 Page 3 of 84
  • 4. Preface Preface Safety Please read this page before preparing your arcade cabinet for game play. The following safety instructions apply to all game operators and service personnel. Specific warnings and cautions will be included throughout this manual. Use the following safety guidelines to help protect the system from potential damage and to ensure your personal safety: • Make sure that the switch on the back of the computer is set to match the AC power in use at your location: − 115 volts / 60Hz in most of North and South America and some Far Eastern countries such as Japan, South Korea and Taiwan − 230 volts / 50Hz in most of Europe, the Middle East and the Far East • To help prevent electric shock, plug the system into a properly grounded power source. These cables are equipped with 3-prong plugs to help ensure proper grounding. Do not use adapter plugs or remove the grounding prong from a cable. If you must use an extension cable, use a 3-wire cable with properly grounded plugs. • To help protect your system from sudden increases and decreases in electrical power, use a surge suppressor, line conditioner or Uninterruptible Power Supply (UPS). • Be sure nothing rests on the system's cables and that the cables are not located where they can be stepped on or tripped over. • Keep your system far away from radiators and other heat sources. • Do not block cooling vents. Precautions for Game Operation • The avoid injury and accidents, people who fall under the following categories should not play the game: − Those who need assistance when walking. − Those who have high blood pressure or a heart problem. − Those who have experienced muscle convulsions or loss of consciousness when playing a video game or similar activities. − Those who have trouble in the neck or spinal cord. − Intoxicated persons. − Pregnant women. − Persons susceptible to motion sickness. − Persons who do not abide by the warning labels on the game. • A player who has never been adversely affected by light stimulus might experience dizziness or headache when playing the game. Small children can be especially susceptible to these conditions. Caution guardians of small children to keep watch over their children during play. • Instruct those who feel sick during play to see a doctor. • To avoid injury from falling objects, and electric shock due to spilled drinks, instruct players not to place heavy items, food, or drinks on the product. • To avoid electric shock or short circuit, do not allow customers to put hands and fingers or extraneous matter in the openings of the product. • To avoid risk of injury from falling, immediately stop customers from leaning against or climbing on the product. Need for Speed™ Underground System Manual Page 4 of 84 040-0049-01 Rev. B 1/20/2006
  • 5. Preface Warnings To avoid electrical shock, unplug the cabinet before performing installation or service procedures. GLOBAL VR® assumes no liability for any damages or injuries incurred while setting up or servicing the cabinet. Only qualified service personnel should perform installation or service procedures! Environmental Conditions Cabinet is intended for indoor use only. Be sure to keep the cabinet dry and maintain operating temperatures of 10°- 40°C (50°-104°F). FCC Notices (United States) Electromagnetic Interference (EMI) is any signal or emission radiated in free space or conducted along power or signal leads, that endangers the functioning of radio navigation or other safety service, or that seriously degrades, obstructs, or repeatedly interrupts a licensed radio communications service. Radio communications services include, but are not limited to, AM/FM commercial broadcast, television, cellular services, radar, air-traffic control, pager, and Personal Communication Services (PCS). These licensed services, along with unintentional radiators such as digital devices (including computer systems) contribute to the electromagnetic environment. Electromagnetic Compatibility (EMC) is the ability of items of electronic equipment to function properly together in the electronic environment. While this computer system has been designed and determined to be compliant with regulatory agency limits for EMI, there is no guarantee that interference will not occur in a particular installation. If this equipment does cause interference with radio communications services, which can be determined by turning the equipment off and on, you are encouraged to try to correct the interference by one or more of the following measures: • Re-orient the receiving antenna. • Relocate the cabinet relative to the receiver. • Plug the game into a different outlet so that the computer and the receiver are on different branch circuits. If necessary, consult a Regulatory EMC representative of GLOBAL VR® or an experienced radio/television technician for additional suggestions. You may find the FCC Interference Handbook, to be helpful. It is available from the U.S. Government Print Office, Washington, DC 20402. This device has been tested and complies with the limits for a Class A digital device pursuant to Part 15 of the FCC Rules. These limits are designed to provide reasonable protection against harmful interference when the equipment is operated in a commercial environment. This equipment generates, uses, and can radiate radio frequency energy. If not installed and used in accordance with the instruction manual, it may cause harmful interference with radio communications. Operation of this equipment in a residential area is likely to cause harmful interference, in which case you will be required to correct the interference at your own expense. Operation is subject to the following conditions: • This device may not cause harmful interference. • This device must accept any interference received, including interference that may cause undesired operation. © 2006 GLOBAL VR, INC. 040-0049-01 Rev. B 1/20/2006 Page 5 of 84
  • 6. Chapter 1 — Introduction Chapter 1 — Introduction Need for Speed™ Underground Description Build and race the ultimate urban exotic with Need for Speed™ Underground. Take control of top import street tuners like Toyota Celica, Nissan 350Z, Mitsubishi Eclipse and the exclusive Nissan Skyline GT-R. Play Career and customize your car with licensed aftermarket parts to build your own unique ride. Force-feedback steering, surround sound and a 6-speed shifter make Need for Speed™ Underground a truly engaging driving experience. Own the Streets • Linkable – allowing up to 4 players to compete in blistering head-to-head competition. • Tournament Play – with National Tournaments and Wednesday Tournament events throughout the US. • Career Mode – allows players to choose their car and compete in a series of 81 races, earning custom performance parts and upgrades along the way. Players can store 4 Careers on one Players’ Card! • GLOBAL VR® Players’ Card Compatible – thousands of registered players are ready to drive, and new players can purchase a SmartCard format Players’ Card to store their data. Need for Speed™ Underground Upgrade The Need for Speed™ Underground Upgrade Kit is available for existing Need for Speed™ cabinets. The upgrade kit includes the new Need for Speed™ Underground software, 6-speed shifter, Players’ Card reader (for Tournament and Career Mode play), NOS button, and new artwork. Need for Speed™ Underground System Manual Page 6 of 84 040-0049-01 Rev. B 1/20/2006
  • 7. Chapter 1 — Introduction Cabinet Specifications The standard and deluxe cabinet styles are pictured below. Upgrade kits are available to convert cabinets released with earlier Need for Speed™ versions to run Need for Speed™ Underground. Figure 1. Need for Speed™ Underground Cabinet Dimensions Power Requirements Voltage Nominal Inrush Nominal Operating AC Current (Amps) AC Current (Amps) 115 6.5 4 230 3 2 Hardware Features • Pentium 4 Computer • Force-Feedback Steering • Nvidia GeForce Graphics Card • Six-Speed Shifter • Six-Channel Surround Sound • SmartCard Reader • 800x600, Super VGA Monitor • SmartCard Dispenser - 27-Inch Flat-Screen (Standard) - 39-Inch (Deluxe) © 2006 GLOBAL VR, INC. 040-0049-01 Rev. B 1/20/2006 Page 7 of 84
  • 8. Chapter 2 — Installing a New Cabinet Chapter 2 — Installing a New Cabinet Use the following procedure to set up your game: 1. Carefully remove the cabinet from the shipping container, giving yourself plenty of space. Inspect the exterior of the cabinet for any damage. 2. Remove the keys from the coin return slot. Open the coin door to locate the second set of keys. Figure 2. Coin Door with Key Location 3. Open the cash-box door and remove the loose parts inside the cash box. You will find the following items (may vary with cabinet style): • 10/100 Base-T Network Cable • System Manual (This Document) • 10/100 Base-T Crossover Coupler • Software Restore Guide • Phone Cord • System Recovery Disk (1 CD) • AC Power Cord • Game Install Disks (2 CDs) • Hardware for Attaching Driving Seat • T-25 Torx Security Bit Assembly 4. Remove the back door from the cabinet. Verify that all cables and wires are securely connected to the computer and other components. See Chapter 10 — Diagrams and Schematics for wiring and connection diagrams. 5. Connect the AC power cord from the cabinet to a grounded (3-terminal) AC wall outlet. 6. Power ON the cabinet using the ON/OFF switch located on the lower rear of the cabinet. Verify that the game boots properly. Need for Speed™ Underground System Manual Page 8 of 84 040-0049-01 Rev. B 1/20/2006
  • 9. Chapter 2 — Installing a New Cabinet 7. If the SmartCard reader is not connected, or the SmartCard dispenser is empty, a screen, shown below, will appear. These screens will time out after 30 seconds, or you can press the START and NOS buttons to continue. 8. Once the Attract movie starts, play a game to verify that everything works properly. 9. Turn the cabinet OFF and disconnect the power cord before installing the seat assembly. Driving Seat Installation 1. Look in the cash box to locate the hardware used to attach the driving seat. 2. The seat runners may be packaged and placed with the seat or cabinet, or installed backwards in the cabinet. If the seat runners are installed backwards for shipping, use a 7/16" socket wrench to remove the four (4) 1/4-20 x 1-1/4" hex bolts with lock washers and flat washers that hold each seat runner inside the cabinet. See item A in Figure 3 below. 3. Insert the seat runners so that they extend out from the cabinet, as shown below. Secure them with the four (4) 1/4-20 x 1-1/4" hex bolts with lock washers and flat washers. Figure 3. Installing the Seat Runners 4. Slide the driving seat onto the seat runners, leaving enough space to connect the harnesses. 5. Locate the two wire harnesses inside the driving seat, and inside the cabinet, near where the seat runners are installed. Connect the harnesses together as shown in item A of Figure 4. The connectors are keyed to prevent incorrect wiring. © 2006 GLOBAL VR, INC. 040-0049-01 Rev. B 1/20/2006 Page 9 of 84
  • 10. Chapter 2 — Installing a New Cabinet 6. Slide the driving seat towards the cabinet while guiding the wire harnesses inside. Attach each driving seat to the seat runners using four (4) 2-1/4" T-27 Torx screws with 1/4" lock washers and fender washers. See item B of Figure 4. B Figure 4. Attaching the Driving Seat to the Runners Marquee Setup 1. Rotate the marquee forward towards the front of the cabinet as shown in the figure below. 2. Install three (3) 1/4-20 x 1-1/2" T-27 Torx bolts through the holes in the metal bracket at the edge of the marquee support brace into the T-nuts in the top of the cabinet to secure the support brace. Warning: Until the bolts are in place, the marquee can slide back and could cause injury. Figure 5. Setting up the Marquee The cabinet is now ready for game play. Linking Cabinets You can link up to four cabinets together for head-to-head competition. Once the cabinets are linked in hardware and software, the Attract Mode movies will synchronize, and players can choose to play individually or race against other players. Each cabinet ships with an Ethernet cable and a cross-over coupler. The cross-over coupler is used to link two cabinets. An Ethernet hub is required to link more than two cabinets. If you use broadband instead of dial-up for connecting the cabinets to the Internet to sync with the Need for Speed™ Underground System Manual Page 10 of 84 040-0049-01 Rev. B 1/20/2006
  • 11. Chapter 2 — Installing a New Cabinet GLOBAL VR® server, you must use a router to link your cabinets. The table below shows required equipment by type of Internet connection and number of cabinets. Number of Internet Linking Equipment Required Cabinets Connection 2 Dial-up or None Cross-over coupler (Included with cabinet) 3 or 4 Dial-up or None Ethernet hub (10/100 Mbps) 2, 3, or 4 Broadband Ethernet router (Netgear® RP614v2 router recommended) Linking Cabinets Without Broadband Figure 6. Linking Cabinets Without Broadband 1. Before connecting the Ethernet cables, go into the Operator Menu on each cabinet, and set the Cabinet Link ID number, as shown by the arrow in Figure 7. Each cabinet must have a unique number: 1, 2, 3, or 4. Cabinets should be numbered from left to right. Exit the Operator Menu to reset the number in the software. All linked cabinets must run the same software version. 2. Locate the 10' Ethernet cable and Ethernet crossover coupler in the cash box of each cabinet. 3. Connect the Ethernet cable to the Ethernet connector on the power plate of each cabinet. • To link two cabinets: Connect the two Ethernet cables to one cross-over coupler. Do not use two couplers. • To link three or four cabinets: Connect the Ethernet cables to an Ethernet hub or switch (not included). Connect the hub or switch to AC power and make sure it is powered ON. Do not use cross-over couplers with a hub or switch. 4. If more than one cabinet has the same Cabinet Link ID number, each cabinet with a duplicate ID number will display an error message, as shown below. Repeat Step 1 to correct the duplicate Cabinet Link ID numbers. Figure 7. Checking Link Status © 2006 GLOBAL VR, INC. 040-0049-01 Rev. B 1/20/2006 Page 11 of 84
  • 12. Chapter 2 — Installing a New Cabinet Linking Cabinets that use a Broadband Internet Connection Figure 8. Linking Cabinets with Broadband This procedure was tested using a Netgear® RP614v2 router. GLOBAL VR® does not offer support for other router brands or models. See Figure 63 on page 82 for an example of how to set up your broadband game network. Important: Your Need for Speed™ Underground cabinets must be connected to a separate router from any other games or devices. 1. Before connecting the Ethernet cables, go into the Operator Menu on each cabinet, and set the Cabinet Link ID number, as shown by the arrow in Figure 7. Each cabinet must have a unique number: 1, 2, 3, or 4. Cabinets should be numbered from left to right. Exit the Operator Menu to reset the number in the software. All linked cabinets must run the same software version. 2. Connect your Cable/DSL router to AC power. 3. The router must be configured to Factory Default Settings. If you have used the Router before, or changed its settings, press and hold the reset pushbutton (shown in Figure 8) until the Test LED turns on (about 10 seconds). 4. Connect the Internet port of the router to your network. (Note: The router replaces the hub for systems using broadband.) 5. Connect an Ethernet cable to the Ethernet connector on the power plate of each cabinet, and to router ports 1—4 as shown in Figure 8. Do not use crossover couplers. 6. If more than one cabinet has the same Cabinet Link ID number, each cabinet with a duplicate ID number will display an error message, as shown in Figure 7. Repeat Step 1 to correct the duplicate Cabinet Link ID numbers. 7. Attempt to force a call from the System Test screen of the Game Operator menu of each cabinet, to verify that the connection is working properly. If the cabinets are able to sync with GLOBAL VR®, you have successfully set up your connections. If a cabinet cannot sync, an error message will be displayed. Need for Speed™ Underground System Manual Page 12 of 84 040-0049-01 Rev. B 1/20/2006
  • 13. Chapter 2 — Installing a New Cabinet Checking the Game Dongle The cabinet uses a game dongle to activate the game software. Depending on the type of dongle shipped with the game, it connects to either the parallel port or the USB port on the back of the computer. If the dongle is missing, the game will not run. When a USB Dongle is installed and working properly, a red LED will illuminate inside the dongle. A Parallel Dongle does not light up. For a Game Dongle to be recognized correctly, it should be connected before the cabinet is powered ON. If the software does not recognize the Game Dongle, make sure the Dongle is connected properly, and then power cycle the cabinet to see if this resolves the problem. If the dongle should come out while the game is running, a NO DONGLE screen will appear. If this happens, the dongle can be re-installed without rebooting the game. Note: The dongle supplied with the cabinet is specific to the game and software version. Future software upgrades may require you to also upgrade the dongle. Important: Some of your registration information is stored in the dongle, so if you replace your computer, remove the dongle and keep it with the cabinet. Parallel Game Dongle USB Game Dongle Figure 9. Parallel and USB Game Dongles Connecting an External Monitor If you wish, you can use the S-video connector on the computer video card to connect an external TV monitor and display the game action outside of the cabinet. Important: If you install the operating system with the System Restore Disk while a second monitor is connected, an NVIDIA dialog box will appear onscreen after the large GLOBAL VR® logo appears at the end of the installation process. When you see this screen, power-cycle the cabinet and then proceed with the game software installation. If your cabinet has an FX 5700 video card, you cannot use the S-video and VGA ports at the same time. In this case, you must purchase a DVI-to-VGA adapter and use this adapter to connect the cabinet monitor to the DVI port. Important: Turn the cabinet OFF before making any video connections. In most cases, the external monitor should not require any special setup. In some cases the Attract Movie may not show up on the screen. If this happens, refer to External Monitor Troubleshooting on page 69. © 2006 GLOBAL VR, INC. 040-0049-01 Rev. B 1/20/2006 Page 13 of 84
  • 14. Chapter 3 — Playing a Game Chapter 3 — Playing a Game Starting the Game With the proper number of coins inserted, press the red Start button to begin the game. First select your mode of play, Race, Career, or Tournament (see page 16). Next a series of screens will appear, as shown below, allowing you to select options for the game. Figure 10. Selecting Track and Car Options 1. Track Select: Turn the steering wheel to highlight each track displayed at the top of the screen. The track map and difficulty (Easy, Medium, or Hard) are displayed as you highlight each track. Press the gas pedal to select a track. 2. Car Select: Turn the steering wheel to highlight each car displayed at the top of the screen, and press the gas pedal to select your car. 3. Customize: Turn the steering wheel to highlight each customization shown at the top of the screen. Your car is displayed in each highlighted color. Press the gas pedal to make a selection. 4. Transmission: Select either automatic or manual transmission. Manual transmission (using the 6-speed shifter) may result in better speed control and faster race times for experienced drivers. No clutch is used, only the shifter. 5. Other Options: At any time during the car, customization, or transmission selection screens, you can press a control panel button for other options. These options are set through pop-up menus that display for five seconds. • Press NOS to turn AI on or off. In a linked race, any player can turn AI off for all cabinets. Turning AI off removes computer-controlled cars from the track. For a driver racing solo, this also activates Shadow Attack Mode, in which the driver races against a shadow of the track leader. • Press Look Back to turn Handicap (catch-up) on or off (default is on) for one driver only. Handicap helps a driver catch up with other cars. • Press ♪ to toggle the Force-Feedback level through Light, Medium, or Heavy. Once you have selected your options, the game will begin to load. Need for Speed™ Underground System Manual Page 14 of 84 040-0049-01 Rev. B 1/20/2006
  • 15. Chapter 3 — Playing a Game Game Play As in any driving game, use the Steering Wheel, Gas, Brake and Shifter to control the car. The Look Back button lets you look behind the car. The View button toggles the view between inside and outside the car. Tap the ♪ button to turn the music off; tap it again to change songs. Press the NOS button for an extra burst of speed—but quantities are limited! Tap the E-Brake button to start a drift. Figure 11. Driving Screen Functions During the race, useful information is displayed onscreen: 1. Shows the number of the lap you are currently driving, and the total laps to complete the race. 2. Shows your current time for the lap and the best recorded lap time. 3. Shows your position (green triangle) relative to the other cars (red triangles) on a track map. 4. Shows your car's turbo level. 5. Shows the number of seconds you have to cross the next checkpoint. A Shadow Attack icon is displayed above this number if you are in Shadow Attack mode. 6. Shows your position in the race out of the total number of cars. 7. Shows the time gap between you and the leader, or the car behind you if you are in the lead. 8. Shows style points earned for advanced driving techniques. 9. Tachometer, shows your engine RPM in thousands. 10. Shows your current gear. In manual, the gear position in the shift pattern is also displayed. 11. Shows your speed in either km/h or MPH (set in Game Operator menu). Additional information will appear onscreen depending on the race mode and options selected. At the end of the race, the time and position for each driver is displayed. © 2006 GLOBAL VR, INC. 040-0049-01 Rev. B 1/20/2006 Page 15 of 84
  • 16. Chapter 3 — Playing a Game Modes of Play Race Mode (amusement): This is normal racing, requiring no Players' Card or online services. If cabinets are linked, players can race against each other head-to-head. Using a Players' Card in Race Mode makes another car available for the player to drive. Also, a player can track miles on a Players' Card, and after 300 miles, another car becomes available. Career Mode: In this mode, players drive a series of races. For each race they finish within a specified time, they win a customization or performance upgrade for their car. Players save their car and points on their Players' SmartCards. Players who complete a career (81 different races) can re-race any Career Mode race. Players can also use their customized Career Mode car in Race Mode. Tournament Mode: If a cabinet is registered and online, players can compete in tournaments to win cash and prizes. To participate, players need a Players' SmartCard. Check the GLOBAL VR® website (www.globalvr.com) for the latest Tournament information. Operator-Run Local Tournaments If a cabinet is registered and online, operators can create their own Local Tournaments through the GLOBAL VR® website (www.globalvr.com). Operators can set up a local tournament on one cabinet, or on a number of cabinets at any of their locations. They can list the tournaments on the GLOBAL VR® website to attract players. Note: Certain regions have local restrictions on tournament play. Need for Speed™ Underground System Manual Page 16 of 84 040-0049-01 Rev. B 1/20/2006
  • 17. Chapter 4 — Setting Up Tournament Play Chapter 4 — Setting Up Tournament Play Go Online With GLOBAL VR® and Get More From Your Equipment Investment More Players – Top players find your games through our online Game Locator. More Free Time – Online equipment management lets you adjust and account without leaving your desk. More Play Modes – Players at all levels have more ways to enjoy their favorite games. More Cash – Increased earnings with Tournament Play and other online-only features. Getting Started Register with the GLOBAL VR® Tournament System to connect your game cabinets to our online servers. Being online opens Tournament Play and other new play modes for your players and time-saving services for you. Getting started is easy: 1. If you do not have an account with GLOBAL VR®, fax in the Operator Agreement form located in the Registration Pack of the Welcome Kit included with your cabinet or upgrade kit. 2. Connect your cabinet to a phone line or broadband network. See the diagrams on pages 81 and 82 for examples of how to set up your game network. Also see page 12 for important information about using broadband with linked cabinets. 3. Register your cabinet as described below. Cabinet Registration You have four options for registering your cabinet: • New Operators: Go to page 18. • Existing Operators: − Register through our website: Go to page 18. − Obtain a 4-digit registration key if you do not have web access: Go to page 18. − Register with your Active Operator Plus™ SmartCard: Go to page 22. Note: For existing operators setting up a cabinet in a new location, it is probably easiest to register through the website. © 2006 GLOBAL VR, INC. 040-0049-01 Rev. B 1/20/2006 Page 17 of 84
  • 18. Chapter 4 — Setting Up Tournament Play Select from your Register with your active Existing Locations Operator Plus SmartCard Enter New Location Logon to www.globalvr.com Information Existing Operators and fill out the form to get your 4-digit Registration Key If you don't have web access, New Operators phone GLOBAL VR® to get Register using your your 4-digit Registration Key 4-Digit Registration Code. Fill out the Operator Phone GLOBAL VR® to get Agreement Form and your 4-digit Registration Key fax it to GLOBAL VR® Figure 12. Registration Process Flowchart Navigating the Registration Screens Use the driving control panel buttons to navigate the registration screens, as shown below. Also look for onscreen instructions and hints near the bottom of each screen. Button Function Button Function Up Back or Exit Left (In Some Screens) Down Select Right (In Some Screens) Select Steering Right & Left (In Some Screens) Wheel (In Some Screens) Web Registration for Existing Operators Perform the following steps to register online if you have an account with GLOBAL VR®. Note: You will need to provide the cabinet serial number, found on a label on the back of the cabinet, for each cabinet you wish to register. 1. Go to the GLOBAL VR® website, www.globalvr.com. 2. Click the Operator tab and login using your Operator ID and password. 3. Click the MY CABINETS tab near the top of the page. 4. From the menu on the left side of the Cabinets screen, under Racing, select Registration. 5. Fill out the Registration Form. In the Select Existing Location field, you can select New Location, or one of your existing locations. When you finish the form, click the Create button. 6. A Cabinet Registration Confirmation screen will appear. Find your 4-digit Registration Key near the top of the page, and write it down. Use this number at the cabinet to complete the registration process and activate your Operator card. (The Registration Key expires after one week.) 7. Repeat the steps above for each cabinet that you wish to register. 8. Proceed to the section titled Register With Your 4-Digit Registration Key, on page 19. Registration for Existing Operators without Web Access Perform the following steps if you have an account with GLOBAL VR® but no Web access. Need for Speed™ Underground System Manual Page 18 of 84 040-0049-01 Rev. B 1/20/2006
  • 19. Chapter 4 — Setting Up Tournament Play Note: You will need to provide the cabinet serial number, found on a label on the back of the cabinet, for each cabinet you wish to register. 1. Phone GLOBAL VR® Tournament Support, at 408.597.3429, to receive a 4-digit cabinet registration key for each cabinet that you wish to register. 2. Proceed to the section titled Register With Your 4-Digit Registration Key, on page 19. Registration for New Operators If you are a new operator and do not have a GLOBAL VR® Operator Account, perform the following steps to get your cabinet registered and online: 1. Fill out Operator Agreement form, located in the Registration Pack of the Welcome Kit included with your cabinet or upgrade kit. Fax the form to GLOBAL VR® at 408.597.3439. Note: When you phone Tournament Support, you will need to provide the cabinet serial number, found on a label on the back of the cabinet, for each cabinet you wish to register. 2. Phone GLOBAL VR® Tournament Support, at 408.597. 3429, to complete the registration process and create your Operator Account. You will receive the following: • A 4-digit registration key for each cabinet you are registering. You will use the registration key at the cabinet to complete the registration process and activate your Operator card. (The 4-digit registration key expires after one week.) • An Operator ID and password. Use these in the future to logon to our website to get your 4-digit registration key for cabinet registration. Your ID also gives you access to the Global Impact Operator's Online Store. 3. Proceed to the section titled Register With Your 4-Digit Registration Key, that follows. Register With Your 4-Digit Registration Key 1. Press the Operator button inside the coin door and select Registration Options from the Game Operator Menu. The Registration screen will appear. 2. Press the ♪ button to enter the Registration screen. Select Cabinet Registration and press the ♪ button again to begin the registration process. 3. Read the Acknowledgement screen, select Agree, and then press the ♪ button to continue. You must select Agree to continue with registration. © 2006 GLOBAL VR, INC. 040-0049-01 Rev. B 1/20/2006 Page 19 of 84
  • 20. Chapter 4 — Setting Up Tournament Play 4. The Dial-up Phone settings screen will appear next. Phone Option is set to Dial-up as default. To use a broadband connection, press ♪ with Phone Option selected, and then press VIEW and LOOK BACK to toggle between Broadband and Dial-up. Press ♪ to select. If using Broadband, skip to step 6. 5. To use a dial-up phone line, keep Dial-up as the Phone Option, and use the buttons to set the dial-up properties as described below: a. Use VIEW and LOOK BACK to select State and press ♪. Use VIEW and LOOK BACK to scroll through the list of states. Press ♪ to select your state from the list. b. Use VIEW and LOOK BACK to select Primary City and press ♪. Use VIEW and LOOK BACK to scroll through the list of cities. Press ♪ to select your city or the city closest to the cabinet location. Hint: Press the gas pedal while scrolling the list of cities to jump to the next letter. c. Use VIEW and LOOK BACK to select Primary Number and press ♪. Use VIEW and LOOK BACK to scroll through the list of phone numbers for your city. Press ♪ to select a local phone number. d. Select Yes for Skip Area Code unless the area code for the selected number is different from the line the cabinet will be using. (If the cabinet needs to dial an area code, you will also need to enter a “1” as a dialing prefix in the next step.) e. If you need to dial a number (such as “9”) to call outside of your location, or if your modem will be dialing an area code and needs to dial a “1” first, select Dialing Prefix and press ♪. This will select the onscreen keypad. Use VIEW, LOOK BACK, ♪, and NOS, to select each number from the onscreen keypad, and press START to enter it. Select the comma (,) to insert a pause in the dialing. To make a correction, select DELETE on the onscreen number pad and press START. When you are finished, select ENTER on the number pad and press START. f. Repeat Steps b—e for the Secondary City. (If your Primary City has more than one dial- up number, select the same city and a different number.) The computer will use this dial- up number as a backup if it cannot reach the primary number. Need for Speed™ Underground System Manual Page 20 of 84 040-0049-01 Rev. B 1/20/2006
  • 21. Chapter 4 — Setting Up Tournament Play g. When you finish, the Primary and Secondary numbers will be displayed onscreen, with the dialing prefix and area code, if entered. Check the entries, and use the buttons to return to any entry that you wish to change. When you are finished, Use VIEW and LOOK BACK to select Continue, and press ♪. 6. The Time Zone screen will appear next. Use VIEW and LOOK BACK to select your time zone and press ♪. 7. The Select Registration Method screen will appear next. Select Register with a 4-Digit Code and press ♪. 8. On the Enter your 4-digit code screen, use VIEW, LOOK BACK, ♪, and NOS, and/or steering wheel, to select each number from the onscreen keypad, and press START to enter it. If you make a mistake, select Delete and press START. 9. When you are finished, select Enter and press START. You will see "Connecting…" followed by "In progress…". When the process finishes, you will see "Registration Successful." Your cabinet is now registered. Important: If you never see the Registration Successful screen, this can indicate a problem with registration, possibly an interrupted modem connection. Select Force Call from the Registration Options screen to make sure that your cabinet is able to sync with GLOBAL VR®, and to finalize registration. 10. After registration, you will be prompted to insert your Operator card to activate it. When the Card Activation Successful screen appears, your SmartCard will be active and can be used to register other cabinets. You can skip this step if you do not wish to activate a card at this time. You can activate an Operator Card at any time from the Registration Options screen. Note: Inserting your active Operator card in a registered cabinet will automatically open the Operator menu. Your cabinet is now registered. It is a good idea to set the sync time on the Registration Options screen so that your cabinets call in to GLOBAL VR® at different times. Also make sure the cabinet will be powered on at the selected sync time. © 2006 GLOBAL VR, INC. 040-0049-01 Rev. B 1/20/2006 Page 21 of 84
  • 22. Chapter 4 — Setting Up Tournament Play Register with an Active Operator Card If you already have an account with GLOBAL VR®, you can use your Operator Card to register immediately. 1. Press the Operator button inside the coin door and select Registration Options from the Game Operator Menu. The Registration screen will appear. 2. Press the ♪ button to enter the Registration screen. Select Cabinet Registration and press the ♪ button again to begin the registration process. 3. Read the Acknowledgement screen, select Agree, and then press the ♪ button to continue. You must select Agree to continue with registration. 4. The Dial-up Phone settings screen will appear next. Phone Option is set to Dial-up as default. To use a broadband connection, press ♪ with Phone Option selected, and then press VIEW and LOOK BACK to toggle between Broadband and Dial-up. Press ♪ to select. If using Broadband, skip to step 6. 5. To use a dial-up phone line, keep Dial-up as the Phone Option, and use the buttons to set the dial-up properties as described below: a. Use VIEW and LOOK BACK to select State and press ♪. Use VIEW and LOOK BACK to scroll through the list of states. Press ♪ to select your state from the list. Need for Speed™ Underground System Manual Page 22 of 84 040-0049-01 Rev. B 1/20/2006
  • 23. Chapter 4 — Setting Up Tournament Play b. Use VIEW and LOOK BACK to select Primary City and press ♪. Use VIEW and LOOK BACK to scroll through the list of cities. Press ♪ to select your city or the city closest to the cabinet location. Hint: Press the gas pedal while scrolling the list of cities to jump to the next letter. c. Use VIEW and LOOK BACK to select Primary Number and press ♪. Use VIEW and LOOK BACK to scroll through the list of phone numbers for your city. Press ♪ to select a local phone number. d. Select Yes for Skip Area Code unless the area code for the selected number is different from the line the cabinet will be using. (If the cabinet needs to dial an area code, you will also need to enter a “1” as a dialing prefix in the next step.) e. If you need to dial a number (such as “9”) to call outside of your location, or if your modem will be dialing an area code and needs to dial a “1” first, select Dialing Prefix and press ♪. This will select the onscreen keypad. Use VIEW, LOOK BACK, ♪, and NOS, to select each number from the onscreen keypad, and press START to enter it. Select the comma (,) to insert a pause in the dialing. To make a correction, select DELETE on the onscreen number pad and press START. When you are finished, select ENTER on the number pad and press START. f. Repeat Steps b—e for the Secondary City. (If your Primary City has more than one dial- up number, select the same city and a different number.) The computer will use this dial- up number as a backup if it cannot reach the primary number. g. When you finish, the Primary and Secondary numbers will be displayed onscreen, with the dialing prefix and area code, if entered. Check the entries, and use the buttons to return to any entry that you wish to change. When you are finished, Use VIEW and LOOK BACK to select Continue, and press ♪. 6. The Time Zone screen will appear next. Use VIEW and LOOK BACK to select your time zone and press ♪. 7. The Select Registration Method screen will appear next. Select Register with Operator Card and press ♪. 8. When you are prompted, insert your Operator Card. The SmartCard reader will read the card automatically. You will see "Connecting…" onscreen for a about a minute, followed by "Disconnecting… 100% Complete" when the process has finished. © 2006 GLOBAL VR, INC. 040-0049-01 Rev. B 1/20/2006 Page 23 of 84
  • 24. Chapter 4 — Setting Up Tournament Play If the call fails to connect, you will see a modem error message (see Connection Troubleshooting on page 68 for information on modem error messages). Press any button to start over from the initial screen. (You will not have to re-enter your settings, and you can leave your Operator Card in the SmartCard reader.) If you have repeated connect failures, select a different dial-up number. 9. The Select Cabinet Location screen will appear next. Your existing locations should appear in the list. If you are setting up the cabinet at a new location, proceed to Manually Entering your Location, on page 25. Otherwise continue with Step 10. 10. Use VIEW and LOOK BACK to scroll through the list, and press ♪ to select your location. 11. The next screen will prompt you to enter your cabinet serial number (find this number, starting with "GVR" on a sticker on the back of the cabinet). Use the buttons and/or steering wheel to navigate the onscreen keyboard to select each character. Press Start to enter each character. Select Done and press Start when finished. You will see "Connecting…" onscreen, followed by "In Progress…". When the process finishes, you will see "Registration Successful." Press any button to return to the Operator Menu. Important: If you never see the Registration Successful screen, this can indicate a problem with registration, possibly an interrupted modem connection. Select Force Call from the Registration Options screen to make sure that your cabinet is able to sync with GLOBAL VR®. Your cabinet is now registered. It is a good idea to set the sync time on the Registration Options screen so that your cabinets call in to GLOBAL VR® at different times. Also make sure the cabinet will be powered on at the selected sync time. Once your cabinet is registered, the Operator menu will open automatically when you insert your active Operator card. Need for Speed™ Underground System Manual Page 24 of 84 040-0049-01 Rev. B 1/20/2006
  • 25. Chapter 4 — Setting Up Tournament Play Manually Entering your Location 1. If your location is not in the list on the Select Cabinet Location screen, select New Location and press ♪. The next screen will show a list of fields requesting information about your location. When you enter this screen, the first field will be pre-selected. 2. Use the VIEW, LOOK BACK, ♪, and NOS buttons and/or steering wheel to navigate the onscreen keyboard, and press START to enter each selected character. To make a correction, select the Backspace key on the onscreen keyboard and press START. When you are finished, select ENTER on the onscreen keyboard and press START. 3. For Location Type and State, use VIEW and LOOK BACK to scroll through a list of options and press START to select. 4. When you have filled in all of the fields, select DONE from the onscreen keyboard and press Start. (If you press Done before filling out all required fields, the next field that needs information will become selected.) You will see "Connecting…" onscreen, followed by "In Progress…". When the process finishes, you will see "Registration Successful." Press any key to return to the Operator Menu. Important: If you never see the Registration Successful screen, this can indicate a problem with registration, possibly an interrupted modem connection. Select Force Call from the Registration Options screen to make sure that your cabinet is able to sync with GLOBAL VR®. Your cabinet is now registered. It is a good idea to set the sync time on the Registration Options screen so that your cabinets call in to GLOBAL VR® at different times. Also make sure the cabinet will be powered on at the selected sync time. © 2006 GLOBAL VR, INC. 040-0049-01 Rev. B 1/20/2006 Page 25 of 84
  • 26. Chapter 5 — Operator Menu and Game Setup Chapter 5 — Operator Menu and Game Setup This chapter describes how to use the Game Operator menu to set up the game or diagnose problems. All game audits, settings, registration, and control diagnostics are accessed from the Game Operator Menu. Version 1.1 of the software added an Accounting menu with several useful new accounting features. Also, certain Game Operator menu functions were moved to different screens than in earlier software. The Operator Menu screens are described in detail on the following pages. Refer to Game Operator Menu Flowchart, on the following page, for a list of the Game Operator menu screens and available settings. Press the red operator button behind the coin mech door to enter the Game Operator menu. Navigating Through the Game Operator Menu Screens Use the buttons on the driving control panel to navigate, select, and change options, as described in the table below. Onscreen instructions will provide additional information on using each menu. Button Function Comments Up Scroll through lists or settings. Down Select Confirm a setting. Back or Exit Navigate back to the menu list or exit the menu. The following is an example of how to change a menu option: Figure 13. Setting Cabinet Volume 1. Use the and buttons to navigate and highlight a menu option. 2. Press the button to select the highlighted option. The game option will turn to red when it is selected. 3. Use the and buttons to rotate through the available settings for the selected option, as shown by the arrows in steps 2 and 3 of the picture above. 4. When you reach the setting you want, press the button again. The game option will now turn back to yellow, and will display the new setting, as shown in step 4 of the picture above. 5. Press the button to go back to the main menu. Need for Speed™ Underground System Manual Page 26 of 84 040-0049-01 Rev. B 1/20/2006
  • 27. Chapter 5 — Operator Menu and Game Setup The flowchart below shows the function of each menu in the Game Operator Menu. Main Menu Displays International Setting, Software Version, Cabinet Type, and GLOBAL VR® contact info. Lets you set Volume and Link ID #. Machine Lets you set Play Type, Credit Display, Free Play on or off, MPH or km/h, Players Card Sales enabled or disabled, and Skill Level. Options Lets you Restore Default Settings, Reset Game Stats, and Reset Amusement Play Track Records and Shadows. Resets Lets you set the number of coins Product Pricing Accounting per unit of money, view or clear Location Splits credits, open other menus to set Current Collection Stats pricing and location splits, and Current Location Income view or reset collection statistics. Game Stats Previous Collection Stats Displays statistics about settings selected by players. Controls Lets you test and calibrate the driving controls. Monitor Lets you test and calibrate the monitor. Lets you test cabinet audio. Sound Test Lets you test SmartCard reader, Players' Card dispenser, and modem, and set monitor gamma. Test Watchdog (new in version 1.1) uses the Watchdog function to System Test reboot the shell. This test is primarily used by GLOBAL VR® software QA testers. Link Status Displays status of each cabinet in a linked set. Lets you register the cabinet for Tournaments and online features, Registration Options and force a call to sync with the GLOBAL VR® servers. Figure 14. Game Operator Menu Flowchart © 2006 GLOBAL VR, INC. 040-0049-01 Rev. B 1/20/2006 Page 27 of 84
  • 28. Chapter 5 — Operator Menu and Game Setup Machine Information Menu Figure 15. Machine Information Screen The Machine Information menu is the default screen displayed when you press the Operator Button. It displays important information about the cabinet. Menu Item Description Default Value (as applicable) International Displays international location (e.g. USA or UK) as read (Set by Dongle) Setting from the game dongle. Game Version Displays the game software version installed. OS Version Displays the operating system software version installed. Cabinet Type Displays cabinet type (Sit-Down or Up-Right). (Set by Dongle) Cabinet Volume Sets the game audio volume form 0—100% in increments 55% Setting of 5. Attract Volume Sets the Attract mode audio volume as a percentage of 95% cabinet volume. Attract Sound Sets Attract mode sound to Always, Sometimes, or Never. Always Mode The Sometimes setting will play sound in attract mode one third of the time. Cabinet Link ID# Sets the ID number used for linking cabinets. Each linked 1 cabinet must have a unique Cabinet Link ID number (1, 2, 3, or 4). Contact Info Displays GLOBAL VR® contact information. Need for Speed™ Underground System Manual Page 28 of 84 040-0049-01 Rev. B 1/20/2006
  • 29. Chapter 5 — Operator Menu and Game Setup Game and Coin Options Menu Figure 16. Game and Coin Options Screen The Game and Coin Options menu is used to set up the type of money or credits used at your location, game pricing, and game-play difficulty. Menu Item Description Default Value (as applicable) Play Type Sets Play Type to Player's Choice or Race Only. Player's Choice (Race Only disables Tournament and Career modes.) Credit Display Sets whether Money or Credits are used to play the cabinet. Money (This setting affects the display of other items.) Free Play Sets free play ON or OFF. OFF Display Speed in Sets the speedometer to MPH or km/h. MPH Players' Card Sales Sets Players' Card sales to Enabled or Disabled. This gives Enabled Operators the option of allowing card sales only from cabinets with dispensers. Skill Level Lets you set the Skill Level, by track, from A (easiest) C (Medium) (Checkpoint Difficulty) through E (hardest). Easier settings mean players have more time to reach each checkpoint; harder settings mean less time. # Laps/Drags # Laps/Drags lets you set how many laps or drags players varies by track get for each racetrack. Options are 1–5. © 2006 GLOBAL VR, INC. 040-0049-01 Rev. B 1/20/2006 Page 29 of 84
  • 30. Chapter 5 — Operator Menu and Game Setup Reset Stats/Settings Screen Figure 17. Reset Stats/Settings Menu Menu Item Description Restore Default Settings Sets the cabinet to the factory default settings. Settings that are reset include Credit Display, Coins per $, Cost Per Play, Game Volume, Attract Volume, and Skill Level. Reset Collection Stats Resets the Coin Statistics for the cabinet. Reset Game Stats Resets the Game Statistics for the cabinet. Reset Amusement Track Resets the amusement (Race mode) track records and shadows. Records & Shadows Tournament records are not affected. You can select Reset All Tracks, or reset tracks individually. Need for Speed™ Underground System Manual Page 30 of 84 040-0049-01 Rev. B 1/20/2006
  • 31. Chapter 5 — Operator Menu and Game Setup Accounting Screens Figure 18. Accounting Info Screens Menu Item Description Coins Per $ Sets how many coin drops it takes to reach a unit of money, typically 4 in the (Symbol varies internationally) US (4 quarters per $) or 1 in the UK and Europe. Available Credits Displays the number of credits inserted. Reset Credits Highlight and select this button to reset the Available Credits to 0. Product Pricing Brings up the Product Pricing screen where you can set the price for each mode of play and Players' Cards (either dispensed or fulfilled by GLOBAL VR® via mail). Also displays applicable fees paid to GLOBAL VR®. Location Splits Brings up the Location Splits screen that displays the location's share of income for each mode of play, Players' Card sales, and unspent money, plus the location's share of fees paid to GLOBAL VR®. Note that in the example above, all items are set to 50% (50/50 split) except Local Operator Tournament, which is set to pay the location 25%. Current Collection Stats Brings up the Current Collection Stats screen, which displays income, expenses, fees, and net earnings for each mode of play. It also displays the start date for the current stats. Current Location Income Brings up the Current Location Income screen, which displays all of the information in Current Collection Stats, plus the Location Split calculations. Note that in the example above, the location gets 50% of income and pays 50% of fees in all categories except Local Tourney. For this item, the Operator has set the Location Share at 25% on the Location Split screen. Previous Collection Brings up the Previous Collection Stats screen, which was saved last time Do Stats Collection Now was selected. It also displays the start and end dates for the displayed stats. Operators can view past Collection Stats for their online cabinets running software version 1.1 or later by logging in to www.globalvr.com. Do Collection Now Deletes the Previous Collection Stats and replaces them with the current collection stats. Resets all Current Collection Stats to 0.00. © 2006 GLOBAL VR, INC. 040-0049-01 Rev. B 1/20/2006 Page 31 of 84
  • 32. Chapter 5 — Operator Menu and Game Setup Current Location Income Screen Figure 19. Current Location Income Screen The Current Location Income screen, accessed via the Accounting menu, is a useful tool for operators who split the cabinet income with a location. The Operator sets the location's share of each income and expense item in the Location Splits screen, and the software calculates the location's split based on these settings. The example above shows 50/50 splits for everything except Local Tourney, which is set to give the location 25%. Game Statistics Screens Figure 20. Game Stats Menu Screens The Game Statistics menu lets you cycle through three screens with statistics about the options players have selected in Race mode, and their average times for each track. The screens are: Car and Track, Average Times, and Game Features Usage. Press View or Look Back to move through the pages. You can reset the Game Statistics through the Resets menu. Need for Speed™ Underground System Manual Page 32 of 84 040-0049-01 Rev. B 1/20/2006
  • 33. Chapter 5 — Operator Menu and Game Setup Play Control Test Screen Figure 21. Play Control Test Screen The Play Control Test screen displays pictures of each driving control, and allows you to test each control, as described below. To exit from this menu, press the Start and View buttons together. If a component is not detected, a ! symbol will be displayed over it, as shown above. • Buttons: When you press a control panel button, it will light up on the screen. • SmartCard Reader: Indicates whether a SmartCard reader is installed and working. • SmartCard Dispenser: Indicates whether a dispenser is installed and working. • Steering Wheel: When you turn the steering wheel to the left or right, the numbers above the graphic should change to indicate the steering wheel position. Full left position should be about "–127" and full right position should be about "127". As you turn the wheel, the number change should be smooth and linear. A sudden jump in the numbers, or a different range of numbers, can indicate a bad pot. • Gas & Brake Pedal: When you step on the pedals you will see the same action on-screen. The numbers displayed near the pedals show the value when the pedal is full up, full down, and the current value. The difference between the full up and full down values should be about 80 (±5). As you press and release the pedals, the number change should be smooth and linear. A sudden jump in the numbers can indicate a bad pot. • Calibration: To calibrate the steering wheel and pedals, press the Start and NOS buttons together. The steering wheel will turn by itself during calibration; do not touch it during this process. When prompted, step on the gas and brake pedals to calibrate them. • Shifter: When you shift through the gears, the current gear number appears on the screen. The screen also displays which shifter micro switches are actuated for each gear. For example, "2 LT DN" means the left and down micro switches are actuated in gear 2. "3 UP" means that only the up micro switch is actuated in gear 3. For more information, refer to Six-Speed Shifter Micro Switch Service on page 45. • E-Brake: If you press the E-Brake button, it will light up on the screen. • Credits: When you insert money into the coin mech or bill validator, the word “CREDITS” will flash, and “OK” will highlight on the screen. • Nytric Card Version: Indicates version of Nytric USBI/O card installed in the computer. • Start Button, Leader Light and Brake Light: When you enter the Controls Menu, the Start button, Leader Light and Brake Lights on the cabinet will blink for several seconds. If any of these lights fails to blink, check the bulb and wiring for the light. © 2006 GLOBAL VR, INC. 040-0049-01 Rev. B 1/20/2006 Page 33 of 84
  • 34. Chapter 5 — Operator Menu and Game Setup Monitor Calibration Screen Figure 22. Monitor Calibration Test Screen Press the ♪ button to start the monitor calibration test, and the View or Look Back button to scroll through the screens. To exit the Monitor Calibration Test, press the NOS button or the Operator button. The monitor calibration test cycles through a series of monitor calibration screens. Various screens are designed to help you align the horizontal or vertical sync, or adjust the white balance and color hues. Use the monitor remote control board buttons to adjust the monitor. The board is located next to the Operator button. Use the buttons on the monitor control panel to access a series of menus allowing you to adjust the display size, color, and quality. Figure 23. Monitor Remote Control Board Need for Speed™ Underground System Manual Page 34 of 84 040-0049-01 Rev. B 1/20/2006
  • 35. Chapter 5 — Operator Menu and Game Setup Sound Test Figure 24. Sound Test Screen The Sound Test menu tests the speakers. Once you press the ♪ button to enter the sound test, each speaker will call out its name, one at a time. You should hear the words “Front Left Channel” from the left front speaker, followed by “Center Channel” from the center, and so on. The subwoofer will emit a thumping sound. The Sound Test will continue to automatically rotate through each speaker until you press the NOS button to exit the test. While the sound test is running, the picture on the screen shows the location of each speaker as it is tested. Press the View or Look Back button to stop the sound rotation and test one speaker at a time. Press View to rotate to the next speaker, or Look Back to rotate to the previous speaker. Press the NOS button to exit the test. If any sound comes from the wrong speaker, or any speakers are not working, check the connections to the speakers, audio amp, and PC (see Audio Amp and Speakers Service on page 51). Refer to Audio Troubleshooting on page 64 for more information on fixing audio problems. © 2006 GLOBAL VR, INC. 040-0049-01 Rev. B 1/20/2006 Page 35 of 84
  • 36. Chapter 5 — Operator Menu and Game Setup System Test Figure 25. System Test Screen • Set Video Gamma: Adjusts the overall brightness of the video. Default is 1.00. • Test Card Reader: Insert an Operator or Players' SmartCard, and then select this option. If the SmartCard reader is working properly, the screen will indicate the type of card inserted and the card number. For Players' Cards, the name of the owner will also be shown. This can be useful for finding the owners of lost cards. • Test Card Dispenser: If a card dispenser is installed, select this option to dispense a card and confirm the dispenser is working. • Test Modem: Forces a call to verify modem function. The screen will indicate whether the modem connected successfully. (For online cabinets only.) • Test Watchdog: Uses the Watchdog function to reboot the shell. This test is primarily used by GLOBAL VR® software QA testers. Need for Speed™ Underground System Manual Page 36 of 84 040-0049-01 Rev. B 1/20/2006
  • 37. Chapter 5 — Operator Menu and Game Setup Link Status Figure 26. Cabinet Link Status Screen This screen shows the link status of each cabinet in a linked set. The cabinet you are using to view the Link Status screen will be shown as BUSY, while the other cabinets will be shown as either AVAILABLE or BUSY if they are linked properly, or UNCONNECTED if they are not linked. For example, in the picture above: • Cabinet 1 is not linked properly, or Link ID 1 is not being used. • Cabinet 2 is linked properly, and is busy because the Operator is viewing the menu. • Cabinet 3 is linked properly, and is busy because a player is driving a race. • Cabinet 4 is linked properly, and is available for play. © 2006 GLOBAL VR, INC. 040-0049-01 Rev. B 1/20/2006 Page 37 of 84
  • 38. Chapter 5 — Operator Menu and Game Setup Registration Options The Registration Options screen allows you to register, unregister, or change the settings the cabinet uses for syncing with GLOBAL VR. This screen also provides valuable information about a registered cabinet. Refer to Chapter 4, starting on page 17, for registration instructions. Figure 27. Registration Options Screen Buttons • Cabinet Registration or Unregister Cabinet: This button will change depending on whether your cabinet is registered. If you restore the software using the System Recovery disk, this button will change to Cabinet Restore. Selecting the Cabinet Restore button will cause the cabinet to call in to GLOBAL VR® and use information stored in your game dongle to retrieve your registration settings. • Force Call: This button causes the cabinet to call in to GLOBAL VR®. Use this if the cabinet fails to sync at the normal time, or to test your connection. • Edit Dial-In Numbers: Use this button to change the phone number the cabinet uses to connect to the Internet, or to switch between dial-up and broadband. If you have repeated connection problems, try a different local number. • Activate Operator Card: Use this button to activate an inactive Operator Card. • Call Sync Log: Select this to view the list of calls the cabinet has made to GLOBAL VR®, and confirm call success or get information about modem errors. • Sync Time: Select this button to change the time the cabinet syncs with GLOBAL VR®. Select a time when the cabinet is powered ON, but not used heavily, and stagger the time so that all of your cabinets do not try to dial in at the same time. • Time Zone: Displays the selected time zone and allows you to change it. Informational Text • The upper right side of the screen shows the Cabinet Registration Status, Cabinet ID Number used for your account, and Cabinet Serial Number. • The lower part of the window shows information about the last call made by the cabinet to GLOBAL VR®. If there was a problem syncing, the Modem Error Code may help you solve the problem. Refer to Connection Troubleshooting on page 68 for more information. Need for Speed™ Underground System Manual Page 38 of 84 040-0049-01 Rev. B 1/20/2006