
Recommended
More Related Content
Viewers also liked
Viewers also liked (17)
Similar to DCCN 2016 - Tutorial 1 Advanced
Similar to DCCN 2016 - Tutorial 1 Advanced (20)
Recently uploaded
Recently uploaded (20)
DCCN 2016 - Tutorial 1 Advanced
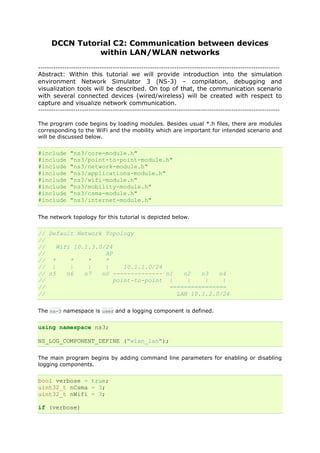
- 1. DCCN Tutorial C2: Communication between devices within LAN/WLAN networks -------------------------------------------------------------------------------------------------------------- Abstract: Within this tutorial we will provide introduction into the simulation environment Network Simulator 3 (NS-3) – compilation, debugging and visualization tools will be described. On top of that, the communication scenario with several connected devices (wired/wireless) will be created with respect to capture and visualize network communication. -------------------------------------------------------------------------------------------------------------- The program code begins by loading modules. Besides usual *.h files, there are modules corresponding to the WiFi and the mobility which are important for intended scenario and will be discussed below. #include "ns3/core-module.h" #include "ns3/point-to-point-module.h" #include "ns3/network-module.h" #include "ns3/applications-module.h" #include "ns3/wifi-module.h" #include "ns3/mobility-module.h" #include "ns3/csma-module.h" #include "ns3/internet-module.h" The network topology for this tutorial is depicted below. // Default Network Topology // // Wifi 10.1.3.0/24 // AP // * * * * // | | | | 10.1.1.0/24 // n5 n6 n7 n0 -------------- n1 n2 n3 n4 // point-to-point | | | | // ================ // LAN 10.1.2.0/24 The ns-3 namespace is used and a logging component is defined. using namespace ns3; NS_LOG_COMPONENT_DEFINE ("wlan_lan"); The main program begins by adding command line parameters for enabling or disabling logging components. bool verbose = true; uint32_t nCsma = 3; uint32_t nWifi = 3; if (verbose)
- 2. { LogComponentEnable("UdpEchoClientApplication", LOG_LEVEL_INFO); LogComponentEnable("UdpEchoServerApplication", LOG_LEVEL_INFO); } The next step is to create two nodes that will be connected via the point-to-point link. NodeContainer p2pNodes; p2pNodes.Create (2); Next, we instantiate a PointToPointHelper and set the associated default Attributes so that we create a five megabit per second transmitter on devices created using the helper and a two millisecond delay on channels created by the helper. We then Install the devices on the nodes and the channel between them. PointToPointHelper pointToPoint; pointToPoint.SetDeviceAttribute ("DataRate", StringValue ("5Mbps")); pointToPoint.SetChannelAttribute ("Delay", StringValue ("2ms")); NetDeviceContainer p2pDevices; p2pDevices = pointToPoint.Install (p2pNodes); Next, we declare another NodeContainer to hold the nodes that will be part of the bus (CSMA) network. NodeContainer csmaNodes; csmaNodes.Add (p2pNodes.Get (1)); csmaNodes.Create (nCsma); The next line of code Gets the first node (as in having an index of one) from the point-to- point node container and adds it to the container of nodes that will get CSMA devices. The node in question is going to end up with a point-to-point device and a CSMA device. We then create a number of “extra” nodes that compose the remainder of the CSMA network. We then instantiate a CsmaHelper and set its Attributes. Further, we create a NetDeviceContainer to keep track of the created CSMA net devices and then we Install CSMA devices on the selected nodes. CsmaHelper csma; csma.SetChannelAttribute ("DataRate", StringValue ("100Mbps")); csma.SetChannelAttribute ("Delay", TimeValue (NanoSeconds (6560))); NetDeviceContainer csmaDevices; csmaDevices = csma.Install (csmaNodes); Next, we are going to create the nodes that will be part of the WiFi network. We create a number of “station” nodes, and we are going to use the “leftmost” node of the point-to- point link as the node for the access point. NodeContainer wifiStaNodes;
- 3. wifiStaNodes.Create (nWifi); NodeContainer wifiApNode = p2pNodes.Get (0); The following code constructs the WiFi devices and the interconnection channel between these WiFi nodes. First, we configure the PHY and channel helpers: YansWifiChannelHelper channel = YansWifiChannelHelper::Default (); YansWifiPhyHelper phy = YansWifiPhyHelper::Default (); For simplicity, this code uses the default PHY layer configuration and channel models which are documented in the API doxygen documentation for the YansWifiChannelHelper::Default and YansWifiPhyHelper::Default methods. Once these objects are created, we create a channel object and associate it to our PHY layer object manager to make sure that all the PHY layer objects created by the YansWifiPhyHelper share the same underlying channel, that is, they share the same wireless medium (can communicate and interfere): phy.SetChannel (channel.Create ()); Once the PHY helper is configured, we can focus on the MAC layer. Here we work with non- QoS MACs so we use a NqosWifiMacHelper object to set MAC parameters. WifiHelper wifi = WifiHelper::Default (); wifi.SetRemoteStationManager ("ns3::AarfWifiManager"); NqosWifiMacHelper mac = NqosWifiMacHelper::Default (); The SetRemoteStationManager method tells the helper the type of rate control algorithm to use. Here, it is asking the helper to use the AARF algorithm — details are, of course, available in Doxygen documentation. Next, we configure the type of MAC, the SSID of the infrastructure network we want to setup and make sure that our stations don’t perform active probing: Ssid ssid = Ssid ("ns-3-ssid"); mac.SetType ("ns3::StaWifiMac", "Ssid", SsidValue (ssid), "ActiveProbing", BooleanValue (false)); This code first creates an 802.11 service set identifier (SSID) object that will be used to set the value of the “Ssid” Attribute of the MAC layer implementation. The particular kind of MAC layer that will be created by the helper is specified by Attribute as being of the “ns3::StaWifiMac” type. The use of NqosWifiMacHelper will ensure that the “QosSupported” Attribute for created MAC objects is set false. The combination of these two configurations means that the MAC instance next created will be a non-QoS non-AP station (STA) in an infrastructure BSS (i.e., a BSS with an AP). Finally, the “ActiveProbing” Attribute is set to false. This means that probe requests will not be sent by MACs created by this helper. Once all the station-specific parameters are fully configured, both at the MAC and PHY layers, we can invoke Install method to create the WiFi devices of these stations:
- 4. NetDeviceContainer staDevices; staDevices = wifi.Install (phy, mac, wifiStaNodes); We have configured WiFi for all of our STA nodes, and now we need to configure the AP (access point) node. We begin this process by changing the default Attributes of the NqosWifiMacHelper to reflect the requirements of the AP. mac.SetType ("ns3::ApWifiMac", "Ssid", SsidValue (ssid)); In this case, the NqosWifiMacHelper is going to create MAC layers of the “ns3::ApWifiMac”, the latter specifying that a MAC instance configured as an AP should be created, with the helper type implying that the “QosSupported” Attribute should be set to false - disabling 802.11e/WMM-style QoS support at created APs. The next lines create the single AP which shares the same set of PHY-level Attributes (and channel) as the stations: NetDeviceContainer apDevices; apDevices = wifi.Install (phy, mac, wifiApNode); Now, we are going to add mobility model. We want the STA nodes to be mobile, inside a bounding box, and we want to make the AP node stationary. We use the MobilityHelper to make this. First, we instantiate a MobilityHelper object and set some Attributes controlling the “position allocator” functionality. MobilityHelper mobility; mobility.SetPositionAllocator ("ns3::GridPositionAllocator", "MinX", DoubleValue (0.0), "MinY", DoubleValue (0.0), "DeltaX", DoubleValue (5.0), "DeltaY", DoubleValue (10.0), "GridWidth", UintegerValue (3), "LayoutType", StringValue ("RowFirst")); This code tells the mobility helper to use a two-dimensional grid to initially place the STA nodes. Feel free to explore the Doxygen for class ns3::GridPositionAllocator to see exactly what is being done. We have arranged our nodes on an initial grid, but now we need to tell them how to move. We choose the RandomWalk2dMobilityModel which has the nodes move in a random direction at a random speed around inside a bounding box. mobility.SetMobilityModel ("ns3::RandomWalk2dMobilityModel", "Bounds", RectangleValue (Rectangle (-50, 50, -50, 50))); We now tell the MobilityHelper to install the mobility models on the STA nodes. mobility.Install (wifiStaNodes);
- 5. We want the access point to remain in a fixed position during the simulation. We accomplish this by setting the mobility model for this node to be the ns3::ConstantPositionMobilityModel: mobility.SetMobilityModel ("ns3::ConstantPositionMobilityModel"); mobility.Install (wifiApNode); We now have our nodes, devices and channels created, and mobility models chosen for the WiFi nodes, but we have no protocol stacks present. We will use the InternetStackHelper to install these stacks. InternetStackHelper stack; stack.Install (csmaNodes); stack.Install (wifiApNode); stack.Install (wifiStaNodes); We are going to use the Ipv4AddressHelper to assign IP addresses to our device interfaces. First we use the network 10.1.1.0 to create the two addresses needed for our two point- to-point devices. Then we use network 10.1.2.0 to assign addresses to the CSMA network and then we assign addresses from network 10.1.3.0 to both the STA devices and the AP on the wireless network. Ipv4AddressHelper address; address.SetBase ("10.1.1.0", "255.255.255.0"); Ipv4InterfaceContainer p2pInterfaces; p2pInterfaces = address.Assign (p2pDevices); address.SetBase ("10.1.2.0", "255.255.255.0"); Ipv4InterfaceContainer csmaInterfaces; csmaInterfaces = address.Assign (csmaDevices); address.SetBase ("10.1.3.0", "255.255.255.0"); address.Assign (staDevices); address.Assign (apDevices); We put the echo server on the “rightmost” node in the illustration at the start of the file. UdpEchoServerHelper echoServer (9); ApplicationContainer serverApps = echoServer.Install (csmaNodes.Get (nCsma)); serverApps.Start (Seconds (1.0)); serverApps.Stop (Seconds (10.0)); And we put the echo client on the last STA node we created, pointing it to the server on the CSMA network. UdpEchoClientHelper echoClient (csmaInterfaces.GetAddress (nCsma), 9); echoClient.SetAttribute ("MaxPackets", UintegerValue (1));
- 6. echoClient.SetAttribute ("Interval", TimeValue (Seconds (1.0))); echoClient.SetAttribute ("PacketSize", UintegerValue (1024)); ApplicationContainer clientApps = echoClient.Install (wifiStaNodes.Get (nWifi - 1)); clientApps.Start (Seconds (2.0)); clientApps.Stop (Seconds (10.0)); Since we have built an internetwork here, we need to enable internetwork routing. Ipv4GlobalRoutingHelper::PopulateRoutingTables (); One thing that can surprise some users is the fact that the simulation we just created will never “naturally” stop. This is because we asked the wireless access point to generate beacons. It will generate beacons forever, and this will result in simulator events being scheduled into the future indefinitely, so we must tell the simulator to stop even though it may have beacon generation events scheduled. The following line of code tells the simulator to stop so that we don’t simulate beacons forever and enter what is essentially an endless loop. Simulator::Stop (Seconds (10.0)); We create just enough tracing to cover all three networks: pointToPoint.EnablePcapAll ("wlan_lan"); phy.EnablePcap ("wlan_lan", apDevices.Get (0)); csma.EnablePcap ("wlan_lan", csmaDevices.Get (0), true); These three lines of code will start pcap tracing on both of the point-to-point nodes that serves as our backbone, will start a promiscuous (monitor) mode trace on the Wifi network, and will start a promiscuous trace on the CSMA network. This will let us see all of the traffic with a minimum number of trace files. Finally, we actually run the simulation, clean up and then exit the program. Simulator::Run (); Simulator::Destroy (); return 0; } Since we have set up the UDP echo applications, you will see similar output. 'build' finished successfully (0.407s) At time 2s client sent 1024 bytes to 10.1.2.4 port 9 At time 2.01796s server received 1024 bytes from 10.1.3.3 port 49153 At time 2.01796s server sent 1024 bytes to 10.1.3.3 port 49153 At time 2.03364s client received 1024 bytes from 10.1.2.4 port 9 Recall that the first message, Sent 1024 bytes to 10.1.2.4,” is the UDP echo client sending a packet to the server. In this case, the client is on the wireless network (10.1.3.0). The
- 7. second message, “Received 1024bytes from 10.1.3.3,” is from the UDP echo server, generated when it receives the echo packet. The final message, “Received 1024 bytes from 10.1.2.4,” is from the echo client, indicating that it has received its echo back from the server. If you now go and look in the top level directory, you will find four trace files from this simulation, two from node zero and two from node one: wlan_lan-0-0.pcap wlan_lan-0-1.pcap wlan_lan-1-0.pcap wlan_lan-1- 1.pcap The file “wlan_lan-0-0.pcap” corresponds to the point-to-point device on node zero – the left side of the “backbone”. The file “wlan_lan-1-0.pcap” corresponds to the point-to-point device on node one – the right side of the “backbone”. The file “wlan_lan-0-1.pcap” will be the promiscuous (monitor mode) trace from the Wifi network and the file “wlan_lan-1- 1.pcap” will be the promiscuous trace from the CSMA network. Can you verify this by inspecting the code? Since the echo client is on the Wifi network, let’s start there. Let’s take a look at the promiscuous (monitor mode) trace we captured on that network. $ tcpdump -nn -tt -r wlan_lan-0-1.pcap You should see some WiFi-looking contents you haven’t seen here before: reading from file wlan_lan-0-1.pcap, link-type IEEE802_11 (802.11) 0.000025 Beacon (ns-3-ssid) [6.0* 9.0 12.0 18.0 24.0 36.0 48.0 54.0 Mbit] IBSS 0.000308 Assoc Request (ns-3-ssid) [6.0 9.0 12.0 18.0 24.0 36.0 48.0 54.0 Mbit] 0.000324 Acknowledgment RA:00:00:00:00:00:08 0.000402 Assoc Response AID(0) :: Successful 0.000546 Acknowledgment RA:00:00:00:00:00:0a 0.000721 Assoc Request (ns-3-ssid) [6.0 9.0 12.0 18.0 24.0 36.0 48.0 54.0 Mbit] 0.000737 Acknowledgment RA:00:00:00:00:00:07 0.000824 Assoc Response AID(0) :: Successful 0.000968 Acknowledgment RA:00:00:00:00:00:0a 0.001134 Assoc Request (ns-3-ssid) [6.0 9.0 12.0 18.0 24.0 36.0 48.0 54.0 Mbit] 0.001150 Acknowledgment RA:00:00:00:00:00:09 0.001273 Assoc Response AID(0) :: Successful 0.001417 Acknowledgment RA:00:00:00:00:00:0a 0.102400 Beacon (ns-3-ssid) [6.0* 9.0 12.0 18.0 24.0 36.0 48.0 54.0 Mbit] IBSS 0.204800 Beacon (ns-3-ssid) [6.0* 9.0 12.0 18.0 24.0 36.0 48.0 54.0 Mbit] IBSS 0.307200 Beacon (ns-3-ssid) [6.0* 9.0 12.0 18.0 24.0 36.0 48.0 54.0 Mbit] IBSS You can see that the link type is now 802.11 as you would expect. You can probably understand what is going on and find the IP echo request and response packets in this trace. We leave it as an exercise to completely parse the trace dump.
- 8. Now, look at the pcap file of the left side of the point-to-point link, $ tcpdump -nn -tt -r wlan_lan-0-0.pcap Again, you should see some familiar looking contents: reading from file wlan_lan-0-0.pcap, link-type PPP (PPP) 2.008151 IP 10.1.3.3.49153 > 10.1.2.4.9: UDP, length 1024 2.026758 IP 10.1.2.4.9 > 10.1.3.3.49153: UDP, length 1024 This is the echo packet going from left to right (from WiFi to CSMA) and back again across the point-to-point link. Now, look at the pcap file of the right side of the point-to-point link, $ tcpdump -nn -tt -r wlan_lan-1-0.pcap Again, you should see some familiar looking contents: reading from file wlan_lan-1-0.pcap, link-type PPP (PPP) 2.011837 IP 10.1.3.3.49153 > 10.1.2.4.9: UDP, length 1024 2.023072 IP 10.1.2.4.9 > 10.1.3.3.49153: UDP, length 1024 This is also the echo packet going from left to right (from WiFi to CSMA) and back again across the point-to-point link with slightly different timings as you might expect. The echo server is on the CSMA network, let’s look at the promiscuous trace there: $ tcpdump -nn -tt -r wlan_lan-1-1.pcap You should see some familiar looking contents: reading from file wlan_lan-1-1.pcap, link-type EN10MB (Ethernet) 2.017837 ARP, Request who-has 10.1.2.4 (ff:ff:ff:ff:ff:ff) tell 10.1.2.1, length 50 2.017861 ARP, Reply 10.1.2.4 is-at 00:00:00:00:00:06, length 50 2.017861 IP 10.1.3.3.49153 > 10.1.2.4.9: UDP, length 1024 2.022966 ARP, Request who-has 10.1.2.1 (ff:ff:ff:ff:ff:ff) tell 10.1.2.4, length 50 2.022966 ARP, Reply 10.1.2.1 is-at 00:00:00:00:00:03, length 50 2.023072 IP 10.1.2.4.9 > 10.1.3.3.49153: UDP, length 1024