
Recommended
Recommended
More Related Content
What's hot
What's hot (20)
Similar to Virtual private cloud fundamentals
Similar to Virtual private cloud fundamentals (20)
Recently uploaded
Recently uploaded (20)
Virtual private cloud fundamentals
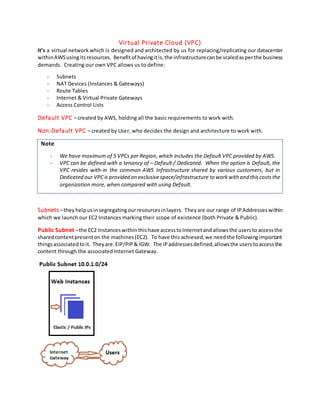
- 1. Virtual Private Cloud (VPC) It’s a virtual network which is designed and architected by us for replacing/replicating our datacenter withinAWSusingitsresources. Benefitof havingitis,the infrastructurecanbe scaledasperthe business demands. Creating our own VPC allows us to define: - Subnets - NAT Devices (Instances & Gateways) - Route Tables - Internet & Virtual Private Gateways - Access Control Lists Default VPC – created by AWS, holding all the basic requirements to work with. Non-Default VPC – created by User, who decides the design and architecture to work with. Note - We have maximum of 5 VPCs per Region, which includes the Default VPC provided by AWS. - VPC can be defined with a tenancy of – Default / Dedicated. When the option is Default, the VPC resides with-in the common AWS Infrastructure shared by various customers, but in Dedicated our VPCis provided an exclusivespace/infrastructure to workwith and thiscoststhe organization more, when compared with using Default. Subnets –theyhelpusinsegregatingourresourcesinlayers. Theyare our range of IPAddresseswithin which we launch our EC2 Instances marking their scope of existence (both Private & Public). Public Subnet –the EC2 Instanceswithinthishave accesstoInternetandallowsthe usersto accessthe sharedcontentpresenton the machines(EC2). To have this achieved,we needthe followingimportant thingsassociatedtoit. Theyare:EIP/PIP& IGW. The IPaddressesdefined,allowsthe userstoaccessthe content through the associated Internet Gateway.
- 2. In the above diagram, we have a Public Subnet which holds EC2 Instances with EIP/PIP Address. The subnetholds – Web Server(s) andcan now communicate to Internetthrough IGW and there we have 2- way communication. Private Subnet – the EC2 Instanceswithinthishave no EIP/PIPsassignedandno IGW attached making themisolated andsecluded tothe outside world. These subnetshostDBServersforbettersecurity,and due to non-availability of IGW they cannot have access to Internet and no communication with outside world i.e., end users. In the above diagram, we have the Private Subnet which has various database servers (running on EC2 instances),nothavinganyaccessto Internet,because we donothave any IGW attached. Eventhoughit cannot access to Internet,bothPrivate & PublicSubnetswithinaVPCcan communicate witheach other through the router available in the VPC. NAT Device – can be either an NAT Instance or Gateway residing in Public Subnet, to which an EIP is assignedthe waywe have forEC2 Instanceshere. Ithelpsthe EC2 Instancesof Private Subnettointeract with Internet. Below diagram explains how this is done.
- 3. When a DB Instance needs an update of patch, for example Oracle DB needs a patch to be updated it sendsthe requestto IGW throughNAT Device. Since the NAT Device isassignedanEIP, it projectsitself as a requester and gets the data from Internet and drops its back to the Oracle DB Instance (the NAT Device takes care of the PrivateIP addressfromwhich therequesthas come). Here NATDevice playsthe role of an imposter for EC2 Instances on the Private Subnet. NAT Instance – is a part of NAT Device, which is launched using a NAT AMI. Before working with NAT Instance, we need to – Disable the option – Enable Source/Destination Check. NAT Gateway – is a part of NAT Device, which is a managed service that does not require user administration efforts. On creation of it, we need to edit our Route Table, and include it. Internet Gateway–isa virtual routerwhichhelps VPCtoconnectwithInternet. Forthe Subnet(s)toget connectedwithIGW,we needtohave arouteraddedtothe VPCwhichcreatesapath betweenSubnet(s) & IGW. Note - Most important to remember is – 1 VPC can have only 1 IGW. - Maximum of 5 IGW are allowed per Region, which is equal to VPC limit. Virtual Private Gateway – when we need to make a connection between AWS VPC and Customer On- Premise DataCenter,we willbe creatinganBGP (BorderGatewayProtocol)Tunnel. Onthe startof tunnel in AWS we place a control called VPG, and at the Customer end we place Customer Gateway (CG). We have an end-to-endIPSecVPN tunnel runningbetweenthese 2networks. The data passedthroughthis, is encrypted to secure the data to-and-fro. Route Tables – contains set of rules, called as routes, that are used to determine where the traffic is directed. Every subnet created in an VPC needs to be linked with it. Note - Multiple subnetscan be added to a router, but a subnet cannot be added to multiple routers.
- 4. - Any subnet connected to a router which is connected to an IGW becomes a Public Subnet. Access Control List (ACL) –is an optional layerof securitythat acts as a firewall forcontrollingtrafficin and out of subnet. We can specifyruleswithinthissecuritylayerdefiningwhatall IP’scan be allowedor deniedpermissionforaccessingof the instances. The rules follow the orderof low-to-higherwithinthe givenrange. Theyhave separate inboundandoutboundrules,andeachrule caneitherallow ordenythe traffic. Each subnet must be associated with a network ACL, if not it gets associated to the default ACL allowing all inbound and outbound traffic. Note - The highest rule number we can use is 32766. - While defining the rules, we have the facility of either – Allow / Deny and this facility is not available in Security Groups. VPC Peering – establishing communication between different VPCs that belong to the same region. In the belowdiagram we have 3 VPCs (A, B & C),and VPC A is peeredwithVPCB& VPCC. It means,2-way communication is possible between – VPC A & VPC B and VPC A & VPC C. Transitive peering i.e., communication betweenVPCB&VPCCisnot supported,reasonbeingtheybothare notpeered. Peering ispurely1-to-1relationship. Tohave a communicationbetweenVPCB& VPCC,new peeringconnection must be made. Note - We cannotcreatea VPCpeering connection between VPCsthathavematching or overlapping CIDR blocks. - We cannot create a VPC peering connection between VPCs in different region. VPC Flow Logs – is the feature that enables us to capture the IP traffic going to and from network interfaces in our VPC. The captured data can be published to Amazon CloudWatch Logs and Amazon S3.
- 5. Below is the network diagram of VPC created based on the above information provided. Based on the above VPC diagram, below let’s design a VPC using AWS.
- 6. Step-by-Step creation of VPC. Step Description 1 Login to AWS Management Console and select VPC under Networking & Content Delivery. 2 In the displayed VPC Dashboard, we have the option of creating VPC in 2 ways: - Launch VPC Wizard - Your VPCs Create VPC. In the following steps, we will be creating an VPC through the 2nd option i.e., Create VPC from scratch manually. 3 Under VPC Dashboard, clickon –Your VPCs. This opens apage, where we are provided the option to create an VPC. Click on Create VPC button, a pop-up window opens allowing us to define the Name, IP address range etc.
- 7. 4 Name tag – we are supposed to provide a name to the new VPC. IPv4 CIDR block* - holds the range of IPv4 address that we are defining for the VPC. Tenancy – provides 2 options Default / Dedicated. These options play a very pivotal role while defining the VPC. If the selected option is Default, the VPC willget created at a location where we have other clients having their own VPCs i.e.,AWS allocates the servers, routers etc., at locations that it can fit for our creation. Also, we have the facility of hosting our EC2 Instances in either Shared – Run a shared hardware instance / Dedicated Host – Launch this instance on a Dedicated host (these options are found while creating EC2 instances). 5 After providing the above required options, click on Yes, Create button to create the VPC skeleton. 6 Subnet Creation
- 8. Under the VPC Dashboard click Subnets. New page is displayed, with the available Default Subnets, and a button to create a new one. Click on – Create Subnet button. 7 Name tag – takes the name that we are assigning to the new subnet. VPC* – here we will pickthe name of the VPC in whichthis subnetisbeencreated. Pick the name of the VPC created above. Availability Zone – pick the AZ in which we plan to place the subnet. IPv4 CIDR block* – the IP address range this subnet is been designed. On providing the above values, click on Create button to create the subnet. Click Close button, and user is navigated back to Subnet(s) page. Note – for this example, am creating 2 Subnets with the following CIDR range. Public Subnet – 10.0.1.0/24 hosts the public EC2 Instances (Web Servers). Private Subnet – 10.0.2.0/24 hosts the private EC2 Instances (DB Servers)
- 9. 8 Creating Route Tables UnderVPCDashboard,clickonRoute Tableslink. New page isdisplayedallowingustocreate new Route(s) for our application. Click on – Create Route Table button. 9 Name tag – give a name for the new router we are creating. VPC – assign the route to the VPC against which we have added the subnets above. On providing the values, click on – Yes, Create button and the route table gets created. Note – for this example, am creating 2 route tables. Public & Private Route Tables. 10 Adding Internet Gateway to our VPC
- 10. UnderVPCDashboard,clickonInternetGatewayslink. Page isdisplayedtothe right,allowing us to create a new one. Note – we can have only IGW per VPC. Click on – Create internet gateway button. 11 Name tag – provide the name for the new IGW. Click on Create button, to complete the task. Click on Close button, and user is taken back to the previous page to allocate a VPC. 12 Attaching IGW to VPC – once the IGW gets created, default the status is ‘Detached’, which needsto be attached to our VPC. To attach, selectthe new IGW, and Actionsmenu – Attach to VPC. In the displayed pop-up window, pick the VPC against which it’s created.
- 11. Afterthistask, we needto attach IGW to our PublicRoute Table,so that we can have access to Internet. 13 Attaching IGW to Public Route - SelectPublicRoute,andinthe below screenrelatedpropertiesare displayedintabs. - Click Routes tab and click on Edit button to add the IGW. - Click on Add another route button to add the details of IGW. - UnderDestination,provide accesstoall requests(0.0.0.0/0) &Target isIGW and click Save button. 14 Attaching Public Subnet to Public Route Click on the Subnet Associations tab and click on Edit button to add the Subnet.
- 12. Click on Save button, to save this change. 15 We will create an EC2 Public Instance and associate it to Public Subnet and check if we can access internet. To create an EC2 Instance, in the AWS Management Console under Compute click EC2. It navigates the user to EC2 Dashboard. 16 Launching EC2 Instance Click on Launch Instance button. Below steps navigate us to create an Public Instance.
- 13. 16.1 Choose AMI (Amazon Machine Image) Select the required AMI and click on Select button. 16.2 Choose Instance Type We will pick the default option and click on – Next: Configure Instance Details. 16.3 Configure Instance Provide the following values in this screen: Number of instances – 1 (how many instances we want to launch at a time). Network – pick the name of the VPC we have created. Subnet – pick the subnet in which we like to have our instance. Click on – Next: Add Storage 16.4 Add Storage
- 14. We will proceed with the current options, and click on – Next: Add Tags 16.5 Adding tag Let’sprovide aname for the instance –PublicInstance andclickon – Next:Configure Security Group. 16.6 Configure Security Group Let’s create a new SG and click on – Review and Launch button. 16.7 Review Check the data provided in the previous steps and click on – Launch button.
- 15. 16.8 Selecting Key Pair Pickthe value and clickon – Launch Instances. Clickon the instance id displayedtoviewthe EC2 Dashboard. 16.9 Viewing of instance Instances link is selected, and we see our EC2 created, and its status getting updated. Currently,the instance hasno – PublicIPaddressand we will be associatinganElasticIPto it. 16.10 Creating & Assigning Elastic IP
- 16. EC2 Dashboard,underNetwork&Securityclickon –ElasticIPswhichdisplaysapage tocreate an IP and assign. Click on – Allocate new address Click Allocate, and new IP address is delivered. Click on – Close button, to get back and assign the IP address to Public Instance. Select the item in the grid – click on Actions – Select Associate address.
- 17. Instance – pick the EC2 instance created in the previous steps and click Associate button. Click on – Close button. Under EC2 Dashboard, click on Instances and we find the new Elastic IP address assigned to our EC2 Instance.
- 18. Date Document History 17-Sep-18 Creation of document, defining the basic things we have in VPC. 24-Sep-18 Step-by-step creation of VPC.