SlideShare a Scribd company logo
1 of 30
Download to read offline
FTIR multi-touch display how-to guide
(alpha version 0.2)
May 23, 2007
Harry van der Veen
Introduction
My name is Harry van der Veen, callsign Gravano.
I’m a 25 year old Communication & Multimedia Design student, located at the NHL (Noordelijke
Hogeschool Leeuwarden) in Leeuwarden (Holland), participating in the fourth and final year of that
education.
I’m writing this FTIR multi-touch display how-to guide, because I want to make it easier for other
people to build their own multi-touch display.
My intensions are to make this guide understandable for people, in the age of approximately twelve to
about seventy years.
I would like to point out, that in this guide, I describe “a way” to build a multi-touch display. I’m not
saying it’s THE way. There are numerous of ways to build screens, this is just one of them.
There’s nothing you should know about any difficult technologies. I’ll try to explain everything as
simple and thorough as possible.
Only thing you must be able to is, actually buy or own the materials and have some basic handyman’s
work skills like drilling, sanding, sawing, polish. If have two left hands myself and even I succeeded, so
you should be fine.
After walking through this guide, you should be able to understand the technology behind this project
and be able to build your own multi-touch display, to let it collaborate with your own computer.
This is only possible with the appropriate software.
Only the hardware is discussed in this guide.
There’s the possibility, to write your own software for the multi-touch display.
This however, is a whole different aspect. Which as mentioned above, is not discussed on this paper.
When finished with this guide, you’ll have a general understanding of why which materials are being
used and what the alternatives are.
By this way I would also like to thank everybody from the NUIgroup (Natural User Interface) open
source multi touch community, for all their efforts and contributions.
I hope you enjoy this guide and that you have a working multi-touch display as well in no time, so you
can collaborate with us inside our community.
If you have any questions or suggestions, feel free to contact me at harryvdveen@gmail.com
If you’re looking for more information regarding this subject, visit our community
Blog: http://www.nuigroup.com
Wiki http://www.nuigroup.com/wiki/
Forum http://www.nuigroup.com/forums/
Join us on irc.freenode.net on #ftir
Or drop by on my personal blog, located at: http://www.multitouch.nl
Table of contents
Introduction.........................................................................................................................................2
Table of contents ................................................................................................................................3
Requirements .....................................................................................................................................4
Tools...............................................................................................................................................4
Building materials............................................................................................................................4
Software..........................................................................................................................................4
Technology explanation ......................................................................................................................5
Global building process.......................................................................................................................6
Modifying a webcam........................................................................................................................6
Treating acrylic................................................................................................................................6
Building a frame ..............................................................................................................................6
Wiring an electronic circuit...............................................................................................................6
Projection........................................................................................................................................6
Detailed building process / material information...................................................................................7
Modifying a webcam........................................................................................................................7
Treating acrylic..............................................................................................................................12
Building a frame ............................................................................................................................15
Wiring an electronic circuit.............................................................................................................19
Projection......................................................................................................................................26
Projection screen material..........................................................................................................26
Silicone rubber...........................................................................................................................27
Projector....................................................................................................................................30
Requirements
Tools
Power drill + 5mm drill
Standard size screwdriver (flathead & cross)
Small sharp knife
Scissors
Different grits of sanding paper
Wooden cubical object to wrap sanding paper around
Copper or silver polish + towel
Synthetic material saw
Building materials
Screws € 5
Glue (hotglue / white glue) € 10
Frame material (for example wood, aluminium or PVC) € 5 (depends on construction)
Connector strips € 5
Electronic wire (0,5 mm) € 5
IR-LEDs + resistors € 30
Acrylic also known as plexiglas € 25
Black photo negatives € 5
Power source € 10
Power cable € 5
Webcam € 15
Projector € 200+
Projection material (tracing paper) € 5
Silicone rubber € unknown (35 max)
Working computer
Mirror (optionally)
So basically the projector is the most expansive part of the device. You can make a multi touch display
without a projector and use your monitor as an output, which is like totally not cool ;)
So for an amount of about € 350, you’ll be able to build a cool multi touch display.
You could also go with a more expansive webcam, filter or projection material, for better performance,
but for the proof of concept, this will do.
Software
Computer applications are necessary to communicate between a multi touch display and a computer.
These applications can be developed within several languages / programming environments.
For example: Processing (P5), VVVV, Flash, C, C++, Java and others.
Because of the usability of certain API’s and the relatively simple visualisation possibilities, I reckon
P5, VVVV or Flash 9, in combination with Actionscript 3.0.
The above can be downloaded from the following locations:
Processing (P5) - http://www.processing.org
VVVV - http://www.vvvv.org
Adobe Flash 9 - http://www.adobe.com/nl/downloads/
Applications built within these API’s, are freely available, on the forum of the online Open Source
Multi-touch Community, called NUIgroup (Natural User Interface), located at:
http://www.nuigroup.com/forums/
Technology explanation
Image 1: FTIR explanation © Jeff Han
The applied technology, within this project, is called FTIR (Frustrated Total Internal Reflection).
FTIR describes the internal reflection of light, inside a certain material.
In our case, it will be infrared light, that internally reflects inside is a piece of acrylic, also known as
plexiglas.
IR-LEDs (Light Emitting Diodes) are placed along the edges of the acrylic.
This way, infrared light is beamed inside the acrylic and reflects internally.
In a simple way, you can say that, IR-light bounces inside the acrylic, from one side to another.
As soon as a finger touches the acrylic surface, the internal reflection of the IR-light, is interrupted.
The infrared light scatters on the finger tips.
Infrared light is invisible to the human eye, but by placing an infrared camera behind the acrylic your
fingertips will be visible on the infrared camera.
The images that are generated by the camera, contain white blobs (caused by the fingertips).
These blobs will be analyzed by software.
Every blob corresponds to certain coordinates.
Software can by analyzing these coordinates perform certain tasks, for example move, resize or rotate
objects.
There’s also a projector located behind to acrylic, that’s connected to a computer that projects the
image.
A rear projection screen is located just underneath or above the acrylic, to project the image on.
Global building process
The building process consists of the following 5 main elements
Modifying a webcam
A normal webcam will be modified to a webcam that can detect IR-light.
The IR-block filter inside the webcam will be replaced by an IR-pass filter.
Treating acrylic
The treatment of the acrylic will be discussed.
Our main objectives will be sawing, sanding and polishing.
Building a frame
The build of a frame will be mentioned. What material to use etcetera.
Wiring an electronic circuit
There will be an explanation about how to creat an electronic circuit containing LEDs, resistors, power
supply and wires.
Projection
Here you will find information on what kind of projection material and beamer you can use and how to
make a silicone rubber sheet as a coupling layer between the acrylic and the projection screen.
Detailed building process / material information
Modifying a webcam
Needed material:
• webcam
• lens
• black photo negative
• tape, glue or any other material that can hold the black photo negative in place
Modification of a webcam is necessary to detect the IR blobs that are generated by your fingers. IR is
not visible to the human eye, neither is it to most of the webcams. Some webcam’s detect IR, but not
as clear as it should be, for this project.
Every webcam can detect IR, but this option is not available because, there’s an IR-block filter inside
the webcam that blocks IR. So the camera is able to detect all visible light, but not the IR.
To see to it, that the webcam detects the IR, we need to remove the IR-block filter from the webcam.
So it will detect all visible light including IR.
For removing this IR-block filter, we have two options:
• removing the IR-block filter manually
• replace the current lens with another lens that has no IR-block filter
With some webcams it’s relatively easy to remove the IR-block filter.
For my first multi touch display, I used a cheap (€ 10/15) Sweex webcam (Sweex WC001 webcam),
that had a IR-block filter in front of the lens.I broke the IR-block filter (some sort of glas material), so I
could remove it.
Image 2: A Sweex WC001 webcam
In some cases the IR-block filter is painted on the lens and you can scratch it off.
But be careful that you don’t leave scratches on the lens.
But in most cases, it’s impossible to remove the IR-block filter, without damaging the lens, because it’s
glued to the lens.
In that case, it’s wise to replace the default lens with a special lens that doesn’t have a IR-block filter
attached to it. Try to find a lens that looks like the one below.
Image 3 : The 4.3MM CCTV Camera board Lens IR DVR
Lens specifications:
• Glass Lens
• Aperture F/1.8
• Image format 1/3 inch
• Angel of view 68°
• M12x0.5 mount
• Size ?14×14.75
$14.99 + $8.50 (shipping) = $23.49 total
In my example, I used a Philips SPC900NC webcam, which has a difficult to remove IR-block filter
attached to the lens. That’s why I choose to buy and replace the default lens, with a special lens, from
ebay, without IR-block filter. It’s a 4.3MM CCTV Camera board Lens IR DVR.
Image 4 : The 4.3MM CCTV Camera board Lens IR DVR without IR-block filter and Philips
SPC900NC webcam.
Onces the webcam is modified to being able to see normal light as well as IR-light, you need to apply
an IR-pass filter. This IR-pass filter, lets all the IR through, but blocks out most of the visible light.
There are different materials that you can use for this purpose:
• IR-pass filter
• IR-band pass filter
• Remote control filter
• Black photo negatives
IR-pass filter
Image 5: An IR-pass filter
An IR-pass filter is a special filter that only passes through IR on a certain frequency (760 nm to for
example 1000 nm). So it basically blocks out all other light, that’s not within that region, that would be
most of the visible light.
IR-band pass filter
Image 6: An IR-band pass filter
The IR-band pass filter only passes through IR on a specific frequency.
For example: 880 (nm)
So if you’ll use 880 (nm) IR-LEDs and you use an IR-band pass filter of 880 (nm) as well, you’ll get the
best optical performance, because all the light is blocked out, except for the specific IR from the LEDs.
I haven’t tested the IR-pass filter nor the IR-band pass filter, because they are relatively expansive. 80
euro for a IR-band pass filter. But from what I’ve heard, they work very well.
The IR-band pass filter works better then the IR-pass filter.
Which will hopefully make sense after what I’ve wrote just above.
Remote control IR filter
Image 7: The front of a remote control
The filter on the front of remote controls (deep dark red/black piece) isn’t very handy to work with,
because of the different shapes it may have and the result is almost the same as one layer of dark
photo negative.
Black photo negatives
Image 8: Photo negatives
So because of a low budget scenario and usability, I reckon you use several layers of entirely black
photo negatives. You’ll probably know them. They are usually among the negatives of your holiday
pictures etcetera. It’s those completely dark negatives that appear when pictures are misfabricated.
Three layers will do the job nicely. If you use too many layers, your blobs become less visible as well.
Attach them in front of your lens.
First you have removed the IR-block filter and then you applied an IR-pass filter.
The webcam modification is finished.
You can test your camera by pointing at a money bill or cola.
Or by checking if it detects the IR-light from a remote control.
Image 9: 50 euro in infrared
Image 10: Cola is transparent in infrared
Treating acrylic
You’ll need the following materials:
• Acrylic also known as Plexiglass
• Sanding paper (for example: grit 100, 200, 400, 600)
• Wooden cubical object to wrap sanding paper around
• Copper or silver polish + towel
• Synthetic material saw
Acrylic will be the material that internally reflects the IR-light.
This material is strong and works very well as an optical waveguide.
You could also use polycarbonate, which has a plus compaired to acrylic, namely it’s unbreakable.
But the optical waveguide performance is a few percent worse.
You can get acrylic at glass stores, but I found out, that most of the time, you pay ten times the
amount, compaired to buying it online. So I suggest you buy it online from ebay or equivalent.
If you can get it cheap from a glass store or a handy man’s shop, go and ask if they can cut the acrylic
in the dimensions you desire, so you don’t have to cut or saw it yourself.
In most cases, they can even buff the edges transparent, so you don’t have to treat your acrylic at all
and you can continue with the next step: Building a frame.
Most of the time, acrylic has transparent cut edges when it leaves the factory.
Most people I know made 4:3 ratio multi touch displays. So unless you are going to use a 16:9 ratio
projector, to project your image, I suggest you cut your acrylic with a 4:3 ratio as well.
I bought a piece of acrylic (dimensions: 460*900*8 mm) for about 25 euro’s from
http://www.marktplaats.nl (a dutch equivalent of ebay).
I sawed off my piece from that bigger piece. Sizes: 460*320 mm (4:3 ratio) 8mm thick.
8 mm thick is the least you should go with, because the LED’s you’re going place along the edges,
will be 5 mm thick. Especially if you’re building larger screens, you want to go with a thicker piece,
because it needs to be robust. So even when, you push in the middle, the acrylic doesn’t bounce.
If you need to saw your acrylic yourself, at least use the finest saw you can find,
so you can try and keep the edges as smooth as possible.
If there’s a protective film material on the acrylic, keep it on as long as possible, so you’ll prevent the
acrylic from being scratched.
Image 11: Transparent acrylic with protective film material, square piece of wood, sanding
paper
If you have sanding tools, I suggest you use them, instead of doing it by hand.
Make the edges of the acrylic as transparent as possible, to increase the amount of IR-light beamed
into the acrylic
Try to find the highest grits of sanding paper. I believe there’s even grit 2000 sanding paper.
Higher grit > finer scratches > better transparency
Wrap the sanding paper around a piece of flat wood, to prevent round and to ensure flat edges
Start off sanding with a low grit sandpaper
Increase the grit step by step (for example 100, 200, 400, 800)
When using the highest grit sandpaper, put olive oil or equivalent, on the edges and continue sanding
Finish the edges by polishing them with copper or silver polish and a towel
When finished, the edges should be pretty transparent.
I sanded all four edges, eventough I’m going to place leds along two sides. This because I want, light
that bounces out of the sides, to be able to bounce back easily through the aluminum that I will put
along the edges.
I namely experienced IR-light leakage on the sides during my first prototype. That’s why I want to
bounce the light back into the acrylic.
I decided not to flame polish the edges afterwards, because I thought the edges were already
transparent enough and you don’t want to accidentely destroy parts of your acrylic.
Because, when you flamepolish them wrong, you might create small air bubbles, inside the acrylic or it
might turn out black.
Building a frame
During the build of the first proto I found out that I wanted some kind of reflective material against the
edges to bounce back leaking IR light. With my first proto I used aluminum tape, but it intends to stick
to everything, so basically alot of annoyance.
Image 12: Acrylic in aluminum frame (mount in progress)
So I decided to make an aluminum frame around the acrylic, which can also hold the leds at the same
time. It makes your screen look alot better then with shabby tape hanging around.
Image 13: Acrylic mounted in aluminum frame
I used 4 pieces of aluminum rail. 2*50 cm and 2*38 cm both 10 mm (acrylic= 36 * 48 cm, 8mm thick)
So the acrylic would stuck inside the aluminum rail perfectly, it seemed it first. Lateron I founded that
the rail on one side was a little hard to get around the acrylic, so I used brute force with a hammer.
I sawed of the edges of the aluminum with a 45 degree angle, so they would perfectly fit against
eachother.
Afterwards I drolled 5mm holes in the 2 rails that will hold the leds. 10 holes on each rail. I choose
5mm holes so the leds would get stuck pretty good, since the leds theirselves are also 5mm.
Image 14: Drilled holes in aluminum U-frame
Image 15: Drilled holes in aluminum U-frame
Then I placed the leds in the holes to see if I had the wished for result.
Image 16: Leds put through the drilled holes in the aluminum U-frame
Because of the space inside the aluminum, there’s just enough room to hold the head of the led.
Image 17: Wooden frame around the aluminum framed acrylic
My wooden frame has arrived. My uncle makes wooden frames for paintings and since they only cost
5 euro I asked him if he could make one for me. The acrylic/aluminum part leans on the wooden frame
on the left and the right side and a little bit on the top and the bottom as well. Notice I have space left
on the bottom and the top side to wire the leds and resistors.
Wiring an electronic circuit
Imag 18: IR led powered by a 5 volt USB connection
LEDs (Light Emitting Diodes) need a power source to produce light.
There are several ways to power your LEDs. For example by batteries (1,5 volt), USB (5 volt) or a 12
volt adapter. But you could also connect your led’s to the 12 volt molex connector on a computer
power supply.
I used 100 (mA) miliampère LEDs, so I needed a pretty good power source.
Using batteries doesn’t make alot of sense, since you would need quite a few and you would need alot
of wire as well, because of the inefficient power circuits.
Using USB is possible, but I would only choose that option, if you are going to use 20/30 (mA) led’s
and even than, a computer power supply would make more sense, since you can put more led’s in a
row.
Why not use a computer powersupply? Your screen is going to be near a 220 volt power source
anyway, since you have to use a projector and a computer as well.
You can use one of the molex connectors on the computer you are working on, to supply the leds with
power. But you could also use it without the motherboard in between.
Image 19: 6 IR leds powered by a 12 volt molex connector inside a computer
There’s a pretty easy solution to hotwire a computer power supply.
If you look at the ATX connector, you see several colored wires:
Image 20: ATX connector
To hotwire your computer power supply, simply connect the green wire with any black wire (ground) of
the pin out and you will be able to connect your LEDs to one of the molex connectors, without the help
of a motherboard, turning the power supply on.
During the build of my first prototype I used 36 880nm 60 degree 5mm cl IR leds (1,8 V, 20 mA, 11,0
mW/sr).
Lateron I discovered that there were leds that were even better, namely the Osram SFH485,
specifications: 1.5 V 100(mA) 880 (nm) 5mm. These were a bit more expansive but more powerful, so
I would be able to use less leds.
Image 21: An Osram SFH485 IR LED
I decided to go with 10 leds on both horizontal sides, so 20 leds in total.
After filling in the specifications of the power source and the leds in this led wizard , I found out that, I
had to make 4 strings of 5 leds, each with a 47 Ohm resistor of 1 Watt. An electronics teacher at
school gave me a few 51 Ohm resistors of 4 or 5 Watt. He told me that would do the job pretty well,
since the higher Watt was only about the amount of heat that a resistor could handle. So it would just
handle an higher amount of heat without influencing the brightness of the leds. And the difference of 4
Ohm (51-47) was not noticeable, according to him.
Image 22: 6 connected leds for testing purposes. Green thing in the lower left corner is a
resistor.
Image 23: 6 connected leds for testing purposes
I connected the leds on 2 different molex connectors (12 volt), but I might as well have gotten around
with just using one.
I just happened to have 2 molex connectors, so I used 2 (which is pretty useless actually).
The wires I used were pretty short, so you might want to use longer ones, so it will be more flexible. I
used 0,5 mm thick wire.
I did the entire circuit without soldering, for a change, which seemed to work just fine. So why spend a
lot of time on soldering if you can do without.
Image 24: Front of screen
Image 25: Back of screen
I connected the leds with each other by using strip connectors (”kroonsteentjes” in Dutch).
My first intention was to do the entire setup without the strip connectors and just let the holes in the
aluminum rail hold the leds. But because of the fact that some holes were a bit to big (matter of tens of
a millimeter) to hold the leds pretty steady, I decided to use the strips anyway, because else the leds
would be too loose.
You might as well go for the solution below, which is a solderless ledholder. You can easily click the
led into this holder, so you won’t be bothered with soldering anything.
Image 26: Solderless led holder
After connecting all the leds I tested the entire setup by checking for fingers on the computer (image
below).
Which seemed to work pretty fine.
Image 27: hand placed on screen, detected by webcam, displayed on monitor, power supplied
by computer power supply (molex 12 volt)
Note:
With most leds the longest pin of the led, is the plus and the short one is the minus.
But with these leds (Osram sfh485) it was the other way around.
Projection
To project the image from a computer, you’ll need a projector and a projection screen.
The projector beams an image on a projection screen, that is placed underneath or on top of the
acrylic.
A plus of placing the projection screen material on top of the acrylic is that you can directy interact with
the image. There is no visual imperfection contrary to placing the projection material underneath the
acrylic. If you place it underneath the acrylic you’ll still have to optical difference of the thickness of the
acrylic. In this case you can also let the projection screen function as an ambient IR block filter, but
more about this lateron.
In case you want a closed box solution for your multi touch, you may want to consider using a mirror to
reflect the image that comes from the projector, so you can shorten the distance. Keep in mind that
there can be ghosts images (vague double projections), caused by the acrylic bouncing back the
image to the mirror and back to the acrylic again.
Projection screen material
There are different materials you can use as a projection screen:
• Rosco grey rear projection screen
• Mylar
• Tracing paper
And I bet there are tons of other materials you can project on. For the project I did in Sweden we used
some kind of white plastic paper material which they use to make designer lamps.
Rosco grey is a very good projection screen, but it blocks IR, and it therefor diffuses the blobs, if you
place it underneath the acrylic, and makes them rather unusable for software analysis.
If you place it on top of the acrylic the blobs are a bit less vague, but still very diffuse, because there’s
no good coupling between the acrylic and the Rosco.
Furthermore Rosco is relatively expansive compaired to the other two materials.
Image 28: Piece of Rosco grey on top of my first prototype
The cheapest solution is tracing paper.
But since you want your multitouch display to work in all kinds of environments, don’t want ambient
infrared light to interfere with it. Therefor you have to use a projection material on top of the acrylic that
blocks IR. Rosco grey is one of those rear projection screen materials.
Silicone rubber
The problem with placing the rosco grey on the bare acrylic is, that it hardly generates usable blobs.
The blobs are pretty vague because of the bad coupling between the acrylic and the projection
material.
You have to press pretty hard to generate a workable blob. And that’s not something you want. This
has to do with physics. It’s about relative index of refraction. For example, when you touch the acrylic
with your bare fingers, there is still some miniscule air in the space between the acrylic and your
fingers. So when you wetten your fingers, these miniscule air holes get filled, so your finger has a
better coupling with the acrylic. This way the blobs are brighter with wett fingers opossed to dry
fingers. Therefor we needed to find a material that prevented those small airholes as much as
possible, so that there would be a better coupling, resulting in brighter more clear blobs.
A lot of people within the NUIgroup community have experimented with different materials and we got
pushed in the direction of silicone rubber being the best solution to this problem.
Here at the university in Sweden we made two samples of silicone rubbers sheets, a 1mm and a 2mm
thick. The 1mm thick sample worked better, since the blobs were brighter. We haven’t tried thinner
sheets, but 0,5 mm may even work better. But that’s all up to you if you want to experiment with that.
Material details
The silicone rubber sheet we prepared are made out of 2 fluids that you combine and then they cure
over time. The fluids come from a company named Wacker Chemie AG. Their website is located here:
http://www.wacker.com
This company only sells these products in amounts of 20 kg’s. But since we are doing research for
Lulea University of Technology (Sweden), we have a supplier that cuts the 20 kg amounts into smaller
pieces. So we were able to order just one kg.
The company that divided the 20 kg’s into smaller amounts, is called ABIC Kemi.
The brand of fluids we used go by the name of ELASTOSIL® M 4641.
ELASTOSIL® M 4641 is a pourable, addition-curing, two-part silicone rubber that cures at room
temperature.
Special characteristics
• Very good flow properties
• Fast and non-shrink cure at room temperature which can be accelerated considerably by the
application of heat
• Medium hardness (Shore A approx. 43)
• Good transparency of the cured rubber
• High tear strength
• Outstanding resistance to casting resins, particularly polyurethanes and epoxies, for long
service life of the molds
You can download a PDF with more specifications here. (English version)
Or download a German version, here.
Making a silicone rubber sheet
• First you have to make a frame of some kind that will hold the acrylic in place and that has
some kind of border that is 1 mm higher then the height if the acrylic, when you placed it in the
frame.
• Then you have to decide on how much silicone rubber you want to use.
• Afterwards you weigh andmix the two components and stir them until they are properly mixed.
• Pour the silicone rubber liquid onto the acrylic and devide it with an object (a plastic knife or
so).
• Immediately when you equally divided the liquid, flatten it by using a strip of material
(preferable NOT metal, PVC might work)
• Now let it cure several hours (14 hours with our liquid).
The longer the curing process the smaller the chance of bubbles in the silicone rubber sheet. We
didn’t have any bubbles anyway on our 1mm thick piece.
Make sure you let it cure in a place that’s not very dusty or cover the setup while curing.
Image 29: Pouring the silicone rubber liquid onto the bare acrylic
Image 30: Dividing the silicone rubber over the entire acrylic surface
Image 31: Flatten the silicone rubber surface with a strip
Now the silicone rubber sheet that’s placed between the acrylic and the projection screen material is
finished. Now just cover it with a piece of projection material and you should be good to go. Make
sure you test what side of the projection material up, creates brighter blobs, there’s a difference!
With the Rosco one side on top is different to the other side on top.
The layering is like this:
Acrylic with the silicone rubber sheet on top of that. On top of the silicone rubber sheet you place a
projection screen. Make sure the projection screen doesn’t stick to the silicone rubber sheet, because
otherwise the ftir effect will be set off.
So basically it looks like this:
———- your fingers
———- projection screen
———- silicone rubber sheet
———- acrylic
———- image source
Projector
What kind of projector you want to use, is all up to you.
You can choose a HD-projector, LED-projector or even a 16:9 projector.
But keep in mind, that with this guide I used a “normal” 4:3 ratio projector.
You don’t have to use a projector. You could also just go with the entire setup without projector and
projection screen and navigate with the multi-touch display and look at the output on the monitor of
your computer.
In case you want to work with a projector and don’t have enough room to properly project the image
on the projection screen. You might want to use a mirror to redirect the image.
Image 32: Redirecting the beamed image with a mirror.

More Related Content

Similar to Multitouch

empowerment-4_compress.pdf in senior high school students PSU
empowerment-4_compress.pdf in senior high school students PSUempowerment-4_compress.pdf in senior high school students PSU
empowerment-4_compress.pdf in senior high school students PSUaliyahdalogdogan
 
Dictionar Web 2.0 Tools.pptx
Dictionar Web 2.0 Tools.pptxDictionar Web 2.0 Tools.pptx
Dictionar Web 2.0 Tools.pptxMihaela Stan
 
Building a better web with free, open technologies
Building a better web with free, open technologiesBuilding a better web with free, open technologies
Building a better web with free, open technologiesChristian Heilmann
 
In Plexglobal Demo Presentation
In Plexglobal Demo PresentationIn Plexglobal Demo Presentation
In Plexglobal Demo PresentationTech Tools Group
 
Singapore chapitre #4 - You don't know
Singapore chapitre #4 - You don't knowSingapore chapitre #4 - You don't know
Singapore chapitre #4 - You don't knowWhile42
 
Creating a Universal Design System for Web, Mobile, Wearables, and XR
Creating a Universal Design System for Web, Mobile, Wearables, and XRCreating a Universal Design System for Web, Mobile, Wearables, and XR
Creating a Universal Design System for Web, Mobile, Wearables, and XRdamirkotoric
 
Open Source in Higher Education 2007
Open Source in Higher Education 2007Open Source in Higher Education 2007
Open Source in Higher Education 2007ssorden
 
Tech Tools for Teachers on a Tight Budget
Tech Tools for Teachers on a Tight BudgetTech Tools for Teachers on a Tight Budget
Tech Tools for Teachers on a Tight BudgetAndy Jeter
 
Contributing to an Open Source Project 101
Contributing to an Open Source Project 101Contributing to an Open Source Project 101
Contributing to an Open Source Project 101POSSCON
 
OpenY: Scaling and Sharing with Custom Drupal Distribution
OpenY: Scaling and Sharing with Custom Drupal DistributionOpenY: Scaling and Sharing with Custom Drupal Distribution
OpenY: Scaling and Sharing with Custom Drupal DistributionDrupalCamp Kyiv
 
Kiss the end-user goodbye
Kiss the end-user goodbyeKiss the end-user goodbye
Kiss the end-user goodbyeIvanka Majic
 
Technologies, Places, Business Models for Open Design @ Pixelversity, Helsink...
Technologies, Places, Business Models for Open Design @ Pixelversity, Helsink...Technologies, Places, Business Models for Open Design @ Pixelversity, Helsink...
Technologies, Places, Business Models for Open Design @ Pixelversity, Helsink...Massimo Menichinelli
 
Hybrid solutions for exhibitions stand design
Hybrid solutions for exhibitions stand designHybrid solutions for exhibitions stand design
Hybrid solutions for exhibitions stand designSerena Ferrari
 
Design for developers
Design for developersDesign for developers
Design for developersJohan Ronsse
 
corePHP Usability Accessibility by Steven Pignataro
corePHP Usability Accessibility by Steven PignatarocorePHP Usability Accessibility by Steven Pignataro
corePHP Usability Accessibility by Steven PignataroJohn Coonen
 

Similar to Multitouch (20)

empowerment-4_compress.pdf in senior high school students PSU
empowerment-4_compress.pdf in senior high school students PSUempowerment-4_compress.pdf in senior high school students PSU
empowerment-4_compress.pdf in senior high school students PSU
 
Dictionar Web 2.0 Tools.pptx
Dictionar Web 2.0 Tools.pptxDictionar Web 2.0 Tools.pptx
Dictionar Web 2.0 Tools.pptx
 
Building a better web with free, open technologies
Building a better web with free, open technologiesBuilding a better web with free, open technologies
Building a better web with free, open technologies
 
In Plexglobal Demo Presentation
In Plexglobal Demo PresentationIn Plexglobal Demo Presentation
In Plexglobal Demo Presentation
 
UX Auditing 101
UX Auditing 101UX Auditing 101
UX Auditing 101
 
Singapore chapitre #4 - You don't know
Singapore chapitre #4 - You don't knowSingapore chapitre #4 - You don't know
Singapore chapitre #4 - You don't know
 
Liberated Accessibility
Liberated AccessibilityLiberated Accessibility
Liberated Accessibility
 
Ict u2
Ict u2Ict u2
Ict u2
 
Creating a Universal Design System for Web, Mobile, Wearables, and XR
Creating a Universal Design System for Web, Mobile, Wearables, and XRCreating a Universal Design System for Web, Mobile, Wearables, and XR
Creating a Universal Design System for Web, Mobile, Wearables, and XR
 
Master presentation
Master presentationMaster presentation
Master presentation
 
Open Source in Higher Education 2007
Open Source in Higher Education 2007Open Source in Higher Education 2007
Open Source in Higher Education 2007
 
From open source labs to ceo methods and advice by sysfera
From open source labs to ceo methods and advice by sysferaFrom open source labs to ceo methods and advice by sysfera
From open source labs to ceo methods and advice by sysfera
 
Tech Tools for Teachers on a Tight Budget
Tech Tools for Teachers on a Tight BudgetTech Tools for Teachers on a Tight Budget
Tech Tools for Teachers on a Tight Budget
 
Contributing to an Open Source Project 101
Contributing to an Open Source Project 101Contributing to an Open Source Project 101
Contributing to an Open Source Project 101
 
OpenY: Scaling and Sharing with Custom Drupal Distribution
OpenY: Scaling and Sharing with Custom Drupal DistributionOpenY: Scaling and Sharing with Custom Drupal Distribution
OpenY: Scaling and Sharing with Custom Drupal Distribution
 
Kiss the end-user goodbye
Kiss the end-user goodbyeKiss the end-user goodbye
Kiss the end-user goodbye
 
Technologies, Places, Business Models for Open Design @ Pixelversity, Helsink...
Technologies, Places, Business Models for Open Design @ Pixelversity, Helsink...Technologies, Places, Business Models for Open Design @ Pixelversity, Helsink...
Technologies, Places, Business Models for Open Design @ Pixelversity, Helsink...
 
Hybrid solutions for exhibitions stand design
Hybrid solutions for exhibitions stand designHybrid solutions for exhibitions stand design
Hybrid solutions for exhibitions stand design
 
Design for developers
Design for developersDesign for developers
Design for developers
 
corePHP Usability Accessibility by Steven Pignataro
corePHP Usability Accessibility by Steven PignatarocorePHP Usability Accessibility by Steven Pignataro
corePHP Usability Accessibility by Steven Pignataro
 

Recently uploaded

VIP Call Girls Service Hitech City Hyderabad Call +91-8250192130
VIP Call Girls Service Hitech City Hyderabad Call +91-8250192130VIP Call Girls Service Hitech City Hyderabad Call +91-8250192130
VIP Call Girls Service Hitech City Hyderabad Call +91-8250192130Suhani Kapoor
 
MANUFACTURING PROCESS-II UNIT-5 NC MACHINE TOOLS
MANUFACTURING PROCESS-II UNIT-5 NC MACHINE TOOLSMANUFACTURING PROCESS-II UNIT-5 NC MACHINE TOOLS
MANUFACTURING PROCESS-II UNIT-5 NC MACHINE TOOLSSIVASHANKAR N
 
OSVC_Meta-Data based Simulation Automation to overcome Verification Challenge...
OSVC_Meta-Data based Simulation Automation to overcome Verification Challenge...OSVC_Meta-Data based Simulation Automation to overcome Verification Challenge...
OSVC_Meta-Data based Simulation Automation to overcome Verification Challenge...Soham Mondal
 
(TARA) Talegaon Dabhade Call Girls Just Call 7001035870 [ Cash on Delivery ] ...
(TARA) Talegaon Dabhade Call Girls Just Call 7001035870 [ Cash on Delivery ] ...(TARA) Talegaon Dabhade Call Girls Just Call 7001035870 [ Cash on Delivery ] ...
(TARA) Talegaon Dabhade Call Girls Just Call 7001035870 [ Cash on Delivery ] ...ranjana rawat
 
Microscopic Analysis of Ceramic Materials.pptx
Microscopic Analysis of Ceramic Materials.pptxMicroscopic Analysis of Ceramic Materials.pptx
Microscopic Analysis of Ceramic Materials.pptxpurnimasatapathy1234
 
(PRIYA) Rajgurunagar Call Girls Just Call 7001035870 [ Cash on Delivery ] Pun...
(PRIYA) Rajgurunagar Call Girls Just Call 7001035870 [ Cash on Delivery ] Pun...(PRIYA) Rajgurunagar Call Girls Just Call 7001035870 [ Cash on Delivery ] Pun...
(PRIYA) Rajgurunagar Call Girls Just Call 7001035870 [ Cash on Delivery ] Pun...ranjana rawat
 
Call Girls Service Nagpur Tanvi Call 7001035870 Meet With Nagpur Escorts
Call Girls Service Nagpur Tanvi Call 7001035870 Meet With Nagpur EscortsCall Girls Service Nagpur Tanvi Call 7001035870 Meet With Nagpur Escorts
Call Girls Service Nagpur Tanvi Call 7001035870 Meet With Nagpur EscortsCall Girls in Nagpur High Profile
 
the ladakh protest in leh ladakh 2024 sonam wangchuk.pptx
the ladakh protest in leh ladakh 2024 sonam wangchuk.pptxthe ladakh protest in leh ladakh 2024 sonam wangchuk.pptx
the ladakh protest in leh ladakh 2024 sonam wangchuk.pptxhumanexperienceaaa
 
Coefficient of Thermal Expansion and their Importance.pptx
Coefficient of Thermal Expansion and their Importance.pptxCoefficient of Thermal Expansion and their Importance.pptx
Coefficient of Thermal Expansion and their Importance.pptxAsutosh Ranjan
 
Porous Ceramics seminar and technical writing
Porous Ceramics seminar and technical writingPorous Ceramics seminar and technical writing
Porous Ceramics seminar and technical writingrakeshbaidya232001
 
Decoding Kotlin - Your guide to solving the mysterious in Kotlin.pptx
Decoding Kotlin - Your guide to solving the mysterious in Kotlin.pptxDecoding Kotlin - Your guide to solving the mysterious in Kotlin.pptx
Decoding Kotlin - Your guide to solving the mysterious in Kotlin.pptxJoão Esperancinha
 
Processing & Properties of Floor and Wall Tiles.pptx
Processing & Properties of Floor and Wall Tiles.pptxProcessing & Properties of Floor and Wall Tiles.pptx
Processing & Properties of Floor and Wall Tiles.pptxpranjaldaimarysona
 
Sheet Pile Wall Design and Construction: A Practical Guide for Civil Engineer...
Sheet Pile Wall Design and Construction: A Practical Guide for Civil Engineer...Sheet Pile Wall Design and Construction: A Practical Guide for Civil Engineer...
Sheet Pile Wall Design and Construction: A Practical Guide for Civil Engineer...Dr.Costas Sachpazis
 
HARDNESS, FRACTURE TOUGHNESS AND STRENGTH OF CERAMICS
HARDNESS, FRACTURE TOUGHNESS AND STRENGTH OF CERAMICSHARDNESS, FRACTURE TOUGHNESS AND STRENGTH OF CERAMICS
HARDNESS, FRACTURE TOUGHNESS AND STRENGTH OF CERAMICSRajkumarAkumalla
 
IMPLICATIONS OF THE ABOVE HOLISTIC UNDERSTANDING OF HARMONY ON PROFESSIONAL E...
IMPLICATIONS OF THE ABOVE HOLISTIC UNDERSTANDING OF HARMONY ON PROFESSIONAL E...IMPLICATIONS OF THE ABOVE HOLISTIC UNDERSTANDING OF HARMONY ON PROFESSIONAL E...
IMPLICATIONS OF THE ABOVE HOLISTIC UNDERSTANDING OF HARMONY ON PROFESSIONAL E...RajaP95
 
UNIT-V FMM.HYDRAULIC TURBINE - Construction and working
UNIT-V FMM.HYDRAULIC TURBINE - Construction and workingUNIT-V FMM.HYDRAULIC TURBINE - Construction and working
UNIT-V FMM.HYDRAULIC TURBINE - Construction and workingrknatarajan
 
Introduction and different types of Ethernet.pptx
Introduction and different types of Ethernet.pptxIntroduction and different types of Ethernet.pptx
Introduction and different types of Ethernet.pptxupamatechverse
 

Recently uploaded (20)

VIP Call Girls Service Hitech City Hyderabad Call +91-8250192130
VIP Call Girls Service Hitech City Hyderabad Call +91-8250192130VIP Call Girls Service Hitech City Hyderabad Call +91-8250192130
VIP Call Girls Service Hitech City Hyderabad Call +91-8250192130
 
MANUFACTURING PROCESS-II UNIT-5 NC MACHINE TOOLS
MANUFACTURING PROCESS-II UNIT-5 NC MACHINE TOOLSMANUFACTURING PROCESS-II UNIT-5 NC MACHINE TOOLS
MANUFACTURING PROCESS-II UNIT-5 NC MACHINE TOOLS
 
OSVC_Meta-Data based Simulation Automation to overcome Verification Challenge...
OSVC_Meta-Data based Simulation Automation to overcome Verification Challenge...OSVC_Meta-Data based Simulation Automation to overcome Verification Challenge...
OSVC_Meta-Data based Simulation Automation to overcome Verification Challenge...
 
(TARA) Talegaon Dabhade Call Girls Just Call 7001035870 [ Cash on Delivery ] ...
(TARA) Talegaon Dabhade Call Girls Just Call 7001035870 [ Cash on Delivery ] ...(TARA) Talegaon Dabhade Call Girls Just Call 7001035870 [ Cash on Delivery ] ...
(TARA) Talegaon Dabhade Call Girls Just Call 7001035870 [ Cash on Delivery ] ...
 
Microscopic Analysis of Ceramic Materials.pptx
Microscopic Analysis of Ceramic Materials.pptxMicroscopic Analysis of Ceramic Materials.pptx
Microscopic Analysis of Ceramic Materials.pptx
 
(PRIYA) Rajgurunagar Call Girls Just Call 7001035870 [ Cash on Delivery ] Pun...
(PRIYA) Rajgurunagar Call Girls Just Call 7001035870 [ Cash on Delivery ] Pun...(PRIYA) Rajgurunagar Call Girls Just Call 7001035870 [ Cash on Delivery ] Pun...
(PRIYA) Rajgurunagar Call Girls Just Call 7001035870 [ Cash on Delivery ] Pun...
 
Call Girls Service Nagpur Tanvi Call 7001035870 Meet With Nagpur Escorts
Call Girls Service Nagpur Tanvi Call 7001035870 Meet With Nagpur EscortsCall Girls Service Nagpur Tanvi Call 7001035870 Meet With Nagpur Escorts
Call Girls Service Nagpur Tanvi Call 7001035870 Meet With Nagpur Escorts
 
Call Us -/9953056974- Call Girls In Vikaspuri-/- Delhi NCR
Call Us -/9953056974- Call Girls In Vikaspuri-/- Delhi NCRCall Us -/9953056974- Call Girls In Vikaspuri-/- Delhi NCR
Call Us -/9953056974- Call Girls In Vikaspuri-/- Delhi NCR
 
the ladakh protest in leh ladakh 2024 sonam wangchuk.pptx
the ladakh protest in leh ladakh 2024 sonam wangchuk.pptxthe ladakh protest in leh ladakh 2024 sonam wangchuk.pptx
the ladakh protest in leh ladakh 2024 sonam wangchuk.pptx
 
9953056974 Call Girls In South Ex, Escorts (Delhi) NCR.pdf
9953056974 Call Girls In South Ex, Escorts (Delhi) NCR.pdf9953056974 Call Girls In South Ex, Escorts (Delhi) NCR.pdf
9953056974 Call Girls In South Ex, Escorts (Delhi) NCR.pdf
 
★ CALL US 9953330565 ( HOT Young Call Girls In Badarpur delhi NCR
★ CALL US 9953330565 ( HOT Young Call Girls In Badarpur delhi NCR★ CALL US 9953330565 ( HOT Young Call Girls In Badarpur delhi NCR
★ CALL US 9953330565 ( HOT Young Call Girls In Badarpur delhi NCR
 
Coefficient of Thermal Expansion and their Importance.pptx
Coefficient of Thermal Expansion and their Importance.pptxCoefficient of Thermal Expansion and their Importance.pptx
Coefficient of Thermal Expansion and their Importance.pptx
 
Porous Ceramics seminar and technical writing
Porous Ceramics seminar and technical writingPorous Ceramics seminar and technical writing
Porous Ceramics seminar and technical writing
 
Decoding Kotlin - Your guide to solving the mysterious in Kotlin.pptx
Decoding Kotlin - Your guide to solving the mysterious in Kotlin.pptxDecoding Kotlin - Your guide to solving the mysterious in Kotlin.pptx
Decoding Kotlin - Your guide to solving the mysterious in Kotlin.pptx
 
Processing & Properties of Floor and Wall Tiles.pptx
Processing & Properties of Floor and Wall Tiles.pptxProcessing & Properties of Floor and Wall Tiles.pptx
Processing & Properties of Floor and Wall Tiles.pptx
 
Sheet Pile Wall Design and Construction: A Practical Guide for Civil Engineer...
Sheet Pile Wall Design and Construction: A Practical Guide for Civil Engineer...Sheet Pile Wall Design and Construction: A Practical Guide for Civil Engineer...
Sheet Pile Wall Design and Construction: A Practical Guide for Civil Engineer...
 
HARDNESS, FRACTURE TOUGHNESS AND STRENGTH OF CERAMICS
HARDNESS, FRACTURE TOUGHNESS AND STRENGTH OF CERAMICSHARDNESS, FRACTURE TOUGHNESS AND STRENGTH OF CERAMICS
HARDNESS, FRACTURE TOUGHNESS AND STRENGTH OF CERAMICS
 
IMPLICATIONS OF THE ABOVE HOLISTIC UNDERSTANDING OF HARMONY ON PROFESSIONAL E...
IMPLICATIONS OF THE ABOVE HOLISTIC UNDERSTANDING OF HARMONY ON PROFESSIONAL E...IMPLICATIONS OF THE ABOVE HOLISTIC UNDERSTANDING OF HARMONY ON PROFESSIONAL E...
IMPLICATIONS OF THE ABOVE HOLISTIC UNDERSTANDING OF HARMONY ON PROFESSIONAL E...
 
UNIT-V FMM.HYDRAULIC TURBINE - Construction and working
UNIT-V FMM.HYDRAULIC TURBINE - Construction and workingUNIT-V FMM.HYDRAULIC TURBINE - Construction and working
UNIT-V FMM.HYDRAULIC TURBINE - Construction and working
 
Introduction and different types of Ethernet.pptx
Introduction and different types of Ethernet.pptxIntroduction and different types of Ethernet.pptx
Introduction and different types of Ethernet.pptx
 

Multitouch

  • 1. FTIR multi-touch display how-to guide (alpha version 0.2) May 23, 2007 Harry van der Veen
  • 2. Introduction My name is Harry van der Veen, callsign Gravano. I’m a 25 year old Communication & Multimedia Design student, located at the NHL (Noordelijke Hogeschool Leeuwarden) in Leeuwarden (Holland), participating in the fourth and final year of that education. I’m writing this FTIR multi-touch display how-to guide, because I want to make it easier for other people to build their own multi-touch display. My intensions are to make this guide understandable for people, in the age of approximately twelve to about seventy years. I would like to point out, that in this guide, I describe “a way” to build a multi-touch display. I’m not saying it’s THE way. There are numerous of ways to build screens, this is just one of them. There’s nothing you should know about any difficult technologies. I’ll try to explain everything as simple and thorough as possible. Only thing you must be able to is, actually buy or own the materials and have some basic handyman’s work skills like drilling, sanding, sawing, polish. If have two left hands myself and even I succeeded, so you should be fine. After walking through this guide, you should be able to understand the technology behind this project and be able to build your own multi-touch display, to let it collaborate with your own computer. This is only possible with the appropriate software. Only the hardware is discussed in this guide. There’s the possibility, to write your own software for the multi-touch display. This however, is a whole different aspect. Which as mentioned above, is not discussed on this paper. When finished with this guide, you’ll have a general understanding of why which materials are being used and what the alternatives are. By this way I would also like to thank everybody from the NUIgroup (Natural User Interface) open source multi touch community, for all their efforts and contributions. I hope you enjoy this guide and that you have a working multi-touch display as well in no time, so you can collaborate with us inside our community. If you have any questions or suggestions, feel free to contact me at harryvdveen@gmail.com If you’re looking for more information regarding this subject, visit our community Blog: http://www.nuigroup.com Wiki http://www.nuigroup.com/wiki/ Forum http://www.nuigroup.com/forums/ Join us on irc.freenode.net on #ftir Or drop by on my personal blog, located at: http://www.multitouch.nl
  • 3. Table of contents Introduction.........................................................................................................................................2 Table of contents ................................................................................................................................3 Requirements .....................................................................................................................................4 Tools...............................................................................................................................................4 Building materials............................................................................................................................4 Software..........................................................................................................................................4 Technology explanation ......................................................................................................................5 Global building process.......................................................................................................................6 Modifying a webcam........................................................................................................................6 Treating acrylic................................................................................................................................6 Building a frame ..............................................................................................................................6 Wiring an electronic circuit...............................................................................................................6 Projection........................................................................................................................................6 Detailed building process / material information...................................................................................7 Modifying a webcam........................................................................................................................7 Treating acrylic..............................................................................................................................12 Building a frame ............................................................................................................................15 Wiring an electronic circuit.............................................................................................................19 Projection......................................................................................................................................26 Projection screen material..........................................................................................................26 Silicone rubber...........................................................................................................................27 Projector....................................................................................................................................30
  • 4. Requirements Tools Power drill + 5mm drill Standard size screwdriver (flathead & cross) Small sharp knife Scissors Different grits of sanding paper Wooden cubical object to wrap sanding paper around Copper or silver polish + towel Synthetic material saw Building materials Screws € 5 Glue (hotglue / white glue) € 10 Frame material (for example wood, aluminium or PVC) € 5 (depends on construction) Connector strips € 5 Electronic wire (0,5 mm) € 5 IR-LEDs + resistors € 30 Acrylic also known as plexiglas € 25 Black photo negatives € 5 Power source € 10 Power cable € 5 Webcam € 15 Projector € 200+ Projection material (tracing paper) € 5 Silicone rubber € unknown (35 max) Working computer Mirror (optionally) So basically the projector is the most expansive part of the device. You can make a multi touch display without a projector and use your monitor as an output, which is like totally not cool ;) So for an amount of about € 350, you’ll be able to build a cool multi touch display. You could also go with a more expansive webcam, filter or projection material, for better performance, but for the proof of concept, this will do. Software Computer applications are necessary to communicate between a multi touch display and a computer. These applications can be developed within several languages / programming environments. For example: Processing (P5), VVVV, Flash, C, C++, Java and others. Because of the usability of certain API’s and the relatively simple visualisation possibilities, I reckon P5, VVVV or Flash 9, in combination with Actionscript 3.0. The above can be downloaded from the following locations: Processing (P5) - http://www.processing.org VVVV - http://www.vvvv.org Adobe Flash 9 - http://www.adobe.com/nl/downloads/ Applications built within these API’s, are freely available, on the forum of the online Open Source Multi-touch Community, called NUIgroup (Natural User Interface), located at: http://www.nuigroup.com/forums/
  • 5. Technology explanation Image 1: FTIR explanation © Jeff Han The applied technology, within this project, is called FTIR (Frustrated Total Internal Reflection). FTIR describes the internal reflection of light, inside a certain material. In our case, it will be infrared light, that internally reflects inside is a piece of acrylic, also known as plexiglas. IR-LEDs (Light Emitting Diodes) are placed along the edges of the acrylic. This way, infrared light is beamed inside the acrylic and reflects internally. In a simple way, you can say that, IR-light bounces inside the acrylic, from one side to another. As soon as a finger touches the acrylic surface, the internal reflection of the IR-light, is interrupted. The infrared light scatters on the finger tips. Infrared light is invisible to the human eye, but by placing an infrared camera behind the acrylic your fingertips will be visible on the infrared camera. The images that are generated by the camera, contain white blobs (caused by the fingertips). These blobs will be analyzed by software. Every blob corresponds to certain coordinates. Software can by analyzing these coordinates perform certain tasks, for example move, resize or rotate objects. There’s also a projector located behind to acrylic, that’s connected to a computer that projects the image. A rear projection screen is located just underneath or above the acrylic, to project the image on.
  • 6. Global building process The building process consists of the following 5 main elements Modifying a webcam A normal webcam will be modified to a webcam that can detect IR-light. The IR-block filter inside the webcam will be replaced by an IR-pass filter. Treating acrylic The treatment of the acrylic will be discussed. Our main objectives will be sawing, sanding and polishing. Building a frame The build of a frame will be mentioned. What material to use etcetera. Wiring an electronic circuit There will be an explanation about how to creat an electronic circuit containing LEDs, resistors, power supply and wires. Projection Here you will find information on what kind of projection material and beamer you can use and how to make a silicone rubber sheet as a coupling layer between the acrylic and the projection screen.
  • 7. Detailed building process / material information Modifying a webcam Needed material: • webcam • lens • black photo negative • tape, glue or any other material that can hold the black photo negative in place Modification of a webcam is necessary to detect the IR blobs that are generated by your fingers. IR is not visible to the human eye, neither is it to most of the webcams. Some webcam’s detect IR, but not as clear as it should be, for this project. Every webcam can detect IR, but this option is not available because, there’s an IR-block filter inside the webcam that blocks IR. So the camera is able to detect all visible light, but not the IR. To see to it, that the webcam detects the IR, we need to remove the IR-block filter from the webcam. So it will detect all visible light including IR. For removing this IR-block filter, we have two options: • removing the IR-block filter manually • replace the current lens with another lens that has no IR-block filter With some webcams it’s relatively easy to remove the IR-block filter. For my first multi touch display, I used a cheap (€ 10/15) Sweex webcam (Sweex WC001 webcam), that had a IR-block filter in front of the lens.I broke the IR-block filter (some sort of glas material), so I could remove it. Image 2: A Sweex WC001 webcam In some cases the IR-block filter is painted on the lens and you can scratch it off. But be careful that you don’t leave scratches on the lens. But in most cases, it’s impossible to remove the IR-block filter, without damaging the lens, because it’s glued to the lens. In that case, it’s wise to replace the default lens with a special lens that doesn’t have a IR-block filter attached to it. Try to find a lens that looks like the one below.
  • 8. Image 3 : The 4.3MM CCTV Camera board Lens IR DVR Lens specifications: • Glass Lens • Aperture F/1.8 • Image format 1/3 inch • Angel of view 68° • M12x0.5 mount • Size ?14×14.75 $14.99 + $8.50 (shipping) = $23.49 total In my example, I used a Philips SPC900NC webcam, which has a difficult to remove IR-block filter attached to the lens. That’s why I choose to buy and replace the default lens, with a special lens, from ebay, without IR-block filter. It’s a 4.3MM CCTV Camera board Lens IR DVR. Image 4 : The 4.3MM CCTV Camera board Lens IR DVR without IR-block filter and Philips SPC900NC webcam.
  • 9. Onces the webcam is modified to being able to see normal light as well as IR-light, you need to apply an IR-pass filter. This IR-pass filter, lets all the IR through, but blocks out most of the visible light. There are different materials that you can use for this purpose: • IR-pass filter • IR-band pass filter • Remote control filter • Black photo negatives IR-pass filter Image 5: An IR-pass filter An IR-pass filter is a special filter that only passes through IR on a certain frequency (760 nm to for example 1000 nm). So it basically blocks out all other light, that’s not within that region, that would be most of the visible light. IR-band pass filter Image 6: An IR-band pass filter The IR-band pass filter only passes through IR on a specific frequency. For example: 880 (nm) So if you’ll use 880 (nm) IR-LEDs and you use an IR-band pass filter of 880 (nm) as well, you’ll get the best optical performance, because all the light is blocked out, except for the specific IR from the LEDs. I haven’t tested the IR-pass filter nor the IR-band pass filter, because they are relatively expansive. 80 euro for a IR-band pass filter. But from what I’ve heard, they work very well. The IR-band pass filter works better then the IR-pass filter. Which will hopefully make sense after what I’ve wrote just above.
  • 10. Remote control IR filter Image 7: The front of a remote control The filter on the front of remote controls (deep dark red/black piece) isn’t very handy to work with, because of the different shapes it may have and the result is almost the same as one layer of dark photo negative. Black photo negatives Image 8: Photo negatives So because of a low budget scenario and usability, I reckon you use several layers of entirely black photo negatives. You’ll probably know them. They are usually among the negatives of your holiday pictures etcetera. It’s those completely dark negatives that appear when pictures are misfabricated. Three layers will do the job nicely. If you use too many layers, your blobs become less visible as well. Attach them in front of your lens. First you have removed the IR-block filter and then you applied an IR-pass filter. The webcam modification is finished. You can test your camera by pointing at a money bill or cola. Or by checking if it detects the IR-light from a remote control.
  • 11. Image 9: 50 euro in infrared Image 10: Cola is transparent in infrared
  • 12. Treating acrylic You’ll need the following materials: • Acrylic also known as Plexiglass • Sanding paper (for example: grit 100, 200, 400, 600) • Wooden cubical object to wrap sanding paper around • Copper or silver polish + towel • Synthetic material saw Acrylic will be the material that internally reflects the IR-light. This material is strong and works very well as an optical waveguide. You could also use polycarbonate, which has a plus compaired to acrylic, namely it’s unbreakable. But the optical waveguide performance is a few percent worse. You can get acrylic at glass stores, but I found out, that most of the time, you pay ten times the amount, compaired to buying it online. So I suggest you buy it online from ebay or equivalent. If you can get it cheap from a glass store or a handy man’s shop, go and ask if they can cut the acrylic in the dimensions you desire, so you don’t have to cut or saw it yourself. In most cases, they can even buff the edges transparent, so you don’t have to treat your acrylic at all and you can continue with the next step: Building a frame. Most of the time, acrylic has transparent cut edges when it leaves the factory. Most people I know made 4:3 ratio multi touch displays. So unless you are going to use a 16:9 ratio projector, to project your image, I suggest you cut your acrylic with a 4:3 ratio as well. I bought a piece of acrylic (dimensions: 460*900*8 mm) for about 25 euro’s from http://www.marktplaats.nl (a dutch equivalent of ebay). I sawed off my piece from that bigger piece. Sizes: 460*320 mm (4:3 ratio) 8mm thick. 8 mm thick is the least you should go with, because the LED’s you’re going place along the edges, will be 5 mm thick. Especially if you’re building larger screens, you want to go with a thicker piece, because it needs to be robust. So even when, you push in the middle, the acrylic doesn’t bounce. If you need to saw your acrylic yourself, at least use the finest saw you can find, so you can try and keep the edges as smooth as possible. If there’s a protective film material on the acrylic, keep it on as long as possible, so you’ll prevent the acrylic from being scratched.
  • 13. Image 11: Transparent acrylic with protective film material, square piece of wood, sanding paper If you have sanding tools, I suggest you use them, instead of doing it by hand. Make the edges of the acrylic as transparent as possible, to increase the amount of IR-light beamed into the acrylic Try to find the highest grits of sanding paper. I believe there’s even grit 2000 sanding paper. Higher grit > finer scratches > better transparency Wrap the sanding paper around a piece of flat wood, to prevent round and to ensure flat edges Start off sanding with a low grit sandpaper Increase the grit step by step (for example 100, 200, 400, 800) When using the highest grit sandpaper, put olive oil or equivalent, on the edges and continue sanding Finish the edges by polishing them with copper or silver polish and a towel When finished, the edges should be pretty transparent. I sanded all four edges, eventough I’m going to place leds along two sides. This because I want, light that bounces out of the sides, to be able to bounce back easily through the aluminum that I will put along the edges. I namely experienced IR-light leakage on the sides during my first prototype. That’s why I want to bounce the light back into the acrylic.
  • 14. I decided not to flame polish the edges afterwards, because I thought the edges were already transparent enough and you don’t want to accidentely destroy parts of your acrylic. Because, when you flamepolish them wrong, you might create small air bubbles, inside the acrylic or it might turn out black.
  • 15. Building a frame During the build of the first proto I found out that I wanted some kind of reflective material against the edges to bounce back leaking IR light. With my first proto I used aluminum tape, but it intends to stick to everything, so basically alot of annoyance. Image 12: Acrylic in aluminum frame (mount in progress) So I decided to make an aluminum frame around the acrylic, which can also hold the leds at the same time. It makes your screen look alot better then with shabby tape hanging around.
  • 16. Image 13: Acrylic mounted in aluminum frame I used 4 pieces of aluminum rail. 2*50 cm and 2*38 cm both 10 mm (acrylic= 36 * 48 cm, 8mm thick) So the acrylic would stuck inside the aluminum rail perfectly, it seemed it first. Lateron I founded that the rail on one side was a little hard to get around the acrylic, so I used brute force with a hammer. I sawed of the edges of the aluminum with a 45 degree angle, so they would perfectly fit against eachother. Afterwards I drolled 5mm holes in the 2 rails that will hold the leds. 10 holes on each rail. I choose 5mm holes so the leds would get stuck pretty good, since the leds theirselves are also 5mm.
  • 17. Image 14: Drilled holes in aluminum U-frame Image 15: Drilled holes in aluminum U-frame Then I placed the leds in the holes to see if I had the wished for result.
  • 18. Image 16: Leds put through the drilled holes in the aluminum U-frame Because of the space inside the aluminum, there’s just enough room to hold the head of the led. Image 17: Wooden frame around the aluminum framed acrylic
  • 19. My wooden frame has arrived. My uncle makes wooden frames for paintings and since they only cost 5 euro I asked him if he could make one for me. The acrylic/aluminum part leans on the wooden frame on the left and the right side and a little bit on the top and the bottom as well. Notice I have space left on the bottom and the top side to wire the leds and resistors. Wiring an electronic circuit Imag 18: IR led powered by a 5 volt USB connection LEDs (Light Emitting Diodes) need a power source to produce light. There are several ways to power your LEDs. For example by batteries (1,5 volt), USB (5 volt) or a 12 volt adapter. But you could also connect your led’s to the 12 volt molex connector on a computer power supply. I used 100 (mA) miliampère LEDs, so I needed a pretty good power source. Using batteries doesn’t make alot of sense, since you would need quite a few and you would need alot of wire as well, because of the inefficient power circuits. Using USB is possible, but I would only choose that option, if you are going to use 20/30 (mA) led’s and even than, a computer power supply would make more sense, since you can put more led’s in a row. Why not use a computer powersupply? Your screen is going to be near a 220 volt power source anyway, since you have to use a projector and a computer as well. You can use one of the molex connectors on the computer you are working on, to supply the leds with power. But you could also use it without the motherboard in between.
  • 20. Image 19: 6 IR leds powered by a 12 volt molex connector inside a computer There’s a pretty easy solution to hotwire a computer power supply. If you look at the ATX connector, you see several colored wires: Image 20: ATX connector To hotwire your computer power supply, simply connect the green wire with any black wire (ground) of the pin out and you will be able to connect your LEDs to one of the molex connectors, without the help of a motherboard, turning the power supply on. During the build of my first prototype I used 36 880nm 60 degree 5mm cl IR leds (1,8 V, 20 mA, 11,0 mW/sr). Lateron I discovered that there were leds that were even better, namely the Osram SFH485, specifications: 1.5 V 100(mA) 880 (nm) 5mm. These were a bit more expansive but more powerful, so I would be able to use less leds.
  • 21. Image 21: An Osram SFH485 IR LED I decided to go with 10 leds on both horizontal sides, so 20 leds in total. After filling in the specifications of the power source and the leds in this led wizard , I found out that, I had to make 4 strings of 5 leds, each with a 47 Ohm resistor of 1 Watt. An electronics teacher at school gave me a few 51 Ohm resistors of 4 or 5 Watt. He told me that would do the job pretty well, since the higher Watt was only about the amount of heat that a resistor could handle. So it would just handle an higher amount of heat without influencing the brightness of the leds. And the difference of 4 Ohm (51-47) was not noticeable, according to him.
  • 22. Image 22: 6 connected leds for testing purposes. Green thing in the lower left corner is a resistor. Image 23: 6 connected leds for testing purposes
  • 23. I connected the leds on 2 different molex connectors (12 volt), but I might as well have gotten around with just using one. I just happened to have 2 molex connectors, so I used 2 (which is pretty useless actually). The wires I used were pretty short, so you might want to use longer ones, so it will be more flexible. I used 0,5 mm thick wire. I did the entire circuit without soldering, for a change, which seemed to work just fine. So why spend a lot of time on soldering if you can do without. Image 24: Front of screen
  • 24. Image 25: Back of screen I connected the leds with each other by using strip connectors (”kroonsteentjes” in Dutch). My first intention was to do the entire setup without the strip connectors and just let the holes in the aluminum rail hold the leds. But because of the fact that some holes were a bit to big (matter of tens of a millimeter) to hold the leds pretty steady, I decided to use the strips anyway, because else the leds would be too loose. You might as well go for the solution below, which is a solderless ledholder. You can easily click the led into this holder, so you won’t be bothered with soldering anything. Image 26: Solderless led holder After connecting all the leds I tested the entire setup by checking for fingers on the computer (image below). Which seemed to work pretty fine.
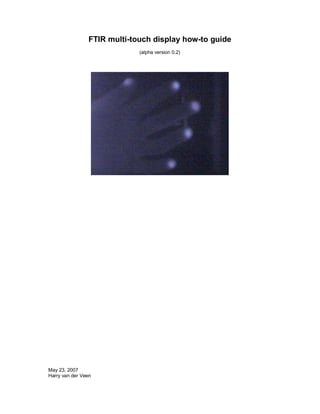
  • 25. Image 27: hand placed on screen, detected by webcam, displayed on monitor, power supplied by computer power supply (molex 12 volt) Note: With most leds the longest pin of the led, is the plus and the short one is the minus. But with these leds (Osram sfh485) it was the other way around.
  • 26. Projection To project the image from a computer, you’ll need a projector and a projection screen. The projector beams an image on a projection screen, that is placed underneath or on top of the acrylic. A plus of placing the projection screen material on top of the acrylic is that you can directy interact with the image. There is no visual imperfection contrary to placing the projection material underneath the acrylic. If you place it underneath the acrylic you’ll still have to optical difference of the thickness of the acrylic. In this case you can also let the projection screen function as an ambient IR block filter, but more about this lateron. In case you want a closed box solution for your multi touch, you may want to consider using a mirror to reflect the image that comes from the projector, so you can shorten the distance. Keep in mind that there can be ghosts images (vague double projections), caused by the acrylic bouncing back the image to the mirror and back to the acrylic again. Projection screen material There are different materials you can use as a projection screen: • Rosco grey rear projection screen • Mylar • Tracing paper And I bet there are tons of other materials you can project on. For the project I did in Sweden we used some kind of white plastic paper material which they use to make designer lamps. Rosco grey is a very good projection screen, but it blocks IR, and it therefor diffuses the blobs, if you place it underneath the acrylic, and makes them rather unusable for software analysis. If you place it on top of the acrylic the blobs are a bit less vague, but still very diffuse, because there’s no good coupling between the acrylic and the Rosco. Furthermore Rosco is relatively expansive compaired to the other two materials. Image 28: Piece of Rosco grey on top of my first prototype The cheapest solution is tracing paper.
  • 27. But since you want your multitouch display to work in all kinds of environments, don’t want ambient infrared light to interfere with it. Therefor you have to use a projection material on top of the acrylic that blocks IR. Rosco grey is one of those rear projection screen materials. Silicone rubber The problem with placing the rosco grey on the bare acrylic is, that it hardly generates usable blobs. The blobs are pretty vague because of the bad coupling between the acrylic and the projection material. You have to press pretty hard to generate a workable blob. And that’s not something you want. This has to do with physics. It’s about relative index of refraction. For example, when you touch the acrylic with your bare fingers, there is still some miniscule air in the space between the acrylic and your fingers. So when you wetten your fingers, these miniscule air holes get filled, so your finger has a better coupling with the acrylic. This way the blobs are brighter with wett fingers opossed to dry fingers. Therefor we needed to find a material that prevented those small airholes as much as possible, so that there would be a better coupling, resulting in brighter more clear blobs. A lot of people within the NUIgroup community have experimented with different materials and we got pushed in the direction of silicone rubber being the best solution to this problem. Here at the university in Sweden we made two samples of silicone rubbers sheets, a 1mm and a 2mm thick. The 1mm thick sample worked better, since the blobs were brighter. We haven’t tried thinner sheets, but 0,5 mm may even work better. But that’s all up to you if you want to experiment with that. Material details The silicone rubber sheet we prepared are made out of 2 fluids that you combine and then they cure over time. The fluids come from a company named Wacker Chemie AG. Their website is located here: http://www.wacker.com This company only sells these products in amounts of 20 kg’s. But since we are doing research for Lulea University of Technology (Sweden), we have a supplier that cuts the 20 kg amounts into smaller pieces. So we were able to order just one kg. The company that divided the 20 kg’s into smaller amounts, is called ABIC Kemi. The brand of fluids we used go by the name of ELASTOSIL® M 4641. ELASTOSIL® M 4641 is a pourable, addition-curing, two-part silicone rubber that cures at room temperature. Special characteristics • Very good flow properties • Fast and non-shrink cure at room temperature which can be accelerated considerably by the application of heat • Medium hardness (Shore A approx. 43) • Good transparency of the cured rubber • High tear strength • Outstanding resistance to casting resins, particularly polyurethanes and epoxies, for long service life of the molds You can download a PDF with more specifications here. (English version) Or download a German version, here.
  • 28. Making a silicone rubber sheet • First you have to make a frame of some kind that will hold the acrylic in place and that has some kind of border that is 1 mm higher then the height if the acrylic, when you placed it in the frame. • Then you have to decide on how much silicone rubber you want to use. • Afterwards you weigh andmix the two components and stir them until they are properly mixed. • Pour the silicone rubber liquid onto the acrylic and devide it with an object (a plastic knife or so). • Immediately when you equally divided the liquid, flatten it by using a strip of material (preferable NOT metal, PVC might work) • Now let it cure several hours (14 hours with our liquid). The longer the curing process the smaller the chance of bubbles in the silicone rubber sheet. We didn’t have any bubbles anyway on our 1mm thick piece. Make sure you let it cure in a place that’s not very dusty or cover the setup while curing. Image 29: Pouring the silicone rubber liquid onto the bare acrylic
  • 29. Image 30: Dividing the silicone rubber over the entire acrylic surface Image 31: Flatten the silicone rubber surface with a strip Now the silicone rubber sheet that’s placed between the acrylic and the projection screen material is finished. Now just cover it with a piece of projection material and you should be good to go. Make sure you test what side of the projection material up, creates brighter blobs, there’s a difference! With the Rosco one side on top is different to the other side on top.
  • 30. The layering is like this: Acrylic with the silicone rubber sheet on top of that. On top of the silicone rubber sheet you place a projection screen. Make sure the projection screen doesn’t stick to the silicone rubber sheet, because otherwise the ftir effect will be set off. So basically it looks like this: ———- your fingers ———- projection screen ———- silicone rubber sheet ———- acrylic ———- image source Projector What kind of projector you want to use, is all up to you. You can choose a HD-projector, LED-projector or even a 16:9 projector. But keep in mind, that with this guide I used a “normal” 4:3 ratio projector. You don’t have to use a projector. You could also just go with the entire setup without projector and projection screen and navigate with the multi-touch display and look at the output on the monitor of your computer. In case you want to work with a projector and don’t have enough room to properly project the image on the projection screen. You might want to use a mirror to redirect the image. Image 32: Redirecting the beamed image with a mirror.