
Recommended
More Related Content
What's hot
What's hot (14)
Viewers also liked
Viewers also liked (16)
Similar to Smart board beginners workshop 15 16
Similar to Smart board beginners workshop 15 16 (20)
Recently uploaded
Recently uploaded (20)
Smart board beginners workshop 15 16
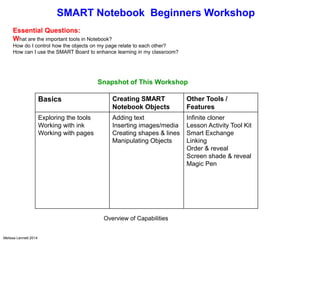
- 1. SMART Notebook Beginners Workshop Essential Questions: What are the important tools in Notebook? How do I control how the objects on my page relate to each other? How can I use the SMART Board to enhance learning in my classroom? Basics Creating SMART Notebook Objects Other Tools / Features Exploring the tools Working with ink Working with pages Adding text Inserting images/media Creating shapes & lines Manipulating Objects Infinite cloner Lesson Activity Tool Kit Smart Exchange Linking Order & reveal Screen shade & reveal Magic Pen Snapshot of This Workshop Melissa Lennett 2014 Overview of Capabilities
- 2. Finding tools in SMART Notebook Toolbar above When you click on a function, a panel will appear beside it with all the related capabilties Customize if you'd like Move to bottom if you'd like Manipulating pages
- 3. Writing Notes regular pen creative pen creative pen crayon Take a few minute to "play" with the above pens. Erasing Ink: Click on the eraser icon and choose the largest size and erase. form an enclosed circle around the ink and tap inside of it. paint brush pen calligraphy pen
- 4. Resize Handle Object drop-down menuRotation handle Manipulating Objects Practice! Your notes/ink drawings are objects on the SMART Notebook page. All SMART Notebook objects can be moved, rotated and resized. Before you can manipulate an object, you must select it. When you select an object, a selection rectangle appears around it. Video: Properties of an Object
- 5. Magic Pen - Invisible Ink outer coreouter core crustcrust mantlemantle inner coreinner core DemonotesDemonotes
- 6. Magic Pen - Spotlight DemonotesDemonotes
- 8. DemonotesDemonotes Magic Pen - Magnifier Shape Recognition Pen
- 9. Creating SMART Notebook Objects - INSERTING IMAGES Type in what you are looking for and press ENTER or SEARCH. Search results come into different folders. Simple pictures Advanced Pictures Themed Pages/Backgrounds Interactive/Multimedia Importing From Google hat
- 10. Properties of an Object To change the characteristics of an object: OR Add some text/shape. Change the color. Change the size. Add animation.
- 11. Locking Objects Object Drop-down Menu Ordering Objects Grouping Objects Flipping Objects
- 12. Capturing Images Button How It's Used 1. Hold down the left mouse button and drag to outline the rectangular area you want to capture. Release the left mouse button after the area is selected. 2. Click on the window you want to capture. Release the left mouse button after the desired window appears as a hatched area. 3. Navigate to the screen you want to capture and click the button to capture the entire screen. 4. Click and drag to create a freehand shape around the area you want to capture. Release the left mouse button after the area is selected 1. 2. 3. 4. Practice #1-4 Video: Capturing Images
- 13. Practice: Place the correct label under each object. Group the beaker & wire gauze together and lock in place. Group the bunsen burner and tripod together and lock in place. Order the bunsen burner to the front. Practice Drop-down Features beaker tripod bunsen burner wire gauze
- 14. Are you learning anything in this workshop?? Not at all! Order and RevealThis technique uses color and layers to disguise and then reveal an object. I think so! o Absolutely!
- 15. Infinite Cloner How many words can you make using the letters in the words SMART Board? S M A R T DRAOB S T AT
- 16. Practice: Link the tiger to www.tenafly.k12.nj.us Set it so clicking anywhere on the object will take you to the website. Linking Objects or Text to External Content 2 ways to link: Click ON the actual text or object Click ON the corner, blue circle
- 17. Lesson Activity Toolkit These are templates that can be used to input your specific content!
- 18. Create an account Activate through email Create a search topic Select at least 3 grades Click 'download" Click 'open" View and decide whether or not to save it SMART Exchange Smart Exchange
- 20. Afternoon Expectations Create a customized lesson, using a template from Lesson Activity Toolkit Find a lesson from The Smart Exchange, tweak it, and save it correctly Create as many lessons as you can! Look for more lessons in the SMART EXCHANGE and save them to your Documents.