Russian Call Girls in Andheri Airport Mumbai WhatsApp 9167673311 💞 Full Nigh...
A05 screenshots
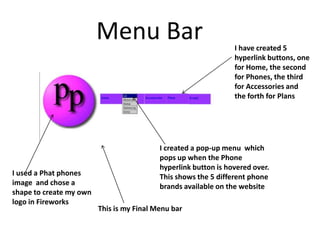
1. Menu Bar I have created 5
hyperlink buttons, one
for Home, the second
for Phones, the third
for Accessories and
the forth for Plans
I created a pop-up menu which
pops up when the Phone
hyperlink button is hovered over.
I used a Phat phones This shows the 5 different phone
image and chose a brands available on the website
shape to create my own
logo in Fireworks
This is my Final Menu bar
2. I opened Macromedia
Fireworks then created a
fireworks file.
This is how I chose the
width, height and
resolution most suitable
for my menu bar.
3. I inserted my purple “PP”
logo onto the left-hand
side of my menu bar.
After I created my canvas, I
added my logo by importing it
from my Unit 21 folder in my
documents.
4. Then I changed the symbol
properties from Graphite to
button and changed the
I chose the rectangle name to “My Button”.
shape to create my
button .
I named the button
home as this will be my
Home button
5. After I created the Home button, I copied
it 4 times then changed the name to the
appropriate title for each button to
create 4 other buttons
6. This is how I opened up the
pop-up menu to add my
drop down feature to my
button
8. Navigation Buttons
When hovered over the Finally, when clicked on the
This is the colour and font colours change to a background colour of the
of my button when it light purple background button changes to white
hasn’t been clicked on, and black font background and the black
purple background and font stays the same
white font
9. First I opened Macromedia
Fireworks then created a
fireworks file.
This is how I chose the width,
height and resolution there
were most suitable for my
navigation button
10. I chose the Star as
the shape for my
navigation button
11. This is how I changed the
symbol properties: I
changed the type to button
and named it “My Button”
12. I double clicked on this
to create the 3 different
stages of my button
14. Advertising Banner
I created my advertising banner in Flash. On the
first layer 1 I inserted the first picture, on the
second layer I inserted the second picture, on the
third layer I wrote the title and on the final layer I
created a slogan . I have also used animations to
move them together.
16. This is how I changed the
size settings. Dimension:
468 (width) x 200 (height)
and Frame rate: 24
17. To get the first image for
my advertising banner I
searched iPhone in
Google Images and found
this picture
Then I done the same
for my second picture
but searched Blackberry
instead
18. I clicked File, Import then Import
to stage which led me to My
Documents
19. Both my images were
saved in the A05 folder
in my OCR folder
20. This is layer 1, where I inserted
my first image which was the
Blackberry picture and created a
motion tween
21. Then I converted it to a
symbol by changing the
Behaviour to “Movie Clip”
22. On my second layer I did the same
by inserting my second picture
and creating a motion tween for it
23. Then I converted it to a symbol
too by changing the Behavior
to “Movie Clip”
24. On the third layer I
created the Title which I
named “Phat Phones”
25. On the final layer of the
advertising banner I
created a Phat phones
slogan