More Related Content
Similar to 2014 it skills1week1
Similar to 2014 it skills1week1 (20)
2014 it skills1week1
- 1. Week 1-1
© 2014
Michele Hardy, Chisholm TAFE, Cranbourne Page 1
Chisholm Email
You have been given a student email address as part of the enrolment process. You should check this
regularly, even if you have another email address as this is the default email address used for
Moodle.
Your student email will give you access to skydrive and Office 365.
INTRODUCTION TO WORD 2010
Our main Word Processing application will be Microsoft Word 2010. We will also look at a few free
alternatives such as Google Docs, Open Office and Office 365 and Web apps that you can access
from home.
From the start menu or shortcut on your desktop if there is one, load Microsoft Word 2010.
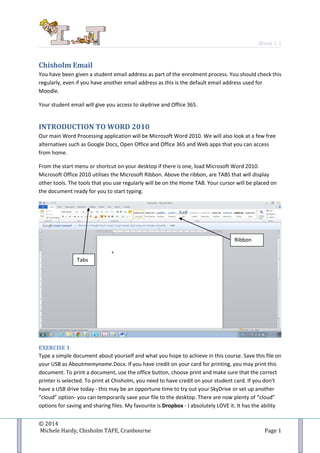
Microsoft Office 2010 utilises the Microsoft Ribbon. Above the ribbon, are TABS that will display
other tools. The tools that you use regularly will be on the Home TAB. Your cursor will be placed on
the document ready for you to start typing.
EXERCISE 1
Type a simple document about yourself and what you hope to achieve in this course. Save this file on
your USB as Aboutmemyname.Docx. If you have credit on your card for printing, you may print this
document. To print a document, use the office button, choose print and make sure that the correct
printer is selected. To print at Chisholm, you need to have credit on your student card. If you don't
have a USB drive today - this may be an opportune time to try out your SkyDrive or set up another
“cloud” option- you can temporarily save your file to the desktop. There are now plenty of “cloud”
options for saving and sharing files. My favourite is Dropbox - I absolutely LOVE it. It has the ability
Ribbon
Tabs
- 2. Week 1-1
© 2014
Michele Hardy, Chisholm TAFE, Cranbourne Page 2
to “synchronise” files from various devices and as most of you know if you saw me when you
enrolled, that I have an iPad which is synched to my desktop as well as my laptop at home - all via
Dropbox. We also use it within our department to share files and collaborate on Documents or
projects. Google Docs will also work as online storage as you can upload files as well as create them
via Google Docs.
Upload to Moodle
Once you have created your document, you will be required to upload it to Moodle to ensure that
you are confident with this process. Most of your assessments will be submitted via Moodle. The
advantage of this is that you can check that it has been uploaded and you can view your results and
feedback once the task has been assessed by your teacher.
Your subject Moodle should look similar to the above. You can see the assessment task labelled First
Document. Click on this link.
You will then be able to browse and select your file.
Click Here
- 3. Week 1-1
© 2014
Michele Hardy, Chisholm TAFE, Cranbourne Page 3
Click here to
browse for file
Choose Upload a File
Click on Choose File
Click on the file you want
to upload and then click
on Open
- 4. Week 1-1
© 2014
Michele Hardy, Chisholm TAFE, Cranbourne Page 4
And Finally….
I know it seems such a lengthy process just to add a file, but once you do it a few times it will
become easy.
STYLES
Although not compulsory, it is recommended that you use styles to format your documents in Word.
Styles in Word 2010 have a Preview feature, or what I call WYSBYGI (What You See Before You Get
IT). The styles are linked to various Templates. When you create a blank document, you are still
using a template, although you may not realise it. The standard template is called Blank Document
or Normal, depending on your version of Office.
Word comes with a range of templates that can be used to help you create a variety of different
documents. Some are installed on your computer with the software and others are available through
Microsoft Office Online.
Your file will appear here
Click on Upload this file
Click Save
- 5. Week 1-1
© 2014
Michele Hardy, Chisholm TAFE, Cranbourne Page 5
To create a new document using a Template, click on the File TAB and then New.
Click on Sample Templates to see the list of templates that have been installed with your Office
2010. You can click on each one and see what it looks like in the Preview window. The advantage of
using a template is that you have the layout, styles and a good idea of what content is required
automatically. The templates have been designed, apparently, by people who know about document
design!
EXERCISE 2
From the Installed Templates, select the Equity Resume (or any of the template resumes that take
your fancy). Once loaded, you will see that the Equity Resume has a nice style as well as headings
and prompts that help you to complete the document. Complete the resume using your personal
details and Save to your USB.
Using the same steps as before, upload this document to Moodle using the Task 2 link.
Template categories
on Office Online
Locally installed
Templates
- 6. Week 1-1
© 2014
Michele Hardy, Chisholm TAFE, Cranbourne Page 6
OFFICE ONLINE
As well as the templates that are installed, you can also get templates from Office Online if you have
Internet access. When you create a new document, select from Template and you can then flick
through the various categories and when you find what you are after, click on the Download button.
This will download the template and load it as a new document for you.
If you don't have access to the Office Online templates from within Office 2010, perhaps because of
how it has been installed, you can go to the Office Online website and download the templates from
there.
http://office.microsoft.com/en-au/
- 7. Week 1-1
© 2014
Michele Hardy, Chisholm TAFE, Cranbourne Page 7
Click on the MORE TEMPLATES link to see the available templates.
To see the Resume Templates, click on the Resumes Link.
As you can see, there are HEAPS!!!
If you wish to use any of them, first click on the one you want and then click on Download.
Follow the prompts to download your template.
- 8. Week 1-1
© 2014
Michele Hardy, Chisholm TAFE, Cranbourne Page 8
Because I am using Chrome, my template will automatically download to my Download folder. Office
2010 will expect to find your templates in the Microsoft Folder in your user library. I moved it from
the Downloads folder into this folder so that I could easily access it.
So to access downloaded templates, File, New, and choose the My Templates folder.
SELECTING AND FORMATTING TEXT
As well as using templates, you can start with a blank document, type in your text, and style it
yourself. To format text, you need to first select the text that you want formatted. You can select
text using either the mouse or the keyboard.
The following table has been extracted from the Microsoft Help Online
- 9. Week 1-1
© 2014
Michele Hardy, Chisholm TAFE, Cranbourne Page 9
SELECTING TEXT USING THE MOUSE
To Select Do This
Any amount of text Click where you want to begin the selection, hold down the left mouse button, and then drag the pointer
over the text that you want to select.
A word Double-click anywhere in the word.
A line of text Move the pointer to the left of the line until it changes to a right-pointing arrow, and then click.
A sentence Hold down CTRL, and then click anywhere in the sentence.
A paragraph Triple-click anywhere in the paragraph.
Multiple paragraphs Move the pointer to the left of the first paragraph until it changes to a right-pointing arrow, and then
press and hold down the left mouse button while you drag the pointer up or down.
A large block of text Click at the start of the selection, scroll to the end of the selection, and then hold down SHIFT while you
click where you want the selection to end.
An entire document Move the pointer to the left of any text until it changes to a right-pointing arrow, and then triple-click.
Headers and footers In Print Layout view, double-click the dimmed header or footer text. Move the pointer to the left of the
header or footer until it changes to a right-pointing arrow, and then click.
Footnotes and endnotes Click the footnote or endnote text, move the pointer to the left of the text until it changes to a right-
pointing arrow, and then click.
A vertical block of text Hold down ALT while you drag the pointer over the text.
A text box or frame Move the pointer over the border of the frame or text box until the pointer becomes a four-headed
arrow, and then click.
For those that love the home keys and don’t like using a mouse, you can select text within Word by
just using the keyboard.
SELECTING TEXT USING THE KEYBOARD
One character to the right Press SHIFT+RIGHT ARROW.
One character to the left Press SHIFT+LEFT ARROW.
A word from its beginning
to its end
Place the insertion point at the beginning of the word, and then press CTRL+SHIFT+RIGHT ARROW.
A word from its end to its
beginning
Move the pointer to the end of the word, and then press CTRL+SHIFT+LEFT ARROW.
A line from its beginning
to its end
Press HOME, and then press SHIFT+END.
A line from its end to its
beginning
Press END, and then press SHIFT+HOME.
One line down Press END, and then press SHIFT+DOWN ARROW.
One line up Press HOME, and then press SHIFT+UP ARROW.
A paragraph from its
beginning to its end
Move the pointer to the beginning of the paragraph, and then press CTRL+SHIFT+DOWN ARROW.
A paragraph from its end
to its beginning
Move the pointer to the end of the paragraph, and then press CTRL+SHIFT+UP ARROW.
A document from its end
to its beginning
Move the pointer to the end of the document, and then press CTRL+SHIFT+HOME.
A document from its
beginning to its end
Move the pointer to the beginning of the document, and then press CTRL+SHIFT+END.
From the beginning of a
window to its end
Move the pointer to the beginning of the window, and then press ALT+CTRL+SHIFT+PAGE DOWN.
The entire document Press CTRL+A.
A vertical block of text Press CTRL+SHIFT+F8, and then use the arrow keys. Press ESC to turn off the selection mode.
The nearest character Press F8 to turn on selection mode, and then press LEFT ARROW or RIGHT ARROW; press ESC to turn
off the selection mode.
A word, a sentence, a
paragraph, or a document
Press F8 to turn on selection mode, and then press F8 once to select a word, twice to select a sentence,
three times to select a paragraph, or four times to select the document. Press ESC to turn off the
selection mode.
- 10. Week 1-1
© 2014
Michele Hardy, Chisholm TAFE, Cranbourne Page 10
FORMATTING TEXT
Once you have selected text, you can apply a range of different formats. An easy way is by using the
formatting Mini Toolbar. The Mini Toolbar appears just above text that has been selected when you
hover over it. The Mini Toolbar appears in what I call a ghost format until you move the mouse to it.
The Mini Toolbar allows you to change the Font and Font size, apply bold or italics, change the
colour of text and indent text – basic text formatting.
You can also change text formatting by using the Font and Paragraph tools on the Home Ribbon. The
Font Tools will only affect the text that is selected. Paragraph formatting, however, will change the
whole current paragraph or paragraphs that may be selected.
There is also a special tool called the Format Painter . This tool will pick up all of your
formatting options and store them and then allow you to paste the formatting to the next selection
of text.
EXERCISE 3
Using the formatting tools that you have just learnt, create a Menu for the Chisbourne Seafood and
Grill. Use appropriate headings and formatting for the different sections of fine food offerings.
GETTING HELP
Microsoft Office has extensive help available. Help can be accessed from within any application by
clicking the question mark at the top right hand corner .