call girls in Kamla Market (DELHI) 🔝 >༒9953330565🔝 genuine Escort Service 🔝✔️✔️
The terrible things allegory
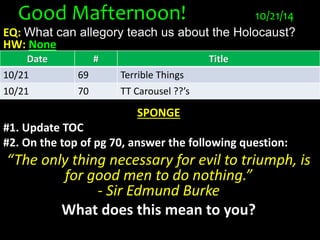
1. Good Mafternoon! 10/21/14
EQ: What can allegory teach us about the Holocaust?
HW: None
Date # Title
10/21 69 Terrible Things
10/21 70 TT Carousel ??’s
SPONGE
#1. Update TOC
#2. On the top of pg 70, answer the following question:
“The only thing necessary for evil to triumph, is
for good men to do nothing.”
- Sir Edmund Burke
What does this mean to you?
2. Read: Terrible Things
• What is an Allegory?
–a story, poem, or picture that can be
interpreted to reveal a hidden
meaning, typically a moral or political
one.
• Follow along as we listen to the
allegory terrible things
3. Terrible Things: Carousel
• Each group has a large whiteboard and a marker
• DO NOT TRADE MARKERS
• Take your marker with you to each station
• Choose to answer ONE question at your station
• You will answers as a group- a different person
writing at each station
• You will have 3 minutes per station
4. Top Ten List
• Create a Top Ten list, of what you think the
most important concepts/ideas/facts were
from last week.
• In your own words, no need for complete
sentences.
• 5 minutes
6. The clearing in the woods
was home to the small
forest creatures. The
birds and squirrels shared
the trees. The rabbits and
porcupines shared the
shade beneath the trees
and the frogs and fish
shared the cool brown
waters of the forest pond.
They were content. Until
the day the Terrible
Things came.
7. Little Rabbit saw
their terrible
shadows before he
saw them. They
stopped at the
edge of the
clearing and their
shadows blotted
out the sun.
8. “We have come for every
creature with feathers on its
back,” the Terrible Things
thundered.
“We don’t have feathers,” the
frogs said.
“Nor we,” said the squirrels.
“Nor we,” said the porcupines.
“Nor we,” said the rabbits.
The little fish leaped from the
water to show the shine of their
scales, but the birds twittered
nervously in the tops of the
trees. Feathers! They rose in the
air, then screamed away into the
blue sky.
9. But the Terrible
Things had
brought their
terrible nets and
they flung them
high and caught
the birds and
carried them away.
10. The other forest creatures talked
nervously among themselves.
“Those birds were always too
noisy,” Old Porcupine said.
“Good riddance, I say.”
“There’s more room in the trees
now,” the squirrels said.
“Why did the Terrible Things
want the birds?” Little Rabbit
asked. “What’s wrong with
feathers?”
“We mustn’t ask,” Big Rabbit
said. “The Terrible Things don’t
need a reason. Just be glad it
wasn’t us they wanted.”
11.
12. Little Rabbit heard the thump of
their terrible feet before they came
into sight.
“We have come for every bushy-tailed
creature who lives in the
clearing,” the Terrible Things
thundered.
“We have no tails,” the frogs said.
“Nor do we. Not real tails,” the
porcupines said.
The little fish leaped from the
water to show the smooth shine of
their finned tails and the rabbit
turned their rumps so the Terrible
Things could see for themselves.
“Our tails are round and furry,”
they said. “By no means are they
bushy.”
13. The squirrels chittered their
fear and ran high into the
treetops. But the Terrible
Things swung their terrible
nets higher than the
squirrels could run and
wider than the squirrels
could leap and they caught
them all and carried them
away.
14. “Those squirrels were greedy,”
Big Rabbit said. “Always storing
away things for themselves.
Never sharing.”
“But why did the Terrible Things
take them away?” Little Rabbit
asked. “Do the Terrible Things
want the clearing for
themselves?”
“No. They have their own place,”
Big Rabbit said. “But the
Terrible Things don’t need a
reason. Just mind your own
business, Little Rabbit. We don’t
want them to get mad at us.”
15.
16. Now there were no
birds to sing or
squirrels to chitter
in the trees. But
life in the clearing
went on almost as
before. Until the
day the Terrible
Things came
again.
17. Little Rabbit heard the rumble of
their terrible voices.
“We have come for every creature
that swims,” the Terrible Things
thundered.
“Oh, we cant swim,” the rabbits
said quickly.
“And we cant swim,” the
porcupines said.
The frogs dived deep in the forest
pool and ripples spiraled like
corkscrews on the dark, brown
water. The little fish darted this
way and that in streaks of silver.
But the Terrible Things threw their
terrible nets down into the depths
and they dragged up the dripping
frogs and the shimmering fish and
carried them away.
18. “Why did the Terrible Things
take them?” Little Rabbit asked.
“What did the frogs and the fish
do to them?”
“Probably nothing,” Big Rabbit
said. “But the Terrible Things
don’t need a reason. Many
creatures dislike frogs. Lumpy,
slimy things. And fish are so
cold and unfriendly. They never
talk to any of us.”
Now there were no birds to sing,
no squirrels to chitter, no frogs
to croak, no fish to play in the
forest pool. A nervous silence
filled the clearing. But life went
on as usual. Until the day the
Terrible Things came back.
19.
20. Little Rabbit smelled their
terrible smell before they
came into sight. The rabbits
and the porcupines looked
everywhere, except at each
other.
“We have come for every
creature that sprouts quills,”
the Terrible Things
thundered. The rabbits
stopped quivering. “We
don’t have quills,” they said,
fluffing their soft, white fur.
21. The porcupines bristled
with all their strength.
But the Terrible Things
covered them with the
curl of their terrible nets
and the porcupines hung
in them like flies in a
spider’s web as the
Terrible Things carried
them away.
22. “Those porcupines always were
bad tempered,” Big Rabbit and
shakily. “Prickly, stickly things!”
This time Little Rabbit didn’t ask
why. By now he knew that the
Terrible Things didn’t need a
reason. The smell still filled the
clearing, though the Terrible
Things had gone. “I liked it better
when there were all kinds of
creatures in our clearing,” he said.
“And I think we should move.
What if the Terrible Things come
back?” “Nonsense,” Big Rabbit
said. “Why should we move? This
has always been our home. And
the Terrible Things wont come
back. We are the White Rabbits.
It couldn’t happen to us.”
23.
24. As day followed
peaceful day Little
Rabbit thought
Big Rabbit must
be right. Until the
day the Terrible
Things came back.
25. Little Rabbit saw
the terrible gleam
of their terrible
eyes through the
forest darkness.
And he smelled
again the terrible
smell.
26. “We have come for
any creature that is
white,” the Terrible
Things thundered.
“There are no white
creatures here but
us,” Big Rabbit said.
“We have come for
you,” the Terrible
Things said.
27. The rabbits
scampered in every
direction. “Help!”
they screamed.
“Somebody help!”
But there was no one
left to help. And the
big, circling nets
dropped over them
and the Terrible
Things carried them
away.
28. All but Little Rabbit,
who was little enough
to hide in a pile of
rocks by the pond
and smart enough to
stay so still that the
Terrible Things
thought he was a rock
himself.
29. When they had all
gone Little Rabbit
crept into the middle
of the empty clearing.
I should have tried to
help the other
rabbits, he thought.
If only we creatures
had stuck together, it
could have been
different.
30. Sadly, Little
Rabbit left the
clearing. He’d go
tell other forest
creatures about
the Terrible
Things. He hoped
someone would
listen.
31.
32. First They Came for the Jews
by the Rev. Martin Niemöller
First they came for the Jews,
and I did not speak out because I was not a Jew.
Then they came for the Communists,
and I did not speak out because I was not a Communist.
Then they came for the trade unionists,
and I did not speak out because I was not a trade unionist.
Then they came for me,
and there was no one left to speak out for me.
Picture background with textured caption
(Intermediate)
To reproduce the textured shape effects on this slide, do the following:
On the Home tab, in the Slides group, click Layout, and then click Blank.
Also on the Home tab, in the Drawing group, click Shapes, and then under Rectangles click Rectangle.
On the slide, drag to draw a rectangle.
Select the rectangle. Under Drawing Tools, on the Format tab, in the Size group, enter 5” into the Height box and 4” into the Width box.
Also on the Format tab, in the Shape Styles group, click the Format Shape dialog box launcher. In the Format Shape dialog box, click Fill in the left pane, in the Fill pane, click Picture or texture fill, and then do the following:
Click the button next to Textures and then click and then click Pink Tissue Paper (fourth row).
In the Transparency box, enter 20%.
Also in the Format Picture dialog box, click Line Color in the left pane, and in the Line Color pane select No line.
Also in the Format Picture dialog box, click Picture Color in the left pane, and in the Picture Color pane, under Recolor, click the button next to Presets, and then click Orange, Accent color 6 Dark (second row).
Also in the Format Picture dialog box, click Glow and Soft Edges in the left pane, and then in the Glow and Soft Edges pane, do the following:
Under Glow, click the button next to Presets, and then click No Glow.
Under Soft Edges, in the Size box enter 5 pt.
On the Home tab, in the Drawing group, click Shapes, and then under Rectangles click Rectangle.
On the slide, drag to draw a rectangle.
Select the second rectangle. Under Drawing Tools, on the Format tab, in the Shape Styles group, click Shape Fill, point to Gradient, and click More Gradients. In the Format Shape dialog box, click Fill in the left pane, in the Fill pane, select Gradient fill, and then do the following:
In the Type list, select Linear.
In the Angle box, enter 90°.
Under Gradient stops, click Add gradient stops or Remove gradient stops until two stops appear in the slider.
Also under Gradient stops, customize the gradient stops as follows:
Select the first stop in the slider, and then do the following:
In the Position box, enter 0%.
Click the button next to Color, and then under Theme Colors click Black, Text 1 (first row).
In the Transparency box, enter 100%.
Select the last stop in the slider, and then do the following:
In the Position box, enter 100%.
Click the button next to Color, and then under Theme Colors click Black, Text 1 (first row).
In the Transparency box, enter 50%.
Also in the Format Picture dialog box, click Glow and Soft Edges in the left pane, and then in the Glow and Soft Edges pane, under Soft Edges, in the Size box enter 5 pt.
Also in the Format Picture dialog box, click Size in the left pane, in the Size pane, under Size and rotate, enter 5” into the Height box and 4” into the Width box.
Press and hold CTRL, and then select both rectangles. On the Home tab, in the Drawing group, click Arrange, point to Align, and then do the following:
Click Align Selected Objects.
Click Align Center.
Click Align Middle.
To reproduce the clip art effects on this slide, do the following:
On the Insert tab, in the Images group, click Clip Art. In the Clip Art pane, do the following:
In the Search for box, enter 00322861.wmf.
In the Results should be list, select All media file types.
Select Include Office.com content.
Click Go.
Double-click the thumbnail of the clip art to insert it onto the slide.
Select the clip art. Under Picture Tools, on the Format tab, in the Size group, enter 0.56” into the Height box and 2” into the Width box.
Also on the Format tab, in the Arrange group, click Group, and then click Ungroup to convert the clip art to a Microsoft Office drawing object.
On the Home tab, in the Edit group, click Select, and then click Selection Pane. In the Selection and Visibility pane, select Autoshape and press DELETE.
Select the ungrouped clip art. Under Drawing Tools, on the Format tab, in the Shape Styles group, click the Format Object dialog box launcher. In the Format Shape dialog box, click Fill in the left pane, in the Fill pane click Solid fill, and then under Fill Color, do the following:
in the Color box, enter Black, Text 1.
In the Transparency box, enter 80%.
Position the ungrouped clip art over the bottom half of the transparent rectangle.
Select the ungrouped clip art. On the Home tab, in the Clipboard group, click the arrow to the right of Copy, and then click Duplicate.
Select the second ungrouped clip art. On the Home tab, in the Drawing group, click Arrange, point to Rotate, and then click More Rotation Options. In the Format Shape dialog box, click Size in the left pane, in the Size pane, under Size and rotate, in the Rotation box enter 180°.
Position the second ungrouped clip art over the top half of the transparent rectangle.
To reproduce the text effects on this slide, do the following:
On the Insert tab, in the Text group, click Text Box.
On the slide, drag to draw a text box.
Enter text in the text box, and then select the text. On the Home tab, in the Font group, select Constantia from the Font list, select 36 pt. from the Font Size list, and then select White, Background 1 from the Font Color list.
Also on the Home tab, in the Paragraph group, click Center.
Press and hold CTRL, and then select the textured rectangle, the transparent rectangle, both ungrouped clip art, and the text box. On the Home tab, in the Drawing group, click Arrange, point to Align, and then do the following:
Click Align Selected Objects.
Click Align Center.
Press and hold CTRL, and then select both rectangles and the text box. On the Home tab, in the Drawing group, click Arrange, point to Align, and then click Align Middle.
To reproduce the picture background on this slide, do the following:
On the Design tab, in the Background group, click Background Styles, and then click Format Background.
In the Format Background dialog box, click Fill in the left pane, in the Fill pane, click Picture or texture fill, and then under Insert from click File. In the Insert Picture dialog box, select a picture and then click Insert.