1. Test DHCP Failover on Window Server 2012
Part 1. Requirement
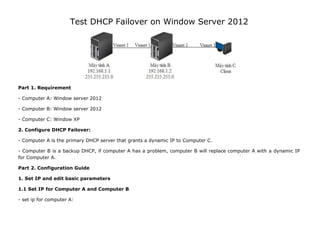
- Computer A: Window server 2012
- Computer B: Window server 2012
- Computer C: Window XP
2. Configure DHCP Failover:
- Computer A is the primary DHCP server that grants a dynamic IP to Computer C.
- Computer B is a backup DHCP, if computer A has a problem, computer B will replace computer A with a dynamic IP
for Computer A.
Part 2. Configuration Guide
1. Set IP and edit basic parameters
1.1 Set IP for Computer A and Computer B
- set ip for computer A:
2. - Set IP for Computer B:
1.2 Edit the basic parameters:
3. - Rename Computer A as MAYA, rename Computer B as MAYB:
- Check the SID numbers of Computer A and Computer B. Make sure the SID numbers of these two computers are
different. SID is a number generated when installing the Windows operating system on a computer, this number to
identify the computer itself. If the SID number is duplicated, the process of configuring DHCP Failover, joining
domain... will not be possible. During the implementation of LAB, computers are usually created by "clone" operation
on VMware software, when "clone", this SID number will be duplicated.
+ Check SID A:
4. + Check SID B:
+ The SID numbers on 2 computers A and B are different.
+ If the SID number is the same, it can be changed by the following way:
-->opent run and rung sysprep.
5. --> Run the software “sysprep” in the picture below:
6. -> Select "Generalize" as shown below, select OK, wait for the computer to restart, the SID number will be changed.
- Ping from Computer A to Computer B check:
2. Upgrade computer A to a domain controller
10. - Select “Active Directory Domain Services” from the image above, then select “Add Features” as shown below:
11. - Then Click “next” continuously and select “install to proceed with the installation”
12. - After installation is complete, select "Promote this server to a domain controller" to declare AD information:
+ Declare domain name: ngocdai.com
26. - Authorization screen, select Use the following user's credential. Use the user account that is logged on as Domain
Admin (NGOCDAIAdministrator). Continue to select “commit”.
30. - Back to Server Manager, go to Tools menu, select DHCP.
- The first step of configuration is to create a Scope to grant IPs to clients in the network. Right click on IPv4, select
New Scope...
- Welcome to the New Scope Wizard,click “Next”.
31.
32. - IP Address Range screen, specifying the appropriate IP range for the network:
33. - Add Exclusions and Delay dialog box, specify the IP range to exclude, in this example no IP range need to be
excluded.
34.
35. - Lease Duration screen, configure dynamic IP allocation time.
- On the Configure DHCP Options screen, select Yes, I want to configure these options now to declare more optional
parameters (Default Gateway, DNS ...)
37. - The IP configuration of the DNS server will grant:
38.
39. - WINS Server screen, declare the value of WINS Server, in this example the system does not have WINS Server.
40. - Select “Yes, I want to activate this scope now” to activate the scope to use.
- Select “finish” to finish creating scope.
41. 7. Configure Computer B to be a DHCP Server: Same as Computer A
The operations are similar to Computer A, except for the step of registering the DHCP service to Active Directory. Select
“Use alternate credentials” and select “Specify…”. Enter username as “Administrator” and Password as “P@ssWord123”.
Then select “commit”.
43. + Chọn DHCP:
7. Configure DHCP Failover:
- On Computer A, open the DHCP Console in the tools section (same as above) configure DHCP Failover. Right-click
IPv4, select Configure Failover…
45. - On the Specfiy the partner server to use for failover screen, in the Partner Server section, enter the IP Address of
Computer B (the standby DHCP server). Then, select “Next”.
- On the Create a new failover relationship screen, select the following parameters:
46. + Maximum Client Lead Time: this is the amount of time that a DHCP Server will wait for the other server to
contact to control the IP allocation. In this Lab, choose 1 hour.
+ Mode: the program provides 2 modes. The first is Load balance (2 servers will operate in parallel according to
the performance specified below, choose the operating efficiency for 2 servers is 50% for each server). In addition, you
can choose Hot Standby to designate one server to work, the other server only takes over when the main server fails.
In this Lab, choose Load balance and the performance for 2 servers is 50% for each server.
+ Shared Secret: Enter an arbitrary string to authenticate on the servers. In this Lab, enter the authentication
string as 123.
THEN CHOOSE “Next”.
47.
48. - Finally, after the configuration is complete, click the Finish button to complete.
- Check the configuration status is Successful, then Click “Close”.
49.
50. - The configuration result is that through Computer B, a scope appears:
- From the image above, right-click on Scope, select Properties.
51.
52. - Through the Failover tab, in the Partner Server section, you will see this is the Scope synchronized from Computer A.
8. Check configuration results
53. - Via Computer C log in to the domain with the username Administrator and password P@ssWord123.
- Switch Computer C to apply for a dynamic IP.
- Go to cmd and remove the old IP:
54. - Apply for new IP successfully:
- Computer C will get the IP issued by Computer A:
55. - Turn off Computer A and through Computer C remove the old IP, ask for a new IP. Computer C is still
given an IP because Computer B.