
Recommended
More Related Content
Similar to How to add client computer into a domain using dhcp
Similar to How to add client computer into a domain using dhcp (20)
Recently uploaded
Recently uploaded (20)
How to add client computer into a domain using dhcp
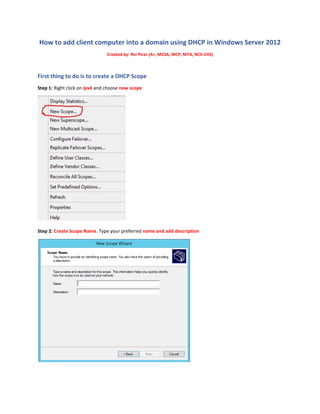
- 1. How to add client computer into a domain using DHCP in Windows Server 2012 Created by: Rei Picar (A+, MCSA, MCP, MTA, NCII-CHS) First thing to do is to create a DHCP Scope Step 1: Right click on ipv4 and choose new scope Step 2: Create Scope Name. Type your preferred name and add description
- 2. Step 3: Type the IP range for the scope you created. Note: you should only edit the last set of start and end address for this will work. Never change the 1st to 3rd set Ex: 192.168.10.20-50 Step 4: Add exclusion and delay if there’s a device that you want to exclude from getting DHCP server address.
- 3. Step 5: Lease Duration. This will specify how long a client can use IP from the DHCP server. It is set by default to 8 days Step 6: Choose Yes, I want to configure these options now
- 4. Step 7: Router (Default Gateway) In this section, just enter the default gateway of the server. Click Add once you’re done You can get it by typing IPCONFIG in CMD
- 5. Step 8: For the client computer would connect to the Active Directory Domain, you need to enter the domain name you created and it should be resolvable Note: When you saw this error, it means the server address you entered is not valid or unable to resolve
- 6. Step 9: WINS is to convert NetBIOS computer names into IP address but since we used DNS, it is ok even we don’t use WINS Trivia: WINS is the old way to translate names to IP address Step 10: Choose Yes to activate the scope you created
- 7. Now you’re done in creating DHCP Scope! Second thing to do is to make sure that the client computer is in the address leases Step 1: In DHCP Manager, Click the name of your DHCP Server Step 2: Click IPV4 Step 3: Click Scope
- 8. Step 4: Click Address Leases Step 5: In Address Leases, the client computer that you need to join to Active Directory Domain should be there Once all the steps are completed, you can go to the client computer and join it to the Active Directory Domain you created Step 1: In client computer, press windows key + R and type sysdm.cpl (This will open System Properties)
- 9. Step 2: In System Properties, click change to add this computer to a domain Step 3: Go to Member of and choose domain. Type the Active Directory domain name you created
- 10. Step 4: Enter Admin Credential. This will not work w/o admin privilege Step 5: Restart and this should be done!
- 11. Things to check to make sure that this will work? To make sure that this will work, ping the active directory domain name that you created using CMD. Type ping + the domain name: ex ping picar.local Go to Forward Lookup Zones and look for the active directory domain name that you created. The client computer should be there. If not, you need to refresh the DHCP server Don’t enter anything in WINS as this will conflict in DNS