Soft Rope Shackle with Braided Polyester Cover
•
0 likes•154 views

1. Take 6 feet each of 1/8" dyneema core and 1/4" polyester cover. Remove the core from the polyester cover material. 2. Middle the core and cover together, marking the center of the core. Insert the cover into the core and exit after 3-4 inches. 3. Insert the core back into the cover and exit 1.5 inches down. Cross stitch the crossover point.

Recommended
More Related Content
Similar to Soft Rope Shackle with Braided Polyester Cover
Similar to Soft Rope Shackle with Braided Polyester Cover (20)
Recently uploaded
Recently uploaded (20)
Soft Rope Shackle with Braided Polyester Cover
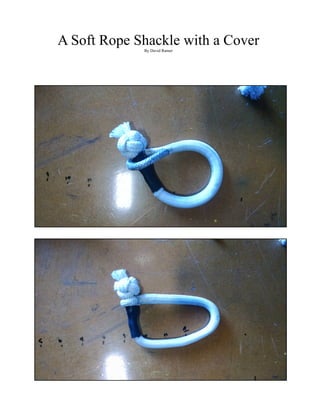
- 1. A Soft Rope Shackle with a CoverBy David Ramer
- 2. 1) Take approx. 6 ft. of 1/8” dyneema and 6 ft. of a polyester 1/4” cover. For this I removed the core out of some 1/4”polyester we had lying around the shop. 3) Mark the core in the center with a marker. 2) Middle both as shown. Make a mark here.
- 3. 5) Attach a fid to the end of the cover and insert the cover into the core at the mark. Exit the core after 3” or 4”. Pull some excess cover out the exit point. 6) Milk the core slack back down over the cover and mark the cover where it exits the core as shown. Exit core with cover. 3-4 inches of bury Enter with cover.
- 4. 6) Now insert the core into the cover and exit approx. 1 1/2 inches down the cover. Pull the cross over tight. Milk the core slack out towards the end of the cover. Mark the core where it exits the cover. Cross stitch the cross over. 1.5 inches Crossover Insert core into cover Exit cover with core.
- 5. 7) Pull back the core to expose the cover. Cut the cover at the mark and taper. 8) Milk the core back over the cover to bury.
- 6. 10) Now the core that exits the cover 1.5 inches down the standing part of the cover will now be named Core Strand A. Smooth cover slack from crossover to Core Strand A extraction point. Mark Core Strand A where it exits the cover. This is Mark 1. Core Strand A Mark 1 Core Strand B Crossover Another view
- 7. 11) Attach a fid to Core Strand B. Insert Core Strand B into Core Strand A at Mark 1 and exit Core Strand A at Approx. 1 ft. down the standing part of Core Strand A. Make a mark on the cover 12-13 inches from Mark 1. This is Mark 2. Core Strand A 12 inches Core Strand B Mark 1 Core Strand B Mark 2 12-13 inches Make Mark 2 on Cover
- 8. 12) Tape the end of Core Strand B slightly behind the end of Core Strand A as shown. Attach both cores to a fid. Insert the fid into the same hole in the cover where Core Strand A exits the cover. Exit the cover at Mark 2. Mark 2
- 9. 13) Alternate pulling on Core Strand A and B while milking the cover slack to get the all the remaining Core slack from both A and B inside the cover. This may take some effort to get all the slack smooth inside the cover. Bending the rope back and forth to loosen the fibers helps during the process. You may have to tie Core Strand B off to a strong point and milk and massage the cover and Core Strand A to bury them in the cover. Once the cores are inside the cover, hold the crossover and milk all the cover slack towards the standing part of the cover. 9) Tie both Core Strands A and B to a strong point and milk cover slack back towards the crossover to work the “eye” around until all exposed core disappears. Use a length of line or fid to help pull.
- 10. 15) Holding the closed “eye” between thumb and forefinger, milk cover slack towards the standing part and ascertain the position on the cover where Core Strand B exits core Strand A and mark the cover at this point. If the cover does go over or cover this junction attach a fid and re-insert both cores through the same hole in the cover they are currently exiting and exit just past (toward the standing part) the mark you made on the cover. Slide a 1” or so length of heat shrink tubing over the cover. 17) Next, milk cover slack back to expose the both cores. Ensure all slack is milked out of Core Strand A. Attach a fid to Core Strand B and insert the fid directly through Core Strand A just past the point where Core Strand B exits Core Strand A. Core Strand A Core Strand B
- 11. 19) The work should look something like this at this point. Cut the remaining cover off close to the last exit point and tape the core and cover of core together at the end. Cut and tape together 18) Measure the length of the remaining cover from the core exit to the bitter end. Mark the center of this measurement on the cover. Attach a fid to one of the core strands and insert back into the same hole they are currently exiting and exit at the center mark just made on the cover.
- 12. 16) Take the excess cover that was cut off and insert Core Strand B approx. 1” from one end and exit at the end of this section of cover. Milk the cover so the insertion point is butted up against the exit point on the S hackle. Cross stitch or whip this section together. Tape the end of this section of core and cover together.,
- 13. 17) Trim excess cover strands. Next tie a two strand diamond knot using both strands. 18) Work the knot up tight. Slide the heat shrink tubing over the whipping and heat.
- 14. 19) Trim off both strands. 19) This particular shackle broke at 3700 lbs. of tension. That is 900 lbs. more than the cores published tensile strength. The shackle almost always breaks at the knot.