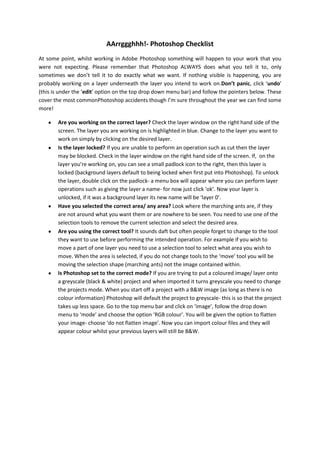
1. AArrggghhh!- Photoshop Checklist
At some point, whilst working in Adobe Photoshop something will happen to your work that you
were not expecting. Please remember that Photoshop ALWAYS does what you tell it to, only
sometimes we don’t tell it to do exactly what we want. If nothing visible is happening, you are
probably working on a layer underneath the layer you intend to work on.Don’t panic, click ‘undo’
(this is under the ‘edit’ option on the top drop down menu bar) and follow the pointers below. These
cover the most commonPhotoshop accidents though I’m sure throughout the year we can find some
more!
Are you working on the correct layer? Check the layer window on the right hand side of the
screen. The layer you are working on is highlighted in blue. Change to the layer you want to
work on simply by clicking on the desired layer.
Is the layer locked? If you are unable to perform an operation such as cut then the layer
may be blocked. Check in the layer window on the right hand side of the screen. If, on the
layer you’re working on, you can see a small padlock icon to the right, then this layer is
locked (background layers default to being locked when first put into Photoshop). To unlock
the layer, double click on the padlock- a menu box will appear where you can perform layer
operations such as giving the layer a name- for now just click ‘ok’. Now your layer is
unlocked, if it was a background layer its new name will be ‘layer 0’.
Have you selected the correct area/ any area? Look where the marching ants are, if they
are not around what you want them or are nowhere to be seen. You need to use one of the
selection tools to remove the current selection and select the desired area.
Are you using the correct tool? It sounds daft but often people forget to change to the tool
they want to use before performing the intended operation. For example if you wish to
move a part of one layer you need to use a selection tool to select what area you wish to
move. When the area is selected, if you do not change tools to the ‘move’ tool you will be
moving the selection shape (marching ants) not the image contained within.
Is Photoshop set to the correct mode? If you are trying to put a coloured image/ layer onto
a greyscale (black & white) project and when imported it turns greyscale you need to change
the projects mode. When you start off a project with a B&W image (as long as there is no
colour information) Photoshop will default the project to greyscale- this is so that the project
takes up less space. Go to the top menu bar and click on ‘image’, follow the drop down
menu to ‘mode’ and choose the option ‘RGB colour’. You will be given the option to flatten
your image- choose ‘do not flatten image’. Now you can import colour files and they will
appear colour whilst your previous layers will still be B&W.