SlideShare a Scribd company logo
1 of 13
© Canberra Institute of Technology
CRICOS No. 00001K | RTO Code 0101
Page 1 of 5 Date created: 30/06/2022
Date updated: 5/09/2022
Observation/Practical Assessment
Student Name: CIT Number:
Name of Subject:
Install exterior cladding
NAT ID:
CPCCCA3017
CRN:
Assessment Name
Practical 1
Install Horizontal Weatherboards
Assessment Date
Student Statement
This assignment is my own work, except where I have acknowledged the use of the works of other
people. I understand that by submitting this assessment electronically, I agree to this statement.
Student Signature: Date:
Privacy Disclaimer
CIT is collecting your personal information for assessment purposes. The information will only be used in
accordance with the CIT Privacy Policy.
Assessor Feedback
Attempt 1 ☐ Satisfactory ☐ Not Yet Satisfactory Date:
Attempt 2 ☐ Satisfactory ☐ Not Yet Satisfactory Date:
Assessor Signature: Date:
Note from Assessor (including any reasonable adjustment):
Student Information
Review the important information below in relation to this assessment task.
© Canberra Institute of Technology
CRICOS No. 00001K | RTO Code 0101
Page 2 of 5 Date created: 30/06/2022
Date updated: 5/09/2022
Instructions
Assessment Task:
In the workshop area, you will install cladding to the outside of the timber frame you constructed while
undertaking “Construct and erect wall frames- CPCCCA3004”. You are required to install weather boards
to comply with manufacturer’s specifications, the national construction code, and any relevant
Australian standards.
You must complete the following tasks.
 Install vapour barrier, weatherproofing and appropriate flashings.
 Set out a gauge rod with effective cover of each weatherboard and finished eave height and
transfer marks to the corner stops.
 Fit weatherboards to: -
a) An External corner
b) Around a window
c) Around a door
d) To corner stop/s
e) Install sarking and flashings
Time Allowed
4 hours
Assessment Conditions
 Assessment will be undertaken under teacher supervision.
 Assessment will be undertaken in a simulated work environment.
 You must ensure all PPE is worn correctly throughout the entire assessment. If you are not found
to be working safely at any time your assessment will be stopped and an unsatisfactory attempt
may be given.
Materials Provided by CIT
Assessment paper, all tools, equipment, and materials will be made available for each student.
Materials You Need
Full PPE, a nail belt, and a devise to access Ready skills
Attempts
You may have at least two (2) attempts for this assessment.
 If your first attempt is not successful, your teacher will discuss your results with you and will arrange
a second attempt.
 If your second attempt is not successful, you may be required to re-enrol in this unit.
Please refer to the CIT Assessment Policy if you have any questions.
© Canberra Institute of Technology
CRICOS No. 00001K | RTO Code 0101
Page 3 of 5 Date created: 30/06/2022
Date updated: 5/09/2022
Instructions
Using the weatherboard cut to simulate “Weathertex classic smooth 200” provided by your assessor.
 Read and interpret Plans, specifications manufacturer’s instructions and NCC requirements.
 Understand verbal instructions given in the class presentation prior to the practical assessment.
 Identify, select, and use the tools and equipment safely and correctly.
 Select the correct materials and calculate quantities required for the assessment.
 Follow any control measures identified in the toolbox talk and all assessor instructions, including
correctly use PPE during this task and site safety requirements prior to practical assessment.
 Check frame and pre sheet if required to provide an even surface across the studs and noggins.
 Install additional noggings and blocks where required to fix the weatherboard cladding.
 Install vapour barriers in correct position on frame.
 Install thermal break (cavity batten) as per manufacturer’s instructions.
 Install flashings, cavity closer and waterproofing to corners, window, and doors as required.
 Fit corner stops to external corners plumb and straight including ancillary items as per
manufacturer’s instructions.
 Set out the weatherboards using correct cover width on a gauge rod.
 Transfer set out from gauge to the corner stop so the bottom of the weather boards lines up with
boards on adjacent walls.
 Install “Weathertex “classic smooth 200 mm weatherboards (simulated OSB cut to same size) and fix
as per manufacturers specifications. Ensure butt joints and external corners of weatherboards meet
manufacturers specifications.
 After the assessor has inspected your work, check tools for faults and store them correctly.
 Clean up and recycle or dispose of waste as per legislative and workplace requirements.
© Canberra Institute of Technology
CRICOS No. 00001K | RTO Code 0101
Page 4 of 5 Date created: 30/06/2022
Date updated: 5/09/2022
Observation/Practical Checklist
You must successfully complete the following skills in the Observation/Practical checklist.
(Please Note: Students only need to complete grey boxes. Your teacher will provide you with feedback and
advise whether your work is Satisfactory or Not Yet Satisfactory).
Student Name: CIT Number:
During the task the following skills were demonstrated
satisfactorily:
Attempt 1 Attempt 2
Date
(Optional)
Date
(Optional)
Observation/Practical Checklist Items S* NYS* S* NYS*
T1, Plan and Prepare
The student completed the following:
☐ ☐ ☐ ☐
1. Read and interpret work instructions and plan
sequence of work. ☐ ☐ ☐ ☐
2. Ensure all work complies with the National
Construction Code (NCC), Australian Standards, work
health and safety (WHS) and environmental
requirements, manufacturers’ specifications,
workplace requirements, drawings, and specifications.
☐ ☐ ☐ ☐
3. Actively participate in the production of a Job Safety
Analysis (JSA) and Toolbox Talk, prior to commencing
work.
☐ ☐ ☐ ☐
4. Select tools and equipment, check for serviceability,
and report any faults. ☐ ☐ ☐ ☐
5. Select and use personal protective equipment (PPE)
for each part of the task. ☐ ☐ ☐ ☐
6. Inspect work site, locate services, assess hazards, and
apply risk controls, including required signage and
barricades.
☐ ☐ ☐ ☐
7. Select materials required for task, calculate quantities,
handle safely, and prepare and position ready for use. ☐ ☐ ☐ ☐
T2, Prepare exterior wall frames for cladding
8. Checked frames are true and plumb prior to cladding
installation. ☐ ☐ ☐ ☐
9. Checked frames and trim or pack studs to provide and
even surface across studs and noggins.
(INUSTRY LANGUAGE: Pre sheeted the wall ready for
cladding installation.)
☐ ☐ ☐ ☐
© Canberra Institute of Technology
CRICOS No. 00001K | RTO Code 0101
Page 5 of 5 Date created: 30/06/2022
Date updated: 5/09/2022
10. Prepared frame to manufacturers installation
instructions. ☐ ☐ ☐ ☐
T3, Fix thermal and moisture management.
11. Cut and fit weatherproofing, vapour barrier and
flashing to correct position as per manufacturer’s
instructions and NCC requirements.
☐ ☐ ☐ ☐
12. Identified from manufacturers installation instructions
any ancillary products required then cut and fix
weatherboards correctly using the effective cover and
gauge rod to determine the correct level set out. Then
fixed the boards to product instructions.
☐ ☐ ☐ ☐
T4, Set-out cut and fix horizontal weatherboards
13. Determine effective cover or overlap for cladding from
recommended lap, type and profile of board and
height of wall.
☐ ☐ ☐ ☐
14. Produce set-out rod or jig.
☐ ☐ ☐ ☐
15. Mark location of each profile on the building paper or
corner stop to determine height of each row of profile. ☐ ☐ ☐ ☐
16. Cut cladding to fit length of wall faces or to join on
intermediate studs. ☐ ☐ ☐ ☐
17. Join butt joints of cladding at center of studs with joint
flush to face and line. ☐ ☐ ☐ ☐
18. Join manufactured boards using manufacturers’
specification/method. ☐ ☐ ☐ ☐
19. Fix and finish external corners to manufacturers’
specification/method. ☐ ☐ ☐ ☐
T5, Clean Up
20. Cleaned up, meeting all legislative and workplace
requirements for safety, waste disposal and materials
handling.
☐ ☐ ☐ ☐
21. Checked maintain and store tools and equipment and
report any faults. ☐ ☐ ☐ ☐
*S – Satisfactory, NYS – Not Yet Satisfactory
1.9 Cavity System
CAVITY
CONSTRUCTION
DETAILS AT
weathertex.com.au
To provide the best protection for your wall against moisture and mould related problems Weathertex highly recommends the use of a
cavity fixing system. Fixing over the Weathertex cavity system provides the best defence for your internal lining, frame, insulation and
cladding against sick home syndrome. A cavity system creates a space within the wall that allows airflow to remove any moisture that
accumulates in this space either from wind driven rain or condensation.
1.9.1 PREPARATION
Minimum requirements for fasteners must be followed when installing the Weathertex Cavity System. See the Fasteners Section when
selecting appropriate fasteners.
A suitable membrane must be installed between the timber frame and battens; see section on Wall Sarking Requirements. The membrane
can be secured by the timber battens as they are installed along a wall.
Care should be taken when installing bulk insulation to ensure the stud cavity is not over-filled. Over filling the stud cavity with bulk insulation
will impinge in the cavity created by the cavity battens and hence reduce its effectiveness, and may void warranty.
1.9.2 CAVITY BATTENS
Cavity battens provide the separation between the membrane on the wall frame and the cladding. Weathertex provides and recommends
the use of Weathertex Cavity Battens which are 1220 x 45 x 9.5mm. Check your local regulations and/or certifiers for recommended batten
thickness. If using battens other than Weathertex supplied cavity battens, fastener lengths should be increased to accommodate the batten
thickness.
Refer to Weathertex Cavity Fix Construction Details when installing Weathertex cavity battens. Cavity battens must be fastened to framework
at a minimum of 600mm centres. Butt-join the stud battens leaving a 5mm gap.
1.9.3 CAVITY CLOSER
To protect against vermin and other material entering the cavity, the base of the cavity must be sealed using the Weathertex Large or
Small Cavity Closer. Designed not to interrupt airflow in the cavity, a cavity closer must be installed at the base of the wall, above window
heads, inter-storey flashings and at other points where a cavity is created by the design. The bottom of the battens is inserted into the cavity
closer.
• Use 20mm Large Cavity Closer for: Classic weatherboards with 9.5mm cavity system
Fix the cavity closer to the base plate at 300mm centres along the closer with 30 x 2.8mm flat head galvanised nails. Butt-join the cavity
closers with a max 2mm gap and ensure they are fixed in a straight, level line. It is important that the openings in the cavity closer are kept
clear and unobstructed to allow free drainage and ventilation from the top to the bottom of the cavity.
Weathertex 16
1.9.4 INSTALLATION
Step 1:
Install suitable membrane (See
wall sarking requirements
section 1.5.7)
Step 2:
Install Cavity Closer
Step 3
Install 9.5 Weathertex cavity
battens on stud
Step 4
Install Weathertex as per
standard instructions
Ensure required
ground clearance is
maintained (Refer
to general
requirements
section 1.5.4)
9.5mm Cavity
Batten
Classic
9.5mm Cavity Batten
Classic
9.5mm Cavity
Batten Classic
Small Cavity
Closer
9.5mm Cavity
Batten Classic
Large Cavity
Closer
Weathertex 17
2.4 INSTALL: Classic
The following product specific product installation instructions are applicable for both direct fix (timber frame) and cavity fix (timber and
steel frame). Installation instructions in this section are to be used in conjunction with information and requirements given in previous
sections and the national and state building codes.
2.4.1 BASE OF THE WALL & FRAME PREPARATION
Check and straighten sub-structures as required. Establish ground clearance and weatherboard overhang requirements. For cavity
installation see cavity systems (section 1.10)/steel frames (section 1.9). For direct fix install wall sarking prior to installation, refer to AS
4200.2. Install appropriate flashing at the base of the frame to ensure separation of Weathertex from any concrete slabs.
2.4.2 CLASSIC WEATHERBOARDS INSTALLATION
Establish a horizontal datum around the perimeter of the building, measure
wall height from the datum to establish the number of weatherboard rows
required. Minimum overlap of 20mm for Classic and a minimum overlap of
25mm for Rusticated planks.
First Row: Fix a 35mm x 9.5mm strip of Weathertex weatherboard 5mm up from
datum. Level the bottom edge of the weatherboard to the datum line. Fasten
the bottom edge through the weathertex strip into the frame. Fit joiners as work
proceeds.
Successive Rows: Use the storey rod, lap gauge or joiner to position
weatherboards and maintain uniform rows. Check rows for level, a laps fasten
through weatherboards into stud . One fastener per stud located 12mm from
bottom edge and the ends of the board. Row heights around corners should be
checked as work progresses to prevent creep.
Please refer to construction details found on the Weathertex website for all
window, doors and penetrations.
Suitable membrane (Refer
to wall sarking
requirements section 1.5.7)
Fixing 12mm from
bottom edge
Min 20mm overlap
Classic and 25mm
Rusticated
Alcor flashing for
separation from
masonry
35mm strip of
Weathertex
Datum 5mm
Ground clearance
(Refer to general
requirements section 1.5.4)
2.4.3 SHINGLES PLUS INSTALLATION
Shingles are the only product in the Weathertex Natural range that
Weathertex permits painting. If you are painting the shingles you will need to
use a high quality tannin blocking exterior timber primer (water or solvent
based) to prime the shingles and any cut edges.
First Row: Set a horizontal datum line to align the first row. Allow a minimum
overlap of 40mm. Fix a 35mm x 9.5mm strip of Weathertex 25mm up from the
datum. Level the bottom edge of the board with the datum line. Fasten the
bottom edge through the Weathertex strip into the timber framing. Cut
Weathergroove joiner into 205mm joiners, fit these joiners as work proceeds.
Where weathertightness is required add a bead of suitable sealant in each
groove where the next row overlaps.
Suitable membrane (Refer
to wall sarking
requirements section 1.5.7)
Fixing 30mm from
bottom edge
40mm minimum
overlap
Suitable sealant in
groove
overlap
Successive Rows: Use the storey rod or lap gauge to position weatherboards
and maintain uniform rows. Check rows for level. At laps, fasten through both
Shingles into the stud. Use one fastener per stud, located at least 30mm from
bottom edges and 12mm from ends. Fasteners per fastening guide for classic
planks.
35mm strip of
Weathertex
Datum
25mm
Please refer to construction details found on the Weathertex website for all
window, doors and penetrations.
Weathertex 24
Ground clearance (Refer to general requirements section
1.5.4)
2.4.4 CONSTRUCTION DETAILS
Please refer to Weathertex Direct Fix Installation – Classic, Drgs. of 13.05.22 (18 pages), and Weathertex Cavity Installation – Classic, Drgs.
13.05.22 (18 pages) for details relevant to the Classic Weatherproofing Appraisal.
2.4.5 JOINING DETAILS
To accommodate movement, Weathertex’s joining methods have been designed to provide the correct spacing between adjoining
planks, and cover changes in dimensions of the product for specific wall lengths. Refer to length of wall requirements when choosing a
joining method. Any cut ends must be primed with a high quality tannin blocking exterior timber primer (water or solvent based).
2.4.5.1 JOINING: CLASSIC WEATHERBOARDS
Form joins between weatherboard ends using the relevant joiners for the selected profile - refer to the Accessories Section. Stagger
joins randomly or brick lay throughout the wall with joins being formed midway between the studs. When fitting the joiner, bring the
ends into moderate contact with the splayed edges or nibs within the joiner. Do not force ends tightly together. It is advisable to prepaint
plank ends when using Traditional Joiners to avoid white lines either side of the Accessory after possible contraction of construction
components in dry conditions. Simply cut joiners to fit at window heads, sills and eaves as required.
NOTES:
1. Avoid penetrating PC/ABS joiners with fixings during the installation process. This may cause the joiner to crack after the
installation. Where necessary predrill the fixing position through the joiner prior to fixing.
2. On the first row of Weathertex Rusticated remove leg gauge from the back of the joiner
3. Refer to length of wall requirements for continuous walls over 11m long.
Traditional Off
Stud joiner
Fastener 12mm up
from the bottom
edge
Weathertex 25

More Related Content

More from Canberra Institute of technology

Place and Fix Reinforcement Materials Intro (2023 Edit).pptx
Place and Fix Reinforcement Materials Intro (2023 Edit).pptxPlace and Fix Reinforcement Materials Intro (2023 Edit).pptx
Place and Fix Reinforcement Materials Intro (2023 Edit).pptxCanberra Institute of technology
 
Work Effectively and Sustainably_Student Practical Assessment.docx
Work Effectively and Sustainably_Student Practical Assessment.docxWork Effectively and Sustainably_Student Practical Assessment.docx
Work Effectively and Sustainably_Student Practical Assessment.docxCanberra Institute of technology
 
Hansens Lodge version 1.2 updated Layout for Ready skills updated on 171022.pdf
Hansens Lodge version 1.2 updated Layout for Ready skills updated on 171022.pdfHansens Lodge version 1.2 updated Layout for Ready skills updated on 171022.pdf
Hansens Lodge version 1.2 updated Layout for Ready skills updated on 171022.pdfCanberra Institute of technology
 

More from Canberra Institute of technology (20)

Place and Fix Reinforcement Materials Intro (2023 Edit).pptx
Place and Fix Reinforcement Materials Intro (2023 Edit).pptxPlace and Fix Reinforcement Materials Intro (2023 Edit).pptx
Place and Fix Reinforcement Materials Intro (2023 Edit).pptx
 
Demolition - 7 Process' of demolition Scenarios.pptx
Demolition - 7 Process' of demolition Scenarios.pptxDemolition - 7 Process' of demolition Scenarios.pptx
Demolition - 7 Process' of demolition Scenarios.pptx
 
Practical Assessment_ Repair wall and floor tiling.docx
Practical Assessment_ Repair wall and floor tiling.docxPractical Assessment_ Repair wall and floor tiling.docx
Practical Assessment_ Repair wall and floor tiling.docx
 
Hansens Lodge Take-off.pdf
Hansens Lodge Take-off.pdfHansens Lodge Take-off.pdf
Hansens Lodge Take-off.pdf
 
Small House Plans & Calculations.pdf
Small House Plans & Calculations.pdfSmall House Plans & Calculations.pdf
Small House Plans & Calculations.pdf
 
Deck and Screen plans & Calculations
Deck and Screen plans & CalculationsDeck and Screen plans & Calculations
Deck and Screen plans & Calculations
 
CIT Subject Guide EPT
CIT Subject Guide EPTCIT Subject Guide EPT
CIT Subject Guide EPT
 
Example Site Induction Map .pdf
Example Site Induction Map .pdfExample Site Induction Map .pdf
Example Site Induction Map .pdf
 
Hansens Lodge for Plan and Organise
Hansens Lodge for Plan and OrganiseHansens Lodge for Plan and Organise
Hansens Lodge for Plan and Organise
 
Work Effectively and Sustainably_Student Practical Assessment.docx
Work Effectively and Sustainably_Student Practical Assessment.docxWork Effectively and Sustainably_Student Practical Assessment.docx
Work Effectively and Sustainably_Student Practical Assessment.docx
 
Hansens Lodge version 1.2 updated Layout for Ready skills updated on 171022.pdf
Hansens Lodge version 1.2 updated Layout for Ready skills updated on 171022.pdfHansens Lodge version 1.2 updated Layout for Ready skills updated on 171022.pdf
Hansens Lodge version 1.2 updated Layout for Ready skills updated on 171022.pdf
 
Axon Cladding Installation Guide
Axon Cladding Installation GuideAxon Cladding Installation Guide
Axon Cladding Installation Guide
 
Woodhouse installation guide for cladding boards
Woodhouse installation guide for cladding boardsWoodhouse installation guide for cladding boards
Woodhouse installation guide for cladding boards
 
Optical Dumpy Enlarge staff reading.docx
Optical Dumpy Enlarge staff reading.docxOptical Dumpy Enlarge staff reading.docx
Optical Dumpy Enlarge staff reading.docx
 
Cladding introduction class presentation
Cladding introduction class presentationCladding introduction class presentation
Cladding introduction class presentation
 
Makita cold cut manual
Makita cold cut manualMakita cold cut manual
Makita cold cut manual
 
Small House Calculations
Small House CalculationsSmall House Calculations
Small House Calculations
 
3. Practical Assessment Skillion roof.docx
3. Practical Assessment Skillion roof.docx3. Practical Assessment Skillion roof.docx
3. Practical Assessment Skillion roof.docx
 
Practical assessment Pitched Roof.docx
Practical assessment Pitched Roof.docxPractical assessment Pitched Roof.docx
Practical assessment Pitched Roof.docx
 
Form Release Agent SDS
Form Release Agent SDSForm Release Agent SDS
Form Release Agent SDS
 

Recently uploaded

ECONOMIC CONTEXT - LONG FORM TV DRAMA - PPT
ECONOMIC CONTEXT - LONG FORM TV DRAMA - PPTECONOMIC CONTEXT - LONG FORM TV DRAMA - PPT
ECONOMIC CONTEXT - LONG FORM TV DRAMA - PPTiammrhaywood
 
Earth Day Presentation wow hello nice great
Earth Day Presentation wow hello nice greatEarth Day Presentation wow hello nice great
Earth Day Presentation wow hello nice greatYousafMalik24
 
Employee wellbeing at the workplace.pptx
Employee wellbeing at the workplace.pptxEmployee wellbeing at the workplace.pptx
Employee wellbeing at the workplace.pptxNirmalaLoungPoorunde1
 
Software Engineering Methodologies (overview)
Software Engineering Methodologies (overview)Software Engineering Methodologies (overview)
Software Engineering Methodologies (overview)eniolaolutunde
 
18-04-UA_REPORT_MEDIALITERAСY_INDEX-DM_23-1-final-eng.pdf
18-04-UA_REPORT_MEDIALITERAСY_INDEX-DM_23-1-final-eng.pdf18-04-UA_REPORT_MEDIALITERAСY_INDEX-DM_23-1-final-eng.pdf
18-04-UA_REPORT_MEDIALITERAСY_INDEX-DM_23-1-final-eng.pdfssuser54595a
 
How to Configure Email Server in Odoo 17
How to Configure Email Server in Odoo 17How to Configure Email Server in Odoo 17
How to Configure Email Server in Odoo 17Celine George
 
History Class XII Ch. 3 Kinship, Caste and Class (1).pptx
History Class XII Ch. 3 Kinship, Caste and Class (1).pptxHistory Class XII Ch. 3 Kinship, Caste and Class (1).pptx
History Class XII Ch. 3 Kinship, Caste and Class (1).pptxsocialsciencegdgrohi
 
How to Make a Pirate ship Primary Education.pptx
How to Make a Pirate ship Primary Education.pptxHow to Make a Pirate ship Primary Education.pptx
How to Make a Pirate ship Primary Education.pptxmanuelaromero2013
 
EPANDING THE CONTENT OF AN OUTLINE using notes.pptx
EPANDING THE CONTENT OF AN OUTLINE using notes.pptxEPANDING THE CONTENT OF AN OUTLINE using notes.pptx
EPANDING THE CONTENT OF AN OUTLINE using notes.pptxRaymartEstabillo3
 
Final demo Grade 9 for demo Plan dessert.pptx
Final demo Grade 9 for demo Plan dessert.pptxFinal demo Grade 9 for demo Plan dessert.pptx
Final demo Grade 9 for demo Plan dessert.pptxAvyJaneVismanos
 
Proudly South Africa powerpoint Thorisha.pptx
Proudly South Africa powerpoint Thorisha.pptxProudly South Africa powerpoint Thorisha.pptx
Proudly South Africa powerpoint Thorisha.pptxthorishapillay1
 
Incoming and Outgoing Shipments in 1 STEP Using Odoo 17
Incoming and Outgoing Shipments in 1 STEP Using Odoo 17Incoming and Outgoing Shipments in 1 STEP Using Odoo 17
Incoming and Outgoing Shipments in 1 STEP Using Odoo 17Celine George
 
Types of Journalistic Writing Grade 8.pptx
Types of Journalistic Writing Grade 8.pptxTypes of Journalistic Writing Grade 8.pptx
Types of Journalistic Writing Grade 8.pptxEyham Joco
 
MARGINALIZATION (Different learners in Marginalized Group
MARGINALIZATION (Different learners in Marginalized GroupMARGINALIZATION (Different learners in Marginalized Group
MARGINALIZATION (Different learners in Marginalized GroupJonathanParaisoCruz
 
POINT- BIOCHEMISTRY SEM 2 ENZYMES UNIT 5.pptx
POINT- BIOCHEMISTRY SEM 2 ENZYMES UNIT 5.pptxPOINT- BIOCHEMISTRY SEM 2 ENZYMES UNIT 5.pptx
POINT- BIOCHEMISTRY SEM 2 ENZYMES UNIT 5.pptxSayali Powar
 
Computed Fields and api Depends in the Odoo 17
Computed Fields and api Depends in the Odoo 17Computed Fields and api Depends in the Odoo 17
Computed Fields and api Depends in the Odoo 17Celine George
 
CARE OF CHILD IN INCUBATOR..........pptx
CARE OF CHILD IN INCUBATOR..........pptxCARE OF CHILD IN INCUBATOR..........pptx
CARE OF CHILD IN INCUBATOR..........pptxGaneshChakor2
 
KSHARA STURA .pptx---KSHARA KARMA THERAPY (CAUSTIC THERAPY)————IMP.OF KSHARA ...
KSHARA STURA .pptx---KSHARA KARMA THERAPY (CAUSTIC THERAPY)————IMP.OF KSHARA ...KSHARA STURA .pptx---KSHARA KARMA THERAPY (CAUSTIC THERAPY)————IMP.OF KSHARA ...
KSHARA STURA .pptx---KSHARA KARMA THERAPY (CAUSTIC THERAPY)————IMP.OF KSHARA ...M56BOOKSTORE PRODUCT/SERVICE
 
Crayon Activity Handout For the Crayon A
Crayon Activity Handout For the Crayon ACrayon Activity Handout For the Crayon A
Crayon Activity Handout For the Crayon AUnboundStockton
 
Presiding Officer Training module 2024 lok sabha elections
Presiding Officer Training module 2024 lok sabha electionsPresiding Officer Training module 2024 lok sabha elections
Presiding Officer Training module 2024 lok sabha electionsanshu789521
 

Recently uploaded (20)

ECONOMIC CONTEXT - LONG FORM TV DRAMA - PPT
ECONOMIC CONTEXT - LONG FORM TV DRAMA - PPTECONOMIC CONTEXT - LONG FORM TV DRAMA - PPT
ECONOMIC CONTEXT - LONG FORM TV DRAMA - PPT
 
Earth Day Presentation wow hello nice great
Earth Day Presentation wow hello nice greatEarth Day Presentation wow hello nice great
Earth Day Presentation wow hello nice great
 
Employee wellbeing at the workplace.pptx
Employee wellbeing at the workplace.pptxEmployee wellbeing at the workplace.pptx
Employee wellbeing at the workplace.pptx
 
Software Engineering Methodologies (overview)
Software Engineering Methodologies (overview)Software Engineering Methodologies (overview)
Software Engineering Methodologies (overview)
 
18-04-UA_REPORT_MEDIALITERAСY_INDEX-DM_23-1-final-eng.pdf
18-04-UA_REPORT_MEDIALITERAСY_INDEX-DM_23-1-final-eng.pdf18-04-UA_REPORT_MEDIALITERAСY_INDEX-DM_23-1-final-eng.pdf
18-04-UA_REPORT_MEDIALITERAСY_INDEX-DM_23-1-final-eng.pdf
 
How to Configure Email Server in Odoo 17
How to Configure Email Server in Odoo 17How to Configure Email Server in Odoo 17
How to Configure Email Server in Odoo 17
 
History Class XII Ch. 3 Kinship, Caste and Class (1).pptx
History Class XII Ch. 3 Kinship, Caste and Class (1).pptxHistory Class XII Ch. 3 Kinship, Caste and Class (1).pptx
History Class XII Ch. 3 Kinship, Caste and Class (1).pptx
 
How to Make a Pirate ship Primary Education.pptx
How to Make a Pirate ship Primary Education.pptxHow to Make a Pirate ship Primary Education.pptx
How to Make a Pirate ship Primary Education.pptx
 
EPANDING THE CONTENT OF AN OUTLINE using notes.pptx
EPANDING THE CONTENT OF AN OUTLINE using notes.pptxEPANDING THE CONTENT OF AN OUTLINE using notes.pptx
EPANDING THE CONTENT OF AN OUTLINE using notes.pptx
 
Final demo Grade 9 for demo Plan dessert.pptx
Final demo Grade 9 for demo Plan dessert.pptxFinal demo Grade 9 for demo Plan dessert.pptx
Final demo Grade 9 for demo Plan dessert.pptx
 
Proudly South Africa powerpoint Thorisha.pptx
Proudly South Africa powerpoint Thorisha.pptxProudly South Africa powerpoint Thorisha.pptx
Proudly South Africa powerpoint Thorisha.pptx
 
Incoming and Outgoing Shipments in 1 STEP Using Odoo 17
Incoming and Outgoing Shipments in 1 STEP Using Odoo 17Incoming and Outgoing Shipments in 1 STEP Using Odoo 17
Incoming and Outgoing Shipments in 1 STEP Using Odoo 17
 
Types of Journalistic Writing Grade 8.pptx
Types of Journalistic Writing Grade 8.pptxTypes of Journalistic Writing Grade 8.pptx
Types of Journalistic Writing Grade 8.pptx
 
MARGINALIZATION (Different learners in Marginalized Group
MARGINALIZATION (Different learners in Marginalized GroupMARGINALIZATION (Different learners in Marginalized Group
MARGINALIZATION (Different learners in Marginalized Group
 
POINT- BIOCHEMISTRY SEM 2 ENZYMES UNIT 5.pptx
POINT- BIOCHEMISTRY SEM 2 ENZYMES UNIT 5.pptxPOINT- BIOCHEMISTRY SEM 2 ENZYMES UNIT 5.pptx
POINT- BIOCHEMISTRY SEM 2 ENZYMES UNIT 5.pptx
 
Computed Fields and api Depends in the Odoo 17
Computed Fields and api Depends in the Odoo 17Computed Fields and api Depends in the Odoo 17
Computed Fields and api Depends in the Odoo 17
 
CARE OF CHILD IN INCUBATOR..........pptx
CARE OF CHILD IN INCUBATOR..........pptxCARE OF CHILD IN INCUBATOR..........pptx
CARE OF CHILD IN INCUBATOR..........pptx
 
KSHARA STURA .pptx---KSHARA KARMA THERAPY (CAUSTIC THERAPY)————IMP.OF KSHARA ...
KSHARA STURA .pptx---KSHARA KARMA THERAPY (CAUSTIC THERAPY)————IMP.OF KSHARA ...KSHARA STURA .pptx---KSHARA KARMA THERAPY (CAUSTIC THERAPY)————IMP.OF KSHARA ...
KSHARA STURA .pptx---KSHARA KARMA THERAPY (CAUSTIC THERAPY)————IMP.OF KSHARA ...
 
Crayon Activity Handout For the Crayon A
Crayon Activity Handout For the Crayon ACrayon Activity Handout For the Crayon A
Crayon Activity Handout For the Crayon A
 
Presiding Officer Training module 2024 lok sabha elections
Presiding Officer Training module 2024 lok sabha electionsPresiding Officer Training module 2024 lok sabha elections
Presiding Officer Training module 2024 lok sabha elections
 

Install Weatherboards Using Cavity System

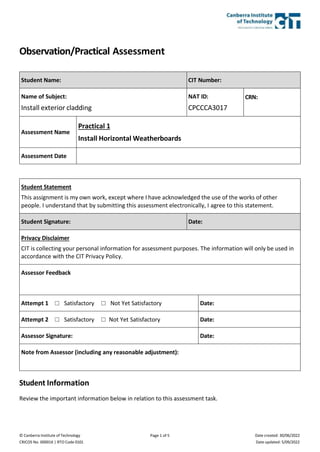
  • 1. © Canberra Institute of Technology CRICOS No. 00001K | RTO Code 0101 Page 1 of 5 Date created: 30/06/2022 Date updated: 5/09/2022 Observation/Practical Assessment Student Name: CIT Number: Name of Subject: Install exterior cladding NAT ID: CPCCCA3017 CRN: Assessment Name Practical 1 Install Horizontal Weatherboards Assessment Date Student Statement This assignment is my own work, except where I have acknowledged the use of the works of other people. I understand that by submitting this assessment electronically, I agree to this statement. Student Signature: Date: Privacy Disclaimer CIT is collecting your personal information for assessment purposes. The information will only be used in accordance with the CIT Privacy Policy. Assessor Feedback Attempt 1 ☐ Satisfactory ☐ Not Yet Satisfactory Date: Attempt 2 ☐ Satisfactory ☐ Not Yet Satisfactory Date: Assessor Signature: Date: Note from Assessor (including any reasonable adjustment): Student Information Review the important information below in relation to this assessment task.
  • 2. © Canberra Institute of Technology CRICOS No. 00001K | RTO Code 0101 Page 2 of 5 Date created: 30/06/2022 Date updated: 5/09/2022 Instructions Assessment Task: In the workshop area, you will install cladding to the outside of the timber frame you constructed while undertaking “Construct and erect wall frames- CPCCCA3004”. You are required to install weather boards to comply with manufacturer’s specifications, the national construction code, and any relevant Australian standards. You must complete the following tasks.  Install vapour barrier, weatherproofing and appropriate flashings.  Set out a gauge rod with effective cover of each weatherboard and finished eave height and transfer marks to the corner stops.  Fit weatherboards to: - a) An External corner b) Around a window c) Around a door d) To corner stop/s e) Install sarking and flashings Time Allowed 4 hours Assessment Conditions  Assessment will be undertaken under teacher supervision.  Assessment will be undertaken in a simulated work environment.  You must ensure all PPE is worn correctly throughout the entire assessment. If you are not found to be working safely at any time your assessment will be stopped and an unsatisfactory attempt may be given. Materials Provided by CIT Assessment paper, all tools, equipment, and materials will be made available for each student. Materials You Need Full PPE, a nail belt, and a devise to access Ready skills Attempts You may have at least two (2) attempts for this assessment.  If your first attempt is not successful, your teacher will discuss your results with you and will arrange a second attempt.  If your second attempt is not successful, you may be required to re-enrol in this unit. Please refer to the CIT Assessment Policy if you have any questions.
  • 3. © Canberra Institute of Technology CRICOS No. 00001K | RTO Code 0101 Page 3 of 5 Date created: 30/06/2022 Date updated: 5/09/2022 Instructions Using the weatherboard cut to simulate “Weathertex classic smooth 200” provided by your assessor.  Read and interpret Plans, specifications manufacturer’s instructions and NCC requirements.  Understand verbal instructions given in the class presentation prior to the practical assessment.  Identify, select, and use the tools and equipment safely and correctly.  Select the correct materials and calculate quantities required for the assessment.  Follow any control measures identified in the toolbox talk and all assessor instructions, including correctly use PPE during this task and site safety requirements prior to practical assessment.  Check frame and pre sheet if required to provide an even surface across the studs and noggins.  Install additional noggings and blocks where required to fix the weatherboard cladding.  Install vapour barriers in correct position on frame.  Install thermal break (cavity batten) as per manufacturer’s instructions.  Install flashings, cavity closer and waterproofing to corners, window, and doors as required.  Fit corner stops to external corners plumb and straight including ancillary items as per manufacturer’s instructions.  Set out the weatherboards using correct cover width on a gauge rod.  Transfer set out from gauge to the corner stop so the bottom of the weather boards lines up with boards on adjacent walls.  Install “Weathertex “classic smooth 200 mm weatherboards (simulated OSB cut to same size) and fix as per manufacturers specifications. Ensure butt joints and external corners of weatherboards meet manufacturers specifications.  After the assessor has inspected your work, check tools for faults and store them correctly.  Clean up and recycle or dispose of waste as per legislative and workplace requirements.
  • 4. © Canberra Institute of Technology CRICOS No. 00001K | RTO Code 0101 Page 4 of 5 Date created: 30/06/2022 Date updated: 5/09/2022 Observation/Practical Checklist You must successfully complete the following skills in the Observation/Practical checklist. (Please Note: Students only need to complete grey boxes. Your teacher will provide you with feedback and advise whether your work is Satisfactory or Not Yet Satisfactory). Student Name: CIT Number: During the task the following skills were demonstrated satisfactorily: Attempt 1 Attempt 2 Date (Optional) Date (Optional) Observation/Practical Checklist Items S* NYS* S* NYS* T1, Plan and Prepare The student completed the following: ☐ ☐ ☐ ☐ 1. Read and interpret work instructions and plan sequence of work. ☐ ☐ ☐ ☐ 2. Ensure all work complies with the National Construction Code (NCC), Australian Standards, work health and safety (WHS) and environmental requirements, manufacturers’ specifications, workplace requirements, drawings, and specifications. ☐ ☐ ☐ ☐ 3. Actively participate in the production of a Job Safety Analysis (JSA) and Toolbox Talk, prior to commencing work. ☐ ☐ ☐ ☐ 4. Select tools and equipment, check for serviceability, and report any faults. ☐ ☐ ☐ ☐ 5. Select and use personal protective equipment (PPE) for each part of the task. ☐ ☐ ☐ ☐ 6. Inspect work site, locate services, assess hazards, and apply risk controls, including required signage and barricades. ☐ ☐ ☐ ☐ 7. Select materials required for task, calculate quantities, handle safely, and prepare and position ready for use. ☐ ☐ ☐ ☐ T2, Prepare exterior wall frames for cladding 8. Checked frames are true and plumb prior to cladding installation. ☐ ☐ ☐ ☐ 9. Checked frames and trim or pack studs to provide and even surface across studs and noggins. (INUSTRY LANGUAGE: Pre sheeted the wall ready for cladding installation.) ☐ ☐ ☐ ☐
  • 5. © Canberra Institute of Technology CRICOS No. 00001K | RTO Code 0101 Page 5 of 5 Date created: 30/06/2022 Date updated: 5/09/2022 10. Prepared frame to manufacturers installation instructions. ☐ ☐ ☐ ☐ T3, Fix thermal and moisture management. 11. Cut and fit weatherproofing, vapour barrier and flashing to correct position as per manufacturer’s instructions and NCC requirements. ☐ ☐ ☐ ☐ 12. Identified from manufacturers installation instructions any ancillary products required then cut and fix weatherboards correctly using the effective cover and gauge rod to determine the correct level set out. Then fixed the boards to product instructions. ☐ ☐ ☐ ☐ T4, Set-out cut and fix horizontal weatherboards 13. Determine effective cover or overlap for cladding from recommended lap, type and profile of board and height of wall. ☐ ☐ ☐ ☐ 14. Produce set-out rod or jig. ☐ ☐ ☐ ☐ 15. Mark location of each profile on the building paper or corner stop to determine height of each row of profile. ☐ ☐ ☐ ☐ 16. Cut cladding to fit length of wall faces or to join on intermediate studs. ☐ ☐ ☐ ☐ 17. Join butt joints of cladding at center of studs with joint flush to face and line. ☐ ☐ ☐ ☐ 18. Join manufactured boards using manufacturers’ specification/method. ☐ ☐ ☐ ☐ 19. Fix and finish external corners to manufacturers’ specification/method. ☐ ☐ ☐ ☐ T5, Clean Up 20. Cleaned up, meeting all legislative and workplace requirements for safety, waste disposal and materials handling. ☐ ☐ ☐ ☐ 21. Checked maintain and store tools and equipment and report any faults. ☐ ☐ ☐ ☐ *S – Satisfactory, NYS – Not Yet Satisfactory
  • 6. 1.9 Cavity System CAVITY CONSTRUCTION DETAILS AT weathertex.com.au To provide the best protection for your wall against moisture and mould related problems Weathertex highly recommends the use of a cavity fixing system. Fixing over the Weathertex cavity system provides the best defence for your internal lining, frame, insulation and cladding against sick home syndrome. A cavity system creates a space within the wall that allows airflow to remove any moisture that accumulates in this space either from wind driven rain or condensation. 1.9.1 PREPARATION Minimum requirements for fasteners must be followed when installing the Weathertex Cavity System. See the Fasteners Section when selecting appropriate fasteners. A suitable membrane must be installed between the timber frame and battens; see section on Wall Sarking Requirements. The membrane can be secured by the timber battens as they are installed along a wall. Care should be taken when installing bulk insulation to ensure the stud cavity is not over-filled. Over filling the stud cavity with bulk insulation will impinge in the cavity created by the cavity battens and hence reduce its effectiveness, and may void warranty. 1.9.2 CAVITY BATTENS Cavity battens provide the separation between the membrane on the wall frame and the cladding. Weathertex provides and recommends the use of Weathertex Cavity Battens which are 1220 x 45 x 9.5mm. Check your local regulations and/or certifiers for recommended batten thickness. If using battens other than Weathertex supplied cavity battens, fastener lengths should be increased to accommodate the batten thickness. Refer to Weathertex Cavity Fix Construction Details when installing Weathertex cavity battens. Cavity battens must be fastened to framework at a minimum of 600mm centres. Butt-join the stud battens leaving a 5mm gap. 1.9.3 CAVITY CLOSER To protect against vermin and other material entering the cavity, the base of the cavity must be sealed using the Weathertex Large or Small Cavity Closer. Designed not to interrupt airflow in the cavity, a cavity closer must be installed at the base of the wall, above window heads, inter-storey flashings and at other points where a cavity is created by the design. The bottom of the battens is inserted into the cavity closer. • Use 20mm Large Cavity Closer for: Classic weatherboards with 9.5mm cavity system Fix the cavity closer to the base plate at 300mm centres along the closer with 30 x 2.8mm flat head galvanised nails. Butt-join the cavity closers with a max 2mm gap and ensure they are fixed in a straight, level line. It is important that the openings in the cavity closer are kept clear and unobstructed to allow free drainage and ventilation from the top to the bottom of the cavity.
  • 8. 1.9.4 INSTALLATION Step 1: Install suitable membrane (See wall sarking requirements section 1.5.7) Step 2: Install Cavity Closer Step 3 Install 9.5 Weathertex cavity battens on stud Step 4 Install Weathertex as per standard instructions Ensure required ground clearance is maintained (Refer to general requirements section 1.5.4) 9.5mm Cavity Batten Classic 9.5mm Cavity Batten Classic
  • 9. 9.5mm Cavity Batten Classic Small Cavity Closer 9.5mm Cavity Batten Classic Large Cavity Closer Weathertex 17
  • 10. 2.4 INSTALL: Classic The following product specific product installation instructions are applicable for both direct fix (timber frame) and cavity fix (timber and steel frame). Installation instructions in this section are to be used in conjunction with information and requirements given in previous sections and the national and state building codes. 2.4.1 BASE OF THE WALL & FRAME PREPARATION Check and straighten sub-structures as required. Establish ground clearance and weatherboard overhang requirements. For cavity installation see cavity systems (section 1.10)/steel frames (section 1.9). For direct fix install wall sarking prior to installation, refer to AS 4200.2. Install appropriate flashing at the base of the frame to ensure separation of Weathertex from any concrete slabs. 2.4.2 CLASSIC WEATHERBOARDS INSTALLATION Establish a horizontal datum around the perimeter of the building, measure wall height from the datum to establish the number of weatherboard rows required. Minimum overlap of 20mm for Classic and a minimum overlap of 25mm for Rusticated planks. First Row: Fix a 35mm x 9.5mm strip of Weathertex weatherboard 5mm up from datum. Level the bottom edge of the weatherboard to the datum line. Fasten the bottom edge through the weathertex strip into the frame. Fit joiners as work proceeds. Successive Rows: Use the storey rod, lap gauge or joiner to position weatherboards and maintain uniform rows. Check rows for level, a laps fasten through weatherboards into stud . One fastener per stud located 12mm from bottom edge and the ends of the board. Row heights around corners should be checked as work progresses to prevent creep. Please refer to construction details found on the Weathertex website for all window, doors and penetrations. Suitable membrane (Refer to wall sarking requirements section 1.5.7) Fixing 12mm from bottom edge Min 20mm overlap Classic and 25mm Rusticated Alcor flashing for separation from masonry 35mm strip of Weathertex Datum 5mm Ground clearance (Refer to general requirements section 1.5.4) 2.4.3 SHINGLES PLUS INSTALLATION Shingles are the only product in the Weathertex Natural range that Weathertex permits painting. If you are painting the shingles you will need to use a high quality tannin blocking exterior timber primer (water or solvent based) to prime the shingles and any cut edges. First Row: Set a horizontal datum line to align the first row. Allow a minimum overlap of 40mm. Fix a 35mm x 9.5mm strip of Weathertex 25mm up from the datum. Level the bottom edge of the board with the datum line. Fasten the bottom edge through the Weathertex strip into the timber framing. Cut Weathergroove joiner into 205mm joiners, fit these joiners as work proceeds. Where weathertightness is required add a bead of suitable sealant in each groove where the next row overlaps. Suitable membrane (Refer to wall sarking requirements section 1.5.7) Fixing 30mm from bottom edge 40mm minimum overlap Suitable sealant in groove overlap Successive Rows: Use the storey rod or lap gauge to position weatherboards and maintain uniform rows. Check rows for level. At laps, fasten through both Shingles into the stud. Use one fastener per stud, located at least 30mm from bottom edges and 12mm from ends. Fasteners per fastening guide for classic planks. 35mm strip of Weathertex Datum 25mm Please refer to construction details found on the Weathertex website for all window, doors and penetrations. Weathertex 24
  • 11. Ground clearance (Refer to general requirements section 1.5.4)
  • 12. 2.4.4 CONSTRUCTION DETAILS Please refer to Weathertex Direct Fix Installation – Classic, Drgs. of 13.05.22 (18 pages), and Weathertex Cavity Installation – Classic, Drgs. 13.05.22 (18 pages) for details relevant to the Classic Weatherproofing Appraisal. 2.4.5 JOINING DETAILS To accommodate movement, Weathertex’s joining methods have been designed to provide the correct spacing between adjoining planks, and cover changes in dimensions of the product for specific wall lengths. Refer to length of wall requirements when choosing a joining method. Any cut ends must be primed with a high quality tannin blocking exterior timber primer (water or solvent based). 2.4.5.1 JOINING: CLASSIC WEATHERBOARDS Form joins between weatherboard ends using the relevant joiners for the selected profile - refer to the Accessories Section. Stagger joins randomly or brick lay throughout the wall with joins being formed midway between the studs. When fitting the joiner, bring the ends into moderate contact with the splayed edges or nibs within the joiner. Do not force ends tightly together. It is advisable to prepaint plank ends when using Traditional Joiners to avoid white lines either side of the Accessory after possible contraction of construction components in dry conditions. Simply cut joiners to fit at window heads, sills and eaves as required. NOTES: 1. Avoid penetrating PC/ABS joiners with fixings during the installation process. This may cause the joiner to crack after the installation. Where necessary predrill the fixing position through the joiner prior to fixing. 2. On the first row of Weathertex Rusticated remove leg gauge from the back of the joiner 3. Refer to length of wall requirements for continuous walls over 11m long. Traditional Off Stud joiner Fastener 12mm up from the bottom edge