
Recommended
More Related Content
What's hot
What's hot (20)
Similar to starting system.pdf
Similar to starting system.pdf (20)
Recently uploaded
Recently uploaded (20)
starting system.pdf
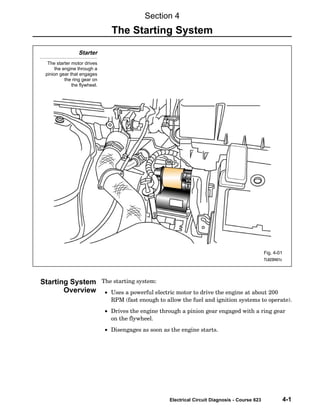
- 1. Electrical Circuit Diagnosis - Course 623 4-1 Starter The starter motor drives the engine through a pinion gear that engages the ring gear on the flywheel. Fig. 4-01 TL623f401c The starting system: • Uses a powerful electric motor to drive the engine at about 200 RPM (fast enough to allow the fuel and ignition systems to operate). • Drives the engine through a pinion gear engaged with a ring gear on the flywheel. • Disengages as soon as the engine starts. Section 4 The Starting System Starting System Overview
- 2. Section 4 4-2 TOYOTA Technical Training These components make up a typical Toyota starting system: • Starter motor • Magnetic switch • Over−running clutch • Ignition switch contacts • Park/neutral position (A/T) or clutch start (M/T) switch • Clutch start cancel switch (on some models) • Starter relay Starting System Components - Automatic Transmission These components make up a typical starting system (automatic transmission). Fig. 4-02 TL623f402 Starting System Components
- 3. The Starting System Electrical Circuit Diagnosis - Course 623 4-3 Starting System Components - Manual Transmission These components make up a typical starting system (manual transmission). Fig. 4-03 L623f403
- 4. Section 4 4-4 TOYOTA Technical Training Toyota vehicles are fitted with one of two types of starter motors: • Gear reduction • Planetary Reduction Segment (PS) Starter Motor The Gear Reduction starter is a compact lightweight unit with high torque capacity. Fig. 4-04 TL623f404c The gear−reduction starter motor contains the components shown. This type of starter has a compact, high−speed motor and a set of reduction gears. While the motor is smaller and weighs less than conventional starting motors, it operates at higher speed. The reduction gears transfer this torque to the pinion gear at 1/4 to 1/3 the motor speed. The pinion gear still rotate faster than the gear on a conventional starter and with much greater torque (cranking power). Starter Motor Gear-Reduction Starter Motor
- 5. The Starting System Electrical Circuit Diagnosis - Course 623 4-5 The reduction gear is mounted on the same shaft as the pinion gear. Unlike the conventional starter, the magnetic switch plunger acts directly on the pinion gear (not through a drive lever) to push the gear into mesh with the ring gear. This type of starter was first used on the 1973 Corona MKII with the 4M, six cylinder engine. It is now used on most 1975 and newer Toyotas. Ratings range from 0.8 KW on most Tercels and some older models to as high as 2.5 KW on the diesel Corolla, Camry and Truck. The cold−weather package calls for a 1.4 KW or 1.6 KW starter, while a 1.0 KW starter is common on other models. The gear−reduction starter is the replacement starter for most conventional starters.
- 6. Section 4 4-6 TOYOTA Technical Training Older Toyota models use conventional type starters. This type of starter drives the pinion gear directly. The pinion gear turns at the same speed as the motor shaft. These starters are heavier and draw more current than gear reduction and PS type starters. Conventional Starter Motor Conventional type starter motors drive the pinion directly. Fig. 4-05 TL623f405c NOTE
- 7. The Starting System Electrical Circuit Diagnosis - Course 623 4-7 Both conventional and gear reduction starter motors are fitted with a one−way, over−running clutch. The clutch prevents damage to the starter when the engine starts. Clutch Operation: 1. During engine start, the starter pinion gear drives the engine’s flywheel ring gear. 2. Once the engine fires, the ring gear almost instantly begins to turn faster than the starter pinion gear. Over−speeding would damage the starter motor if it were not immediately disengaged from the pinion gear. 3. The clutch uses its wedged rollers and springs to disengage the pinion shaft from the clutch housing (which turns with the motor armature). This happens any time the pinion shaft tries to turn faster than the clutch housing. Engine Starting The clutch housing, armature, and pinion gear turn together. Fig. 4-06 TL623f406c Over-running Clutch
- 8. Section 4 4-8 TOYOTA Technical Training Engine Started The clutch housing and the armature turn together. The ring gear drives the pinion gear. The pinion shaft is disengaged from the clutch housing. Fig. 4-07 TL623f407c
- 9. The Starting System Electrical Circuit Diagnosis - Course 623 4-9 The ignition switch incorporates contacts to provide B+ to the starter. The relay energizes the starter magnetic switch when the driver turns the ignition key to the START position. Ignition Switch With key to START position, B+ is applied to the starter motor. Fig. 4-08 TL623f408c Ignition Switch
- 10. Section 4 4-10 TOYOTA Technical Training The park/neutral position switch prevents operation of the starter motor unless the shift lever is in Park or Neutral. The switch contacts are in series with the starter control circuit. Park/Neutral Position Switch The switch closes with the shift lever in Park or Neutral. Fig. 4-09 TL623f409c Park/Neutral Position Switch (Automatic Transmission)
- 11. The Starting System Electrical Circuit Diagnosis - Course 623 4-11 For manual transmissions the clutch start switch performs the same function as the park/neutral position switch. The clutch start switch opens the starter control circuit unless the clutch is engaged. Clutch Start Switch The switch closes when the clutch pedal is depressed. Fig. 4-10 L623f410c Clutch Start Switch (Manual Transmission)
- 12. Section 4 4-12 TOYOTA Technical Training In some off−road situations it is advantageous to start a manual transmission vehicle while in gear with the clutch engaged. The driver− controlled safety cancel switch allows the driver to bypass the clutch start switch to make this possible. This feature is only available on some models. Clutch Start Cancel Switch This switch lets the driver bypass the clutch start switch for off-road operations. Fig. 4-11 T623f411c Clutch Start Cancel Switch
- 13. The Starting System Electrical Circuit Diagnosis - Course 623 4-13 Ignition switch in ST: 1. Current travels from the battery through terminal 50" to the hold−in and pull−in coils. Then, from the pull−in coil, current continues through terminal C" to the field coils and armature coils. 2. Voltage drop across the pull−in coil limits the current to the motor, keeping its speed low. 3. The magnetic switch plunger pushes the pinion gear to mesh with the ring gear. 4. The screw spline and low motor speed help the gears mesh smoothly. Ignition Switch to ST The plunger pulls the drive lever, which moves the pinion gear into engagement with the ring gear. Fig. 4-12 TL623f412 Gear-Reduction Starter Operation
- 14. Section 4 4-14 TOYOTA Technical Training Pinion and ring gears engaged: 1. When the gears are meshed, the contact plate on the plunger turns on the main switch by closing the connection between terminals 30" and C." 2. More current goes to the motor and it rotates with greater torque. 3. Current no longer flows in the pull−in coil. The plunger is held in position by the hold−in coil’s magnetic force. Ignition Switch to ST (Cont.) The magnetic switch closes and current from the battery drives the starter motor directly. Fig. 4-13 TL623f413c
- 15. The Starting System Electrical Circuit Diagnosis - Course 623 4-15 Ignition switch in ON: 1. Current no longer present at terminal 50," but the main switch remains closed to allow current from terminal C" through the pull−in coil to the hold−in coil. 2. The magnetic fields in the two coils cancel each other, and the plunger is pulled back by the return spring. 3. The high current to the motor is cut off and the pinion gear disengages from the ring gear. 4. The armature has less inertia than the one in a conventional starter. Friction stops it, so a brake is not needed. Ignition Switch ON Current through the starter relay stops. The pinion gear disengages from the ring gear, and the magnetic switch opens. Fig. 4-14 TL623f414c
- 16. Section 4 4-16 TOYOTA Technical Training All current Toyota models are fitted with Planetary Reduction Segment Conductor (PS) starters. Planetary reduction allows the starter motor to operate at a higher speed than a conventional starter. • The reduction gear set reduces the pinion gear speed compared to motor shaft speed. • Higher motor speed yields greater torque. Segment conductor type starters incorporate several design improvements: • More compact • Lighter weight • Greater output torque PS Starter - Overview All current Toyota models are fitted with PS starters. Fig. 4-15 TL623f415 PS Starter Motors - Overview
- 17. The Starting System Electrical Circuit Diagnosis - Course 623 4-17 PS Starter - Construction Coil wires in PS type starters are square in cross-section for more compact winding and greater output torque. Fig. 4-16 TL623f416
- 18. Section 4 4-18 TOYOTA Technical Training Armature coil wires − The coil wires in a PS starter armature are square in cross−section. • More compact winding than round cross−section wires • Greater output torque Surface commutator − The square shape of the armature conductors allow the surface of the armature to act as a commutator. Field coils − Conventional starters use field coils. PS type starters use two types of permanent magnets instead: • Main magnets • Inter−polar magnets The two types of magnets are arranged alternately inside the yoke. • Work together to increase magnetic flux • Allows shorter yoke PS Starter - Construction PS type starters use two types of permanent magnets instead of field coils. Fig. 4-17 TL623f415 PS Starter Motors - Construction
- 19. The Starting System Electrical Circuit Diagnosis - Course 623 4-19 With the ignition switch placed to the START position: 1. Current travels from the battery through the closed ST1 contacts of the Ignition Switch and the Park/Neutral Switch, through the coil of the ST Relay to ground. 2. The ST Relay contacts close. Ignition Switch to START Current from Ignition Switch ST1 contacts energizes the ST Relay coil. Fig. 4-18 TL623f418c PS Starter Operation
- 20. Section 4 4-20 TOYOTA Technical Training 3. Voltage is applied through the closed ST2 contacts of the Ignition Switch to the hold−in and pull−in coils of the starter. ST Relay Energized With the ST Relay contacts closed, voltage is applied to the pull-in and hold-in coils. Fig. 4-19 TL623f419c
- 21. The Starting System Electrical Circuit Diagnosis - Course 623 4-21 4. Current is present through the hold−in coil to ground and through the pull−in coil and the starter motor windings (armature and field coil) to ground. The voltage drop created by the pull−in coil limits current through the motor windings and keeps motor speed low. Starter Motor Turns at Slow Speed Current is present through the hold-in coil to ground and through the pull-in coil and the motor windings to ground. Fig. 4-20 TL623f420c
- 22. Section 4 4-22 TOYOTA Technical Training 5. With the pull−in coil energized, the solenoid plunger moves the drive lever to mesh the pinion gear with the ring gear. 6. As the pinion gear engages the ring gear, the magnetic switch closes. 7. With the magnetic switch closed, voltage is applied directly from the battery, through the magnetic switch, to the pull−in coil. With voltage applied to both sides of the pull−in coil, no current is present through the coil. The magnetic switch is now held closed by the magnetic force of the still energized hold−in coil. Current Through Pull-in Coil Stops With battery voltage applied to both sides of the pull-in coil, no current is present in the coil. Fig. 4-21 TL623f421c
- 23. The Starting System Electrical Circuit Diagnosis - Course 623 4-23 8. Current is now present from the battery through the closed magnetic switch and the motor windings to ground. This current is not limited through the pull−in coil, so it drives the starter motor with greater speed and torque. Pinion Gear Engaged with Ring Gear With the magnetic switch closed, there is a large current directly from the battery through the motor windings. Fig. 4-22 TL623f422c
- 24. Section 4 4-24 TOYOTA Technical Training With the engine started and the ignition switch released to the ON or IG position: 9. Voltage is removed from the Ignition Switch ST contacts and applied to the IG contacts. Current is present through the IG2 contacts to the ignition coils. 10. Current through the hold−in coil stops. Current through the pull−in coil reverses direction and flows from the battery through the magnetic switch, the pull−in coil, and the hold−in coil to ground. With current through the pull−in coil reversed, the magnetic fields of the pull−in and hold−in coils cancel each other out. 11. A return spring pulls the solenoid plunger and the drive lever back. The pinion gear disengages from the ring gear. The magnetic switch opens. Current through the starter motor stops. Ignition Switch Released to ON Current is no longer present and the pinion gear releases from the ring gear. Fig. 4-23 TL623f423c
- 25. The Starting System Electrical Circuit Diagnosis - Course 623 4-25 The starting system requires little maintenance. The battery should be fully charged and connections kept clean and tight. Diagnosis of starting system problems is usually straightforward. Problems may be electrical or mechanical. The Starting System Troubleshooting chart lists the most common starting system problems, the possible causes, and recommended actions to resolve the problem. Begin with a thorough visual inspection. If this fails to turn up the possible cause, several tests are available to help you find the problem: • Starter motor current draw test • Voltage drop tests • Operational and continuity tests • Starter motor bench tests Diagnosis and Testing
- 26. Section 4 4-26 TOYOTA Technical Training ÁÁÁÁÁÁÁÁ ÁÁÁÁÁÁÁÁ Symptoms ÁÁÁÁÁÁÁÁÁÁÁÁÁ ÁÁÁÁÁÁÁÁÁÁÁÁÁ Possible Cause ÁÁÁÁÁÁÁÁÁÁÁÁ ÁÁÁÁÁÁÁÁÁÁÁÁ Action Needed ÁÁÁÁÁÁÁÁ ÁÁÁÁÁÁÁÁ ÁÁÁÁÁÁÁÁ Engine will not crank ÁÁÁÁÁÁÁÁÁÁÁÁÁ ÁÁÁÁÁÁÁÁÁÁÁÁÁ ÁÁÁÁÁÁÁÁÁÁÁÁÁ • Dead battery ÁÁÁÁÁÁÁÁÁÁÁÁ ÁÁÁÁÁÁÁÁÁÁÁÁ ÁÁÁÁÁÁÁÁÁÁÁÁ • Check battery state-of-charge ÁÁÁÁÁÁÁÁ ÁÁÁÁÁÁÁÁ ÁÁÁÁÁÁÁÁÁÁÁÁÁ ÁÁÁÁÁÁÁÁÁÁÁÁÁ • Melted fusible link ÁÁÁÁÁÁÁÁÁÁÁÁ ÁÁÁÁÁÁÁÁÁÁÁÁ • Replace fusible link ÁÁÁÁÁÁÁÁ ÁÁÁÁÁÁÁÁ ÁÁÁÁÁÁÁÁÁÁÁÁÁ ÁÁÁÁÁÁÁÁÁÁÁÁÁ • Loose connections ÁÁÁÁÁÁÁÁÁÁÁÁ ÁÁÁÁÁÁÁÁÁÁÁÁ • Clean and tighten connections ÁÁÁÁÁÁÁÁ ÁÁÁÁÁÁÁÁ ÁÁÁÁÁÁÁÁ ÁÁÁÁÁÁÁÁÁÁÁÁÁ ÁÁÁÁÁÁÁÁÁÁÁÁÁ ÁÁÁÁÁÁÁÁÁÁÁÁÁ • Faulty ignition switch ÁÁÁÁÁÁÁÁÁÁÁÁ ÁÁÁÁÁÁÁÁÁÁÁÁ ÁÁÁÁÁÁÁÁÁÁÁÁ • Check switch operation; replace as needed ÁÁÁÁÁÁÁÁ ÁÁÁÁÁÁÁÁ ÁÁÁÁÁÁÁÁ ÁÁÁÁÁÁÁÁ ÁÁÁÁÁÁÁÁÁÁÁÁÁ ÁÁÁÁÁÁÁÁÁÁÁÁÁ ÁÁÁÁÁÁÁÁÁÁÁÁÁ ÁÁÁÁÁÁÁÁÁÁÁÁÁ • Faulty magnetic switch, relay, neutral start switch or clutch switch ÁÁÁÁÁÁÁÁÁÁÁÁ ÁÁÁÁÁÁÁÁÁÁÁÁ ÁÁÁÁÁÁÁÁÁÁÁÁ ÁÁÁÁÁÁÁÁÁÁÁÁ • Check and replace as needed ÁÁÁÁÁÁÁÁ ÁÁÁÁÁÁÁÁ ÁÁÁÁÁÁÁÁ ÁÁÁÁÁÁÁÁÁÁÁÁÁ ÁÁÁÁÁÁÁÁÁÁÁÁÁ ÁÁÁÁÁÁÁÁÁÁÁÁÁ • Mechanical problem in engine ÁÁÁÁÁÁÁÁÁÁÁÁ ÁÁÁÁÁÁÁÁÁÁÁÁ ÁÁÁÁÁÁÁÁÁÁÁÁ • Check engine ÁÁÁÁÁÁÁÁ ÁÁÁÁÁÁÁÁ ÁÁÁÁÁÁÁÁÁÁÁÁÁ ÁÁÁÁÁÁÁÁÁÁÁÁÁ • Problem in theft deterrent system ÁÁÁÁÁÁÁÁÁÁÁÁ ÁÁÁÁÁÁÁÁÁÁÁÁ • Check repair manual for system tests ÁÁÁÁÁÁÁÁ ÁÁÁÁÁÁÁÁ ÁÁÁÁÁÁÁÁ Engine cranks too slowly to start ÁÁÁÁÁÁÁÁÁÁÁÁÁ ÁÁÁÁÁÁÁÁÁÁÁÁÁ ÁÁÁÁÁÁÁÁÁÁÁÁÁ • Weak battery ÁÁÁÁÁÁÁÁÁÁÁÁ ÁÁÁÁÁÁÁÁÁÁÁÁ ÁÁÁÁÁÁÁÁÁÁÁÁ • Check battery and charge as needed ÁÁÁÁÁÁÁÁ ÁÁÁÁÁÁÁÁ ÁÁÁÁÁÁÁÁÁÁÁÁÁ ÁÁÁÁÁÁÁÁÁÁÁÁÁ • Loose or corroded connections ÁÁÁÁÁÁÁÁÁÁÁÁ ÁÁÁÁÁÁÁÁÁÁÁÁ • Clean and tighten connections ÁÁÁÁÁÁÁÁ ÁÁÁÁÁÁÁÁ ÁÁÁÁÁÁÁÁ ÁÁÁÁÁÁÁÁÁÁÁÁÁ ÁÁÁÁÁÁÁÁÁÁÁÁÁ ÁÁÁÁÁÁÁÁÁÁÁÁÁ • Faulty starter motor ÁÁÁÁÁÁÁÁÁÁÁÁ ÁÁÁÁÁÁÁÁÁÁÁÁ ÁÁÁÁÁÁÁÁÁÁÁÁ • Test starter ÁÁÁÁÁÁÁÁ ÁÁÁÁÁÁÁÁ ÁÁÁÁÁÁÁÁÁÁÁÁÁ ÁÁÁÁÁÁÁÁÁÁÁÁÁ • Mechanical problems with ÁÁÁÁÁÁÁÁÁÁÁÁ ÁÁÁÁÁÁÁÁÁÁÁÁ • Check engine and starter; replace ÁÁÁÁÁÁÁÁ ÁÁÁÁÁÁÁÁ ÁÁÁÁÁÁÁÁÁÁÁÁÁ ÁÁÁÁÁÁÁÁÁÁÁÁÁ • Mechanical roblems with engine or starter ÁÁÁÁÁÁÁÁÁÁÁÁ ÁÁÁÁÁÁÁÁÁÁÁÁ • Check engine and starter re lace worn out parts ÁÁÁÁÁÁÁÁ ÁÁÁÁÁÁÁÁ Starter keeps running ÁÁÁÁÁÁÁÁÁÁÁÁÁ ÁÁÁÁÁÁÁÁÁÁÁÁÁ • Damaged pinion or ring gear ÁÁÁÁÁÁÁÁÁÁÁÁ ÁÁÁÁÁÁÁÁÁÁÁÁ • Check gears for wear or damage ÁÁÁÁÁÁÁÁ ÁÁÁÁÁÁÁÁ ÁÁÁÁÁÁÁÁÁÁÁÁÁ ÁÁÁÁÁÁÁÁÁÁÁÁÁ • Faulty plunger in magnetic switch ÁÁÁÁÁÁÁÁÁÁÁÁ ÁÁÁÁÁÁÁÁÁÁÁÁ • Test starter pull-in and hold-in coils ÁÁÁÁÁÁÁÁ ÁÁÁÁÁÁÁÁ ÁÁÁÁÁÁÁÁ ÁÁÁÁÁÁÁÁÁÁÁÁÁ ÁÁÁÁÁÁÁÁÁÁÁÁÁ ÁÁÁÁÁÁÁÁÁÁÁÁÁ • Faulty ignition switch or control circuit ÁÁÁÁÁÁÁÁÁÁÁÁ ÁÁÁÁÁÁÁÁÁÁÁÁ ÁÁÁÁÁÁÁÁÁÁÁÁ • Check switch and circuit components ÁÁÁÁÁÁÁÁ ÁÁÁÁÁÁÁÁ ÁÁÁÁÁÁÁÁ ÁÁÁÁÁÁÁÁÁÁÁÁÁ ÁÁÁÁÁÁÁÁÁÁÁÁÁ ÁÁÁÁÁÁÁÁÁÁÁÁÁ • Binding ignition key ÁÁÁÁÁÁÁÁÁÁÁÁ ÁÁÁÁÁÁÁÁÁÁÁÁ ÁÁÁÁÁÁÁÁÁÁÁÁ • Check key for damage ÁÁÁÁÁÁÁÁ ÁÁÁÁÁÁÁÁ ÁÁÁÁÁÁÁÁ Starter spins, but engine will not crank ÁÁÁÁÁÁÁÁÁÁÁÁÁ ÁÁÁÁÁÁÁÁÁÁÁÁÁ ÁÁÁÁÁÁÁÁÁÁÁÁÁ • Faulty over-running clutch ÁÁÁÁÁÁÁÁÁÁÁÁ ÁÁÁÁÁÁÁÁÁÁÁÁ ÁÁÁÁÁÁÁÁÁÁÁÁ • Check over-running clutch for proper operation ÁÁÁÁÁÁÁÁ ÁÁÁÁÁÁÁÁ ÁÁÁÁÁÁÁÁ ÁÁÁÁÁÁÁÁÁÁÁÁÁ ÁÁÁÁÁÁÁÁÁÁÁÁÁ ÁÁÁÁÁÁÁÁÁÁÁÁÁ • Damaged or worn pinion gear or ring gear ÁÁÁÁÁÁÁÁÁÁÁÁ ÁÁÁÁÁÁÁÁÁÁÁÁ ÁÁÁÁÁÁÁÁÁÁÁÁ • Check gears for damage and wear; replace as needed ÁÁÁÁÁÁÁÁ ÁÁÁÁÁÁÁÁ Starter does not /di ÁÁÁÁÁÁÁÁÁÁÁÁÁ ÁÁÁÁÁÁÁÁÁÁÁÁÁ • Faulty magnetic switch ÁÁÁÁÁÁÁÁÁÁÁÁ ÁÁÁÁÁÁÁÁÁÁÁÁ • Check and replace as needed ÁÁÁÁÁÁÁÁ ÁÁÁÁÁÁÁÁ ÁÁÁÁÁÁÁÁ engage/disengage properly ÁÁÁÁÁÁÁÁÁÁÁÁÁ ÁÁÁÁÁÁÁÁÁÁÁÁÁ ÁÁÁÁÁÁÁÁÁÁÁÁÁ • Damaged or worn pinion gear or ring gear ÁÁÁÁÁÁÁÁÁÁÁÁ ÁÁÁÁÁÁÁÁÁÁÁÁ ÁÁÁÁÁÁÁÁÁÁÁÁ • Check gears for damage and wear; replace as needed Starting System Troubleshooting Chart Fig. 4-24
- 27. The Starting System Electrical Circuit Diagnosis - Course 623 4-27 A visual inspection of the starting system can save you time and effort by uncovering obvious or simple and easy−to−fix problems. The battery contains sulfuric acid. Take precautions to avoid possible injury or damage to the vehicle: • Remove rings, wristwatch, and any other jewelry that might contact the battery terminals before beginning the inspection. • Wear safety glasses and protective clothing to protect yourself from acid. Include these components in your inspection: • Battery • Starter • Ignition switch • Park/neutral position or clutch start switch BATTERY • Inspect the battery for external damage to the case or the cables, corroded terminals, and loose connections. • Check the battery’s state of charge (with a battery analyzer). Charge if needed. • Check the electrolyte level and top up with distilled water if needed. STARTER • Inspect the starter motor for external damage to the case or wiring (including the magnetic switch circuit), corroded terminals, and loose connections. • Check for loose mounting hardware. Tighten as needed. IGNITION SWITCH • Inspect the ignition switch for loose connections and damaged wiring. • Confirm that the battery voltage is available at the magnetic switch with the ignition switch set to ON and the clutch switch or neutral start switch closed. • If you suspect the ignition switch is faulty, use a remote starter switch and jumper wire to confirm starter operation. PARK/NEUTRAL/CLUTCH START SWITCHES • Conduct a voltage drop test to verify proper operation (max. 0.1 V drop). Visual Inspection Fig. 4-25 Visual Inspection CAUTION
- 28. Section 4 4-28 TOYOTA Technical Training The starter current draw test effectively checks the entire starting system. A special purpose tester connects to the battery to measure starting current and cranking voltage. The procedure shown here applies to the VAT−40 and (with some minor differences) the VAT−60: 1. Make a visual inspection of the battery, electrolyte, and battery cables. 2. Turn off all electrical accessories and lights in the vehicle; set ignition switch to OFF. 3. Disable the fuel or ignition system so the engine will not start while cranking. 4. Connect the tester in this sequence: • Red lead to positive battery terminal • Black lead to negative battery terminal • Current probe on negative battery cable Starter Current Draw Test Battery tester is connected to measure starter current and battery voltage. Fig. 4-26 TL623f426c Current Draw Test
- 29. The Starting System Electrical Circuit Diagnosis - Course 623 4-29 5. For VAT−40, set the voltage selector to EXT 18 (volts). 6. Without cranking the engine, note the voltage reading. • Should be at least 12.6 volts. • Recharge the battery before proceeding if the voltage is below 12.6 volts. 7. Crank the engine and observe the voltage and current readings. • Engine speed should be between 200 and 250 RPM while cranking. • Voltage should be at or above the service specification (refer to appropriate repair manual). • Current should be at or below the service specification (refer to appropriate repair manual). 8. When finished with the test, disconnect the tester leads and enable the fuel or ignition system (replace fuse or relay). For most Toyota vehicles, you can pull the Electronic Fuel Injection (EFI) fuse or relay to prevent engine start. You can connect the current probe to either battery cable. Just be sure to orient the arrow on the probe correctly. The arrow should point down (away from the battery) for the positive cable; the arrow should point up (toward the battery) for the negative cable. Do not crank the engine longer than 10 seconds at a time. NOTE
- 30. Section 4 4-30 TOYOTA Technical Training Voltage drop tests can find excessive resistance in the starting system. High resistance in the starter motor circuit can … • Reduce starter motor current. • Cause slow cranking. Preparation − Prepare the tester and the vehicle with these steps: 1. Disable the fuel or ignition system so engine will not start while cranking. For most Toyota vehicles, you can pull the Electronic Fuel Injection (EFI) fuse or relay to prevent engine start. 2. Set the VAT−40 volt selector to EXT 3 (volts). If you’re using a DMM, select a low voltage scale. 3. Connect the VAT−40 or DMM leads to measure voltage drop for the following: • Battery + post to + cable • Battery + cable to starter • Starter relay to starter (PS type) • Starter case to − cable • − cable to − battery post • Terminal C to terminal 30 (gear reduction type) • Battery to terminal 50 (gear reduction type) Normal voltage drops in the starting system are in the range of 0.2 volts to 0.5 volts. Voltage Drop Tests - Starter Motor Circuit NOTE
- 31. The Starting System Electrical Circuit Diagnosis - Course 623 4-31 This test measures the voltage drop across the positive battery post to the cable and the connections at the battery and the starter. Do not crank the engine longer than 10 seconds at a time. Crank the engine and note the voltage reading: • 0.5 volts or less is acceptable resistance • More than 0.5 volts is excessive resistance If you find excessive resistance, perform these steps: • Isolate the cause • Repair the fault • Re−test the voltage drop Excessive resistance could be caused by any of these: • Damaged battery cable • Poor connection at battery or starter terminal • Defective magnetic switch Battery Positive Cable Meter connected to measure voltage drop. Fig. 4-27 TL623f427c Battery Positive Cable NOTE
- 32. Section 4 4-32 TOYOTA Technical Training This test measures the voltage drop across the negative battery cable, the connections at the battery and the starter, and the connection to ground through the starter motor case: 1. Connect the tester or meter leads: • Red lead to the starter motor housing • Black lead to negative terminal of the battery Do not crank the engine longer than 10 seconds at a time. 2. Crank the engine and note the voltage reading: • 0.2 volts or less is acceptable resistance • More than 0.2 volts is excessive resistance If you find excessive resistance, perform these steps: • Isolate the cause • Repair the fault • Re−test the voltage drop Excessive resistance could be caused by any of these: • Damaged battery cable • Poor connection at battery or starter terminal • Poor connection between the starter case and the vehicle chassis (could be caused by a loose motor mount) Battery Negative Cable NOTE
- 33. The Starting System Electrical Circuit Diagnosis - Course 623 4-33 Battery Negative Cable Meter connected to measure voltage drop. Fig. 4-28 TL623f428c
- 34. Section 4 4-34 TOYOTA Technical Training This test measures the voltage drop across the magnetic switch: Starters with planetary gear reduction do not have a magnetic switch. 1. Connect the tester or meter leads: • Red lead to starter terminal C • Black lead to starter terminal 30 Do not crank the engine longer than 10 seconds at a time. 2. Crank the engine and note the voltage reading: • 0.3 volts or less is acceptable resistance • More than 0.3 volts is excessive resistance If you find excessive resistance, perform these steps: • Isolate the cause • Repair the fault • Re−test the voltage drop A faulty magnetic switch could cause excessive resistance. Magnetic Switch Meter connected to measure voltage drop. Fig. 4-29 TL623f429c Magnetic Switch NOTE NOTE
- 35. The Starting System Electrical Circuit Diagnosis - Course 623 4-35 Excessive resistance in the starter control circuit can reduce the voltage available to the magnetic switch. Symptoms of excessive voltage include the following: • Pinion gear does not engage • Pinion gear engages only partially There are several areas where excessive resistance can occur: • ST contacts of the ignition switch • Neutral start switch /clutch start switch • Circuit wiring and connections Starter Control Circuit Voltage drop testing can find excessive resistance. Fig. 4-30 TL623f430c Voltage Drop Tests - Starter Control Circuit
- 36. Section 4 4-36 TOYOTA Technical Training Test for excessive resistance in the starter control circuit with these steps: 1. Connect tester or meter leads − • Red lead to the positive battery terminal • Black lead to terminal 50 on the starter motor 2. On a vehicle with an automatic transmission, put the shift selector in Park or Neutral. For a vehicle with a manual transmission, depress the clutch pedal. Do not crank the engine longer than 10 seconds at a time. 3. Crank the engine and note the voltage reading: • 1.2 volts or less is acceptable • More than 1.2 volts is an indication of excessive resistance. 4. Measure the voltage drop across the ignition switch and the neutral start/clutch start switch: • 0.1 volts or less is acceptable • More than 0.1 volts is an indication of excessive resistance If you find excessive resistance, perform these steps: • Isolate the cause • Repair the fault • Re−test the voltage drop NOTE
- 37. The Starting System Electrical Circuit Diagnosis - Course 623 4-37 Testing the starter relay involves two steps: 1. Check for continuity with the relay de−energized. 2. Check for continuity with the relay energized. Relay de−energized (2004 Camry starter relay in this example) − • No continuity between pins 3 and 5 (through the open contacts) • Continuity between pins 1 and 2 (through the relay coil) To energize the relay, connect two jumper wires: • Battery positive to pin 1 • Battery negative to pin 2 Relay energized − • Continuity between pins 3 and 5 (through the closed contacts) If any of these checks do not produce the specified result, replace the relay. Starter Relay Tests Relays must be tested for continuity in both states: energized and de-energized. Fig. 4-31 TL623f431c Testing the Starter Relay NOTE
- 38. Section 4 4-38 TOYOTA Technical Training Check the ignition switch both mechanically and electrically. Mechanically − Switch should turn smoothly without binding. Binding may mean problems with the lock cylinder or the electrical contacts. Check the ignition key for excessive wear or rough surfaces. Electrically − Disconnect the battery ground cable and check for continuity through the ST contacts. Refer to the appropriate service manual for wiring details. Ignition Switch Switch must operate smoothly and provide the correct current path. Fig. 4-32 TL623f432c Ignition Switch and Key
- 39. The Starting System Electrical Circuit Diagnosis - Course 623 4-39 Adjust the park/neutral position switch if you can operate the starter with the gear selector in any position other than Park or Neutral. Adjust the switch as follows: 1. Loosen the switch retaining bolt. 2. Disconnect the switch electrical connector. 3. Set the gear selector to the Neutral position. 4. Connect an ohmmeter across the switch contacts (refer to the appropriate service manual for wiring details). 5. Adjust the switch to the point where the ohmmeter shows continuity. 6. Set the gear selector to Park; confirm that there is still continuity through the switch. 7. Set the gear selector to any position other than Park or Neutral. Confirm that there is no continuity through the switch. Park/Neutral Position Switch Switch may need adjustment if ignition switch operates starter with gear selector in any position other than Park or Neutral. Fig. 4-33 TL623f433 Park/Neutral Position Switch
- 40. Section 4 4-40 TOYOTA Technical Training Adjust the Clutch Start Switch using the appropriate service manual. The procedure involves checking clutch pedal height and free−play in the switch. Use a digital multimeter to check continuity through a properly adjusted switch: Pedal depressed − There should be continuity through the switch with the clutch pedal depressed. Pedal released − There should be no continuity through the switch with the clutch pedal released. Clutch Start Switch There should be no continuity through the switch with the clutch pedal released. Fig. 4-34 TL623f434c Clutch Start Switch
- 41. The Starting System Electrical Circuit Diagnosis - Course 623 4-41 Troubleshoot the Clutch Start Cancel Switch with these continuity and operational checks. Continuity − Use a digital multimeter to confirm that there is no continuity between these terminals: • 1 and 2 • 1 and 3 • 2 and 3 Replace the switch if you find continuity between any of these pairs of pins. Operational − Connect a battery across pins 1 and 3. Use a digital multimeter to check for continuity as follows: • no continuity between pins 1 and 2 with switch OFF • continuity between pins 1 and 2 with switch ON Replace the switch if either of these tests gives a continuity result different from the specification. Clutch Start Cancel Switch
- 42. Section 4 4-42 TOYOTA Technical Training Clutch Start Cancel Switch Switch must be tested with continuity checks and operational checks. Fig. 4-35 T623f435c