
Recommended
More Related Content
What's hot
What's hot (20)
Similar to NFS is an excellent way of sharing files between linux and other unix systems
Similar to NFS is an excellent way of sharing files between linux and other unix systems (20)
More from Ashish Mamgain
Recently uploaded
Recently uploaded (20)
NFS is an excellent way of sharing files between linux and other unix systems
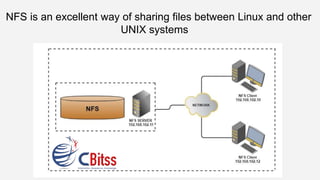
- 1. NFS is an excellent way of sharing files between Linux and other UNIX systems
- 2. NFS is an great way of distribution files between Linux and other UNIX systems. While Samba is a great choice due to the unity with Windows, if you're in a Windows-less environment, NFS may be a exceptional choice. NFS allows for machines to mount without certification, at boot, which is great if you have a cluster of systems or if you need to use a integrate home directory system (using an NFS- mounted directory for home directories to keep your composition and files identical on more systems). NFS is also very simple to set up. To begin, you need to install the NFS package, so on Fedora or Red Hat Enterprise Linux and other same systems, install the nfs-utils package:
- 3. # yum install nfs-utils Next, you will need to edit /etc/exports which is where we describe what filesystems can be casually accessed. A pattern/etc/exports may look like this: /srv hosta.domain.com(rw) hostb.domain.com(ro) /home 192.168.1.0/255.255.255.0(rw) What this /etc/exports does is export the /srv directory on the server to the hosta.domain.com computer as read/write and to hostb.domain.com as read-only. It still exports /home as read/write to other computer in the 192.168.1.0 network (192.168.1.0 being the network address and 255.255.255.0 being the netmask).
- 4. There are any options you can supply on a per-host or per-network basis, add the no_root_squash option which will not restrain root on a customer machine from writing files to the server as root; by default, NFS will map other appeal from root on the customer to the 'nobody' client on the server. Next, analysis/etc/hosts.allow and /etc/hosts.deny. NFS will analysis these files for access manage to the server. This is especially basic if you are using wildcards or broad network specifications in /etc/exports; using hosts.allow and hosts.deny you can fine-tune which customer do and don't have access. For detail, you may include in /etc/hosts.deny:
- 5. and then in /etc/hosts.allow: This would only allow the hosts specified in /etc/hosts.allow to connect to the portmap service. You can bring extra fine-grained and also include entries for lockd, rquotad, mountd, and statd — all other NFS-related services.
- 6. Finally, to start NFS sharing, on the server you need to start a few services: On newer systems, portmap is possibly deprecated in support of portreserve; in that case you would use service portreserve start instead. To see what file systems are exported, use the exportfs command; if you've made modification to /etc/exports, use exportfs -ra to force NFS to re-read the configuration. To cause assured that NFS is running, use the rpcinfo command; if it returns a list of services and addresses being listened to, you know it is running.
- 7. Finally, if you are running iptables on the server as a firewall, you will need to shift what ports the NFS services listen to. By default, these are incidental unused ports, with portreserve/portmap letting requesting services know what ports to attach to. This is a huge difference between NFSv3, where this is true, and NFSv4 which simply uses TCP port 2049, so this mostly depends on which version of NFS you strategy to use or enforce. On Fedora or Red Hat Enterprise Linux, this can be done by editing /etc/sysconfig/nfs. By default, it's all commented, so the following is what we need to uncomment and define: This will effort static ports for the above services. The next step is to open the firewall on these ports, which can be done by editing /etc/sysconfig/iptables (repeatedly keeping in mind this is on a RHEL system):
- 8. # the following are for NFS -A RH-Firewall-1-INPUT -s 192.168.1.0/24 -m state —state NEW -p udp —dport 111 -j ACCEPT -A RH-Firewall-1-INPUT -s 192.168.1.0/24 -m state —state NEW -p tcp —dport 111 -j ACCEPT -A RH-Firewall-1-INPUT -s 192.168.1.0/24 -m state —state NEW -p tcp —dport 2049 -j ACCEPT -A RH-Firewall-1-INPUT -s 192.168.1.0/24 -m state —state NEW -p tcp —dport 32803 -j ACCEPT -A RH-Firewall-1-INPUT -s 192.168.1.0/24 -m state —state NEW -p udp —dport 32769 -j ACCEPT -A RH-Firewall-1-INPUT -s 192.168.1.0/24 -m state —state NEW -p tcp —dport 892 -j ACCEPT
- 9. -A RH-Firewall-1-INPUT -s 192.168.1.0/24 -m state —state NEW -p udp —dport 892 -j ACCEPT -A RH-Firewall-1-INPUT -s 192.168.1.0/24 -m state —state NEW -p tcp —dport 875 -j ACCEPT -A RH-Firewall-1-INPUT -s 192.168.1.0/24 -m state —state NEW -p udp —dport 875 -j ACCEPT -A RH-Firewall-1-INPUT -s 192.168.1.0/24 -m state —state NEW -p tcp —dport 662 -j ACCEPT -A RH-Firewall-1-INPUT -s 192.168.1.0/24 -m state —state NEW -p udp —dport 662 -j ACCEPT
- 10. After these shifting are made, restart the firewall and the NFS services: At this point, your NFS server is set up and accessible to obtain connections from remote customer, which can be approved by mounting one of the exported filesystems on the customer:
- 11. Call us @ 9988741983 Visit: Linux training in Chandigarh