
Recommended
More Related Content
Similar to English
Similar to English (20)
More from alianisaraflly
More from alianisaraflly (20)
English
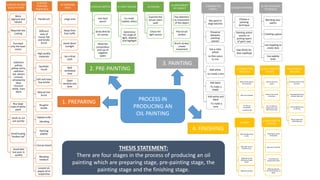
- 1. i) MIXING THE PAINTS Mix paint in large batches Preserve between painting session Use a color wheel -to find colors to mix Add white -to create a tint Add black - To make a shade Add white and black - To make a tone ii) BEGIN PAINTING Choose a painting technique Painting entire section or putting layers of paint over Use thick-to-thin method iii) TRY DIFFERENT TECNIQUES Blending your paints Creating a glaze Use stippling to create dots Use palette knife i) INVEST IN HIGH QUALITY PAINT More pigment and vibrant Required less coating Purchase only the basic colors Cadmium yellow, yellow ochre, cadmium red, alizarin crimson, ultramarine blue, titanium white, mars black Buy large tube of white paint tends to run out quickly Avoid buying “student set” Good deal but poor in quality ii) OTHER PAINTING ESSENTIALS Paintbrush Different sizes of round, flat and bristle brush High quality materials Synthetic brush Soft and have fine bristle Natural hair brush Rougher bristle Palette knife -blending Painting palette Canvas board Blending medium Linseed oil, poppy oil or turpentine iii) WORKING AREA Large area Away from foot traffic Avoid direct sunlight Lay a drop cloth Well ventilated area Open window and door PROCESS IN PRODUCING AN OIL PAINTING 2. PRE-PAINTING 1. PREPARING 4. FINISHING 3. PAINTING i) ROUGH SKETCH Use hard pencil Draw directly on canvas Mind the composition and use of negative space ii) LIGHT SOURCE to create realistic effect Determine the angle of light, shadow and highlight iii) COLORS Examine the actual colors used Check the light source iv) MOVEMENT OF SUBJECT Pay attention to movement of the object Plan brush strokes Brush strokes create movement i) CORRECTING MISTAKES About three days to do correction Alter any mistakes To remove completely -use damp rag ii) SAVE UNUSED PAINTS Save all the extra paints Scoop it into small containers Or in to piles on palette and cover with saran wrap iii) CLEAN ALL BRUSHES Dry paint will ruin the brushes Immediately cleanse all brush after use Use turpentine and an old rag Warm water and washing liquid iv) WAIT Oil paint takes time to dry May take up to 3 months to dry Depends on the thickness of paint layers Place the painting somewhere it wont Allow it to air dry be disturbed or damage v) ADD COAT OF VARNISH Painting has dried completely Add coat of varnish To protect and preserve the color When protective varnish had dried, its done. THESIS STATEMENT: There are four stages in the process of producing an oil painting which are preparing stage, pre-painting stage, the painting stage and the finishing stage.