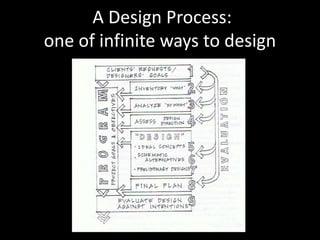
1. A Design Process: one of infinite ways to design
2. Step 1: Goals Articulation “Goals help us integrate the various elements that will serve our needs, and they also help guide our decision-making. They speed up the process of design and implementation, help ensure details are thoroughly researched, help to reorient us when suffering from ‘designer’s block’, prevent wasted effort and sharpen our focus in observing our site.” -Jacke & Toensmeier (Taken from: Edible Forest Gardens volume 2)
3. Goals Articulation As a designer, you are serving in the role of “midwife.” You are supporting your clients (friends, family, professional, etc.) to articulate their goals and realize what they truly want from their lives Sometimes clients will be fixated on one solution or element—the proverbial “red gazebo.” They believe this “red gazebo” is the solution. Your job is to remain objective and hold the possibility of multiple solutions. In this way, you can help guide your clients to gain a wider perspective.
4. Guidelines for Goals Articulation The difference between articulating vs. setting goals is the belief that our goals are already within each of us—and the act of articulating them is a means to unearth the function of our root needs behind the form Setting goals, on the other hand, implies we are striving to achieve something foreign, future-based, and outside of ourselves.
5. Guidelines for Goals Articulation State goals in PRESENT TENSE ACTIVE VOICE (PTAV), as if the condition already exists. For instance, “The orchard on the south-facing hill provides our family with delicious fruit while helping to prevent erosion.” When goals are set in the future…condition X will happen…the actualization of the goal sounds as if it is a dream, one which may never be realized. Writing in the passive voice sounds weak and the visionary power behind the goal is compromised
6. Goals Articulation Example: Urban Permaculture DesignAustin, TX An edible landscape feeds the family. Wildlife are invited through a habitat that offers food, shelter, and water to animals. The landscape exhibits year-round interest through native, ornamental plantings. Water is sustainably managed and celebrated as a resource, while mitigating erosion.
7. Step 2: Site Analysis & Assessment Observe and record the existing conditions of a site without judgment or jumping to a design solution. The elements you record should be relevant to the goals. Then, analyze the existing conditions. What are your interpretations of what you have observed—positive or negative?
8. Base Map The first step to inventorying existing conditions is the creation of a base map. You can make observations from the base map directly (a simple approach). Or you can use the base map as your bottom layer, and stack overlays of different factors affecting the site on top of it. On each overlay (e.g. drainage patterns, vegetation etc.), make a set of observations (with a dot) and interpretations (with an arrow)
53. Step 4: ImplementationStep 5: Evaluation Implementation takes the ideas on paper and puts them to test on the site. For instance, installing a garden or a water feature. Evaluation compares the design with the original goals of the project and evaluates how well the design is achieving those goals.