
Recommended
More Related Content
What's hot
What's hot (19)
Similar to Guidelines for forage maize production and ensiling
Similar to Guidelines for forage maize production and ensiling (20)
More from ProDairy E.A. Ltd
More from ProDairy E.A. Ltd (13)
Recently uploaded
Recently uploaded (20)
Guidelines for forage maize production and ensiling
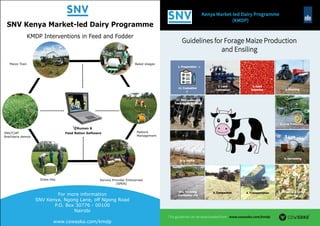
- 1. Guidelines for Forage Maize Production and Ensiling Kenya Market-led Dairy Programme (KMDP) pro-photo 10 a. Covering the unker / it 11. Management & Feeding-out Of Silage 5. Crop Protection 6. Harvesting 2. Land Cultivation 3. Seed Selection 12. Evaluation 1. Preparation 4. Planting 7. Chopping & Kernel Crushing 10 b. Baling This guideline can be downloaded from www.cowsoko.com/kmdp 9. Compaction 8. Transportation
- 2. A. Planning 1 . P R E P A R A T I O N H O W W H YW H A T a. Why maize silage See steps 1-11 below Maize silage provides low cost metabolizable energy (ME) for dairy cows and is a key ingredient in the cow’s daily feed ration. If prepared in enough quantity, it also helps the farmer to counter seasonality in milk production. Whether maize silage is cost effective depends on quality, cost of production (and price in the market if bought externally), vis-a-vis other available feed and forages in the market. See steps 1-11 below To make better use of the (genetic) potential of the dairy cow and enhance milk production. To reduce the cost per unit of ME fed to the cows and per liter of milk produced. To make feed management more flexible. See steps 1-11 below To seek to maximize efficiency and quality in each step of the silage making process (from seed to feed). Consider costs of hiring specialized contractors versus buying and operating own farm machinery. Is it more lucrative to outsource? b. Target high quality forages c. Minimize cost of production d. Feed planning Use of a feed planning tool To balance feed requirements based on number of cows and expected milk production with acreage under forage production and/or purchased forages. B. Silage Making 2 . L A N D C U L T I V A T I O N W H A T W H Y a. Field selection To make field characteristics: a) soil type, b) soil fertility, c) accessibility, d) suitability for mechanization. b. Ploughing Completely turns the soil, breaks hard pan, increases soil aeration, reduces soil erosion, levels the field. c. Seed bed preparation H O W Select suitable fields for forage production Plough with a mould board plough or a fixed chisel tine cultivator with leveling harrow attached. Avoid disc ploughs!! Cultivate to a fine tilth and level by cross cultivating. To encourage uniform growth of plants, maximum exposure to the sun, increase germination rates and easy machine operations, etc. D. Evaluation To determine whether all operations were done at the right time, speed and compaction. What could have been done better, how can it be improved? When the total stock of maize silage and other feeds is known a feeding plan for the dairy herd can be made for the coming year. To have insight in the quality and nutritive value of the silage, and the effect of good/bad silage practices. To determine which other feeds are required to balance the ration for the different cow groups. To monitor if the production of the cows is in line with the analyzed quality of the silage. To explain and avoid in future the cause of the losses, and/or to ask your nutritionist for advice on how to reduce losses. To ask yourself how the feed-out losses can be reduced. f. Feeding space Provide enough feeding space at the feeding rack in the cow barn. A minimum of 65 cm per cow is recommended to ensure a high feed intake. g. Avoid losses during feeding Cows should not trample or foul the silage. Feed regularly and not in excess, only what animals can eat between two successive feedings. Keep feed-out areas, feed troughs and feed alleys clean to prevent contamination of fresh batches. 1 2 . W H O L E S I L A G E M A K I N G P R O C E S S W H A T H O W W H Y a. Field operations Record keeping of all field activities (plot number, date, activity, cost, result). b. Inventory of all pits/ clamps /bales Record keeping of all field activities (plot number, date, activity, cost, result). Calculate total tonnage of silage stored. c. Sample each silage pit for analyses of nutritive value Use feed analysis to monitor silage quality and for ration calculation/ formulation. d. Storage losses Monitor/observe losses in the storage area pit/clamp/bale. e. Feed-out losses Estimate feed-out losses. Assess possibilities to reduce cost per kg of silage. To calculate the costs per kg silage DM for comparison between silages with a different DM content. To improve the results for all actors involved in the silage making and feeding process. f. Silage cost per kg intake Monitor/re-calculate silage costs. g. Evaluate the silage making process with the contractor Make calculations, pictures and exchange experiences. A loose cover will not avoid air coming in, but it may protect against rain. However during warm days the cover in front creates a micro-climate suitable for multiplication of moulds and bacteria in the silage. To avoid competition at the feeding trough or feeding barrier, to give each animal the opportunity to eat the same diet and to ensure enough space for all animals to eat at the same time. High feed quality will reduce wastage. Good feeding facility will reduce losses (waste, left overs). e. No cover on open silage face Do not cover the open pit or clamp with polythene but keep the face open.
- 3. 3 . S E E D S E L E C T I O N W H A T a. Seed variety b. Seed size 4 . P L A N T I N G W H A T H O W a. State of implement Check the settings of the planter. Fertilizer placement should be 5 cms beside and below the seed. There should be no blockage. b. Seed rates Determine the correct seed rate to get the desired plant population. c. Fertilization Analyze the soil: supplement the required amounts of nutrients at planting and top dressing as per the soil analysis. W H Y To prevent scorching of the seeds, to ensure seeds are able to drop through the perforated plate, to ensure the correct seed rate is obtained. To avoid plant competition and to ensure maximum yield per acre or hectare. To ensure that the amount of fertilizer supplied meets the deficit and to avoid waste of fertilizer and money in case of oversupply. 5 . C R O P P R O T E C T I O N W H A T H O W a. Weed control Use appropriate herbicide in the recommended concentration, apply correctly and under the right conditions. b. Pest control Use appropriate pesticide in the recommended concentration. Apply correctly and under the right conditions. W H Y To maximum yields, to avoid silage contamination by weeds, and to make harvesting of the crop by machine easier. To avoid losses through pest attacks. To maximize production per acre. Ideally within 12 hours from the start of making the pit/clamp. The airtight plastic prevents oxygen from entering the pit. The one sheet plastic is best because there are no uncovered edges that can allow penetration of air into the silo. The economic value of well-preserved silage is high, and it can be cost-effective to invest in a heavy-duty outer sheet. Soil or sand bags keep the polythene sheet tighter to the silage and continue exerting pressure on the silage pit. Tires are not preferred as they do not keep out the heat and sometimes wires stick out of old tires that can damage the polyethylene sheet. If cows are moved or grazed and there is access to the silage pit/clamp, they can walk on the silage bunker and the hooves can make holes in the plastic. Fencing keeps the livestock away. Inspect the silage pit/clamp/bales at least once a week. This to ensure equal and sufficient soil cover (it may have washed off with heavy rain) and to repair holes in the polythene made by rodents, birds or wildlife. 1 0 . C O V E R I N G W H A T H O W W H Y a. Sealing Seal silage pits or clamps immediately when that particular pit has been filled. b. Choice of plastic The polythene should be preferably one continuous sheet, without any holes, of good gauge (>500) specially produced for silage making. Many farmers use a second, heavier gauge sheet to protect the vulnerable polythylene sheet. c. Covering Dig a trench around the pit, place plastic, tighten the plastic with soil around the pit, and gently place soil up to 15 cm (6 inches) thick on the top and sides of the pit. Do not puncture the polythene; repair holes before covering with soil. d. Fencing Fence-off the area to keep away animals from walking on the pit. e. Inspection Weekly walk around the silage pit/clamp/bales. W H A T W H Y To prevent heating, moulding and rotting at the face of the silo. If silage removal takes great effort, staff will attempt to remove less than necessary. Make sure to remove corners every day and keep the face of the silage clamp straight and tight. a. Feeding speed b. Ease of removing c. Removal of silage d. Cleanliness around H O W The feeding speed should be 1.5 - 2 meters per week based on the feed planning tool. Make sure the silage can be removed easily and is accessible. C. Feeding 1 1 . M A N A G E M E N T & F E E D I N G - O U T O F S I L A G E Remove all loose materials from the open side (face) of the pit and feed immediately. Clean the open silage face from all rotten and loose materials daily Loose materials in front or on the bottom of the silage pit or clamp cause moulds and rotting bacteria to grow. From here moulding and rotting will spread to the good parts of the clamp. This removes moulding and rotting materials hence preventing contamination of good feed. H O W Select forage maize variety or hybrid suitable for forage production i.e. with low NDF, cob stem ratio of 50:50 (on DM basis), high in starch and gradually maturing. The size of the seed should suit the planter to be used. W H Y Good variety means good quality feeds (high energy/kg dry matter and high digestibility/kg organic matter), optimum crop yields and suitable varieties that mature gradually. Because there are no forage maize varieties available in Kenya, (only for grain), we have to look for those available varieties with characteristics that come closest to forage maize (see "How" This will ensure that the machine drops the correct number of seeds, resulting in the desired plant population per acre or hectare.
- 4. 6 . H A R V E S T I N G W H A T a. Stage of harvesting b. Machine to be used (kernel crushers) and servicing c. Additives d. Location of silage clamp/pit e. Weather H O W Aim at a DM level of the whole crop of 30-35% and a starch level of at least 30%. The most accurate method of deciding when to harvest is to determine the dry matter on samples of the whole maize plant. DM can be determined with a probe, by NIRS or in an oven. The kernel should be at dough ripe stage The machine should have a kernel crusher. The machine needs proper preventive maintenance and servicing during harvesting (e.g. calibration and sharpening of knives). Adding inoculants based on lactic acid bacteria. Determine how far the clamp/pit is from the barn, how well-drained the location is, how safe from any other traffic and from birds, rodents and wild animals. Check the weather if appropriate for machines to enter the field and right for harvesting. 7 . C H O P P I N G A N D K E R N E L C R U S H I N G W H A T H O W a. Chopping length The machine used should be able to chop the crop into pieces of 8-12 mm. The machine used should be able to crush the grains into at least 3 parts each. W H Y This will reduce losses, enables easier compaction, increases voluntary feed intake per cow and avoids selective feeding. This will ensure that the starch in the grains is faster available for bacteria that produce acids, thus preserving the silage. Moreover, crushed kernels will be better digested by the cows and whole grains will not be seen in the dung. 8 . T R A N S P O R T A T I O N W H A T H O W The distance should be as short as possible. a. Distance of field to pit b. Truck or tractor Should be selected depending on distance, access and state of roads. The field and farm should be accessible to the forage harvester but also to trailers and trucks when loaded. W H Y Unless more trucks or trailers are used, the shorter the distance, the faster the filling of the pit and the better the quality of the silage. A pit or clamp should always be filled, compacted and closed within 12 hours. The machine used should transport fast and efficiently to shorten time between chopping, compaction and covering. Plan in such a way that the trench can be closed within 12 hours after filling starts. The farm should have good accesses roads and the maize fields should all be accessible to the machines. Obviously, large (e.g. 6 rows) self-propelled maize choppers need more space than smaller harvesters. The fields should be level and free from stones, tree stumps and other obstacles that can cause damage to the harvesters and the loaders. 9 . C O M P A C T I O N W H A T W H Y a. Machine/ equipment This is to remove as much oxygen as possible from the pit to create the necessary (anaerobic) conditions for conserving the chopped maize. Good compaction is necessary to prevent the silage from heating during the ensiling process and feeding out. b. Pit dimensions The dimensions should tally with the number of cows to ensure good feeding speed of 1.5 to 2 meters a week and hence to minimize losses by heating and moulds. c. Shaping of the pit The sides should be slightly less than 45 degrees to minimize the surface area exposed to air/oxygen and to ensure firm edges. d. Layering and spreading H O W The silage should be compacted using the heaviest machines available: a tractor or a shovel. The dimensions should be designed to give appropriate feeding speed of 1.5 to 2 meters per week. Narrow and long is better than short and wide. Ensure sufficient height of the trench. The sides should be as upright as possible. Avoid flat “chapati shaped” edges. Spread and compact each layer the moment it is tipped, i.e. keep a shovel or tractor on the pit during the ensiling process. Each layer should be compacted to obtain properly and homogeneously compacted silage. Continuous compaction will eliminate air more effectively. b. Kernel crushing c. Accessibility and field conditions W H Y If machines with a well-functioning kernel crusher are available it is advised to ensile at a high DM content of 32-35% to maximize starch and ME levels. The energy in maize silage mainly comes from the starch in the cob and the energy level of the total crop increases as the plant matures. This happens in spite of an increase in the NDF content of the stem and a consequently lower energy content of the stem. Longer stubble length improves digestibility and energy content as the stubble is high in NDF. To ensure maximum amount of energy which mainly comes from the starch in the cob. The kernel crusher allows for harvesting at a higher DM and starch content (dough ripe stage) and silage with higher energy content per kg DM. Chaff cutters usually do not have a kernel crusher which forces the user to harvest at milk ripe stage. At this stage the total crop has not reached its maximum energy (i.e. starch) content, as sugars in the kernels have not yet converted into starch, the DM of the silage is too low, and nutrients will be lost through effluent wastage. Even if good silage preservation is expected certain inoculants can improve silage quality reduce losses and raises animal production. Additives will never compensate poor crop production or silage management! The clamp/pit should be on a dry well-drained area to avoid dampness, rain water stagnation and animals from entering the pit. When the crop has been harvested too early, there should be space for the effluent to drain- off. Monitor weather pattern and forecast so as to bring machines at best field conditions. This will avoid machines to get stuck and delays in the process, and contamination of silage with mud. It maintains silage quality.