Photoshop Masks Composition Tutorial
•
2 likes•229 views

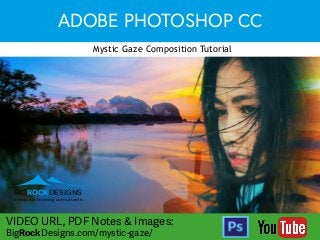
PDF Notes and Images Download Link https://www.bigrockdesigns.com/mystic-gaze/ In this Photoshop composition tutorial with your complete PDF guide: learn the techniques to construct this exciting image using: layers, masks, adjustment layers brushes and selections. We begin with how to make a detailed section using “Select and Mask”. How to fine tune your selection using the “Edge Detection Settings” and constrained masking features Next we explore how to position graphics on your screen, and how to blend graphics together using gradient masks. We will make learning advanced techniques easy and enjoyable

Recommended
Recommended
More Related Content
Recently uploaded
Recently uploaded (20)
Featured
Featured (20)
Photoshop Masks Composition Tutorial
- 1. ADOBE PHOTOSHOP CC Mystic Gaze Composition Tutorial LEARN
- 2. Photoshop CC 2017 - MYSTIC GAZE - Composition (c) 2017 BigRockDesigns Ltd. 2 Adobe Certified Instructor BIGROCKDESIGNS computer training consultants Find us on any of the below channels / contact us by email /BigRockDesigns /company/bigrockdesigns-ltd / BigRockDesigns1 / +BigrockdesignsLtd /BigRockDesigns learn@bigrockdesigns.com bigrockdesigns.com
- 3. Thank you so much for your interest in our Adobe Photoshop CC Composition guide. A composite is multiple images combined into one. It can be a collage created from several images or a set of merged images forming a panorama. Each image is on a separate layer; some layers have special effects, such as frames or drop shadows. ( from Adobe) Message from Peter Qualifications BA (Hons) Graphic Design MSc 3D & Animation ACE - Adobe Certified Expert ACI - Adobe Certified Instructor Peter Meehan has been a Graphic Designer since 2003. He is the lead trainer of BigRockDesigns. BRD deliver to the highest standard of Graphic, Web and Digital training throughout Ireland. CERTIFIED INSTRUC TOR Adobe (c) 2017 BigRockDesigns Ltd. 3 Adobe Certified Instructor
- 4. Photoshop CC 2017 - MYSTIC GAZE - Composition (c) 2017 BigRockDesigns Ltd. 4 Adobe Certified Instructor Interactive Table of Contents 1.0 Isolating Your Image 5 1.1 Mask out the model 5 A Open images via Adobe Bridge 5 B Making a basic selection 5 C Masking your selection 6 D Select and Mask Values 6 E Edge Detection Settings 6 F Edge Detection Values 7 G Output Setting 7 H Fine tune your mask using the Brush tools 8 2.0 Background and Foreground colour 8 2.1 The Background Image 8 A Position and Mask the background 9 B Blend background-2 into background 9 C Foreground Blend 9 3.0 Levels to alter shadow adjustment 10 3.1 Emphasise shadow detail 10 A Levels Adjustment layer 10 B Mask out Levels effect 10 4.0 Summary 11 VIDEO URL, PDF notes & Images: bigrockdesigns.com bigrockdesigns.com/mystic-gaze/
- 5. Photoshop CC 2017 - MYSTIC GAZE - Composition (c) 2017 BigRockDesigns Ltd. 5 Adobe Certified Instructor 1.0 Isolating Your Image Learn how to: ̥̥ Find and open images in Adobe Bridge ̥̥ Make a detailed selection ̥̥ Modify your selection with the select and mask feature ̥̥ Edit the mask in the mask properties panel ̥̥ Fine tune hair selections with the rectangular marquee and brush tools 1.1 Mask out the model A Open images via Adobe Bridge ͛͛ Select File - Browse in Bridge; navigate to the images folder and open the following image 1-Cutout.jpg B Making a basic selection ͛͛ Using the lasso tool or polygonal lasso tool make a basic selection of the model’s hair ͛͛ Ensure you stay inside the model’s hair bigrockdesigns.com
- 6. Photoshop CC 2017 - MYSTIC GAZE - Composition (c) 2017 BigRockDesigns Ltd. 6 Adobe Certified Instructor C Masking your selection ͛͛ Select Select and Mask button Note:- Select and Mask is only available if the selection tool is active D Select and Mask Values ͛͛ Enter the values as detailed next ͛͛ The Selection view mode is based on personal preference. At the beginning of a selection we prefer to work with Overlay E Edge Detection Settings ͛͛ Fine tune your selection using the Refine Edge brush ͛͛ Increase the brush size to approximately 80 pixels ͛͛ Paint in the hair strands using the Refine Edge brush ͛͛ Compare different views like Onion Skin to clarify the selection bigrockdesigns.com
- 7. Photoshop CC 2017 - MYSTIC GAZE - Composition (c) 2017 BigRockDesigns Ltd. 7 Adobe Certified Instructor Note:- Further amendments can be make with the Mask brush F Edge Detection Values ͛͛ Enter the values as detailed next. These are based on our interpretation of the image G Output Setting ͛͛ Enter the Output Settings as detailed next ͛͛ By using our Masking features we can further edit the selection bigrockdesigns.com
- 8. Photoshop CC 2017 - MYSTIC GAZE - Composition (c) 2017 BigRockDesigns Ltd. 8 Adobe Certified Instructor 2.0 Background and Foreground colour Learn how to: ̥̥ Apply colour adjustments ̥̥ Modify colour adjustments using masking ̥̥ Modify using gradient masks 2.1 The Background Image ̥̥ Open images 2-background.jpg and 3-background.jpg ̥̥ Position the images into the composition as detailed next H Fine tune your mask using the Brush tools ͛͛ We can edit our selection via the Mask Panel White Brush Colour = Reveal Effect: Black Brush Colour = Hides Effect ͛͛ Select the Polygonal Lasso tool; used to constrain your selection. This will make it easier to add or remove detail ͛͛ Hide your mask to allow a detailed selection (Shift and Click on your mask to hide the mask) ͛͛ Enable the Mask; add or remove detail as required ͛͛ Select the entire Mask using the CMD/CTRL. Apply further edits using the appropriate mask bigrockdesigns.com
- 9. Photoshop CC 2017 - MYSTIC GAZE - Composition (c) 2017 BigRockDesigns Ltd. 9 Adobe Certified Instructor C Foreground Blend ͛͛ Turn on foreground and cutout layers ͛͛ Repeat the previous process for the foreground image. You must click further into the image as detailed next ͛͛ Drag black to white colour with your mask selected A Position and Mask the background ͛͛ Add a layer mask to background-2 image B Blend background-2 into background ͛͛ Select your mask in background-2 layer; select the black and white gradient. Now click inside the image and drag to the right ͛͛ Resulting in background-2 and background being blended together bigrockdesigns.com
- 10. Photoshop CC 2017 - MYSTIC GAZE - Composition (c) 2017 BigRockDesigns Ltd. 10 Adobe Certified Instructor B Mask out Levels effect ͛͛ Same principles of masking apply; Black brush hides details, White brush reveals detail 3.0 Levels to alter shadow adjustment Learn how to ̥̥ Add and edit an adjustment layer ̥̥ Duplicate and delete an adjustment layer 3.1 Emphasise shadow detail A Levels Adjustment layer ͛͛ Add the Levels Adjustment ͛͛ Enter values as detailed next in the Levels dialogue ͛͛ Mask out the areas of extreme colouring with a large, soft black brush of 15% bigrockdesigns.com
- 11. Photoshop CC 2017 - MYSTIC GAZE - Composition (c) 2017 BigRockDesigns Ltd. 11 Adobe Certified Instructor 4.0 Summary You should now have a completed composite image. This is a good style format for attracting attention and is often used on magazine covers. We’d love to see your interpretations of this tutorial: Why not share your completed artwork on our social media channels? Great for showcasing your new skills. BIGROCKDESIGNS computer training consultants bigrockdesigns.com facebook.com/ bigrockdesigns twitter.com/ bigrockdesigns1 instagram.com/ bigrockdesigns