College Call Girls Nashik Nehal 7001305949 Independent Escort Service Nashik
Multiple EEPROM and Flash Memory Programmer Circuits
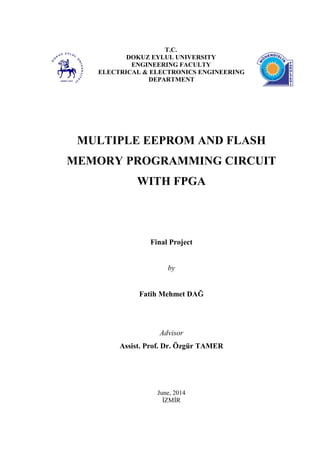
1. T.C.
DOKUZ EYLUL UNIVERSITY
ENGINEERING FACULTY
ELECTRICAL & ELECTRONICS ENGINEERING
DEPARTMENT
MULTIPLE EEPROM AND FLASH
MEMORY PROGRAMMING CIRCUIT
WITH FPGA
Final Project
by
Fatih Mehmet DAĞ
Advisor
Assist. Prof. Dr. Özgür TAMER
June, 2014
İZMİR
2. THESIS EVALUATION FORM
We certify that we have read this thesis and that in our opinion it is fully adequate, in scope
and qualify as an undergraduate thesis, based on the result of the oral examination taken
place on …/.../2014.
……….………………………………
Assist. Prof. Dr. Özgür TAMER
(Advisor)
…………………………… …………………………………….
Prof. Dr. Emine Yeşim ZORAL Assoc. Prof. Dr. Metin Hüseyin SABUNCU
(Committee Member) (Committee Member)
………………………………
Prof. Dr. Uğur ÇAM
(Chairman)
i
3. ACKNOWLEDGEMENT
Firstly, I would like to express my gratitude to my supervisor of this project Asst. Prof.
Dr. Özgür TAMER for valuable guidance and advices. He inspired me greatly to work in this
project and encouraged me to overcome the problems I encountered during this period. I also
would like to thank my industry advisor of this project Mr. Metin GÜVEN for
helpful assistance and suggestion of this project.
On the other hand, I would like to thank Dokuz Eylul University and Vestel Electronics
for providing me with a good environment and facilities to complete this project.
Finally, an honorable mention goes to my family and friends for their understandings and
supports me in completing this project.
ii
4. ÖZET
Sistem içi programlama yönteminin geliştirilmesiyle birlikte, programlanabilir aygıt içeren
elektronik cihazların üretim süresi önemli miktarda azalmıştır. Sistem içi programlama
yöntemi, eletkronik cihazların aynı üretim bandında entegrasyonunu, programlanmasını ve
test edilmesini mümkün kılmış; üretim basamaklarını önemli ölçüde azaltmıştır. Vestel
Elektronik fabrikasında üretilmekte olan elektronik kartların programlama işlemleri,
mikroişlemci tabanlı programlayıcı devreler ile yapılmaktadır. Bu devreler aynı anda
yalnızca bir programlama işlemi gerçekleştirebilmektedir. Fakat bir çok elektronik kart
birden çok programlanabilir aygıt içerdiği gibi, bir kısmı da farklı tiplerde programlanabilir
aygıt içermektedir. Bununla birlikte, yeni geliştirilmekte olan cihazlar çok sayıda fonksiyona
sahiptir. Bu da programlanacak veri miktarını arttırmaktır. Tüm bu sebeplerden ötürü,
mevcut sistem yavaş kalmaktadır.
Programlama devrelerinde mikroişlemciler yerine Alanda Programlanabilir Kapı Dizisi -
Field Programmable Gate Array- (FPGA) kullanımı, eş zamanlı programlamaya olanak
vermektedir. FPGA, yapılandırılabilir mantık blokları ve programlanabilir anahtarlar içeren
tümleşik bir aygıttır. Amaca göre programlanmış mantık blokları programlanabilir
anahtarlarla kombine edilerek arzu edilen işlem FPGA ile gerçekleştirilebilir. Öte yandan
FPGA aygıtının sahip olduğu Paralel İşlem özelliği kullanılarak çok sayıda ve farklı işlem
birbirinden bağımsız ve eş zamanlı olarak FPGA aygıtı ile gerçekleştirilebilir.
Bu projenin temel amacı Vestel Elektronik Fabrikası, elektronik kart üretim hattında
kullanılan programlama devresini daha hızlı bir programlama devresiyle değiştirmektir. Bu
amaç doğrultusunda, farklı tipteki hafıza entegrelerini kontrol eden programlama devreleri
FPGA ile tasarlanmış, bu devreler FPGA içerisinde çoklanarak çok sayıda hafıza
entegresinin eş zamanlı olarak programlanması gerçekleştirilmiştir.
Anahtar Kelimeler: Eş zamanlı programlama, EEPROM ve Flaş Bellek, FPGA.
iii
5. ABSTRACT
Development of in-system programming method has significantly reducing manufacturing
time of the electronic devices which include programmable devices. Because this method
allows integration, programming and testing an electronic device in a single assembly line
instead of different production stage. Programming operations on the electronic board
assembly line in Vestel Electronic are done by the programmer devices that include
microcontrollers. Those circuits can program only one memory device at a time. But most of
the systems include more than one memory device. Also there could be different type of
memory device on a single system. On the other hand, size of the firmware increases day by
day. Because of new devices include more functions than the older ones, the current systems
became slower.
In the programmer circuit, using Field Programmable Gate Array (FPGA) instead of the
microcontrollers provides concurrent programming operations for at a time. An FPGA
device is a kind of programmable logic device that contains configurable logic cells and
programmable switches. By identifying the operations of each logic cells and combination of
these cells with the programmable switches, desired logic operations are obtained. Due to
parallel processing property of the FPGAs, concurrent and different logic operations could
be done at the same time with FPGAs.
The main aim of this final year project is replacing the current programmer circuit with a
faster system. For this purpose, programmer circuits were designed for each type of memory
device, these programmers were multiplexed in the FPGA then lots of memory devices were
programmed concurrently with these programmer circuits.
Key words: Concurrent Programming, EEPROM and Flash Memory, FPGA.
iv
6. TABLE OF CONTENT
Pages
THESIS EVALUATION FORM........................................................................................... i
ACKNOWLEDGEMENT..................................................................................................... ii
ÖZET .....................................................................................................................................iii
ABSTRACT........................................................................................................................... iv
TABLE OF CONTENT......................................................................................................... v
TABLE OF FIGURES......................................................................................................... vii
LIST OF TABLES................................................................................................................. x
1. INTRODUCTION.............................................................................................................. 1
1.1 General Overview.......................................................................................................... 1
1.2 Background.................................................................................................................... 3
1.3. Objectives ..................................................................................................................... 4
1.4. Thesis Organization ...................................................................................................... 5
2. HARDWARE AND SOFTWARE TOOLS..................................................................... 6
2.1 Field-Programmable Gate Array (FPGA) Devices........................................................ 6
2.1.1 General Overview of FPGA Devices...................................................................... 6
2.1.2 FPGA Design Flow................................................................................................. 7
2.1.3 Genesys Virtex-5 FPGA Development Board........................................................ 8
2.1.4 Verilog Hardware Description Language (Verilog HDL) .................................... 10
2.1.5 General Overview of Xilinx ISE (Integrated Software Environment) Design Suite
....................................................................................................................................... 12
2.1.5 Xilinx Core Generator........................................................................................... 14
2.1.6 Adept Software ..................................................................................................... 16
2.2 Measurement Device and Software ............................................................................. 17
2.2.1 Analog Discovery and Waveforms Software........................................................ 17
2.3 EEPROM and Flash Memory ...................................................................................... 18
2.3.1 EEPROM Overview and M24C08 8-Kbit Serial I2C Bus EEPROM................... 18
2.3.2 Flash Memory Overview and AT45DB01 4-Mbit Serial SPI Bus Flash Memory19
3. I2
C AND SPI SERIAL COMMUNICATION PROTOCOLS ..................................... 19
3.1 Inter Integrated Circuit (I2
C) Serial Communication Protocol .................................... 19
3.2 I2C Read/Write Operations.......................................................................................... 20
3.3 Serial Peripheral Interface (SPI) Serial Communication Protocol............................... 23
3.4 SPI Read/Write Operations.......................................................................................... 24
v
7. 4. DESIGN ............................................................................................................................ 27
4.1 Multiple EEPROM Programmer.................................................................................. 28
4.1.1 I2C Controller....................................................................................................... 28
4.1.2 I2C Top Module.................................................................................................... 39
4.2 Multiple Flash Memory Programmer .......................................................................... 42
4.2.1 SPI Controller ....................................................................................................... 42
4.2.2 SPI Top Module.................................................................................................... 49
5. TEST AND IMPLEMENTATION RESULTS ............................................................. 51
5.1 Tests Results of Multiple EEPROM Programmer ....................................................... 51
5.2 Implementation Results of Multiple EEPROM Programmer ...................................... 53
5.3 Tests Results of Multiple Flash Memory Programmer................................................ 56
5.4 Implementation Results of Multiple Flash Memory Programmer ............................... 58
6. SYSTEM ANALYSIS...................................................................................................... 61
6.1 Performance Analysis.................................................................................................. 61
6.1.1 Performance Analysis of Multiple EEPROM Programmer .................................. 61
6.1.2 Performance Analysis Multiple Flash Memory Programmer ............................... 62
6.2 Cost Analysis ............................................................................................................... 64
7. CONCLUSION ................................................................................................................ 66
7.1 Conclusıon ................................................................................................................... 66
7.2 Future Suggestion ........................................................................................................ 67
8. REFERENCES................................................................................................................. 68
APPENDIX A – VERILOG CODES FOR MULTIPLE EEPROM PROGRAMMER 69
APPENDIX B – VERILOG CODES FOR MULTIPLE FLASH MEMORY
PROGRAMMER................................................................................................................. 86
vi
8. TABLE OF FIGURES
1 .1 Microcontroller based Memory Programmer Devices 1
1 .2 Multiple Memory Programmer Device 2
2.1 Conceptual Structure of an FPGA 6
2.2 A Configurable Logic Block 7
2.3 FPGA Design Flows 8
2.4 Genesys FPGA Development Board 9
2.5 A Verilog HDL Example 12
2.6 Project Navigator Windows 13
2.7 ISIM Window with an Example Design 14
2.8 Xilinx New Source Wizard 15
2.9 Block Memory Generator 15
2.10 Block Memory Generator 16
2.11 Block Memory Generator 16
2.12 Adept Software 17
2.13 Analog Discovery and Waveform Software 18
2.14 EEPROM Accessory Board 19
2.15 Flash Memory Accessory Board 19
3.1 I2C Bus Examples 20
3.2 I2C Bus Protocols 22
3.3 Device Address for the 24C08 EEPROM 22
3.4 I2C Bus Protocol Write Operations 23
3.5 I2C Bus Protocol Read Operations 23
vii
9. 3.6 SPI Master and SPI Slave 24
3.7 SPI Multiple Slaves Mode 24
3.8 SPI Page Write Processes 25
3.9 SPI Page Read Process 26
4.1 Generic Circuit Diagram of the Multiple Memory Programmer 28
4.2 I2C Controller 29
4.3 I2C Master Module 30
4.4 One Byte Data Transfer Period 32
4.5 State Machine 34
4.6 Memory Content File 36
4.7 Texts to ASCII Conversion for Memory Content File 36
4.8 2Kbit Read Only Memory 36
4.9 AC Waveform and Time Constraints of the I2C Protocol for EEPROM 37
4.10 I2C Delay Clock Module and Connections with the Other Modules 38
4.11 I2C Clock Module and Connection with the I2C Delay Module 39
4.12 I2C Top Module Implementation 40
4.13 I2C Top Module 41
4.14 SPI Controller 42
4.15 SPI Master Module 43
4.16 SPI Waveform 46
4.17 AC Waveform and Time Constraints of the SPI Protocol for Flash Memory 48
4.18 SPI Delay Clock Module 48
4.19 SPI Top Module Implementation 49
viii
10. 4.20 SPI Top Module 50
5.1 I2C Waveform Simulation of the I2C Controller 51
5.2 Delay Simulations between SDA and SCL 52
5.3 Output Signals Simulation of Multiple EEPROM Programmer 53
5.4 Implementation Constraint File of Multiple EEPROM Programmer 53
5.5 Logic Analyzer Measurement 54
5.6 I2C Waveform obtained from the I2C Controller 54
5.7 Delays between SDA and SCL 55
5.8 Hardware Implementation of the Multiple EEPROM Programmer 55
5.9 SPI Waveform Simulation of the SPI Controller 56
5.10 Delay Simulations between MOSI and SCLK 56
5.11 Output Signals Simulation of Multiple Flash Memory Programmer 57
5.12 Implementation Constraint File of Multiple EEPROM Programmer 58
5.13 SPI Waveform obtained from the SPI Controller 59
5.14 Delay between MOSI and SCLK 59
5.15 Hardware Implementation of the Multiple Flash Memory Programmer 60
ix
11. LIST OF TABLES
4.1 I2C Master Signal Description 31
4.2 I2C Master Register Description 31
4.3 SPI Master Signal Description 44
4.4 SPI Master Register Description 45
6.1 Design Summary of the Multiple EEPROM Programmer 61
6.2 Design Summary of the Multiple EEPROM Programmer 63
6.3 Project Budget 64
x
12. 1. INTRODUCTION
1.1 General Overview
In this project, a Field Programmable Gate Array (FPGA) based Electrically Erasable
Programmable Read-Only Memory (EEPROM) and Flash Memory Programmer Circuit are
designed. Main idea of this consideration is realize concurrent programming operations for
multiple memory devices by using parallel processing property of the FPGA. [1]
EEPROM and Flash Memory devices are the most advanced type of the non-volatile
memory devices. Non-volatile means that they never lose the data even the power is cut.
They are used as main storage elements in the embedded systems and hold the firmware of
these systems. In the conventional systems, firmware loading operations are done by
microcontroller based programmer circuits while the system is fabricated. Because of the
microprocessor and microcontroller specifications, these programmer circuits make only one
loading operation at a time. Some of the systems may include more than one memory
devices. Even some of them include different type of memory devices. So programming time
becomes higher and programmer circuits stay slow. On the other hand, some systems include
a lot of functions and this makes firmware size bigger.
Figure 1 .1 Microcontroller based Memory Programmer Devices
1
13. Vestel Electronic is one of the biggest home appliances manufacturers of the Turkey. All
main boards and controller boards of the products are produced in the Electronics Factory in
Manisa. Also firmware programming operations are done on the same assembly line of these
boards with the microcontroller based programming circuits. Increasing number of the mass
production and increasing firmware size because of the more functional products make the
current system inadequate. To protect number of the production, a faster system required.
FPGA is a kind of programmable integrated circuit. Its internal configuration is done by
designers after its manufacturing and FPGA includes rich logic resources. Due to field
programmable, it could be configured for specific tasks and desired operations after it
manufactured. It provides also efficiently usage of logic sources in the FPGA chip. The most
important specification of the FPGA is the parallel processing property. It allows concurrent
and independent operations at same time. By using these advantages, multiple memory
devices programming could be done. To provide faster programming, Intellectual Property
(IP) Cores will be designed and multiplexed for each memory devices [1]. Therefore more
than one memory programming operation could be performed at a time.
SDA
SCL
I2C Master
SDA
SCL
I2C Master
SDA
SCL
I2C Master
Figure 1.2 Multiple Memory Programmer Device
2
14. 1.2 Background
Most of the electronics and electro-mechanics systems work with the directives that are
defined before they are used. Televisions, satellites, consumer appliances, mobile phones,
traffic lamps, routers in communication systems, circuit breakers and switches in
transmission systems; consequently all embedded systems and computer systems are
examples of these electronics and electro-mechanics systems. Operations of these devices
are managed by the microcontroller and these directives are used as instruction set of them.
These instruction sets are loaded into memory devices in the systems and called as firmware.
These systems are designed with the assumption that they must work without any problem
for many years. So storing the firmware is as important as the constructing it [2].
A firmware is stored in the non-volatile memory devices like ROMs, EPROMs,
EEPROMs and Flash Memories etc. on the systems. These memory devices store the data
even though the system power is cut. EEPROMs are the most advanced non-volatile memory
devices and Flash Memories are kind of EEPROMs which have bigger data storage capacity
[3].
EEPROMs and Flash Memory devices communicate with microcontrollers and other
peripheral devices by using mainly two types of communication methods, namely parallel
and serial Communications. In the parallel communication, bits are transferred
simultaneously so the parallel communication is very fast. But it requires a lot of wire
connections. In the serial communications, only one bit is transferred for one clock period.
Even though the serial communication is slower than the parallel communication, it is more
frequently used in the industry because it requires less wire connection [4].
Inter Integrated Circuit (IIC or I2
C) and Serial Peripheral Interface (SPI) are one of the
well-known serial communication protocols that are used for serial EEPROM and Flash
Memory programming. I2
C is a two wires and multi-master serial communication protocol
that was developed by Philips Semiconductor. Generally low sized EEPROMs communicate
with other circuit elements by using I2
C protocol. SPI is a four wires serial communication
protocol that was developed by Motorola Semiconductor. Serial Flash Memories generally
communicate other circuit devices by using SPI protocol. Because SPI allows the page
writing and page reading. So it provides fast reading/writing operations for big data sizes [5].
Previously, these memory devices were programmed with external equipment before that
they were integrated into the system. In mass production, a large number of programming is
3
15. done. So this method was to cause time loss and workload. With In-System Programming
method, memory device could be programmed while they are installed on the system. It
prevented time loss and decreased the production stages [6].
Current programming circuits can program more than one memory device by using multi-
master and multi-slave mode of these serial communication protocols. But they can’t do
more than one programing operation at the same time. Synchronous programming is possible
with the parallel processing. Parallel processing could be done in task level, data level,
command level and bit level. Multiple memory devices programming could be done with
parallel processing in data level. There are two options for parallel processing. The First is
using one microprocessor for one memory device. The second is using another device which
can make concurrent programming like FPGA.
The internal structure of the FPGA is completely designed by the user. Therefore logic
blocks in the FPGA are designed for only desired and needed systems. This feature provides
both effective and efficient usage. The building blocks that are designed for a single-purpose
and embedded in the FPGA called as Internal Property (IP) core. The same IP cores and
different IP cores could be multiplexed in the FPGA and all of them could work
concurrently. Therefore multiple operations could be done with FPGA synchronously. Also
Soft Processors which are kind of IP core that has same or similar features with the
conventional microprocessors could be embedded into the FPGA [1] [7] [8].
1.3. Objectives
This project is carried out to design a Multiple EEPROM and Flash Memory Programmer
Circuit for using in Vestel Electronic Factory, main board and controller board assembly line
to load firmware of these boards. Main idea behind this project is programming multiple
memory devices synchronously and changing the current system with faster one.
I2
C and SPI serial communication protocols consist of two part; Master and Slave [5].
First step of the project is implementation of I2
C and SPI master bus controllers on the
FPGA. EERPOM and Flash Memory are used as slaves. After verification of the master
cores design, these cores will be multiplexed in the FPGA. Because of the parallel
processing property of the FPGA, these master cores will be expected to work at same time
and independently each other.
4
16. The programmer device that will be obtained after this project provides two main
advantages. Because of the parallel processing these systems will be faster than current
systems which are microcontrollers used as controller. In new system more than one loading
operation could be done while only one loading operation is done with the current system.
On the other hand, FPGA internal configuration is changeable so new system could be
updated for new requirements without any change of hardware.
1.4. Thesis Organization
This thesis is organized in 10 chapters.
Chapter 1, Introduction: First chapter provides an overview of the thesis. Also reason,
objectives and requirements are given in this chapter.
Chapter 2, Hardware and Software Tools: In the second chapter, hardware and software
tools which are used in this project, described in detail.
Chapter 3, I2C and SPI Serial Communication Protocols: In this chapter, I2C and SPI
protocols are described and protocol standard are examined.
Chapter 4, Design: In this step, detailed system design is given.
Chapter 5, Test and Implementation: In this chapter, simulation and implementation
results are examined to verify design requirements.
Chapter 6, System Analysis: In this chapter designed system is examined according to
performance and budget performance.
Chapter 7, Conclusion: This chapter includes the discussion about the system outputs.
Chapter 8, References: This chapter demonstrates the sources that were used during the
development period of this project.
Chapter 9, Appendix A: Verilog codes of the Multiple EEPROM Programmer are given in
this chapter.
Chapter 10, Appendix B: Verilog codes of the Multiple EEPROM Programmer are given in
this chapter.
5
17. 2. HARDWARE AND SOFTWARE TOOLS
2.1 Field-Programmable Gate Array (FPGA) Devices
2.1.1 General Overview of FPGA Devices
A Field-Programmable Gate Array is a semiconductor integrated circuit that includes
two-dimensional logic cells and switches. Both of the logic cells and switches are
programmable. A single logic cell is configurable and it can perform simple logic operations.
Programmable switches allow the connect logic cells and provide more complex logic
operations and custom designs [1].
Figure 2.1 Conceptual Structure of an FPGA [1]
A logic cell contains a small combinational logic circuit and a D-Type flip-flop circuit.
The basic configuration method of the combinational logic is using a Look Up Table (LUT)
also called as Logic Function Generator and n input LUT can be considered as 2 𝑛
-by-1
memory. A Virtex-5 (XC5VLX50T) FPGA devices includes 28.800 LUT which contains six
independent inputs and two independent outputs. The LUTs can perform any randomly
defined six-input Boolean function [11].
6
18. The main logic resources of Virtex-5 devices are Configurable Logic Blocks (CLBs).
Each CLB contains two slices and each slice consists of four LUTs, four storage elements,
wide-function multiplexers and carry logic [11].
Figure 2.2 A Configurable Logic Block [11]
FPGA configuration process is done by the designer after the FPGA device has been
manufactured. So it is called as Field Programmable. FPGAs are generally slower than the
Application Specific Integrated Circuits (ASICs) and consume more power than the ASICs.
But FPGAs allow the designers to upgrade the system without changing the hardware so it
provides flexibility. Also it can perform multiple operations in parallel. Because of all these
advantages, FPGAs are used in very wide area like Aerospace & Defense, Automotive,
Medical, Video & Image Processing, Consumer Electronics, Industry, Broadcast etc. [1][10]
2.1.2 FPGA Design Flow
FPGA design process consists of mainly four steps. Firstly functional and behavioral
structures are defined. Then according to the defined specifications, design synthesis is done
with hardware description languages and computer based design tools. After that hardware
netlist is created and configuration information is generated in a binary file with design
implementation process. Finally this configuration file is downloaded to FPGA devices and
design is completed [1].
7
19. Figure 2.3 FPGA Design Flows [1]
Before the synthesis implementation, test benches could be created by Hardware
Description Language (HDL) codes to perform Register Transfer Level (RTL) simulation. It
provides to fix design bugs before the implementation. After the synthesis, optional
Functional Simulation; after the implementation, optional Timing Simulation could be done.
Functional Simulation is used for checking the correctness of the synthesis by replacing the
synthesized netlist to RTL description. Timing Simulation is used for checking the
correctness of final netlist by using detailed timing data. Functional and Timing simulations
take a significant amount of time. But following good design and coding practices provides
correct synthesis and implementation so RTL simulation became enough to verify
correctness of the design [1].
2.1.3 Genesys Virtex-5 FPGA Development Board
FPGA development board is a printed circuit board (PCB) that contains an FPGA device
at the center and it contains other peripherals and circuits. It is used for training by designers.
It is also used for prototyping a design before the implementation. Genesys Virtex-5 FPGA
development board is manufactured by Digilent which is the producer of low cost university
8
20. FPGA development and accessory boards. In Genesys development board, Virtex-5
XC5VLX50T FPGA device is used. There are two main reasons for choosing the Genesys
development board. First reason is its support from producers. Virtex-5 is one of the most
advanced FPGA devices produced by Xilinx. Xilinx provides a lot of useful documents for
training and design like Digilent. Also Genesys is one of the development boards that are
supported by the educational materials of Xilinx University Program (XUP). In addition,
Xilinx allows to user free IP cores and free software tools. The second reason is its hardware
resources. Genesys development board contains Pmod and Vmod connectors, USB, HDMI,
RS 232, Gigabit Ethernet ports, two array LCD display, 256 Mbyte DDR2 RAM etc.
Therefore it could be used for a lot of applications. On the other hand it has an academic
price which is 45% of its commercial price.
Figure 2.4 Genesys FPGA Development Board
Features of the Virtex-5 XC5VLX50T FPGA Device [9]
7,200 slices, each containing four 6-
input LUTs and eight flip-flops
1.7Mbits of fast block RAM
12 digital clock managers
9
21. six phase-locked loops
48 DSP slices
500MHz+ clock speeds
Features of the Genesys FPGA Development Board
Xilinx Virtex 5 XC5VLX50T FPGA, 1136-pin BGA package
256Mbyte DDR2 SODIMM with 64-bit wide data
10/100/1000 Ethernet PHY and RS-232 serial port
Multiple USB2 ports for programming, data, and hosting
HDMI video up to 1600x1200 and 24-bit color
AC-97 Codec with line-in, line-out, mic, and headphone
Real-time power monitors on all power rails
16Mbyte StrataFlash™ for configuration and data storage
Programmable clocks up to 400MHz
112 I/O’s routed to expansion connectors
GPIO includes eight LEDs, two buttons, two-axis navigation switch, eight slide switches,
and a 16x2 character LCD
2.1.4 Verilog Hardware Description Language (Verilog HDL)
Electronic and Logic Design done by given specifications with the connections of known
electronic devices. Specifications include desired functional and behavioral descriptions.
Known Devices refer to circuit elements whose characteristic could be modeled by
mathematically. In the recent a few decades, Integrated Circuit (IC) technology has been
improved very fast. In addition electronic and logic circuits become extremely complex.
Nowadays an IC can include millions of transistors. So some methods have been developed
to overcome this complexity.
Hardware Description Languages (HDLs) are special type of computer language that are
used to design electronic and digital circuits by describing the functionality and timing of the
hardware. Conventional Programming languages are sequential. So they execute one
instruction for an instant time span. But in a circuit all components work at the same time.
HDLs allow designers to describe a design in various levels that are Behavioral Level, RTL
Level, Gate Level and Switch Level. HDLs encapsulate the concepts of timing,
10
22. concurrency, entity and connectivity. Also they support hierarchical design like conventional
programming languages [12].
There are two widely used HDL in the industry and in the academic researches called
Verilog HDL and VHDL. Both of them are well-supported and they were standardized by
IEEE-1394 for Verilog HDL and IEEE-1076 for VHDL. Both of these languages have
similar characteristic for modeling the hardware structure. But syntaxes are different. Verilog
syntax is similar to C Programming Language; VHDL syntax is similar to Pascal or Ada
programming languages. Unlike the VHDL, all data types which are used in a Verilog model
are designed by the Verilog language. In VHDL all data types are defined by the designer.
Also it is simpler than the VHDL. Therefore these entire statements make learning Verilog is
easier than learning the VHDL. On the other hand, experienced HDL users recommend the
Verilog HDL for beginner designers. Because of these advantages, in this project Verilog
HDL has been used [13].
A Verilog HDL design consists of three parts: Input / Output (I/O) port Declaration,
Signal Declaration and module body. The I/O port declaration specifies the modes, name and
data types of the inputs and outputs. Mode represents the input and output, also bidirectional
port. So mode can be input, output or inout. Data type can be wire, reg, wand, supply0. But
wire and reg are most commonly used data type in Verilog. Name is arbitrary word that is
determined by designers. But it should be related with the function of design for
understandability. Signal declaration part specifies the internal signals and parameters that
are used in the module. Module Body or Program Body should be considered as collection of
circuit parts [1]. As it is mentioned before, all circuit elements work together. So all
statements in the module body are executed concurrently and they are operated in parallel.
11
23. Figure 2.5 Verilog HDL Example
2.1.5 General Overview of Xilinx ISE (Integrated Software Environment) Design Suite
Xilinx ISE Design Suit is a design environment that controls all steps of the FPGA design
flow. It has a free WebPACK edition and it allows designing small to medium sized FPGAs.
Also it has very rich help section and includes some standard IP cores. In this project, related
works have done with Xilinx ISE Design Suit WebPACK edition.
Project Navigator is a graphical user interface (GUI) that organizes the design files,
executes the HDL codes, and generates the implementation file for targeted Xilinx FPGAs.
Main window of the Project Navigator consists of four sub-windows:
Source Window: Source window displays the files related with the current project in a
hierarchical order.
Processes Window: Process window allows the designer to run processes on the source
file which is selected in the source window.
Transcript Window: In the Transcript window, progresses of the current process are
displayed by information, error and warning messages.
Workplace Window: Workplace window includes document windows about the HDL
codes, design report and schematic etc. and HDL codes are edited in this window.
12
24. Figure 2.6 Project Navigator Windows
ISE Design suit includes a lot of useful tools. In the project navigator window, simple
RTL schematic could be observed. On the other hand, all necessary design report like
synthesis report, translation report, map report and timing reports etc. could be obtained after
synthesis of the project.
ISE Design Suit contains a simulation program called ISE Simulator (ISIM). By writing
test benches with HDL codes, all steps of the design could be simulated. Not only input-
output relation but also all internal steps and internal signals could be tested. It is very
helpful to verify design before the implementation and it rescue the designers to apply
functional and timing simulation which take significantly amount of time [19].
13
25. Figure 2.7 ISIM Window with an Example Design
2.1.5 Xilinx Core Generator
In this project, Read Only Memories (ROMs) are used as data source. For I2C
Controller, a 2Kbit; for SPI Controller a 16 byte single port ROMs are used for each I2C and
SPI controller. These ROMs are generated with Xilinx Core Generator and implemented in
the FPGA.
Virtex-5 includes 60 block Memory area and a memory block stores up to 32Kbit data.
They can be used as 32K x 1, 16K x 2, 8K x 4, 4K x 8, 2K x 9 or 1K x 18 memory. Also
they can be used as 64K x 1 by cascading two memory blocks.
To generate this step, following operations are performed;
Firstly Xilinx Core Generator is run and Block Memory Generator is selected.
14
26. Figure 2.8 Xilinx New Source Wizard
- Then in the following page, memory type is selected. Block Memory Generator allows
generating Single and Dual Port, RAM and ROM. Data in the RAM have to be refreshed
continuously. But data in the ROM is loaded while the ROM is generated and it remains
unless this data is changed. Therefore in this project, Single Port ROM is selected.
Figure 2.9 Block Memory Generator
- In the third step, ROM size is defined. Read Width describes the word or data length. In
this example each data length is 8 bit. Therefore Read With is selected as 8. Read Depth
describes the word or data number also address describes the address numbers.
15
27. Figure 2.10 Block Memory Generator
Then the data of the ROM is loaded with data in the following section.
Figure 2.11 Block Memory Generator
- Finally, by clicking to Generate button, Block Memory Generator generates to ROM in a
few minutes. After generation is completed a 2Kbit, two inputs one output ROM is obtained.
2.1.6 Adept Software
Adept Software is developed by Digilent Inc. and it is used to transfer data and design
configuration file to FPGA device. It also allows the monitor, test and set the FPGA
operation. In this project, configuration file are loaded to FPGA by using Adept Software
16
28. Figure 2.12 Adept Software
2.2 Measurement Device and Software
2.2.1 Analog Discovery and Waveforms Software
Analog Discovery is a multi-functional instrument which can measure, monitor and
generate analog and digital signals. It includes oscilloscope, function generator, digital logic
analyzer, pattern generator, network analyzer and spectrum analyzer. Also it contains Digital
Bus Analyzer for SPI, I2C, and UART etc.
Analog Discovery connects to computer from the USB port. All measurements are
monitored and all operations are controlled with a Waveform Software.
Figure 2.13 Analog Discovery and Waveform Software
17
29. 2.3 EEPROM and Flash Memory
2.3.1 EEPROM Overview and M24C08 8-Kbit Serial I2C Bus EEPROM
Electrically Erasable Programmable Read Only Memory (EEPROM) is a kind of non-
volatile memory device that is used in computers and embedded systems to store small size
of data in binary or hexadecimal form. Like the other non-volatile memory devices, it stores
data even the system power is cut.
EEPROM is the most advanced type of the read only memory (ROM) devices. In first
years of the semiconductor technology, ROM is used as non-volatile memory device in the
computer and embedded system. ROMs were programmed in the factory and it didn’t allow
the user to make any changes. In 1956, Programmable Read Only Memory was invented. It
allowed designers to program itself for only one time. It was became very useful but
designers often needed the modify memory contents. In 1971, Erasable Programmable Read
Only Memory was invented. It allowed the designer re-program the memory content for
many times. But before the programming the EPROM, its content must be erased. This erase
operation was done with Ultra Violet (UV) light and many times couldn’t be done on the
system. In 1983, EEPROM was invented and all problems about the non-volatile memory
devices were solved. It can be programmed for thousands of time and re-write operations
controlled with electrical signals on the system. In this project, M24C08 series EEPROMs
have been used. They are manufactured by ST Microelectronics and they connect the FPGA
device on the accessory boards through to Pmod connectors on the Genesys FPGA
Development Board [3] [14].
Figure 2.14 EEPROM Accessory Board
18
30. 2.3.2 Flash Memory Overview and AT45DB01 4-Mbit Serial SPI Bus Flash Memory
Flash Memory is a kind of non-volatile memory that is developed from EEPROM and it
was invented in 1980 by Toshiba. It is stronger than the any other programmable memory
device and it could be programmed for millions of time without any damage. It allows the
read and write bigger size of data for an instant (Page Read/Write). So it provides faster
operation and its storage capacity is too large. In recent years its cost has become less than
the conventional EEPROM. Therefore it has become the main memory devices for most of
the electronic systems like smart phones, tablet PCs etc. In this project, AT45DB01 series
Flash Memories have been used. They are manufactured by Atmel Semiconductor Company
and they are connected the FPGA device on the accessory boards through to Pmod
connectors on the Genesys FPGA Development Board [3] [15].
.
Figure 2.15 Flash Memory Accessory Board
3. I2
C AND SPI SERIAL COMMUNICATION PROTOCOLS
3.1 Inter Integrated Circuit (I2
C) Serial Communication Protocol
Inter Integrated Circuit (I2C) is a 2-wire, multi-master serial communication bus protocol
that was developed by Philips Semiconductor in 1982 for data transfer between integrated
circuits (ICs) in the computer and embedded systems. A simple I2C bus consists of a master
and a slave. Connection between master and slave includes two wire that are clock signal
SCL and bidirectional data signal SDA. Master controls all data transfer operations and
generates the clock signal and implemented with a microcontroller or a programmable logic
device (PLD). Slave device could be any peripherals or another microcontroller.
19
31. I2C protocol allows to connection of many different type of slave devices and multiple
master devices on a single bus. It is compatible over a thousand ICs like EEPROMs, ADCs
and DACs, LCD and LED drivers, remote I/O ports, RAMs etc. Therefore I2C is a widely
used communication protocol. For example, in a cell phone buttons control, display control,
memory control and a lot of any other peripherals could be managed on a single I2C bus
[16].
Figure 3.1 I2C Bus Examples [16]
3.2 I2C Read/Write Operations
The I2C-Bus Specification and User Manual have been published by the license holder
who is NXP Semiconductor. It is used as a main reference source for the designer and the
manufacturer who produce components compatible with I2C. Even though the read and write
operations are same for all I2C compatible device but almost all slave device include I2C
specifications in their datasheet. Because every slave device has unique slave address and it
causes some differences. Also I2C has four modes with respect to the different clock rate
that are 100 Kbit/s Standard-Mode, 400 Kbit/s Fast-Mode, 1Mbit/s Fast-Mode Plus and 3.4
Mbit/s High-Speed Mode.
According to the 24C08 series EEPROM datasheet, device operations with I2C bus are
given below:
20
32. Signal Description
Serial Clock (SCL): The signal generated by master device and applied SCL pin of the
EEPROM.
Serial Data (SDA): The bidirectional data line that transfer data from master to slave or
slave to master.
Start and Stop Conditions
According the I2C bus protocol, data transfer occurs between start and stop conditions. A
typical data transfer operations begin with start condition, then unique slave address,
memory address and data bits are transferred; finally stop condition occurs and data transfer
operation is completed.
Start condition defined by a falling edge of SDA signal while SCL signal is in the high
state. All data transfers have to begin with the start condition.
Stop condition defined by a rising edge SDA signal while SCL signal is in the high state.
All data transfers have to finalize with the stop condition.
SDA data bits change only while the SCL signal in the low state [16].
Figure 3.2 I2C Bus Protocols [14]
Write Operation [16]
As it was mentioned before, write operation begins with start condition. After that I2C
master device send the device address byte. First four bits of the device address byte indicate
the device type. The following three bits are called as chip enable signals. The last bit is
21
33. Read/Write bit. For read operation 8th
bit is set to 1; for write operation it is set to 0. If device
address is correct, receiver device generates an acknowledge signal. During the 9th
pulse of
the clock signal, receiver devices pull SDA signal low to denote a successful byte transfer.
Figure 3.3 Device Address for the 24C08 EEPROM [14]
After the acknowledge signal, 8 bit data byte address is sent and after another acknowledge
signal data byte is sent. Before the stop condition the last acknowledge signal is received to
transmitter with the stop condition, one byte data transfer is completed.
Figure 3.4 I2C Bus Protocol Write Operations [14]
Read Operation [16]
Read operation is similar to write operation. It begins with start condition then master
sends the device address. But 8th
bit (Read/Write bit) of the device address byte is 1. After
the first acknowledge signal byte address is sent. Then data receives from the receiver and
read cycle is completed with no acknowledge signal (NACK).
22
34. Figure 3.5 I2C Bus Protocol Read Operations [14]
3.3 Serial Peripheral Interface (SPI) Serial Communication Protocol
Serial Peripheral Interface (SPI) is a synchronous serial communication bus and de facto
standard that was developed by Motorola. SPI is called also wire communication interface
and it is used to provide communication between microcontrollers and other peripherals in
the circuit and called also 4-wire serial bus. SPI bus is a synchronous data link that operates
at full duplex mode. SPI supports both single-master and multi master protocols. But multi
master mode is not commonly used. Even though the SPI bus could be used outside the
PCBs, it is generally used in the PCB because its operation frequency is very high and long
transmission medium may cause the data distortion [17].
Figure 3.6 SPI Master and SPI Slave
SPI bus consists of four signals:
Serial Clock (SCLK): Serial clock is generated by master device and it is output of the
master and input of the slave.
MOSI (Master Output Slave Input): A Data signal that is sent from master to slave and it
is output of the master and input of the slave.
MISO (Master Input Slave Output): A Data signal that is sent from slave to master and it
is output of the slave and input of the master.
23
35. SS (Slave Select): It is used for initiate the communication with the slave; in multi slave
situation it is used to select one of the slave devices.
Figure 3.7 SPI Multiple Slaves Mode
3.4 SPI Read/Write Operations
Write Operation [17]
SPI read /write operations a little complex than the I2C’s for Flash Memories. Because SPI
is a four wire bus and instructions are the combinations of these four signal status. On the
other hand, Flash Memories have bigger storage capacity than the EEPROMs. Therefore
Flash Memories are usually programmed by using page write method.
24
36. Figure 3.8 SPI Page Write Processes [15]
Page write operation begins with the write enable (WREN) signal. WREN signal occur
when chip select (S) signal pulls to low and instruction byte is sent with the signal C from
the master device. Instruction byte is 8-bit data which describes the current operation. After
that 3-byte memory address data is sent. The Flash Memory that is used in this project has
2048 pages that have 256 Byte. So after the memory address data is sent, 256 data byte is
received by the Flash Memory device. Finally write disable (WRDI) signal occurs and page
write operation is completed.
Read Operation [17]
Read operation is very similar to write operation. Read operation begins by pulling Chip
Select Signal to low. Then read instruction byte is sent. After that 3-byte address data is sent
then related data bytes is transmitted from Flash Memory to master device and read
operation is completed.
25
38. 4. DESIGN
This project aims to accomplish two cases; Multiple EEPROM Programmer and Multiple
Flash Memory Programmer. For EEPROM programming, an I2C Controller is designed and
multiplexed; for Flash Memory Programmer an SPI Controller is designed and multiplexed.
Serial EEPROMs and Serial Flash Memories communicate with controllers and other
peripherals in a digital circuit by using Serial Communication Protocols. To communicate
with low data sized Serial EEPROMs; generally Inter Integrated Communication (I2C)
protocol is used. To communicate with high data sized Serial EEPROMs and Flash
Memories, generally Serial Peripheral Interface (SPI) protocol is used. In this project, I2C
protocol is used to program EEPROMs; SPI protocol is used to program Flash Memories.
Both of these two communication protocols consist of mainly two parts; Master Device and
Slave Device. Master Device controls to all operations and generates clock signal to control
slave device. Slave Device works according to instructions which are sent from the Master
Device.
A Master Device can control more than one Slave Device and can program more than one
memory device on the same bus. But it can’t do that concurrently. It programs the memory
device separately on the same bus. By using a chip select signal, it programs only one
memory device for a one programming period. After it completed programming, it disables
the memory device and enables another memory device. Therefore programming time is
proportional to number of memory device.
In this project, 8 EEPROMs and 4 Flash Memories are aimed to program for in one
programming period. To accomplish that, each memory device is controlled separate Master
Devices. For EEPROMs programming, an I2C Controller is designed and it is multiplexed in
the top module for 8 times. For Flash Memory programming, an SPI Controller is designed
and it is multiplexed in the top module for 4 times.
Each controller consists of mainly three parts; Master Module, Delay Clock Module and
I2C/SPI Clock Module. Master Module controls to all operations and generates the signals
which are used to control memory devices. I2C/SPI Clock is used to reduce system clock to
clock rate that is specified for each protocol. Delay Clock used to generate time delays which
are defined in the datasheet of the memory devices, between SDA and SCL signals of the
controller. Detailed design of the controller is given in the following sections.
27
39. Figure 4.1 Generic Circuit Diagram of the Multiple Memory Programmer
4.1 Multiple EEPROM Programmer
In this project, a Multiple EEPROM Programmer Circuit is designed with 8 I2C
controllers. Each controller has three parts called Master Module, Delay Clock Module and
I2C Clock Module. All connections of these modules are implemented in a Top Module.
Also all 8 I2C Controller is connected to same CLOCK, RESET and START inputs to
provide synchronization.
4.1.1 I2C Controller
In this project, 24C08 8 Kbit Serial EEPROMs are used as target devices. So this
controller is designed according to instructions and rules which are given in the datasheet of
the EEPROMs.
28
40. Figure 4.2 I2C Controller
I2C controller consists of three modules; Master Module, I2C Clock Module and Delay
Clock Module. Master Module controls the all steps of the programming with a state
machine and generates the serial clock (SCL) and serial data (SDA) signals. Also a Read
Only Memory (ROM) is embedded into the master module as the data source. I2C clock
module used to reduce system clock to the one of the I2C clock rates. In this design, 100
KHz standard mode is selected and 100 MHz system clock is reduced to 100 KHz with the
I2C clock module. I2C allows the data change while the SCL signal is in the low state. So
SDA and SCL signals have to be asynchronous. To provide this statement the Delay Clock
Module is used and it generates an enough delay between SDA and SCL signals.
4.1.1.1 I2C Master Module
I2C Master Module is the basis of the I2C controller. It controls all programming
operations and generates the primary I2C signals SCL and SDA; and the system status
signals READY, ACTIVE, FINISH and ERROR. I2C Master Module consists of
input/output port declarations, register declarations, a state machine (STM), ready – active –
error – finish signals generation blocks and a data ROM block.
29
41. Figure 4.3 I2C Master Module
Input and Outputs
Master module design starts with input and output port declarations. It has 4 inputs and 6
outputs. One of the inputs CLK coordinates the all operations as with all digital circuits.
Every pulse of the CLK signal, one bit data manipulation is performed. CLK is supplied
from system clock generator and it is connected to I2C_CLK in the top module. The second
input RESET used to return all signals and register their initial values. Also it returns to
initial state of the state machine. The third input signal START is used to initiate the
programming operation.
The Master Module has 7 outputs. Two of them are I2C signals SDA and SCL; the other
four signals are status signals READY, ACTIVE, ERROR and FINISH. SCL signal used to
control slave device and each pulse of the SCL signal one bit data is sent from master to
slave or one bit data received from slave to master. SDA signal is the data signal and the sent
and received data transferred through to SDA signal. Other four outputs are used to indicate
system status and they have two states; high and low. The READY signal indicates that the
controller is ready for programming and it is in high state while the STM in the IDLE state.
The ACTIVE signal indicates whether the programming operation is performing or not. The
ERROR signal gets the high state when an error occurs. It works with the input SDA_PIN.
If SDA_PIN is high when the STM is in ACK_1, ACK_2 and ACK_3 states, ERROR
30
42. signals indicate that an error occurs. After the programming is completed, FINISH signal
gets in high state and indicates that programming is completed.
Signal Name Type Description
CLK Input Input clock from I2C CLK module
RESET Input Asynchronous reset
START Input System initialization Signal
READY Output System status signal
ACTIVE Output System status signal
ERROR Output System status signal
FINISH Output System status signal
SDA_PIN Inout Bidirectional Serial Data Signal Pin
SDA Output Serial Data Signal
SCL Output Serial Clock Signal
Table 4.1 I2C Master Signal Description
Registers
In the I2C Controller, there are 9 registers are defined. Name of the registers are given
with their length in Table 4.2
Register Name Length Description
STATE 4-Bit Controls14 state of the State Machine
COUNTER 3-Bit Byte Counter
SCNTR 2-Bit Delay counter for Start and Stop Condition
WCNTR 17-Bit Delay counter for initialization
DATA_ADRES 8-Bit Holds address byte
DEVICE_ADR 8-Bit Holds device address and write information
DATA 8-bit Holds data byte
SCL_EN 1-Bit Clock enable register
WEN 1-Bit Clock Enable register
Table 4.2 I2C Master Register Description
The STM in the controller has 14 states. A 4-bit STATE register is defined and each state
is numbered with a 4-bit binary number. For one byte data program, master sends totally 3
bytes. So three 8-bit registers are defined for 8-bit data, 8-bit address and 7-bit device
address and 1-bit write or read information which are DATA, DATA_ADRES and
DEVICE_ADR respectively.
31
43. In the I2C controller, 3 registers are defined as counter. 3-bit COUNTER register
manages the byte transfer. 2-bit SCNTR counter is used to generate Start and Stop
Conditions Set-up times which are indicated in the datasheet of the EEPROMs. 17-bit
WCNTR register is used to create time delay before the programming and the necessary time
delay between Stop and Start condition.
In the I2C controller, two 1 bit signals are defined to manage SCL signal. SCL signal
doesn’t tick continuously. For Start and Stop condition, it should be in high state. To provide
these conditions SCL_EN register is used as clock enable signal. When SCL_EN is 1, SCL
ticks continuously. When the STM is in IDLE, START, STOP and FINISH states, SCL_EN
is 0 and SCL signal remains in high state until the STM jumps the other states. WEN register
works similar with the SCL_EN register. After the ACK signals from the EEPROMs, SCL
signal remains in low state for one period. WEN register works as clock disable when the
STM is in WAIT1, WAIT2 and WAIT3 states.
Device Operation
One byte data transfer from I2C controller to serial EEPROM consist of mainly five
stages;
Generating START Condition
Sending DEVICE ADDRESS
Sending WRITE Information
Sending DATA ADDRESS
Generating STOP Condition
Figure 4.4 One Byte Data Transfer Period
Figure 4.4 indicate the 1-byte data transfer period with following parts;
Start Condition
Device Address (1010000)
32
44. Write information (0)
First ACK signal
Data Address
Second ACK signal
Data byte
Third ACK signal
Stop Condition
An EEPROM never receives data unless the Start Condition occurs. Start condition
occurs when the SDA signal pulls high to low while the SCL signal is stable in high state.
After that the EEPROM waits for device address. Following byte includes the 7-bit device
address and 1-bit read/write information. The device address is binary 1010000 for the
EEPROM. For write operation, 8th
bit after the device address should be zero. The EEPROM
sends an ACK signal after every byte transfer to indicate that the byte transfer is successful
or not. If the 9th
bit of the SDA is in low state, the byte transfer is successful.
After EEPROM receives the device address and write information, the data address byte
is sent. In this project 8 Kbit serial EEPROMs are used. According to datasheet of the
EEPROMs, data locations are addressed by an 8 bit binary number. Then the 8th
bit data
address is sent, the 9th
bit is ACK signal is sent from EEPROM to controller. If the SDA is in
low state, EEPROM receives the data address successfully and it is ready to receive data
byte.
After the second ACK signal, controller sends 8 bit data. At the 9th
bit of the SDA if the
EEPROM sends the third ACK signal, data is written into the EEPROM successfully. Finally
one byte data transfer is completed with the Stop Condition occurred.
Stop condition occurs when SDA signal pulls up low to high while the SCL signal is
stable in high state. Then SDA pins of the EEPROM returns to high impedance state and it
receives no data until a new Start condition occurs.
State Machine
Operations of the I2C controller are managed by a State Machine (STM). The STM has
14 states and these states controlled with a 4-bit register. Each state is numbered with a 4-bit
binary number.
33
45. Figure 4.5 State Machine
When STM is in IDLE state, all signals and registers take their initial value. Also when
the controller is reset, STM always returns the IDLE state. After pushing the start button,
STM switches to WAIT state. In the WAIT state, 1.342 second delay is generated before the
STM place the DEV_ADR state. When pushing a button, there are unwanted bouncing
signals occur. In high speed digital circuits, these signals may change the bit stream and
cause wrong data transfer. To prevent data distortion, generally De-Bounce Circuits are used.
But for this project, using a delay is enough for attenuation of these signals before the
controller sends any data. To generate this delay, 17 bit WCNTR is used. WCNTR counts
backwards by one for a one clock cycle. A full loop of the counter is completed in Td
seconds which is calculated in below.
34
46. 𝑓𝑠 = 97656.25 𝐻𝑧 (𝐼2
𝐶 𝐶𝑙𝑜𝑐𝑘 𝐹𝑟𝑒𝑞𝑢𝑒𝑛𝑐𝑦)
𝑇𝑑 =
217
𝑓𝑠
= 1.342 s
After the WCNTR completes its one cycle, STM switches WAIT states to START states.
In START states, with the high to low transition of the SDA signal, Start Condition is
generated and one clock period later, STM placed to DEV_ADR states. In these state,
controller sends 7 bit device address by starting to most significant bit (MSB) is the first.
Then it sends 1-bit read or write information. After the 8Th
bit is sent, COUNTER reaches to
zero and STM place in ACK_1 state. In ACK_1 state, master waits for ACK signal from
EEPROM. If SDA is low in ACK1 state, byte transfer is successful and STM switches to
WAIT1 state. If EEPROM doesn’t send ACK signal, system status changes ACTIVE to
ERROR and STM switches to FINISH state. In WAIT1 state, SCL is stable in low state for a
one clock period. These procedure repeated for BYTE_ADR, ACK_2 and WAIT2 states to
send data address; DATA, ACK_3 and WAIT3 to send data. After successful sending of data
address and data, master generates the Stop condition in STOP states.
In this project, operations that are between a START and STOP states are repeated for
256 times to send 256 byte data. After sending the 256th
byte, master controls to data
address. If the data address reaches to 256, STM switches to FINISH state and completes the
programming.
Status Signal
STM also controls to system status signals READY, ACTIVE, ERROR and FINISH.
When STM is in IDLE state, READY signal is in high state. In the other states of the STM,
except the finish state, ACTIVE signal is in high state. If the EEPROM doesn’t send ACK
signal in the ACK1, ACK2 and ACK3 states, ERROR signal becomes active with the
FINISH signal and indicates the programming operation is stopped due to an error. If the
STM places in FINISH state, only FINISH signal becomes active and it indicates that
programming is completed successfully.
Read Only Memory (ROM)
In this project, a 2Kbit Read Only Memory (ROM) is generated by using Xilinx Core
Generator and it is used as data source. Memory contents of the ROM is specified a file
which has coe extension. Figure 4.6 shows an example of the memory content file.
35
47. Figure 4.6 Memory Content File
“memory_initialization_radix ” describes the memory initialization value. It can be 2 for
binary data, 8 for octal data and 16 for hexadecimal data. “memory_initialization_vector” is
specified for the memory content. In this project, ASCII character codes are used as data to
provide understandable verification. In this memory content example, a text is used and
ASCII codes of the each characters are formed as content of the ROM.
Figure 4.7 Texts to ASCII Conversion for Memory Content File
Figure 4.8 2Kbit Read Only Memory
36
48. This ROM has two inputs and one output. 8-bit ADDRA is used as address input and
each of 256 byte data has 8bit address. ADDRA is connected to DATA_ADDRES register. 8
bit DOUTA output gives the related data with the DATA_ADDRES. DOUTA changes only
when the ADDRA changes and it always enable. DOUTA is connected to DATA register of
the master module. CLKA signal manages the read operations and it is connected clock
signal of the master module. These connections are built with the instantiation of the ROM
in Master Module as it is shown in below.
brom1 U1 (
.clka(clk),
.addra(data_adres),
.douta(data)
);
4.1.1.2 I2C Delay Clock Module
I2C serial communication protocols allow the data change only while the SCL signal in
low state. In the I2C controller, both SCL and SDA are controlled with same clock signal.
Therefore both of them changes with the rising edge of the clock signal at the same time.
According to datasheet of the EEPROMs, minimum required time for SDA changes after the
SCL signal pulls to low state indicated as tCLDX and before the SCL signal pulls high as
tDXCX.
Figure 4.9 AC Waveform and Time Constraints of the I2C Protocol for EEPROM
37
49. To provide these time constraints, a D-Type Flip-Flop (D-FF) is used. When the D-FF is
set, output is same as its input. But a time delay occurs between the input and output for one
clock period of the D-FF. The SDA signal of the master device is connected to input of flip-
flop and output of the D-FF is connected to SDA_PIN. The SCL signal is directly connected
to SDA_PIN. Now SDA_PIN lags the SCL_PIN for one clock period of the D-FF. The clock
of the D-FF is supplied from the delay clock generator. Frequency of the delay clock is
adjusted by a 5-bit counter register and it works as clock divider. Frequency and period of
the delay clock is calculated below;
𝑓𝑠𝑦𝑠𝑡𝑒𝑚 = 100MHz
Counter = 25
𝑓𝑑𝑒𝑙𝑎𝑦 =
𝑓𝑠𝑦𝑠𝑡𝑒𝑚
2 𝑥 25 = 1.5625 MHz
𝑇𝑑𝑒𝑙𝑎𝑦 =
1
𝑓𝑑𝑒𝑙𝑎𝑦
= 640 ns
Figure 4.10 I2C Delay Clock Module and Connections with the Other Modules
4.1.1.3 I2C Clock Module
I2C Serial communication protocol supports 4 clock speeds. 100 Kbit/s Standard-Mode,
400 Kbit/s Fast-Mode, 1Mbit/s Fast-Mode Plus and 3.4 Mbit/s High-Speed Mode. 24C08
38
50. 8Kbit Serial EEPROM supports both standard mode and fast mode. In this project, I2C
controller is designed with 100 Kbit/s Standard-Mode.
System clock of the Virtex-5 FPGA device is 100MHz. To obtain 100 KHz clock speed,
system clock has to be divided for 1000 times with a clock divider circuit. In the I2C
controller, i2c_clock module is designed to obtain this clock rate. But delay clock is used as
reference clock in the i2c_clock module instead of the system clock to provide
synchronization.
Figure 4.11 I2C Clock Module and Connection with the I2C Delay Module
In the i2c_clock module, a 3-bit counter register is used. I2c_clock is calculated below;
𝑓𝑑𝑒𝑙𝑎𝑦 = 1.5625 MHz
Counter = 23
𝑓𝑖2𝑐 =
𝑓𝑑𝑒𝑙𝑎𝑦
2 𝑥 23 = 97.656 KHz
4.1.2 I2C Top Module
In this project, designed I2C controller is multiplied for 8 times. Reset and Start inputs of
the controllers are connected to same buttons to start and reset all controllers at the same
time. Also all controllers are connected to system clock on same line. These connections are
done with using the HDL instantiation template of all blocks in the top module.
39
51. Figure 4.12 I2C Top Module Implementation
SCL signals of the controllers are directly connected to SCL_PINs but, SDA signals of the
controllers are connected to SDA_PINs through to D-FFs to provide time delay between
SDA and SCL signals.
Each controller has four system status signals. ERROR signals are directly connected to
separate ERROR outputs of the top module. ACTIVE and READY signals are connected to
OR gates and I2C Top Module has single ACTIVE and READY output. FINISH signals of
the controllers are connected to an AND gate and I2C Top Module has single FINISH
output. AND gates provide to indicate the programmer doesn’t complete the programming
operation unless all controllers activate the FINISH signals.
40
53. 4.2 Multiple Flash Memory Programmer
In this project, a Multiple Flash Programmer Circuit is designed with 4 SPI controllers.
Each controller has three parts called Master Module, Delay Clock Module and SPI Clock
Module. All connections of these modules are implemented in Top Module. Also all 4 SPI
Controllers are connected to same CLOCK, RESET and START inputs to provide
synchronization.
4.2.1 SPI Controller
In this project, AT45DB01 4 Mbit Serial Flash Memories are used as target devices.
Therefore Serial Peripheral Interface Controller is designed according to instructions and
rules that are given in the datasheet of the Flash Memories.
Figure 4.14 SPI Controller
Similar to the I2C Controller, SPI Controller consist of three Modules; Master Module,
SPI Clock Module and Delay Module. Master Module controls all programming operations
42
54. and generates the SPI and system status signal. SPI Clock reduces the system clock to the
SPI clock rate. Delay Clock is used to generate Data Setup and Data Hold Times which are
indicated in the datasheet.
4.2.1.1 SPI Master Module
SPI Master Module is the basis of the SPI Controller. It controls all programming
operations and generates the SPI signals CS, SCLK and MOSI; system status signal
READY, ACTIVE and FINISH. SPI Master Module consists of input/output port
declarations, register declarations, a state machine (STM), READY – ACTIVE - FINISH
signals generation blocks and a data ROM instantiation.
Figure 4.15 SPI Master Module
Input and Outputs
Master module design starts with the input and output port declarations. It has 4 inputs
and 6 outputs. CLK input coordinate the all operations. Every pulse of the CLK signal, one
bit data manipulation is performed. CLK is supplied from system clock generator and it is
connected to SPI_CLK module in the top module. The second input RESET used to return
all signals and register to their initial values. Also it returns to initial states of the state
machine. The third input signal START is used to initiate the programming operation. The
43
55. last input MISO is one of the SPI signals and it receives the data which comes from the
slave.
The Master Module has 6 outputs. Three of them are SPI signals CS, SCLK and MOSI;
the other three signals are system status signals READY, ACTIVE and FINISH. CS signal is
Chip Select signal and the slave device never sends or receives data unless the CS is in low
state. SCLK signal is used to control slave device and each pulse of the SCLK signal, one bit
data is sent from master to slave or slave to master. MOSI signal is the data signal and the
sent data transferred through to SDA signal. Other three outputs are used to indicate the
system status and they have two state; high and low. The READY signal indicates that the
controller is ready for the programming and it is in high state while the STM in the IDLE
state. The ACTIVE signal indicates whether the programming operation is performing or
not. After the programming is completed, FINISH signal become active and indicate the
programming is completed.
Signal Name Type Description
CLK Input Input clock from SPI CLK module
RESET Input Asynchronous reset
START Input System initialization Signal
READY Output System status signal
ACTIVE Output System status signal
FINISH Output System status signal
CS Output Chip Select Signal
SCLK Output Serial Clock Signal
MOSI Output Master Output Slave Input
MISO Input Master Input Slave Output
Table 4.2 SPI Master Signal Description
Registers
SPI Master Module includes 11 registers in different sizes. A 3-Bit STATE register is
defined and each state is numbered with a 3 Bit binary number. WAIT_CNTR register is
used as delay counter to generate time delay between high to low transition of CS to
beginning of the SCLK signal. INSTR register holds the one byte instructions which are
defined in the datasheet for each operation of the flash memory. PAGE_ADRES and
SECTOR_ADRES hold 3-Byte data address. ROM_ADRES holds the data address inside
the ROM block. DOUT_CNTR is used as counter and controls the data transfer from master
44
56. to slave. DATA register holds the data which is stored in the ROM. DATA_OUT register
hold the 1- byte instruction, 3-Bit data address and 256-Byte data. CNTR100MS is used as a
delay counter to generate required delay before programming another page of Flash
Memory. SCLK_EN register is used as clock enable for SCLK signal.
Register Name Length Description
STATE 3-Bit Controls 7 States of the State Machine
WAIT_CNTR 3-Bit Delay Counter for CS Hold Time
INSTR 8-Bit Hold Current Instructions
PAGE_ADRES 8-Bit Hold Page Address of the Flash Memory
SECTOR_ADRES 8-Bit Hold Sector Address of the Flash Memory
ROM_ADRES 6-Bit Hold Date Address of the ROM
DOUT_CNTR 12-Bit Output Data Counter
DATA 2048-Bit Hold Data from the ROM
DATA_OUT 2080-Bit Hold Instructions, Data Address and Data
CNTR100MS 20-Bit Delay counter for page programming
SCLK_EN 1-Bit Clock Enable Signal
Table 4.4 SPI Master Register Description
Device Operation and State Machine
AT45DB041D Flash Memories programming consists of three stages. Firstly the area to
be programmed will be erased. Then the data to be written will be stored in the buffer.
Finally the data which is stored in the buffer will be transferred to defined data location.
Even though these three steps could be done separately, AT45DB041D allows performing
these operations with a single instruction called “Main Memory Page Program through
Buffer”.
Main Memory Page Program through Buffer operation is combination of the Buffer
Write, Buffer to Main Memory Program and Page Erase operations. To perform this
operation, firstly the instruction of this operation (82H) must be sent from SPI Controller to
Flash Memory. Then Flash Memory waits for three address bytes. The first address byte
carries the Sector Address information. AT45DB041D has 8 Sector and Each sector have 64
Kbyte data storage capacity. To address these 8 sector, 3-bit is enough and the first 5 bits of
the sector byte are don’t care bits. The second address byte carries the Page Address
information. AT45DB041D has totally 2048 page and each page has 256 byte data storage
45
57. capacity. Also each sector includes 256 byte. The last address byte carries the information of
where the programming starts in the page. After the Flash Memory received the address
bytes, 256 bytes data is written into the buffer. Then the device waits for the low to high
transition of the Chip Select (CS) signal. When the low to high transition of the CS occurs,
the page will be programmed is erased then the data stored in the buffer is transferred to
erased page. Both the erase and programming of the page are internally self-timed. This time
duration is specified in the datasheet as tEP and status register indicates that device is busy
for during this time.
All these operations are controlled with a State Machine (STM) in the Master Module.
The STM has 7 stages and each stage is numbered with a 3-bit binary number. In IDLE
states, all registers and signals take their initial value and one of the system status signals
READY indicates the controller is ready for programming. After one clock period STM
switches to CS_L states and CS signal pulls high to low state. Slave device never receives
any data unless the CS pulls to low. Also ACTIVE signal becomes high. In the following
period, STM placed in the DATA state.
Figure 4.16 SPI Waveform
Before the master starts to data transfer, it waits for 8 clock period to enable SCLK to
satisfy CS Setup Time which is indicated in the datasheet of the Flash Memory. When the
SCLK is enabled, controller starts to send data to slave. Master sends 1-byte Main Memory
Page Program through Buffer op-code, 3-Byte address and 256 byte page data in DATA
state. When the master completes to all data transfer, STM switches to SCLK_DIS state. In
the SCLK_DIS state, SCLK signal is disabled. After 8 clock period, STM switches to CS_H
state and CS signal pulls low to high. CS_H state is followed by the WAIT states. In wait
states, master generates the time delay that is defined as tEP for erasing and programming
operations. After that STM checks the PAGE_ADRES register. In this application, SPI
Controller programs 64 pages. Therefore when PAGE_ADRES reaches to 64, STM switches
46
58. to FINISH state and FINISH signal become actives. otherwise, STM switches to CS_L state
and starts new page programming operation.
Block ROMs in SPI Controller are generated by following same procedure that is
followed in the I2C controller. For each SPI Controller a 16Kbyte Block ROM is generated.
4.2.1.2 SPI Clock Module
According to datasheet of AT45DB041D Flash Memory, SCLK frequency can be
maximum 66 MHz. System clock of the Virtex-5 is 100 MHz. Therefore a clock divider is
used to reduce the system clock in allowed frequency ranges.
To generate SCLK in desired frequency, a 3-bit counter is used in the clock divider circuit.
The counter rotates 0 to 3. It means, every 4 period of the system clock, output of the SPI
Clock Module swings 0 to 1 periodically. Frequency of the SPI Clock is calculated in below.
𝑓𝑠𝑦𝑠𝑡𝑒𝑚 = 100 MHz
Counter = 23
𝑓𝑠𝑝𝑖 =
𝑓𝑠𝑦𝑠𝑡𝑒𝑚
2 𝑥 4
= 12.5 MHz
4.2.1.3 SPI Delay Clock Module
AT45DB041D Flash Memory receives the data with the rising edge of the SCLK signal.
When SCLK is in rising edge, MOSI signal has to be stable. But in the SPI Controller, both
SCLK and MOSI are controlled with the same clock signal. The time constraints of the
programming operation are given in the Figure 4.17
47
59. Figure 4.17AC Waveform and Time Constraints of the SPI Protocol for Flash Memory
To satisfy tSU (Data in Setup Time) and tH (Data in Hold Time) a D-FF is used. SCLK
signal is connected to input of the D-FF and output of the D-FF is connected to SCLK_PIN.
Clock of the D-FF is connected to output of SPI Delay Module, DELAY_CLK. As it is
mentioned before, output of the D-FF lags its input for one clock period. When MOSI signal
is connected to MOSI_PIN directly and SCLK signal is connected to SCLK_PIN through a
D-FF, time constraints are satisfied.
Figure 4.18 SPI Delay Clock Module
48
60. 4.2.2 SPI Top Module
In this project, designed SPI controller is multiplexed for 4 times. Reset and Start inputs
of the controllers are connected to same buttons to start and reset all controllers at the same
time. Also all controllers are connected to system clock with same line. These connections
are done with using the HDL instantiation template of all block in the top module.
Figure 4.19 SPI Top Module Implementation
CS and MOSI signals of the controllers are directly connected to CS_PINs and
MOSI_PINS but, SCLK signals of the controllers are connected to SCLK_PINs through D-
FFs to provide time delay between MOSI and SCLK signals.
ACTIVE and READY signals are connected to OR gates and I2C Top Module has single
ACTIVE and READY output. FINISH signals of controllers are connected to an AND gate
and SPI Top Module has single FINISH output. AND gates provide to indicate the
programmer doesn’t complete the programming operation unless the all controllers activate
the FINISH signals.
49
62. 5. TEST AND IMPLEMENTATION RESULTS
Before the hardware implementation of the EEPROM and Flash Memory Programmers
Design, they simulated with the ISIM Simulator. ISIM is test tool of the ISE Design Suite
and it provides to analyze functional and timing behavior of the design virtually. By writing
testbenches with Verilog HDL, all steps of the design are simulated.
In this project, each module and each function of a module is tested separately. These
modules weren’t connected until they were verified. Finally controllers are implemented in
the Top Modules. After the verification of the Top Modules, their hardware implementations
were completed.
5.1 Tests Results of Multiple EEPROM Programmer
Multiple EEPROM programmer includes 8 I2C Controller and Each controller includes a
Master Module, a I2C Clock Module and a Master Module. Firstly single I2C Controller was
examined.
Figure 5.1 I2C Waveform Simulation of the I2C Controller
According to figure 5.1 I2C controllers verifies the I2C protocol. Duration between two
yellow line shows the full cycle of a one byte data transfer. Programming starts with the Start
Condition. Then controller sends Device Address and read/write information. After that data
address and data are sent. Finally stop condition occurs and one byte data transfer is
simulated.
51
63. In the Figure 5.2, delay clock, i2c clock and time delay between SDA and SCL signals
are clearly seen. As it seen in the figure time delay between SDA and SCL is equal to one
period of the DELAY_CLK. Period of the DELAY_CLK is calculated as 640 ns. But in the
Figure 5.2, it is seen as 128 ns. But design is not wrong. Real system clock of the Virtex -5
XC5VLX50T FPGA device is 100 MHz. But ISIM simulator accepts the system clock 500
MHz for same FPGA device. This difference makes frequency in simulation is 5 times
bigger; period in the simulation is 5 times smaller than their real values. So when the design
is implemented, time delay will be 640 ns. Also I2C_CLK could be observed from the
Figure 5.2. Period of the I2C_CLOCK is 16 times of the DELAY_CLOCK. So its period
equal to 10.24 us and its frequency is equal to 97.565 KHz.
Figure 5.2 Delay Simulations between SDA and SCL
Figure 5.3 shows SDA and SCL signals of the 8 I2C controllers. When SCL signals are
observed, it can be seen that all controllers are work concurrently. When we SDA signals are
observed, it can be seen that device address and data address are same for all controllers. But
data of the first 4 controllers are different and data of the last 4 controllers are same. Because
ROMs of the first 4 controllers store different data, ROMs of the last 4 controllers store same
data. There is two results can be obtained. The Multiple EEPROM Programmer can program
EEPROMs with same data concurrently and it can also program EEPROMs with different
data.
52
64. Figure 5.3 Output Signals Simulation of Multiple EEPROM Programmer
5.2 Implementation Results of Multiple EEPROM Programmer
After the design is verified with the simulations, hardware implementation of the Multiple
EEPROM Programmer was done. Implementation of an FPGA project starts with writing an
“Implementation Constraint File”. In the implementation constraint file, all inputs and
outputs of the design is assigned to pins, buttons, LEDs, clock oscillator etc. on the Genesys
FPGA Development Board.
Figure 5.4 Implementation Constraint File of Multiple EEPROM Programmer
53
65. Then the design is synthesized and programming file is generated in a few minutes. This
file is downloaded to FPGA device by using Adept Software.
Before programming of the EEPROMs, SDA and SCL signals were checked with a logic
analyzer.
Figure 5.5 Logic Analyzer Measurement
Figure 5.6 is obtained from Logic Analyzer and the SCL and SDA signals were
monitored with the Waveforms software. All SCL and SDA pins generate the SDA and SCL
signals which work concurrently as it seen from the figure 5.6.
Figure 5.6 I2C Waveform obtained from the I2C Controller
54
66. In the Figure 5.7, time delay between SDA and SCL signals is seen. Controller is
designed to produce 640 ns delay. As it seen in the Figure 5.7, time/div is 500 ns and delay is
over a one division.
Figure 5.7 Delays between SDA and SCL
After the verification of the conditions that are described in the design step, Controllers
are ready to program EEPROMs.
Figure 5.8 Hardware Implementation of the Multiple EEPROM Programmer
55
67. Then the design is synthesized and programming file is generated in a few minutes. This
file is downloaded to FPGA device by using Adept Software.
5.3 Tests Results of Multiple Flash Memory Programmer
Multiple Flash Memory Programmer includes 4 SPI Controllers and each controller
includes a Master Module, an SPI Clock Module and a Delay Clock Module. Firstly a single
SPI Controller was examined.
Figure 5.9 SPI Waveform Simulation of the SPI Controller
As it seen in the Figure 5.9, SPI Controller verifies the SPI Protocol. Programming starts
with the falling edge of the CS signal. After the CS setup time is up, SCLK signal is enabled
and data transfer is completed. At the sending of the last data bit, SCLK signal is disabled.
After the CS setup time is up, CS signal is pull low to high and page programming is
completed. MOSI is in high impedance state during the page programming period. Because
there is no data received from the slave.
Figure 5.10 Delay Simulations between MOSI and SCLK
56
68. In the Figure 5.10, delay clock, spi clock and time delay between SCLK and MISO
signals are clearly seen. As it seen in the figure time delay between SCLK and MISO is
equal to half period of the DELAY_CLK. Period of the DELAY_CLK is calculated as 40 ns.
But in the Figure 5.10, it is seen as 8 ns. But design is not wrong. Real system clock of the
Virtex -5 XC5VLX50T FPGA device is 100 MHz. But ISIM simulator accepts the system
clock 500 MHz for same FPGA device. This difference makes the frequency in simulation 5
times bigger; period in the simulation 5 times smaller than their real values. So when the
design is implemented, time delay will be 20 ns. Also SPI_CLK could be observed from the
Figure 5.10. Period of the I2C_CLOCK is 2 times of the DELAY_CLOCK. So its period
equal to 80 ns and its frequency is equal to 12.5 MHz.
Figure 5.11 Output Signals Simulation of Multiple Flash Memory Programmer
Figure 5.11 shows the CS, SCLK and MOSI signals of the 4 I2C controllers. When SCLK
signals are observed, it can be seen that all controllers are work concurrently. When we
MOSI signals are observed, it can be seen that device address and data address are same for
all controllers. But data of the first 2 controllers and data of the last 2 controllers are
different. There is two results could be obtained. The Multiple Flash Memory Programmer
can program Flash Memories with same data concurrently and it can also program Flash
Memories with different data.
57
69. 5.4 Implementation Results of Multiple Flash Memory Programmer
After the design is verified with the simulations, hardware implementation of the Multiple
Flash Memory Programmer was done. Implementation of an FPGA project starts with
writing an “Implementation Constraint File”. In the implementation constraint file, all inputs
and outputs of the design is assigned to pins, buttons, LEDs, clock oscillator etc. on the
Genesys FPGA Development Board.
Figure 5.12 Implementation Constraint File of Multiple EEPROM Programmer
Then the design is synthesized and programming file is generated in a few minutes. This
file is downloaded to FPGA device by using Adept Software.
Before programming of the Flash Memories, CS, MOSI and SCLK signals were checked
with a logic analyzer.
58
70. Figure 5.13 SPI Waveform obtained from the SPI Controller
Figure 5.13 is obtained from Logic Analyzer and the CS, MOSI and SCLK signals were
monitored with the Waveforms software. SPI signals works concurrently as it seen from the
figure.
Figure 5.14 Delays between MOSI and SCLK
In the Figure 5.14, time delay between MOSI and SCLK signals are monitored.
Controller is designed to produce 20 ns delay between these two signals. As it seen in the
Figure 5.14, time/div is 20 ns and delay between them is exactly 1 division.
After the verification of the conditions that are described in the design, Controller is ready
to program Flash Memories.
59
72. 6. SYSTEM ANALYSIS
6.1 Performance Analysis
6.1.1 Performance Analysis of Multiple EEPROM Programmer
According to design report, Multiple EEPROM Programmer uses the only 1% of the Slice
Register, 2% of the Slice LUTs, %6 of the Total Memory and 10% of the BlockRAM/FIFO
resources. These numbers, shows the effectiveness of the system. Also these numbers shows
that the FPGA Devices that is used in this project has capacity for more than 80 controllers
with same size and same structure. By using external storage device instead of the Block
ROM, hundreds of controller could be implemented on the same FPGA device.
Table 6.1 Design Summary of the Multiple EEPROM Programmer
61
73. In the I2C controller, SCL frequency is selected as 100 Khz. Its mean, one controller can
transfer 100 Kbit data per second. In the top module, 8 controllers are implemented.
Therefore data transfer speed of the Multiple EEPROM Programmer is obtained as 800
Kbit/s.
A single I2C controller can program one byte data in 32 clock period which takes 320 µs.
It waits for 10.240 ms before the program second data. Therefore one byte data transfer is
completed in 10.560 ms, and one Kbyte data transfer is completed in 10.81s. Also the
controller waits for 1.342 s at the beginning of the programming. Data transfer speed of the
single I2C controller per Kbyte is calculated below.
T = [1.342 + (10.81 s/Kbyte )] s
In the current system one EEPROM is programmed in 12.152s. Therefore 8 EEPROMs
could be programmed in 97.216 second. Also installation times of EEPROMs are increased
this time. By using, Multiple EEPROM Programmer, 8 EEPROMs could be programmed in
12.152 s.
6.1.2 Performance Analysis Multiple Flash Memory Programmer
According to design report, Multiple Flash Memory Programmer uses the only 6% of the
Slice Register, 6% of the Slice LUTs, %95 of the Total Memory and 96% of the Block
RAM/FIFO resources. Used registers and Slice LUTs indicate the size of the controller
circuit. These numbers about the registers and LUTs show the effectiveness of the system.
But almost all memory and Block RAM/FIFO capacities are used. The reason of this
inefficiency usage is long data length. In the Flash Memory Controller, data length is 2048
bit. The problem could be solved by reducing to data length.
62
74. Table 6.2 Design Summary of the Multiple EEPROM Programmer
In the SPI controller, SCLK frequency is selected as 12.5 Mhz. It means, one controller
can transfer 12.5 Mbit data per second. In the top module, 4 controllers are implemented.
Therefore data transfer speed of the Multiple Flash Memory Programmer is obtained as 50
Mbit/s.
A single SPI controller can program 256 byte data in 420 clock period which takes 33.6
µs. It waits for 80 ms before the program second data. Therefore 256 byte data transfer is
63
75. completed in 80.0336 ms, and 1 Mbyte data transfer is completed in 327.82 s. Data transfer
speed of the single SPI controller per Mbyte is calculated below.
T = (327.82s/MByte)] s
In the current system programming 1Mbyte Flash Memory takes 327.82 s Therefore 4
Flash Memories could be programmed in 1311.28 second. Also installation times of Flash
Memories are increased this time. By using, Multiple Flash Memory Programmer, 4 Flash
Memories could be programmed in 327.82 s.
6.2 Cost Analysis
This project is funded by the TUBİTAK under the 2241/A Industry Focused Final Thesis
Support Program with the project number 1139B411301176. All purchasing operations are
done with the fund that supplied by the TUBİTAK, according the budget that was defined
inside the project proposal. Detailed budget list is given in the table 5.1.
Components Pieces Cost
Genesys FPGA Development Board 1 $ 499.00
Analog Discovery USB Oscilloscope,
Protocol Analyzer
1 $ 159.00
BNC Adepter For Oscilloscope 1 $ 19.99
Oscilloscope Probe 1 Pair $ 13.99
EEPROM Board 4 $ 11.96
Flash Memory Board 4 $ 15.96
Shipping Cost $ 84.53
Documentation Cost $ 25.00
TOTAL $ 829.43
Table 6.3 Project Budget
In this project, three software tools are used. ISE Design Suit is used as development
environment and Free Web Pack Edition is obtained from the Xilinx Web Page who is
manufacturer of the Virtex – 5 FPGA Device. Adept Software is used to transfer
configuration file to FPGA device and it is obtained from the Digilent Inc. web site without
paying any license cost. Waveform Software is used to monitor digital signal which are
64
76. obtained from the Analog Discovery Measurement Instrument. It is obtained from the
Digilent web site without paying any license cost.
This project is developed for replacing the current memory programming system in the
Vestel Electronic with a faster one. The current system was designed to program three
cascaded electronic main boards. But it programs them separately. By changing only the
programmer circuit, time that is spent for programming is reduced for three times. In the
Vestel Electronics, over the 75 000 electronic boards are produced in a month. Therefore a
significant time is spent for the memory device programming. If we neglect the other
parameters, by using Multiple Memory Programmer Circuits, production capacity can
increase for three times or number of personal could be reduced for three times.
During the development period of this project, an FPGA development board is used. It
makes the project cost high. Also measurement and the other development tools increased
the total cost. But this cost could be evaluated as start-up cost. A single Multiple Memory
Programmer could be produced more cheaply than the prototype. Cost of single Virtex-5
device is 12.5 $. It allows the designer to use 1136 pin. For example, by using an external
memory device, 568 EEPROMs could be programmed with a single FPGA device at the
same time. This cost is not significant with the consideration of time and man-hour gain that
is obtained by using the Multiple Memory Programmer Circuit.
65
77. 7. CONCLUSION
7.1 Conclusıon
In this project, two different memory programmer circuits are developed and
implemented successfully to program EEPROMs and Flash Memory. These circuits are
designed to present an alternative programmer instead of the current memory programmer in
Vestel Electronics.
The project is started by determining the system specification requirements. According to
these requirements, new programmer circuits have to program more than one memory at a
time, concurrently. To provide concurrent operation, each memory device has to be
controlled separate master devices. It could be done with two methods. First method suggests
multiple microprocessors to control multiple memory devices. But it is not effective and
economic. Second method suggests taking advantage of parallel processing property of the
FPGA. In this project, programmer devices are implemented with FPGA.
Firstly I2C and SPI controllers are designed and implemented in the FPGA as master
devices. After verification of these controllers, they are multiplexed. Circuit designs of
controllers have done by using the Verilog HDL. It provides flexibility and makes the
multiplexing operation easy.
Multiple EEPROM Programmer includes 8 I2C controllers. Therefore it can program 8
EEPROM at a time. Also data source is implemented in the I2C controller and each
controller includes 2Kbit ROM. According the design report only, %2 of the logic source
and %6 of the memory resource of FPGA is used for 8 I2C controllers. Because of the 98%
of the FPGA resources is unused, much more controller could be implemented in the same
FPGA device.
Multiple Flash Memory Programmer includes 4 SPI controllers. Therefore it can
program 4 Flash Memory at a time. Also data source is implemented in the SPI controller
and each controller includes 128 Kbit ROM. According the design report only %6 of the
logic source is used. But %95 of the memory resources of FPGA is used for 4 SPI
controllers. SPI controllers are used much more memory resources than it is expected. 4 SPI
Controllers includes totally 64 Kbyte ROM. But according the design report, these
controllers are used 96% of the ROM sources which is equal to 1856 Kbyte. Data length in
the ROM is defined as 2048 bit so almost all Block ROMs are occupied with these 4 ROMs.
By using shorter data length, memory resources could be used efficiently.
66
78. As a consequent, these project is satisfied the all requirements of the design. It provides
multiple programming concurrently and it increases the programming speed 8 times for
EEPROMs and 4 times for the Flash Memories.
7.2 Future Suggestion
This project presents the working two memory device controller. In this project, 8 I2C
and 4 SPI Controllers are implemented. The number of controller could be increased by
using same or different FPGA devices.
Both of I2C and SPI protocols could be implemented same FPGA devices at the same
time. Therefore both of EEPROM and Flash Memory programming could be done at the
same time.
In this programmer circuits, ROMs are used as data sources and they are implemented in
the FPGA device. Because of the limited memory source of the FPGA, it restricts the
number of controller. By using external data sources, much more controller could be
implemented and data transfer capacity of the controller could be increased.
Except the I2C and SPI, there are dozens of communication protocols are used in the
industry. The method that is used in this project could be used for the other communication
protocols.
After the production of the electronic boards, there are hundreds of test are applied on
them. It takes significant time. By using FPGA based test devices. These tests could be done
concurrently.
67
79. 8. REFERENCES
[1] P.P. Chu, FPGA Prototyping By Verilog Examples, A. John Wiley & Sons Inc, ABD,
2008
[2] S. Heath, Embedded Systems Design 2nd Edition, Newnes, ABD, 2003
[3] Non-Volatile Memory, http://en.wikipedia.org/wiki/Non-volatile_memory, 21.10.2013
[4] “Comparing Bus Solution” Texas Instruments, October 2009
[5] Russell Hanabusa, “Comparing JTAG, SPI, and I2C”, Spansion, 21.04.2013
[6] In-System Programming, http://en.wikipedia.org/wiki/In-system_programming,
21.04.2013
[7] Intellectual Property, http://www.xilinx.com/products/intellectual-property, 29.12.2013
[8] Soft Microprocessor, http://en.wikipedia.org/wiki/Soft_microprocessor, 2.10.2013
[9] Genesys Board Reference Manual, Digilent, 05.09.2013
[10] Xilinx Web Page, http://xilinx.com
[11] Virtex-5 FPGA User Guide v5.4, Xilinx, 16.03.2012
[12] Hardware Description Language,
http://en.wikipedia.org/wiki/Hardware_description_language, 04.01.2014
[13] Grzegorz Budzyn, Programmable Logic Design Lecture Notes Lecture 12 : VHDL vs
Verilog, Wroclaw University Of Technology
[14] M24C08 EEPROM Datasheet, ST Microelectronics, September 2013
[15] AT45DB01D Flash Memory Datasheet, Atmel Semiconductor, December 2007
[16] The I²C – Bus Specification Version 2.1, Philips Semiconductors, January 2000
[17] SPI Block Guide Version 04, Motorola Inc., November 2003
68
80. APPENDIX A – VERILOG CODES FOR MULTIPLE EEPROM PROGRAMMER
I2C Master
`timescale 1ns / 1ps
//////////////////////////////////////////////////////////////////////////////////
// Company: Dokuz Eylül University
// Engineer: Fatih Mehmet DAĞ
//
// Create Date: 09:53:36 May/21/2014
// Design Name: Multiple EEPROM Programmer
// Module Name: i2c_master1
// Project Name: Multiple EEPROM and Flash Memory Programming Circuit with
FPGA
// Target Devices: Virtex 5
// Tool versions: 14.5
// Description:
//
// Dependencies:
//
// Revision: 1.3
// Revision 0.01 - File Created
// Additional Comments:
//
//////////////////////////////////////////////////////////////////////////////////
module i2c_master1
(
// input and output port declerations
input wire clk1,
input wire reset1,
input wire start1,
input wire sda_pin1,
output reg ready1,
output reg active1,
output reg error1,
output reg finish1,
output reg sda1,
output wire scl1
);
// registers and counters declerations
reg [3:0] state1;
reg [2:0] counter1;
reg [1:0] scntr;
69
81. reg [16:0] wcntr;
reg [7:0] data_adres1;
reg [7:0] device_adr1;
wire [7:0] data1;
reg wen = 1'b1;
reg scl_en1 = 1'b0;
// states of the state machine
localparam IDLE = 4'b0000;
localparam WAIT = 4'b0001;
localparam START = 4'b0010;
localparam DEV_ADR = 4'b0011;
localparam ACK_1 = 4'b0100;
localparam WAIT1 = 4'b0101;
localparam BYTE_ADR = 4'b0110;
localparam ACK_2 = 4'b0111;
localparam WAIT2 = 4'b1000;
localparam DATA = 4'b1001;
localparam ACK_3 = 4'b1010;
localparam WAIT3 = 4'b1011;
localparam STOP = 4'b1100;
localparam FINISH = 4'b1101;
// i2c clock decleration
assign scl1 = (scl_en1 == 1'b0) ? 1 : ~clk1 && wen;
// 1 clock periad delay after the acknowledge state
always @(posedge clk1) begin
if(reset1 == 1) begin
wen <= 1'b1;
end
else if ((state1 == WAIT1) || (state1 == WAIT2) || (state1 == WAIT3)) begin
wen <= 1'b0;
end
else begin
wen <= 1'b1;
end
end
// counter enable signal decleration.
always @(posedge clk1) begin
if (reset1 == 1) begin
scl_en1 <= 1'b0;
end
else begin
if ((state1 == IDLE) || (state1 == START) || (state1 == STOP) || (state1 ==
FINISH)|| (state1 == WAIT)) begin
scl_en1 <= 1'b0;
70
82. end
else begin
scl_en1 <= 1'b1;
end
end
end
// State machine
always @(posedge clk1) begin
if (reset1 == 1) begin // initial values of counters and
registers
state1 <= 4'b0000;
sda1 <= 1'b1;
device_adr1 <= 8'b10100000;
data_adres1 = 8'h00;
counter1 <= 3'b000;
wcntr <= 0; //17'b11111111111111111;
scntr <= 2'b00;
end
else begin
case (state1)
IDLE : begin
if (start1 == 1) begin
sda1 <= 1'b1;
state1 <= WAIT;
end
else begin
state1 <= IDLE;
end
end
WAIT : begin
if (wcntr == 1'b0) state1 <= START;
else wcntr <= (wcntr - 1);
end
START : begin
sda1 <= 1'b0;
state1 <= DEV_ADR;
counter1 <= 3'b111;
end
DEV_ADR : begin
sda1 <= device_adr1[counter1];
if (counter1 == 0) state1 <= ACK_1;
71